David Lester
-
Posts
679 -
Joined
Content Type
Profiles
Forums
Gallery
Events
Everything posted by David Lester
-
 Hi Derek, What kind of tape are you using? David
 -
I just took my measurements right off the plans. I think the differences are virtually undetectable. I don't have other resources, so I've just assumed that there are similar differences on the real ship which are also undetectable. It didn't occur to me to do anything else. I don't think you will be disappointed with the result if you simply follow the plans. Some of the gunports are tight against bulkheads as it is, so it might be more trouble than it's worth trying to re-space them. For what it's worth, that's my thought on the subject. David
-
Hi JD, I also find these coils devilishly hard to make look half decent. The lightweight line just doesn't have the heft it needs to hang naturally. My method is similar to yours in that I use a jig to make the coil. I pretty much follow J Brent's method which he shows in the video below, but it has been only with many failed attempts that I can get even close to an acceptable result. While I don't think your coils actually look all that bad, one suggestion I might make is to make your coils a little longer, so that they're more elongated and less round, and make the loop that goes over the pin a little shorter. Let the top portion of the coil rest against, or even on, the pin rail rather than hang below it. When I belay the actual line to the pin, I only give it one turn around the pin rather than several, which leaves quite a bit more space for the coil to be attached separately. I secure it with a small dab of CA glue. (J Brent gives it quite a few turns, but I think it works better to leave as much room as possible.) I don't generally use CA glue on rigging, but this is one place where it seems to work well. I then make the coil the way J Brent does, bringing a small loop from back to front, which will be the loop that goes over the top of the pin. There will be a bit of trial and error here, spacing the nails on the jig, getting the right length for the coil. I also experiment with the number of turns around the nails, usually four or five. (I think a coil that is a bit too heavy, rather than one that is a bit too light is more forgiving in its appearance and gives a little more material to play around with, once it's in position.) I carefully lift the coil off the nails with tweezers, before having applied any glue and then apply a very small dab of CA glue on the back side of the coil at the top. I make sure that it's a very small amount to ensure that it doesn't wick through to the front, because it will discolour the line. I don't tend to use any diluted white glue on the coil, especially on the front because it seems that no matter how dilute I make it, it still discolours the line. I make sure the glue has set well before hanging the coil. I then put a small dab of CA glue on the rail, in front of the pin, place the loop over the pin and press the coil against the rail, maybe even pushing the coil under the rail in an attempt to get it to appear to be hanging straight down rather than sticking straight out which they tend to want to do. I leave long ends on the coil. Once it's secure on the pin, I cut the back one off short so that it can't be seen and cut the front one off long, about the same length as the coil. Here are some of the coils on my Constitution. The other thing, of course, is to not worry about it too much. Every ship that I have ever visited has coils hanging in a lot messier and haphazard fashion than most modelers would tolerate. Not sure if that's of help or not, and I'm not trying to suggest that I have the definitive approach (or result), but I do share your frustration with this aspect of any build. David
.JPG.fce3f8e54bec047a0e5ec518df967d9d.JPG)
-
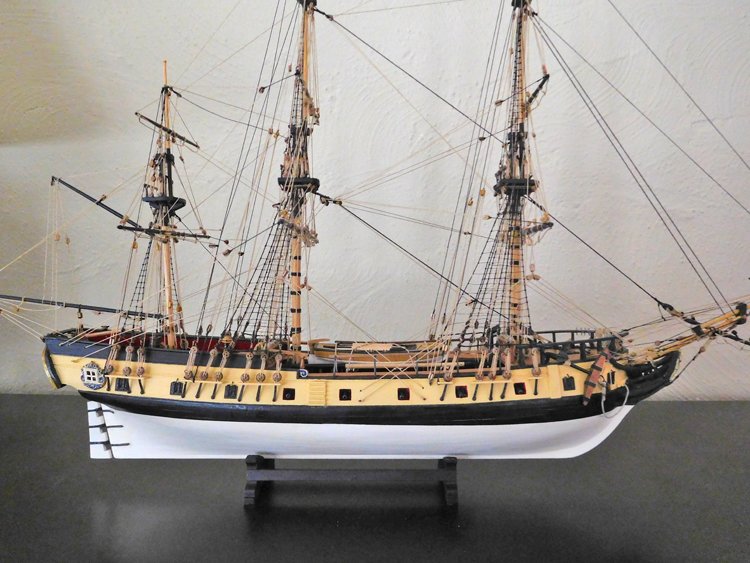
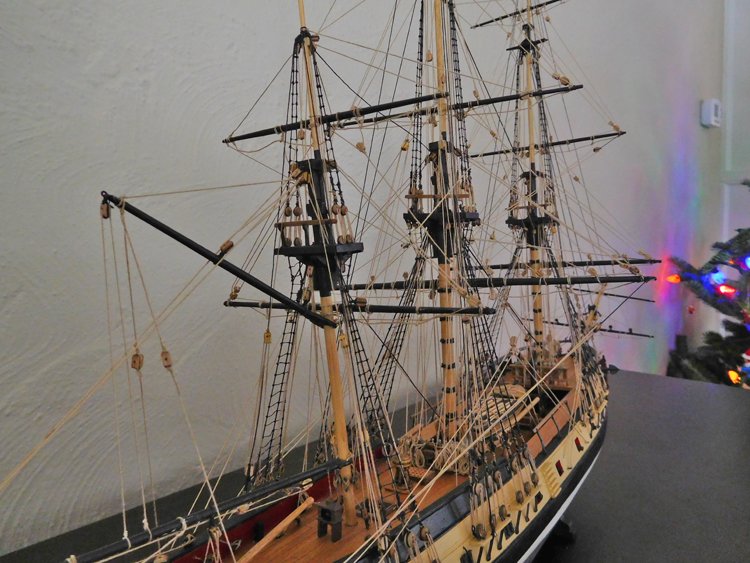
Good Morning Everyone, A quick update - I almost have the hull finished and will soon be ready to add the masts. I've painted the hull and I'm pretty happy with the colours. I didn't think I was happy with the Humbrol copper at first, but I've decided it's just fine. As per usual, I still have a bit of paint touch up yet to do. I've returned all of the details to deck, except for belaying pins. I had to make new fife rails and pin rails, as the old ones virtually crumbled. A couple of the channels had broken off, so I removed all four which make sanding and repainting a lot easier. I have them returned to the hull now as well, but I won't re-attach the chainplates until I have discovered their correct location once the shrouds are in place. Here's where I've repaired the major damage on the hull. Deck details are now completed. All of my colour choices are the same as the original, whether they're correct or not. The rigging will be a bit of a challenge. I do have the original plans, but as is often the case they aren't always very clear. I made extensive notes before removing the old rigging, but I don't believe it was necessarily always correct. So I will be relying on four things - the original plans, my notes from the old rigging, Petersson's book on fore-and-aft rigging and even Bob Hunt's practicum for the Pride of Baltimore II. I think that's enough to let me come up with a passable result, hope so anyway. David

- 40 replies
-
- 6
-

-
- virginia
- marine model company
- (and 2 more)
-
Hi Dave, That all looks really beautiful. I don't think Mamoli had any idea how well their "Constitution" cross section could actually turn out when skillfully turned into something else completely. David
- 75 replies
-
- 4
-
-
- constitution
- mamoli
- (and 2 more)
-
Congratulations Mike, I think you've done a great job. You're braver than I would be tackling sails, but you got a very nice result. I especially like the idea of a wire in the hem to shape the sail. The hardest part with a restoration is decided how much to leave as is and how much to re-do. I think you've found that balance beautifully. David
-
Mike, I can't say for sure what kind of wood the hull is made from. I believe that current solid hull models are usually basswood, so I think it's probably safe to assume that this one is too. The wood has to be soft enough to carve easily, reduce the thickness of the bulwarks and cut in gunports. The colour of the hull in the picture in my previous post is no indication, because what you can see is where I have removed the copper paint and the surface is somewhat stained. David
-
Hi Doug, It's looking great. I think this might be a very satisfying model to work on - It looks like it presents plenty of challenges but with a pretty big payoff. David
- 79 replies
-
- 3
-
-
- marisstella
- barque
- (and 1 more)
-
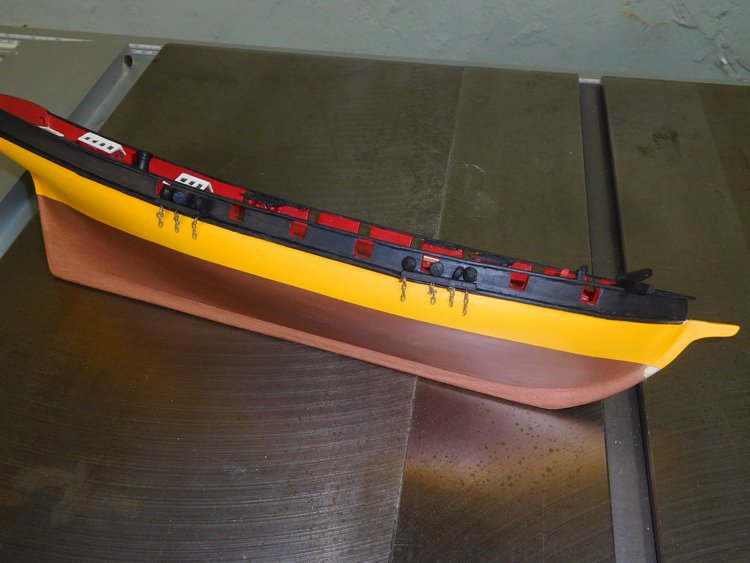
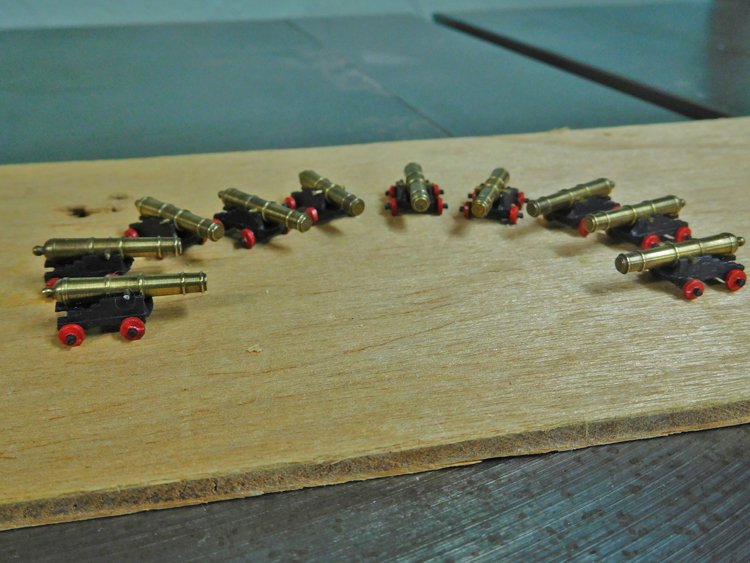
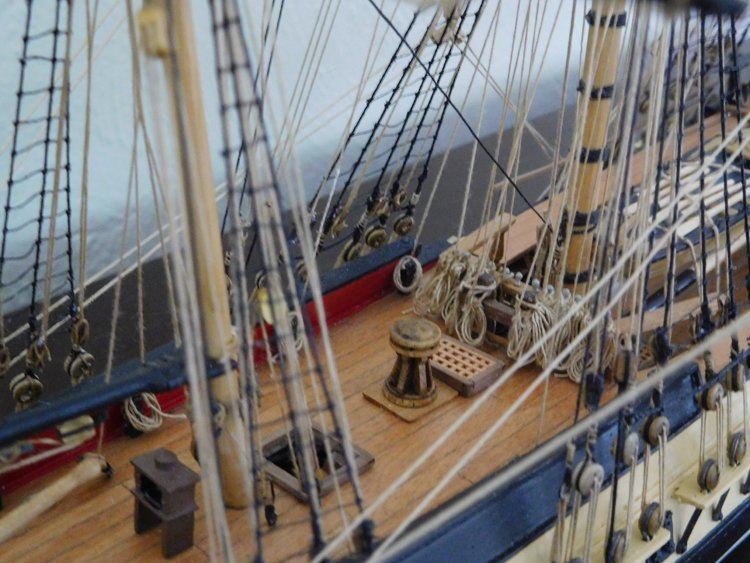
Hello All, Continuing along, I've turned my attention to refinishing the hull. I added the fife rails and pin rails to the deck, but decided that before I return any more of the deck details, I needed to get the hull done. It desperately needed repainting, but I was finding it impossible to get a decent job going over the old paint, so I stripped it all off. It went against the grain to do that and I know serious antique restorers would run me out of town, but I decided it was necessary to get a decent job. The original is not painted exactly as the plan indicates, but I've decided to paint it the way it was done to try to get some integrity to the original. It's black above the wales, then a wide swath of yellow and then copper paint below the waterline. Here I'm working on the yellow - a couple more coats needed as well as some minor touch up at the bow. As I mentioned in an earlier post, this Model Master Insignia Yellow is almost exactly the same as the original. The hull has been beautifully carved and is very smooth. I've also been working on the cannons and carriages. The cannons are brass, so I just shone them up a bit (but not too much). Even though I prefer them blackened, I'm going to leave them as is because that's the way they were done. The carriages are cast metal and the old paint was coming off in places. I stripped them all down and repainted them the same colours as the originals. I don't know if they're historically correct or not, but I'm trying as much as possible not to second guess the original modeler's vision. So I guess that's enough excitement for one Saturday night. If you'd told me 40 years ago that one day I'd be quite content spending a Saturday night painting a model ship's hull yellow followed by Midsomer Murders on Netflix, I'll say you were crazy, yet here I am nevertheless! David
- 40 replies
-
- 7
-
-
- virginia
- marine model company
- (and 2 more)
-
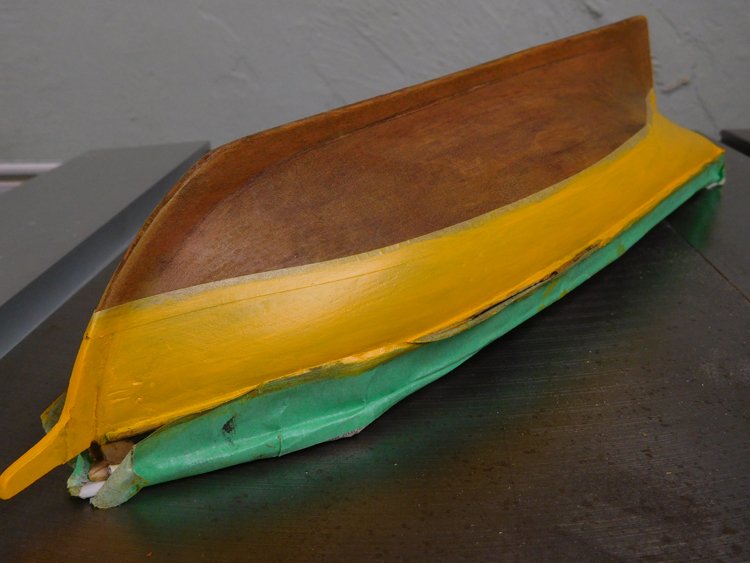
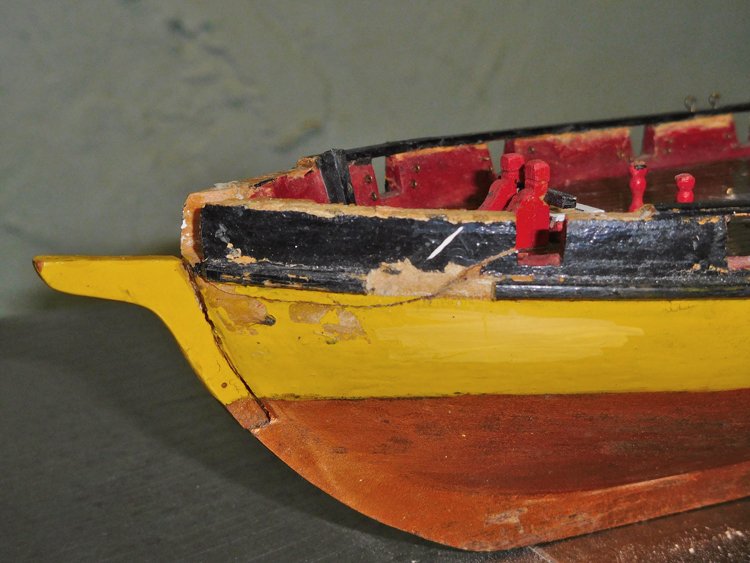
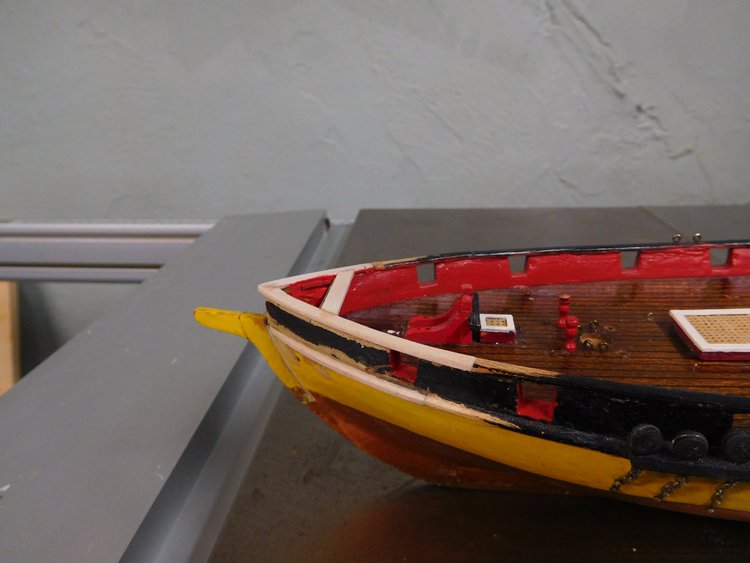
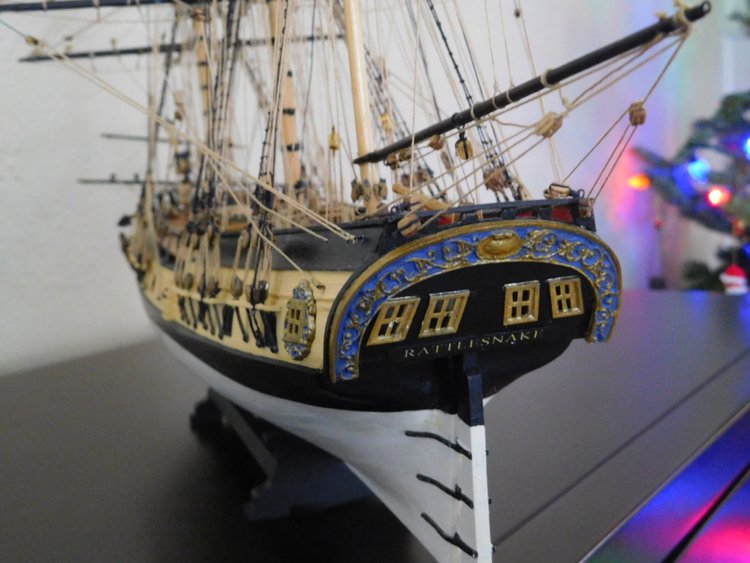
Good Morning, A little progress to report and thank you for comments and "likes." I've focused on repairing the broken bow and painting the bulwarks. Here I've glued the two broken pieces back on. I'm glad that they weren't missing. It would have been possible to recreate them, but having them saved a lot of work. A little further along in the process - some replacement wood and filler. The new rail in place. I still have to add the triangular piece of grating, but it's going to wait until I'm quite a bit further along. It's very fragile stuff. How much to repaint, and how much to leave alone has been a question I've been grappling with since the outset. My first inclination was to try to leave as much original as possible, but I'm beginning to realize that almost everything needs to be repainted. Here I've done the bulwarks. I've used Model Master Insignia Red, which I think is a great colour and it matches the original almost perfectly. There were actually two different reds used originally. The bulwarks is slightly different than the deck furniture. I suspect I'm worrying about it more than the original builder did, for all I know he probably just dug around in his basement and used whatever he could find. I'm really fond of Model Master paints, their flat finish in particular. Unlike some other brands, it isn't dead flat; it has a low sheen to it that I think makes it the ideal finish. On Tuesday, I made the big drive to Dailey Hobbies, (about 40 min. drive) and stocked up on the basics plus the red and some yellow for the hull. I found Model Master Insignia Yellow, also a flat finish and it is a perfect match for the yellow on the hull. I couldn't find a Model Master copper colour. I did find some Humbrol copper enamel, but when I got it home, I didn't care for the colour very much. A spray metallic copper might be something I can find in a hardware store, so I'll take a look today. The cannons were not rigged on this model. I guess I could rig them, but the carriage are cast metal so it's not easy to do. Nevertheless, the original builder added small eyebolts at each gun port - you can see them in the first photo. I removed them all in order to paint and I'm inclined to leave them off. Until next time. David

- 40 replies
-
- 6
-
-
- virginia
- marine model company
- (and 2 more)
-
Great to have those false timbers finished. I think you'll find that the biggest challenge of this build is now behind you. David
-
I can't believe you've started another one already! This should really be a fun build and the ship is such a beautiful one too. I'm looking forward to following. David
- 79 replies
-
- 1
-
-
- marisstella
- barque
- (and 1 more)
-
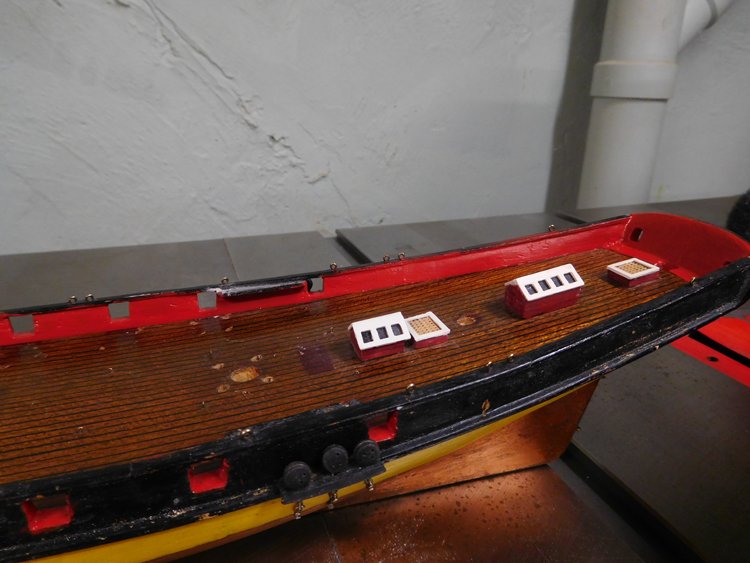
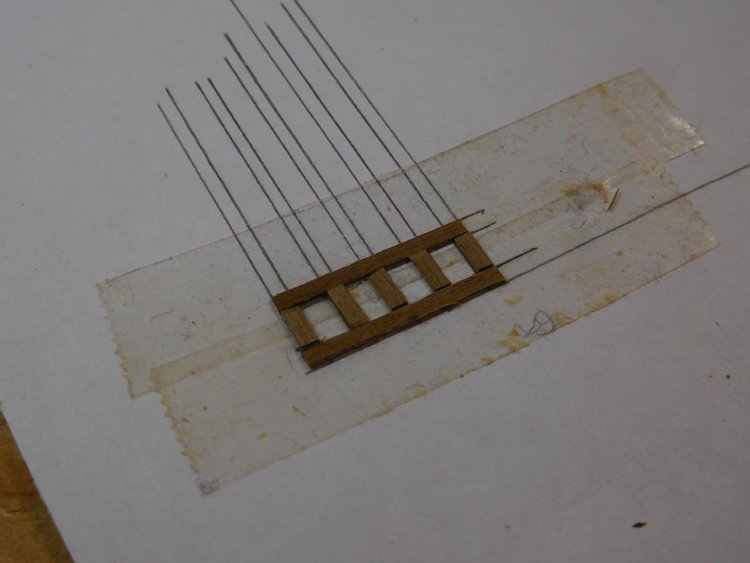
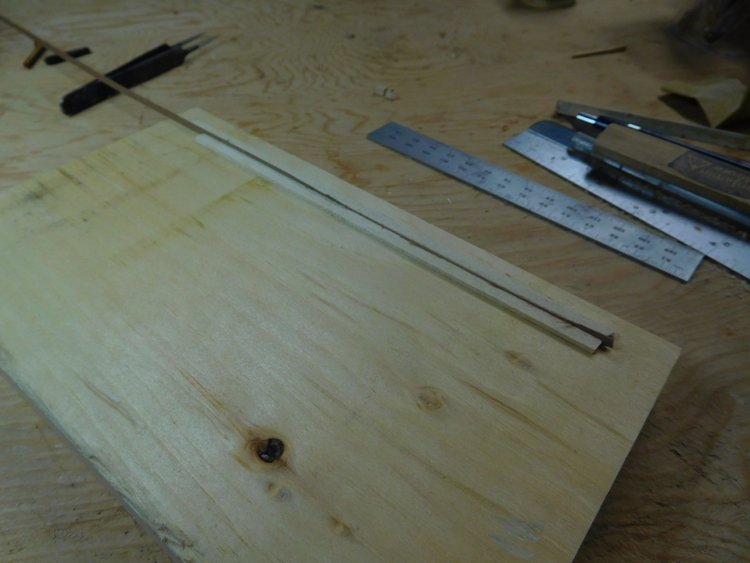
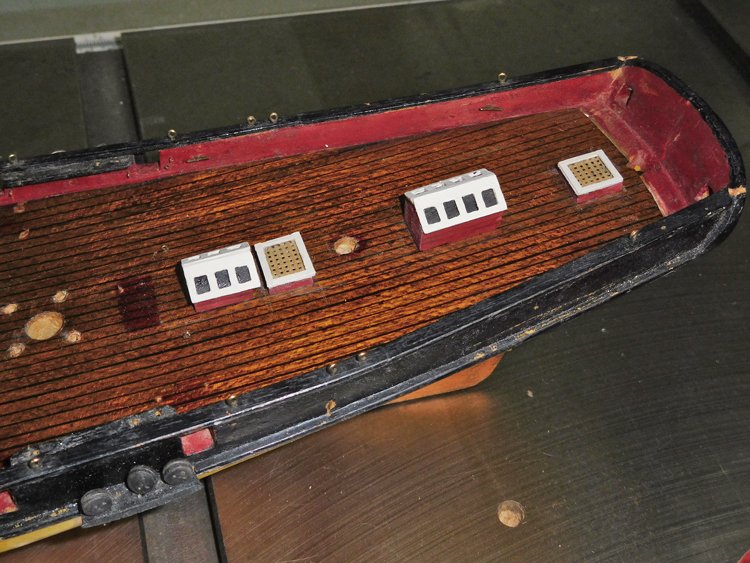
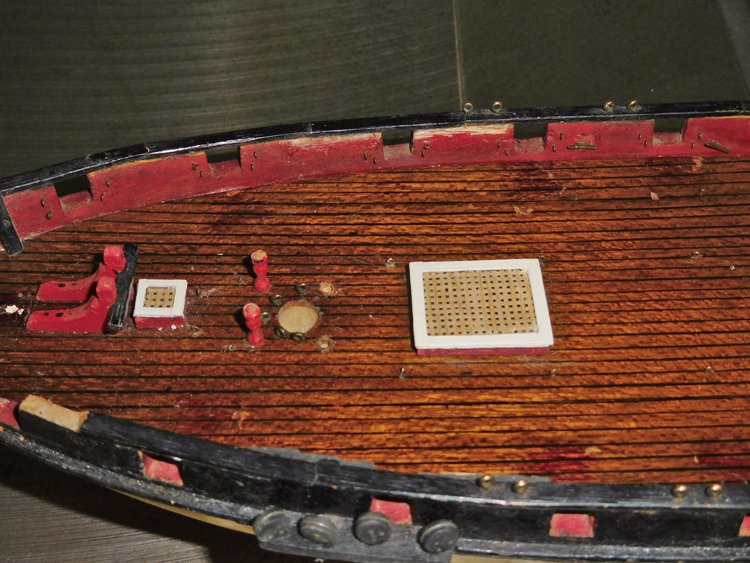
Hello All, I little progress to report. I've been working on a couple of things - the window frames on the skylights and the trim on the hatches as well as the masts and yards. As I mentioned the window frames and hatch trim were made of card stock which I decided to replace with thin wood, but I'm trying to keep the appearance as close to the original as possible. I made the window frames using a technique I learned in one of my Lauck St. practicums, which involves laminating the frames from two layers and using double sided tape. With the guide lines drawn on a piece of paper and then overlaid with the tape, lay the first layer on top of the tape. Then glue the second layer on top, but overlapping the joints. When the glue is dry, lift it from the tape, sand and paint. It works really very well. I used .5mm stock for each layer. I didn't have any stock narrow enough, so I trimmed some down. I glued two pieces of scrap, the same thickness as the width I needed, to a piece of wood, with a gap between the two just wide enough to accept the .5mm stock. I then pared it down and sanded it flush with the two guide pieces. Because I was fortunate to have received a package of replacement parts for this model, I also replaced the grating in the hatches. For this kit the grating is a thin sheet of wood about .5mm thick with the square holes punched through. Each hatch is a solid block of wood about 1/8" thick. The top is painted black and the piece of the hatch veneer glued on top. Maybe not as good as a built-up style hatch that is more commonly found in kits, but the scale looks pretty good and I'm not sure if you could make something quite this small using the more conventional means. While I'm planning on repainting the bulwarks red, I think I'll leave the sides of the skylights alone as they have thin lines painted on them to simulate boards and I don't think I could redo them as well as these have been done. I also did a little clean up on the masts and yards. Despite all the damage to the rigging, the only broken piece was the jibboom, which I couldn't glue together in a satisfactory way, so I recreated it from scratch. The main mast had come apart at the trestle trees, but was not broken and needed to be fully disassembled and re-glued. And a couple of the saddles had come free of the gaffs, and needed to be re-glued, but that was it, so they're now all ready to go. David narrowing the stock making the window frames
- 40 replies
-
- 7
-
-
- virginia
- marine model company
- (and 2 more)
-
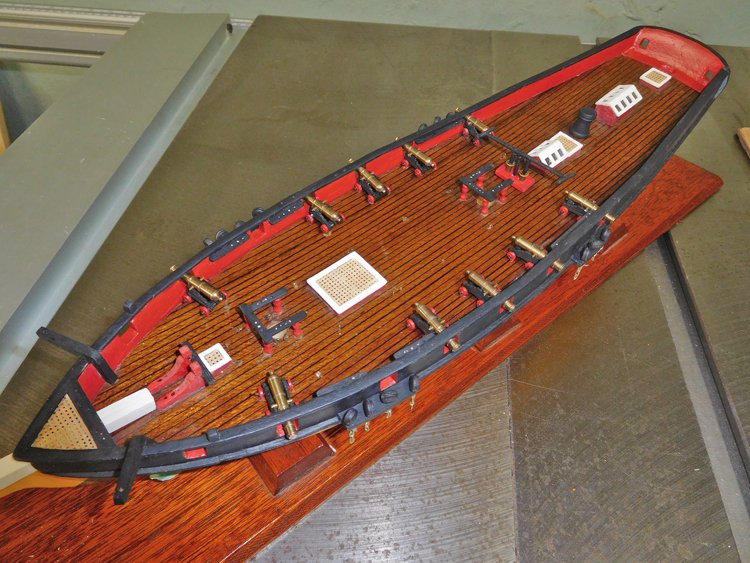
Hello, Thanks for likes everyone. Mike, the rigging line that came in the parts package looks like thread in a couple of different thicknesses. I don't think I'l going to use it though as it's likely about as old as the model is. I've ordered some Amati line from Cornwall Model Boats. Also Mike, I know the whole history of the model. It was built my my friend's father back when we were both kids. I used to visit their house frequently and was always very interested in his models. He died several years ago. I hadn't been in much contact with my friend for quite a few years, as he has been working in Europe and the Middle East. He retired and returned to Ontario this fall. When we got caught up I was surprised and pleased that he still had two of his dad's old models. One was the Rattlesnake, which is in pristine condition (and he's keeping) and the other was this one which is in poor condition. He has given this one to me to keep. With the help of others on this forum, I learned that it's a Marine Model Co. product. I'm very pleased to have it. Don, the deck on this model is especially interesting. It appears that the planking has been painted or drawn on and it's a bit of a mystery to me because it's done so skillfully, while the rest of the painting on the model is pretty poorly done at best. I also don't understand why there is some red discolouration on the deck where each cannon sits; I'm not concerned as it won't show up when they're back in place. By the way, as it turns out I am actually using .5 mm stock for the replacement window frames. I just said a fractional number so not to confuse our American friends (just kidding.) While on this subject, I got a digital read-out caliper from Lee Valley for Christmas and I don't know how I got along without it. It converts from mm to decimal inches to fractional inches. I hope all those on the east coast are surviving this current storm. It's wintery enough here in southern Ontario, but nothing like you're getting from what I understand. Stay safe and warm. David
- 40 replies
-
- 3
-
-
- virginia
- marine model company
- (and 2 more)
-
I believe that the builder used the kit-supplied line. Fellow forum member Bill (OCN30BCO) was kind enough to send me the plans for this kit along with a package of fittings etc for it. Among that package were a few spools of rigging in two colours - black and white, so I surmise that the builder of this model used his kit-supplied line in two colours - black and a shade of tan. It looks to me like he coloured the white. It had all become so dirty, that they both looked grayish. David
- 40 replies
-
- 3
-
-
- virginia
- marine model company
- (and 2 more)
-
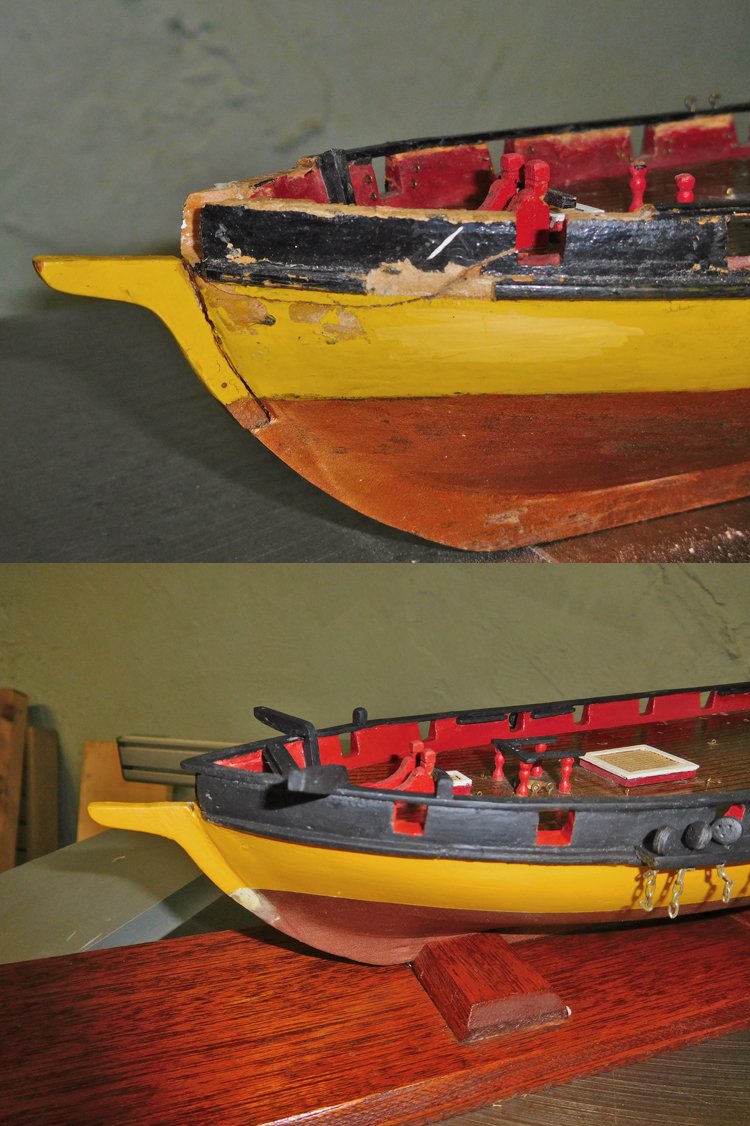
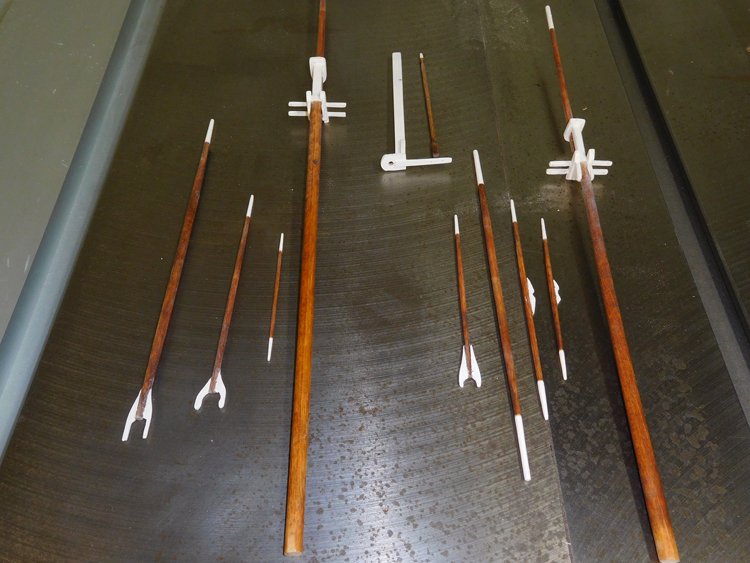
Hello Everyone and Happy New Year! Over the past couple of days, I've begun my restoration of this old model. At the outset I didn't know how much, if any, of the rigging could be saved, but after some time with it I decided to cut it all out and start over. Where the spars are broken, it had become hopelessly tangled. As well many of the knots were letting go and the lines felt very brittle, so I spent the better part of a day of examining it and making copious notes before I cut it all out. Next on the list was a thorough cleaning of the deck and hull. It was coated in decades of dust. In the process, some additional damage occurred, but in many ways, I'm better off having it all happen now as it's easier to repair then it would be later. The type of thing I'm talking about here is fife rails coming loose and the edging on the hatches and the roof on the skylight coming off. These were made with cardstock, so I'll replace them with some 1/32" wood. I salvaged all of the blocks, deadeyes etc. by soaking them in some rubbing alcohol and releasing them from the lines. I've taken stock of the repairs that have to be made - the main one is the chunk that's broken out of the port side bulwarks, some missing railing, missing cathead, broken jibboom, broken tressle trees on the main mast, fife rails, hatch trim and skylight roof, as well as return the cannons. When I received the model, over half the cannons were missing. However, over Christmas, I saw the friend who gave me the model and he had found them, so I have the full compliment. I'm particularly fond of the deck on this model, so I am going to give it a coat of polyurethane to protect if from the likely possibility of paint, glue and/or coffee being spilled on it. I had hoped at the outset that I would only be doing very minor touch ups, but the closer I look, the more I realize I will need to do. I think I will have to repaint virtually the whole model. For example, take a look at the photo of the yard below. I just can't return it with the white tip looking like that. That's a combination of a sloppy glue job plus 60 years of dust and cigarette smoke. David the major damage is this break. Thankfully, the piece is not missing the skylight roofs and hatch trim are made of cardstock example of how it needs to be cleaned up soaking the blocks etc. loose the rigging stripped off - no turning back now the deck is almost clean now, notice how the cardstock pieces did not survive the cleaning
.JPG.2ad2d194830c62a943810b60753b722b.JPG)
.JPG.189e0881f45d93d280fb94270ca7cf2e.JPG)
.JPG.e4e34050b40cf88afe29803a72099ea1.JPG)
.JPG.db04ef4b9108dd48211742430eea52c2.JPG)
.JPG.7c6f01663fbced22ddca866e9185389b.JPG)
.JPG.964730deaecf73612a6414408dfc331e.JPG)
- 40 replies
-
- 8
-
-
- virginia
- marine model company
- (and 2 more)
-
Aftermarket yards and Masts for plastic kits
David Lester replied to William-Victory's topic in Masting, rigging and sails
I was surprised to discover how easily yards can be made from wooden dowels with only an xacto knife and a #10 or #22 blade. Start with a dowel that is the same diameter (or a little bit bigger) as the thickest part of the yard. Mark the major transition points and centre point etc with a pencil and when necessary make shallow cuts around the dowel at those points. Then taper the dowel by simply scraping it repeatedly, pulling the knife towards you and rotating the dowel as you go. If you have to reduce the diameter significantly at the very end of the yard, make your shallow cut around the perimeter, then make short cuts coming in from the end towards the centre. Follow up with some sanding. While you won't get results that are as perfect as turning in a lathe would produce, you'll be surprised to discover what good results you can actually achieve. You will get a perfectly acceptable result. I am no expert craftsman and got very nice looking yards right off the bat using this method. And considering that a length of dowel won't break the bank, you can afford to have several practice runs if need be. I'm give this a try if I were you. Hope that's of some help. David -
Hi Dave, Yeah, it's just the display stand that came with the kit and I painted it black. It's a bit unsophisticated, but it holds the model surprisingly securely. The model is not attached; it's just sitting there. I used it throughout most of the build and it presented me with no problems. I kept thinking I would glue it or otherwise affix it at a later time in case I needed the model to be free for some reason, but never actually did it. (I decided not to use the kit supplied sign with its inappropriate western style lettering that would look at home at the OK Corral.) On my Constitution, I drilled the keel and implanted some posts - always wanted to be a dentist - which sat inside cherry standards on the stand, but I had a terrible time getting it to sit securely. I kept getting the slots in the cherry standards that the keel sat in too tight or too loose. On the other hand, this simple little stand was very easy and actually works quite well. David
- 67 replies
-
- 3
-
-
- rattlesnake
- mamoli
- (and 1 more)
-
Thank you everyone for comments and "likes." And Zappto, I agree that the Rattlesnake has beautiful lines; it's a vary lean looking ship and was probably a fast one too. Thanks again, David
-
Hi All, I finished my Rattlesnake model yesterday and here are a couple of photos. The rigging went very smoothly without too many red-dos. (Don, you may notice that I changed the pendants for the braces from natural to black.) This is not a very large model, but boy does it ever have a lot of rigging. The little coils that hang on the belaying pins always drive me crazy. They need a drop of glue on the back to hold them, but if you get a bit too much, it bleeds through to the front and looks terrible. Because they don't have the heft that the real lines do, they need a fair bit of fiddling with to hang half decently. Most of my do-overs involved these. I'm taking a break now until the holidays are over, and I'm not sure which of my two projects I'll start on next in the new year. Either my Prince de Neufchatel or my Virginia Privateer restoration - I'm not sure yet. I hope everyone has a safe and happy holiday season! David
- 67 replies
-
- 12
-
-

-
- rattlesnake
- mamoli
- (and 1 more)
-
Rattlesnake Rigging Question
David Lester replied to David Lester's topic in Masting, rigging and sails
Thanks very much. I was pretty sure aft was correct. Thanks for the confirmation. David -
I'm nearing the end of my Rattlesnake rigging and have a question. I'm attaching the braces to the topgallant yard on the main mast. Each brace passes through a block attached to the mizzen topmast stay, then down through the mizzen mast top and terminates on one of the mizzen shrouds. My question is this - the line must run past the mizzen topsail yard. What side of the yard should it be on - fore or aft? The run looks more natural if it passes on the fore side of the yard, but that feels counterintuitive to me as it seems that it would be in the way of the mizzen topsail. On the other hand, the line doesn't run as naturally on the aft side of the yard and looks awkward. I've positioned the blocks on the stay as far up and aft as possible. The instructions, although detailed, don't address this and while Petersson shows the complete run of the line, he shows it in isolation without including the yard in the picture, so that doesn't help either. I've tried looking at photos in various build logs, but I've found it hard to find a photo that clearly shows what I am looking for. I know this is a pretty fundamental question to be asking at this point, but here it is nevertheless. Any input will be much appreciated. Thanks, David
-
Hi Geoff, Your Constitution is looking great. Your experience with the rigging so far is exactly the same as mine was. I relied on Petersson's book to a large extent and found Bob Hunt really dropped the ball on the rigging stage of his practicum. It misses many points and actually steers you wrong in a couple of places. There is a lot of knot tying on the ratlines, but don't sweat them. You'll get into a rhythm and it will become almost a zen experience and quite enjoyable. The hardest part for me was keeping the outermost shrouds straight and not bowing in. I read somewhere (too late of course) that one technique is to tie every fourth ratline first, then go back and fill in the others. I'm not sure if it works or not, but I'm going to give it a try next time. If your rigging as half as good as your work so far, you'll have a great model. David
-
Hi Derek, I've always had a hard time finding brass blackening solution in Canada. I haven't found a single supplier that has it. I have used gun bluing (from Canadian Tire) with some success, but I also used blackening solutions from Blue Jacket in Maine and the shipping charges didn't break the bank. They have several different ones available including one that works on Britannia metal. David
- 30 replies
-
- 2
-
-
- model shipways
- finished
- (and 1 more)
-
Hi Dave, The Prince de Neufchatel is a discontinued kit. I'm not sure why, I think it's a particularly beautiful ship. I found this kit on ebay. I do have the instructions for the launching ways. I'm not sure how your model compares in size to this one, so you might have to adapt slightly. It seems to me that the key measurement is getting the best slope for the particular model. They suggest a 3/4" rise over a 24" length for this model; it might be different for yours. But I imagine it would be pretty easy to eyeball it. I'll pm the instructions to you. David