
MORE HANDBOOKS ARE ON THEIR WAY! We will let you know when they get here.
×


GuntherMT
-
Posts
2,213 -
Joined
-
Last visited
Reputation Activity
-
 GuntherMT reacted to Glenn-UK in Duchess of Kingston 1798 by glennard2523 - FINISHED - Vanguard Models - 1:64 - Royal Yacht by Glenn Shelton
Stage: Hull Construction
Build instructions: 78-81
Task: Stern Counter Patterns and Outer Side Patterns
Parts: 77 & 78 & 119 &120
Time Spent: 30 mins
Status: Complete
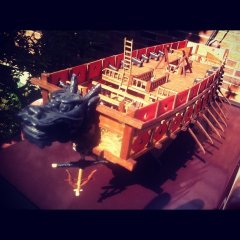
Build Notes: The bent lower stern counter pattern fitted like a dream and was glued in to place as was the upper stern counter pattern. The stern post assembly was also glued in to place at this stage. I did bevel the edge of the upper stern counter pattern so that I got nice join with the lower stern counter pattern. I will leave this area alone for the next couple of hours to allow time for the glue to cure.
I did remove and reposition the patterns shown in the following pattern as they were not correctly positioned.
I might need to add a touch of filler near the two outer edges, as can be seen in the photo below
Using the location strips supplied (another great idea by Chris) I dry fitted the bow and keel outer facings and this does provide a perfect rabbet for the 2nd planking.
The two outer side patterns were soaked in hot water for 30 mins and then clamped to the hull. I found having the bow outer facings to be a benefit but not essential. These patterns will be glued and clamped along with the bow and keel outer facings once the patterns have had time to fully dry out. I am impressed with the provision of pin holes to aid the correct alignment of the outer side patterns during the glue and clamp phase. This attention to detail by Chris is one for the many factors which sets his kits apart for other designers.
I plan to start the 2nd planking tomorrow morning. I will take my time to ensure I am happy with the fit of each plank before it is glued into place. I plan to edge bevel the planks to minimise the joint gaps and will probably use Chuck’s lateral planking bending method once again, especially for the planks above the water line. I do not think it is a critical for the planks fitted below the water line as they will be sanded, filled, primed and painted for a smooth seamless finish (fingers crossed).
-
GuntherMT reacted to Glenn-UK in Duchess of Kingston 1798 by glennard2523 - FINISHED - Vanguard Models - 1:64 - Royal Yacht by Glenn Shelton
I have finished the sanding on the hull after the 1st planking. I believe I have a really smooth and good shaped hull ready for the 2nd planking.
I have fitted the Fore and Aft keel parts. I also assembled the stern post assembly and will glue that in place once the stern counter pattern has been shaped and is ready to be fitted, just in case I have to trim / sand the stern area a little bit more.
There following three points are worth noting:
a) Position the stern counter patter (dry fit). Make pencil markings on the 1st planking to indicate areas which needed additional trimming
b) The first planking needs to be sanding almost to nothing along the stern post edge to ensure, when fitted, the 2nd planking aligns correctly with the stern post assembly. I did check this by holding the stern post assembly in place and then seeing how the plank would look.
c) Check the rabbet by holding the bow outer and keel facings in place (dry fit). I think this method of providing a rabbet is a brilliant and innovative design idea by Chris Watton.
The stern counter pattern needs to be shaped. I soaked the pattern in hot water for 90 mins (as per the instructions). I initially clamped the pattern to a tin can but I was not totally happy with how this was looking. In the end I decided to use a broom handle and 4 tie wraps to form the required bend. This will now be left to dry out overnight.
-
 GuntherMT got a reaction from BobG in Duchess of Kingston 1798 by glennard2523 - FINISHED - Vanguard Models - 1:64 - Royal Yacht by Glenn Shelton
I agree completely with your plan to prime and sand. This is the fastest and easiest way to see bumps and dips that are not apparent to the eye.
Nice work so far.
-

 GuntherMT got a reaction from Glenn-UK in Duchess of Kingston 1798 by glennard2523 - FINISHED - Vanguard Models - 1:64 - Royal Yacht by Glenn Shelton
I agree completely with your plan to prime and sand. This is the fastest and easiest way to see bumps and dips that are not apparent to the eye.
Nice work so far.
-
 GuntherMT got a reaction from FrankWouts in HMS Winchelsea 1764 by Stuntflyer (Mike) - FINISHED - 1/4" scale
Nicely done Mike, and beautiful joinery. I'm sure if I had tried to work on a 30" piece like that off the ship I would have broken it about a dozen times.. lol..
-
 GuntherMT got a reaction from Stuntflyer in HMS Winchelsea 1764 by Stuntflyer (Mike) - FINISHED - 1/4" scale
Nicely done Mike, and beautiful joinery. I'm sure if I had tried to work on a 30" piece like that off the ship I would have broken it about a dozen times.. lol..
-
 GuntherMT got a reaction from Rustyj in HMS Winchelsea 1764 by Stuntflyer (Mike) - FINISHED - 1/4" scale
Nicely done Mike, and beautiful joinery. I'm sure if I had tried to work on a 30" piece like that off the ship I would have broken it about a dozen times.. lol..
-
GuntherMT reacted to Stuntflyer in HMS Winchelsea 1764 by Stuntflyer (Mike) - FINISHED - 1/4" scale
Happy Thanksgiving! 🦃
I've completed work on the starboard side margin planks which are made up of four sections joined by scarf joints. I decided to join all four sections together first, rather than adding them to the ship individually. The idea was to get really tight joints while still being able to maintain the proper shape along the bulwarks. That would mean using a light box or a window in daylight to check the joint fit.
All of the sections were cut wider than the provided template to allow for any custom shaping that might be needed. I started with the first section at the bow by shaping the outer edge and making the scarf joint. Once completed, I shaped the next section without making the forward scarf joint. Both sections were placed along the hull and overlapped where the joint was located. I marked the joint shape with a sharp pencil and once satisfied with the fit, joined the two sections together. The same steps were carried out for the next two sections until all four sections were joined together. I used a compass to scribe the inner edge width of the margin plank and drum sanded it to complete the new shape. Lastly, I final sanded the inner edge to a smooth shape and a 90° edge. Everything went smoothly. I just needed to be careful when handling the joined lengths which is over 30". The easiest part was gluing the completed work to the hull. To speed up glue application I used a glue syringe to apply a small bead of PVA glue over its entire length.
Mike
-
GuntherMT reacted to Glenn-UK in Duchess of Kingston 1798 by glennard2523 - FINISHED - Vanguard Models - 1:64 - Royal Yacht by Glenn Shelton
Stage: Hull Construction
Build instructions: 71-73
Task: Fitting 1st Planking
Parts: n/a
Time Spent: 12 hours
Status: Completed
Build Notes: I have now completed the first planking stage and I have four full lengths of the planking material left over. I am happy with the result; it is certainly my best effort at 1st planking.
The stern area now needs to be trimmed and tidied up before the hull undergoes a good sanding and filling, where necessary. I will certainly take my time with the sanding and filling to ensure I have a good solid smooth base.
I may follow Chuck Passaro’s excellent method for lateral plank bending when I get around to adding the 2nd planking, especially above the water line. It worked really well when I used it on my Speedy build.
-
 GuntherMT got a reaction from Ciciak35 in Armed Virginia Sloop by Ciciak35 - FINISHED - Model Shipways - 1:48
I have had no issues with gaps opening and it's now been about 5 years since completion. Most of my visible wood is the kit walnut, or replacement wood like the holly I used for the deck, so can't really speak to how the basswood does over time, but no issues at all for me.
-
 GuntherMT got a reaction from Boxbuilds in Bluenose by JohnU - Model Shipways - 1:64
Nice work on both resizing your plank, and the scuppers, they look good!
Unless I'm mistaken, this is a double planked model, so the rough planking is no big deal, the first planking just forms the base for the 2nd, and you can fill and sand until it's good for the 2nd. It's all about learning by doing.
-
GuntherMT reacted to JohnU in Bluenose by JohnU - Model Shipways - 1:64
Hi GuntherMT, Thanks for the help. I was trying to do this with a mini miter box that had appropriate size slots. I couldn't get a consistent size out of it. Perhaps the miter box slot was just not snug enough against the saw. I couldn't even get truly square ends. I'll give your suggestion a try.
It's a painted model so I can use filler. Sadly the rough planking means lots of sanding. Interestingly, Model Shipways supplies walnut in a thickness for doing a double plank job; even though they don't say that in the ads.
John
-
 GuntherMT got a reaction from Nirvana in Bluenose by JohnU - Model Shipways - 1:64
Nice work on both resizing your plank, and the scuppers, they look good!
Unless I'm mistaken, this is a double planked model, so the rough planking is no big deal, the first planking just forms the base for the 2nd, and you can fill and sand until it's good for the 2nd. It's all about learning by doing.
-
 GuntherMT got a reaction from Hsae in Bluenose by JohnU - Model Shipways - 1:64
I drew a stupid picture in Paint to hopefully demonstrate better than my words what the 'jig' would look like in order to get a bunch of cuts at the exact same length. The brown boards are glued to the base board. The blue board is just stuck into the jig for cutting and held by hand.
The cool thing about a little jig like this is you can use it for all kinds of different lengths, just add new slots for the new lengths, and you can write a note onto the base board at each cut telling you what that specific cut length was for.
-
.thumb.jpeg.fc5d633a7b34428fcf19419a73d56d55.jpeg) GuntherMT got a reaction from EricWilliamMarshall in Bluenose by JohnU - Model Shipways - 1:64
GuntherMT got a reaction from EricWilliamMarshall in Bluenose by JohnU - Model Shipways - 1:64
Look like you are moving along nicely.
You posted a question in there about how to get a bunch of things cut to the same length. The answer is to make yourself a simple jig.
I'm not sure what sort of saw you are using (or maybe just using a knife if it's basswood you are cutting), but for those little posts you could just make yourself a simple cutting jig by placing two parallel pieces of wood on a flat piece of wood leaving a gap just wide enough for the pieces you are cutting to fit. Then cut off the ends so that they are even and place a 'cap' across that end so that when you put your piece to be cut down, it 'stops' at that end. Then measure from that end and cut your first piece, while at the same time cutting a 'slot' into the two guide boards. Pull out the cut off piece, put your board back in, and now cut using the nice 'slot' that was created on the first cut. Every piece should come out almost exactly the same.
Basically you are making a square "U" shape jig with a slot at the distance from the bottom of the U where you do the cutting at.
Hopefully that makes sense!
-
 GuntherMT got a reaction from Rach10199 in Bluenose by JohnU - Model Shipways - 1:64
I drew a stupid picture in Paint to hopefully demonstrate better than my words what the 'jig' would look like in order to get a bunch of cuts at the exact same length. The brown boards are glued to the base board. The blue board is just stuck into the jig for cutting and held by hand.
The cool thing about a little jig like this is you can use it for all kinds of different lengths, just add new slots for the new lengths, and you can write a note onto the base board at each cut telling you what that specific cut length was for.
-
GuntherMT reacted to JohnU in Bluenose by JohnU - Model Shipways - 1:64
I debated about adding the scuppers. They were so small I thought the detail might not be visible on the finished model. After looking at other build logs I decided they were worthwhile. It's a nice detail if done properly. By having them painted the same color as the waterway they stand out nicely against the black. I'm still undecided about the cove just below the waist. On the prototype it's quite noticeable and the color is yellow. Some people just paint a yellow stripe and others create the actual cove. The problem is how to make such a small detail in a uniform way. Need to make a tool to get this right.
The scuppers turned out pretty good except the plank leaves a noticeable line that needs filling. Of course filling will also close the scuppers and they will need to be cleaned out later. Just have to deal with that when the time comes to sand and paint.
There was no wood supplied with the kit the right height for the quarterdeck scupper plank. I made a jig using a drill press and sanding drum. The fence is positioned to the finished size of the plank from the drum. Then it's just a matter of carefully feeding the plank through.
The actual scuppers turned out to be the easiest part, but tedious. I had a file the thickness of the scupper width. It just took a bit of file/check/file to cut them. This makes a really neat slot with square corners. There are a LOT of those little things!
Here's the finished result. Please ignore the rough planking job. This was my first attempt at planking and the last part is much better than the first part.
-
GuntherMT got a reaction from Nirvana in Bluenose by JohnU - Model Shipways - 1:64
Look like you are moving along nicely.
You posted a question in there about how to get a bunch of things cut to the same length. The answer is to make yourself a simple jig.
I'm not sure what sort of saw you are using (or maybe just using a knife if it's basswood you are cutting), but for those little posts you could just make yourself a simple cutting jig by placing two parallel pieces of wood on a flat piece of wood leaving a gap just wide enough for the pieces you are cutting to fit. Then cut off the ends so that they are even and place a 'cap' across that end so that when you put your piece to be cut down, it 'stops' at that end. Then measure from that end and cut your first piece, while at the same time cutting a 'slot' into the two guide boards. Pull out the cut off piece, put your board back in, and now cut using the nice 'slot' that was created on the first cut. Every piece should come out almost exactly the same.
Basically you are making a square "U" shape jig with a slot at the distance from the bottom of the U where you do the cutting at.
Hopefully that makes sense!
-
GuntherMT got a reaction from EricWilliamMarshall in Bluenose by JohnU - Model Shipways - 1:64
I drew a stupid picture in Paint to hopefully demonstrate better than my words what the 'jig' would look like in order to get a bunch of cuts at the exact same length. The brown boards are glued to the base board. The blue board is just stuck into the jig for cutting and held by hand.
The cool thing about a little jig like this is you can use it for all kinds of different lengths, just add new slots for the new lengths, and you can write a note onto the base board at each cut telling you what that specific cut length was for.
-
GuntherMT reacted to Tim Moore in A Model Builder’s Cabin
I was sharing a studio (converted garage) with the admiral who is a potter, but we found that it didn’t really work to best effect for both of us. Serious pottery is a pretty messy business and she needed the extra space I was taking up as her business grew. I was relegated to the basement last year. So after I got back this fall from my latest construction gig up north I set to building a small model workshop for myself just out back, which I’m just finishing. The cabin is a compact 10x14 and is fully insulated and heated with a small 240v system. It houses an electrical sub panel for my level 2 car charging power unit, and I extended the roof to create a carport. This will be my light duty workshop for model building and assorted projects. I’m an architect and builder so my main power equipment (compressors, saws, planers etc) is located in another space. I created one long wall hung 14’ bench on the one side, and the other houses various tables I use. I’ve yet to install the flooring and all my small modeling tools but you get the idea. Shortly I’ll be setting up here to finish the final rigging stage of my Bounty, and then move on to my next victim.
-
GuntherMT reacted to mtdoramike in Lucky Lady by mtdoramike - 1940 barrelback mahogany runabout
Here is the Lucky Lady aka: 1940 Barrel Back Mahogany Run about all dolled up and ready for her new home. I made sure and asked the recipient of this model if his wife was ok sharing him with the Lucky Lady, he laughed and said sure, he was getting it for his adult son for Christmas. Hahahahahahaha.
-
GuntherMT reacted to Jerry Sturdivant in GLAD TIDINGS 1937 by Jerry Sturdivant - Model Shipways - Scale 1:24 - Pinky Schooner
The plans call for about 60 short pieces of wood to place between ribs.
So I set up a little assembly line by making a table saw out of my Dremel drill press.
Then a little sanding on each one and started gluing.
-
GuntherMT reacted to Jerry Sturdivant in GLAD TIDINGS 1937 by Jerry Sturdivant - Model Shipways - Scale 1:24 - Pinky Schooner
Now to gluing the ribs. When trimming the wood gaps where the laser cutter stopped, I didn’t clean the carbon very well and noticed the yellow glue didn’t bond well.
So when I flipped the glued-together center boards over, I spend more time sanding the carbon off.
When these last few ribs are glued, I’ll add some glue all along where the ribs contact the center boards. I will also sand the black carbon off the exposed parts of the ribs you see here before adding the planks.
-
GuntherMT reacted to Jerry Sturdivant in GLAD TIDINGS 1937 by Jerry Sturdivant - Model Shipways - Scale 1:24 - Pinky Schooner
Thanks, Ryland; you've earned a free ride in my boat...
I'm doing some of my fairing ahead of time, thanks to the blue prints. (Should I call them white prints?). A little pencil work (being sure to cut the correct side).
Then cut it down to where I hope it should be. I'll leave the fine fairing for when it's all together and braces are in.
-
GuntherMT reacted to Jerry Sturdivant in GLAD TIDINGS 1937 by Jerry Sturdivant - Model Shipways - Scale 1:24 - Pinky Schooner
Rather than christening the ship early with a pint of my blood, (and the inevitable stiches), I dropped my blade and grabbed my Dremel. That was nice, it was like molding wax.