

Griphos
-
Posts
105 -
Joined
-
Last visited
Content Type
Profiles
Forums
Gallery
Events
Everything posted by Griphos
-

Should I build Benjamin Latham?
Griphos replied to Dr PS - Paul Schulze's topic in Wood ship model kits
I've built most of the ships I've built, and all of the Model Shipways kits without power tools. -
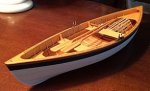
Now that's a very clever technique! This sure is a lovely little dinghy. You've got me wanting to make one.
-
I'm curious as to why the wipe-on poly before working? Is it to protect the soft wood that stains easily? Another reason?
-
I'll bet you can make good rings. Find something hard the right diameter. A nail, or a piece of rod, or even a wooden dowel. Then bend the wire around, wrapping tight to each wrap. When you pull the coils off, you can cut them and twist them closed (and even solder them if you want). I understand the frustration (of being a perfectionist 🙂), but that rudder isn't very far off and I'll bet the real boats varied a bit as well.
-
Should I build Benjamin Latham?
Griphos replied to Dr PS - Paul Schulze's topic in Wood ship model kits
Those fishing schooners like the Latham are beautiful. I love the shape of them. I'd say you have what it takes. Go for it. -
Roger, I haven't ever used it for ship modeling. It's one of the most stable wood species. Just doesn't move much with humidity or temperature. But it has very prominent grain. And it's hard, but brittle. Splinters fairly easily. One thing I don't like about it is that handling it turns my fingers bluish/purple. Something in the wood reacts with skin. It fades quickly (day or two). I'm not sure it would look good in scale. The grain is just so pronounced. Here's a table and some chairs I made from a log I cut down off my dad's place. That's an oil finish, so the wood is pretty dark without any stain. If you do any turning, your logs would make lovely bowls. I've made quite a few live edge bowls from Mesquite.

-
I changed that line instantly, since I saw that it would read as unfriendly. You must have seen it in the minute in which it was live. I think we may be forgetting that the OP asked about cleaning rust from knurled areas in particular of older and not maintained tools. In my advice, I suggested he start with steel wool. If the rust is deeper than light surface rust, then he may indeed have to be more aggressive. I would say that 400 grit sandpaper wrapped around a slender edge, like a putty knife, perhaps, or a hand made hardwood wedge of acute angle, would be better than using a file to get into the knurled area. I don't think anyone was suggesting sandpaper as some kind of maintenance regime on fine drawing instruments. Knurled knobs are quite tricky to remove rust from. You can soak the knob in white vinegar, but it will likely etch the metal as it lifts the rust. It's an acid.
-
We are indeed talking about the latter. And whether or not you change the shape of the part is dependent on the grit of the abrasive, the stability of its backing (including whatever the sandpaper is attached to or wrapped around) and your technique. Again, I'm not talking about 100 grit garnet sandpaper that you might use on wood, or even aluminum oxide, although that's a perfectly good abrasive in the finer grits. I'm talking about silicon carbide, at 400 grit and finer. You can change the shape of the part - dull the edge or round off a corner - with pretty much any abrasive. When using any abrasive (including polishing compounds or even steel wool) on any part, you need to know what you are doing. Other abrasives are not more "compliant" (whatever that means). Abrasive is abrasive. It has a grit and a medium and some kind of backing. A rubber abrasive block or wheel will just as readily alter the shape of a part if used badly. You said "Never use sandpaper on tools!" That's simply not the case, as the vast majority of people who work with tools can attest.
-
I have his saw. I understand reluctance to spend several hundred on a tool for models, but when you think about it, it’s not that much relative to what you pay for materials, or even kits. If you only build kits, and never kit bash them, it may not be worth it as it may not get much use. But it is an exceptionally well-made tool, and I know tools. (I’ve even built a couple of stringed instruments!). 🙂 As for “holding up” to hard woods, that’s a matter of the sharpness of the teeth of the blade. The saw itself has the power and tolences to handle hard wood of reasonable dimensions. I’ve used mine to saw hard maple and even mesquite and ebony. Mesquite is very hard. Harder wood will dull the teeth more quickly. And I prefer the thicker default blade for them. Sawing a lot of hard stuff means you’ll need to learn how to sharpen the teeth (tricky at best on such small blades, and probably impractical with the Thurston blades), get them sharpened periodically, or invest in a new blade occasionally.
-
Of course it is perfectly desirable to use sandpaper on tools. I’m not talking about 100 grit red oxide. I use 400 grit wet/dry or finer such as auto shops use. Sandpaper is just an abrasive grit on a flat medium. It is no different from steel wool or, indeed, the polishing abrasive block you mention. All of them are simply various grades of abrasive grit on various media. You grind your tool edges, right? Same principle. Sharpening stones often use the very same abrasive particles as sandpaper. For sharpening my edge tools, I have a piece of dead flat 3/8” plate glass about 10” by 24”. I’ve glued sheets of sandpaper to it ranging from 320 to 2000 grit. A few strokes on each grit sharpens and eventually polishes and hones the edge to a mirror finish and a sharpness that easily shaves the hair off my arm. Decades ago this method became popular on an old tools list and was nicknamed the “Scary Sharp” method. Polishing is no different. It is simply the process of replacing fine scratches/abrasions with finer scratches/abrasions. It goes faster if smaller increments of intermediary grit is used. So, removing surface rust from metal is easily done with abrasion, rather than chemical process. And if the right grit is used, both the rust is removed and the metal is polished. I may not have the experience many here have with modeling, but I have over four decades of experience refurbishing and using antique and modern tools in making furniture and fine cabinetry. Old tools are something I know a great deal about. As for the difference in the length of the compass legs, a much bigger difference than 1/32” will not affect use at all. As already stated, if the locking mechanism is solid and the points don’t move, then they will work perfectly. You will move your hand while using them, changing the angle of contact, so perfectly equal length is moot. When using them to scribe (rather than scribing circles), the reference surfaces will not usually be at the same height anyway.
-
WAIT!! You can buy boxwood at Hobby Lobby?!?!
-
If it's light rust, a little WD40 and some fine steel wool will do the trick. If it's a bit deeper, then some sandpaper. I've used flap sanding wheels in the drill for more stubborn rust/pitting. WD40 is an oil, and seems to do a better job of assisting in rust removal than other products I've tried that are dedicated to the purpose. Once clean, wipe with mineral spirits to get rid of the oil, and then use preservation wax or a spray protector like Boeshield T-9. I've cleaned up many a 19th c plane iron and early 20th c tools with these methods. Old Starrett tools are top quality. I've got a number of their old rules and other tools. Congrats on the find.
-
What first wooden ship kit should I buy.
Griphos replied to SHIPSCAT's topic in New member Introductions
In addition to the glue and files and knife and little scissors and sanding paper (emery nail files are great) and pin vise/drill bits mentioned above, tweezers are pretty indispensable in my working. A razor saw is nice to have and cheap enough. A good little ruler, of course. Little clamps are very useful. The little 2" plastic spring clamps are useful, even for rigging (putting weight on lines). Even little alligator clamps are useful where their teeth won't mark parts that will be visible (or for rigging), or clothes pins (I prefer the wooden ones). Rubber bands are handy. You can build a lot with such a selection of tools as this. You can add as some particular job calls for it. The articles database here is very helpful. There's an article on basic hand tools: http://modelshipworldforum.com/ship-model-materials-and-tools.php -
What first wooden ship kit should I buy.
Griphos replied to SHIPSCAT's topic in New member Introductions
The Midwest kits can be a good choice. I've built several of them, canoes and sailboats both. I think the canoes or dories would be a better choice. The sailboats aren't going to teach you techniques you'll use on more complex models. Some of the supplied material isn't the best. The little boat in my avatar is their Peapod. I very much enjoyed that build. I would recommend a kit that builds into a workboat rather than a naval ship. Lots of cannons and rigging can be daunting. Of course, my first kit was the Halifax, I think by Mamoli, a gift from family. Not a huge man-of-war, but plenty of fiddly work for a brig its size, for sure. The instructions were poor, as were many of the parts. I wound up kitbashing a good bit of it. It turned out okay, and I learned a lot, but I also bought a small library of books about how to build wooden ship kits. Don't think I would have made it without those. With smaller (or larger scale) working boats, you learn a lot of the basic techniques, but don't get bogged down in overwhelming rigging and armament. I think Model Shipways kits are pretty good. I've done a number of them. The whaleboat is lovely. The Pinky Schooner looks like it would be quite fun. I'm building the Willie Bennett now. The hull has gone together quickly and well. Some of the deck equipment is a bit complex, and is best done by soldering brass, so that might be an issue. Nice to learn how to do that kind of thing, though. The Armed Longboat (Chuck's design) or the Pinnace would be a very nice kit to start with. It's plank on frame, rather than bulkhead, so for that reason would be a bit more challenging, but the Emma Berry is a lovely boat, both in real life and kit form. I think any of those would be an excellent first kit. Whichever kit you choose, don't think you have to set aside large chunks of time to work on it. That's fine if you have the time, but I think a lot of kits get started and just sit there because the builders don't think they have enough time to work on them, due to other demands and tasks. Keep it out and handy and just do one or two small things. Put on a couple of planks. Rig the boom to get ready to mount. Make a piece of deck furniture. Ten minutes here, 15 minutes there, once or twice a day on most days and before you know it, you'll be done. -
PM sent.
-
I’ve not heard of clamps from stationery stores. Do you have more no reason on this?
-
Got mine today as well! 🙂
-
source for steel bar stock?
Griphos replied to Griphos's topic in Modeling tools and Workshop Equipment
I had totally forgotten about the PVC "spring" clamp idea. I used to work as a finish carpenter with a guy who made guitars. He had lots of cool clamps, but he also had a few PVC "clamps" as well. I've got lots of reversed clothes pins of several sizes. Those do work well when there's room for them. -
source for steel bar stock?
Griphos replied to Griphos's topic in Modeling tools and Workshop Equipment
I went into town Sunday and looked at the big box store. The smallest they had was 1/4"x1/4". It was pretty heavy. I think the brass bar is the best bet. Now to find some! 🙂 I can order it online, but if I can find it nearby and save shipping, I'll try to do that. -
source for steel bar stock?
Griphos replied to Griphos's topic in Modeling tools and Workshop Equipment
Those look pretty darned good. Do they flex much under clamping pressure? These might be a good way to go. I was thinking about aluminum, Mark. I was wondering if it would work. If I could get the right hardness, it would certainly drill easily enough, and probably would be stiff enough. I'm liking the brass idea, though. -
source for steel bar stock?
Griphos replied to Griphos's topic in Modeling tools and Workshop Equipment
Thanks for that great advice, Bob. Mild steel it is. -
Will you be sending the discount code by PM?
-
source for steel bar stock?
Griphos replied to Griphos's topic in Modeling tools and Workshop Equipment
That's what I suspected. Thanks again. -
source for steel bar stock?
Griphos replied to Griphos's topic in Modeling tools and Workshop Equipment
Thanks for the advice. I'd noticed "key stock" a couple of places, including Amazon. I wasn't sure whether that was annealed or hardened. If hardened, I wondered whether it would bend and drill easily enough. -
source for steel bar stock?
Griphos replied to Griphos's topic in Modeling tools and Workshop Equipment
There is a city an hour or so away. They may have engineering firms. I'll see if I can find something like that.
