hornet
-
Posts
690 -
Joined
-
Last visited
Content Type
Profiles
Forums
Gallery
Events
Everything posted by hornet
-

replacement for blacken it brass?
hornet replied to rtropp's topic in Metal Work, Soldering and Metal Fittings
JAX GREEN PATINA also does a great job when applied to copper plates - gives an authentic look for those who do not want a bright 'copper' finish on a hull. -
I would say that filler blocks are only necessary at the bow and stern so you have something to assist you in both affixing the planks and achieving the correct shape. There should be more than enough bulkheads for you to attach your planks with some type of planking screw between these blocks. Just make sure you fair in the bulkheads with a file or sanding block before beginning planking
-
replacement for blacken it brass?
hornet replied to rtropp's topic in Metal Work, Soldering and Metal Fittings
Birchwood Casey is also available on EBay. -
Filler block question.
hornet replied to Ronjja76's topic in Building, Framing, Planking and plating a ships hull and deck
If you have one, a band saw is ideal for 'roughing out' the shape of your filler blocks. It allows you to achieve the curves much more accurately. -
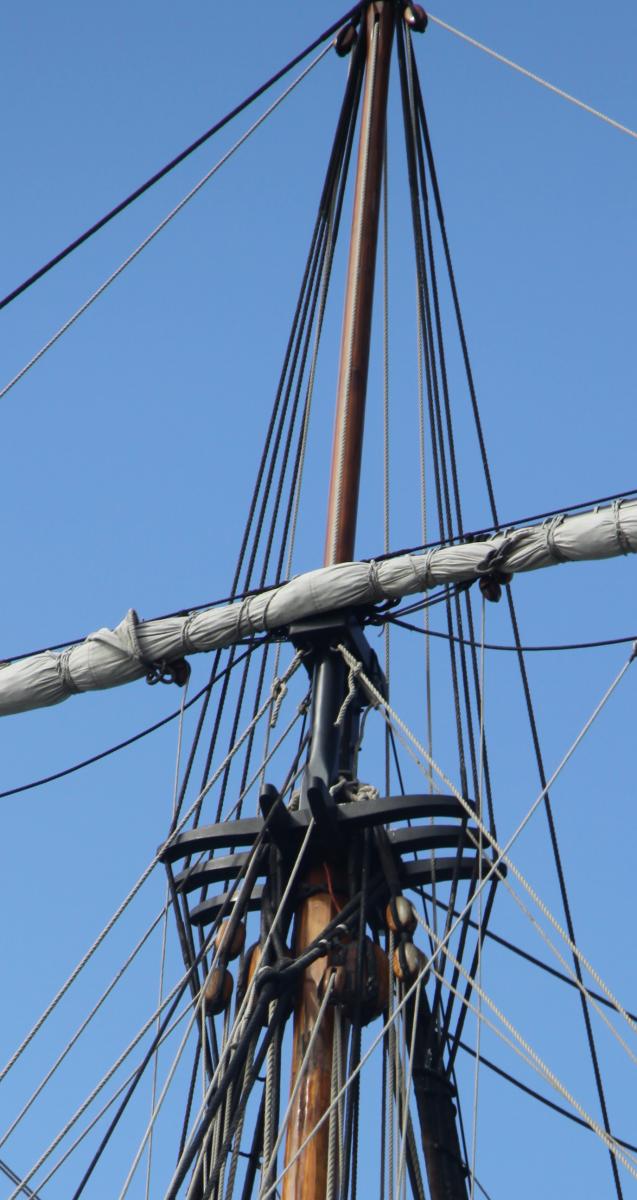
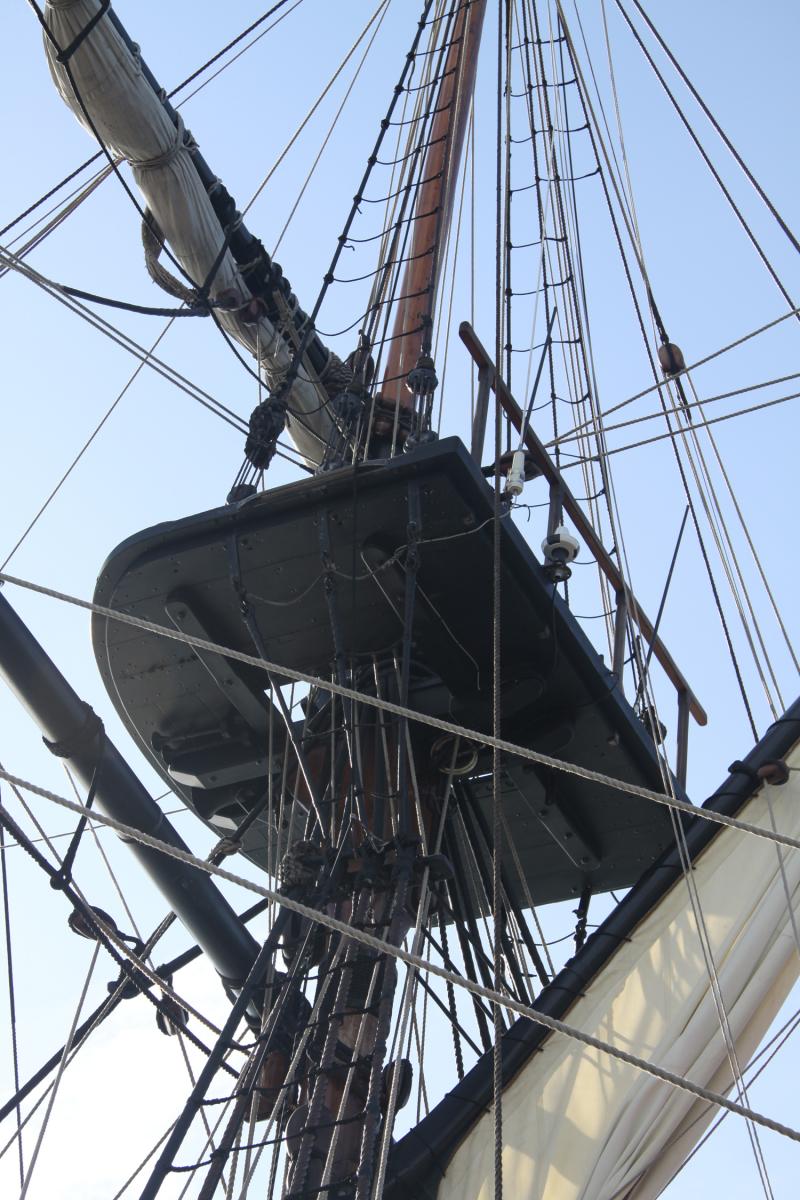
endeavour shrouds & ratlines (moved by admin)
hornet replied to geoff's topic in Masting, rigging and sails
Hi Banyan I dug out another pic from my collection of the Endeavour Replica. It may help you. If you are able to zoom in (this pic was cropped from a larger one)you will see that the Topgallant leading shroud has not been served along its full length. It appears to be only served at the top and from just above the crosstrees and down from there. The other shrouds seem to have been served in the same manner. Hope this helps. Cheers Steve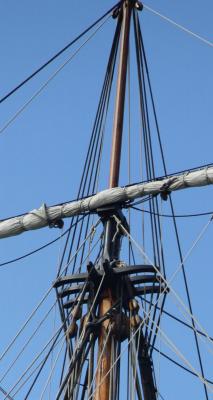
-
endeavour shrouds & ratlines (moved by admin)
hornet replied to geoff's topic in Masting, rigging and sails
Don't know if this helps but here are some pics I took of the shrouds/ratlines on the Endeavour replica recently.


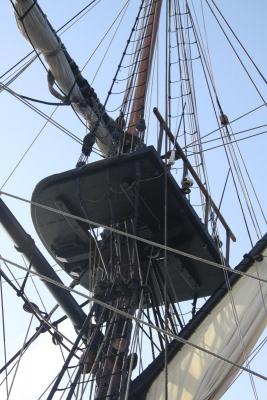
-
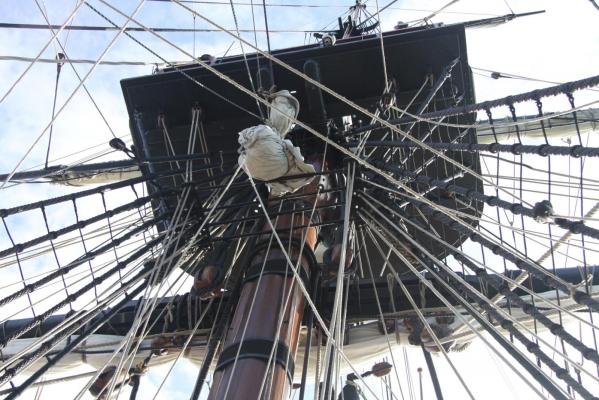
Spyglass. It is not always the case that the treenails are invisible. Check out the photo I took on board the Endeavour Replica and posted on another treenailing thread a while ago. They are quite visible in this case. http://modelshipworld.com/index.php/topic/8317-to-treenail-or-not-to-treenail/
-
Obviously a more 'pointy' bow is much easier to shape than a rounded bow such as on the Endeavour. My advise is to: 1. work on s simple model that does not require too much planking. There are plenty on the market. 2. Calculate the width (approximately) of your planks as they taper towards the bow and stern before you commence planking. 3. Use filler blocks at the bow and stern (even if the kit doesn't include them) as this really helps when shaping an supporting planks. These can be shaped from bass wood. 4. Get or make yourself some planking screws. These really help to hold planks in place while they dry. 5. Always shape your planks in pairs ( port and starboard together) so you end up with a symmetrical result. 6. Never taper your planks to less than half their width at the end ie a plank that is 5mm wide should not be tapered to any less than 2.5 mm. 7 Use a quick drying PVA glue in combination with a CA gel. The CA gel is great when applied to the ends of planks. To holds them in place while the PA glue dries. 8. Get yourself a good quality plank bender - preferably one where the planks are soaked then heated to bend- make sure they are dry before you fit them. 9. Make sure you buy a model that is 'double planked'.' You can then afford to make some mistakes on the first layer, fill, shape then apply the second (thinner) layer of planking. 10. As to your question about the lengths of planks, I think that for a beginner, longer planks are better. They are easier to shape and bend. You will find that you need shorter 'stealer' or 'drop' planks at some point in your build. These are shorter and more like a wedge. They are often applied at the stern. Take your time and don't be afraid to take planks off and refit if they don't look right. I have planked 10 models over the last 30 years and am still learning
-
Hi Bryan I too have a proxxon Lathe. I use it all the time. Recently finished turning all masts and yards for my HMS Supply with it. It is a great tool. Speed is infinitely adjustable and collets allow you to work accurately with very small dowel or square timber. I also used it to turn up very small oars for my scratch built ship's boat on the deck of the Supply and the scratch built capstan. I also turn up pedestals for my model stands. It is worth the money - one of my favourite mini power tools.
- 75 replies
-
- 2
-

-
- Caldercraft
- Supply
- (and 1 more)
-
Cabbie, I have found Petersson's books to be very helpful. This Aussie Online seller has good prices too!! http://www.thenile.com.au/search?s=Lennarth+petersson&x=0&y=0
-
Solder and brass blackening
hornet replied to Cabbie's topic in Metal Work, Soldering and Metal Fittings
I get my Birchwood Casey via EBay. Jaycar electronics sell a lot of soldering stuff. They do online orders as well. -
I agree with Brian, that's how I do it too. I use brass or stainless screws.
-
Micro-Mark MicroLux LaserKnife 2525 – A Review
hornet replied to mtaylor's topic in Modeling tools and Workshop Equipment
Excellent review. Much appreciated!!!!! -
I built the Corel version. I wouldn't recommend it unless you are very experienced.
-
Rick, I think you are right about the boats. They look identical to the ones supplied with the Perseverance and Mermaid - which were plastic. I think this may be the case with other manufacturers as well though. The Caldercraft Supply ( my current build) did not even come with a ship's boat. I actually used the plan from the Modellers Shipyard Sirius Longboat (which I reduced to a length of about 8cm on a photocopier) and scratch built it. It turned out really well - better than anything I could buy.
-
I think you may be right Frankie. I checked out the Sirius Website and there is a good diagram of the bow section. The bowsprit on the model does seem to be a smaller diameter than the one in the diagram. ( link below) http://www.hmssirius.com.au/the-early-years.html
-
This kit is not 'new.' Modeller's Shipyard (modeller's central) was selling it some years ago. The rumour was that it was that it was taken off the market due to design faults - I'm not sure if this is true but it looks like they have resurrected it - they must have fixed the problems that existed in the earlier version ???????? This kit is considerably cheaper than the original which (from memory) sold for around $1100 (AU)
-
Swift bowsprit brass band
hornet replied to Cabbie's topic in Metal Work, Soldering and Metal Fittings
Hi again Cabbie Yes the outer stunsail boom rings are attached with brass tubing (1mm) which I bought cheaply on ebay. However you could do the same thing with brass wire. The copper sheeting I used was about 0.2 mm thick. I can't be exact as my vernier callipers aren't the new fangled digital type and I got it quite a while ago and don't remember the thicknesses. However even the thicker stuff bends very easily and can be moulded into all sorts of shapes. I have two thicknesses of copper sheet, one is a little thicker, probably 0.3 - 0.4mm. Both are good and easier to use (in my opinion) that brass. Silver soldering isn't hard and adds another dimension to the hobby. -
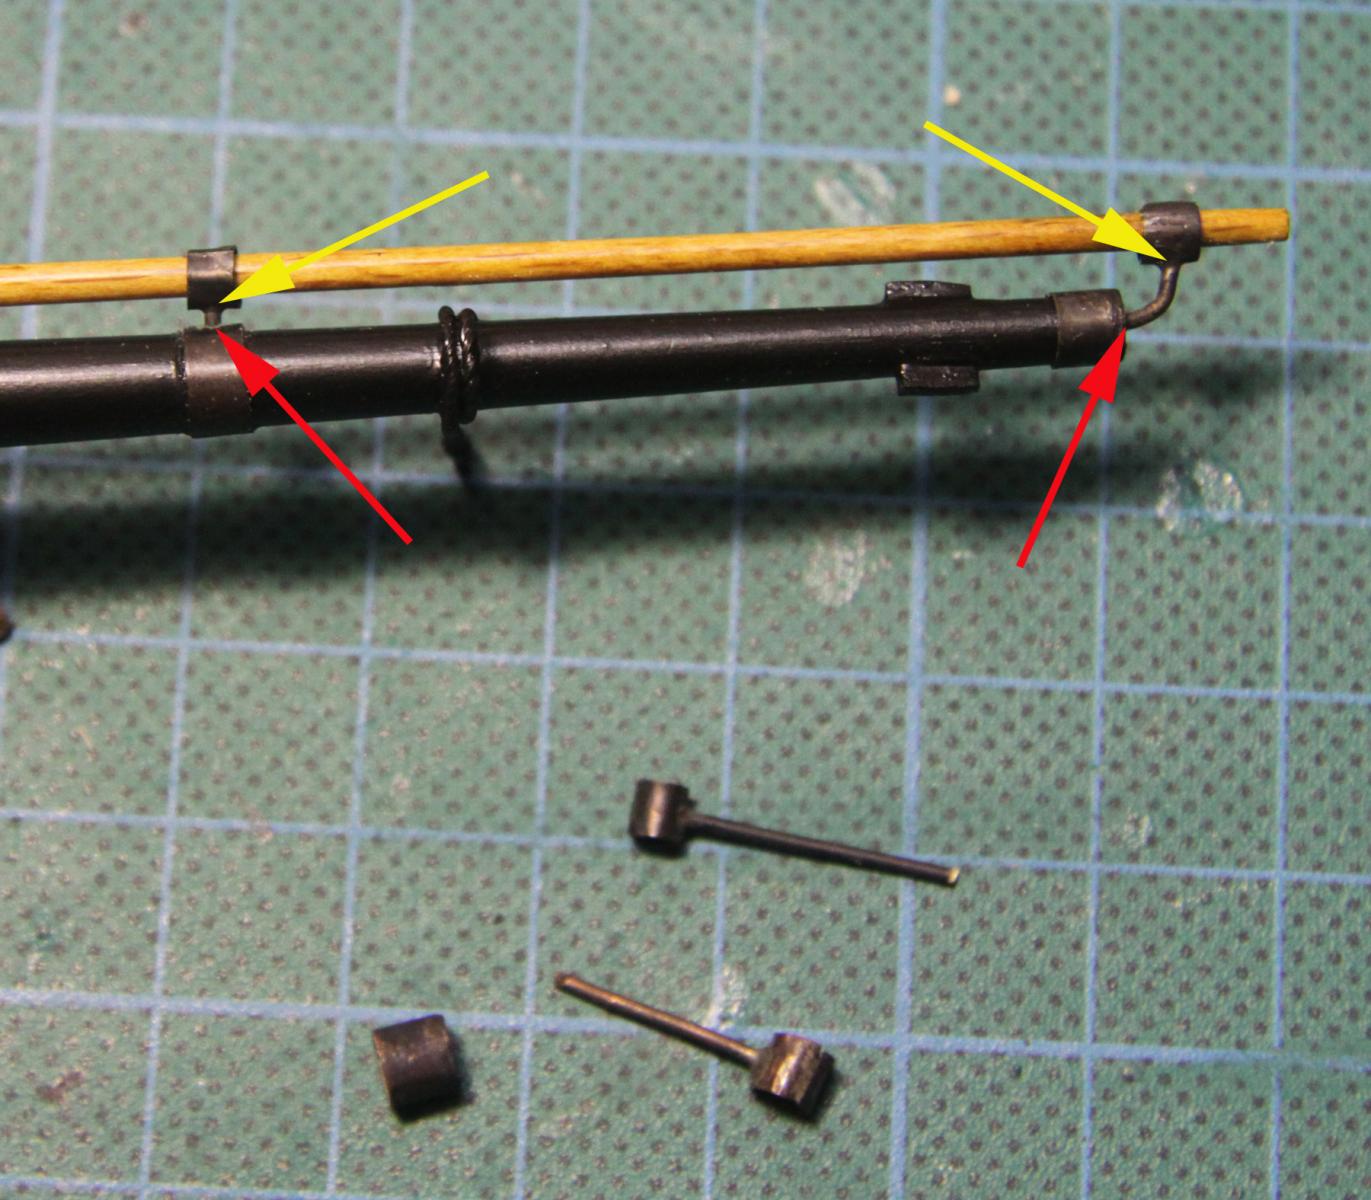
Swift bowsprit brass band
hornet replied to Cabbie's topic in Metal Work, Soldering and Metal Fittings
Hi Cabbie Welcome from a fellow Aussie. I have to concur with DocBlake in regard to just drilling a hole and using the whole eyebolt. I might add you may wish to consider buying a sheet or two of copper (quite cheap on ebay) and using it instead of brass sheeting. I have found that is easier to bend, blackens easily as well and is very easy to silver solder. I have done a number of jobs where I have silver soldered copper sheeting to brass wire or tubing. The pic below shows some scratch built inner and outer stunsail boom rings. The joins arrowed in yellow have been silver soldered ( brass tubing to copper sheeting) the ones arrowed in red were drilled through the copper and directly into the dowel. I found that the silver soldering blackened well using Birchwood Casey Brass Black.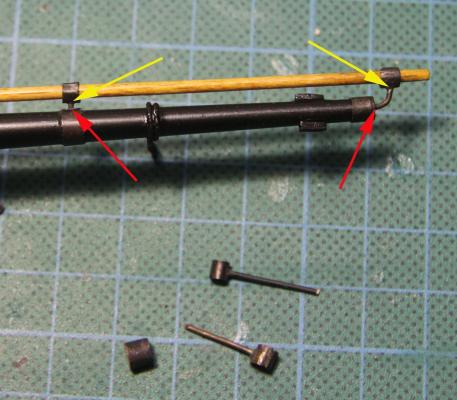
-
Clamps for deck to frame
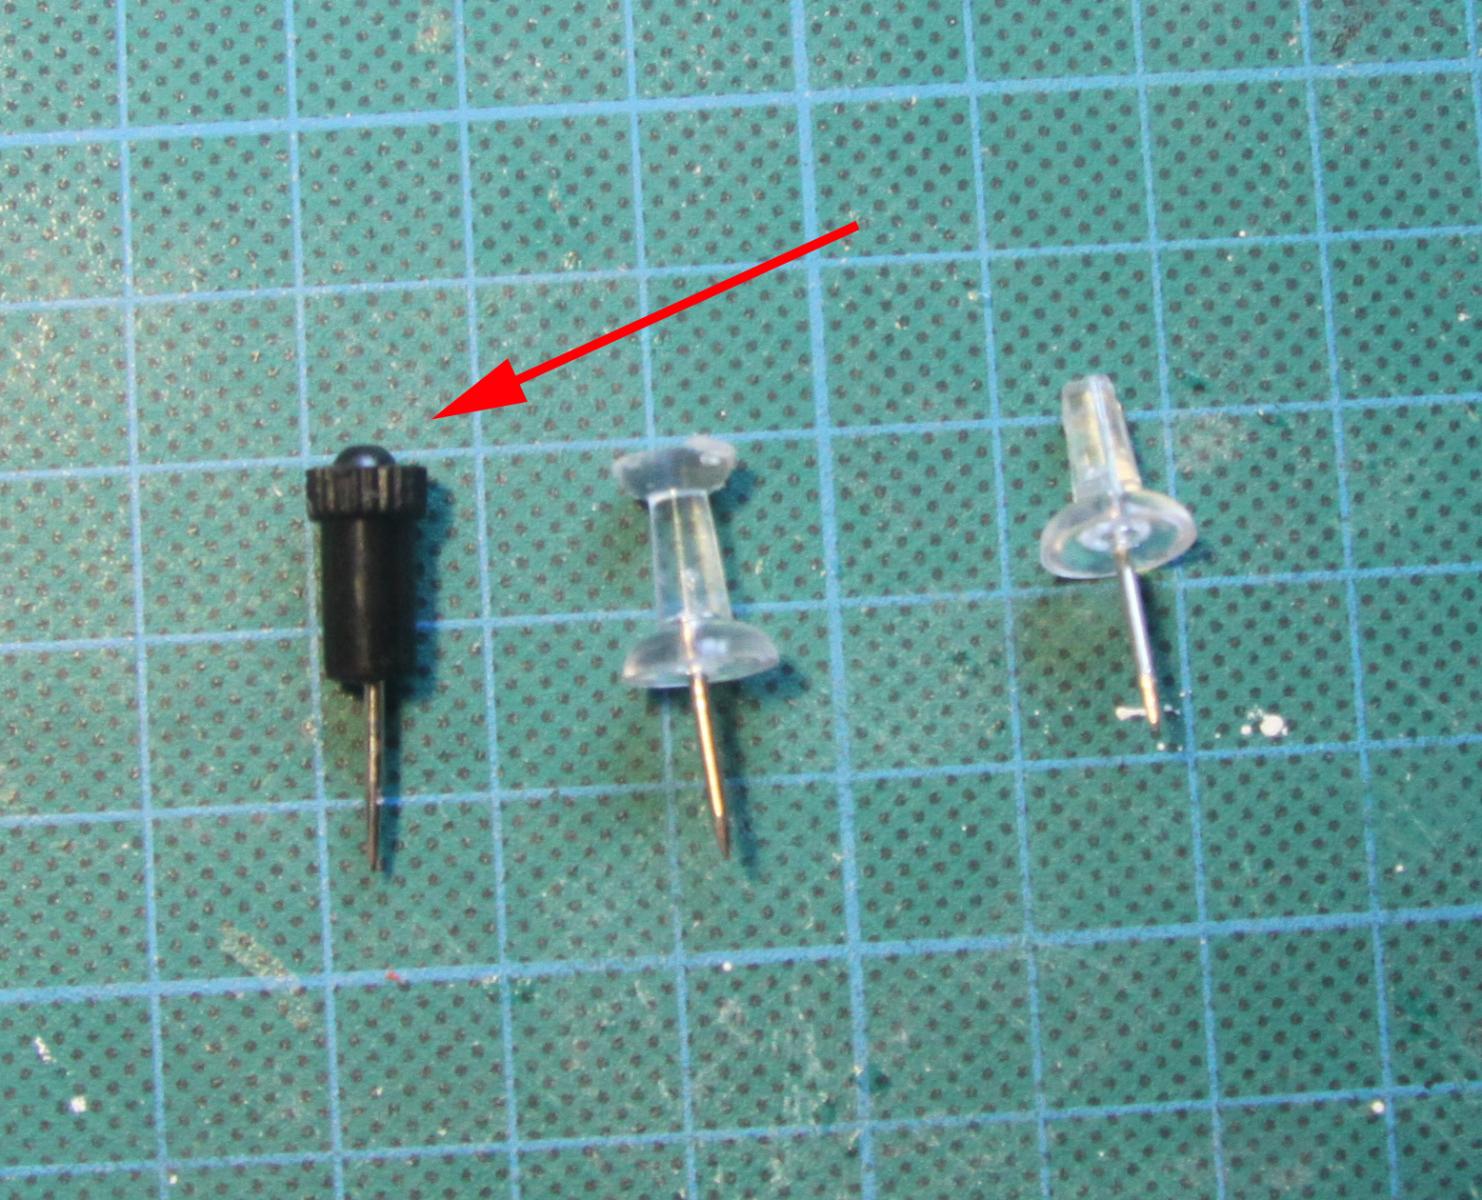
hornet replied to zamboknee's topic in Building, Framing, Planking and plating a ships hull and deck
If you are going to plank your deck after gluing in place, a good result can be gained by marking the deck where the bulkheads line up under it, predrilling (about a 0.8mm drill bit) through the deck and bulkheads, applying glue then nailing deck in place with pushpins or chart pins. I have found chart pins such as that arrowed below work better than standard push pins because the heads don't break off when nailing. Pins are easily removed when glue is dry.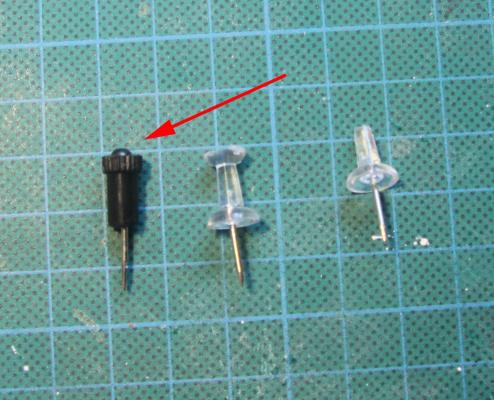
-
My No 11 blades have a very short life expectancy. I find that I regularly snap the tip off them. This often occurs while the blade is still sharp. For this reason I tend to buy my blades in packs of 100 and I don't get too attached to them. In saying that, checking out how other's sharpen their blades sounds interesting. I have found a use for broken No 11 blades. See glue scraper on following link. http://modelshipworld.com/index.php/topic/4679-the-kit-bashers-guide-to-the-galaxy/page-7
-
Speaking of windlasses, I found a black Lego cog which I was able to cut in half to make excellent gears for the scratch built windlass on my HM Supply

- 396 replies
-
- 13
-
-
- Idea
- Bright Idea
- (and 1 more)
-
I used Zap-a- gap CA glue to copper the hull of my Sloop Norfolk. It was my first attempt at copper plating. Up until this time I had never had any health problems with CA glue. Even though I did the coppering outside on a deck, I too came down with symptoms similar to flu. In fact I thought I had a very bad cold and ended up taking a couple of days off work. The Admiral suggested that I may have been suffering from the effect of CA fumes. At first I thought that this could not be so as there was no warning on the bottle. However, after doing some research, I discovered that this was a fairly common problem. I now never use CA - even a very small amount - without a face mask.
- 75 replies
-
- 1
-
-
- Caldercraft
- Supply
- (and 1 more)
-
Difference between a deadeye and a clump block
hornet replied to Captain Al's topic in Masting, rigging and sails
Every time I browse this site, I learn something new. LOVE IT -
Varnish and primer
hornet replied to sygreen's topic in Painting, finishing and weathering products and techniques
I use polyurethane matt and satin but dilute 50/50 with low odour turps. On small areas I brush it on but on larger areas such as decks, I apply with a single action airbrush. I find this gives a smoother more even finish that an aerosol can. Because the poly is thinned, I usually apply at least 4 coats. It tends to dry a lot quicker than 100% poly. I agree with Geoff, Admiralty paints are excellent both for brush and thinned in an airbrush.