Bob Blarney
-
Posts
467 -
Joined
-
Last visited
Content Type
Profiles
Forums
Gallery
Events
Everything posted by Bob Blarney
-
A No. 4 Stanley/Record plane and a shooting board would free you from relying upon others. Have a look for videos by Paul Sellers -- a traditional joiner who teaches in plain words. A 60-1/2 low-angle plane would be most useful. I think too many people here are confined by the notion that power tools are best or only way to do things. A summer or so ago, I broke a wrist when I fell off my bicycle. I was hesitant to mill down wood on my DeWalt Radial saw and the other machines, and so I developed handtool skills -- a steady workbench with a sturdy vise, fine Japanese handsaws, and then I learned to sharpen and use handplanes. I learned that for many things, it was faster, easier, quieter, less dusty, and cheaper, to use the hand tools.
-
I made the description, of the idea of a shopbuilt magnetic holder too complex to understand. It's quite easy to do. Oh, and a light spraying/wipedown of vegetable-based kitchen canola oil (i.e. rapeseed) such as PAM, works well against rust, and can be washed off easily with soap and water.
-
Hmm, considering Edwin Abbott's literary work 'Flatland: A Romance of Many Dimensions' (now in the public domain), and my own experience about developing dimensions and shapes: A Point: Drill press A Line: fine Japaneses handsaw A Plane: a 60-1/2 Handplane
-
What thickness of disc do you desire? For 1mm diameter discs, I think could be very difficult to do. Hmm, can you commission a trophy shop that has a laser engraver/cutter? A laser can do fine work.
-
Oh, and don't forget about the Big UV light in the Sky that can be used to cure the UV glue. You can carefully lay out the parts on a tray and then apply the glue at your leisure, and then take the tray outside for curing. Maybe better for you, you can do your layout beside a sunny window that has been temporarily covered with aluminum foil. , When you're ready, just open the window to cure the glue. I also made some judicious use of a magnifying glass, a couple of times. The glass concentrated the UV light and also concentrated the thermal energy of the the sun to complete a cure. (Jeez, some people thought I was sunbathing on company time and burning ants!)
-
Dentists have been using UV-cured adhesives/epoxies for years, as you may know. About 7-10 years ago, I worked with some UV-cure adhesives for assembling biomedical instrumentation. I don't know/remember the chemistries of them, but back then there were basically two types. One type requires exposure to UV light (and nothing else), and so if the UV light can not penetrate the materials to be bonded, then the adhesive will never cure. >It is important to remember that for many/most materials, that transparency to UV light is not at all the same as transparency for visible light.< The other basic glue type can be cured by UV light for initial or total curing, but it can also be cured by heating. This means that some materials that are UV-opaque or semi-opaque can be 'surface' bonded by UV light exposure, but full bonding can also be accomplished by heating the materials, to fully cure the UV glue. I hope this tidbit is useful to you.
-
Dust collection and extraction
Bob Blarney replied to Trussben's topic in Modeling tools and Workshop Equipment
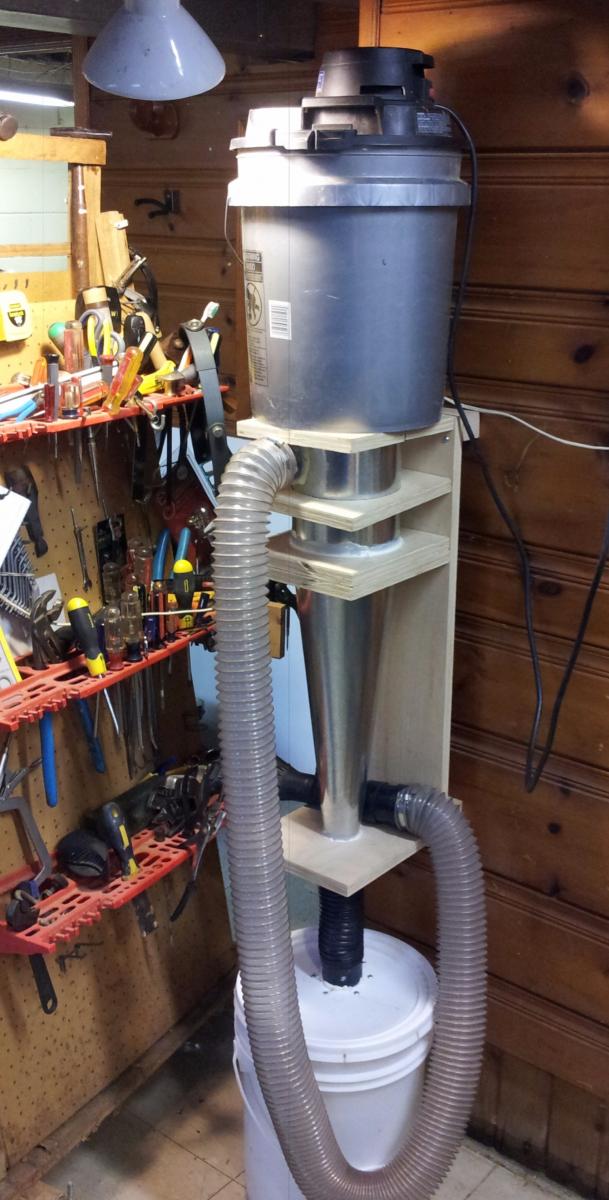
Here's a pic of my shopbuilt mini-cyclone system. From top to bottom, a buckethead vac with a HEPA filter, the cyclone, and a 5 gallon collection bucket. It's attached to the wall and takes up about one square foot of floorspace. It can almost suck my socks off without clogging.
-
I'd use a brass brush. Stainless steel might be too hard. Ferric chloride will eventually dull the teeth . But before using a file, try rubbing some chalk on the file. It might prevent clogging the teeth with metal chips and make it easier to clean with the brass brush.
-
Dust collection and extraction
Bob Blarney replied to Trussben's topic in Modeling tools and Workshop Equipment
If you buy a vacuum cleaner / shopvac / dust extractor , then also consider the purchase of an Oneida Dust Deputy separator. I built my own cyclone separator, but at $50 US, this is a good buy for most people. I don't think you'll regret it: http://www.oneida-air.com/category.asp?Id=%7BCC6B6F2A-E3D7-4F18-A53C-B5C357DFE131%7D -
Look over the site carefully. There's a calculator that can scale images that have been scanned or that are on the internet. There are also many other things, e.g. circle-divider/protractors for woodturners. It's a a very useful site for many projects if you look around.
-
Tweezers - Japanese vendor Kaneshin
Bob Blarney replied to Landlubber Mike's topic in Modeling tools and Workshop Equipment
You might save some money, if you look in a catalog of instruments for a veterinarian's armamentarium. -
Bryanc, It's not apparent to me that that vise is cumbersome. A good vise is like having a giant with a strong hand to hold things for you. If I were you, I'd think about making auxiliary jaws for special purposes. (Note - as I understand the English language: British English makes no distinction between the spellings of 'vice' and 'vise'. But for Americans, the word 'vice' means something that holds >you< tightly and usually works to your detriment. On the other hand, the word 'vise' means a mechanical object that holds objects for you so that you can work productively.)
-
DIY router machine
Bob Blarney replied to kees de mol's topic in Modeling tools and Workshop Equipment
Good stuff. -
DIY router machine
Bob Blarney replied to kees de mol's topic in Modeling tools and Workshop Equipment
That's very nIce workmanship. The only thing that I could suggest, is to make the arms that span from the fence/center guide(?) to the router base could be made stiffer. -
Tool for Sanding Inside of Curved Pieces
Bob Blarney replied to ChrisLBren's topic in Modeling tools and Workshop Equipment
Just another tip about freehand sanding of small pieces, especially with power tools Do not attempt to hold on to any tiny piece with your fingers -- it will likely vanish, and you'll probably trim your fingernails at best and maybe your fingertips painfully too. instead, wrap a single layer band of paper masking tape (sticky side out) or double-stick tape around 2-4 fingers, and then stick the small piece on the tape. This way, you can feel and lightly feed the tiny piece to the abrasive, but you're not directly holding the piece. This prevents too much feed pressure, and gives your fingers a buffer skin if the piece should fly away. Do not use cloth tape -- paper tears away much more easily and you'll naturally draw your hand away. You can also hold a small piece by the same method while using a popsicle stick or other holder instead of your fingers -- that's much safer. -
Tool for Sanding Inside of Curved Pieces
Bob Blarney replied to ChrisLBren's topic in Modeling tools and Workshop Equipment
There are many options. and which might be most suitable depends upon the curvature and clearances. My workhorse power tool is a Rigid Model EB4424 Oscillating Edge Belt / Spindle Sander. It's possible to do many things with this sander by making various fixtures that can be mounted on the table. For hand sanding, I've traced around a set of french drafting curves on to wood, cut the curvers out, and put self-stick sandpaper on them, or made self-stick (see below) in various grits. Self-stick sandpaper can be made by laying down a strip of masking tape, and then spreading some CA glue, and then abrasive paper of the desired grit. For flat sanding tools (e.g. a carpenter's level), a printer's brayer (a roller) might help in smoothing the paper down on to the tape. For curved tools, a rubber or credit-card squeegee can be used. Spoons and butter knives can be fitted with this technique, as well as common bench chisels. When the paper wears out, then it's easy to peel it off, wipe clean with naptha, and then reapply. There is also a new product by 3M that can be very useful. It is a stretchy film of silicone plastic/rubber that is coated with grit, called 3M Ultraflexible Sanding Sheet. -
Hello, here's a link to blocklayer.com, a website for various calculators and other things. I think you will find many of them useful. Blocklayer.com (Greg Tarrant) supports a chidrens foundation, so if you find this site useful please consider a donation. http://www.blocklayer.com/Scale-RuleEng.aspx
-
Harbor Freight Mini Wood Planes
Bob Blarney replied to grsjax's topic in Modeling tools and Workshop Equipment
This is a digression, but In the 1920s-40s, model shipbuilding articles were a regular feature in Popular Science. There are plans and descriptions of techniques. Sadly, the plans are no longer available from the publisher. If you're interested, do a search for Captain E. Armitage McCann, who was a ship captain and a excellent modeler who wrote many articles for Popular Science until he passed away i in 1938. There is a two part eulogy on the modelshipbuilders.org research pages that also lists the models and publication dates of Capt. McCann's articles. -
Harbor Freight Mini Wood Planes
Bob Blarney replied to grsjax's topic in Modeling tools and Workshop Equipment
Mike, maybe this vid from Paul Sellers could help you with sharpening small and short blades: -
Harbor Freight Mini Wood Planes
Bob Blarney replied to grsjax's topic in Modeling tools and Workshop Equipment
Has anybody asked Lee Valley about sharpening the blades of their tiny tools? Or are the L-V tools just museum/display pieces? Really, I think you that should learn how to sharpen your tools of any size, so that you're not a prisoner to 'somebody else' who is far away in location or time. -
Harbor Freight Mini Wood Planes
Bob Blarney replied to grsjax's topic in Modeling tools and Workshop Equipment
I forgot to mention that a used spade drill bit can be reworked into a blade for small planes. You can poke it through a potato near to the cut & grinding lines, and then cut or grind the bit to shape. The potato will keep it cool, and you'll learn that if the potato cooks that the blade is getting too hot. Note: I do ot recommend eating the potato afterwards. -
Harbor Freight Mini Wood Planes
Bob Blarney replied to grsjax's topic in Modeling tools and Workshop Equipment
These are ok, and certainly for the price. Mine needed a touchup of the bodies as well. I suggest that your relieve the edges and corners so as to avoid creasing the wood. By the way, the HF "Windsor 33" bench plane ($12) can be tuned up to usefulness as well, but the No.4 clone isn't worth the bother. But if you want something nice, look at these: http://www.leevalley.com/US/Wood/page.aspx?p=70138&cat=1,41182 If you'd like to make your own, look up Stephen Boone, and also: tiny handplanes -
Every kid should have a sturdy cast-iron band saw as the first electrically powered cutting tool. When it comes to band saws, price is commensurate with quality and ease and pleasure of use. If I was marooned on a desert island with a single palm tree with an electrical outlet mounted on the trunk, then I would choose a 1) drill press (pillar drill for the Brits), 2) a band saw, and 3) a combo disc/belt sander. If the palm tree didn't have an outlet, then I could easily get by with Japanese pullsaws, a gimlet, and a Stanley/Record No.4 hand plane. A Stanley 60-1/2 would be very useful too.
-
I see that there is a quantum leap in price from the 10" saw to the 12" saw. But if possible, I'd consider a secondhand 12" saw (better yet, a 14"). The 12" saw won't take up much more room, but they are significantly more robust and the blades usually last longer. But above all, avoid a three-wheel saw - they have a tendency to track poorly. An important consideration is whether you can adequately judge the condition of a secondhand saw. Take an experienced friend along to help the inspection and keep you from an impulse-buy. If possible before going, look up the operator's manual and study it, and find reviews as to which parts might be susceptible to wear or breakage. Also check to see if parts are available (My sturdy 14" Delta-Milwaukee left the factory in the 1940s and every part is still available.); missing parts are usually a dealbreaker for me.
-
a tilt-a-whirl positioning fixture
Bob Blarney replied to Bob Blarney's topic in Modeling tools and Workshop Equipment
Hello, someone alerted me to this 'better mousetrap. This might be much more suitable: http://www.jerryhartzell.com/wood-carving-on-a-budget/jerrys-wood-carving-vise/