HOLIDAY DONATION DRIVE - SUPPORT MSW - DO YOUR PART TO KEEP THIS GREAT FORUM GOING! (Only 75 donations so far out of 49,000 members - C'mon guys!)
×


ccoyle
-
Posts
10,459 -
Joined
-
Last visited
Content Type
Profiles
Forums
Gallery
Events
Everything posted by ccoyle
-
 Congratulations -- nicely done!
 -
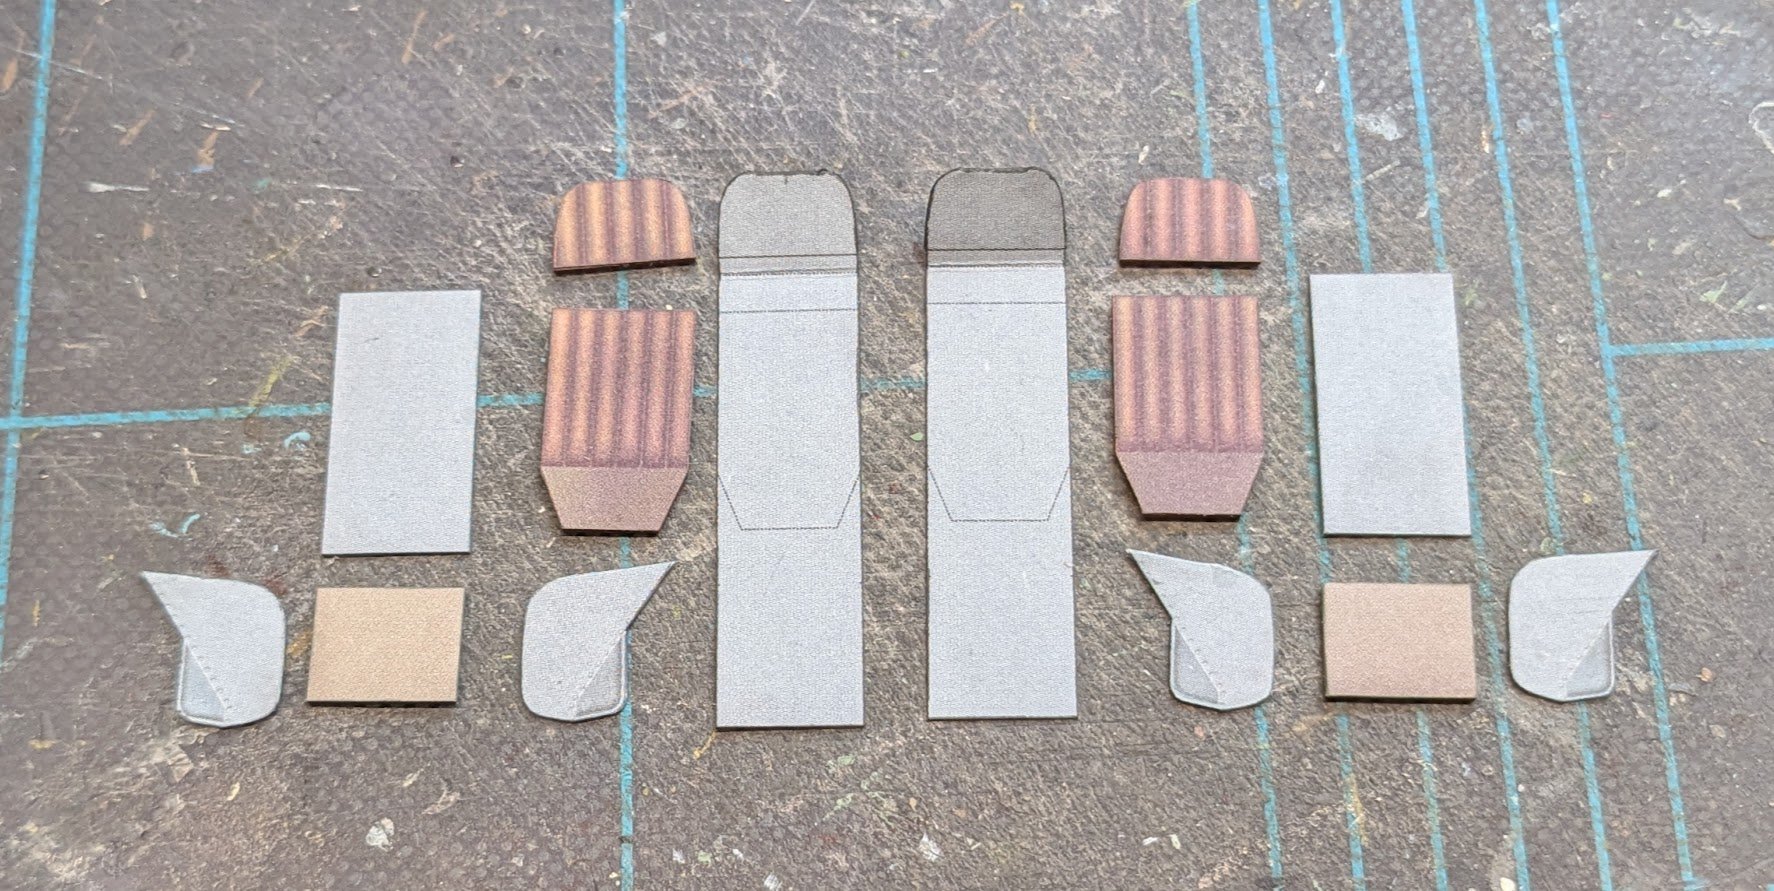
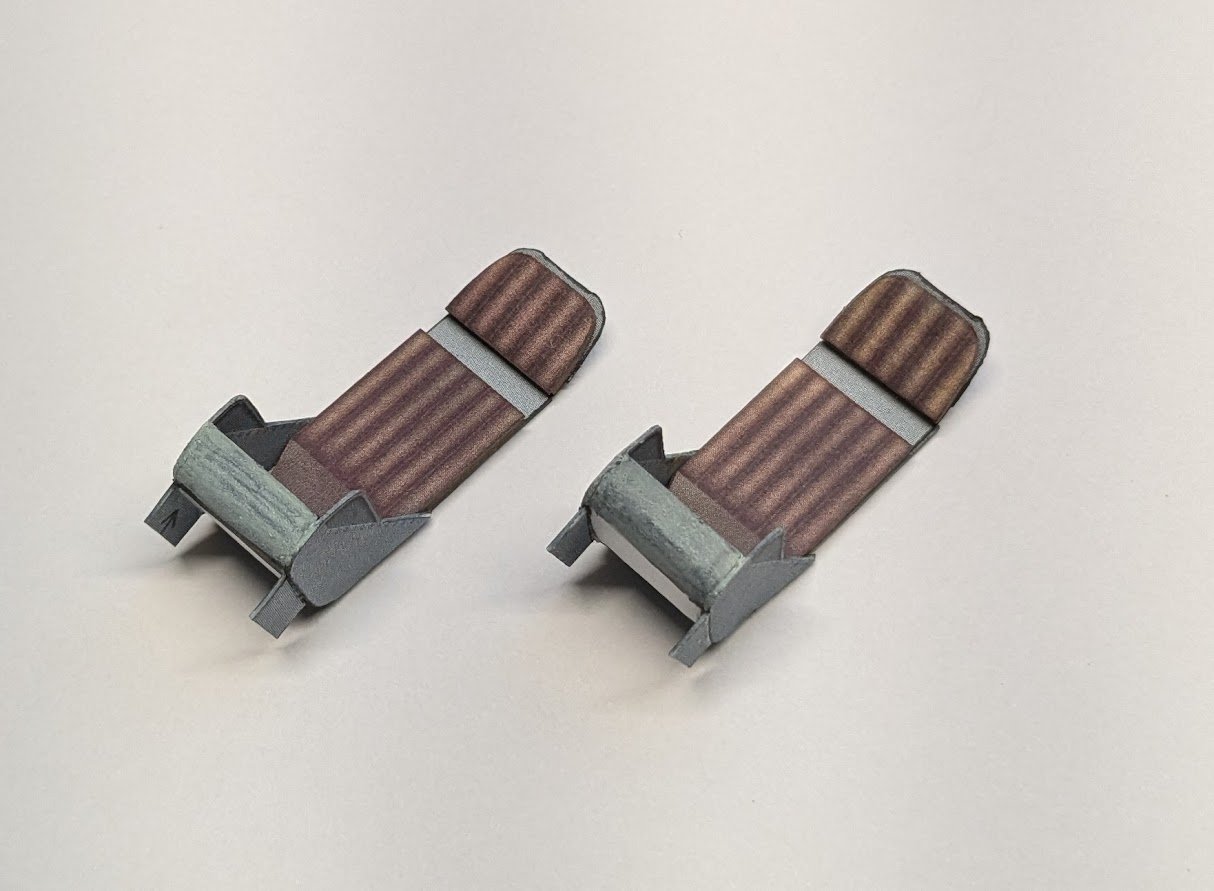
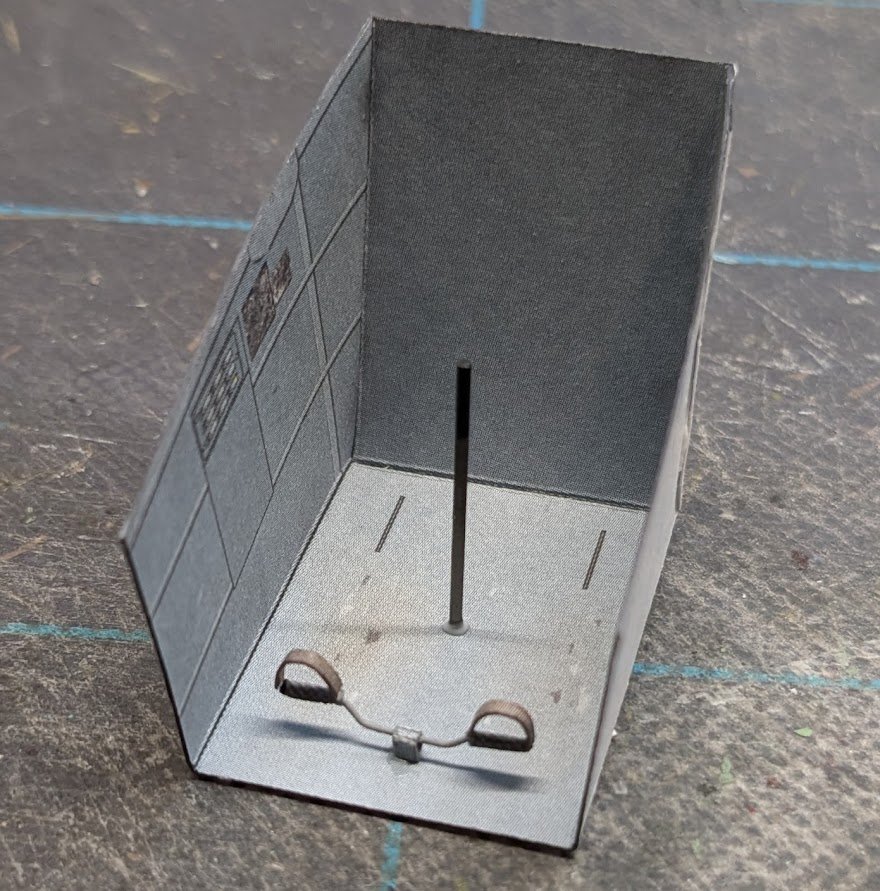
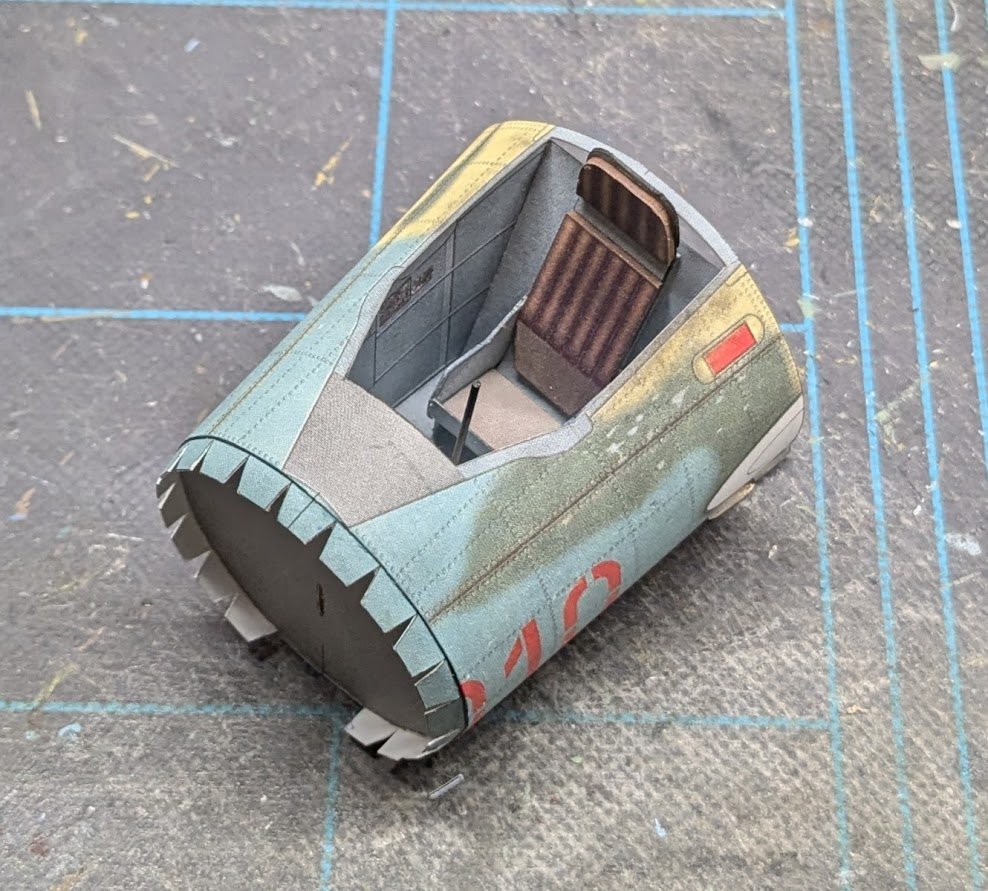
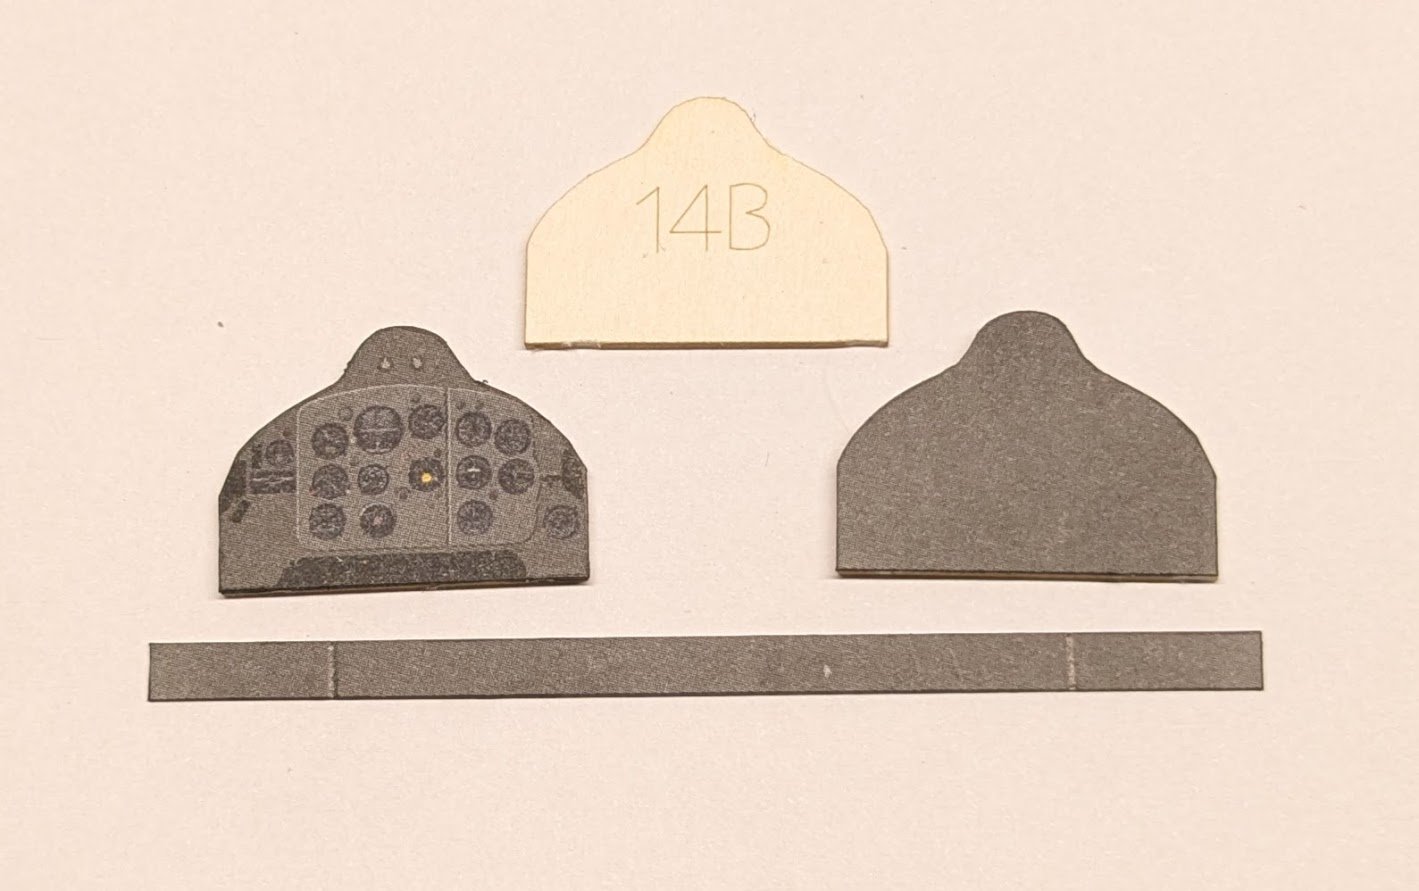
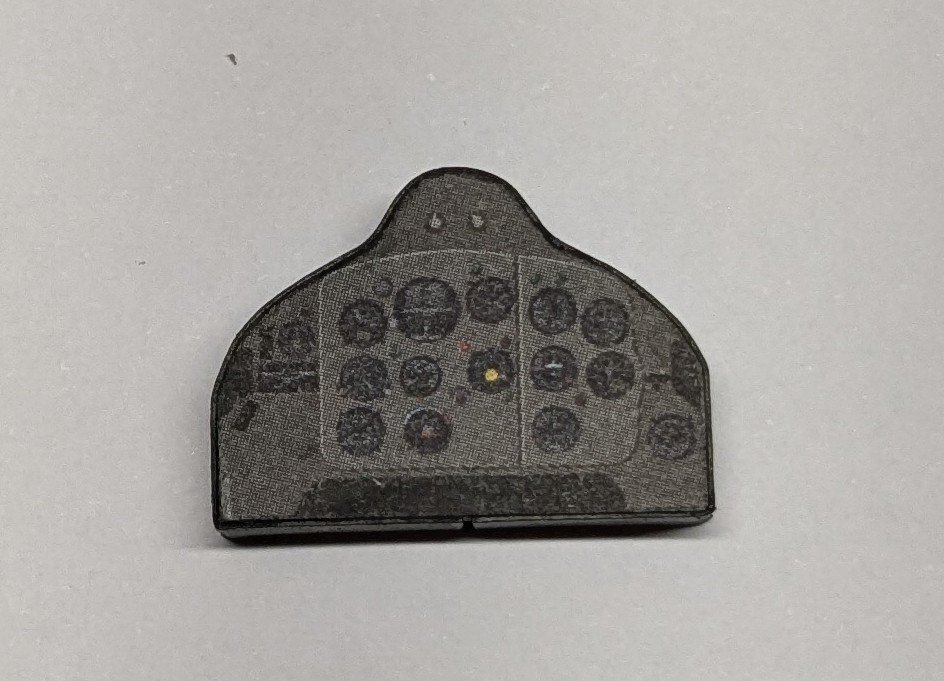
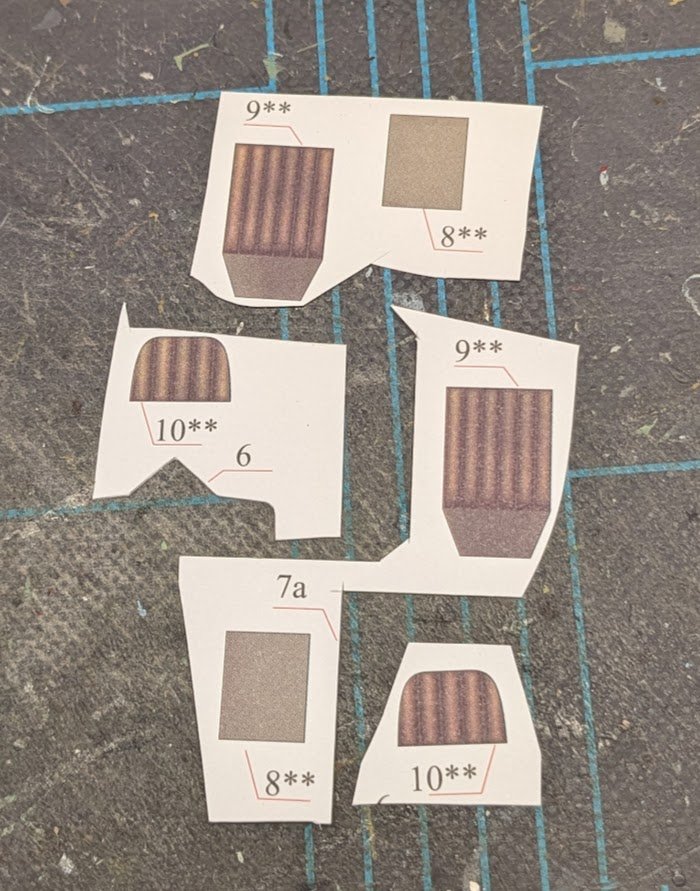
Here are the parts for the two seats. Making the seats is not difficult. Matching the curve of the bottom to the two sides on each seat is a bit challenging, but not overly so. There is no reverse-side printing on the parts, so you will need to add some color to the front of each bucket. You can now see the different cant produced by the two sets of seat mounts -- the seat on the right with the steeper cant is the pilot's seat. The control stick has been added. The kit provides a paper part to be rolled, which is a pain for tiny, narrow tubes, so I replaced it with painted 0.88 mm styrene rod. All we needed to do next was glue the tub into the cockpit section and add the seat. BTW, there are locator marks for the seat on the cockpit floor, but they don't match the width of the seat mounts. They're useful, though, for centering the seat. Next we move to the observer's station, starting with his instrument panel. The panel consists of three pieces of 2 mm laser-cut card to be laminated together and then skinned. The construction is not difficult. And now for some bad news: We had our first hot day in the Upstate today. I had to turn the AC on for the first time this year to cool down my sweltering upstairs man cave (I really dislike summer weather). We also got a cubic yard of topper for the front lawn, so a lot of spring yard work is in the immediate forecast (I really dislike yard work). Hopefully I will still get some modeling time in. That's all for now!
- 66 replies
-
- 14
-

-
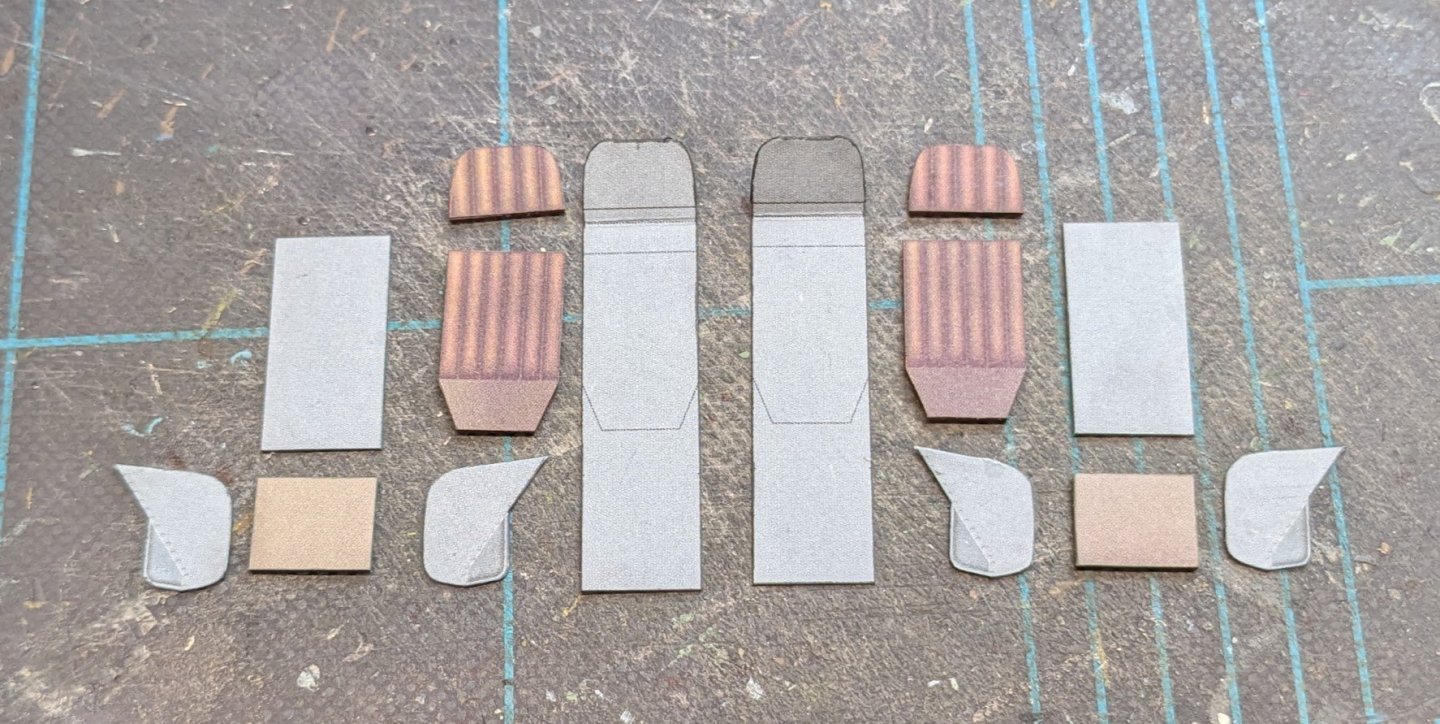
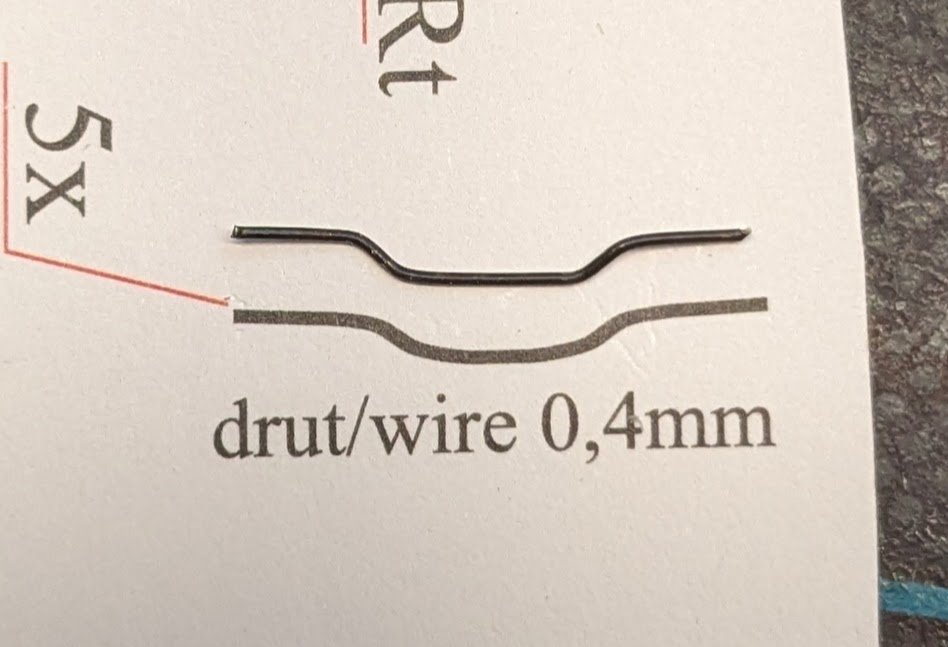
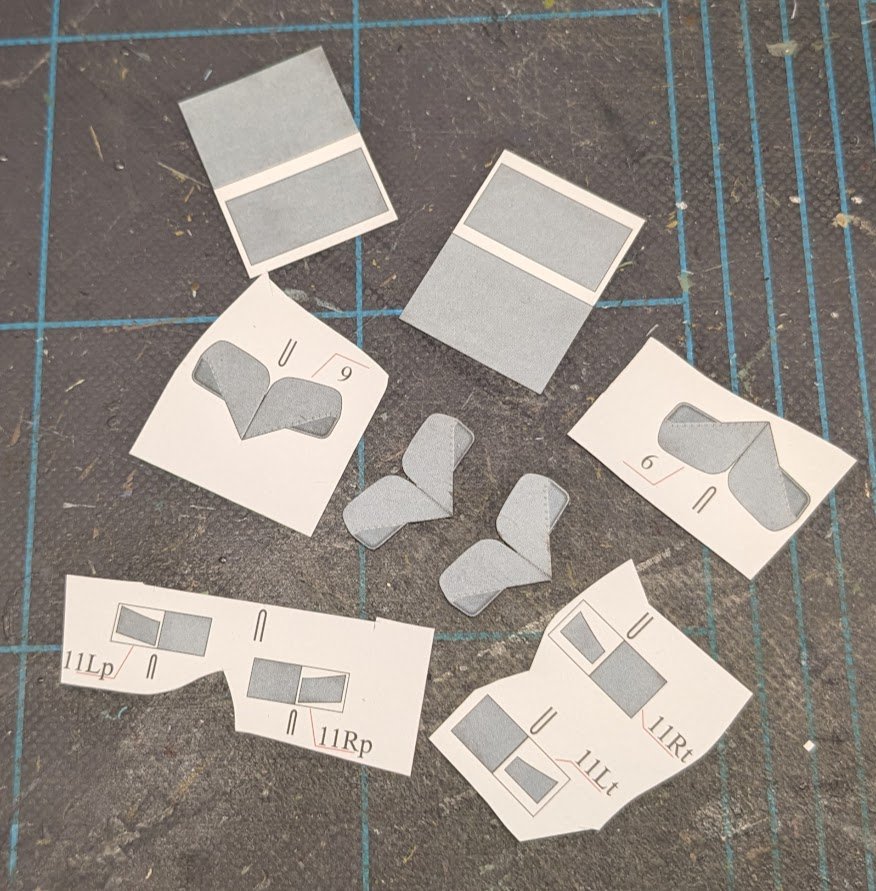
A bit more progress. . . Next we have the rudder bar. There is a template for making the bar from wire. Don't worry about matching the template exactly -- this element will be difficult to see in the finished model. In fact, the instructions even suggest omitting the rudder bar if you don't want to deal with it. Here's the finished rudder bar mounted to the cockpit floor. The bar is fiddly -- there's no magic bullet for coping with the tiny parts. Maybe keep a swear jar handy?🤔 Also, there's no locator mark on the floor, but the bar is supposed to be positioned directly below the instrument panel. Next we will start on the seats, remembering that the pilot's seat doesn't go into the cockpit tub until later. Here's a bunch of seat parts that need to be doubled, i.e., folded and glued to make a 2x-thick part. The instructions say that the two seats are identical, but there is obviously two different sets of parts #11. I suspect the difference is linked to slope of the floor in each tub, but I will need to confirm this once both tubs are ready for seats. There's also a bunch of seat cushions that must be laminated to laser-cut backings. That's it for tonight. Time permitting, I'll get the seats assembled tomorrow.

- 66 replies
-
- 12
-
-

-
Well done, Dave!
-
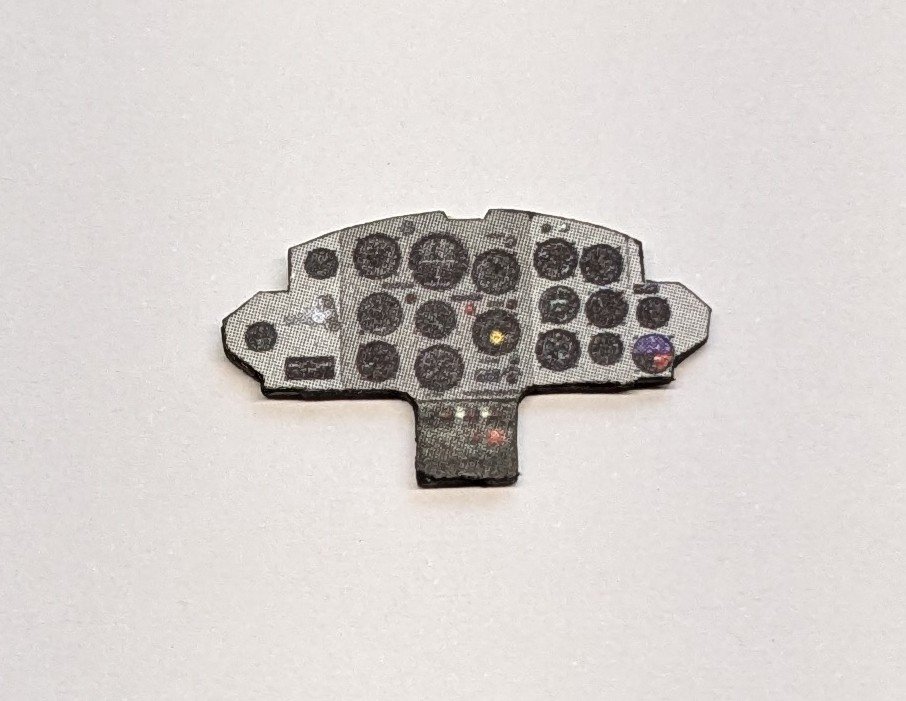
Being an intermediate-level kit, only rudimentary cockpit details are included. Here is the instrument panel laminated to its laser-cut backing and edge colored. No option for glazing is included, but it could be done by using a photocopy of this part. I have depicted glazing in some of my other logs. And here is the panel glued into the cockpit. You might be able to see where I added a center line tic mark on the fuselage skin to help position the panel correctly. The next numbered part is the gun sight. I suggest holding off on that part, because it sits on top of the cockpit dash, which means it might get bumped a lot during the fuselage construction. I have circled this part on the construction diagram to remind myself to add it later. Next we'll work on the bits that go into the cockpit tub.

- 66 replies
-
- 13
-
-
That finish is looking very nice indeed, and it has a kind of old-timey look to it that is appropriate for the subject.
-
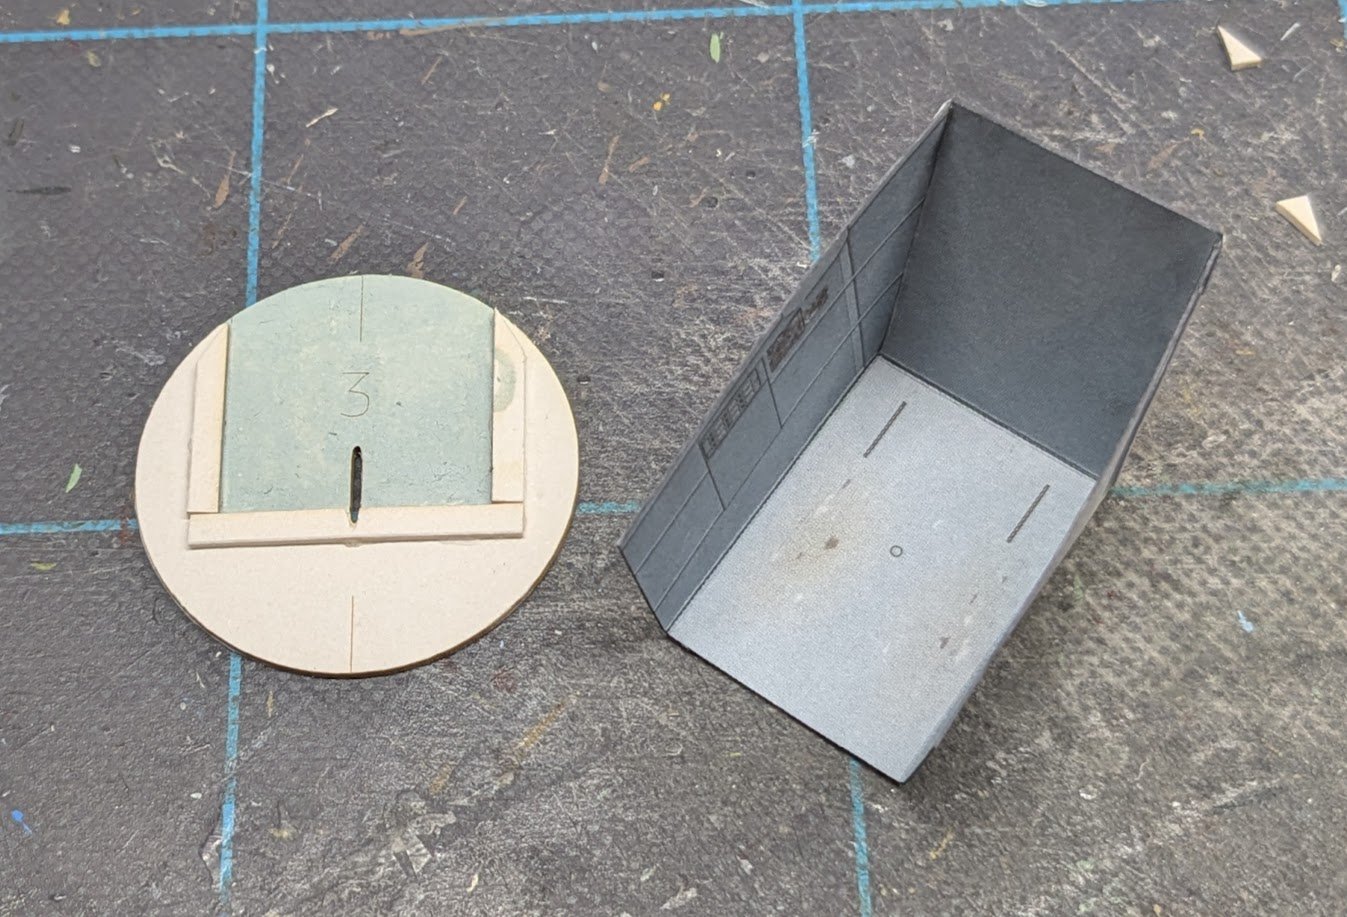
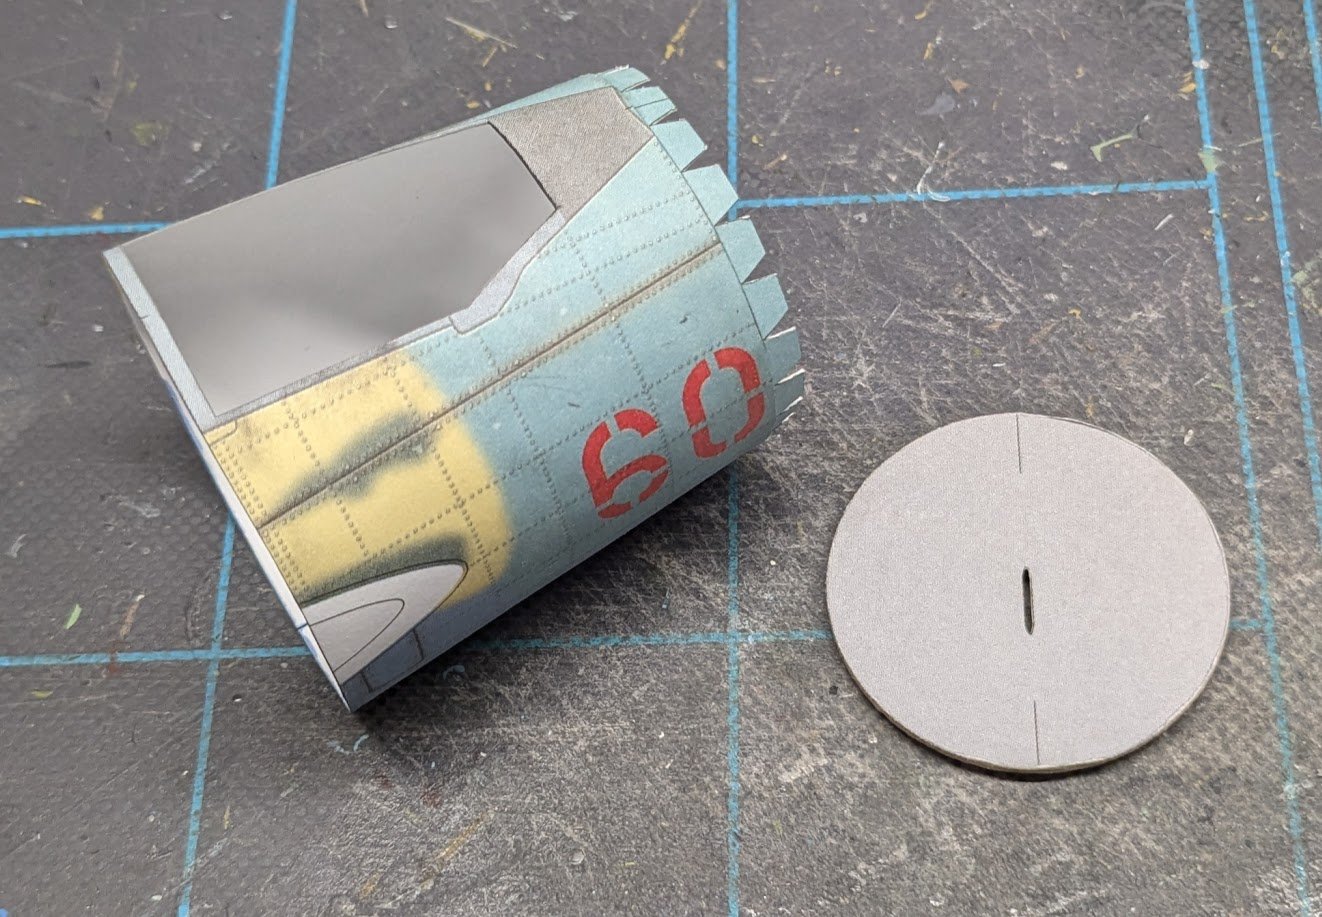
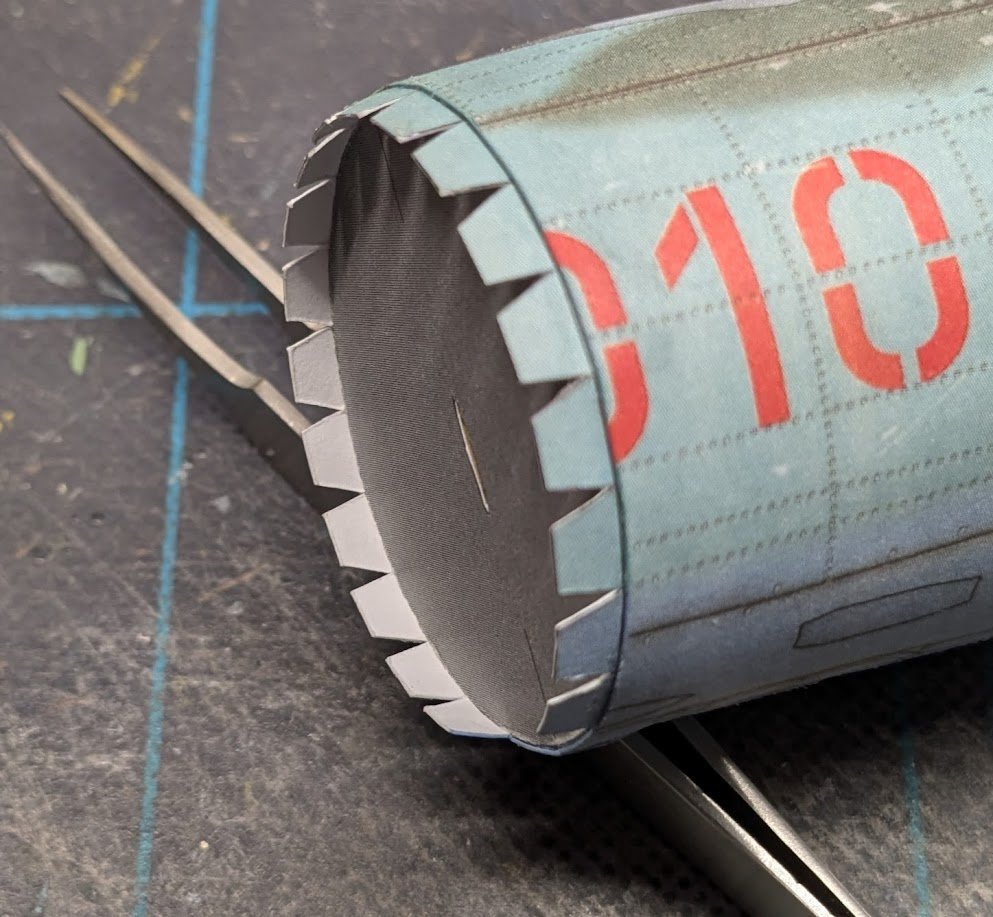
One thing I have learned over two decades of building card models is that it pays to study and re-study the diagrams. The part I mentioned in post #12 is not a false air inlet -- it's the interior nose wheel well color. Also, I noticed that the pilot's seat protrudes above the level of the fuselage, so it can't be glued into the cockpit tub until after the tub is in the fuselage. Here's a couple of simple modifications I made to the bulkhead before proceeding. First, I don't know how much of that bulkhead will be visible on the finished model, so to be safe I added some interior color to it. It's not an exact match for the cockpit tub, but at least it's not pulp board colored. Second, I added some scrap card along the lines that indicate where the tub is to be glued. This will make neater and stronger joints between the tub and bulkhead. Here's the fuselage section glued into a ring. Try to get the ring as round as possible -- it will make fitting the bulkhead easier, and the ring will be more difficult to shape once the bulkhead is in. A couple of tips on the bulkhead. Notice that the fuselage section isn't a true cylinder -- it's a conic section. Beveling the edge of the bulkhead will make it easier to fit and enable it to make better contact with the fuselage skin. Only a slight bevel is needed, so don't go overboard. If you want, you can soak some thin CA into the bulkhead to stiffen it. With the joiner strip in place, it can be difficult to align the bulkhead properly, unless you were careful in aligning the joiner strip to the fuselage piece first. If you were careful, then gluing the bulkhead flush with the ends of the darts cut into the joiner strip will also make the bulkhead flush with the cylinder opening. You can see here that the dart tips just touch both the fuselage skin and the interior bulkhead. Tip: With a large bulkhead like this one and any type of fast-setting glue (such as canopy glue), you may not have time to adjust the part if you apply glue to the entire rim of the bulkhead first and then try to position it within the cylinder (or vice versa). What I do in such instances is position the dry bulkhead first, then run a bead of glue around the interior seam -- like caulking a tub. That's it for this session!
- 66 replies
-
- 15
-
-
Refer back to the PM I sent last Sunday. BTW, that was less than two weeks' shipping time, right? The people at WAK don't mess around!
-
Vanguard's cutter kits....how do they differ?
ccoyle replied to bigcreekdad's topic in Wood ship model kits
When you say "JoTiKa version" versus "Vanguard Models version", you're really comparing an early Chris Watton design with a much more recent Chris Watton design. -
Vanguard's cutter kits....how do they differ?
ccoyle replied to bigcreekdad's topic in Wood ship model kits
Which cutters are you referring to, the ships' boats or the larger kits such as Alert and Trial? -
Congratulations, Bill! That's a lovely model.
-
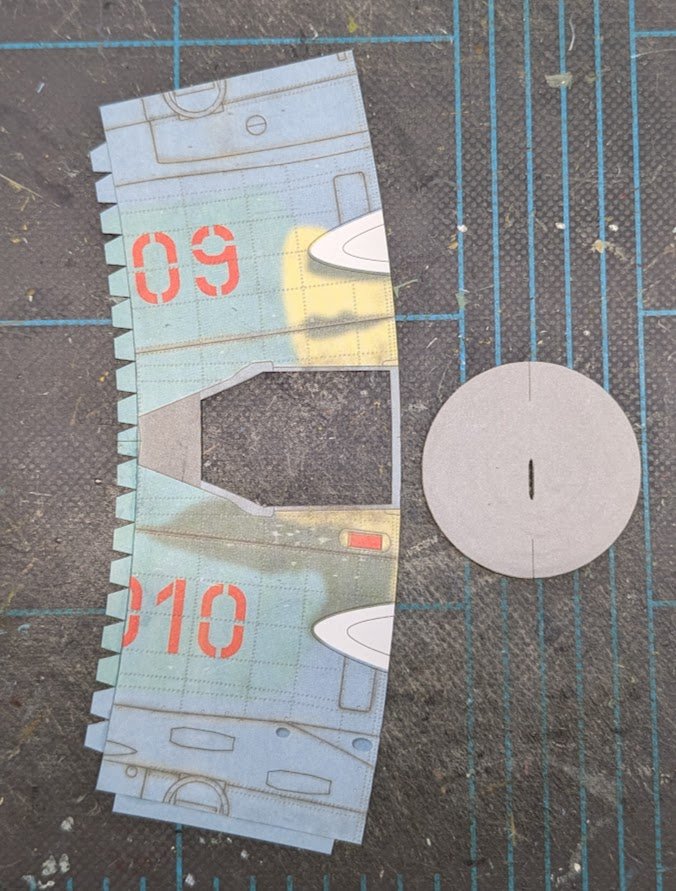
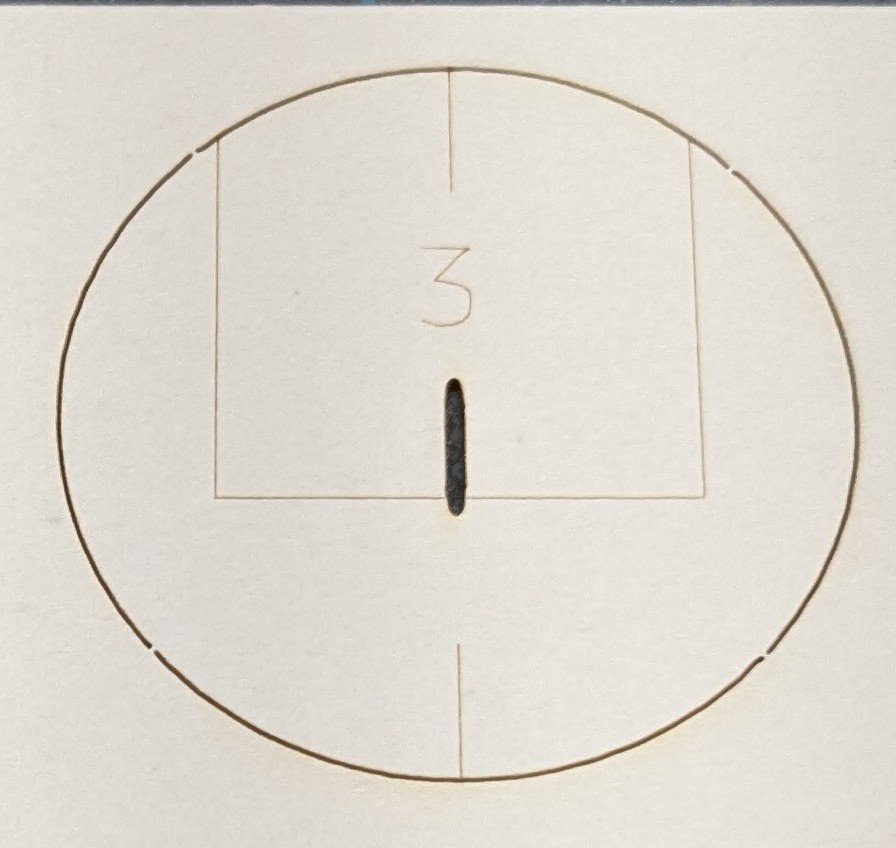
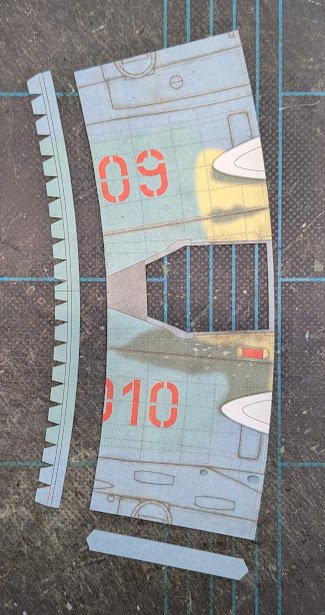
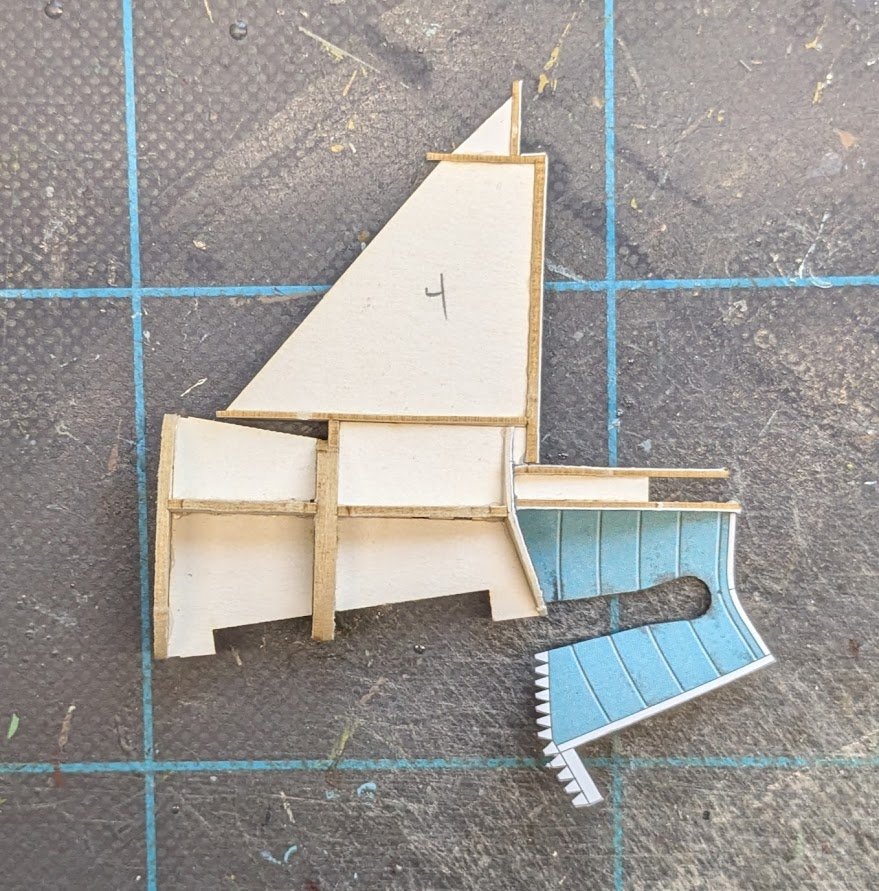
This is all I had time for last night. In this progression, we see first the fuselage parts with the joiner strip as it should be used for the no-wheel-wells option, the parts with the joiner trimmed for wheel wells (nose wheel, in this case), and the prepped fuselage section with its bulkhead, which consists of a laser-cut frame and printed part laminated together. Some thought had to be given to the bulkhead. As I mentioned earlier, the frames are laser-engraved, as seen here. It took me awhile to realize that the printed part is not the interior cabin color, but rather a kind of false air inlet that will be seen from the front of the finished model. Therefore, the part needs to be glued to the back of the printed bulkhead, making sure the two oval-shaped holes align properly -- they are not centered. That's it for now!


- 66 replies
-
- 13
-
-
Tell you what, I will go for gear down and add the wheel wells, but will point out how to do the simpler versions. Wheels are not too hard to make, just a little labor-intensive -- but that comes later!
-
The option is to do no wheel wells -- gear up would require some modification, but I could probably do that without too much difficulty. I can look into it. EDIT: Gear-up is definitely doable. Doing so would require making a stand, but that would not be difficult.
-
Welcome aboard!
-
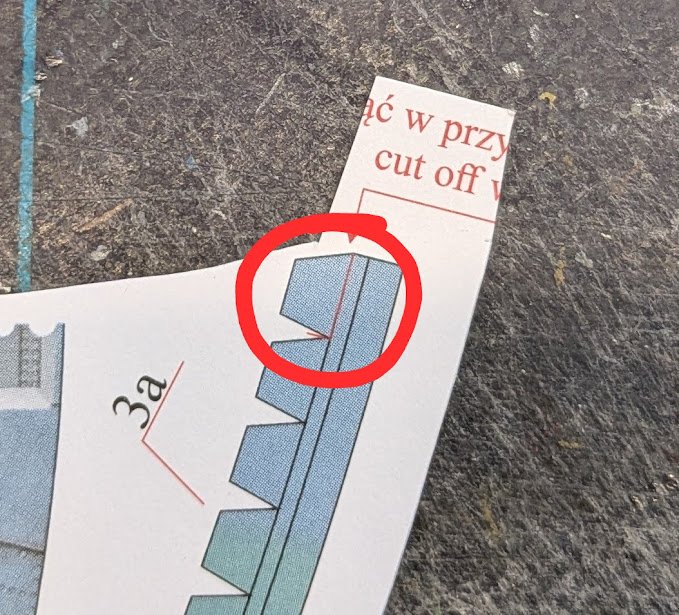
The instructions call for the first section of fuselage to be be built next. Here is the section and its joiner strips. But before we can move on, we need @CDW and @Richard44 to make a decision: wheel wells or no wheel wells? If the former, then we will need to remove part of the joiner strip before gluing it to the fuselage piece, as indicated here:
- 66 replies
-
- 11
-
-
A lot of 1st generation jet fighters had that stubby "pilot strapped to the back of a jet engine" look. On the plus side, the finished model should not take up too much precious display space.
-
The Mossy Shipyard by Bryan Woods - 1:1
ccoyle replied to Bryan Woods's topic in Non-ship/categorised builds
Looks to me like with a minimum of modification, your shipyard could double as a permanent deer stand. 🤔 -
This is totally on Model Shipways, not on Midwest, since MS now does the manufacturing. The Midwest-version smack was my first wooden ship model, and I don't recall any metal cleats in the kit. Off-the-shelf fittings are one of the unfortunate cost-cutting compromises found in kits. The correct term is Britannia metal (also called white metal), which is a specific type of pewter, but yeah, it is still awful to work with. It came into use as a placement for lead fittings, which would oxidize over time, causing a phenomenon known as "lead disease" (not to be confused with lead poisoning). Keep up the good work!
- 34 replies
-
- 4
-
-
- muscongus bay lobster smack
- Model Shipways
- (and 1 more)
-
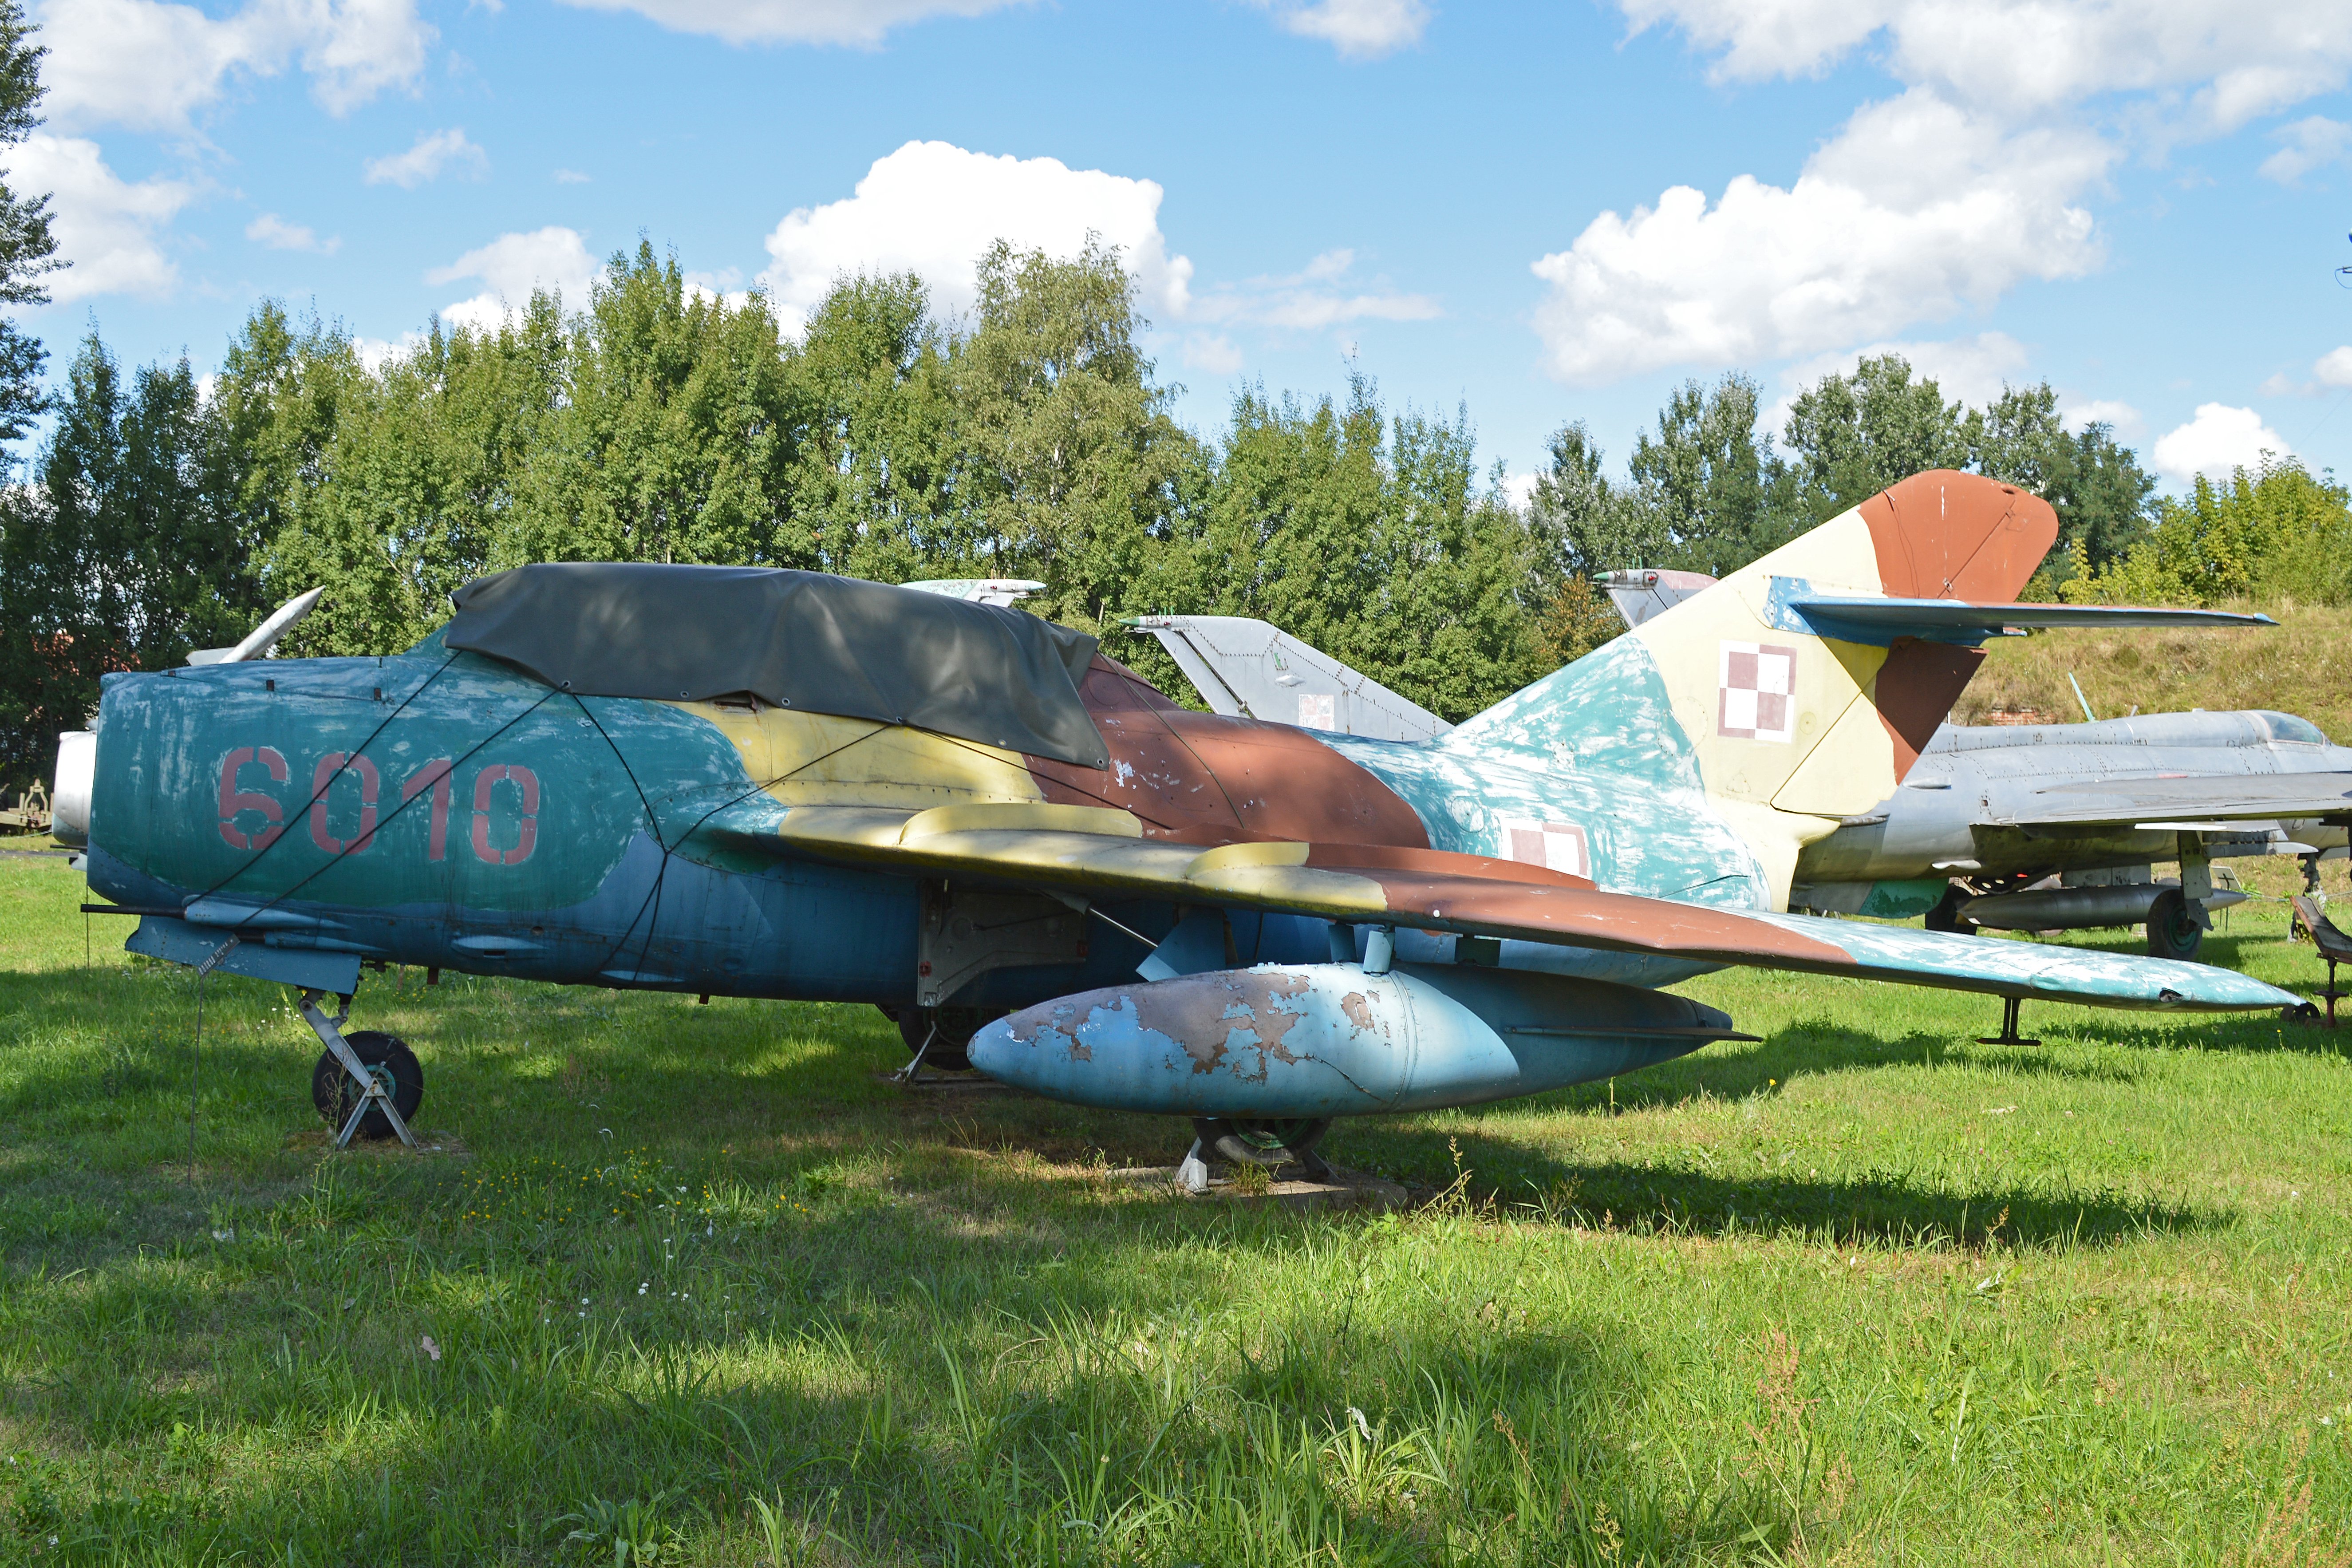
Found this image at Wikimedia. This is the actual aircraft depicted by the kit. It is on display at the Katyn Museum.

- 66 replies
-
- 15
-
-
Well deserved!
-
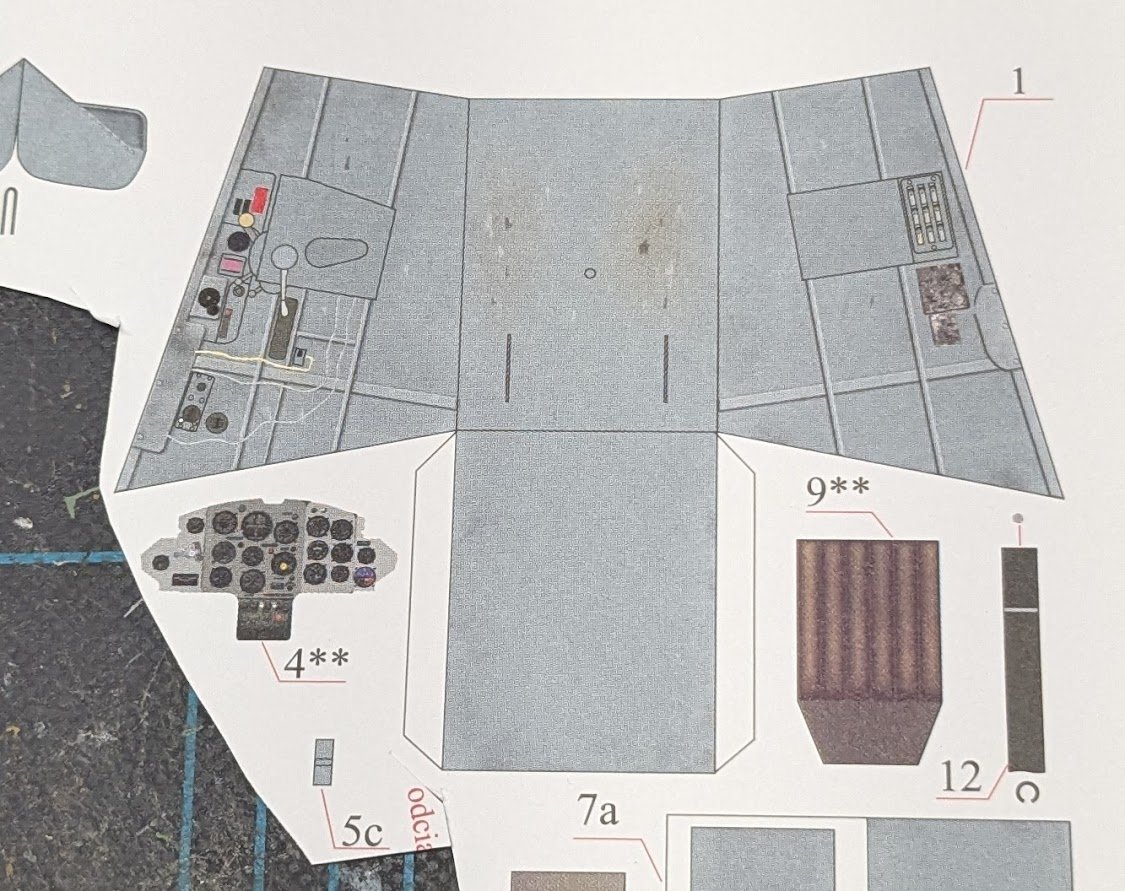
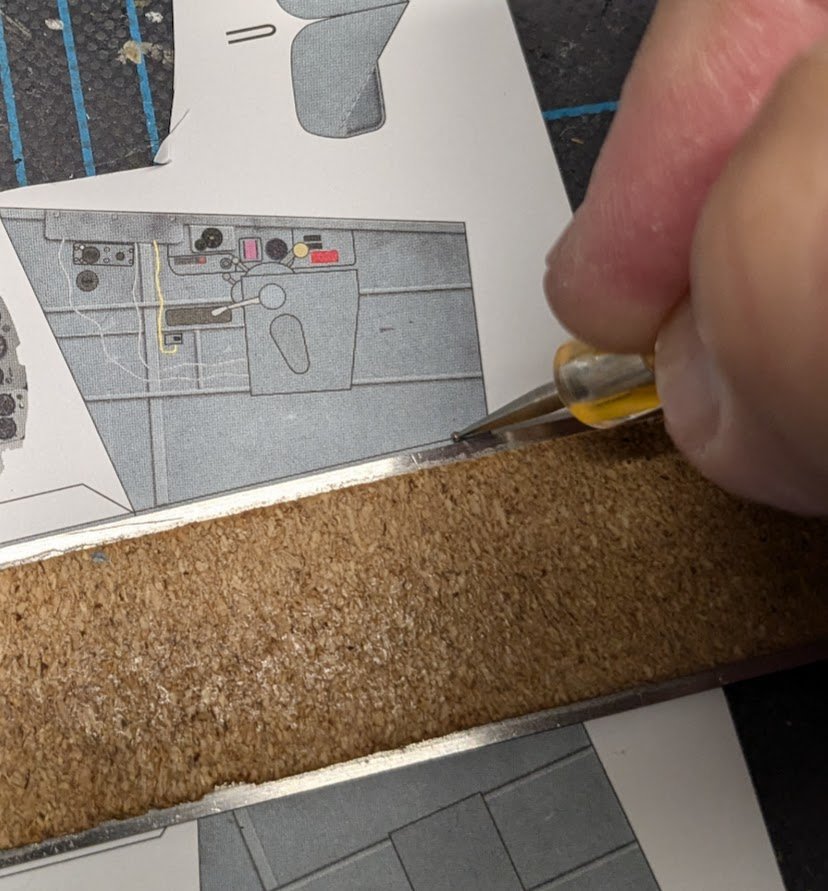
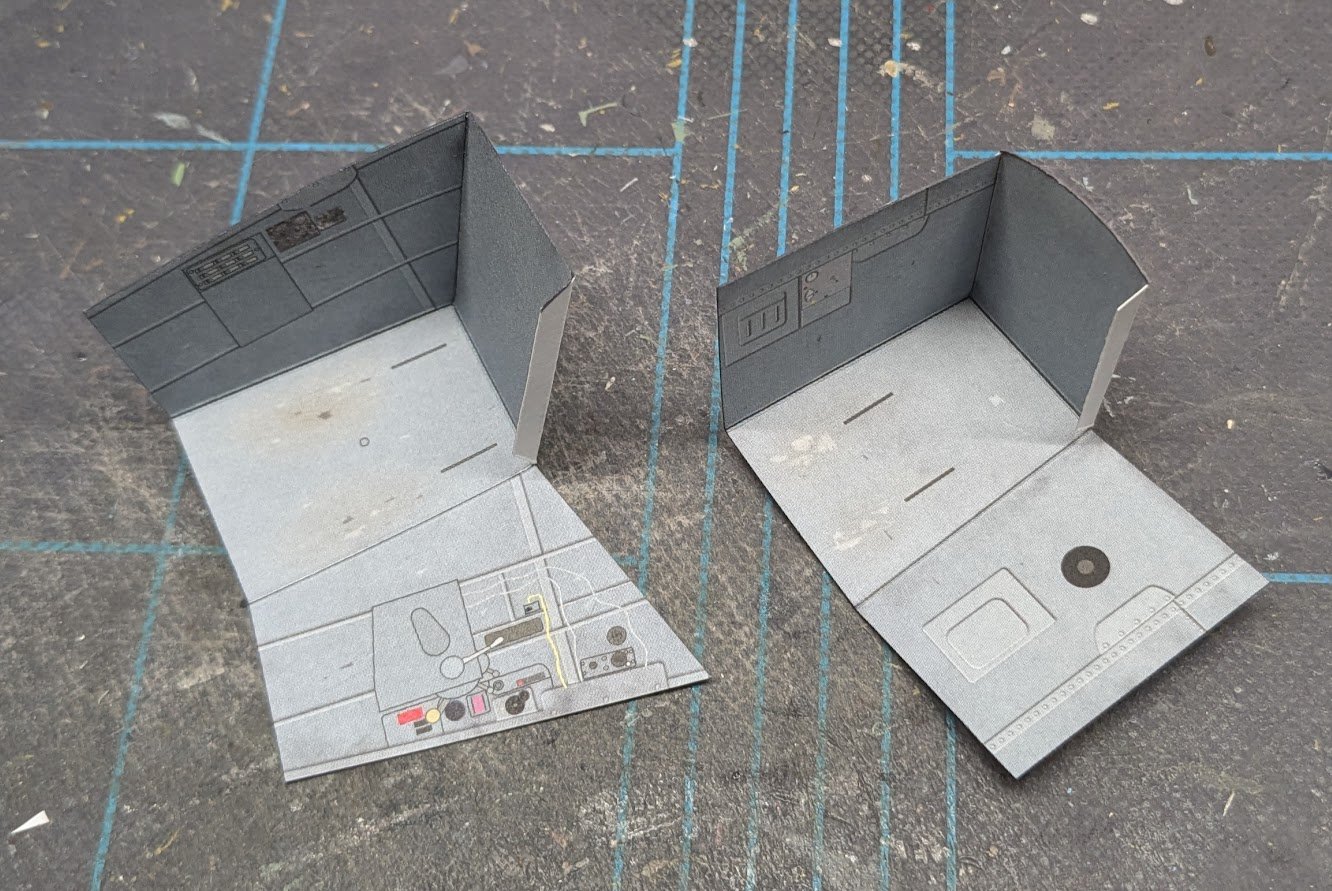
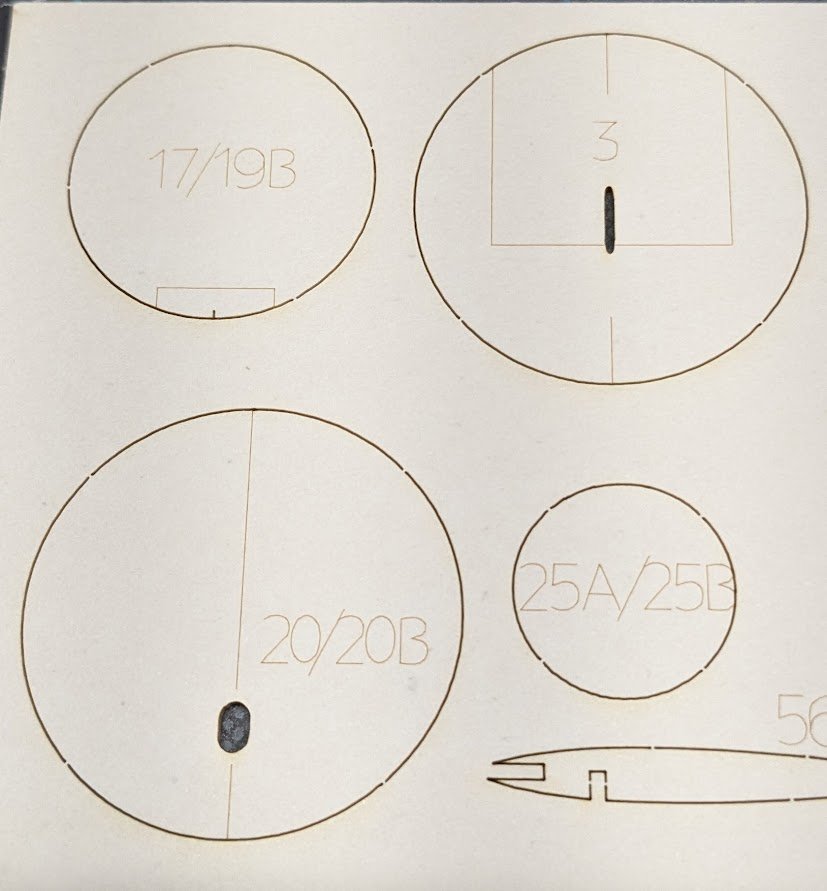
Part 1: Cockpit Assembly I started by separating the booklet pages and giving the parts pages my usual coat of matte clear varnish spray (some modelers have suggested that gloss varnish soaks into the paper better, and the shine can be knocked down later with a top coat of matte). To make the pages easier to handle, I separated the cockpit parts from the fuselage parts. Fold lines need to be scored in advance. For this I use a straight edge and a small-diameter manicurist's spotting tool. A scribing tool could also be used for this task, but it makes a sharper crease, which makes the ink more prone to cracking when a part is folded. The part is then cut out and folded. This task is repeated for the observer's tub. I wrote the part numbers for the two tubs (sounds like a missing novel in the LOTR series -- "Book 2A: The Two Tubs, in which the fellowship finally bathe after weeks on the road without showering") in pencil on the reverse side just to help distinguish which is which. Afterward, I glued one side of each tub. Leaving the other side open for now will make it easier to add internal details, such as the seats. A quick note on edge coloring: At this point, I'm not sure how much, if any, of these edges will be visible later. To be safe, I have colored the cut edges with a gray Crayola marker (hi-tech, I know). At some point, each builder will need to decide on an edge-coloring technique to use and start thinking about matching colors in the kit. That's it for this evening, but looking ahead at the build sequence I saw that laser-cut parts will soon be needed (if you are using them), and I was going to conclude my workbench session by numbering the parts with a pencil. But I was pleased to learn that each part already has its number laser-engraved, eliminating the need to manually add one -- a very nice touch! See you next time!

- 66 replies
-
- 19
-
-
Here's the link to the SBLim build:
-
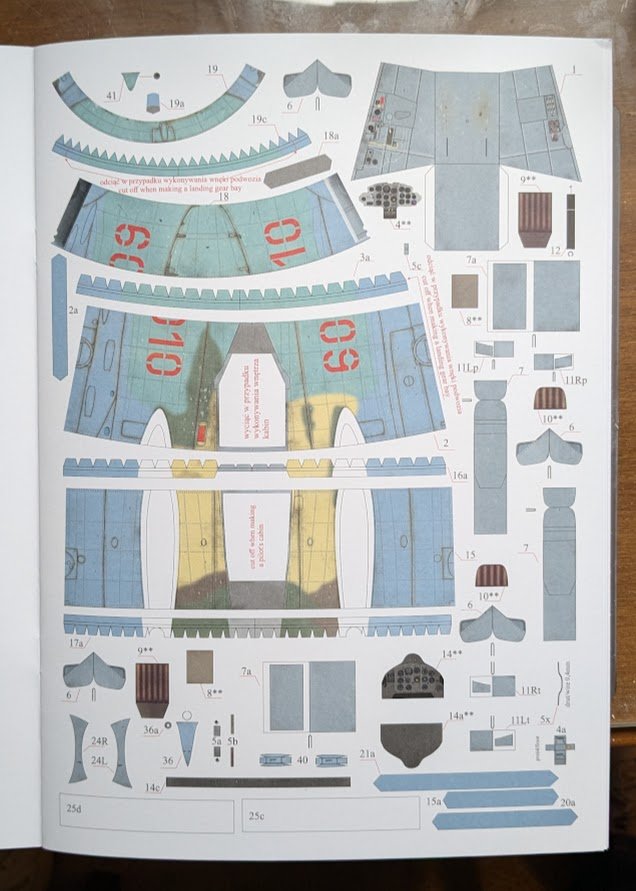
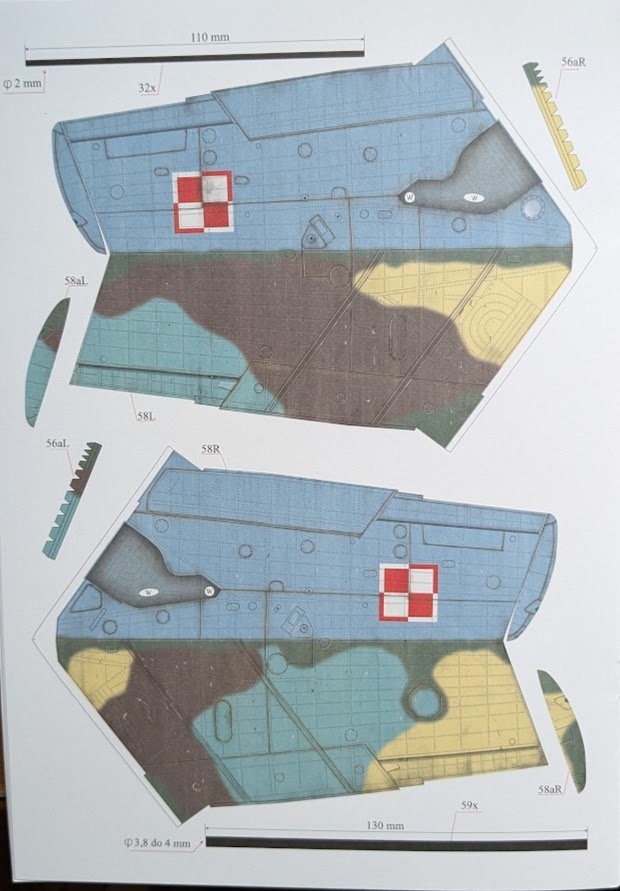
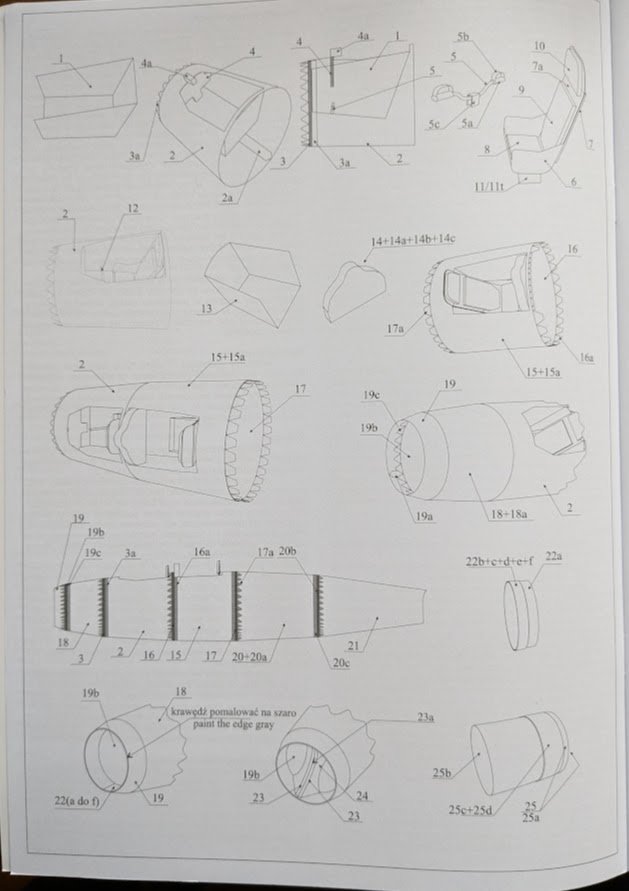
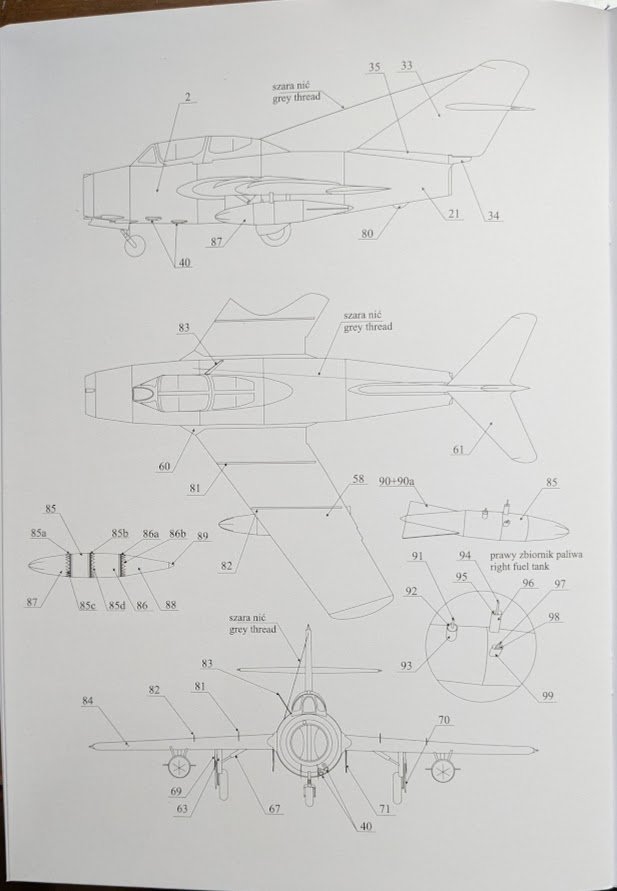
Introduction Welcome to yet another build log for a non-wooden, non-ship model! This build is inspired by a discussion that was had in my A6M5a build log. Fellow MSW member Craig (CDW) shared that his only attempt at card modeling was "a disaster," in his words, so I suggested he take a look at WAK's skill level 2 kits and offered to build one along with him, whichever one he wanted. He took me up on the offer and chose the SBLim-2A, so that's how the subject of the build was selected. Richard (Richard44) has also expressed an interest in building this kit (click HERE to see Richard's build) -- let's see if we can get any others on board, maybe? BTW, except for a very simple, free, downloadable, flyable MiG-15 glider I built many years ago, this will be only the second jet I have ever built in card. 😮 The Subject The SBLim-2A is a Polish, license built, two-seat reconnaissance variant of the MiG-15, built by WSK-Mielic in the 1950s. It's actually a conversion of a conversion. Originally, 227 Lim-1 (Licencyjny myśliwiec - licensed fighter aircraft) were built; some of these were later converted to SBLim-1 two-seat trainers (equivalent to the MiG-15 UTI), and some of those were later converted to the SBLim-2A. Confusing, right? The Kit The kit, representing an aircraft wearing the 1993 livery of the 7th Naval Special Aviation Regiment, is designed by Lech Kołodziejski, a respected designer who has published his own designs under the brand name CardPlane. I have built five of Lech's CardPlane kits (see the finished non-ship models section). Lech's CardPlane offerings were all models of either prototype aircraft or planes that entered into very limited service. His designs published by WAK have been more widely recognizable aircraft. Some of his recent efforts, including this one, have been collaborations with graphic artist Marcin Dworzecki, whose work is second to none in the hobby. As you can see, I purchased the available molded canopy and laser-cut frames. A quick pitch here for WAK. They have become one of my favorite publishers and a first-choice vendor. They offer a large selection of kits and always process orders promptly, package them securely, and offer very reasonable shipping rates compared to other vendors. If you shop there, tell them I sent you! The kit is designed with amateur builders in mind, and it shows. In this next image you can see, for instance, that only very rudimentary cockpit elements are included. Stuff on the side walls is printed rather than being separate parts. There are likewise no separate control surfaces nor landing gear bays. (EDIT: Upon further inspection, I discovered that optional wheel well parts are included.) Lech draws pretty easy to follow diagrams. Horrible white balance in this shot -- sorry! There's a lovely three-view. Finally, as a huge bonus, but not shown here, the kit includes instructions in English. The Purpose and Guiding Philosophy of This Build We all know that when it comes to beginners and wooden ship models, there is such a thing as "too much model." This is certainly true for card models as well. If you have never built a card model before and decide to start with Halinski's Bf-110G-4/R8, you will fail miserably (heck, even I'm not ready for that one). The WAK Skill Level 2 kits are a good compromise between detail and ease of construction. At least I hope that will prove to be the case, because I haven't built one yet -- but I trust Lech. I have titled this as a semi-tutorial, because it is not my intention here to describe every necessary tool and basic technique for building a card model; if you need that kind of help, you can find it in our Torpedoboat V-108 tutorial. So I will not, for example, demonstrate how to fold a part or roll a tube, but I will try to include as much detail as is necessary to get a novice builder through this project. And speaking of 'novice,' I will also try to make this build as much as possible an "out-of-box" project -- except there is no box, of course. So, join us on this adventure, won't you? And if you're feeling particularly bold, get the kit from WAK and jump in! Come over to the Dark Side --er, I mean, the "wonderful world of card models"! Cheers!

- 66 replies
-
- 18
-
-
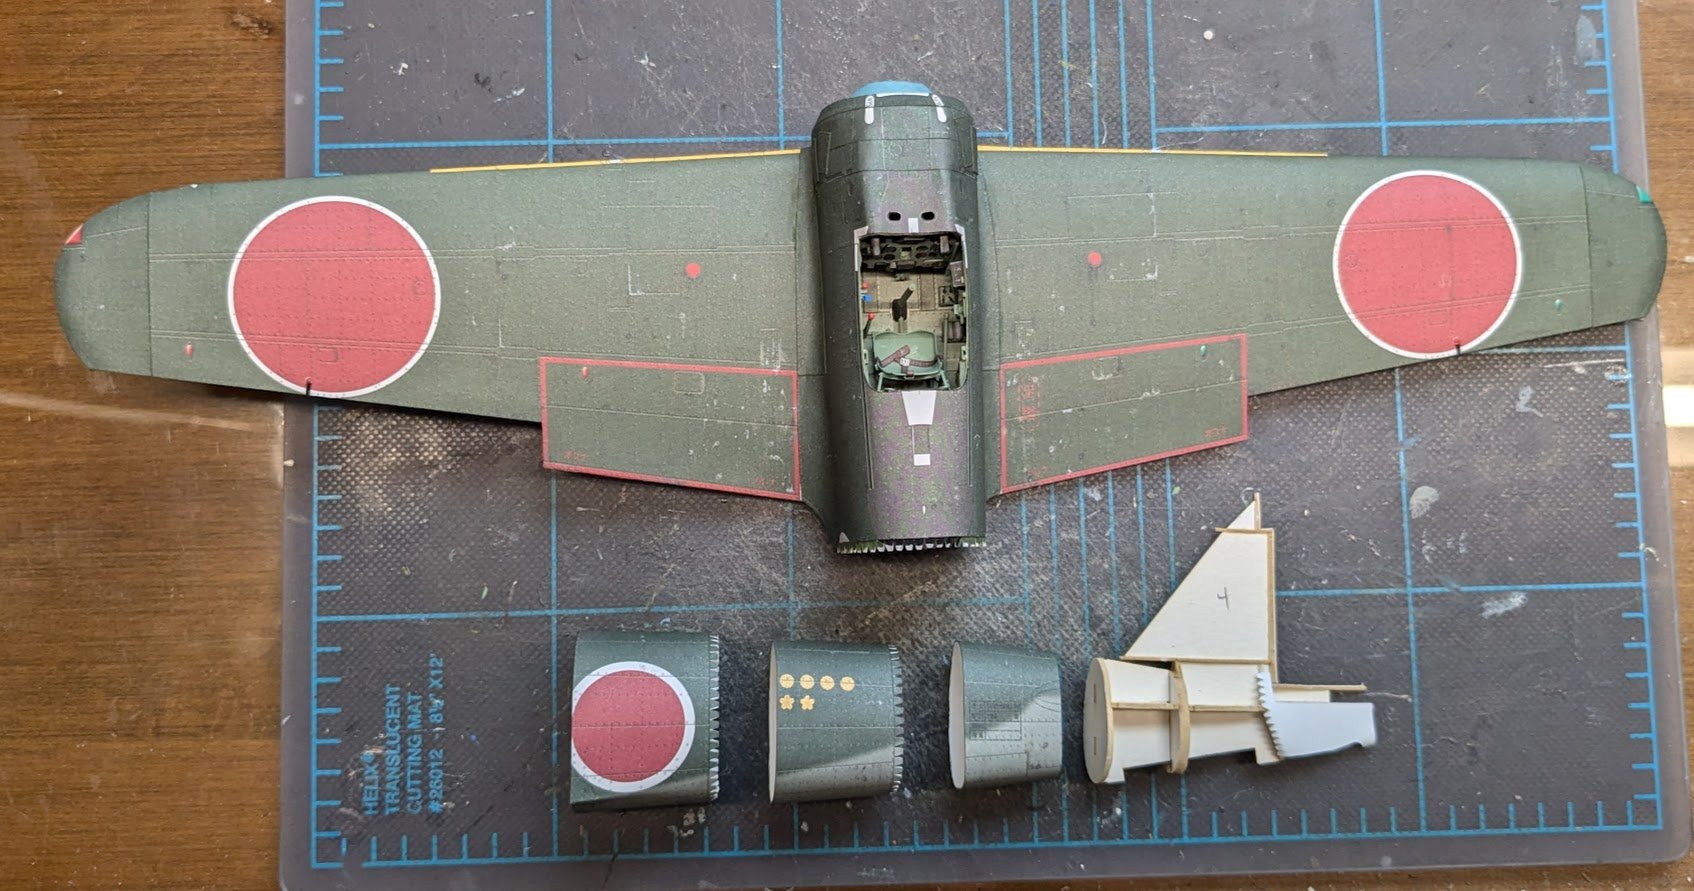
The usual robust framing in a Halinski kit, this time for the aft fuselage. The tail wheel well includes a piece with the interior color. And now for a bit of news: This build will be going on a temporary hiatus. I know I already have another kit on hiatus for this build, so I guess that makes this a hiatus²? 🤔 Anyways, I will be building WAK's SBLim-2A, which shouldn't take too long to build (hopefully). A build log will be created for that shortly. Cheers!

- 112 replies
-
- 20
-