HOLIDAY DONATION DRIVE - SUPPORT MSW - DO YOUR PART TO KEEP THIS GREAT FORUM GOING! (Only 24 donations so far out of 49,000 members - C'mon guys!)
×


toms10
-
Posts
929 -
Joined
-
Last visited
Content Type
Profiles
Forums
Gallery
Events
Everything posted by toms10
-
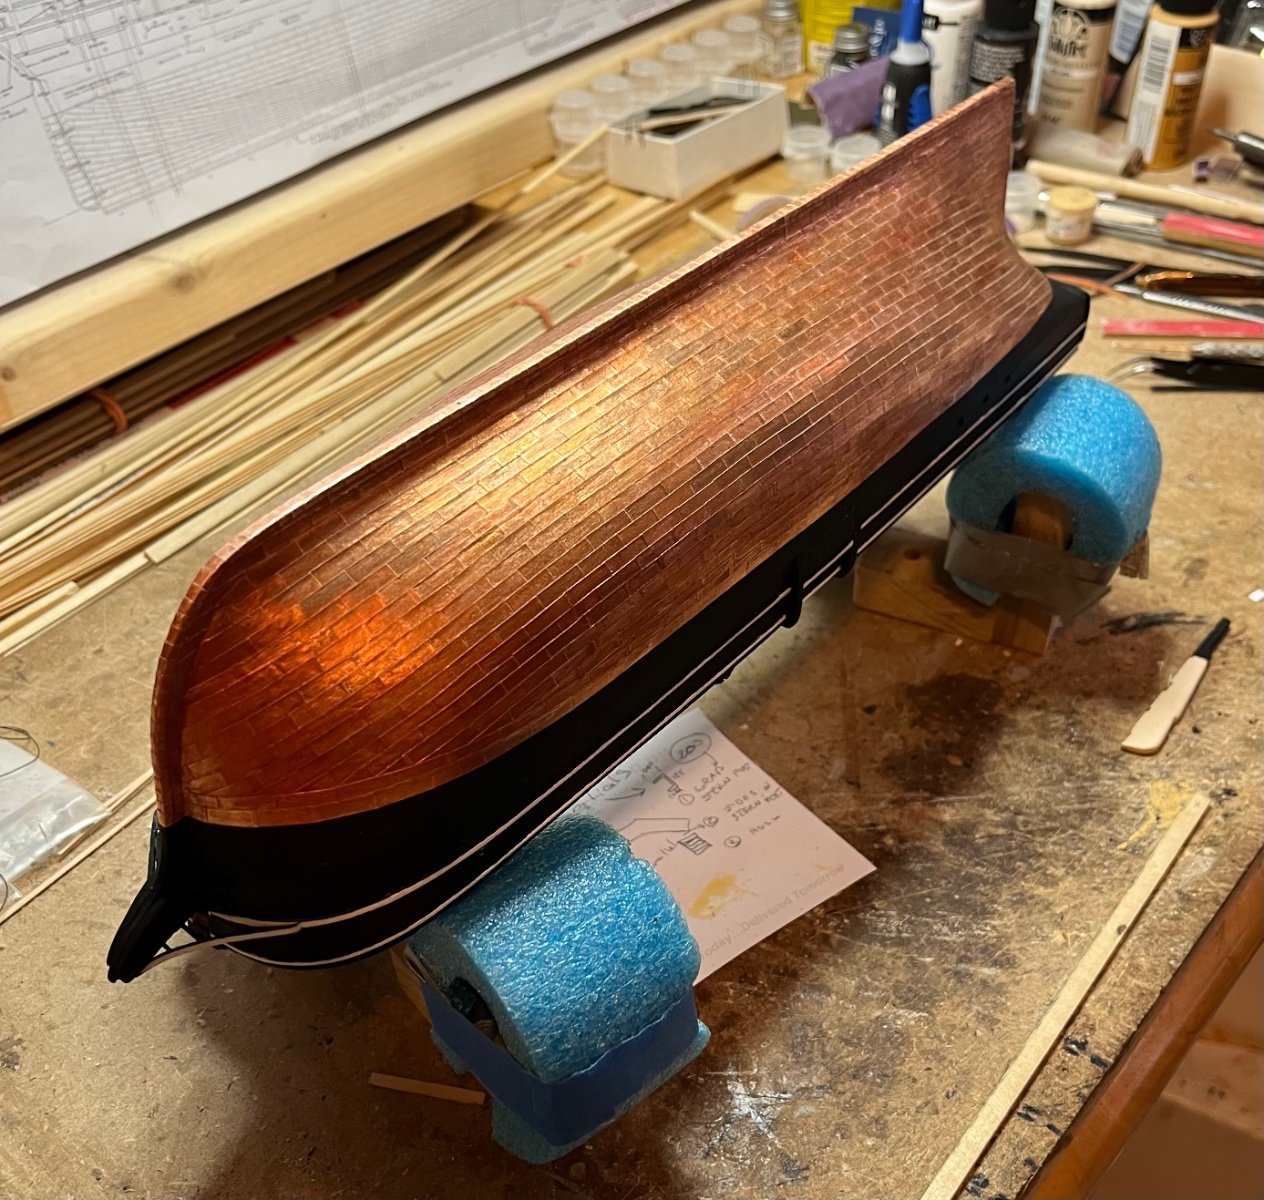
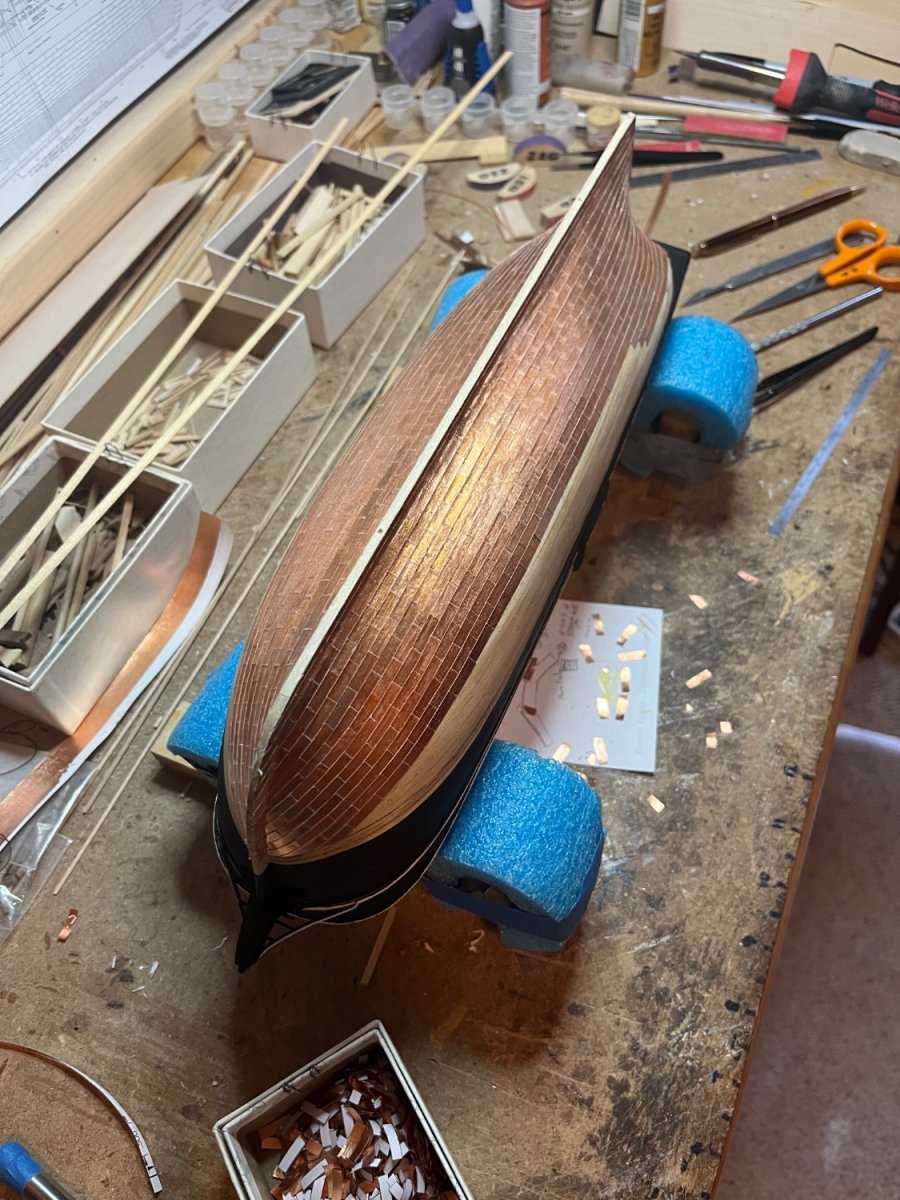
 Finished coppering the hull. Just need to do the rudder which won’t take long. Make some hinges and assemble. Well, at least it sounds easy! 😜 I also need to assemble the cradle pieces I made earlier so I can mount it to the hull and the work on the model right side up for a change. Tom
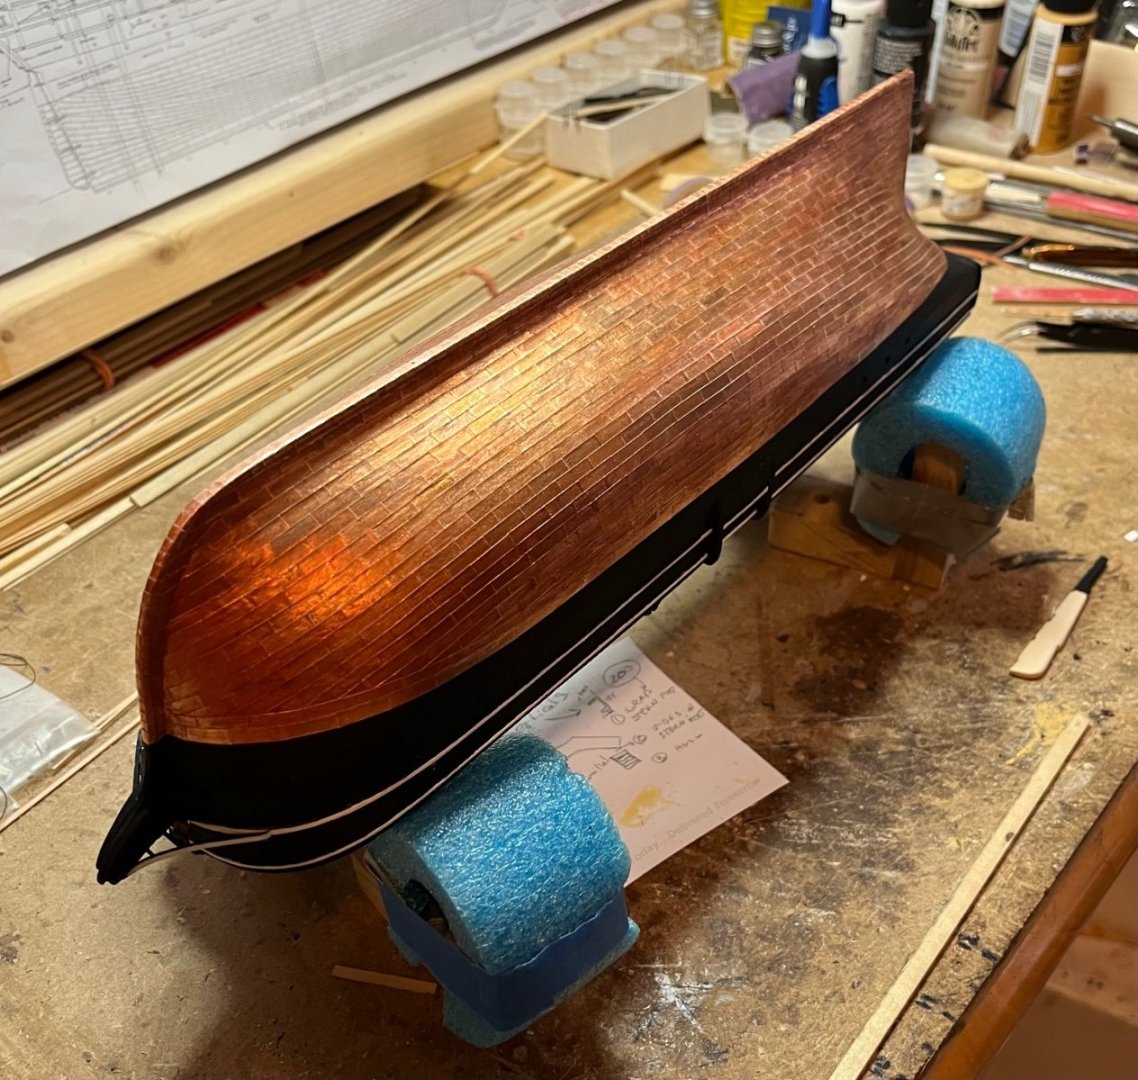
- 200 replies
-
- 10
-

-

-
- Whaling Bark
- Charles W Morgan
- (and 1 more)
-
Hi Ron I like the new deck color. Sounds like a ton of work but it will be worth it in the end, especially if it makes you happy. If you are not happy with something that will become your point focus whenever you look at the model. Us OCD people need to stick together. 😂 Tom
- 542 replies
-
- 1
-
-
- Sphinx
- Vanguard Models
- (and 3 more)
-
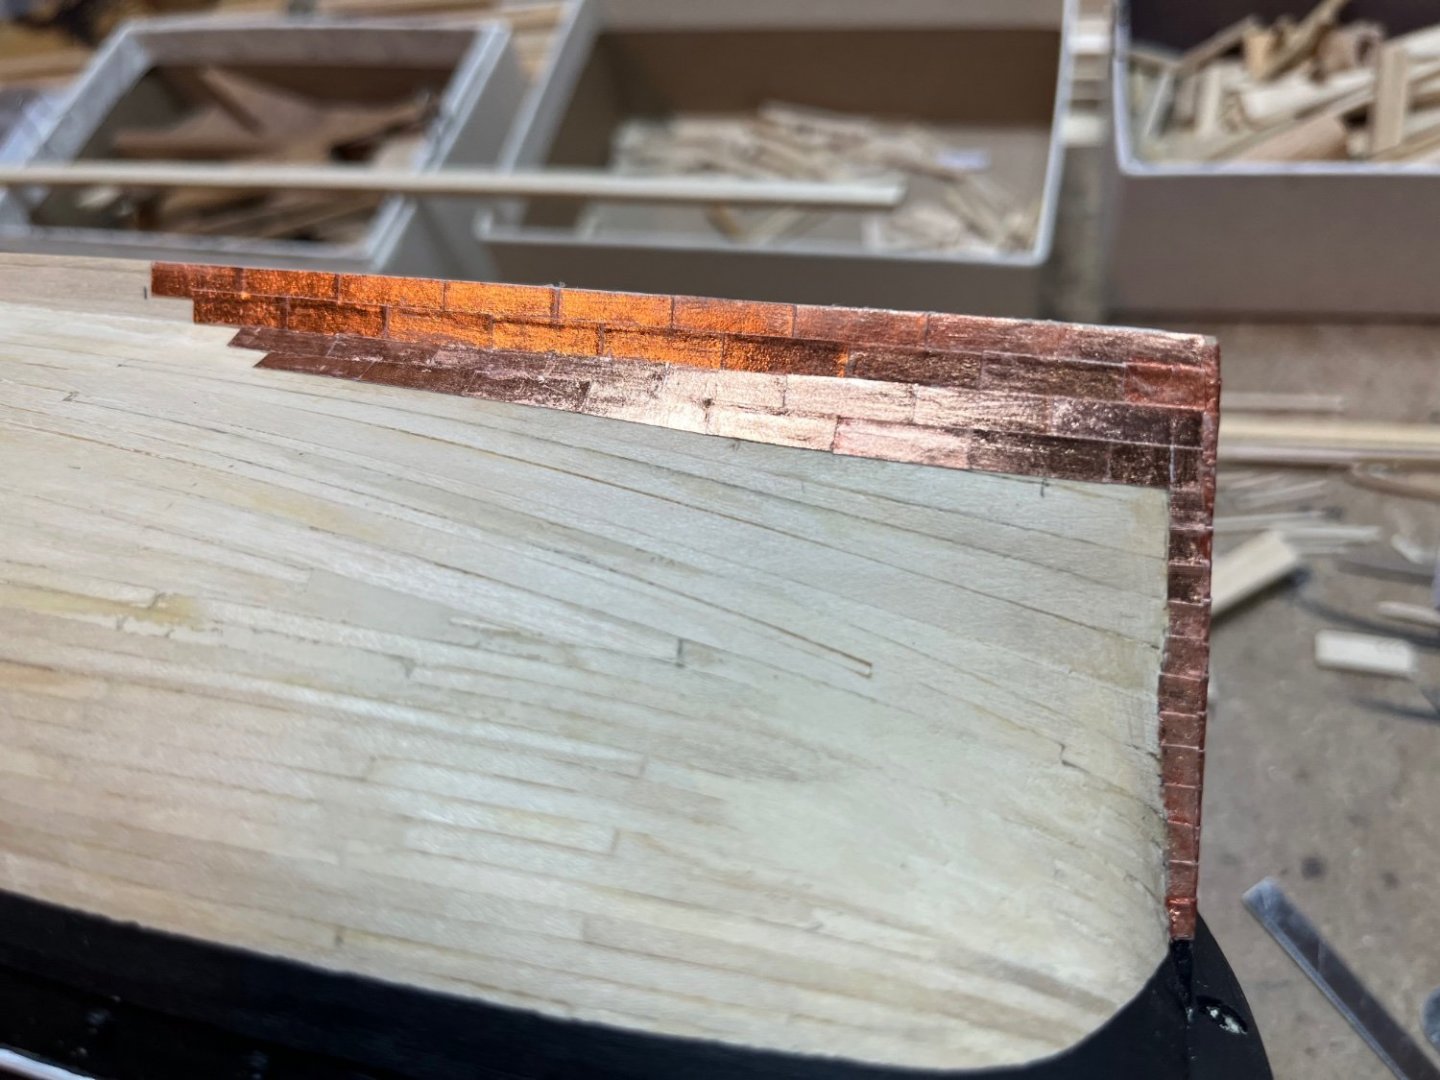
Starting to see the light at the end of the copper tunnel! Both sides are coming out very close to symmetrical so that is a good indication that my frames were faired correctly. Estimating around 900 tiles so far. Definitely falls into the same category as tying 1500 clove hitches for the ratlines on my Leopard. 😜 Tom

- 200 replies
-
- 6
-
-
- Whaling Bark
- Charles W Morgan
- (and 1 more)
-
Hi John At the rate I am going, by the time I finish it will patina on its own. 😜. Actually I am not a big fan of the shiny new polished look. My plates have a slightly brushed finish from lightly rubbing the copper leaf with a tissue when I applied it to the paper backing. That finish seems to have calmed down the brightness a bit. I will allow it to tarnish a bit to darken and kill some of the shine the spray it with some clear matte sealer. At least that is the plan right now. Tom
- 200 replies
-
- 6
-
-
- Whaling Bark
- Charles W Morgan
- (and 1 more)
-
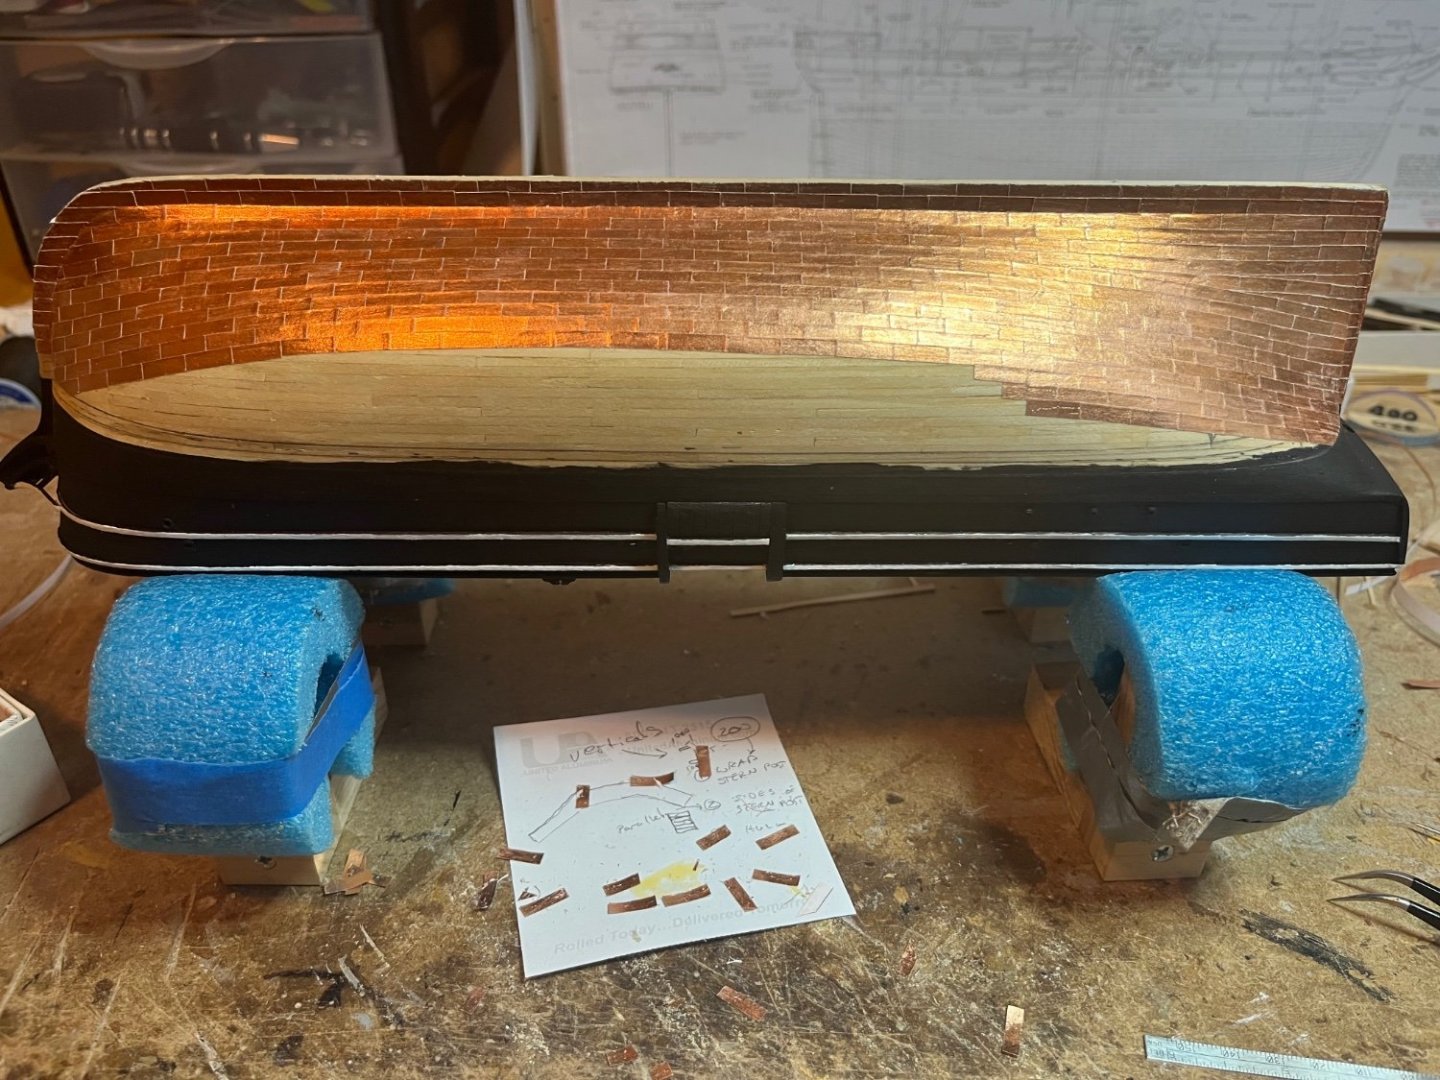
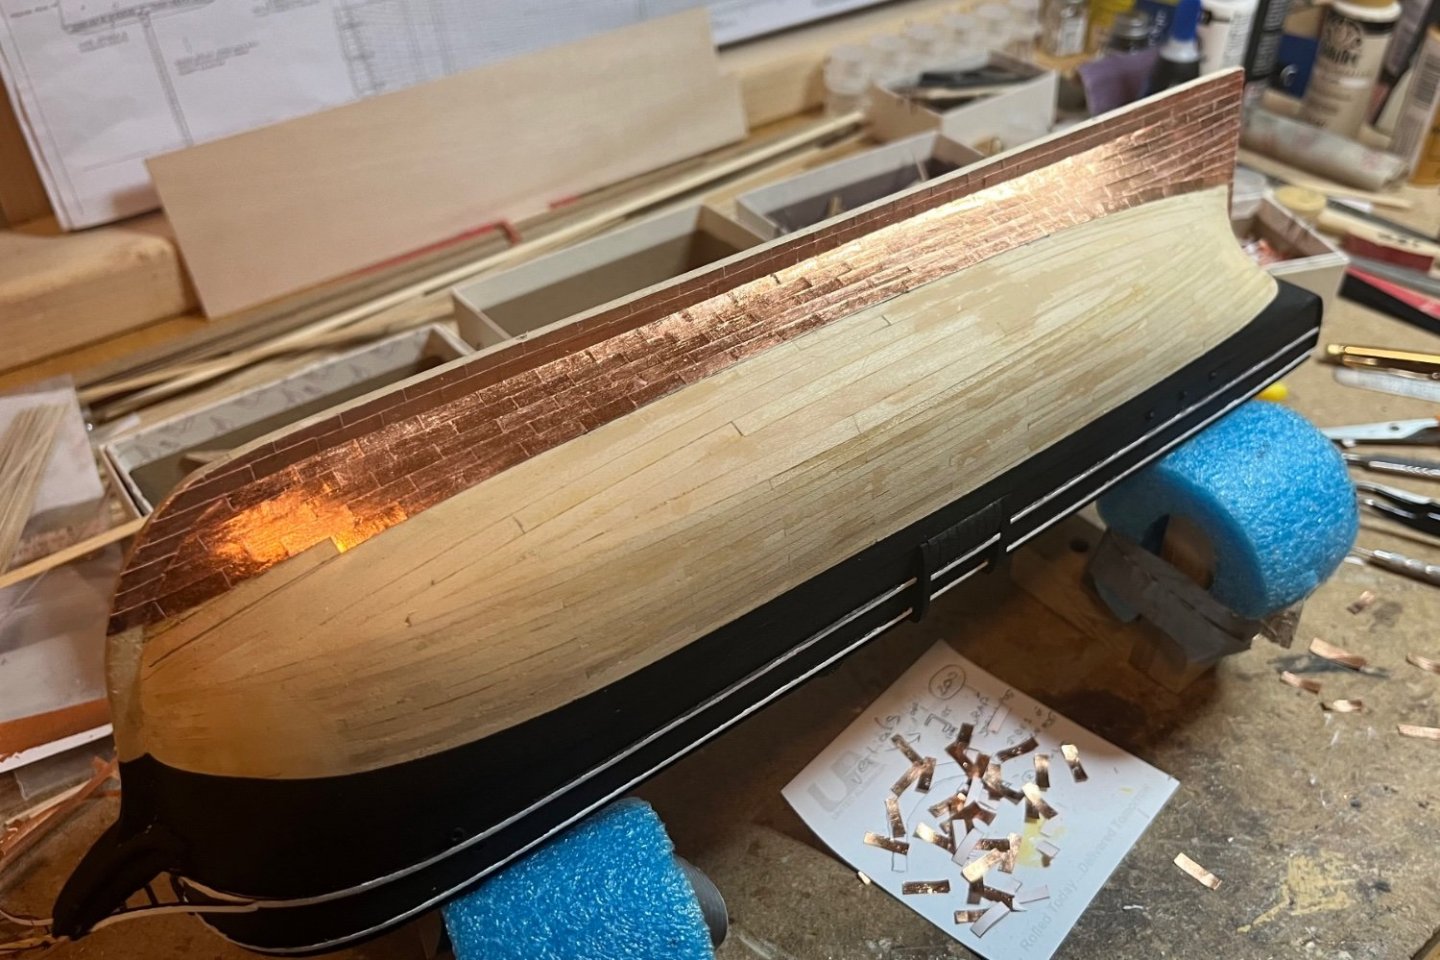
Almost done with the first band on the starboard side. The coppering is divided into three bands according to the drawings. The leaf is very delicate so you need to be careful not to get glue all over the place. Sometimes when you try to wipe it off, a spot of leafing may also come off. As with anything, the more practice the better it comes out. There are a lot of tiles so I will get plenty of practice. 😜😂 Tom
- 200 replies
-
- 7
-
-
-
- Whaling Bark
- Charles W Morgan
- (and 1 more)
-
Hi Tom Don’t get a ticket for following too close!🚔👮♀️ This is my first coppering job too and I may have to stop quickly!😂. I will try to do a good job posting my progress if I make any. Two steps forward, a few back is what it seems like right now. Tom
- 200 replies
-
- 1
-
-
- Whaling Bark
- Charles W Morgan
- (and 1 more)
-
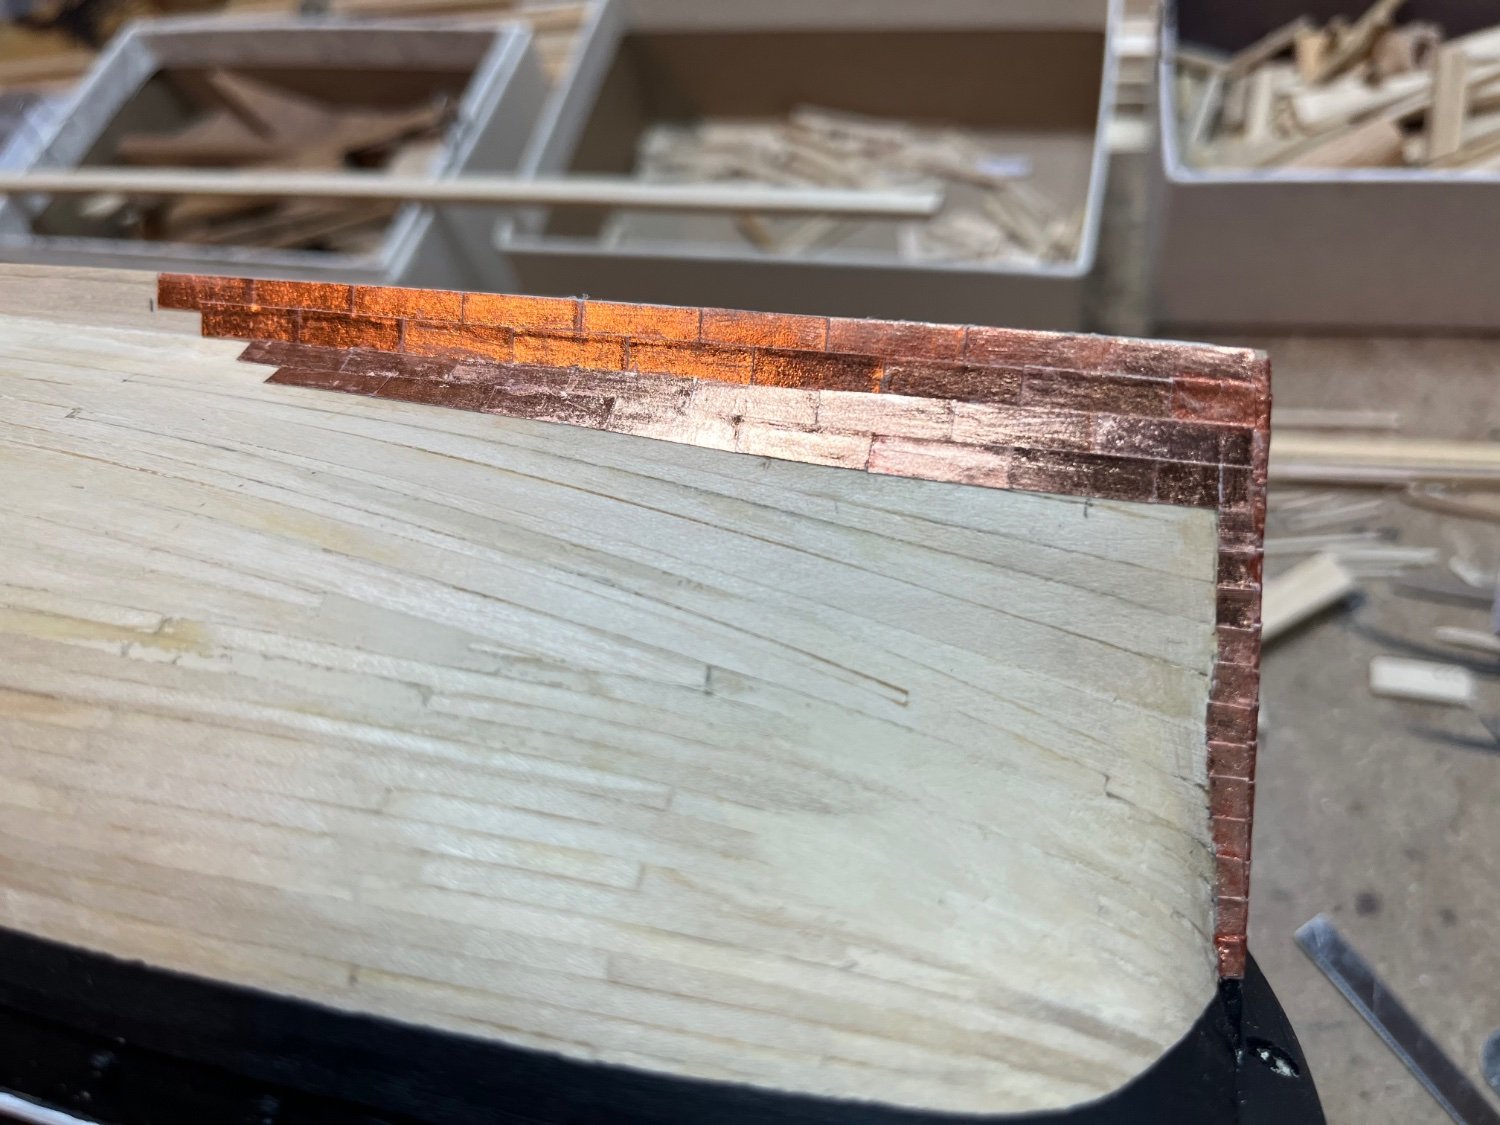
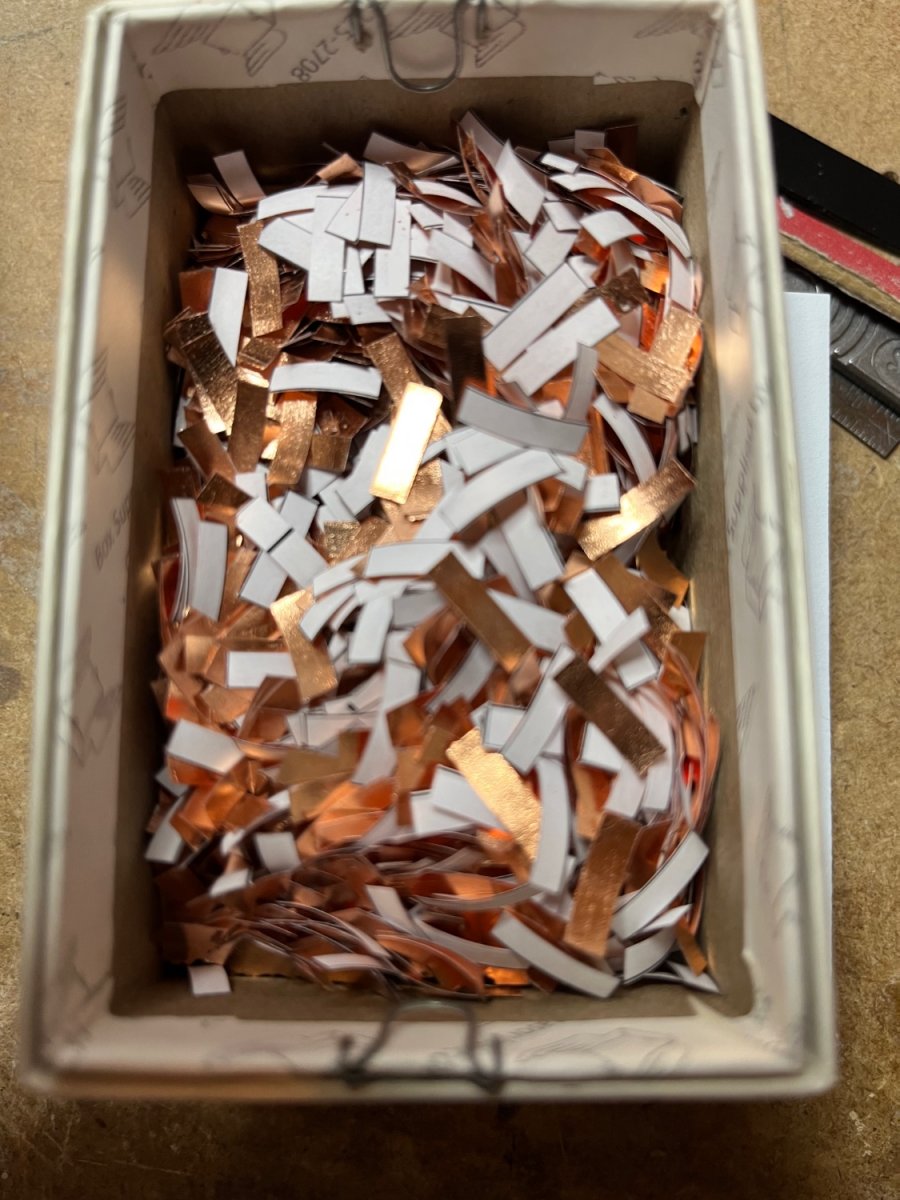
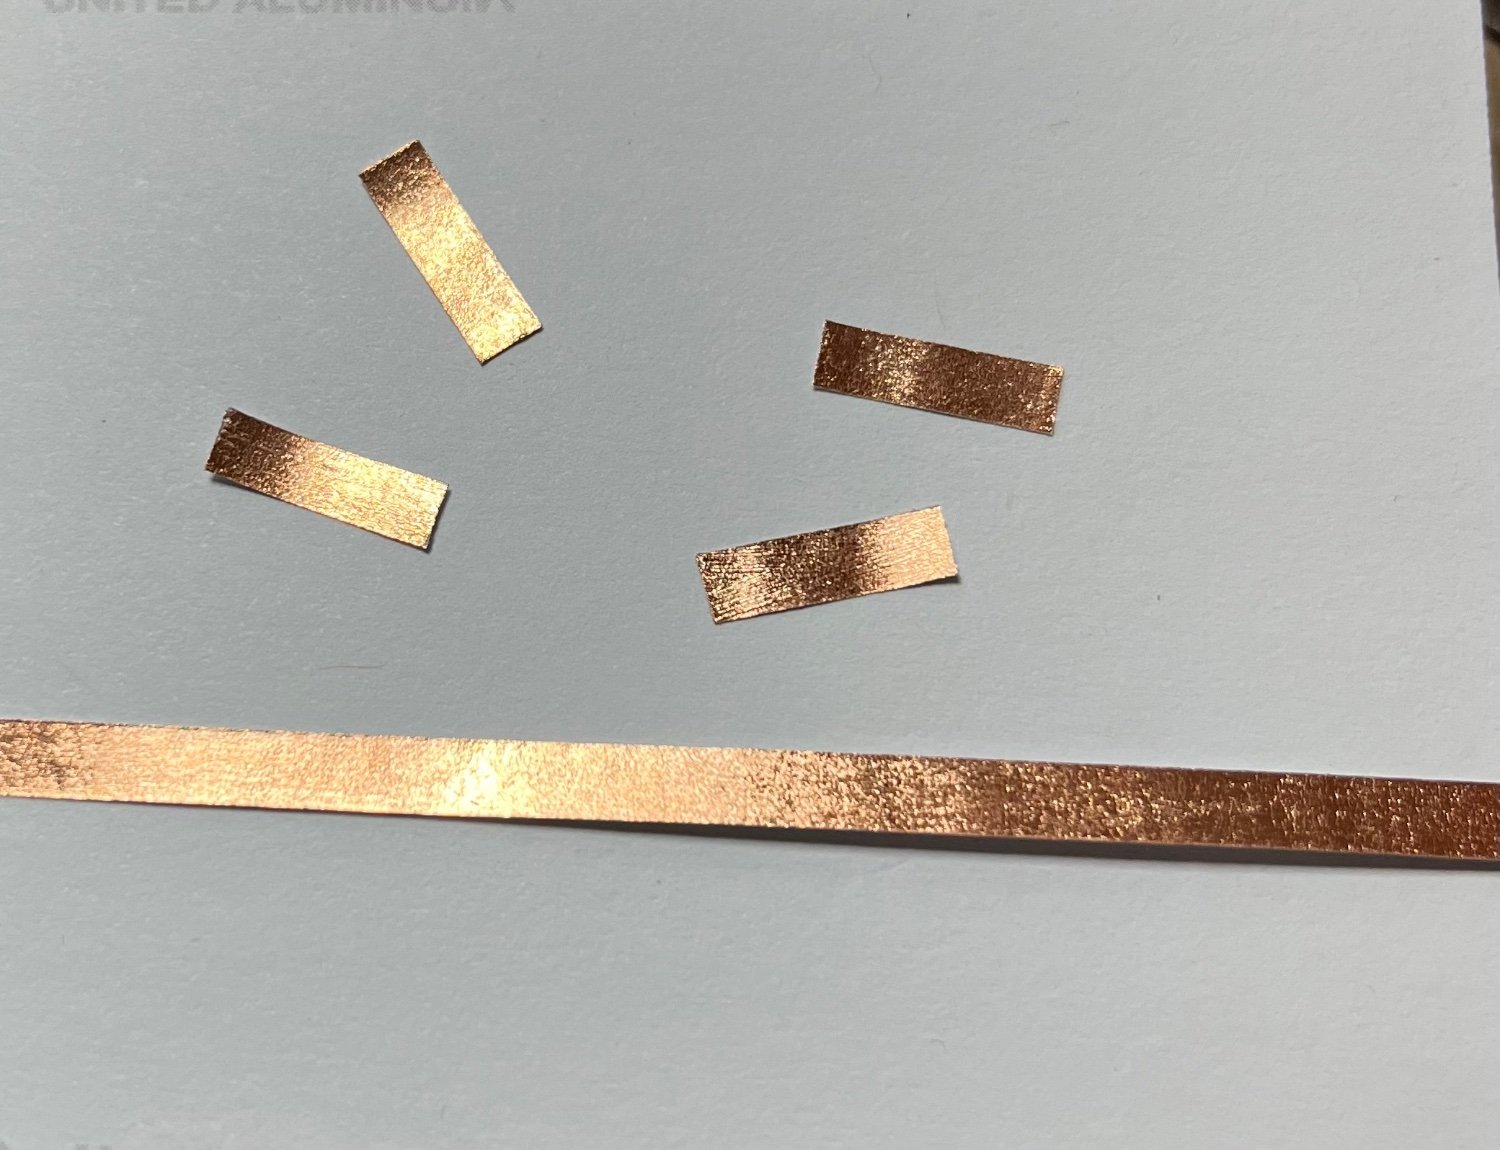
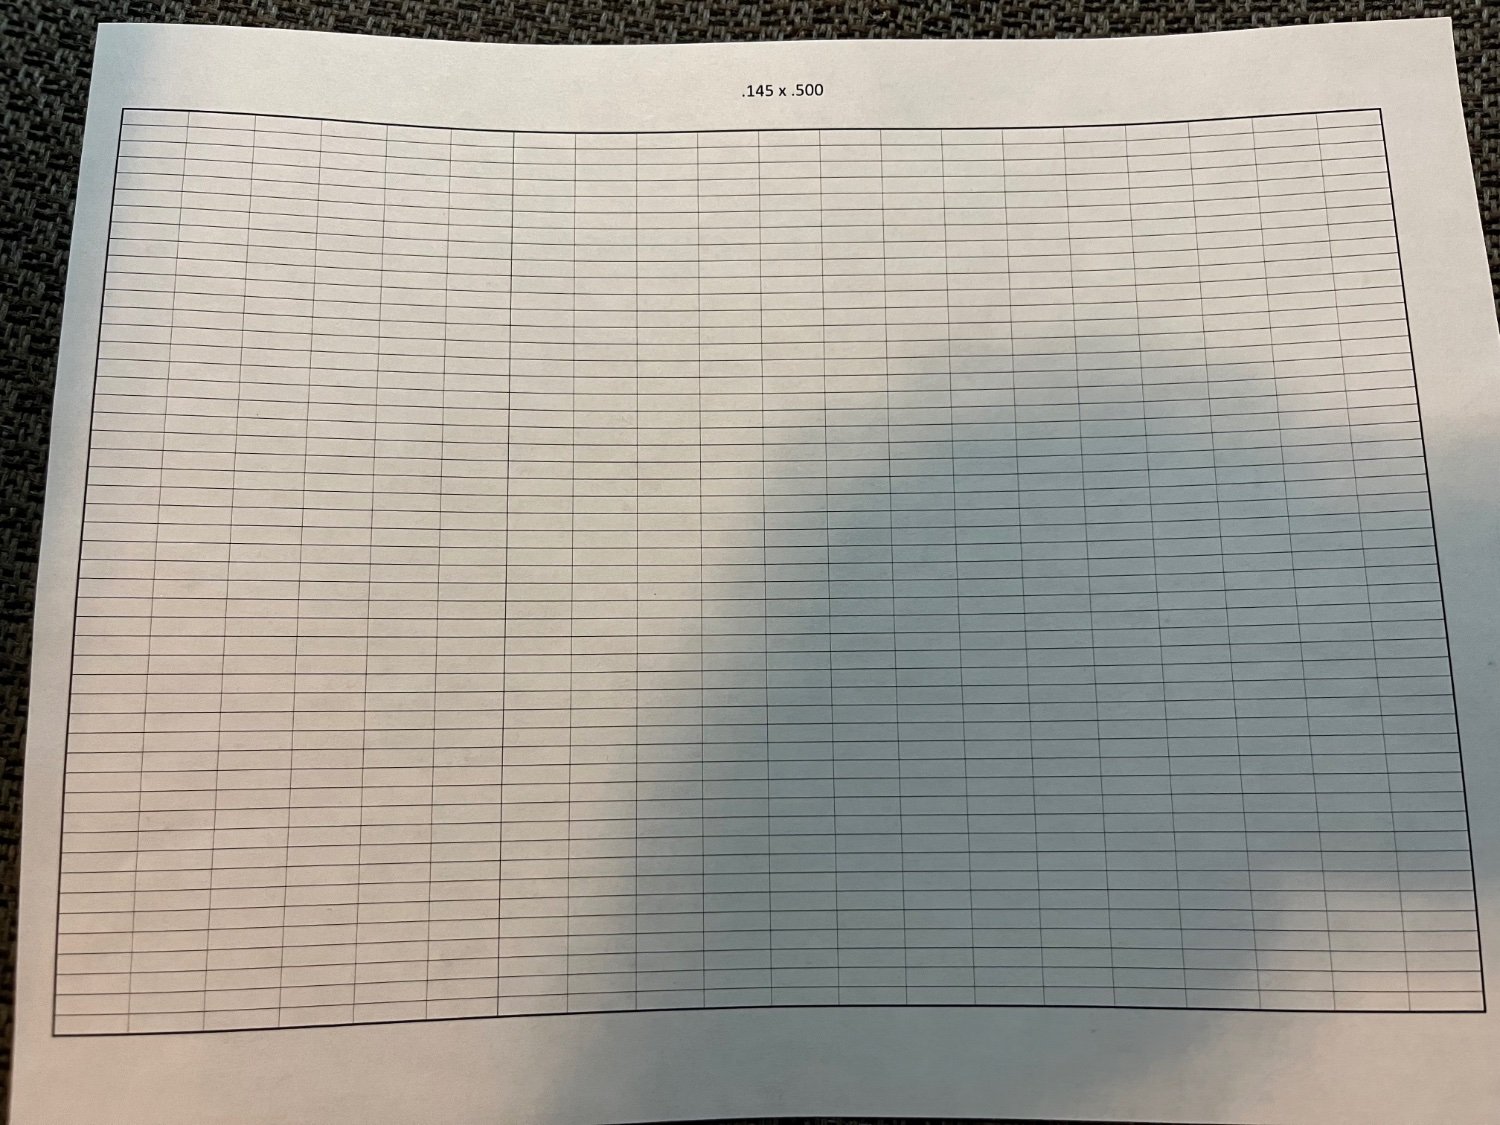
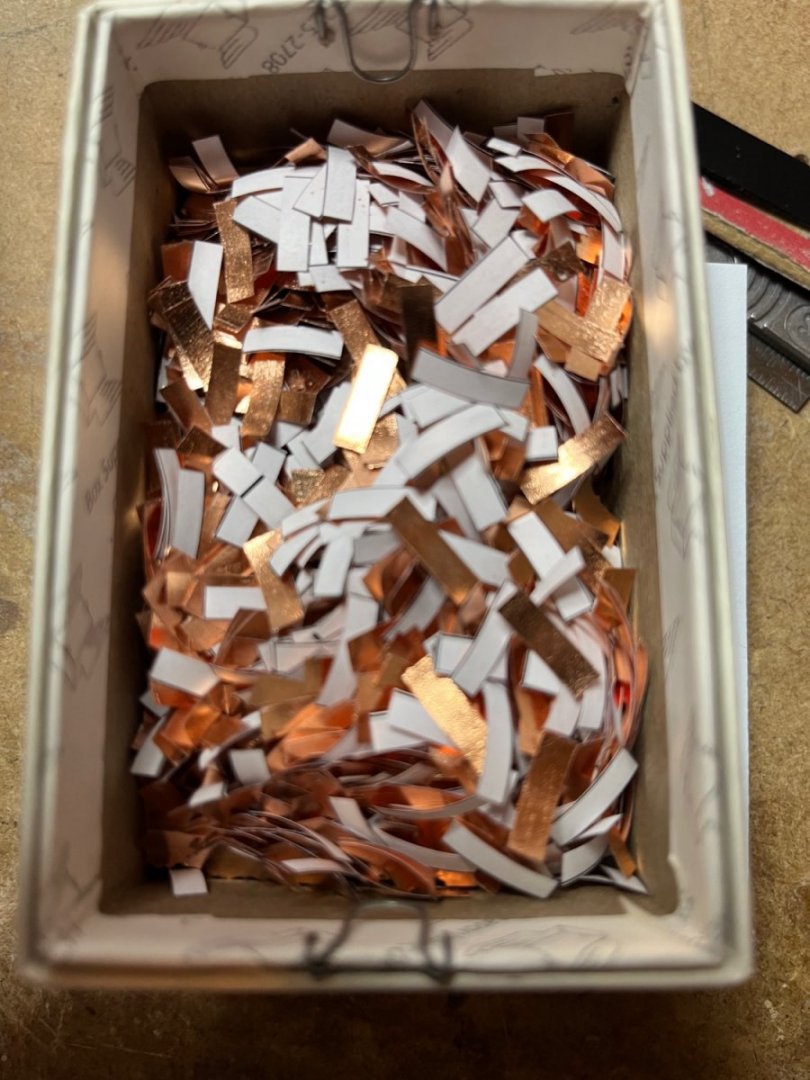
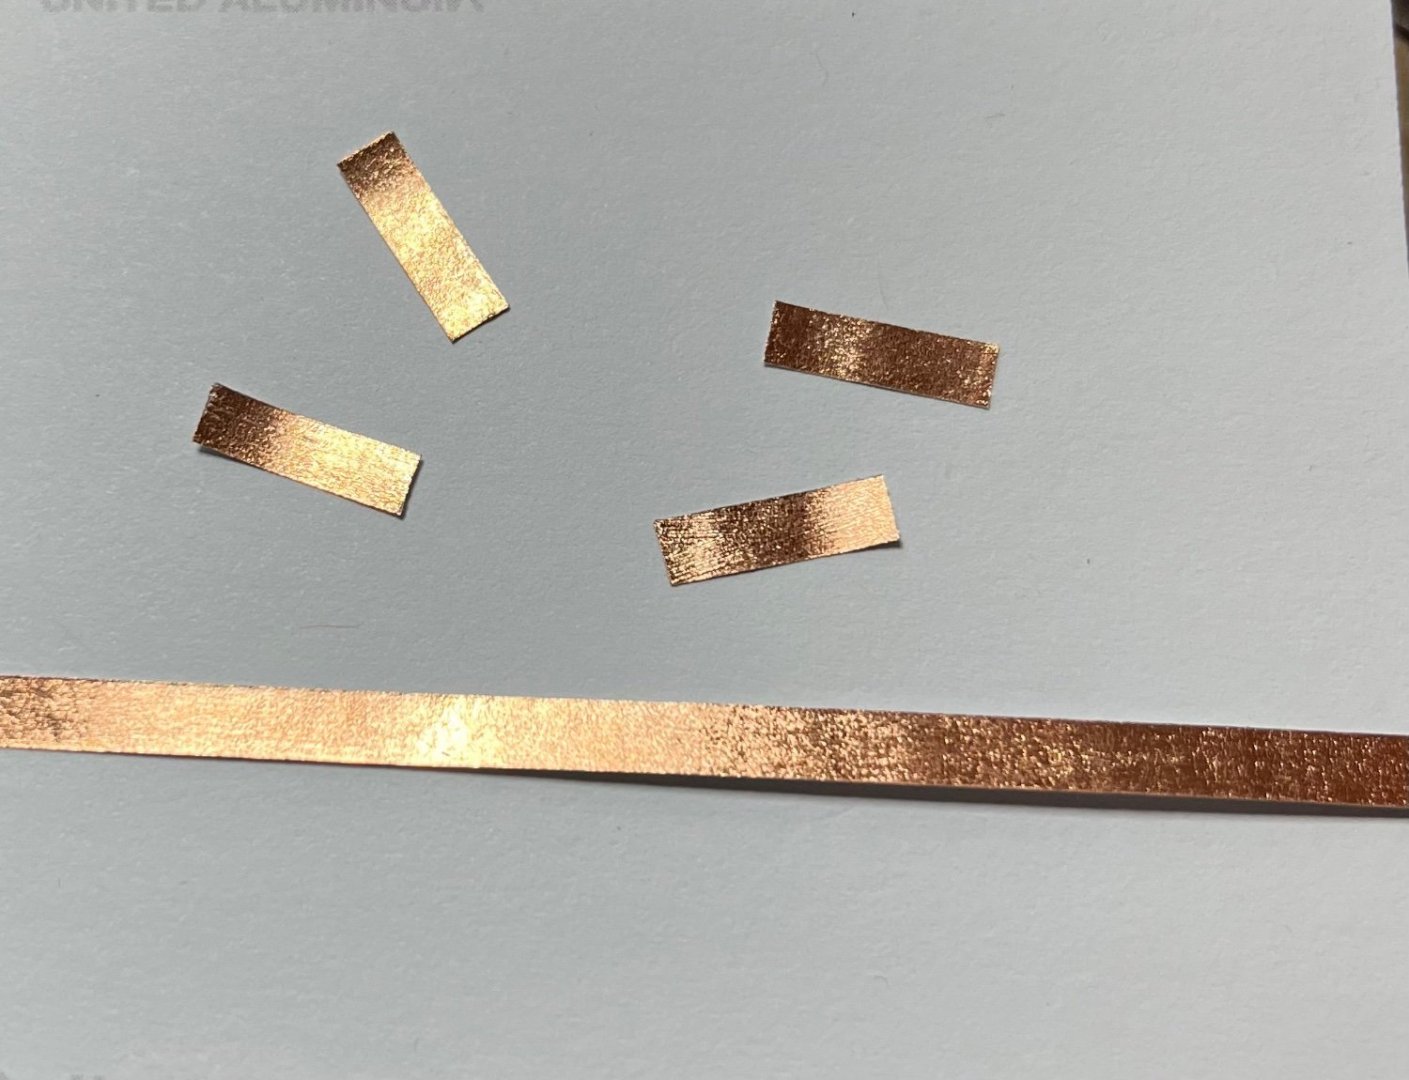
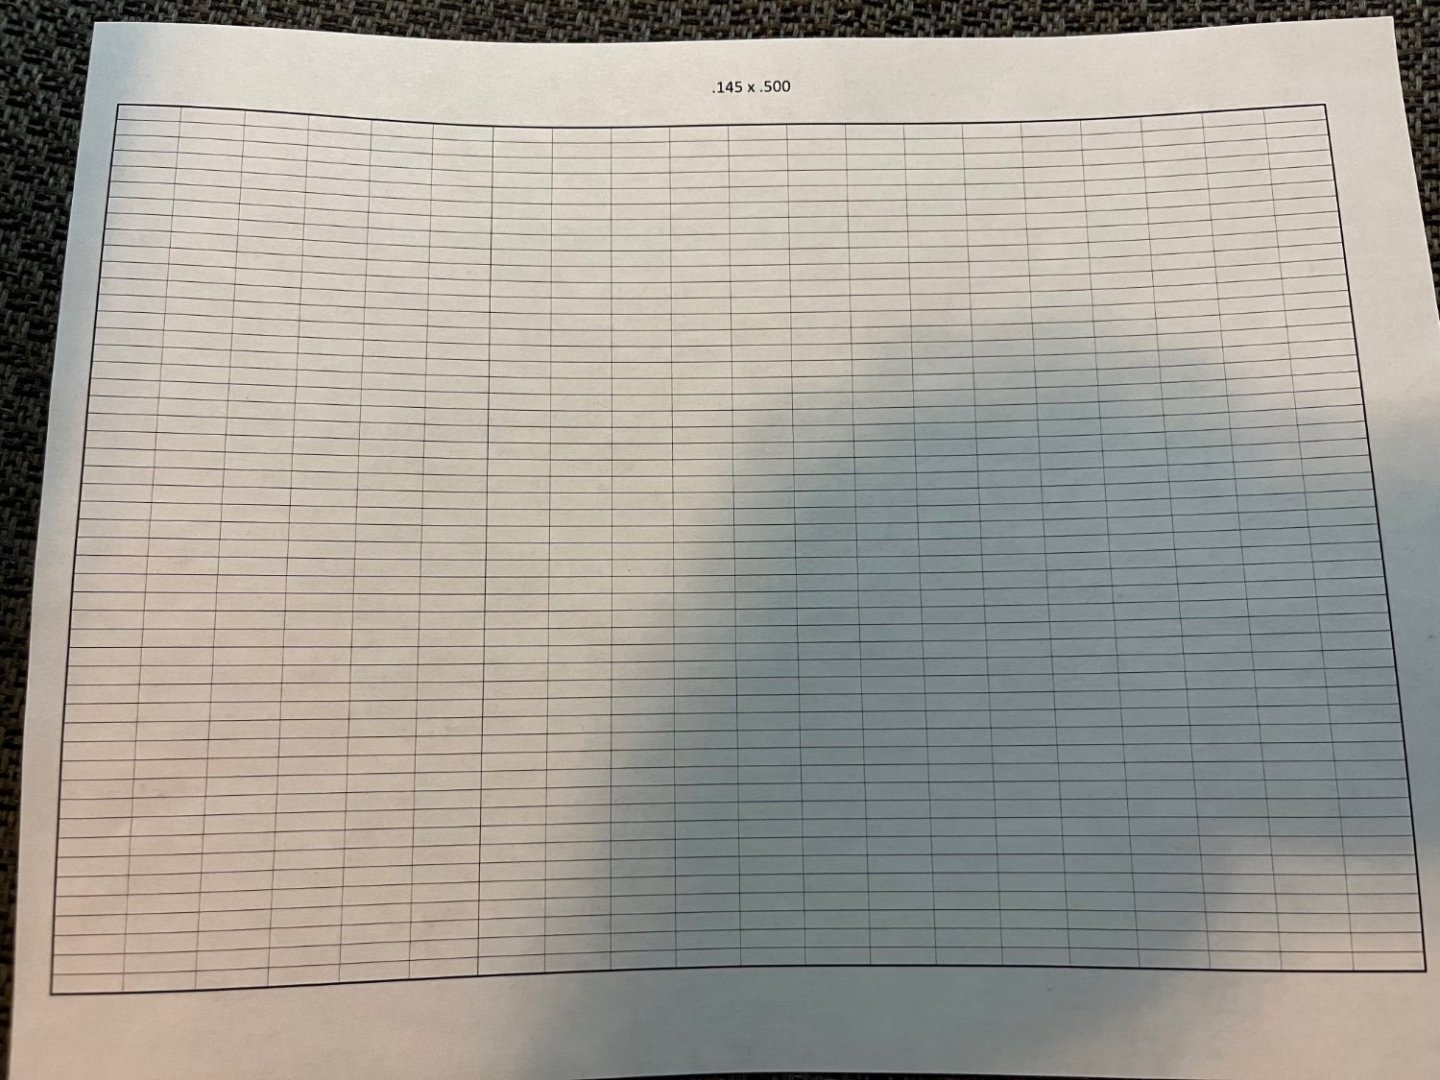
So I started on my coppering. I took a piece of regular 20# copier paper and printed a grid in Excel. Each plate will measure .145” x .500”. The grid is 50 x 20 resulting in 1000 plates per page. The paper was then copper leafed on the opposite side then sliced to width using a scalpel and straight edge. There are plenty of You Tube videos on leafing to learn how. This was my first time and it is really not that hard. 2 pages produced the 2000 plates you see in the box below. Here are a few up close along with one of the strips prior to cutting to the .500” lengths. Finally I started gluing a few on to see how it would look. You need to be careful not to get glue (I am just using regular wood glue) all over the leaf because it can be tricky to get off as the leaf is only about .002” thick. It is only about ..005 to 006” thick so it is not terribly out of scale. I am not putting any nail marks in the plates as the model scale is 1:96 so you really would not see them in the real world at normal viewing distance. Tom
- 200 replies
-
- 9
-
-

-
- Whaling Bark
- Charles W Morgan
- (and 1 more)
-
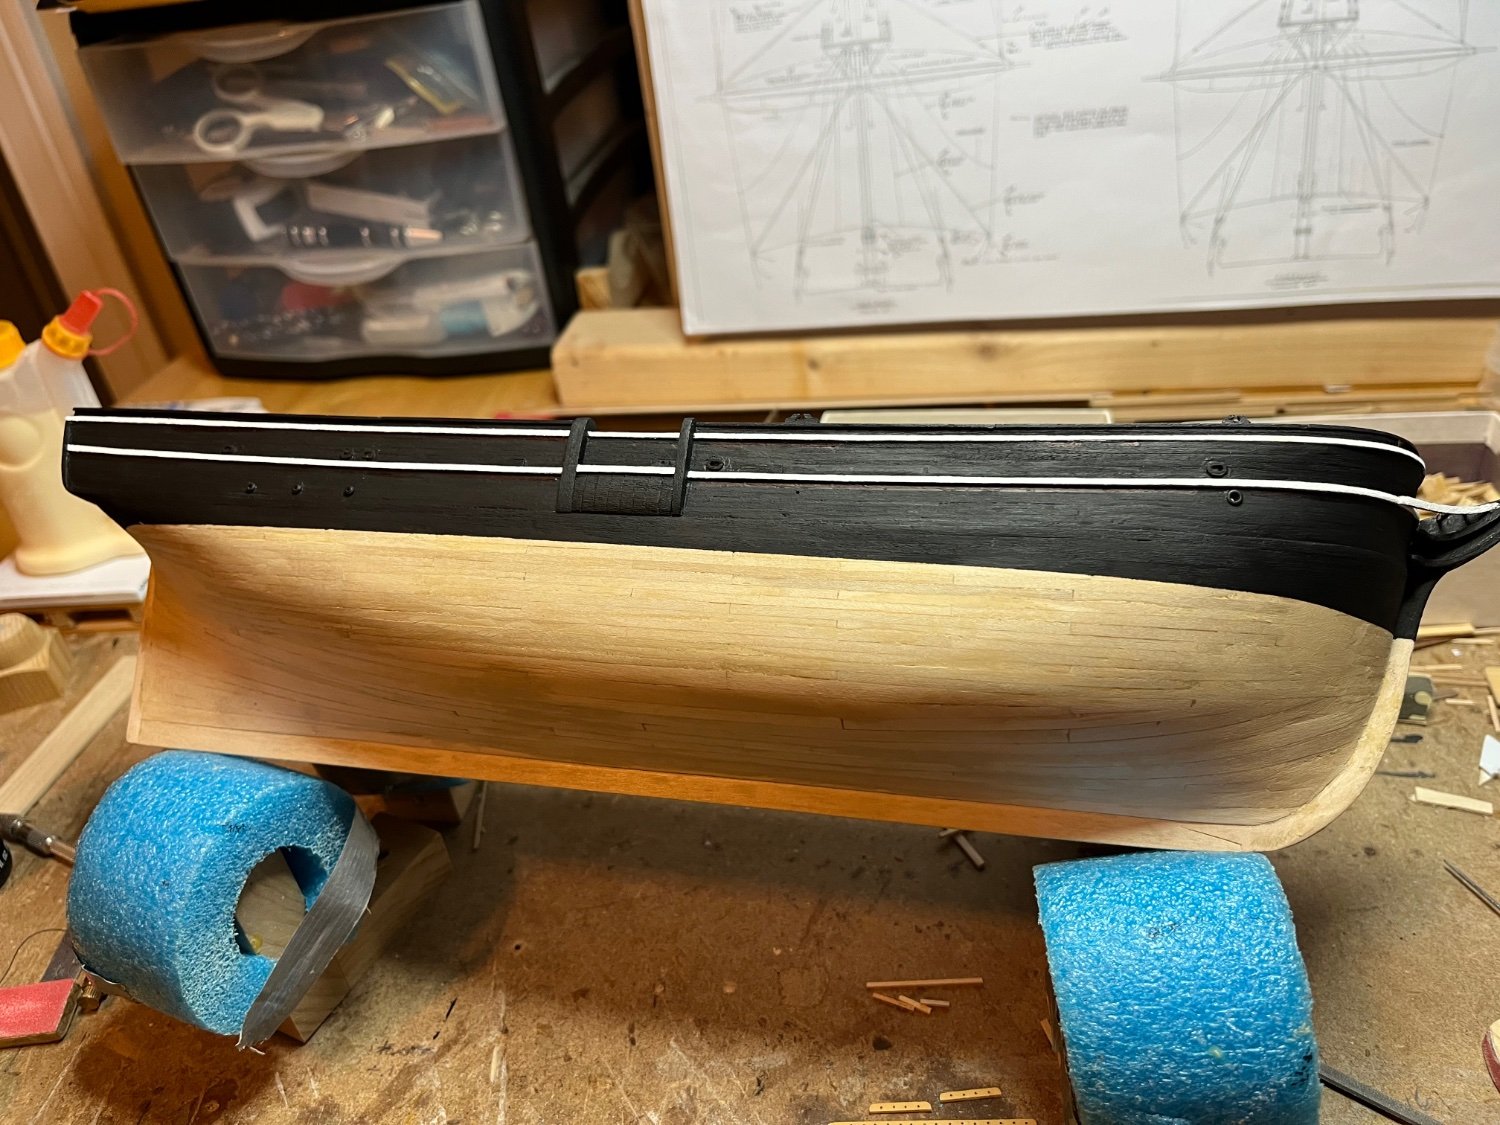
Managed to get the bulwarks painted as well as the upper hull. Let the coppering begin!! As mentioned earlier I plan on using a copper leaf method that was demonstrated at the last Northeast Joint Conference a few weeks ago. This is going to definitely be a learning experience. 😜 I still see a few spots on the edges of white lines that need a little sharpening. Damn OCD. 😂😜 Tom


- 200 replies
-
- 8
-
-
- Whaling Bark
- Charles W Morgan
- (and 1 more)
-
From what I have seen on MSW, many kit parts are often replaced due to poor quality or out of scale issues. That is most of the reason I took the leap to scratch building after my first kit. I can’t see paying a hefty price for a kit and replacing most of it, especially if you plan on purchasing the replacements. Now the price of the kit is even higher! May as well take the money invested in kits and buy some tools to make some components. Just my 2 cents. In the end I would replace the blocks, etc since you will spend a good deal of time building this project. May as well make it the best that you can. 😁 Tom
-
I used some maple I had laying around. Probably not the best choice. I think boxwood, holly or pear might be better but I didn’t have any. Anything with a tight grain should work as long as you take your time working it. Don’t put a lot of pressure on it when sanding and use a finer grit so it doesn’t bite into the wood to deep. Tom
- 200 replies
-
- 3
-
-
- Whaling Bark
- Charles W Morgan
- (and 1 more)
-
Hi Tom No real trick, just patience. I started with an oversized piece of wood. Then drilled a hole and elongated it to size with a small rat tail file. Then I very carefully filed the outside to shape and size and yes a couple did break. To get some more strength to the piece I left them about .050” thick. Lastly I glued them in place and after they were set in place I sanded the thickness down to .015 so they were to proper scale. Touch up the inner and outer edges and you have it. Tom
- 200 replies
-
- 2
-
-
- Whaling Bark
- Charles W Morgan
- (and 1 more)
-
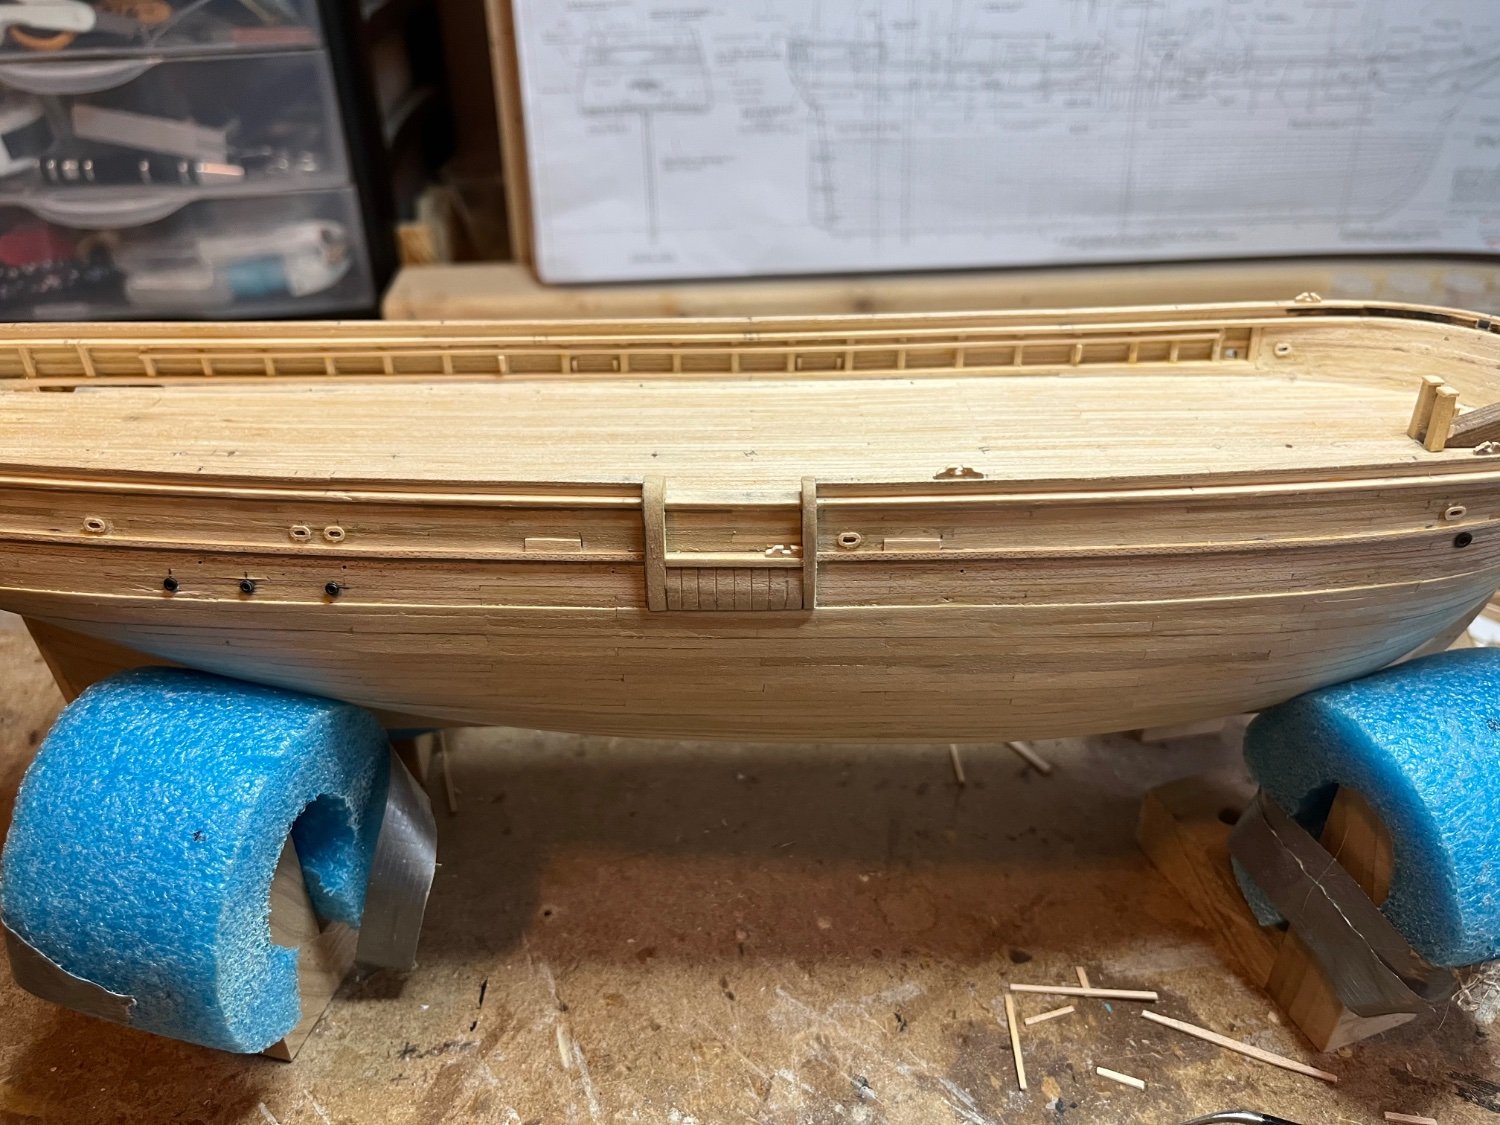
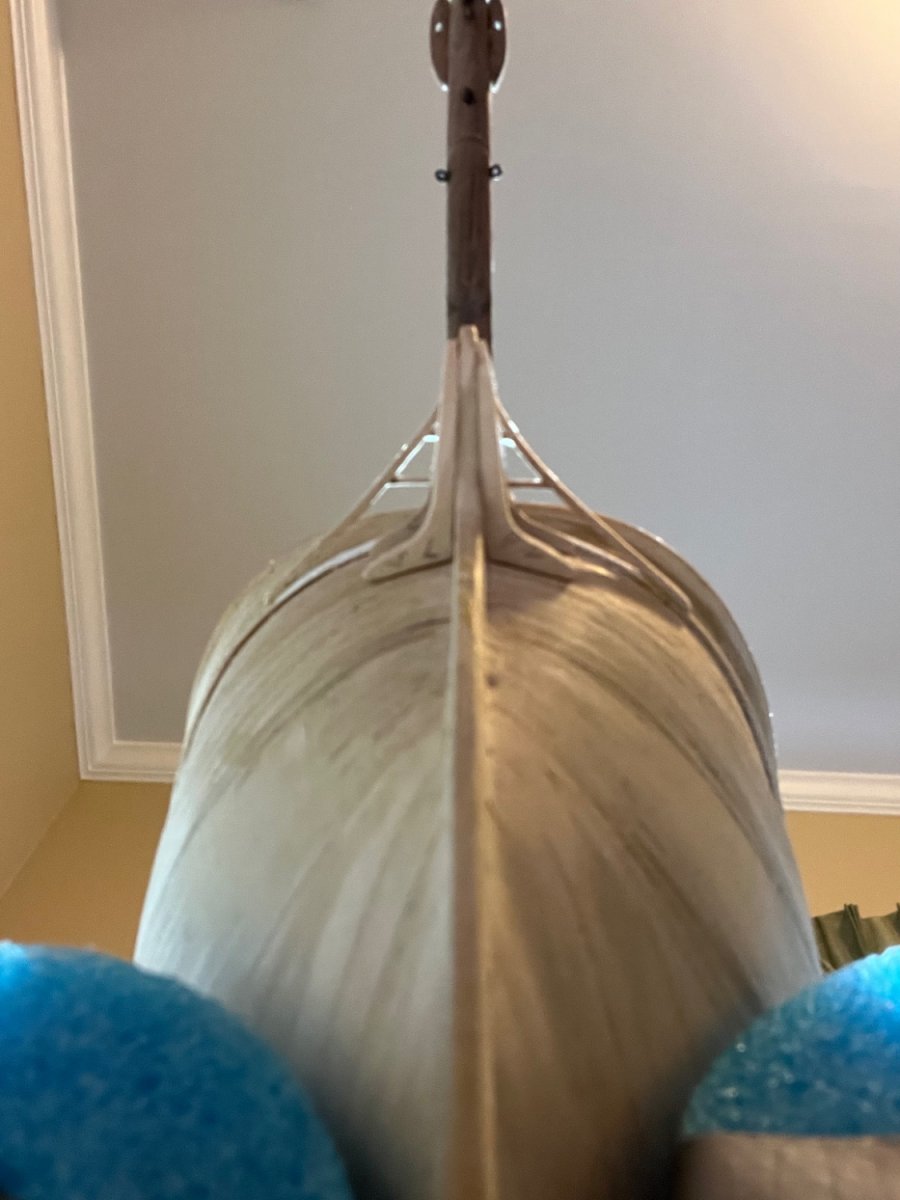
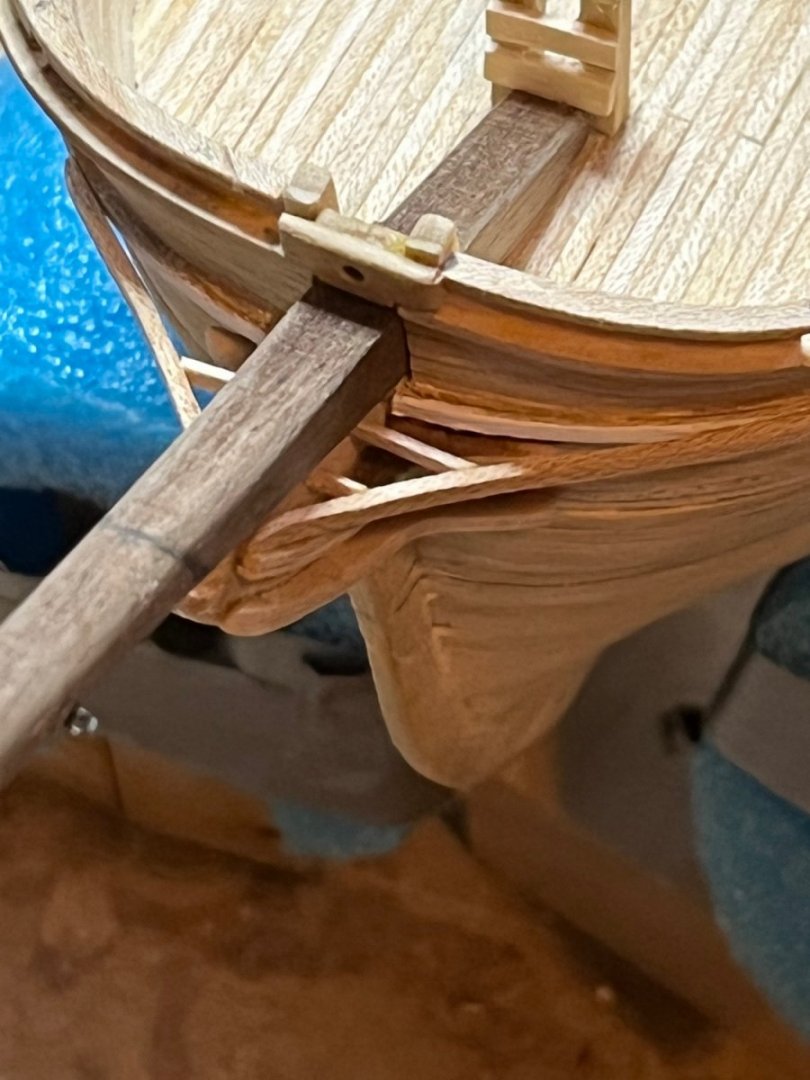
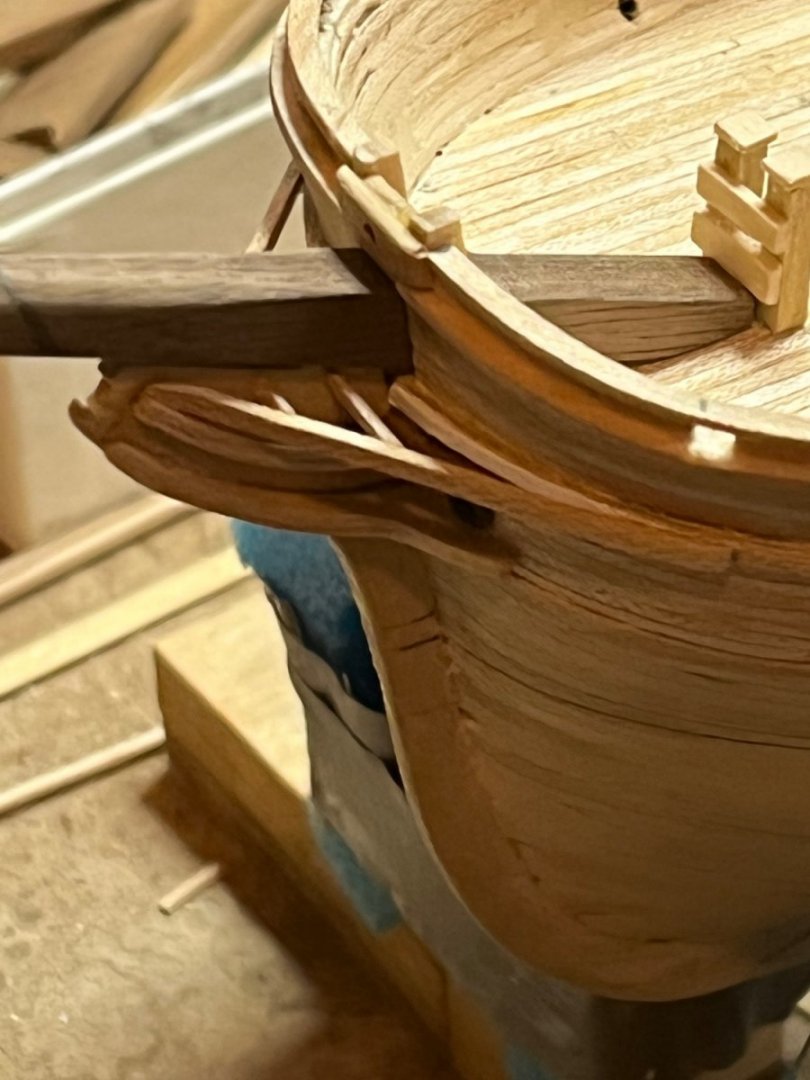
Finishing up some of the countless details on the hull like the various chock holes, cleats, mooring and freeing ports. Still have sea steps and lots of other items that just seem to appear as I think I am getting close. Also managed to get the cheek knees and head Timbers mounted. Here is what it looks like from a dolphin’s perspective. 😜😁😂 Tom


- 200 replies
-
- 7
-
-
- Whaling Bark
- Charles W Morgan
- (and 1 more)
-
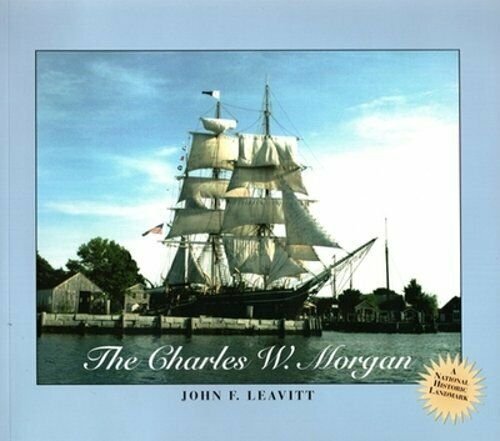
Hi Charles, The book is by John Leavitt. You can pick it up used for less than $10. Here is a picture of the cover. Binding: Paperback ISBN: 0913372102 EAN: 9780913372104 Book Title: Charles w. Morgan Publisher: Mystic Seaport Museum, Incorporated Publication Year: 1970 Language: English Item Length: 8in., Width: 9in., Height: 0.4in. Author: John F. Leavitt Item Weight: 13.6 Oz Number of Pages: 124 Pages Tom
-
I am going to skip the fake gun ports and take my chances with the natives. 😂 Tom
- 11 replies
-
- 2
-
-

-
- Charles W Morgan
- anchor chain
- (and 1 more)
-
Yes John that is it. I assumed that the fluke meant the fluke on the anchor not the fluke on the whale! That explains why it is only on the starboard side which is the side they bring up the whale on. Now it all makes sense. 🤔😁. You may have just saved what little sanity I have left. This is my first model that is not a warship so I didn’t even think of the fluke on the whale. 😜 Thank you again Tom
- 11 replies
-
- 2
-
-
- Charles W Morgan
- anchor chain
- (and 1 more)
-
Thanks John. The pics are very helpful. Based on these it looks like the fluke chain pipe in question doesn’t even come into play. I was hoping to get to Mystic around Memorial Day or so. That will be a great chance to try to ask someone there. I won’t be rigging any anchors anytime soon, just want to get all the necessary holes in the hull before I paint and copper. Thanks again. Tom
- 11 replies
-
- 1
-
-
- Charles W Morgan
- anchor chain
- (and 1 more)
-
Yes there are two. The plans from Ben Lankford (Model Shipways) say to build an anchor for port and starboard. I just came across picture in the Leavitt book (pages 98 & 99) taken from the bowsprit looking aft and there are two anchors. Tom
- 11 replies
-
- 1
-
-
- Charles W Morgan
- anchor chain
- (and 1 more)
-
I am working on a scratch build of the CW Morgan whaler and started putting in the various chocks and holes in the bulwarks. I noticed that there is a hole for the fluke chain pipe on the starboard bow side of the ship but not on the port side. Am I correct in assuming that the fluke being referred to is the anchor fluke and a chain is attached to it that comes through this hole. If that is the case, what about the port side anchor? The pictures I took of the Morgan at Mystic don't have the anchors rigged to the boat. Currently, just a mooring line comes through the starboard side hole. I am not there yet and won't be for a while, but when the time comes, how are the anchors rigged if there are not symmetric holes? In the meantime I will be "googling" for pics of the CWM with the anchors rigged as well as searching the forums here. Any help would be appreciated. Thanks, Tom
- 11 replies
-
- 2
-
-
- Charles W Morgan
- anchor chain
- (and 1 more)
-
Hi rookie Thanks and yes that is brass wire that was soldered. Truth be told that was attempt #2. We won’t talk about the first try 😜😂 Tom
- 200 replies
-
- 2
-
-
-
- Whaling Bark
- Charles W Morgan
- (and 1 more)
-
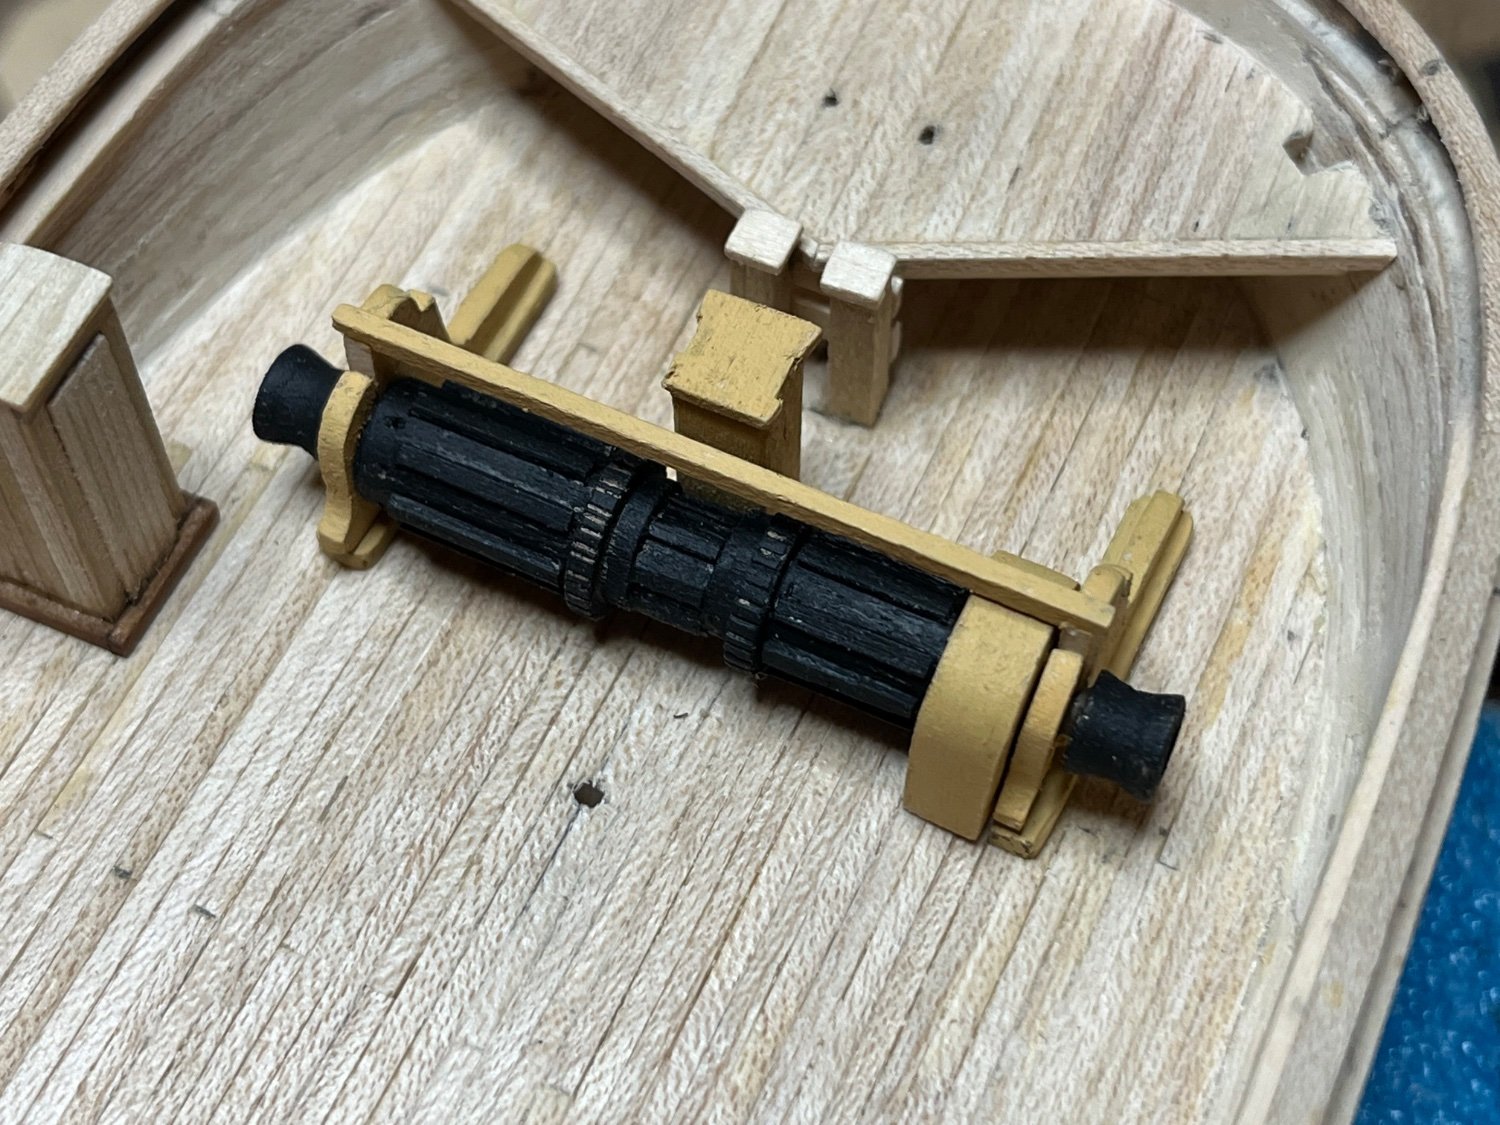
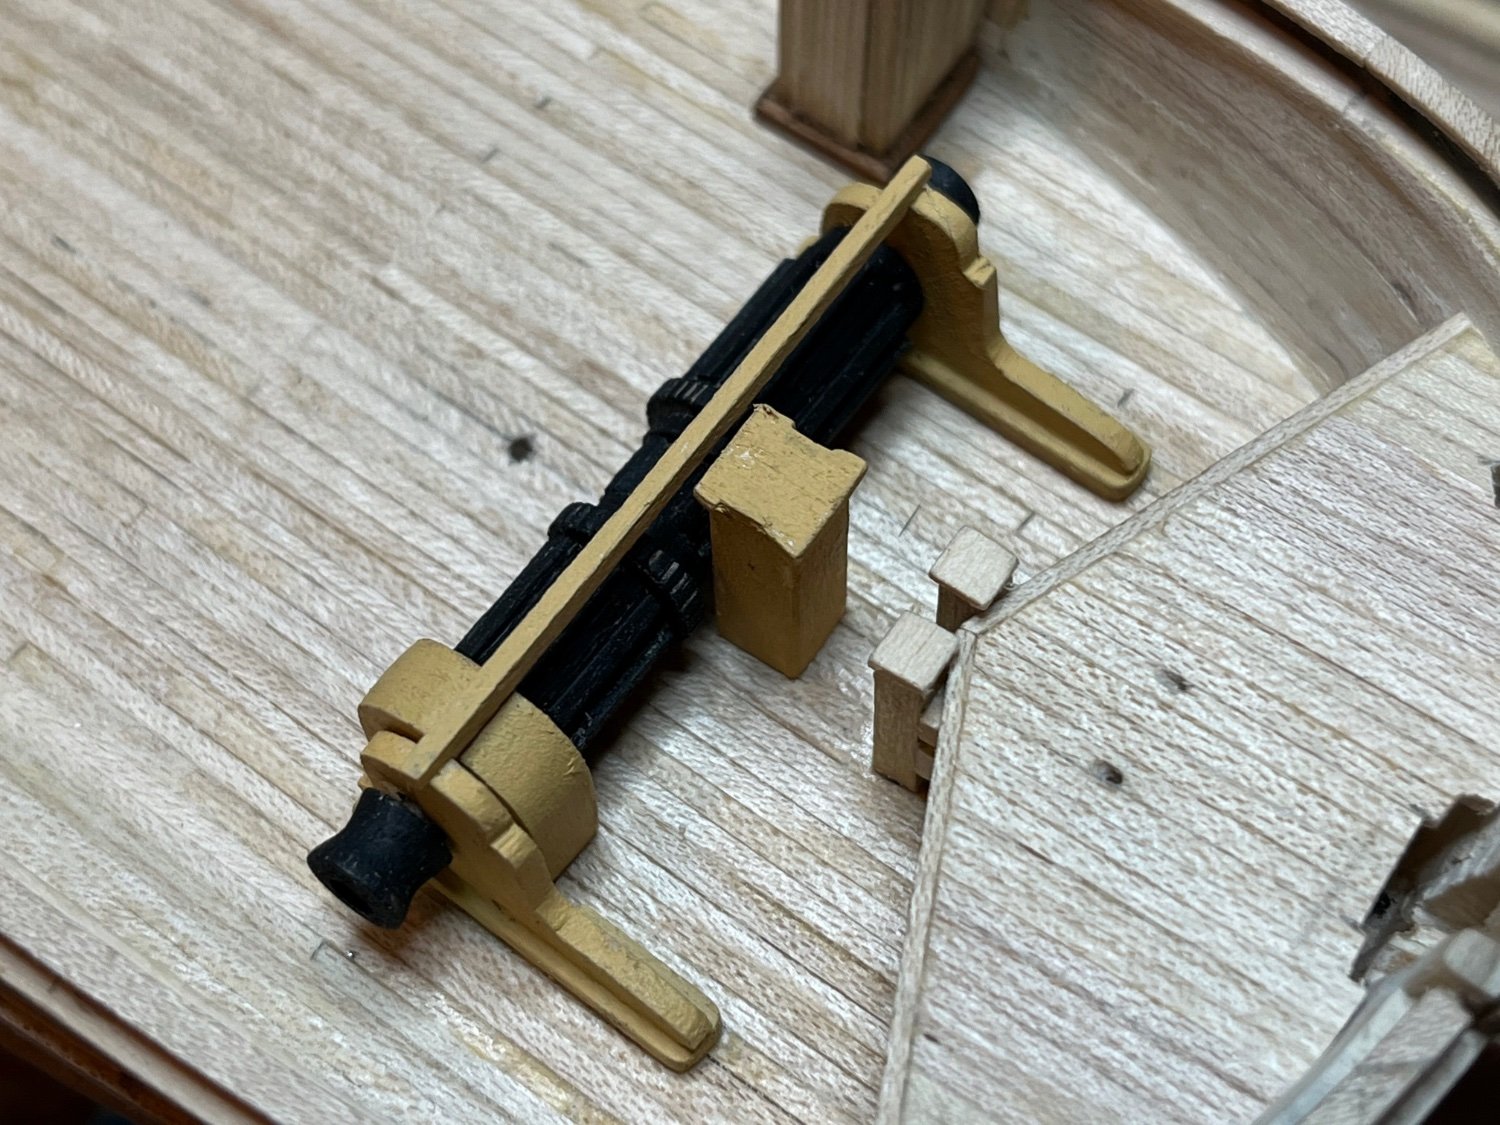
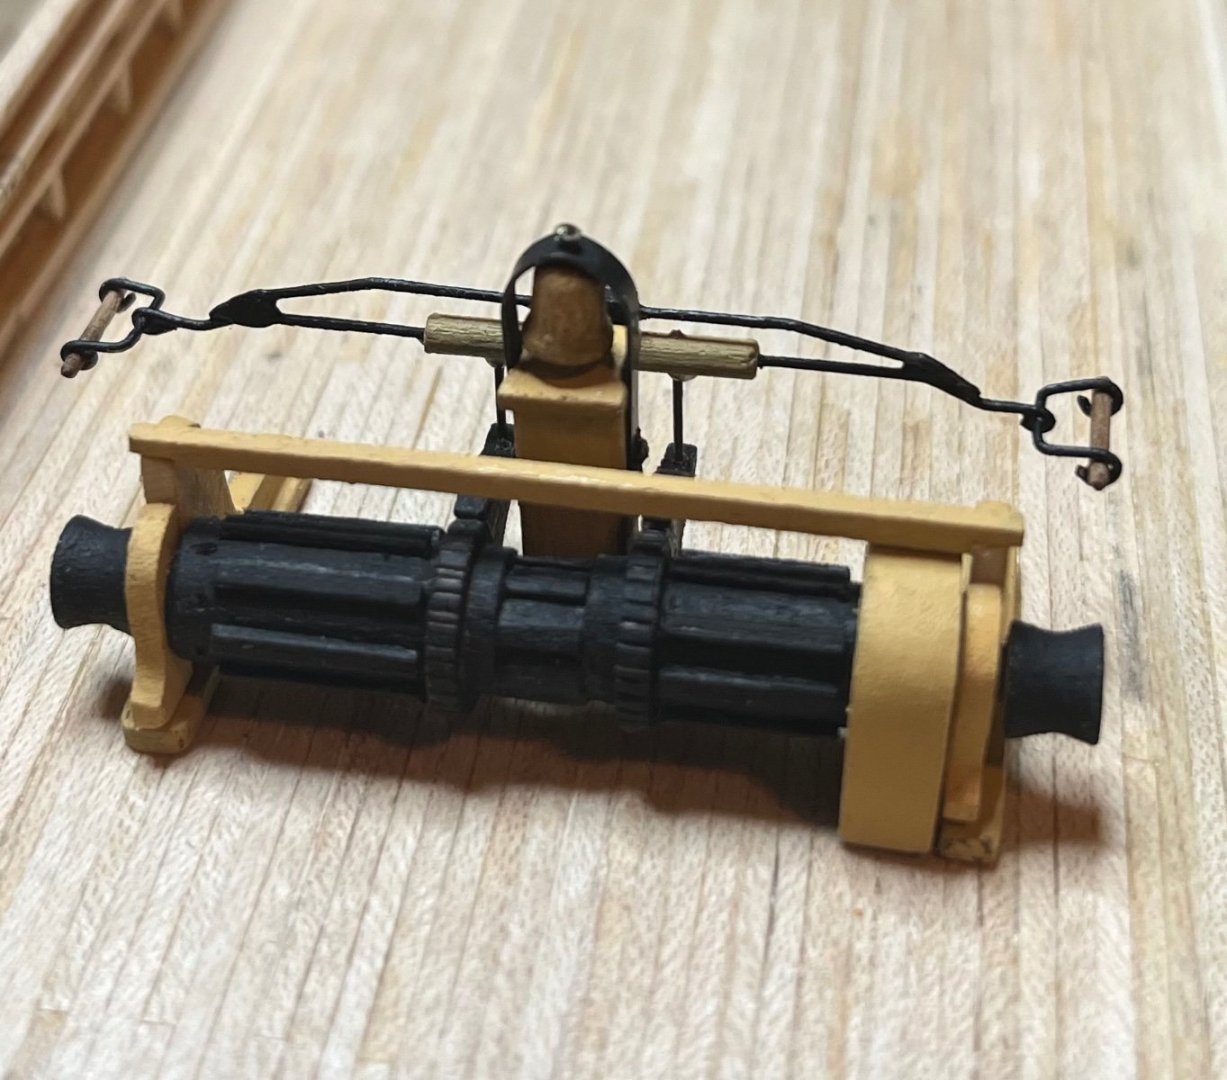
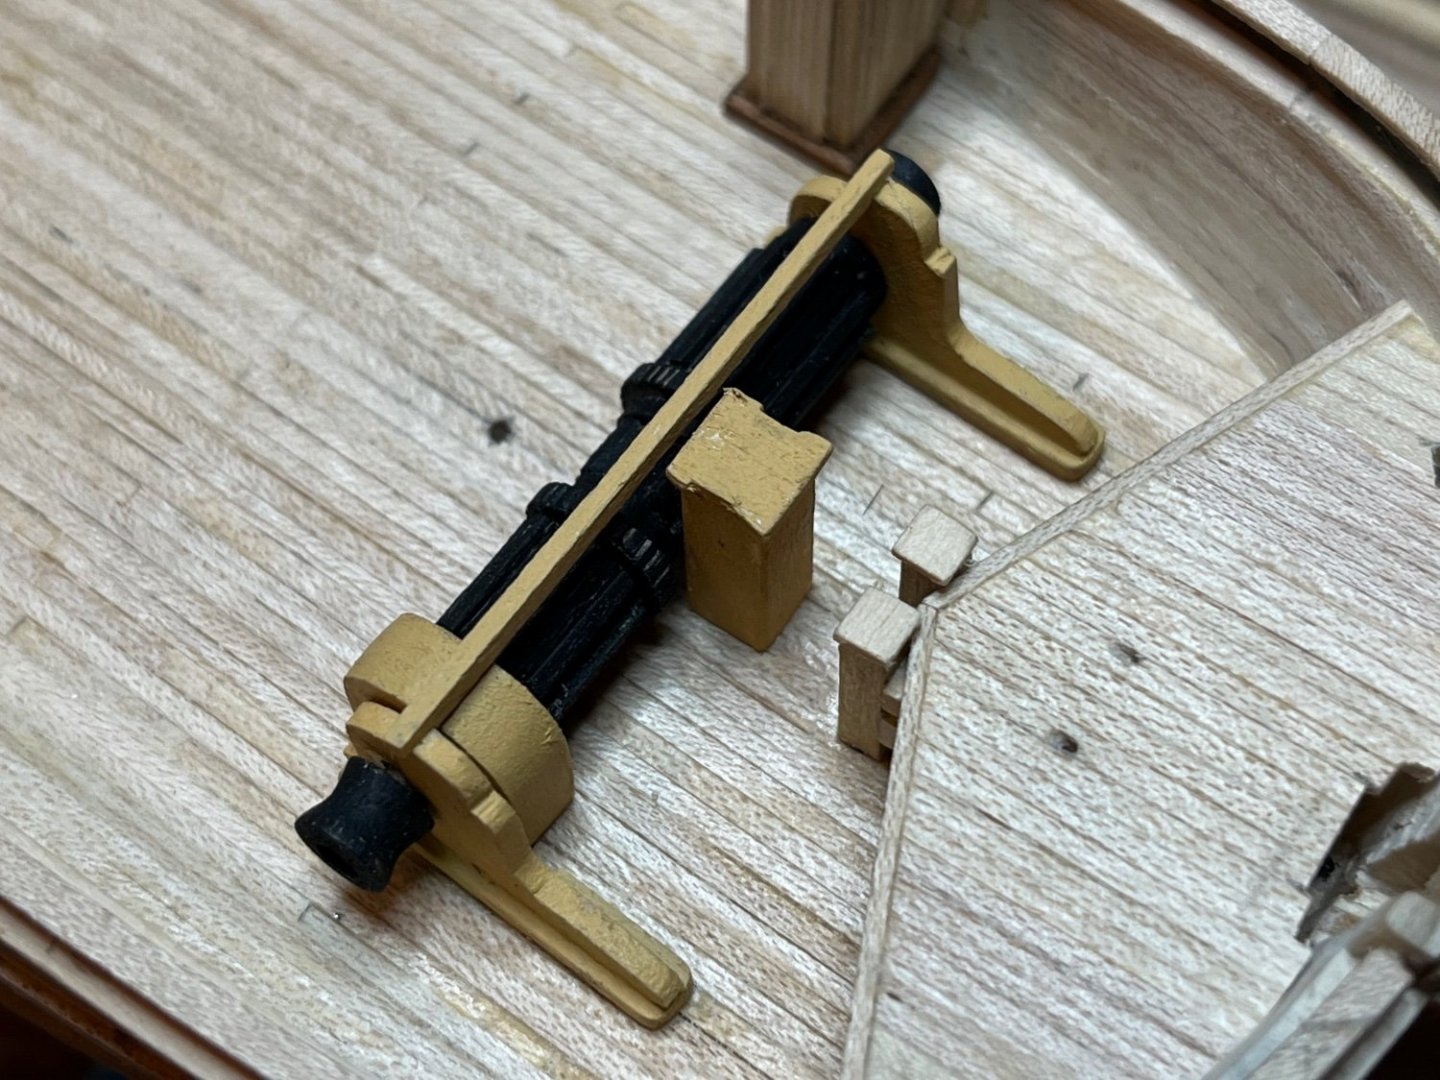
Here is the finished windlass, pump & brake assembly and ship’s bell. A little bit delicate so I need to store it in a safe place until I am ready to install it. I plan to start painting the hull now followed by the copper plates. I managed to take in an excellent demonstration by Rich from the New Jersey club on copper gilding and making realistic plates at the Northeast Joint conference. Can’t wait to experiment with this technique. Tom
- 200 replies
-
- 14
-
-
- Whaling Bark
- Charles W Morgan
- (and 1 more)
-
Thanks Tom, I will attempt a new pump & brake assembly tonight. As for the deck, it is actually unfinished maple strips. The actual color on the ship right now is a weathered light gray. I do like the color as is right now and may leave it. I would like it to be closer to the real gray but I don't want to make a mess of it since it looks pretty good now... just like brand new planks. I plan on building an experimental piece of deck and see if I can come up with a gray that is somewhat "whitewashed". It was good to see you at the show last weekend. Tom
- 200 replies
-
- 2
-
-
- Whaling Bark
- Charles W Morgan
- (and 1 more)
-
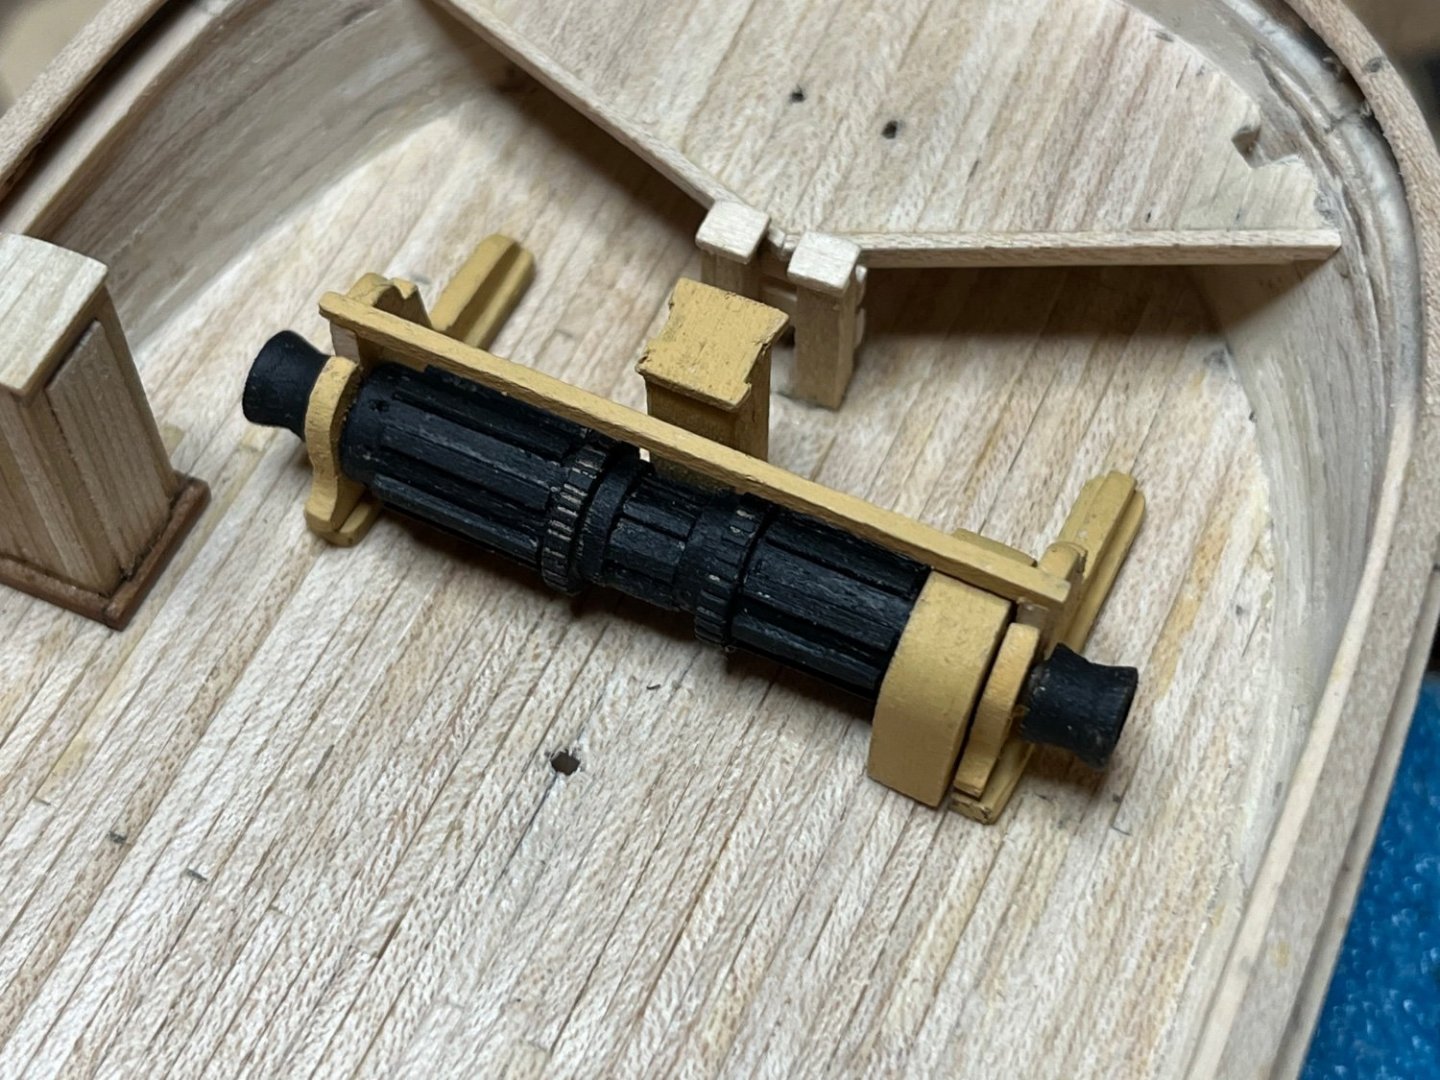
Working on the windlass. Not bad for a first attempt. Can’t say the same for the pump & brake mechanism. The first try came out a bit clumsy looking. Maybe just a bit oversized using .032 diameter brass wire. I have some .022 so I will try it again and see how it fits. If I like it I’ll post it, if not I hear the third time is a charm. 😜😂 Tom
- 200 replies
-
- 11
-
-
- Whaling Bark
- Charles W Morgan
- (and 1 more)
-
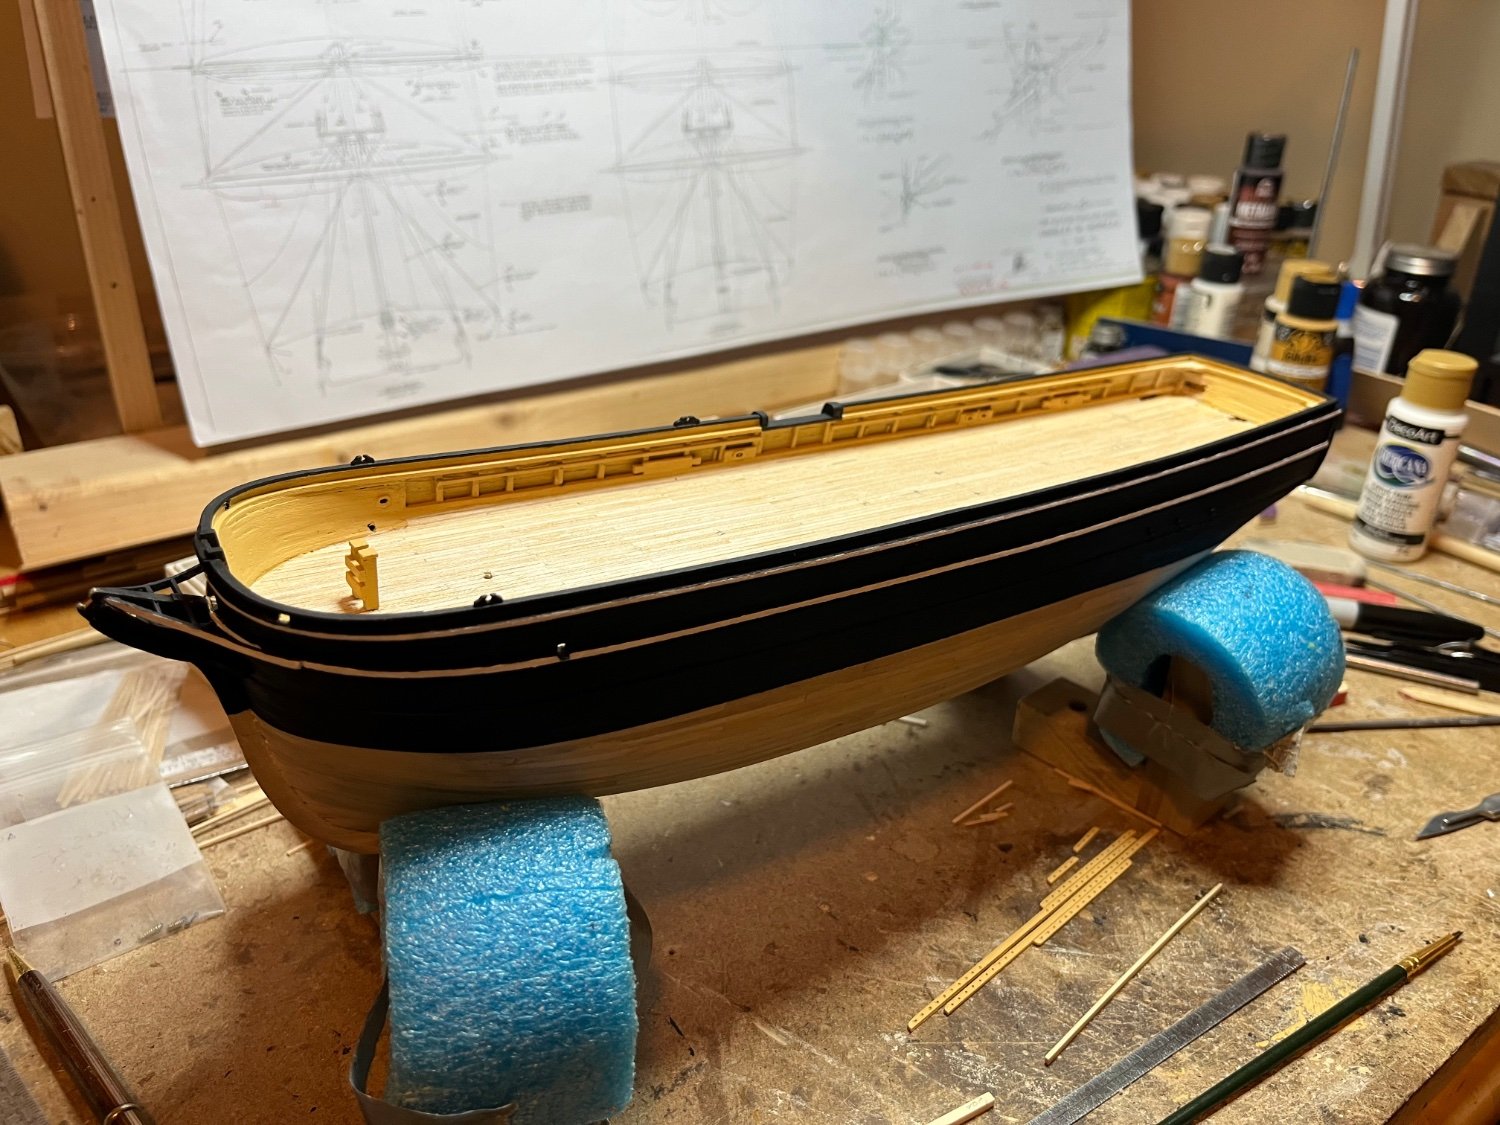
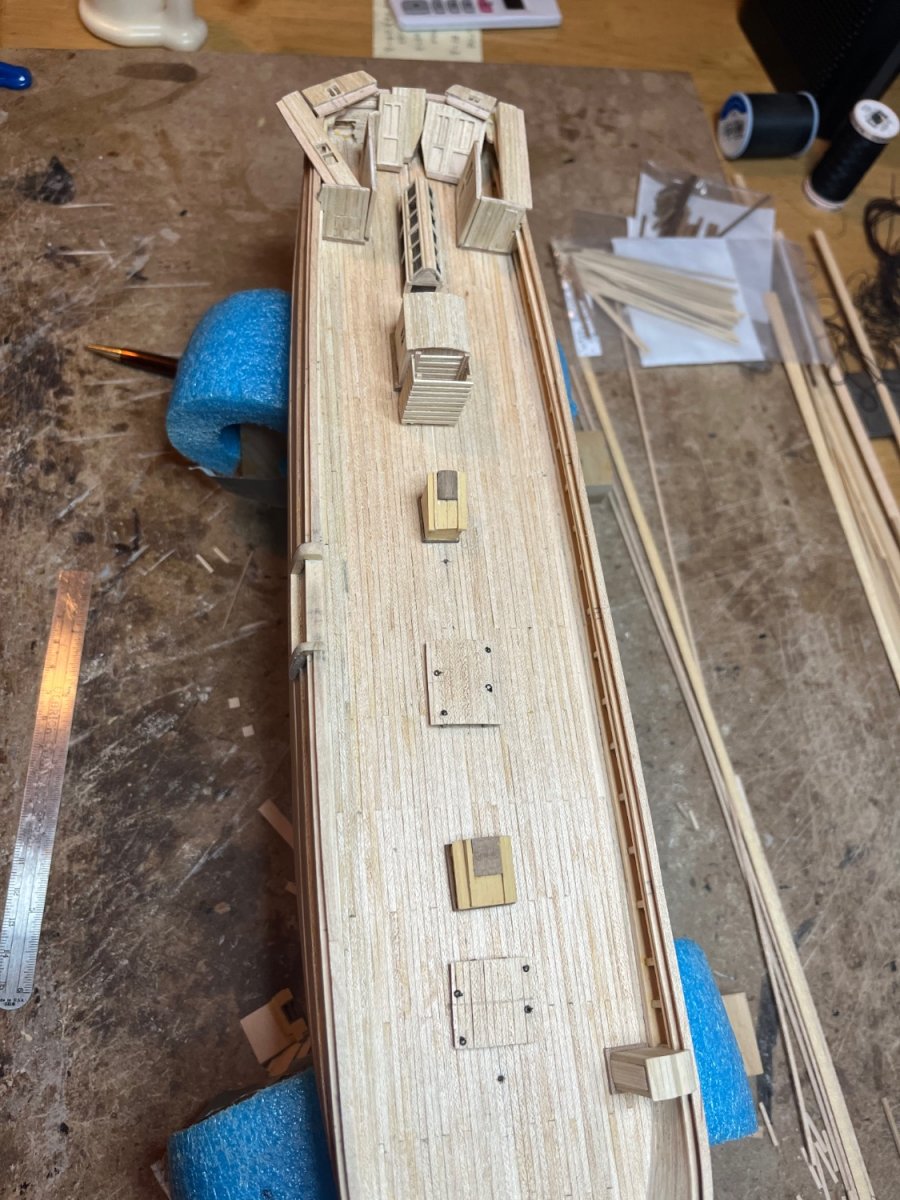
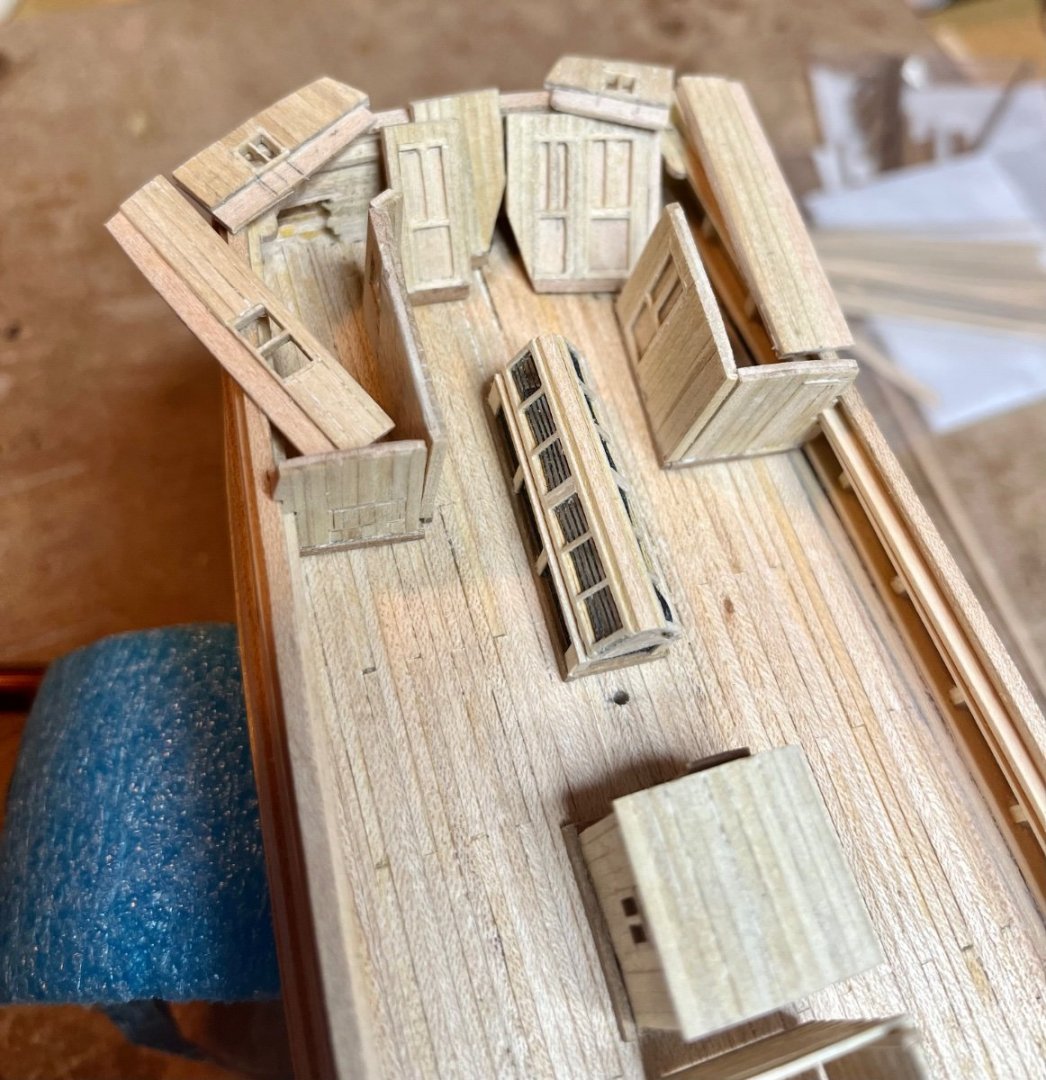
Still plugging along on the deck components whenever I get a chance which is not often lately 😕. The jumbled pile of stuff in the stern area are all the walls of the hurricane house. The have all been fitted but before I glue the sections together I will do all the painting. I think it might be easier while they are still in a flattened state. As seen above the skylight is also finished. I am now going to tackle the windlass and then the tryworks. I still have all kinds of holes to put in the hull at deck level for various lines. Plan is to paint and copper the hull after the holes. I also still need to make the pedestals to mount the hull to a base which will just be a scrap block of wood for now. Looking forward to the Northeast Joint Conference this weekend and seeing all my fellow modeling friends. Tom

- 200 replies
-
- 7
-
-
- Whaling Bark
- Charles W Morgan
- (and 1 more)
-
Hi KJackson I live about a hour away from where she is moored in Mystic. I visit often and bring my camera as well as video so I have lots of pics to reference. I also check out the many logs here on MSW. Other than that, just the plans. Oh yeah, of course Google for whatever I can find. Tom
- 200 replies
-
- 2
-
-
- Whaling Bark
- Charles W Morgan
- (and 1 more)
-
Hi Rookie. I have been on the Morgan many times and the deck is a grayish color from the weathering. I am not sure if I will turn my maple deck gray or just leave it as fresh wood. Since the model is not as originally built, grayish makes sense. I am thinking some watered down paint to sort of stain it gray. I still have a bit of time to decide. I still need to paint and copper the hull. Tom
- 200 replies
-
- 2
-
-
- Whaling Bark
- Charles W Morgan
- (and 1 more)