HOLIDAY DONATION DRIVE - SUPPORT MSW - DO YOUR PART TO KEEP THIS GREAT FORUM GOING! (Only 24 donations so far out of 49,000 members - C'mon guys!)
×


toms10
-
Posts
929 -
Joined
-
Last visited
Content Type
Profiles
Forums
Gallery
Events
Everything posted by toms10
-
 Hi Bob, Thanks for the comment. I neglected to mention in the post above that it only works if you don’t twist the wire too tightly. The wire need to be able to open up around the pin when you insert it into the twist. I just received some 30 and 34 gauge wire to see how it will look. Might be too small to even notice the links versus just twisted wire. Tom
- 200 replies
-
- 1
-

-
- Whaling Bark
- Charles W Morgan
- (and 1 more)
-
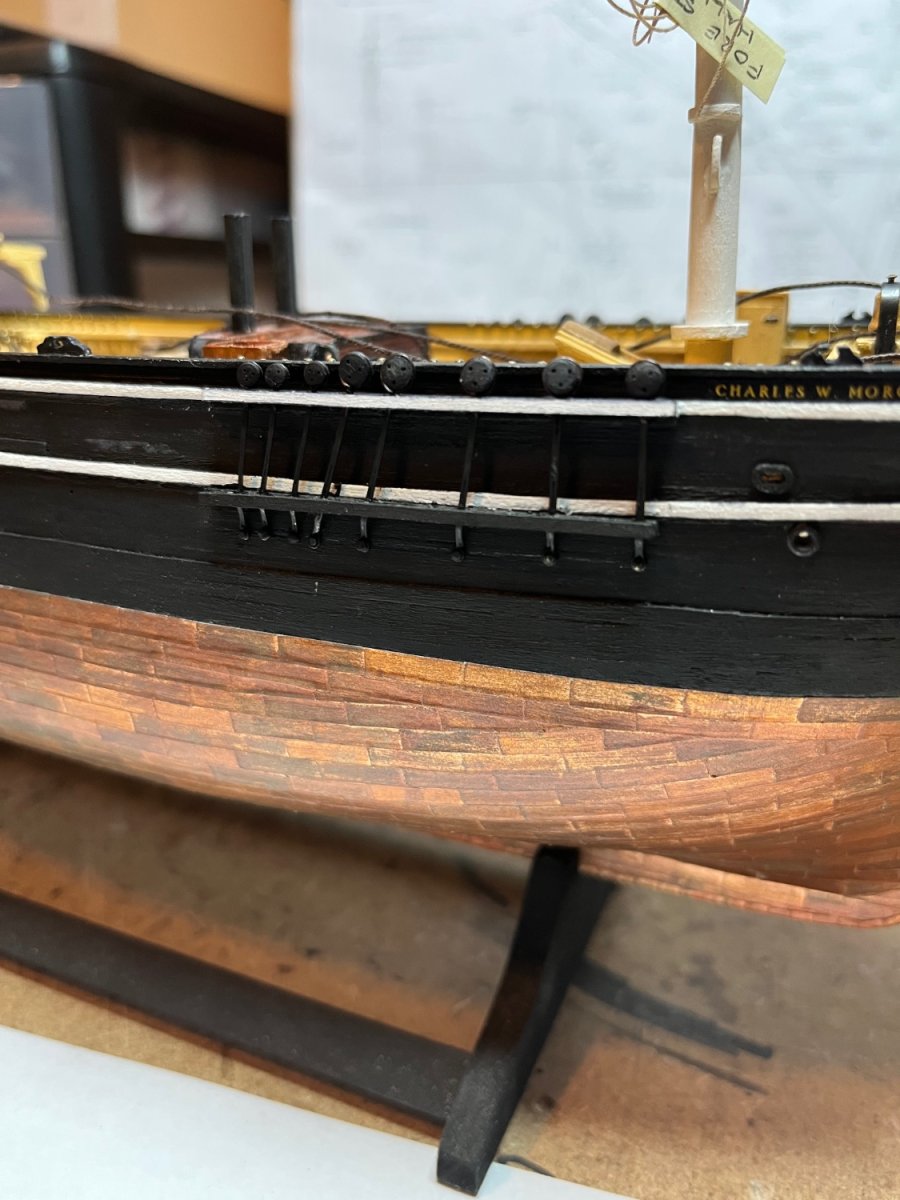
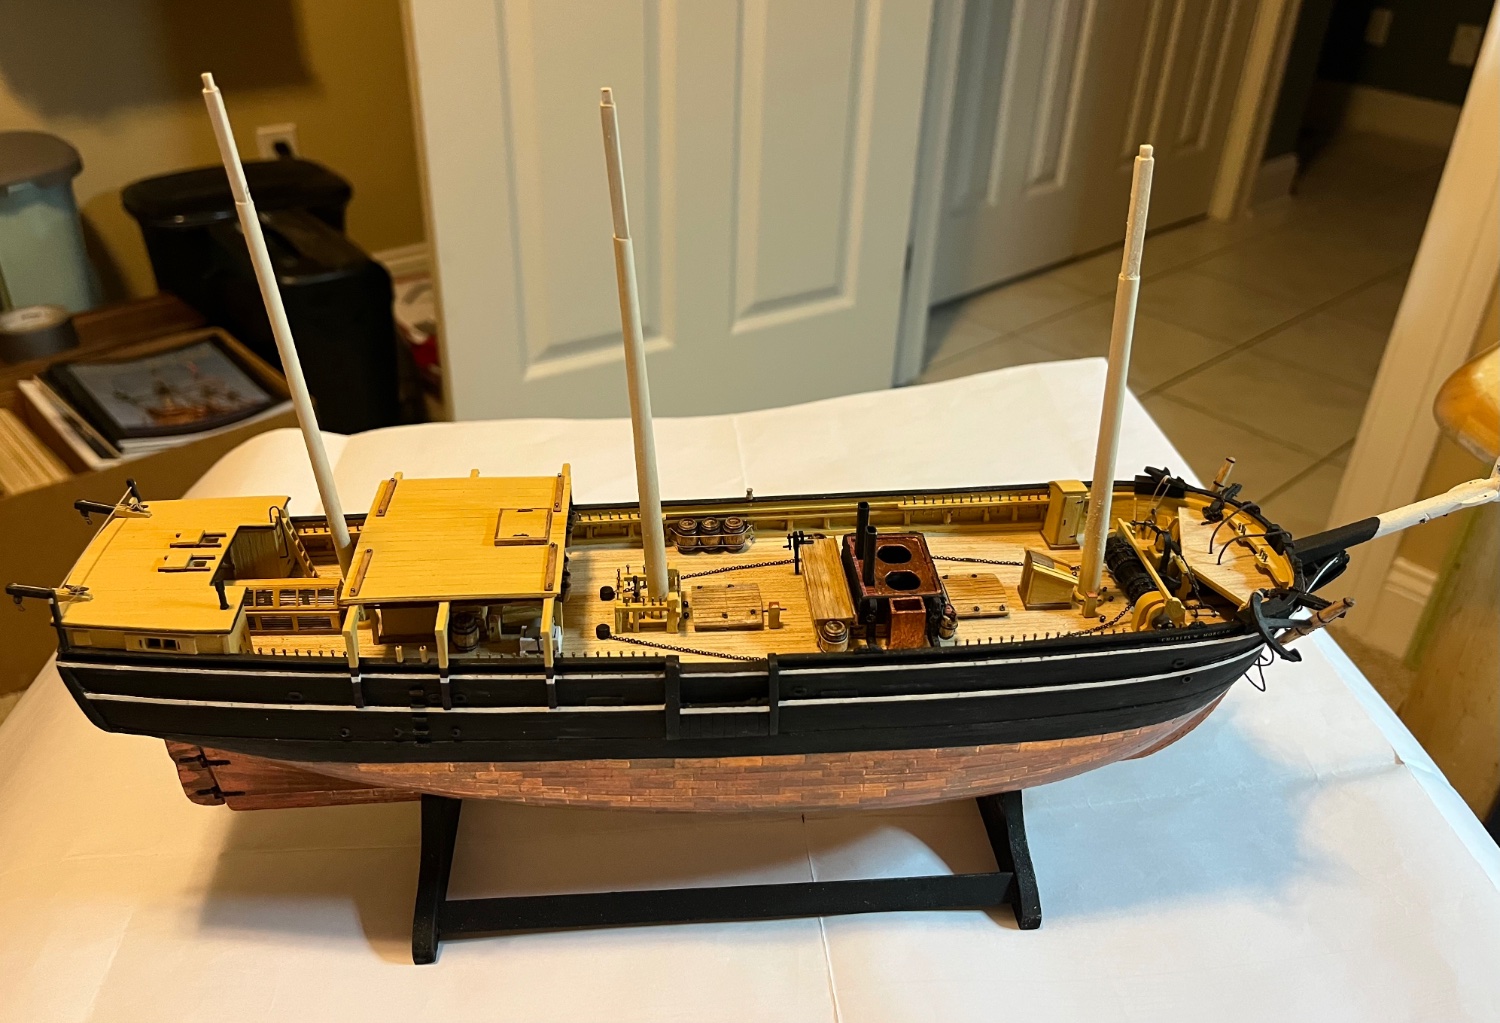
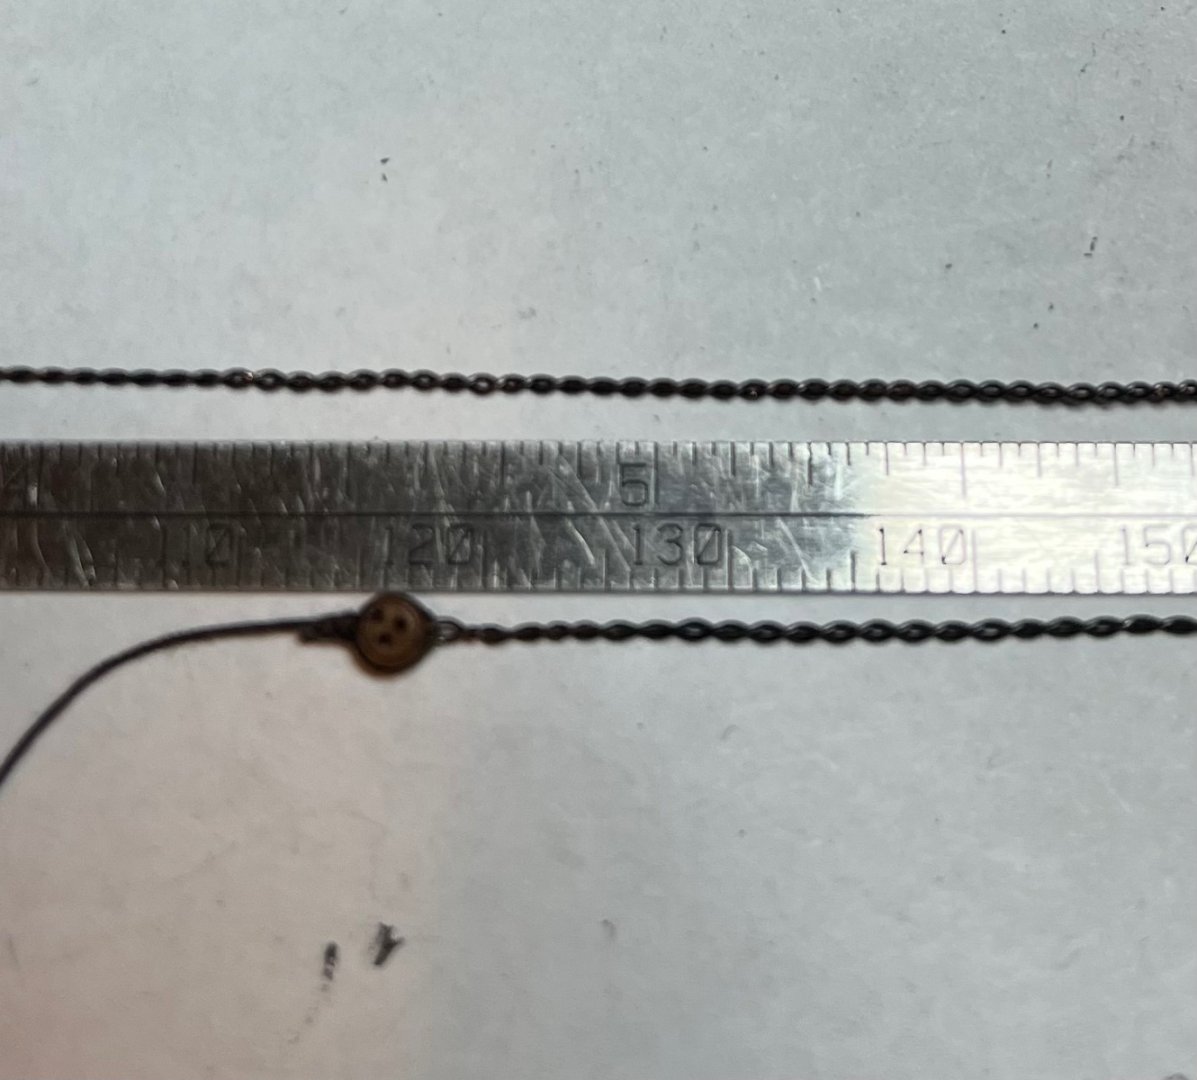
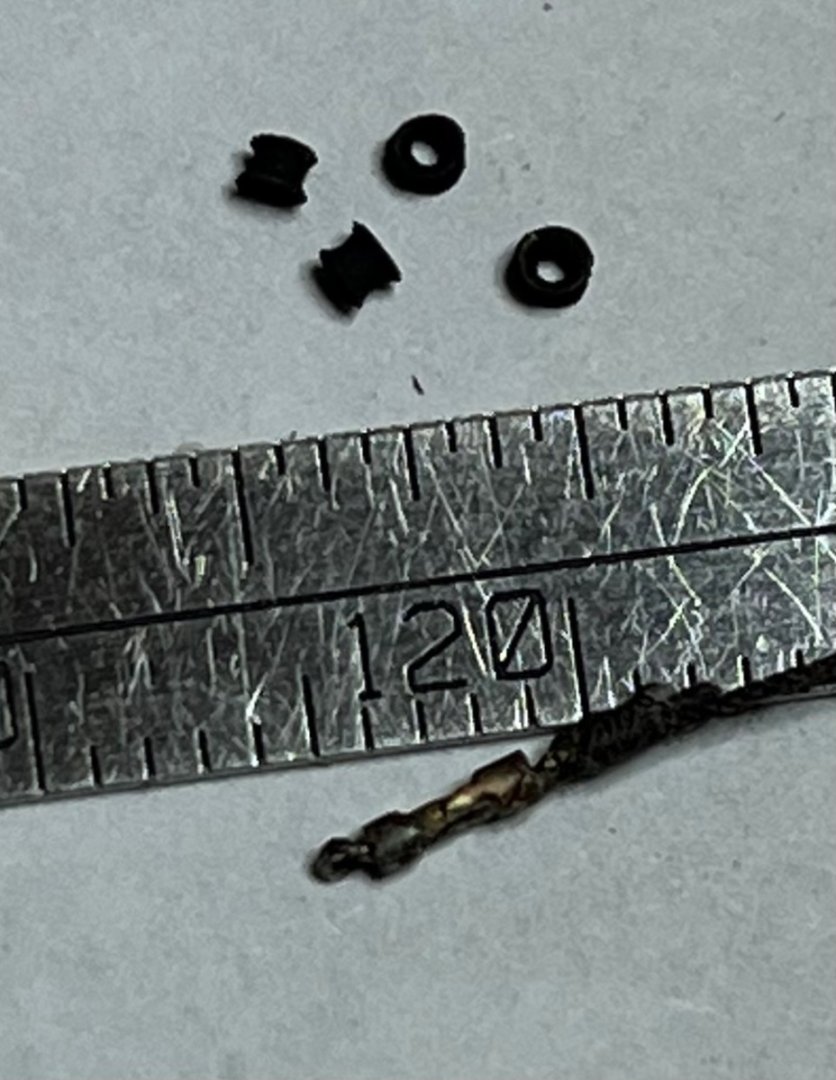
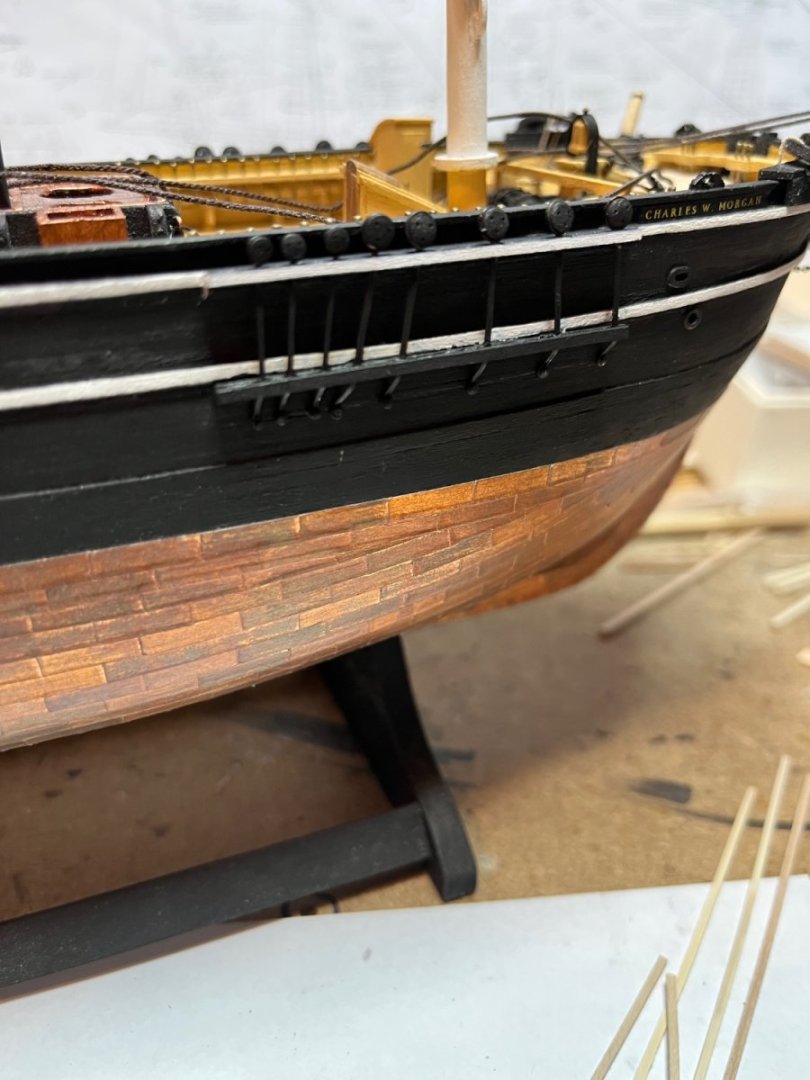
Finally got back to modeling. This working for a living is getting old. 😂. I spent some time figuring out how to make some of the hardware and chain and get it to look like it is to scale at 1:96. I am very happy with the chain. I took copper wire, in this case I used .012”diameter (28 gauge) to experiment with. it came out about .027” in diameter and about 28 links per inch. I can buy chain about the same diameter and 40 LPI so I will experiment with 30 and 34 gage wire. The advantage to using my wire is it is stiff and can easily be formed to any curve or kept very straight to look taut. I just took a length of wire, folded it in half and placed my homemade hook in the looped end and twisted the wire. Then I took a common pin and poked it through the twists to slightly separate the wire twists to make something that looks just like a link. The whole process took less than 10 minutes. Here are a couple of blackened test pieces below. I also took a stab at making miniature turnbuckles and thimbles. The turnbuckle shown below was made by filing about a third of the way through the side wall of a 1 millimeter diameter brass tube, turning it around and doing the same on the opposite side. This left a tube with slots on opposite sides that sort of simulates the body of a turnbuckle. I then micro-brazed an eye hook on each end to tie a rope or attach a hook to. The thimbles above were made by collapsing a 1 millimeter brass tube on a forming tool that flares the ends of the straight blank to what you see in the picture above. The inside diameter is .024” and the length is about .035”. They can definitely pass for proper scaled pieces. I also have a set of forming tools to make them with a .039 ID which seemed to big for 1:96 scale. I did manage to braze up some chain plates and mount some fore channels. Zooming in on the pics I see I need to touch up the white edges in a couple of places. I will continue onto the main and mizzen channels and plates next as long as the “work thing” does not go back into crazy mode. Tom

- 200 replies
-
- 10
-
-
- Whaling Bark
- Charles W Morgan
- (and 1 more)
-
Ron, Really sweet looking model and display. As always, your attention to detail and craftsmanship is top level. Hopefully I will see it in person at the Northeast Conference in April. Congratulations on a great model. Also thank you for taking the time to put together an awesome build log. It was inspiring and packed with great “how to” information. Tom
- 542 replies
-
- 5
-
-
- Sphinx
- Vanguard Models
- (and 3 more)
-
Hi Ron no not yet. Should be a real challenge at 1:96 Tom
-
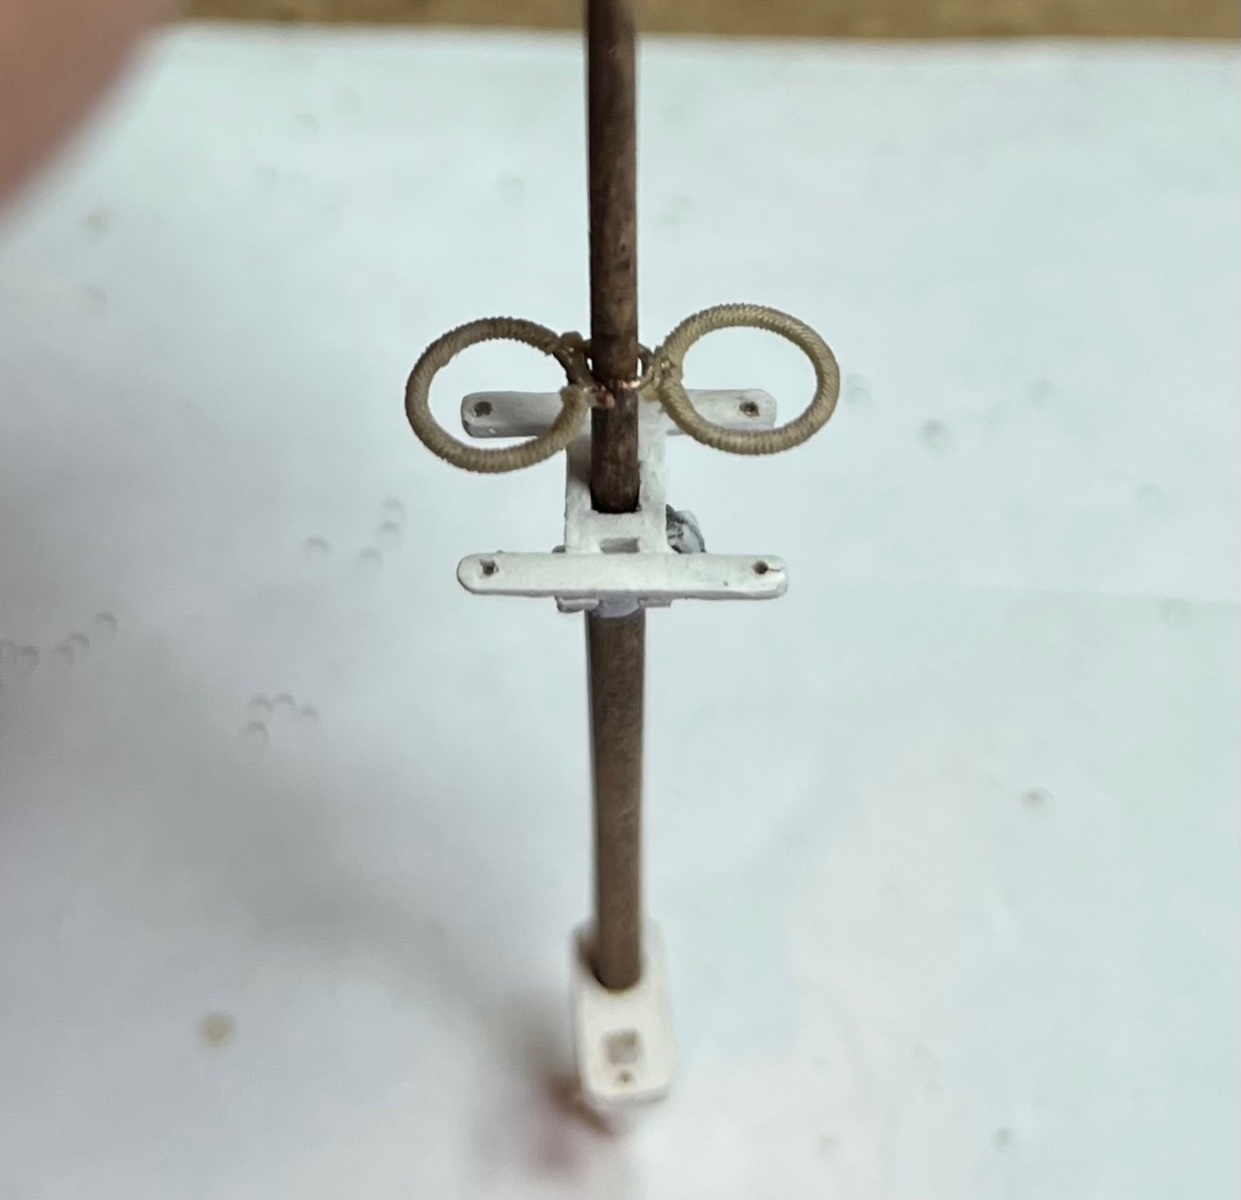
Finished dry fitting all the masts, top and trees. Here are a few pics. Below are the lookout rings on the fore top gallant mast. I used my new micro torch I got for Christmas, made some rings from .020” diameter copper wire and soldered away. Then I wound some .008” diameter rope around the ring to finish it off. Had so much fun I did it all over again for the main top gallant mast. 🤪😁 After I finish up putting all the blocks, eyes and assorted other components on the masts I will start to work on the channels. Tom


- 200 replies
-
- 8
-
-

-
- Whaling Bark
- Charles W Morgan
- (and 1 more)
-
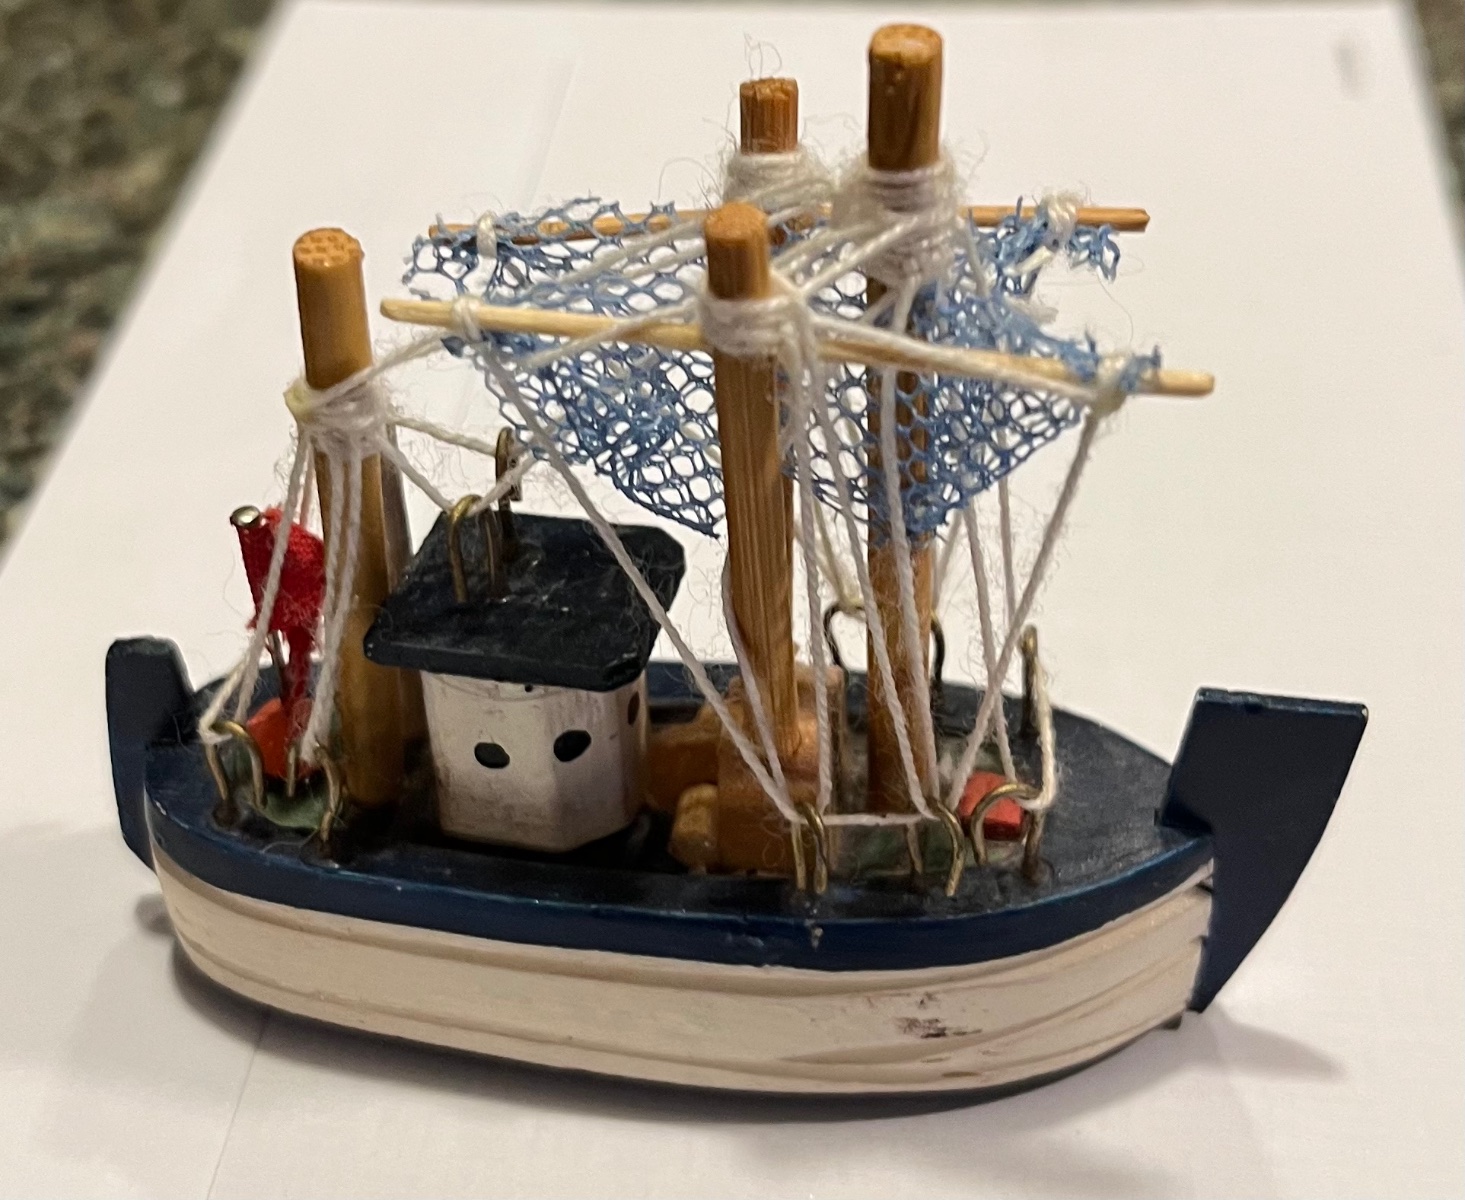
Here is one of the reasons it is taking me so long to do anything on my Morgan. My daughter brings me all kinds of stuff to repair. This is the latest. This beautiful replica of a trawler made in China was in need of a new yard and some re-rigging. It stood next to her beta fish bowl for 7 years. It now has sentimental value and it is hard to say no to your daughter. Okay, now back to the Morgan until the next broken item shows up 😂 Tom

- 200 replies
-
- 7
-
-
- Whaling Bark
- Charles W Morgan
- (and 1 more)
-
Continuing with the masts, caps and trees. Starting to dry fit everything as well as studying the rigging. Definitely want to put as much on these masts while they are off the model. This makes for slow going now but will definitely payoff later provided I don’t miss a block or eye. The picture is a bit yellowish but you get the idea. Here are the upper masts under construction for the fore and main. Still need to make the main top mast cross trees. Things are slow going but I relate more to the tortoise than the hare, at least right now. 😜 Tom


- 200 replies
-
- 9
-
-
- Whaling Bark
- Charles W Morgan
- (and 1 more)
-
I vote for the simpler one on the left. Much cleaner looking at this scale. just my 2 cents Tom
-
Ron, you are ridiculously talented!😁 I think I actually felt the spray from the whitecaps! 😂 Tom
- 542 replies
-
- 5
-
-
- Sphinx
- Vanguard Models
- (and 3 more)
-
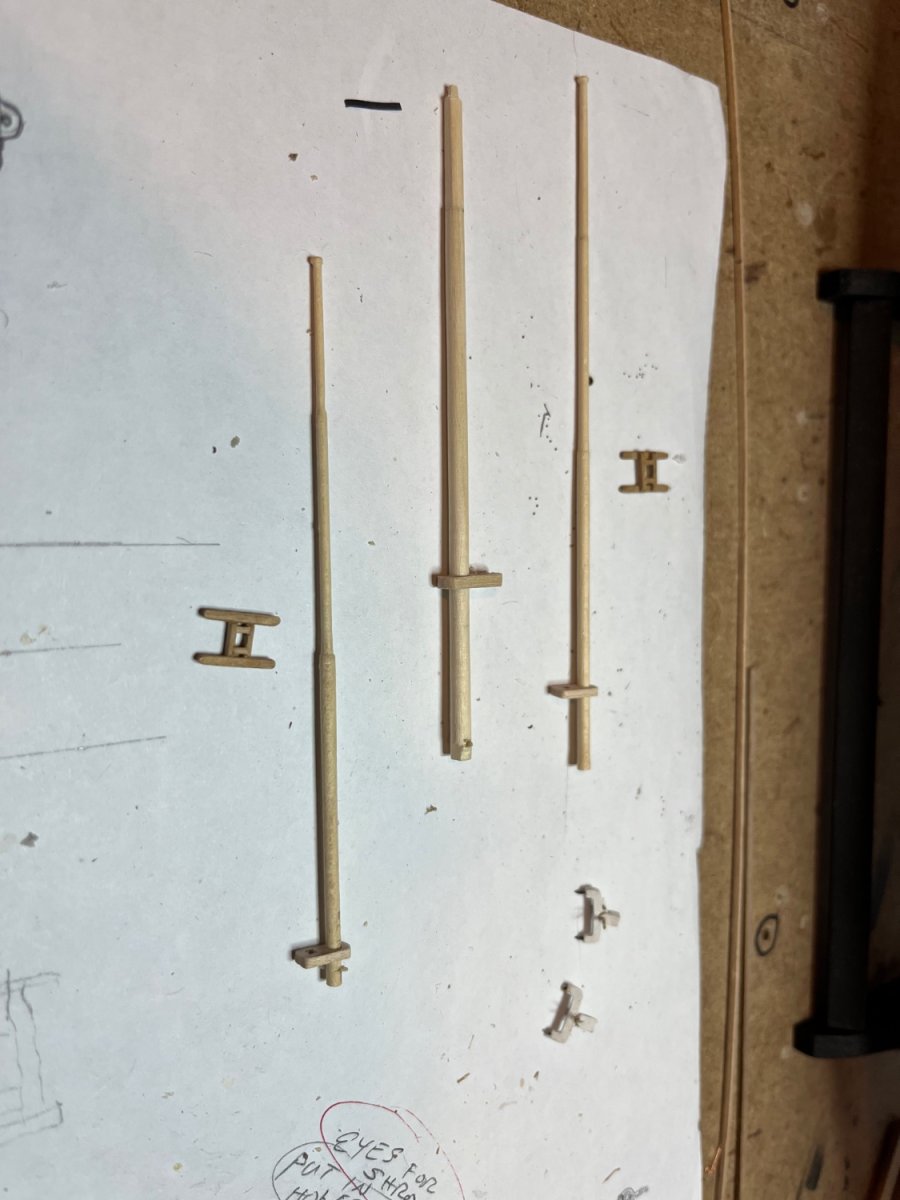
Managed to make 3 lower masts today. They still need a lot of detail work but at least the model is starting to gain some elevation! Tom

- 200 replies
-
- 9
-
-
- Whaling Bark
- Charles W Morgan
- (and 1 more)
-
One issue to consider when using a needle threader is the thread is folded over when it is pulled through the hole in the block. This means that the hole must be large enough to accept twice the thread (rope) diameter. As previously mentioned, if the hole is that big, it might mean that the block is too big or the rope too small or even both. I am assuming the block is of decent quality. Sometimes the hole needs to be cleaned up a bit The CA glue on the tip works best for me. 😁 Tom
-
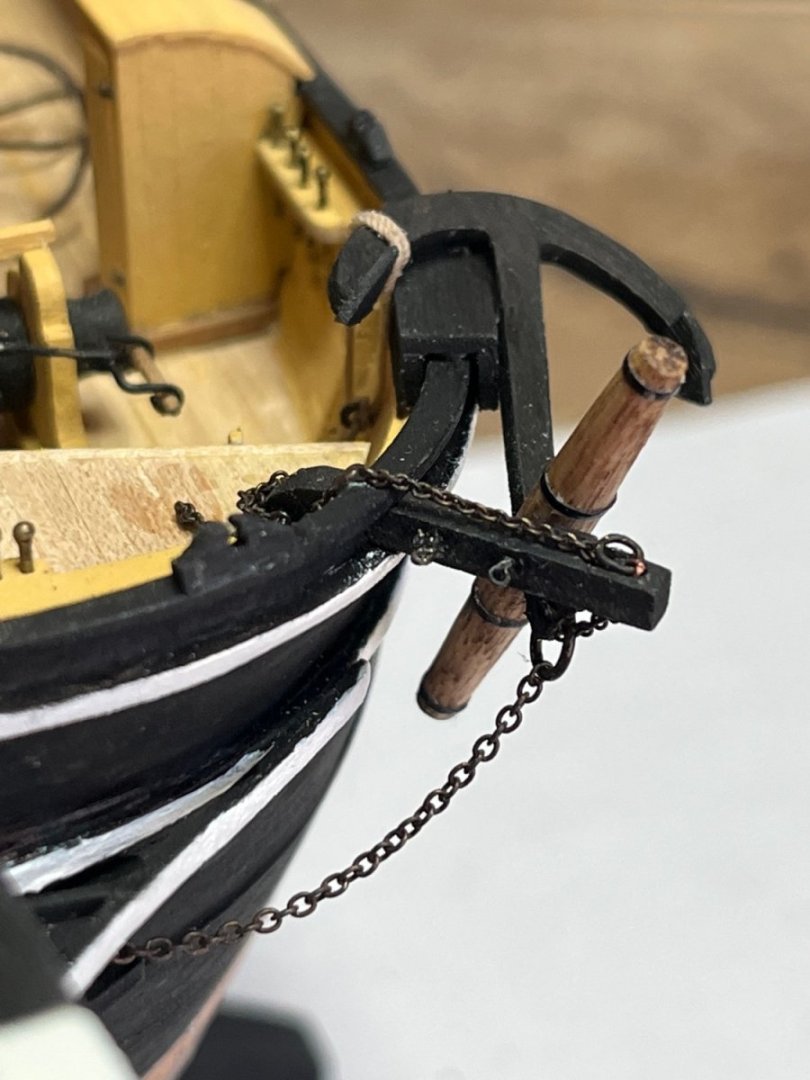
Anchors away! Finished installing and rigging the anchors. The deck is starting to get filled up with stuff. I think now is a good time to look ahead at the rigging again to make sure I have all the eyebolts, cleats and the like that I will need. It will become more difficult to fit those forgotten or missed ones in later on when there is even more “stuff” in the way. 😜. I think the next big step might be to make the 3 lower masts. I will use those to locate the channels and shroud lines. Then I can verify that the davits for the whale boats will be in the correct positions. I see a lot of dry fitting components in my future. Tom

- 200 replies
-
- 11
-
-
-
- Whaling Bark
- Charles W Morgan
- (and 1 more)
-
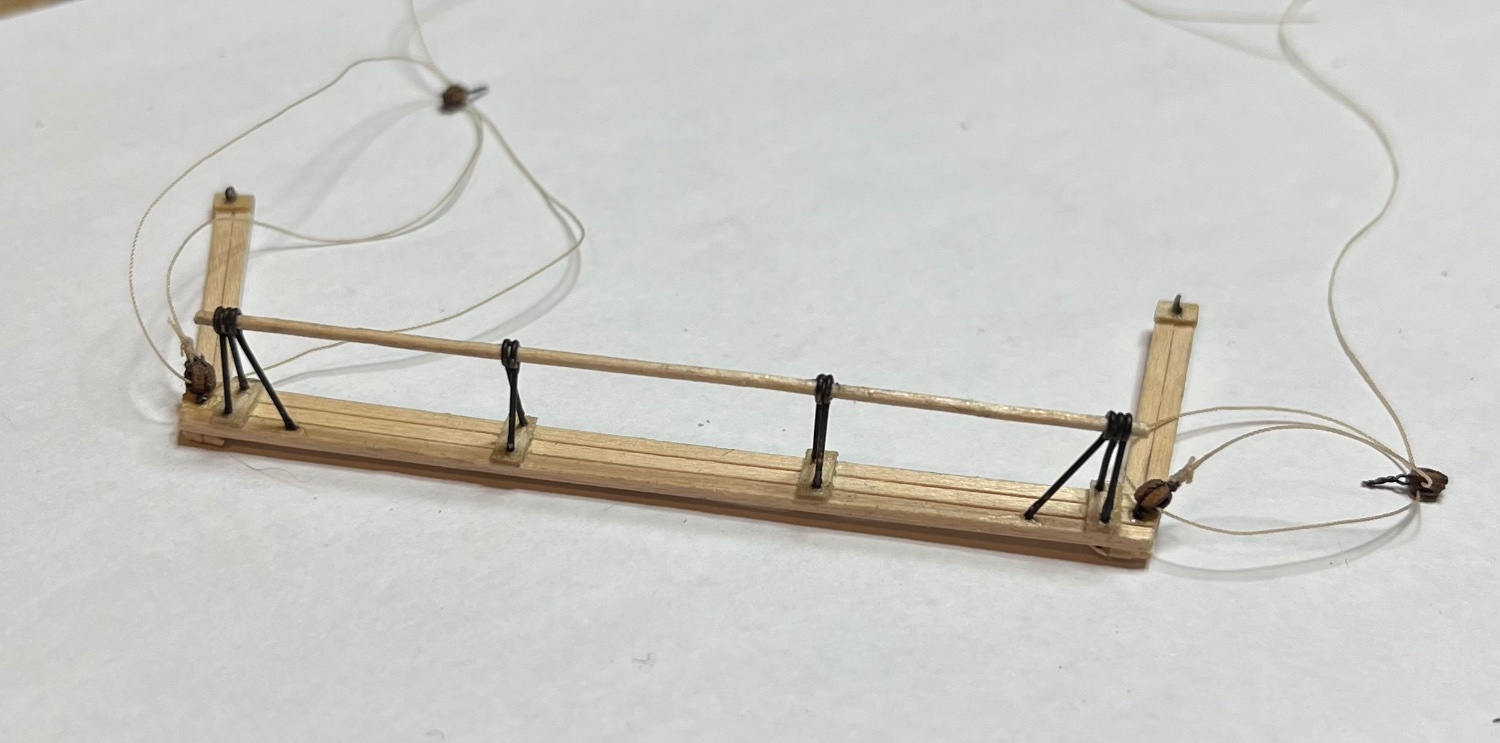
It’s been a while since I was able to do some modeling. I had to tend to my mom’s funeral arrangements and relocate my dad back up from Florida. Seems like there is a never ending list of loose ends to be completed. I was able to build and semi rig the cutting stage. This will be rigged in an upright position as I plan to show the model with sails. I did make my own .008” diameter polyester rope shown here. I am also playing around with my Syren Rope Rocket to develop the various rope diameters any lays I will be needing. Still need to put some type of color to it to dirty it up a bit. The wood is too white compared to the rest of the ship. Tom

- 200 replies
-
- 7
-
-
- Whaling Bark
- Charles W Morgan
- (and 1 more)
-
Ron your detailed description of the process is making me want to do a diorama for my next build. Excellent work and thank you for taking the time to photograph and describe the process. Your build log brings build logs to a new level. Thank you Tom
- 542 replies
-
- 3
-
-
- Sphinx
- Vanguard Models
- (and 3 more)
-
Hi Ron, Your last comment above is the the key to any hobbiest’s success. After all isn’t that why one persue’s a hobby in the first place? Your dioramas are definitely something to behold as I can attest to having seen them in person. This one is no exception. Looking forward to seeing some water splashing around inside that “box”. 😁 Tom
- 542 replies
-
- 4
-
-
- Sphinx
- Vanguard Models
- (and 3 more)
-
Thanks John and Mark for the well wishes. Mark, regarding the chains, what you said makes. A lot of sense and explains why they were not present in any of the photos. After all, who takes photos of a whaling ship in severe weather! 😁 Thanks again, I will leave them off, and just put an eye hook on the rudder. Tom
- 200 replies
-
- 4
-
-
- Whaling Bark
- Charles W Morgan
- (and 1 more)
-
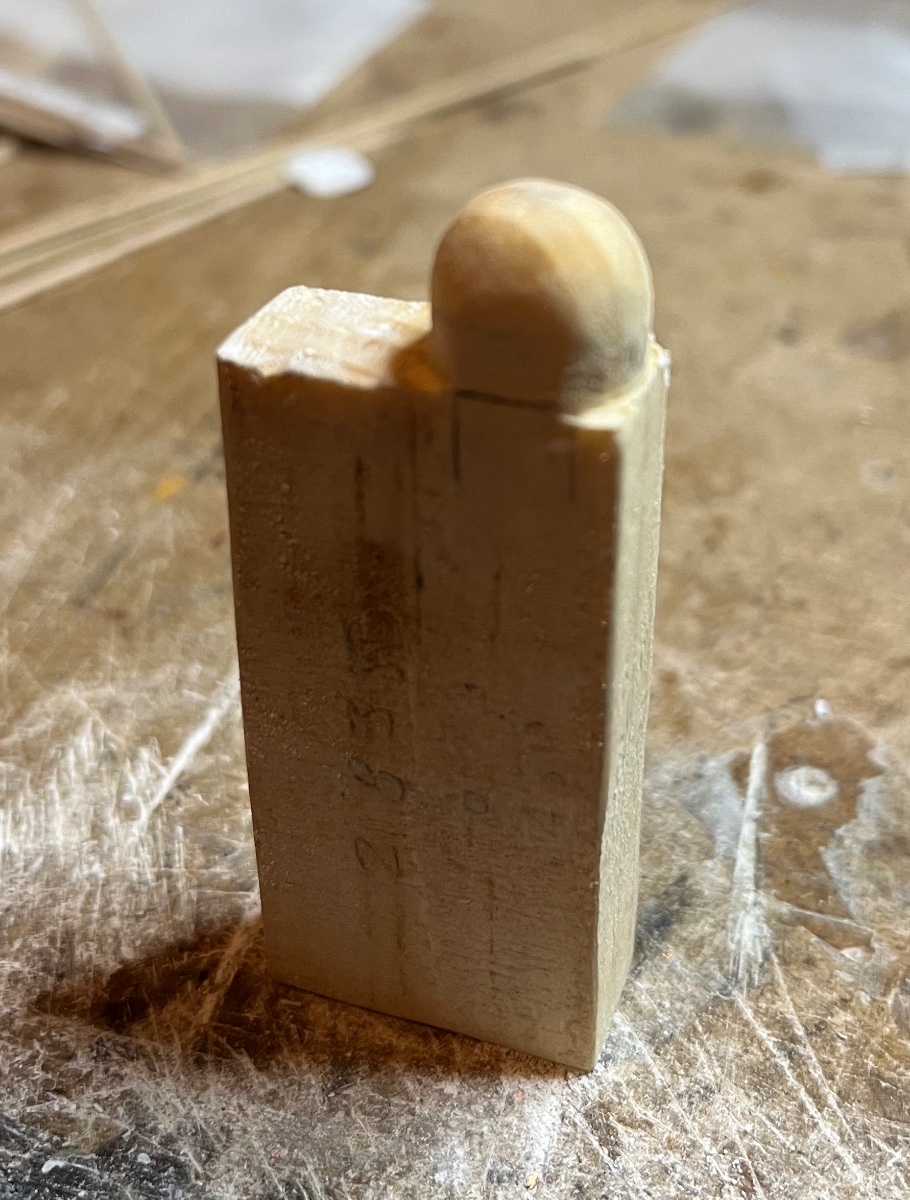
After a bit of time away from modeling (that life thing in the way again) I was messing around with some Sculpy clay. Made an attempt at the eagle that is on the stern. I am not a sculptor, that is for sure but came up with one seen below. Luckily at this scale fine detail is not critical to complete success. I think I was able to put enough detail for one’s eye to interpolate the details. I believe the power of suggestion is an important tool in a modeler’s arsenal and I am taking advantage of that here. 😁 I need to take a break again as I will be moving my parents back to Connecticut from Florida in the coming weeks due to health issues. It is very difficult to provide proper support from 1200 miles away. 🙁 In the mean time I need to do some research regarding the rudder’s preventer chains. There is an eye on the top of the rudder as called out in the plans but there is no preventer chain currently (since restoration) on the ship. I have searched through many old pictures of the Morgan at see on the internet as well as build logs and I have yet to see any chains. Why??? Should they be there? I would think so. I can’t seem to find any information. Next time I am at the Mystic Seaport I need to ask someone in the shipyard. In the meantime I am trying to figure out whether to put them on or not. If anyone has any insight I would welcome a bit of education. 😁 Tom

- 200 replies
-
- 5
-
-
- Whaling Bark
- Charles W Morgan
- (and 1 more)
-
I went through the links on my IPhone and it gave me a note that the Modelerssawmill.com is not a secure site. It did go through to the site. I am not an IT guy but could your browser settings or virus protection software be blocking the link?
-
Bench vise was a bit of a challenge at this scale but I am happy with the results. 😁 Tom

- 200 replies
-
- 10
-
-
-
- Whaling Bark
- Charles W Morgan
- (and 1 more)
-
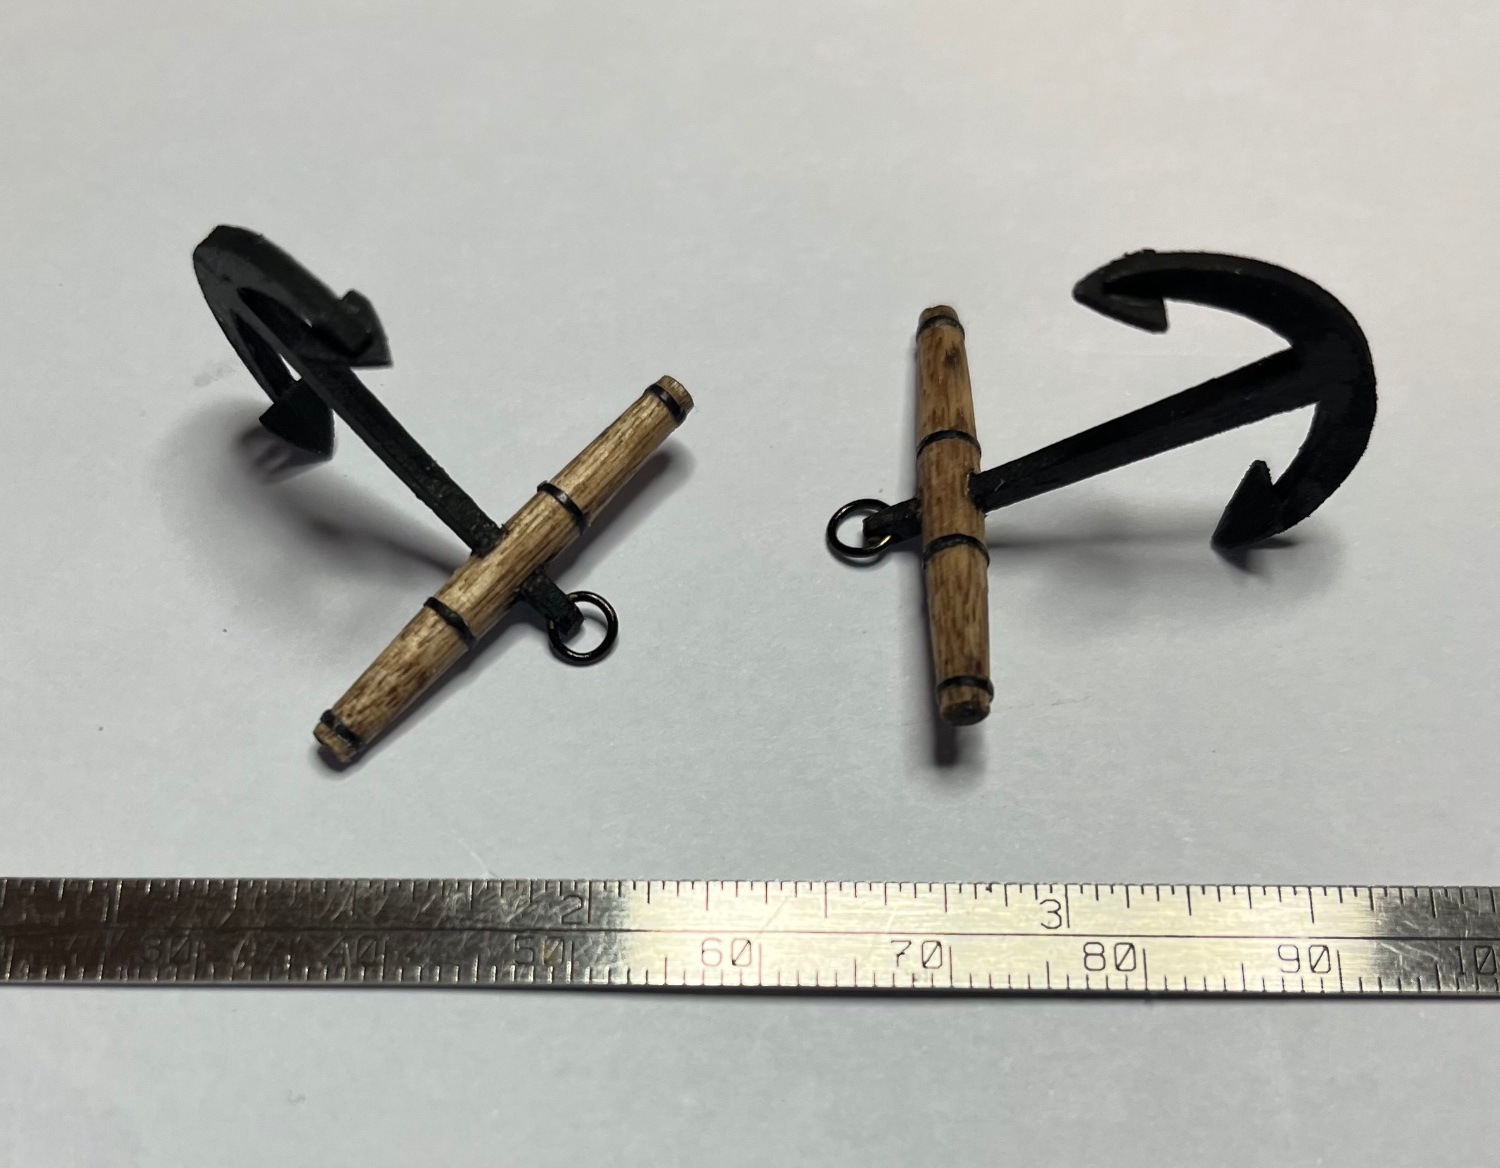
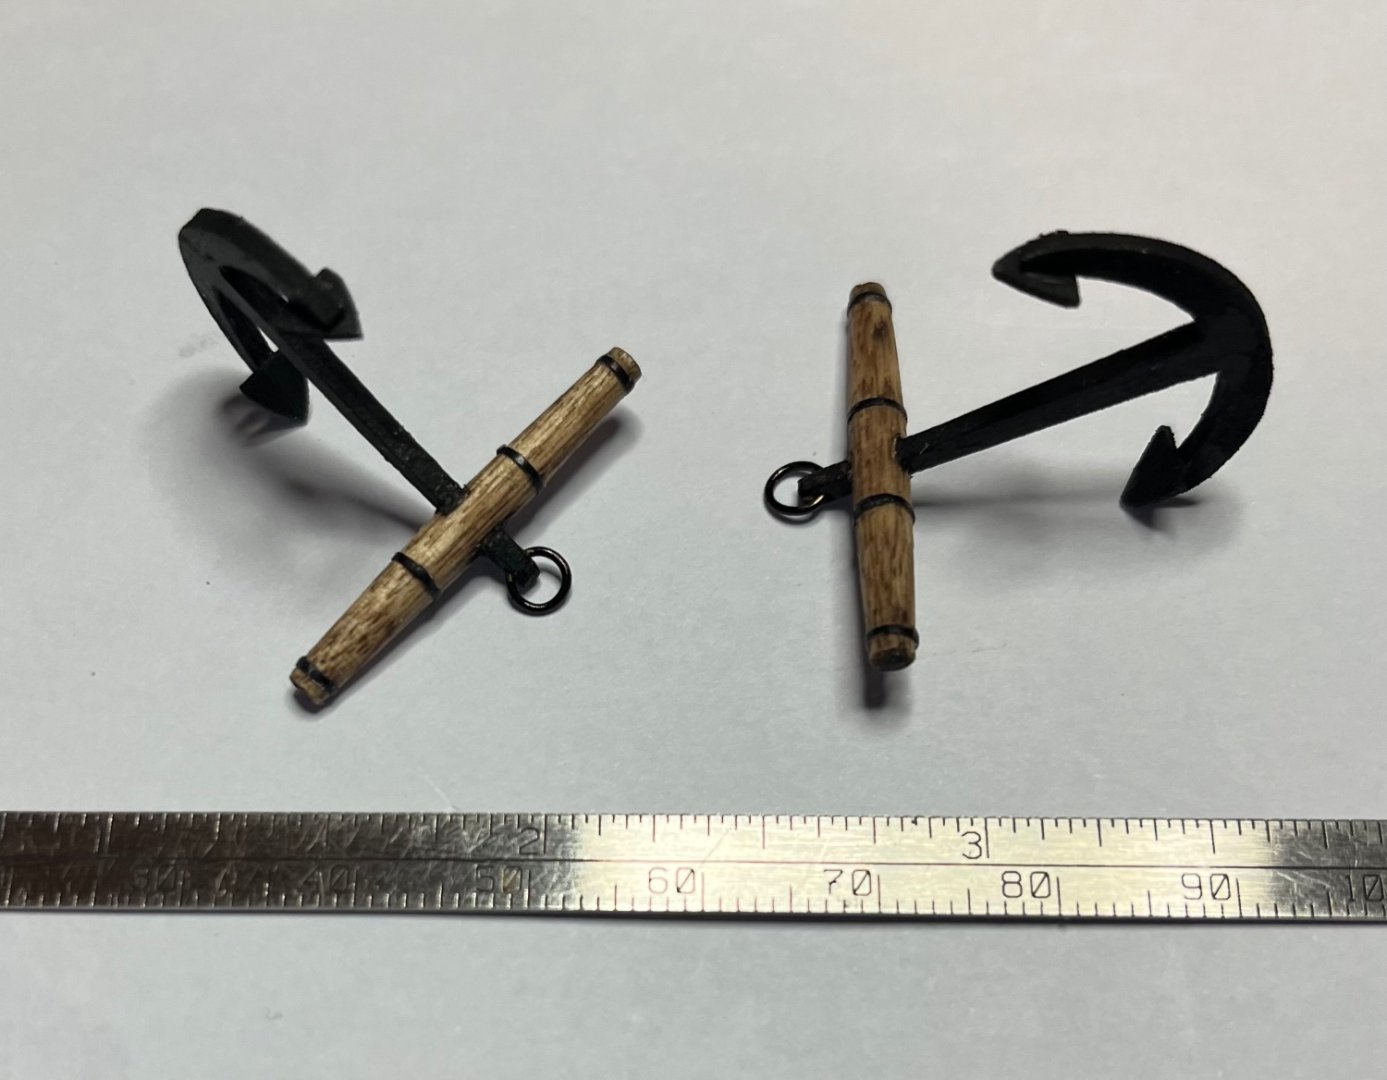
Found a little time to make a couple of anchors. Everything is wood except the bands around the stock which are paper. I ended up drilling a hole in the stock which is just a shaped dowel. I then took a triangular needle file and squared up the hole to accept the anchor shank. The shank, throat and arm are one piece cut and filed to shape. The flukes are independent pieces glued to the arms. Lastly I added the metal ring. The whole assembly is a bit fragile at this scale but should be plenty strong enough for a static model. I seem to be in the “making bits and pieces” mode again also known as “busy work”. 😁 Still need the bench vise and some various tryworks utensils which are next on the list… unless I get side tracked AGAIN. 😜😁😂 Tom
- 200 replies
-
- 6
-
-
- Whaling Bark
- Charles W Morgan
- (and 1 more)
-
I think the brad idea to pin the part will help. It just needs to small enough so there is enough material around it so the piece doesn’t split apart near the hole. Sometimes just using a thinner piece of wire instead of an actual brad is enough. Tom
-
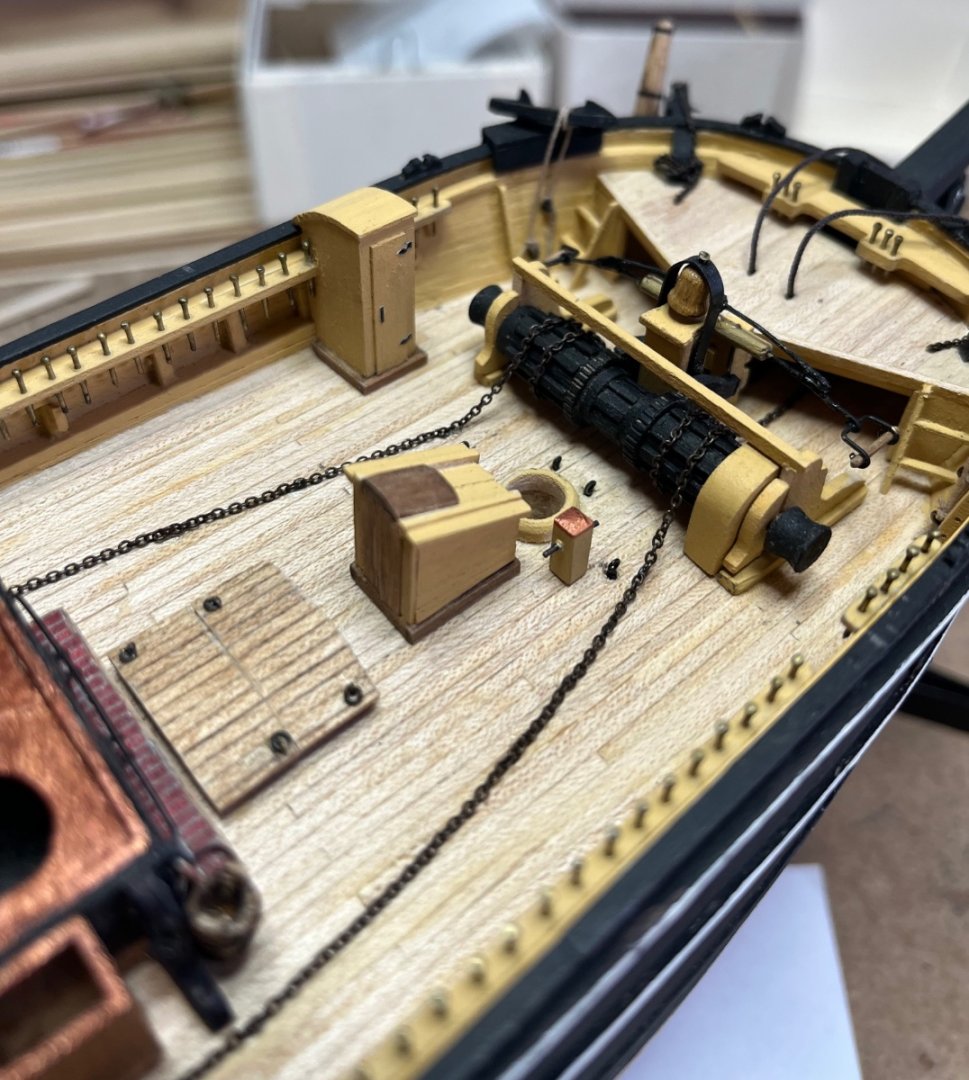
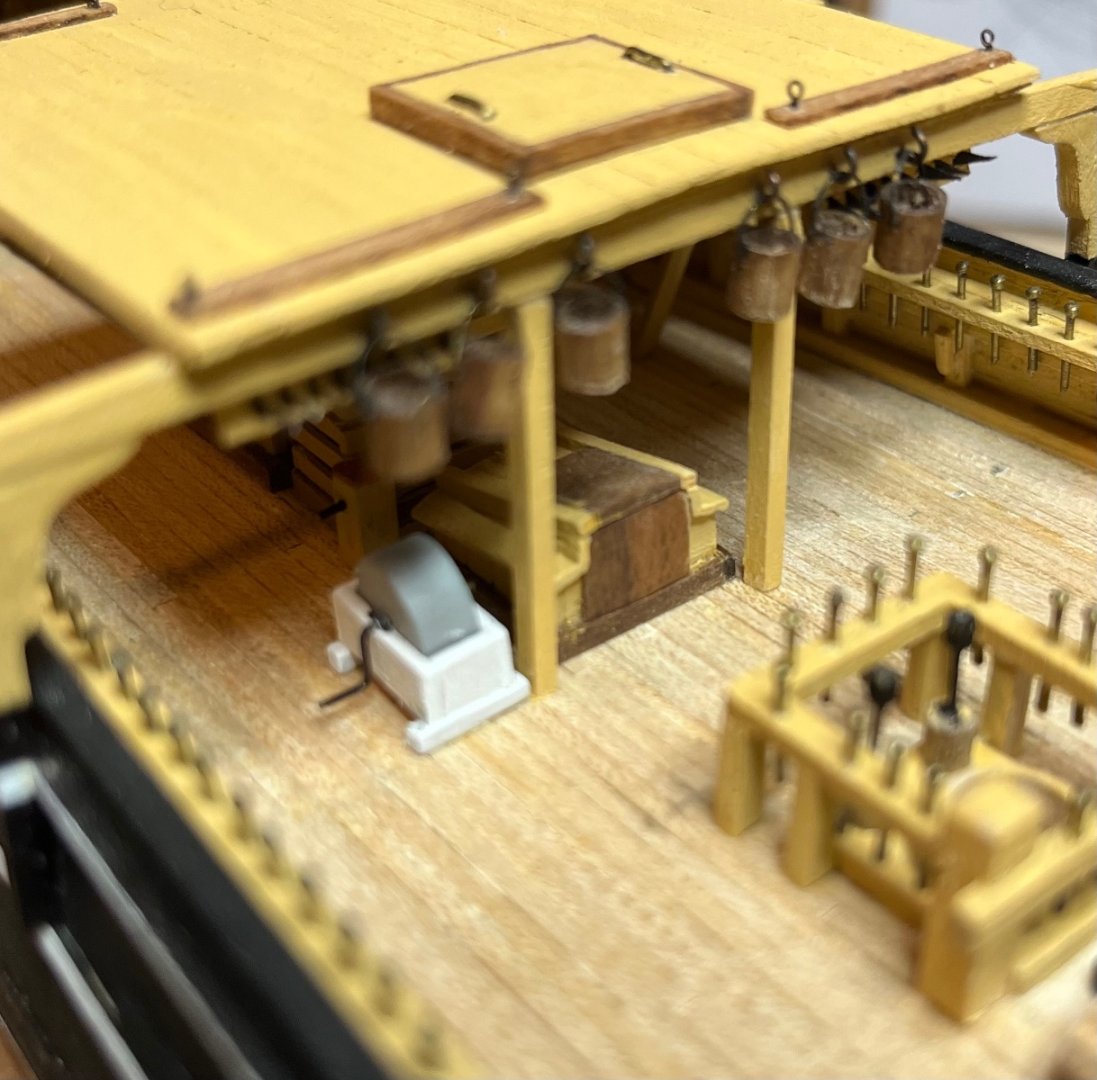
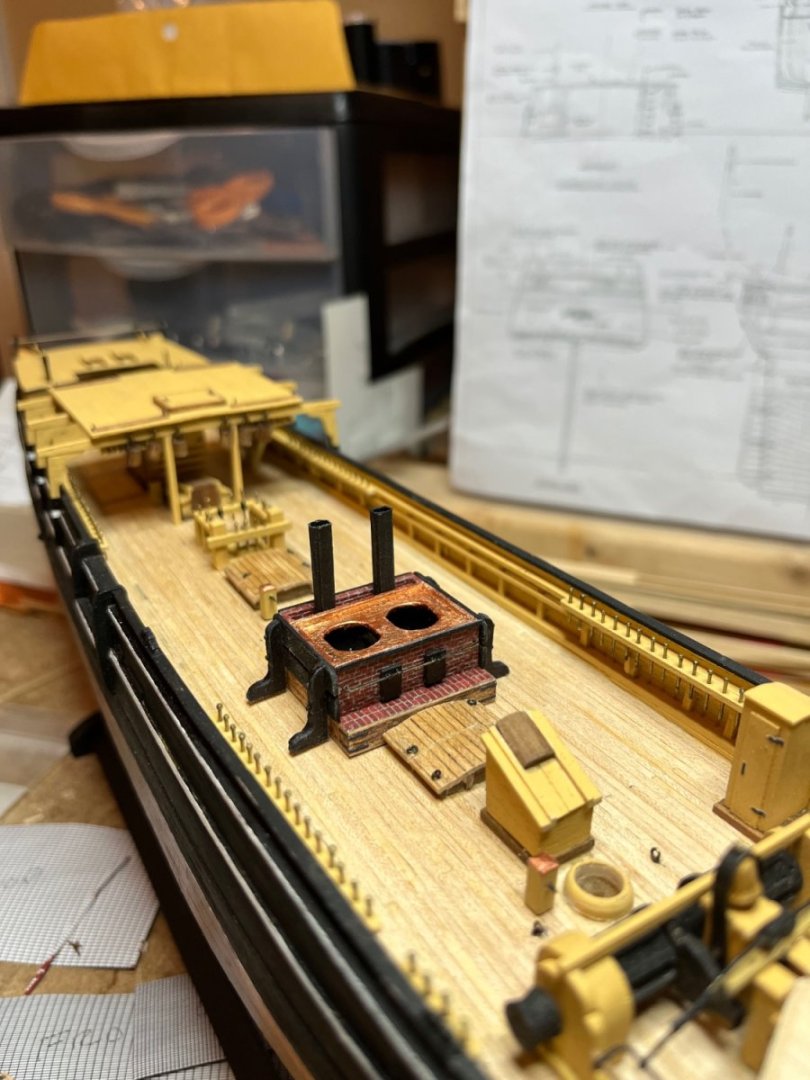
Went to a wedding in Auburn, NY this past weekend but managed to sneak in a bit of time before I left and made workbench / chicken coop. Still need to make the vice for the workbench. Also got the copper cooling tank completed. Need to wait for that to patina a bit. The wood box is done as well as the grinding wheel for the lances. Not sure why the grinding wheel base is white but that is what it is supposed to be according to the plan. All of these pieces are just dry fit for now. Here is the starboard side of the tryworks with the cooling tank and work bench. The wood box on the port side. And finally the grinding stone. I am taking a break from deck components and working on the anchors now for a change of pace That also gives me time to think about how to make the vice that goes on the workbench. 😁 Tom

- 200 replies
-
- 6
-
-
- Whaling Bark
- Charles W Morgan
- (and 1 more)
-
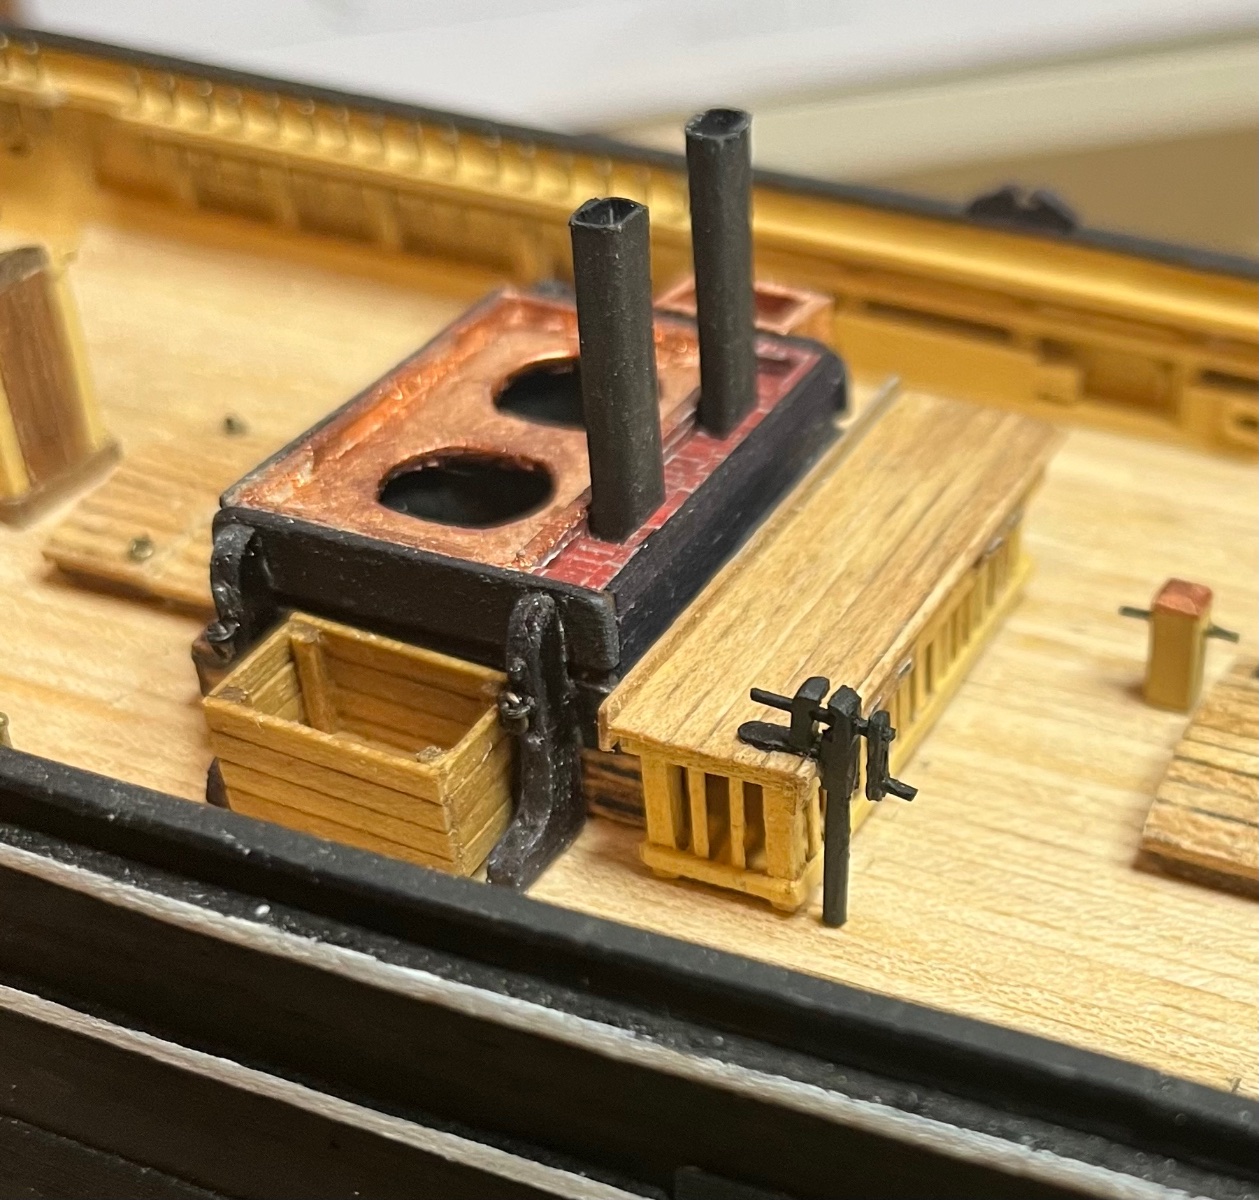
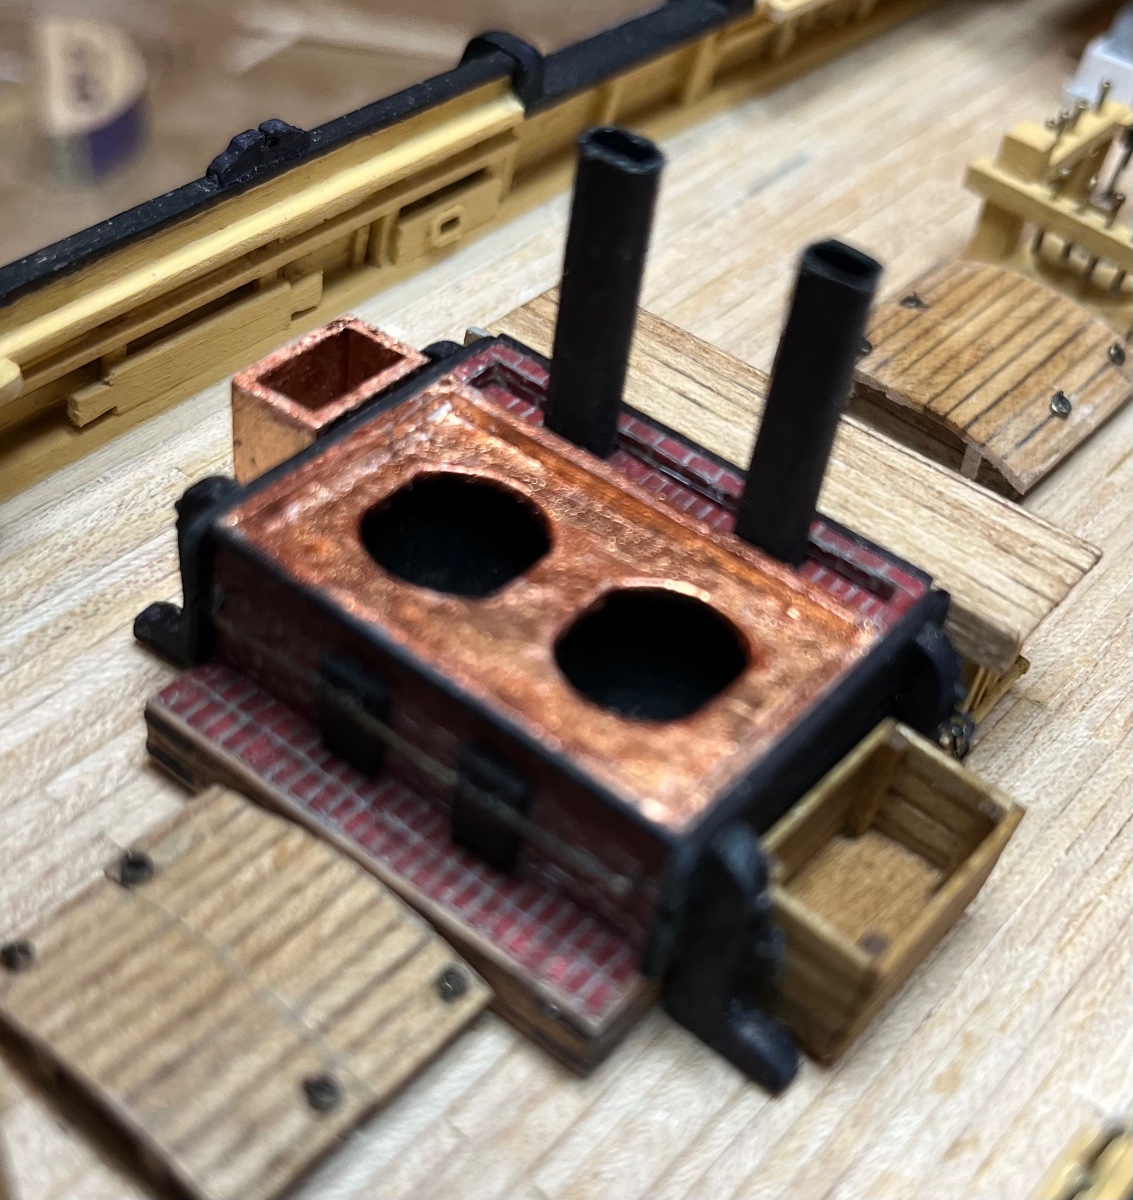
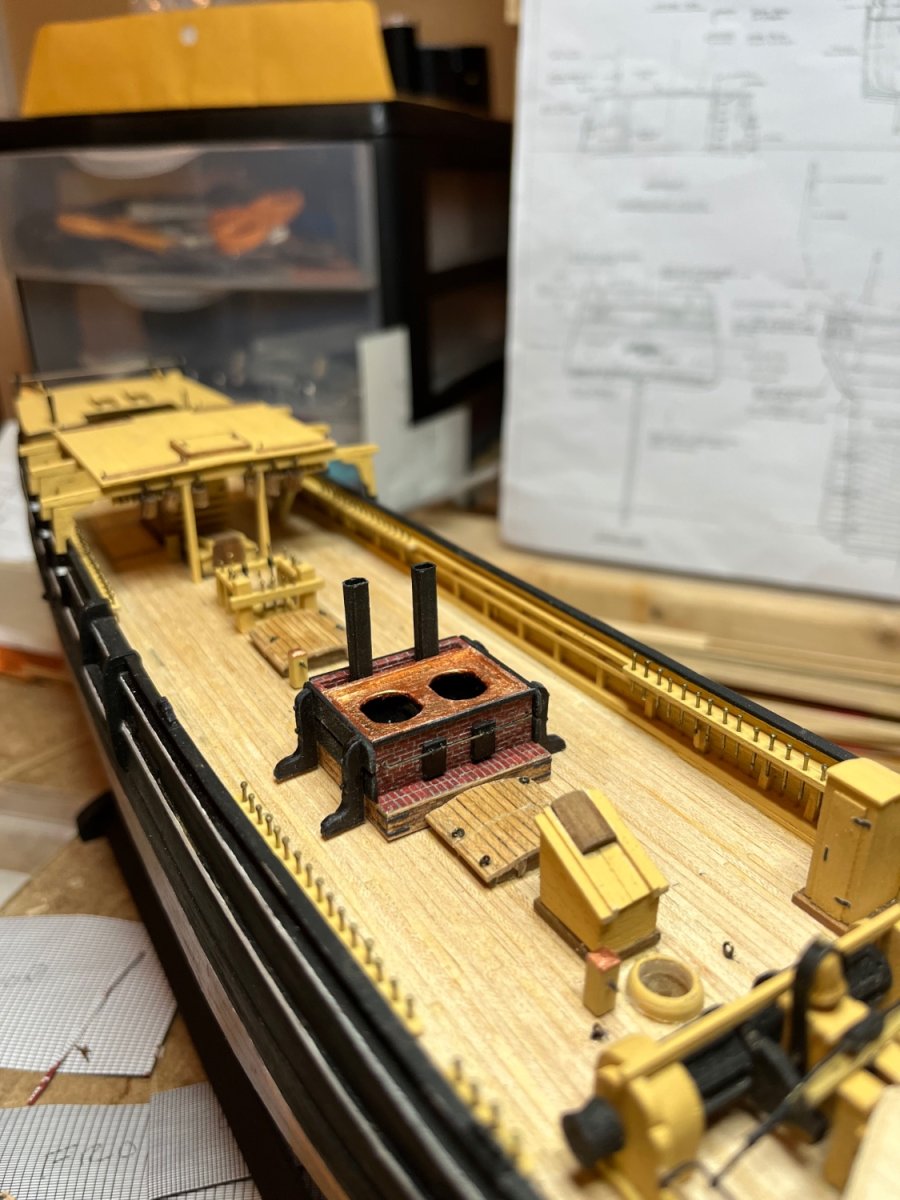
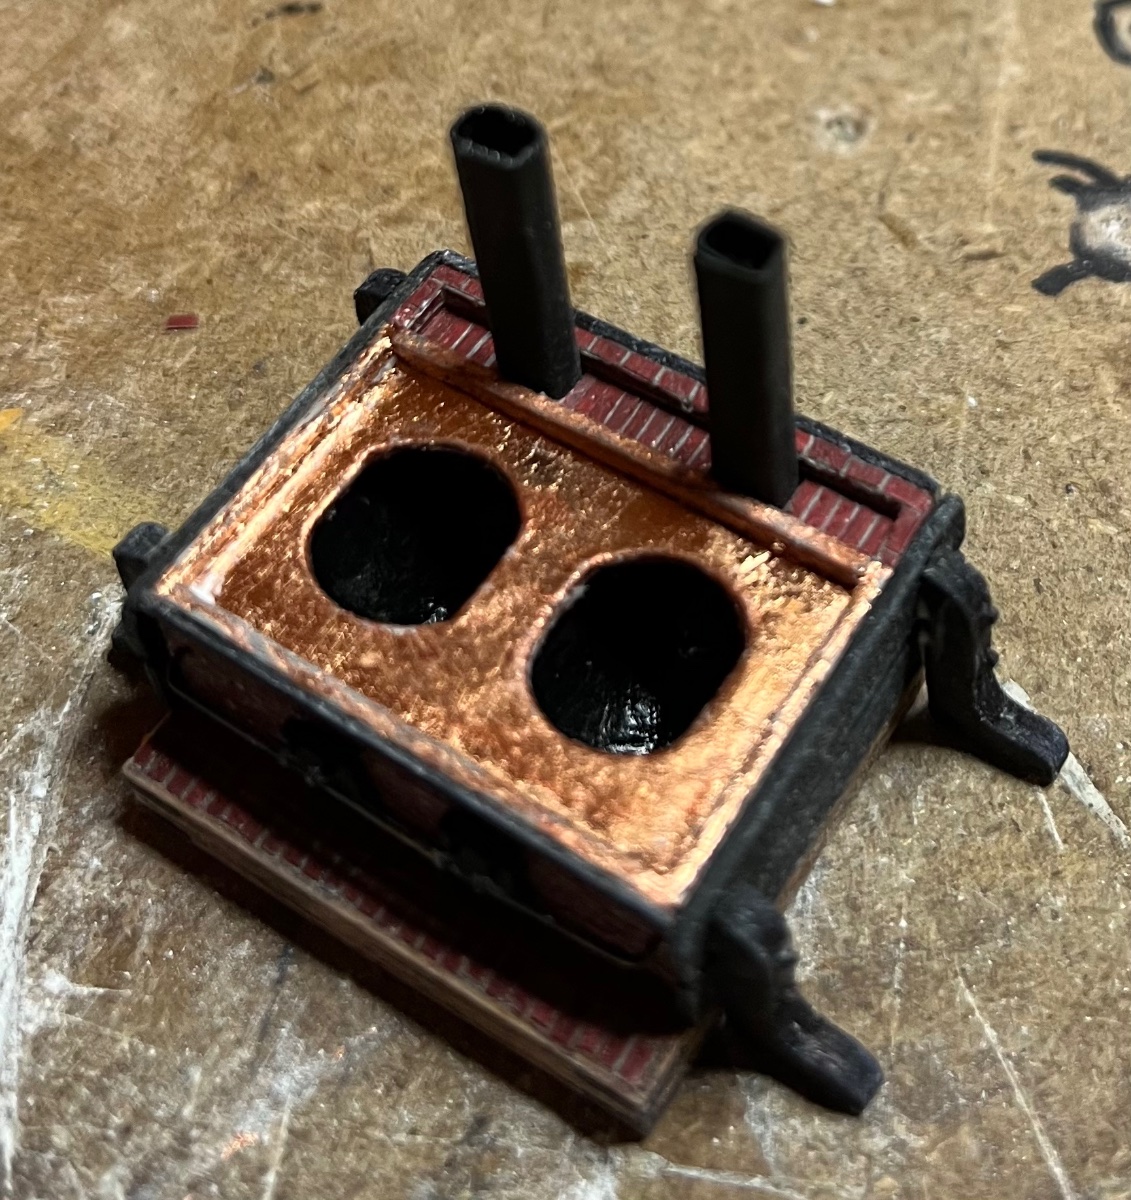
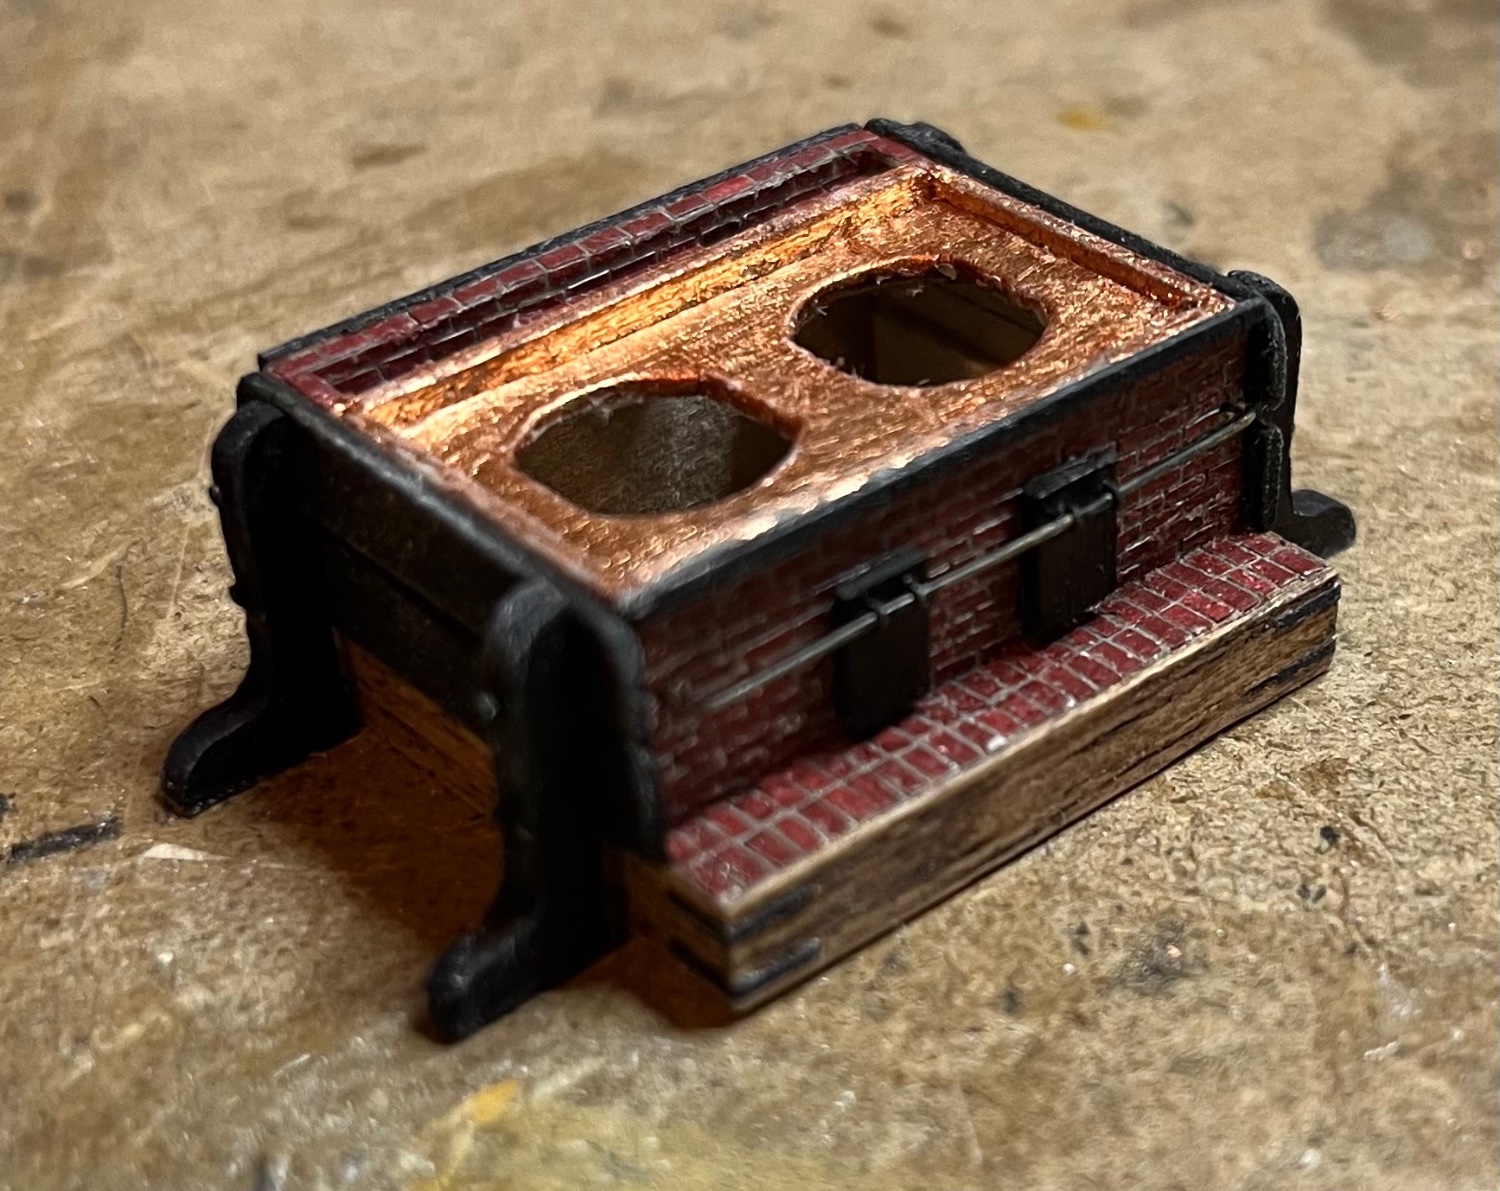
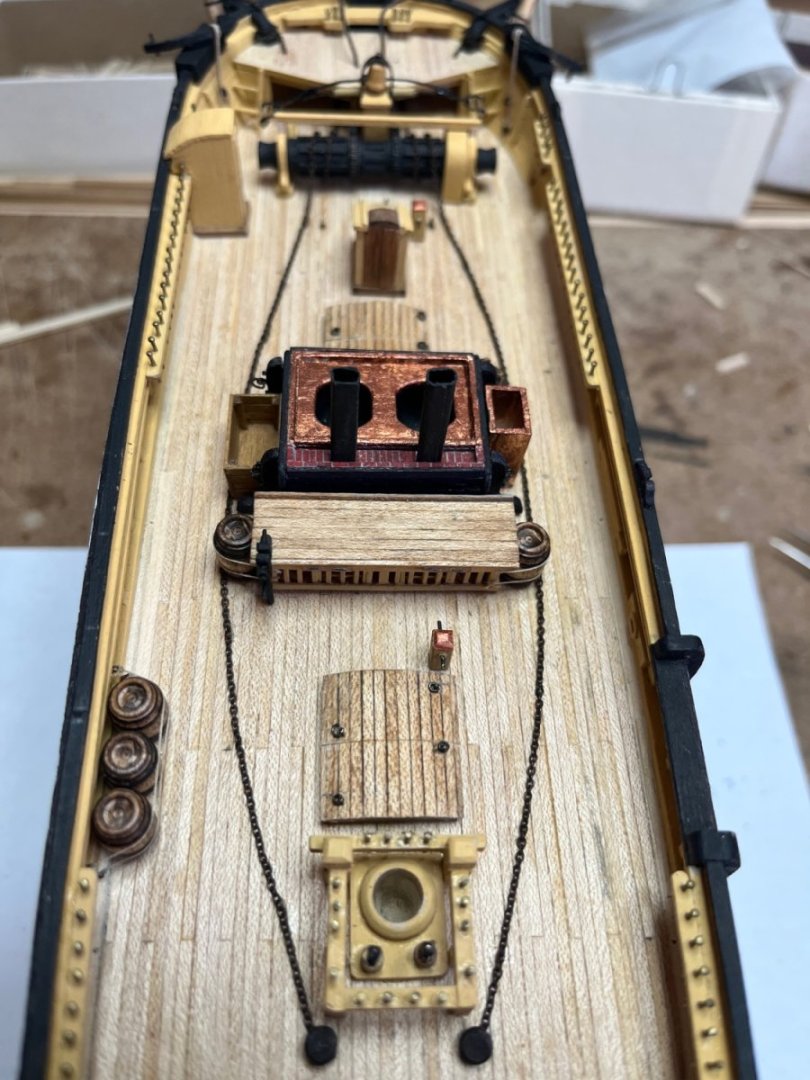
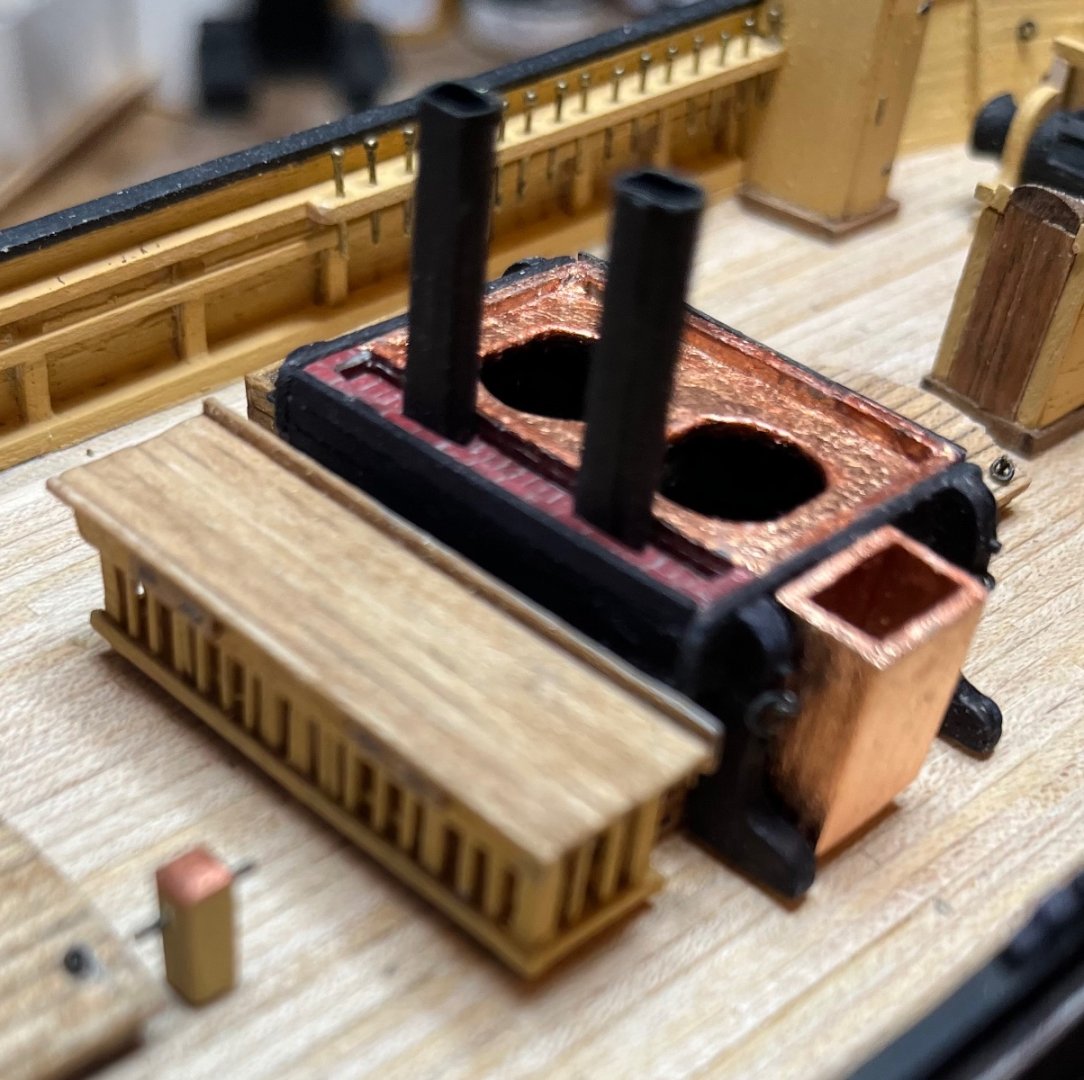
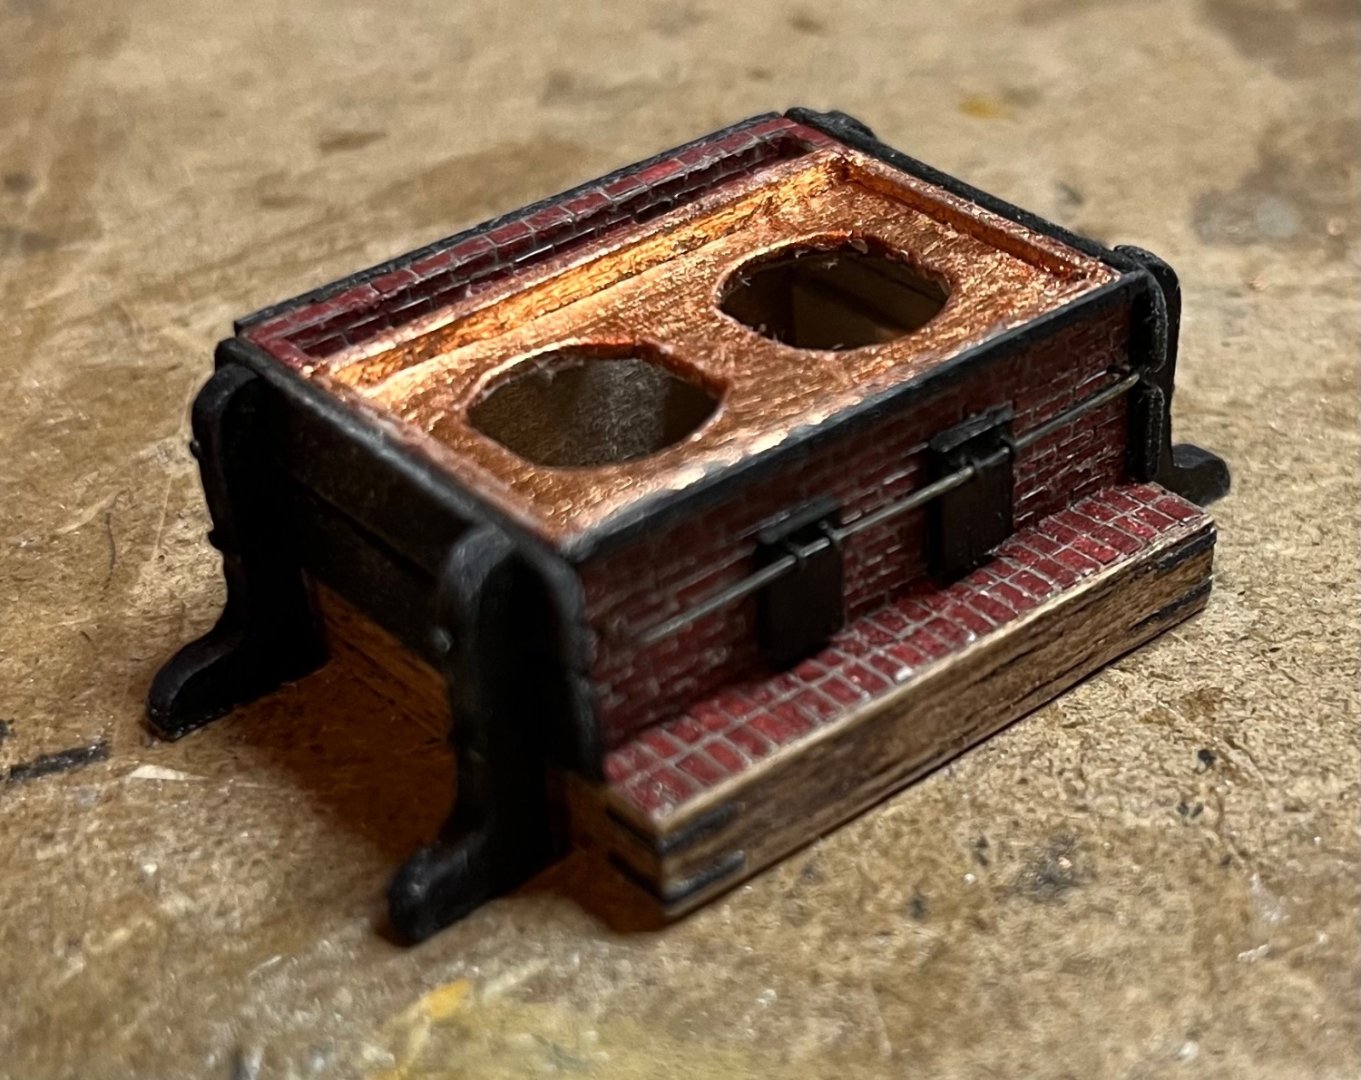
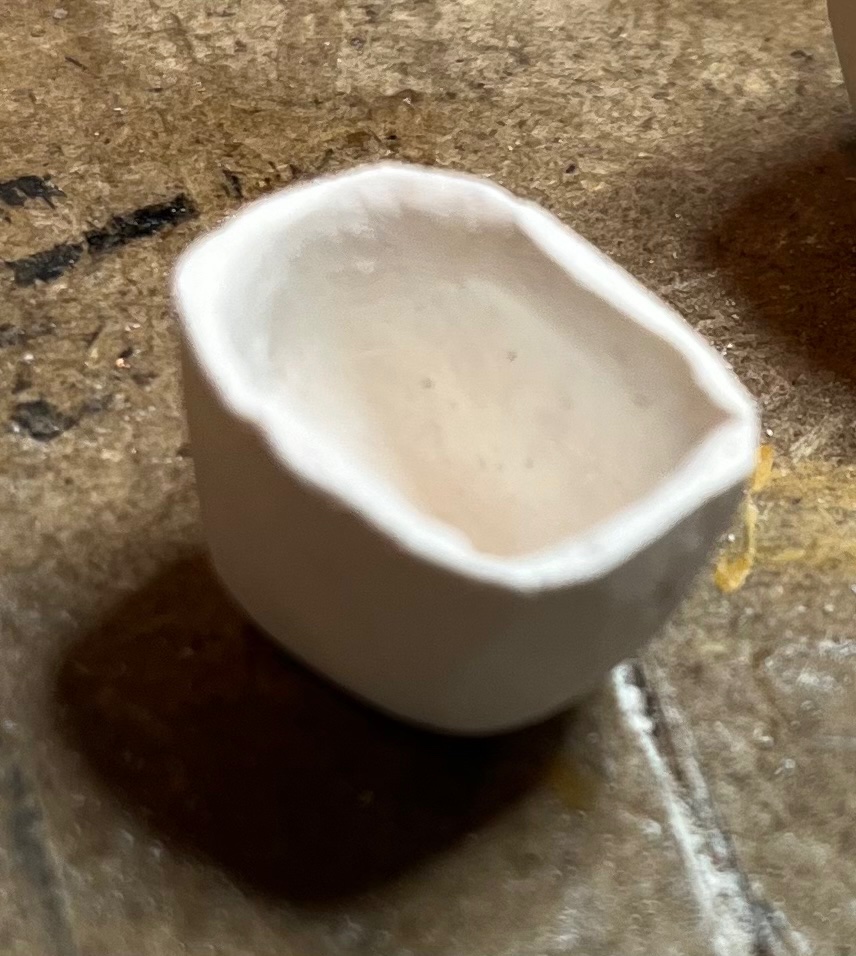
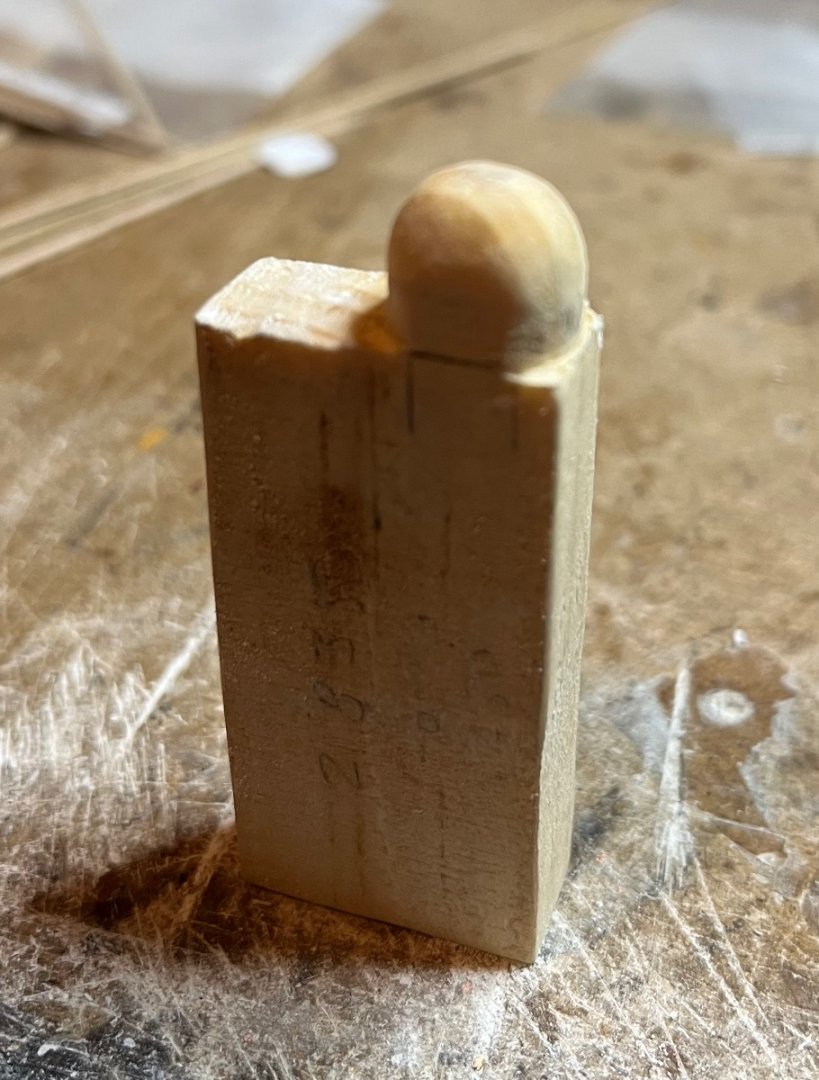
Working at it on and off I finally got through the tryworks. Bricks were a bit tedious but worth the effort… at least I think so. The top is copper leaf and will tarnish in time similar to the copper sheathing on the hull. I wasn’t sure how I was going to make the cast iron boiling kettles. I ended up making them out of Sculpy clay. First I filed down a wooden pattern to the inside dimensions of the pot. Then I formed the clay around it leaving the wall thickness about .060” thick. It was a bit tricky getting the clay off the form without destroying the shape of the pot. The clay had a tendency to stick to the wood. To help alleviate the sticking, I covered the mold with baby powder. That was enough to get the clay off the mold reasonably well. After a bit of touching up the shape I baked the pair. Here is the hand filed wooden mold. Sometimes low tech is the way to go especially when that is all you have. 😜 And the baked product. After a bit of filing and sanding, I managed to get them to fit into the tryworks structure. Next step was to take them back out and paint the inside black. Finally, insert them back into the framework and glue them in place. Here is what they look like after gluing. The sliding doors were then attached to the front with eyes and a blackened brass wire. Last but not least I fabricated 2 smoke stacks. Again, following the mold pattern idea I folded ordinary 20# copy paper around a piece of wood with the correct dimensions for the stacks. I overlapped one edge and glued. Cut to length and a little black paint and we are ready to start cooking! Here is what it looks like dry fit onto the deck. Time to make all the peripheral benches and things. The key is finding the time to do it. 😜 Tom

- 200 replies
-
- 14
-
-
-
- Whaling Bark
- Charles W Morgan
- (and 1 more)
-
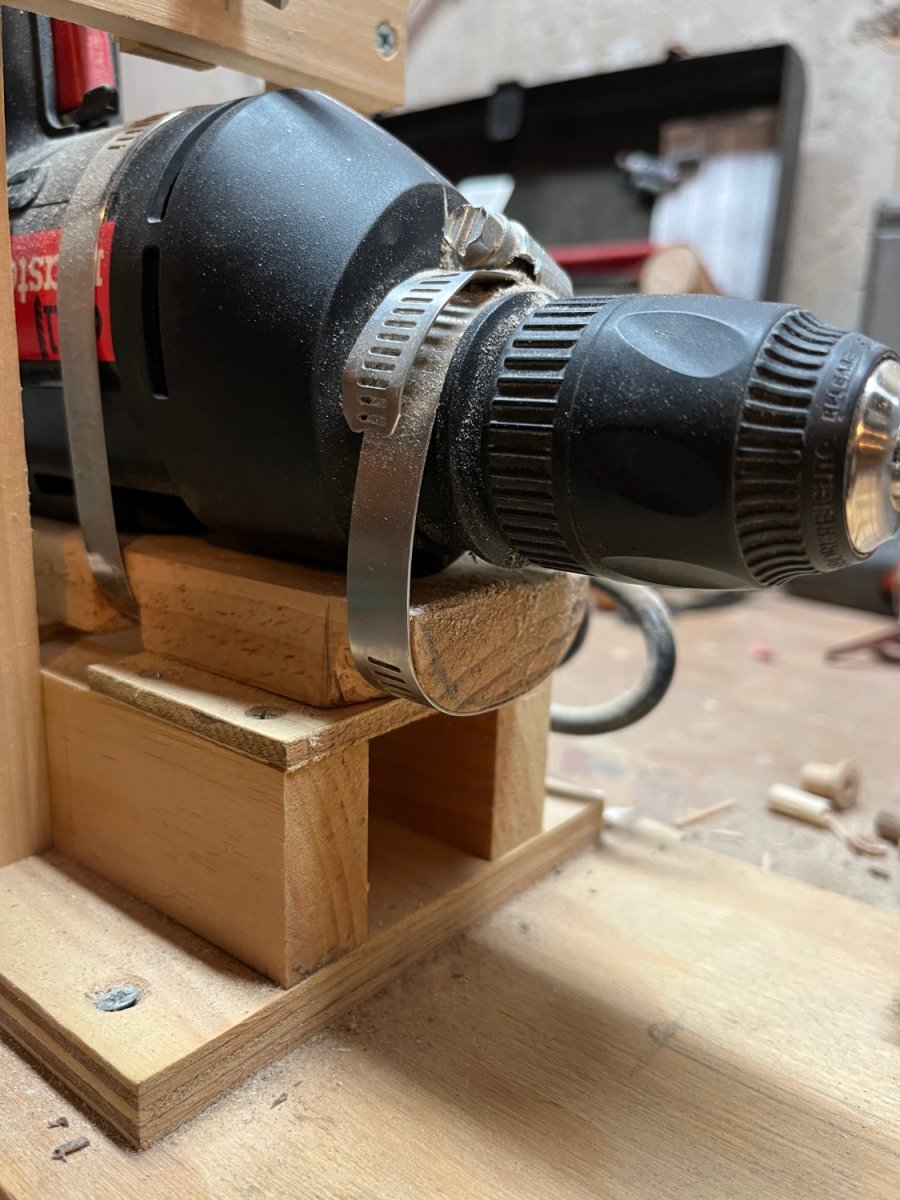
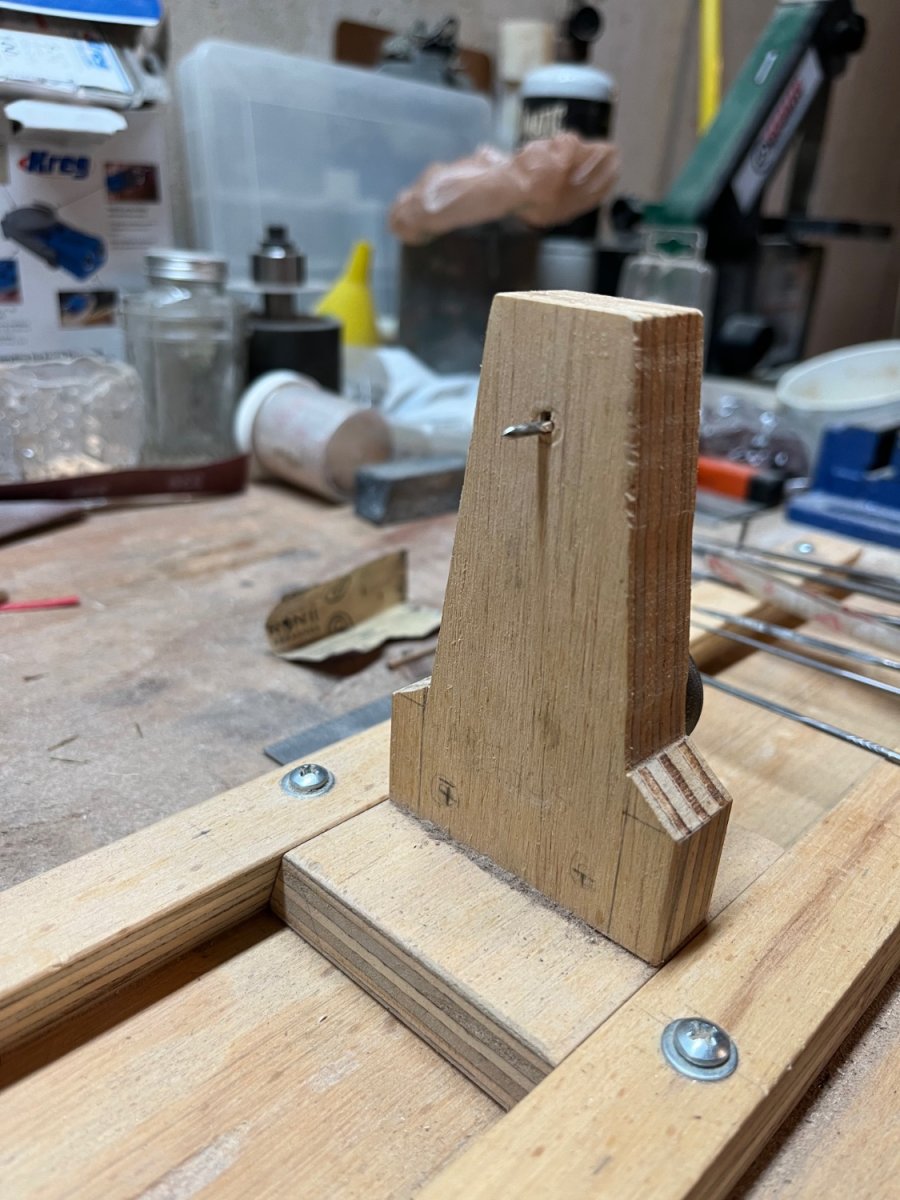
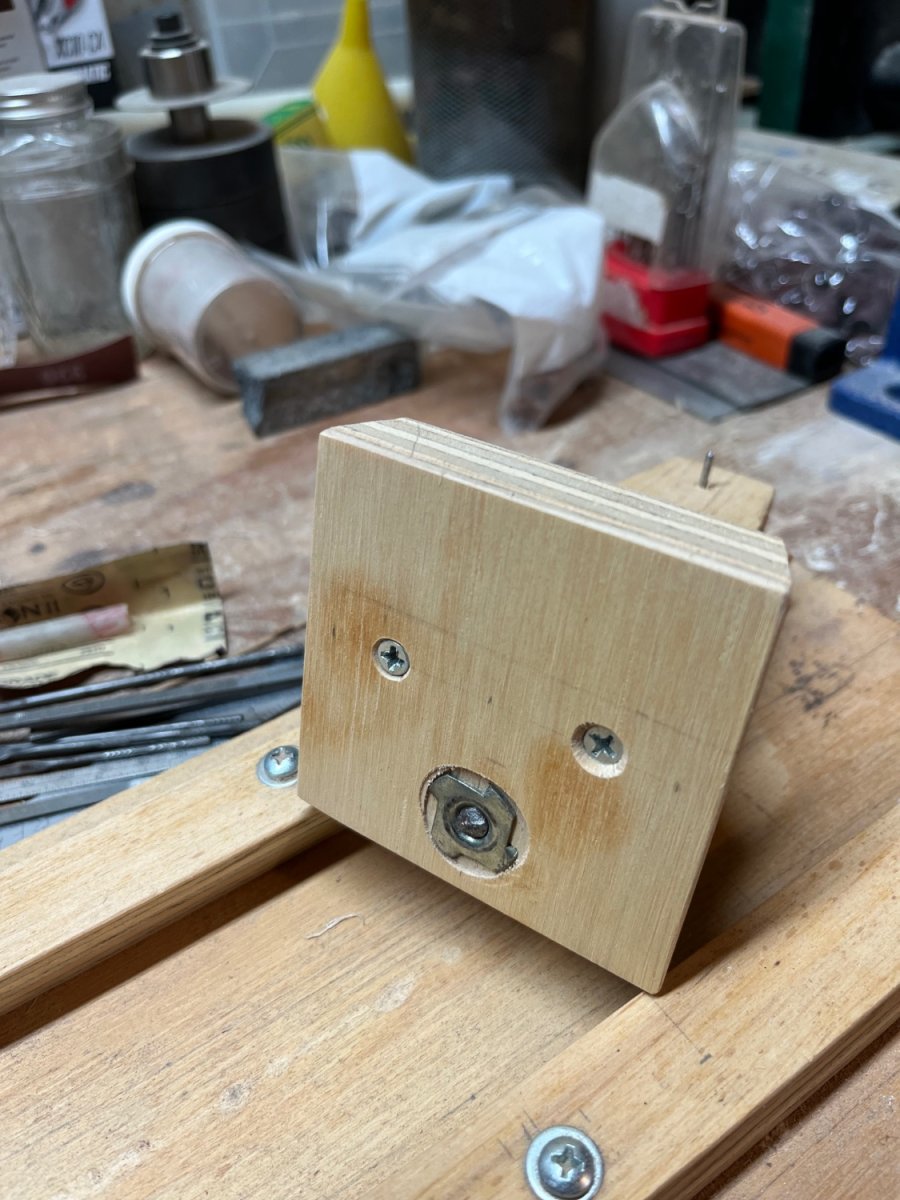
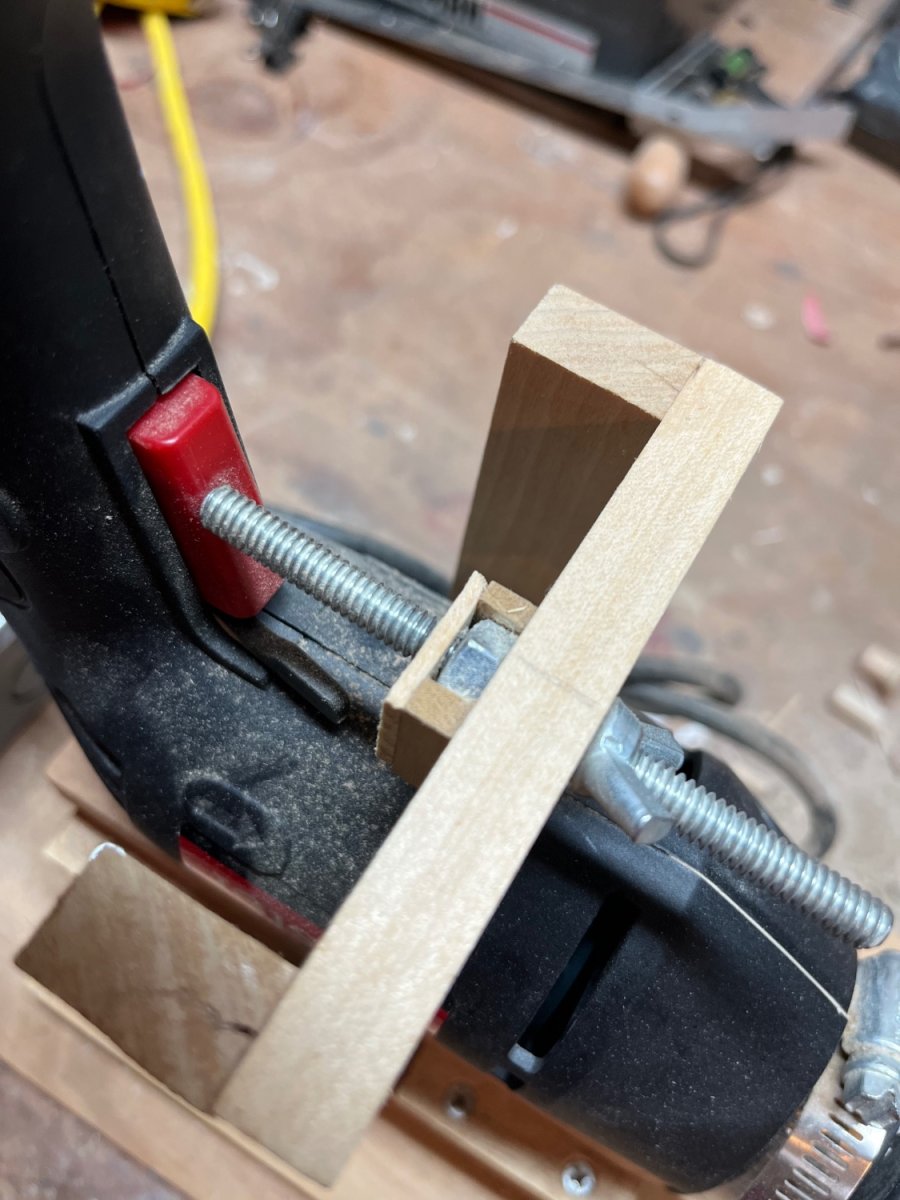
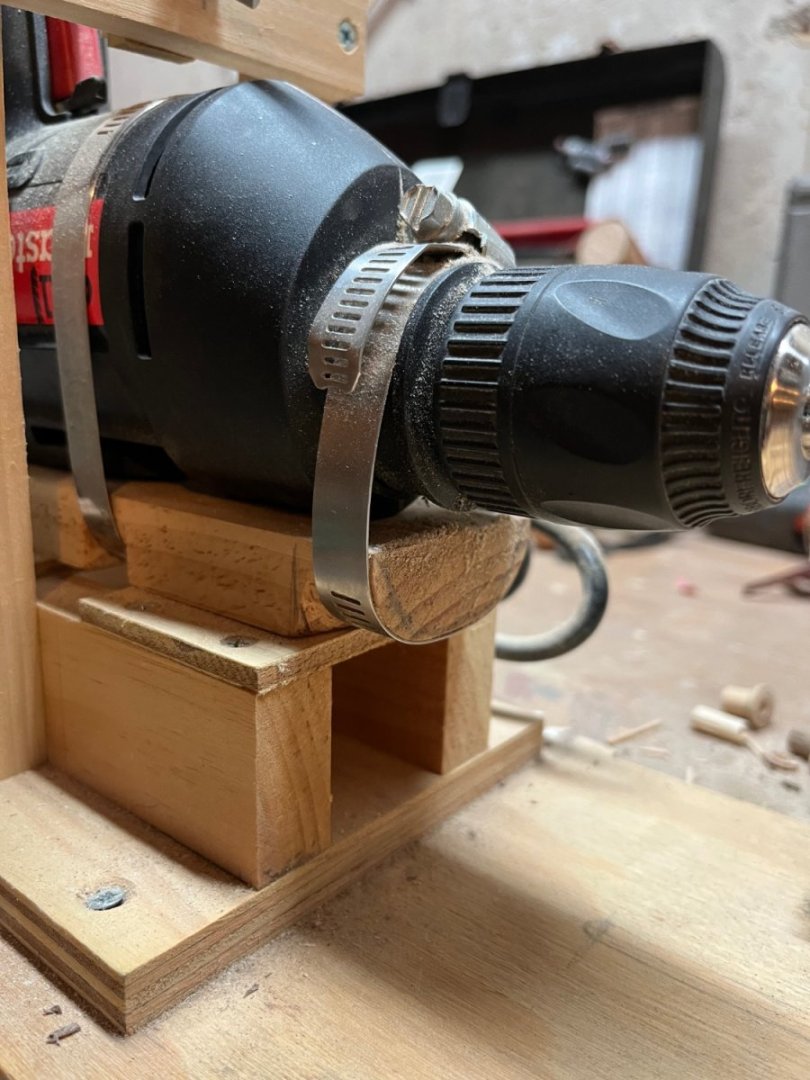
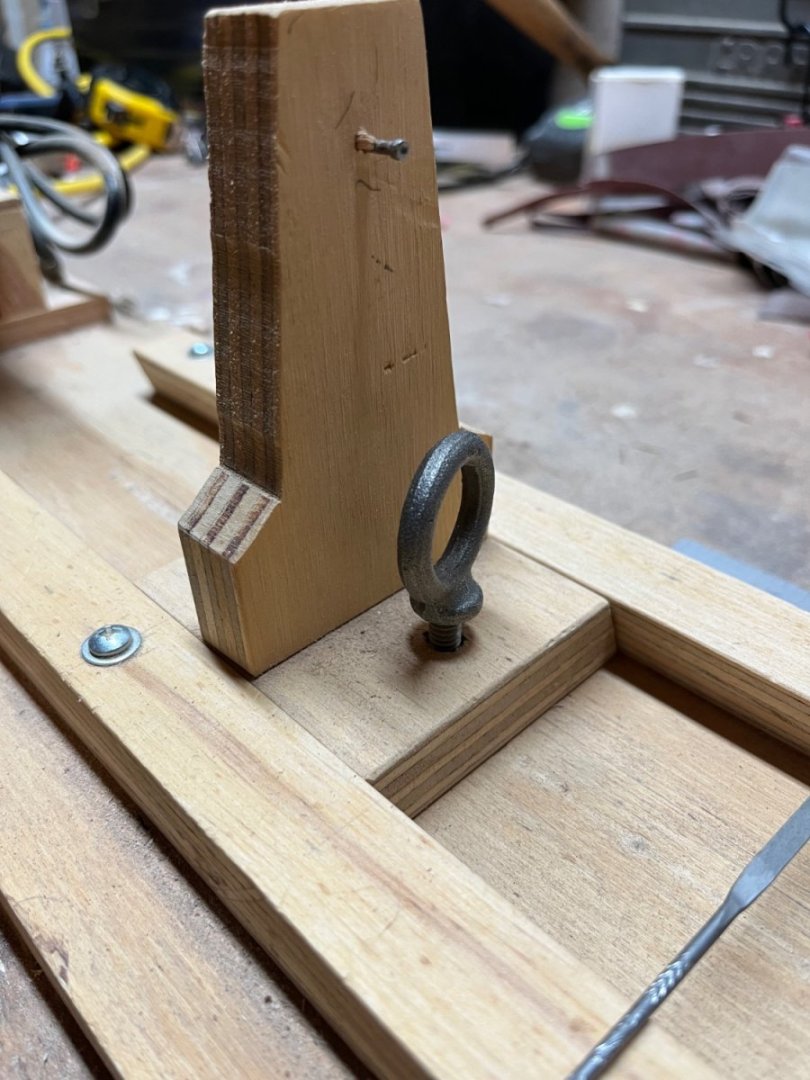
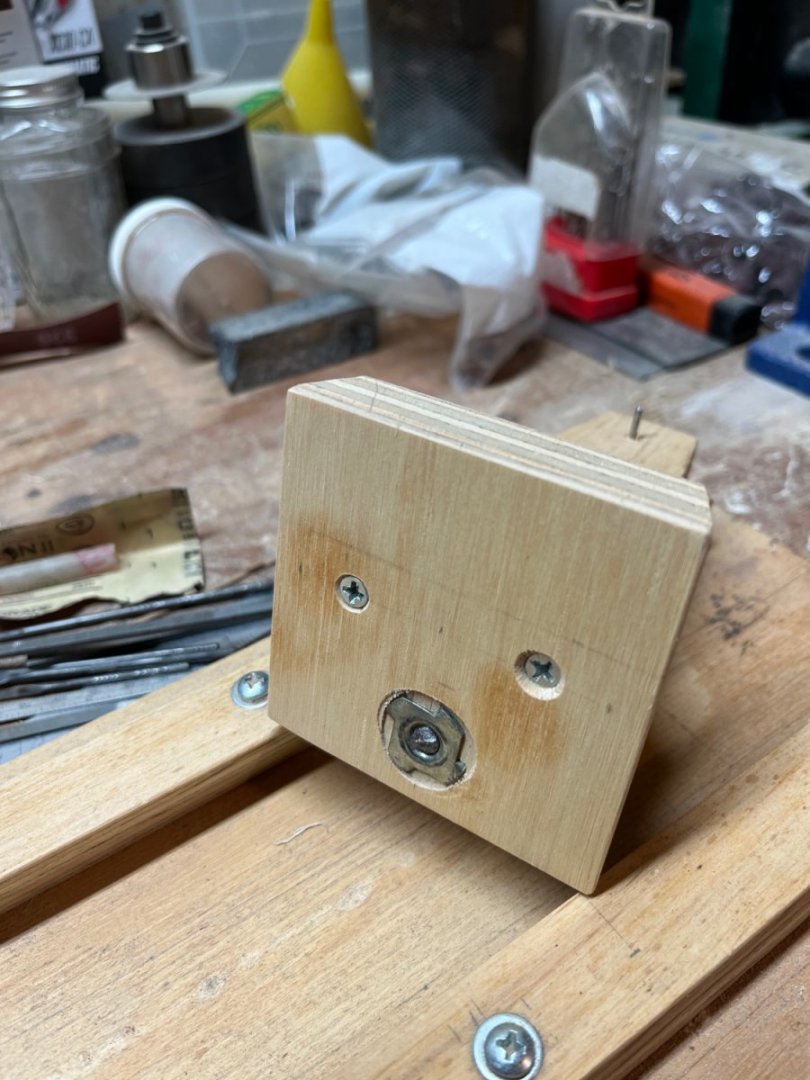
John here are a few more pics to better show how it is put together. There are many ways to make the mounting bracket for the drill but this was the easiest for me with what I had on hand for materials. Here is another view of the hose clamp holding the drill. I shaped the bottom on a belt sander so the clamp did not have to go around sharp corners on the wooden block. This is the tailstock. The center pin is just a finishing nail that is tightly fit so it does not slide in and out. To locate the correct position that aligns with the drill chuck, put the nail in the chuck and then slide the tailstock into it to place a mark where the nail needs to go. The underside of the tailstock has one of those barbed threaded inserts used in a lot of shelving a new furniture that you put together yourself. I happened to have a few laying around in a junk draw. Gluing a hex nut in with epoxy will do the same. Note the dovetail between the gibs and tailstock base. This keeps the tailstock in position vertically when tightening. To tight the tailstock in position I had an eye hook that just happened to have the same thread as the barbed fitting. Sometimes I get lucky. 😁 A thumb screw would work too I did not want to use a screw because then you would need a wrench and those always end up growing legs and walking away. As for the high tech speed control device, it is just a wing nut, threaded rod and hex nut. I did not have any epoxy to affix the nut so I built a little enclosure to keep it in place. Just loosen the wing nut and turn the rod to adjust the speed of the drill. I don’t think it is ready for mass production yet but I have been using this prototype for a few years now. 👍 hope this helps, anything else just ask, Tom


- 200 replies
-
- 8
-
-
-
- Whaling Bark
- Charles W Morgan
- (and 1 more)
-
It is stationary. The drill is secured to the base with a hose clamp that clamps around the nose of the drill and the top piece of the base. I will take some more pics and post. Tom