NMBROOK
-
Posts
2,305 -
Joined
-
Last visited
Content Type
Profiles
Forums
Gallery
Events
Everything posted by NMBROOK
-
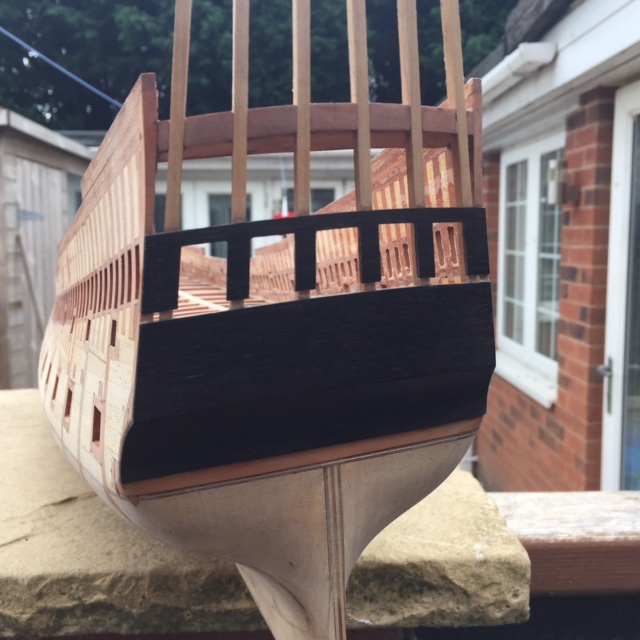
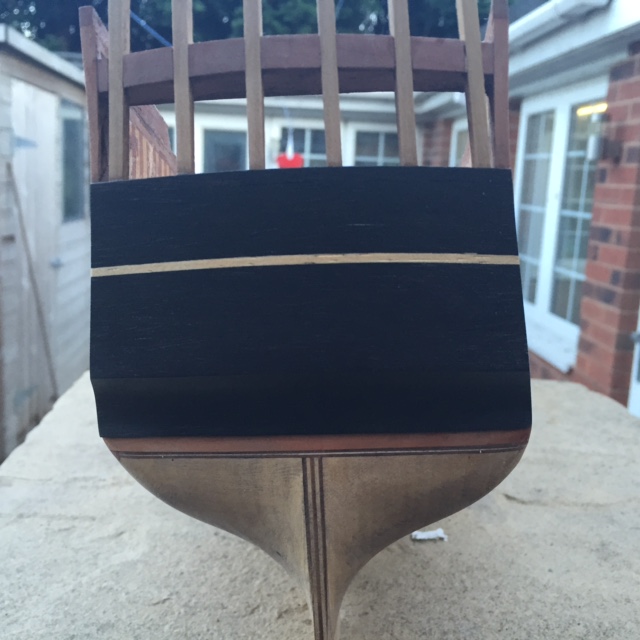
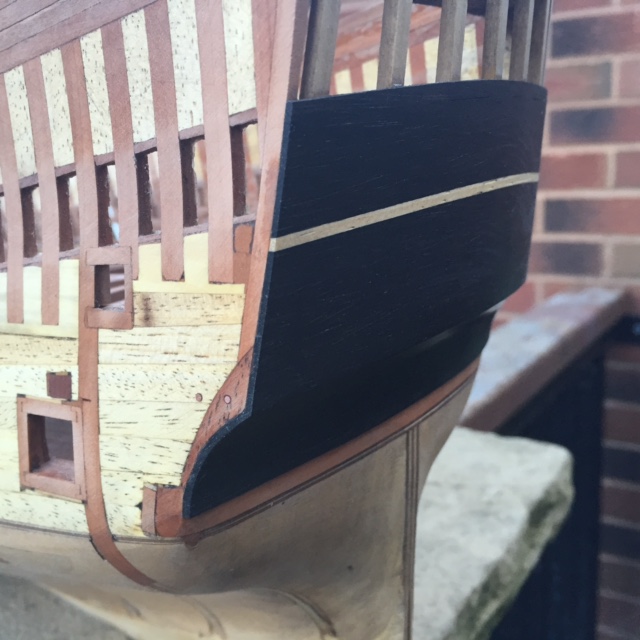
 Thank you very much indeed Martyn I have checked out your SOS,stunning work mate! on the home straight now. Saving the pics until after next weekends work I have been planking from the lower chainwale down to the upper wale.Very slow work due to using 6mm wide boxwood planks coupled with some very serious tumblehome and sheer necessitating some bizarre spiled planks.As a complete change to the norm for me,I have deliberately chosen NOT to represent caulking.Fixings will be represented as these will also be actually performing a function due to the model's hull structure.The 'black' strake will be Ebony as it is actually black on the builders model. Kind Regards NIgel
 -
I am sorry to hear of your troubles Peter.I am kind of stuck in limbo myself,until we get moved I cannot get properly settled down in to any of my builds. My best advice would be to store the model safely in the meantime even if you have to knock up a solid box to put it in.The time will come when you can throw yourself back into the build.The most disheartening thing is to have a part built or complete model damaged when moving things about. Kind Regards Nigel
-
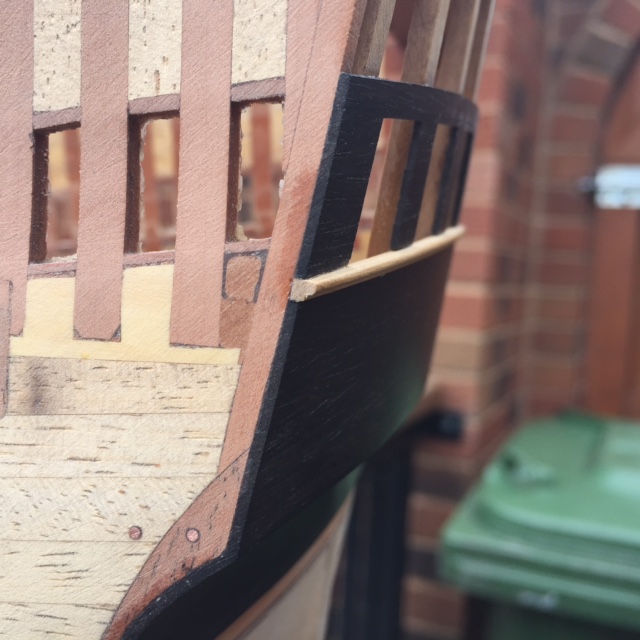
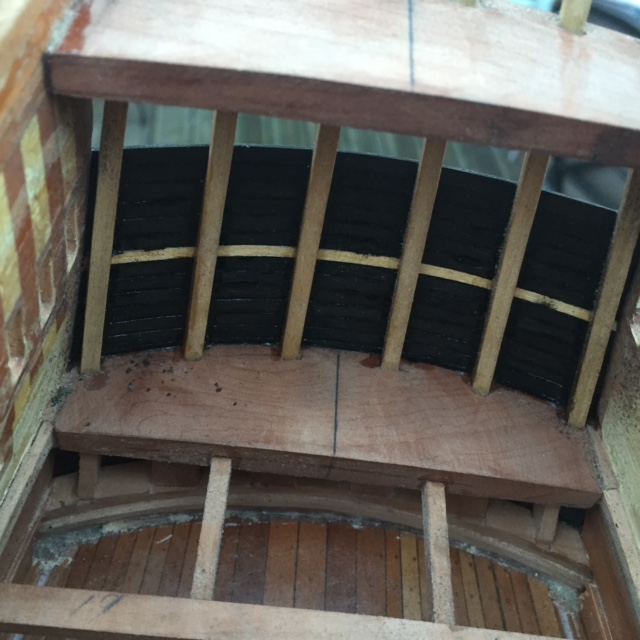
Final update of the week,back to work tonight I have cut the lower windows out and removed the obechi strip and cleaned the slot out.I have then fitted a boxwood moulding I machined on the mill using a guide fence.The builders model depicts a central doorway but I am having doors at each end of the balcony.Artistic license has kicked in here.A central door would have spoiled the symmetry and when all said and done,I don't find the stern overly attractive on the builders model. Kind Regards Nigel

-
Hi David The 470 number refers to the main kit,the 471 refers to the fittings kit.They had to be bought separately when this model was available.If I remember correctly this model was discontinued around 20/30 years ago.A letter to Billings might help,however they have been taken over and are currently recovering from their new owners insolvency,so I really don't know. Other than someone on here having a copy of the plans,all I can suggest is looking at photos on the net and trying to second guess the proportions of the spars and rudder. From experience you are not missing anything not having the instructions other than the spar sizes.Their instructions at this time will have been five pages long,all the information and rigging belaying points will be on one of the plan sheets. Kind Regards Nigel
-
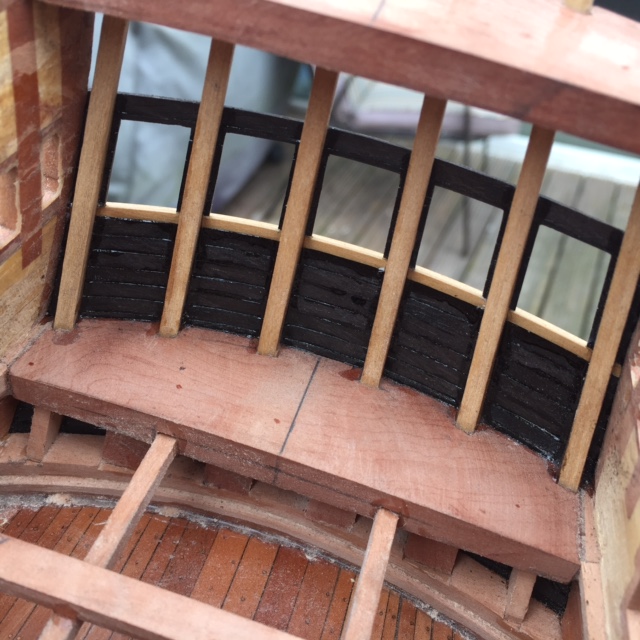
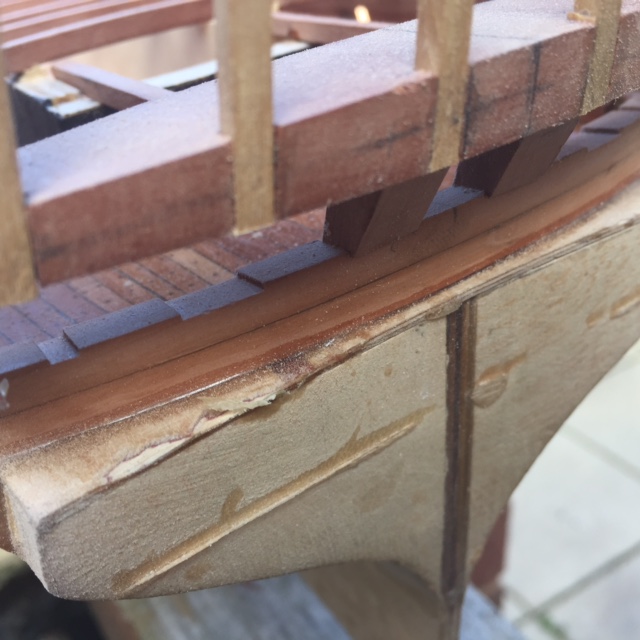
Stern counter and area behind balcony now planked in 3mm wide ebony.I have tack glued a strip of obechi in to act as a spacer for where a boxwood moulding will sit.This will be removed when I cut the windows openings out.Doing it this way made it easier to sand,not having to work around a raised moulding Kind Regards Nigel


-
Thank you Nigel Just want to get moved now,the 80 mile a day trip to work is wearing a bit thin Kind Regards Nigel
-
Thank you very much indeed Nigel,Bob,Peter and Michael I have never really lost my workshop Nigel,I have just brought some items back out of storage.After two house sales have fallen through,it is now going to auction at the end of September.This hopefully means we can finally get relocated.My only stipulation as to where we rent is that there is a garage It means I will loose workbench space,but that will just teach me to work tidier Kind Regards NIgel
-
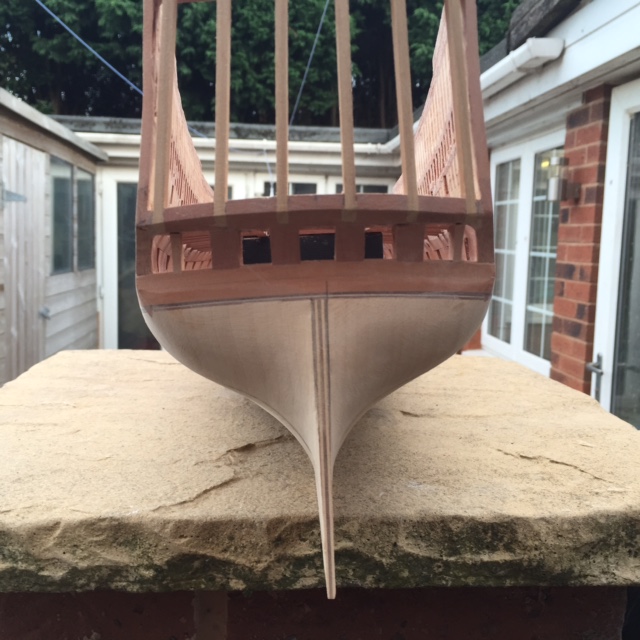
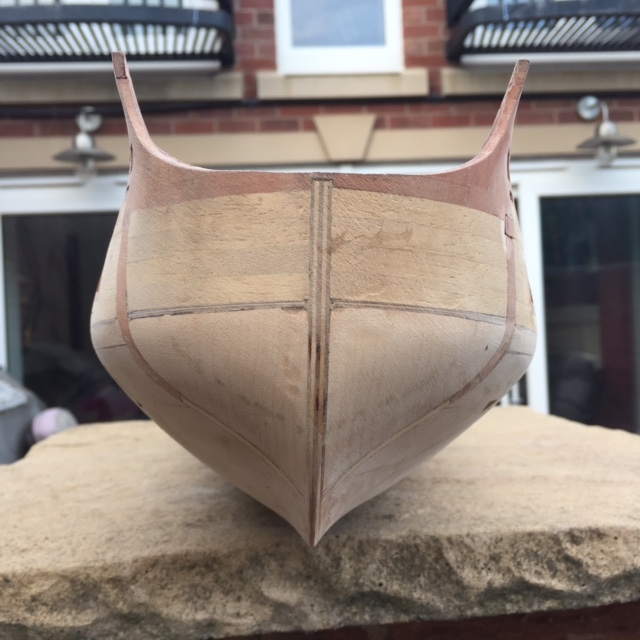
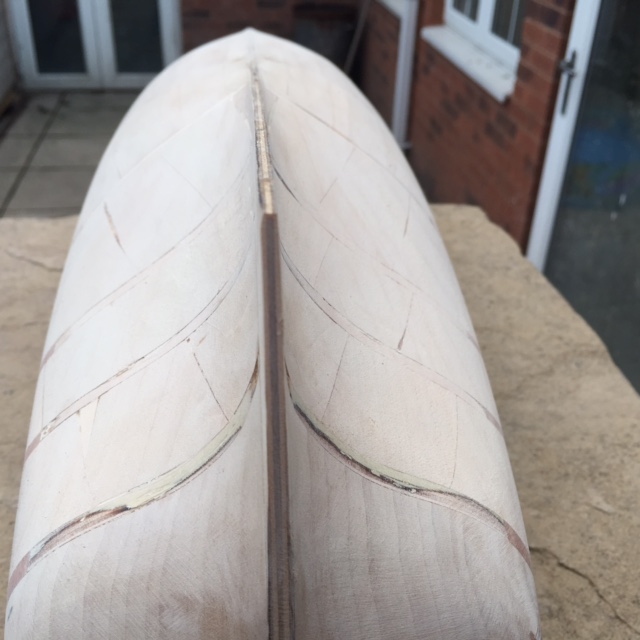
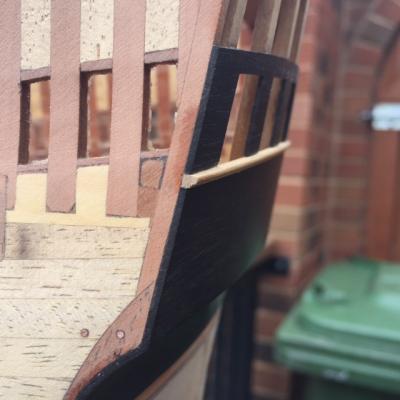
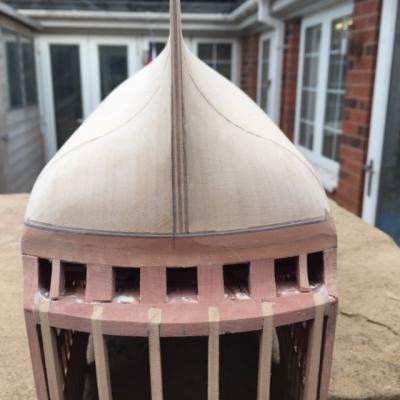
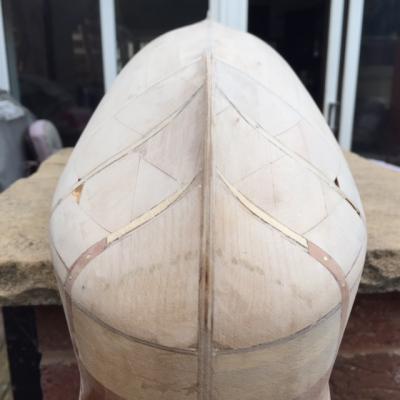
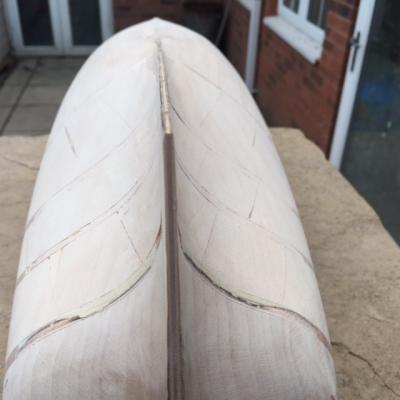
Ok then,milestone finally reached.The square stern has gone hull is now fully faired in preparation for planking.I must fess up,I know I said the build will follow the kit plans,but I will be adding a tweak to the stern to bring it a little more in line with the builders model,the kit quarter galleries will still be used along with most of the kit castings,however the prominent balcony will be incorporated.I am not going to waffle on with the exact details,all will be revealed in due course.Some pics of the shaped hull,upper 'sub' linings to add to the stern chasers then on to planking the counter in Ebony Kind Regards Nigel


-
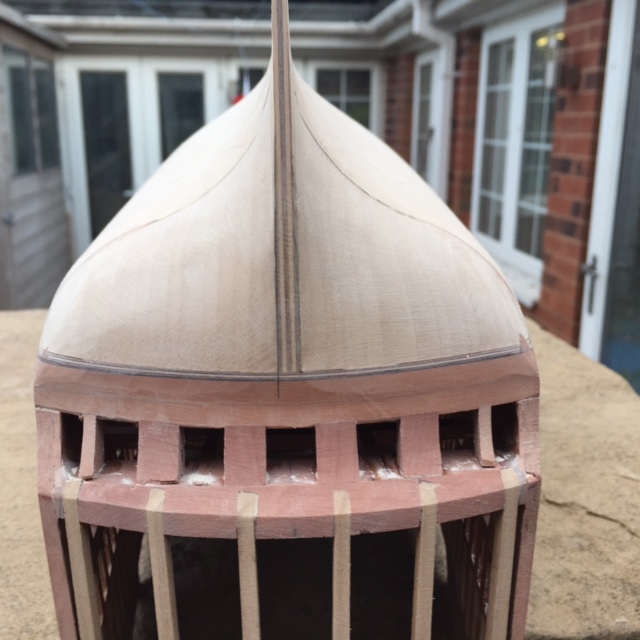
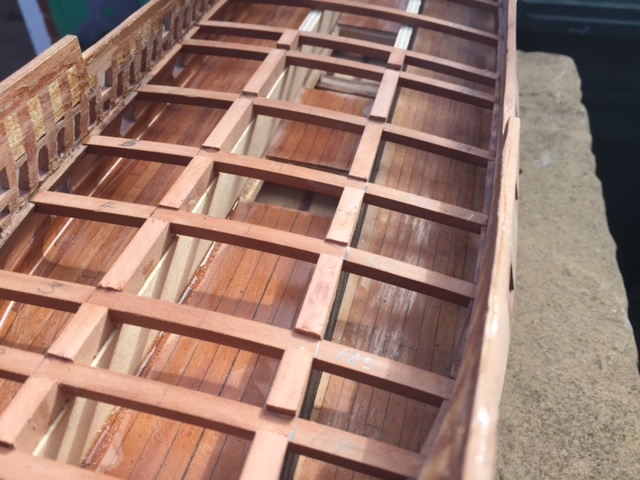
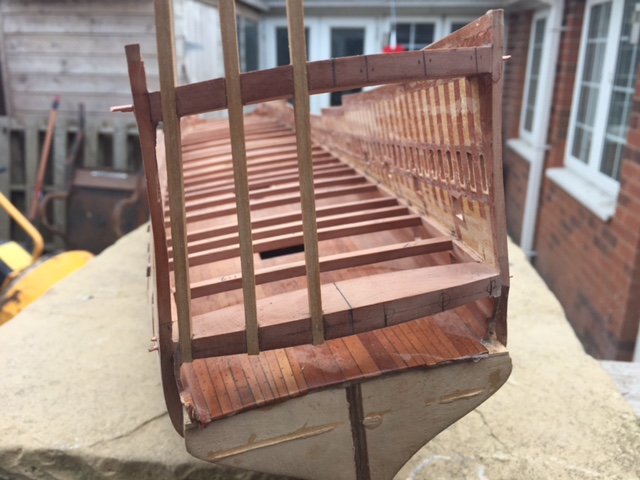
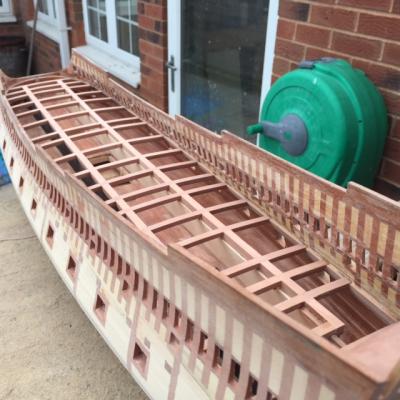
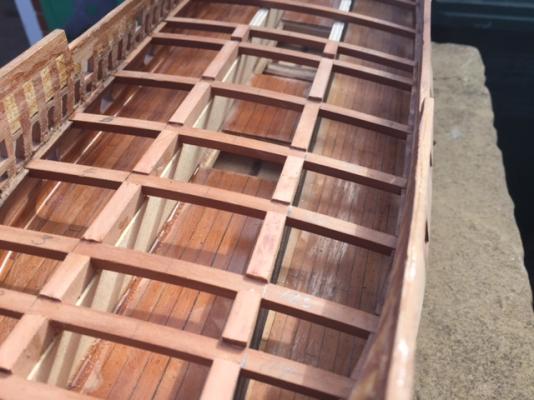
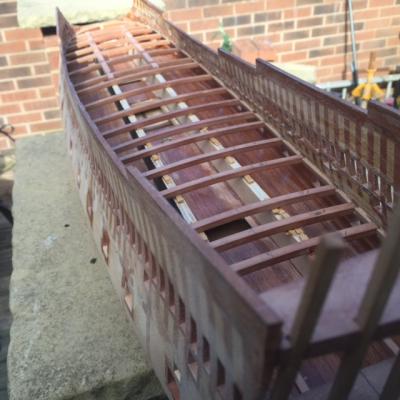
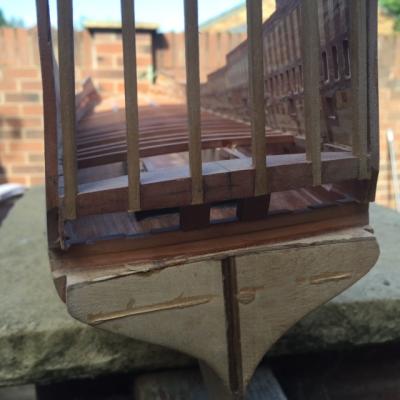
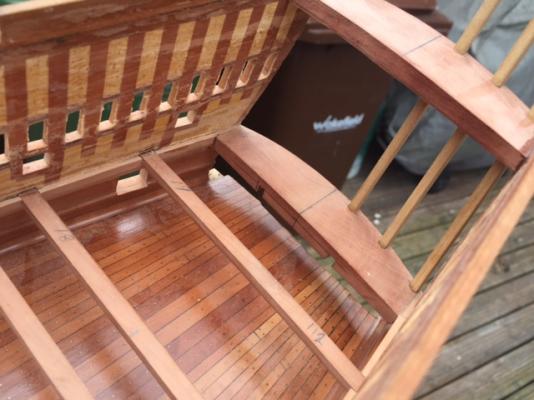
Work this weekend has predominantly concentrated on reinforcement of the upper structure and fitting the deck beams.No external work can start without fitting these beams as they slide through the hull sides. shaped plywood pieces were epoxied the length of the deck to provide support for the deck beams and to give a visual 'blackout to the lower deck.This is to counteract the fact that full internal detail and rigging of the cannons will not be carried out.Carriages will be authentic on the top but have a flat bottom to allow secure gluing to the deck.Careful studying of what is actually on show with the full cannons in place shows no other additional work is necessary. The deck beams once inserted were packed with boxwood shim to increase the camber the required amount.These beams are insufficiently strong enough to be unsupported and were originally going to be set by the hanging knees and pillars.Further work after trimming the packs is to add pear chocks inbetween each beam.These will be sanded to follow the tops of the beams and the sheer.This provides further support for the sub deck but also tidies things up if a get anyone staring into the gunports I have also commenced framing the counter.The width of the blocks used allows them to form the lining of the stern chasers.I milled a shallow slot in the bottom member to ease accurate positioning of these. The pics show WIP,as that is it until next weekend.Then I hope to complete this work in readiness for the final shaping of the bow and stern blocks and general completion of the fairing. Kind Regards Nigel

-
Thank you very much Geoff and Patrick A bit more of a meaningful 'structural' update to follow a little later Kind Regards Nigel
-
Thank you Grant Kind Regards Nigel
-
Thank you very much indeed Mark and Bob Kind Regards Nigel
-
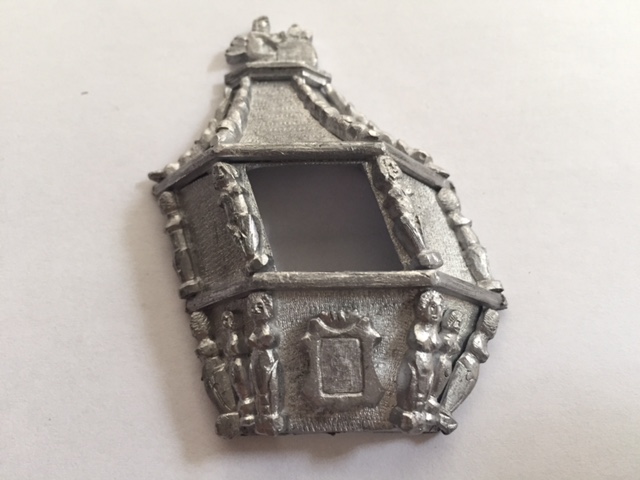
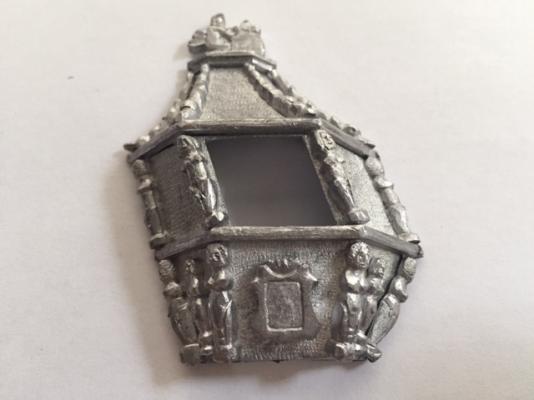
Some pics of the completed quarter badge with window unit bonded in place Kind Regards Nigel


-
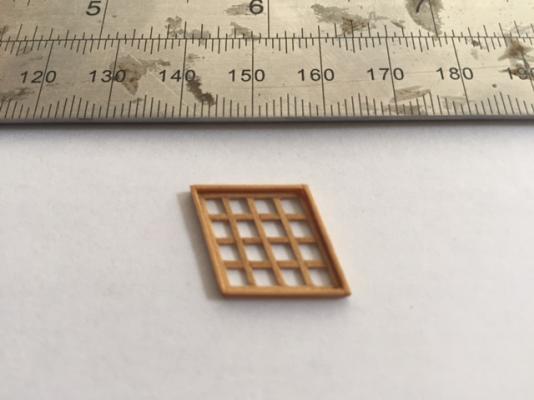
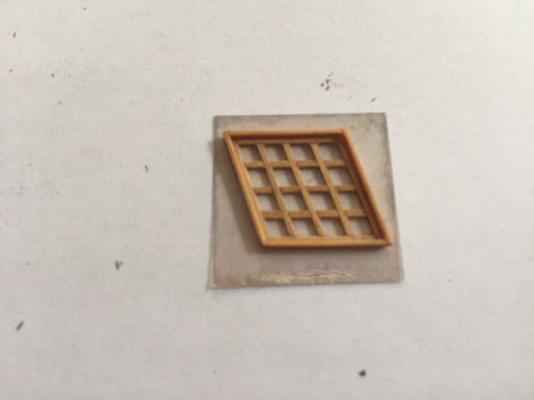
Thank you Nigel and Nils No secret jig for this one Nigel,just patience,frustration and very tired eyes I will post some stage pics when I do the other side,I just wanted to check it was feasible before taking loads of pics.There are a couple of useful techniques I will illustrate that may help,but everything was based on cutting the half lap joints accurately to set the sizes of the panes.These two windows are more forgiving as I have flexibility on the overall dimension.The TEN!!!! windows on the transom will be less so as overall size and the fact they have to all line through should provide some entertainment! Kind Regards Nigel
-
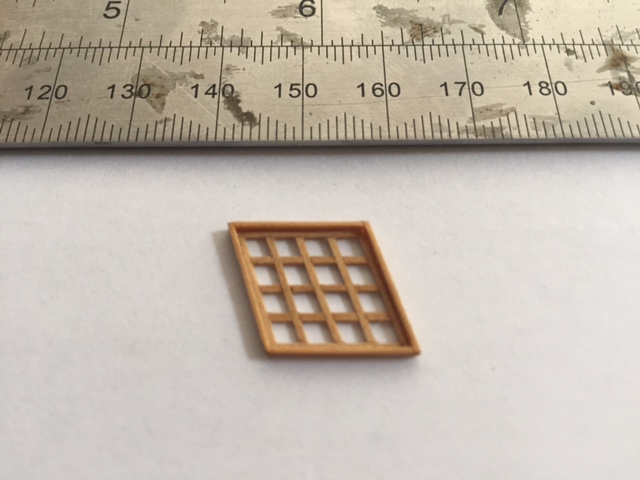
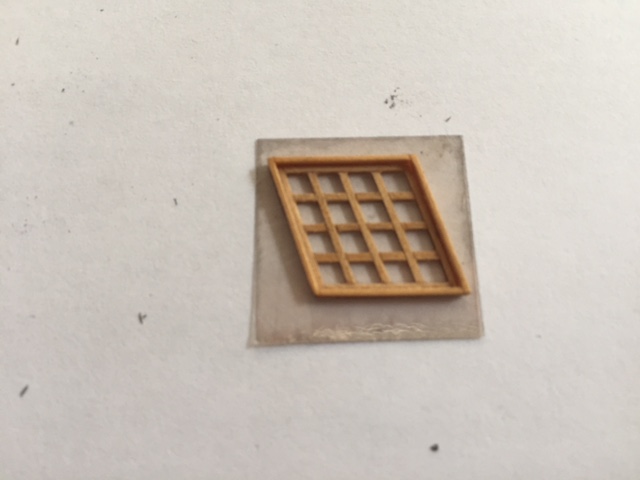
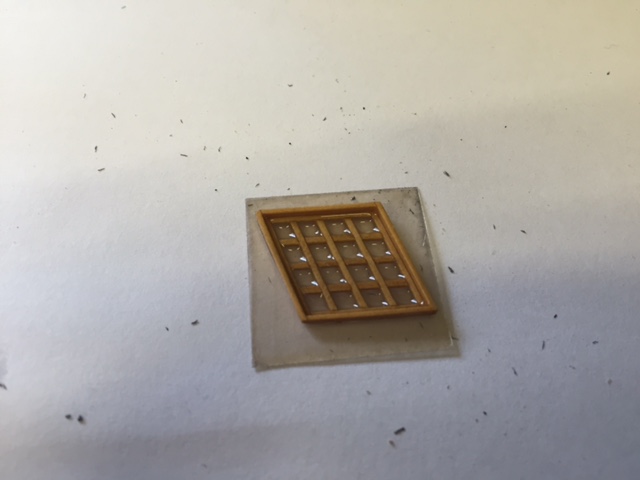
I had a bit of a 'late one' last night.Far to late to spark the saw up so I decided I would produce a 'prototype' window to prove my plans would work.The frame was made out of 0.8mm square box strip sanded a little further to reduce it's size.I managed to produce half lap joints using a sharp scalpel and jewellers file.I was keen to do this because otherwise the glazing bars never seem to line through no matter how hard you try. The casting has been cut out and the back heavily reduced in thickness with a burr to thin out where the window will fit. The frame was then bonded with a bead of CA around it's perimeter to a piece of mica.Matt poly has the then been applied ensuring a meniscus was formed inside the individual panes.As ever,a picture explains a thousand words,to be continued once the varnish has hardened off Kind Regards Nigel

-
I must thank you again for this Tony,I had another 'fix' last week.The list was up to 94 then so I a have another one to watch I know I am finding a lot of useful stuff not even mentioned in the DVD.Obviously because of the time spent with Dr Mike,if they covered everything,it would have been a ten DVD boxed set Kind Regards Nigel
-
I know mate,but I don't think the finished article will lose anything for it in the long run Kind Regards Nigel
-
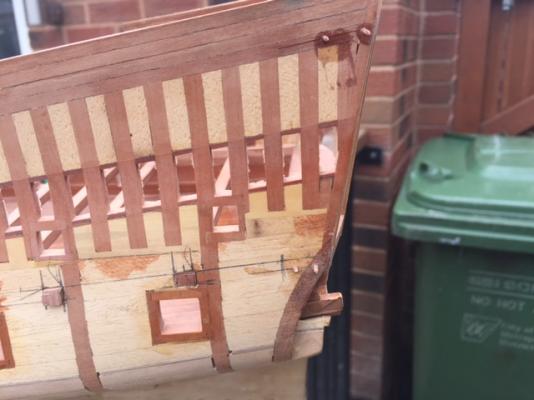
Thank you Michael Work may still be in fits and starts over the next few months but hopefully things should settle down by Christmas A few pics.I have started to assemble the transom support work to reflect the kit's drawings.Not a great deal of changes required as I hadn't go as far as extending the hull sides to accommodate the overhanging upper deck and balcony.This is one area where I will be deviating from the kits design,mainly for ease of construction.There is supposed to be a piece of curved ply on the transom face with a large casting bonded on top featuring the windows.Careful study of the casting has made me realise there is an easier approach as I want my windows opening out instead of painted on. Plan is to remove the vertical carved detail from the casting and bond it on afterwards.Also planking straight on to the framework makes the stern counter transition easier to accomplish as both faces will be covered by the same thickness material.The counter is carved from a solid block in the kit but I would like to have the option of having the gunports open. I have started the transom framework paying attention that the vertical members fall centrally behind the window pillars and carvings.Epoxy and copper pinning has been used as this needs to be solid before I finish fairing the hull.Once this is complete I will move to the counter framing which will double as lining for the four stern chasers.Then,finally I came shape the round tuck and get rid of that square end to the filler blocks Other conclusions have been drawn now I have the armament for my lower deck,but will cover these when I get to that stage,too much for one post Kind Regards Nigel

-
Thanks buddy Kind Regards Nigel
-
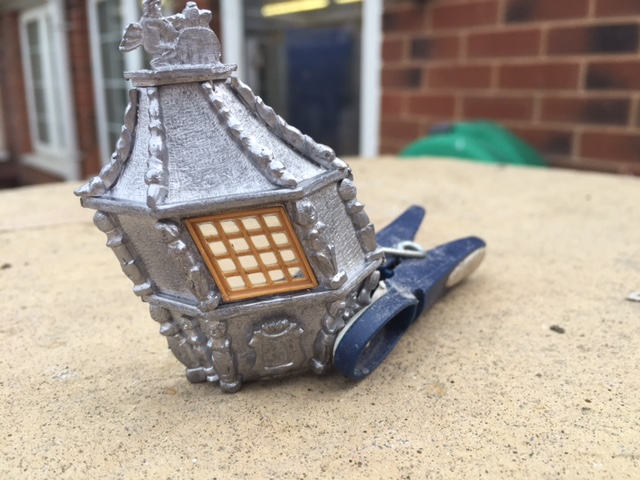
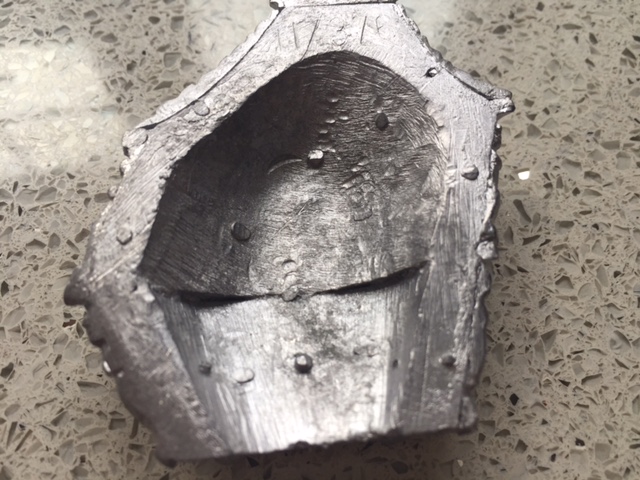
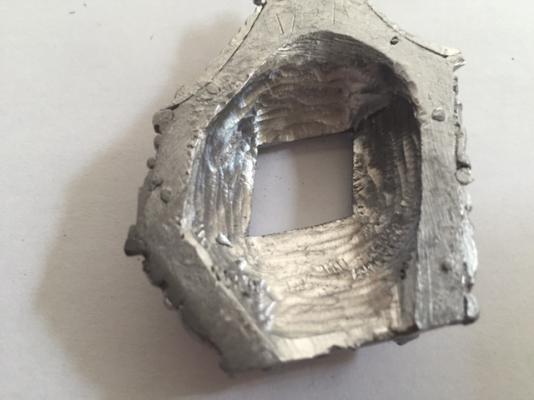
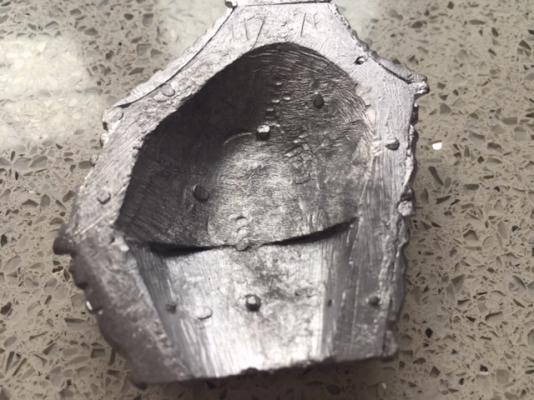
Just a couple of pics to illustrate the multipiece casting approach I mentioned earlier.The cast rivets can be seen on the inside although not as clear as in real life as the peening marks can be made out.Yes I have a solution for the windows,like I say all will be revealed in due course Kind Regards Nigel
-
Great to see you back in the shipyard Jason.Going through a similar period of distractions myself,mainly work related and trying to move closer to my new job.Spending too much time on the motorway that could be spent modelling. Kind Regards Nigel
-
I will have to agree to disagree with you on that one Dave Personally I use a preposterous number of coats of paint with flatting in between to achieve the glass like finish you are trying to avoid Shiny not good but smooth yes is my preference. Kind Regards Nigel
- 962 replies
-
- 2
-

-
- sovereign of the seas
- ship of the line
- (and 1 more)
-
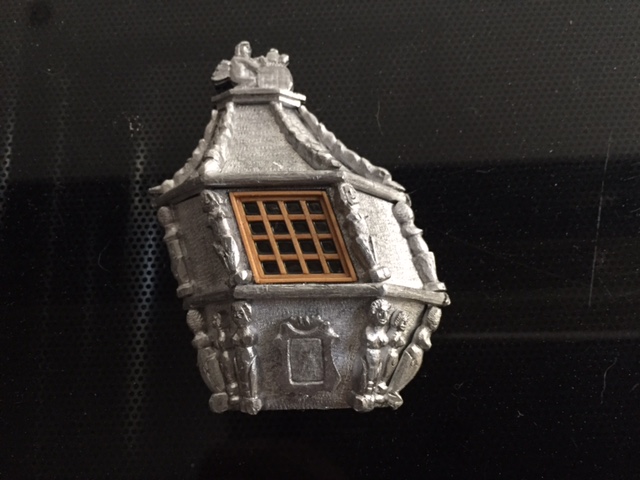
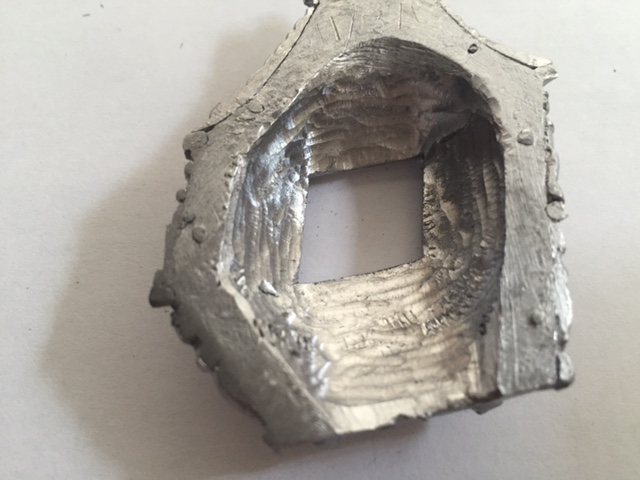
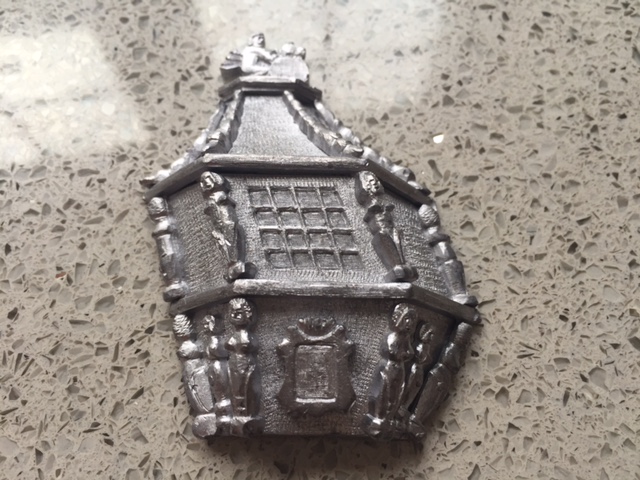
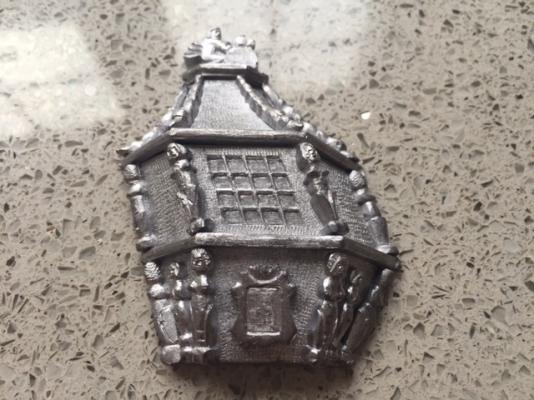
I have had a bit of an eye opener.Whilst 'mocking up my stern to see how the Quarter gallery castings match up to the transom,I had a bit of a shock.What appears to be one single casting is around seventeen individual pieces hand riveted together!!!!That care and attention to detail I find astounding in the kit market.To think I was going to discard the castings . Pictures to follow tomorrow to illustrate the point. Kind Regards Nigel
-
Sorry to hear of your redos Dave and your ear problems. I can share my personal experience of ear problems with you to put your mind at rest.I was continually plagued with ear infections since birth and had gromits fitted many times.When I was 18 I approached a specialist to see what could be done.The infections had destroyed my left ear drum almost entirely and I am nearly stone deaf in my left ear.However,I was referred to a surgeon,he grafted skin from above my ear and reconstructed my ear drum.It hasn't cured the deafness,that is attributed to damage much further inside,but,touch wood,I haven't had an ear infection worth mentioning in twenty five years!! Still no good at swimming though,that was the ones games activity I always had to be excused from as a kid! Kind Regards Nigel
- 962 replies
-
- 7
-
-
- sovereign of the seas
- ship of the line
- (and 1 more)
-
Thank you Patrick and Nigel In fact,thanks to everyone again who has commented or hit the like button.Your support and understanding has made me feel comfortable with decision.I think I need to be realistic and put the quest for historical exactness and fully framed builds on hold till I retire Just get back to basics and enjoy this great hobby for what it is,I no longer have the freetime to take things as seriously as I have been doing and actually complete something in a realistic timeframe. Far too many models I wish to make,infact I just bought some plans for a vessel the other day They had to go in the stash as the kit manufacturer has gone down the pan due to fire,but if I do build her it will be in a decent scale to match Chris Watton's Victory.The kit was pretty bang on for authenticity,Mamoli just got the date and history wrong Do also wonder whether she is supposedly the vessel featured in Les Miserables as she was indeed wrecked in drydock Kind Regards Nigel