NMBROOK
-
Posts
2,305 -
Joined
-
Last visited
Content Type
Profiles
Forums
Gallery
Events
Everything posted by NMBROOK
-
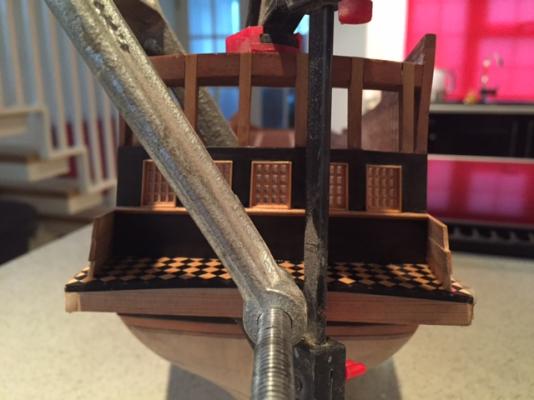
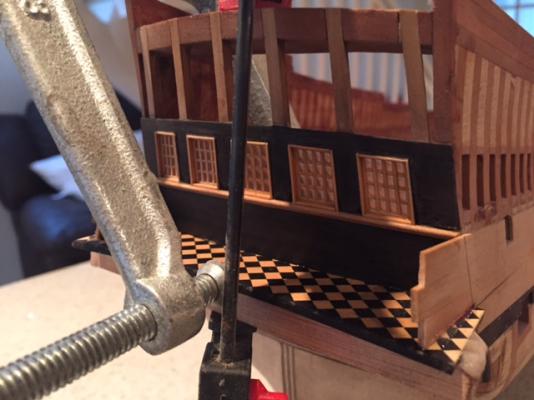
 Just some pics without all the clamps and things trimmed to shape so it makes a little more sense The upper level of the transom will be inline with the projecting balcony Kind Regards Nigel
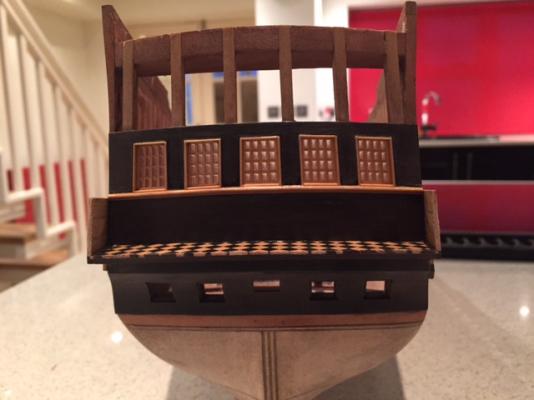

-
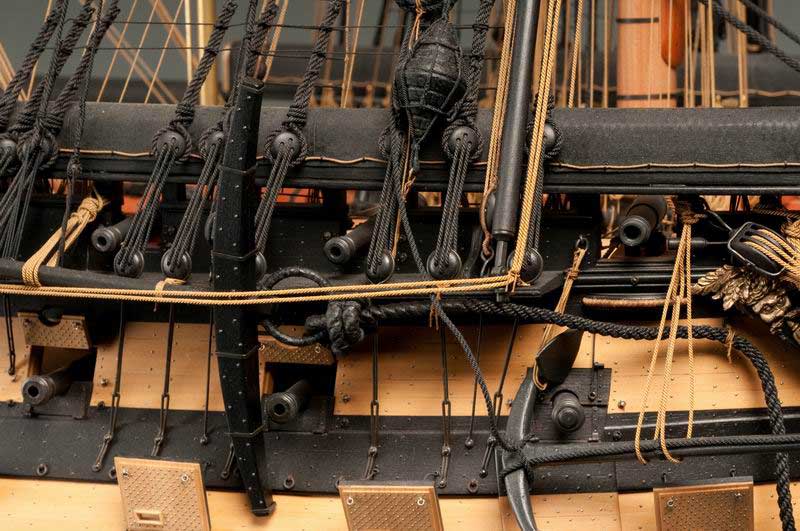
Excellent work JP I like your prefab gunport linings,I did something similar myself on Mordaunt.The only issue with basswood is it's inherent fuzzyness.You may end up making extra work for yourself when it comes to painting these.Lots of coats and rubbing down to get a satisfactory finish on something that isn't the easiest for access.That is the only downside you may experience,pear or boxwood,although a pain to trim etc,would make the painting so much easier Kind Regards Nigel
-
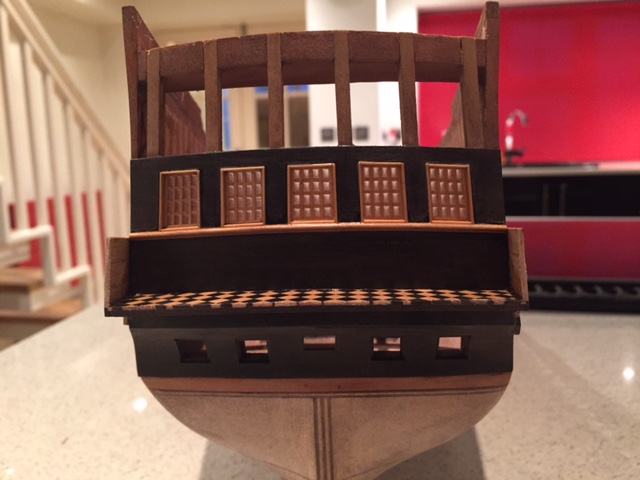
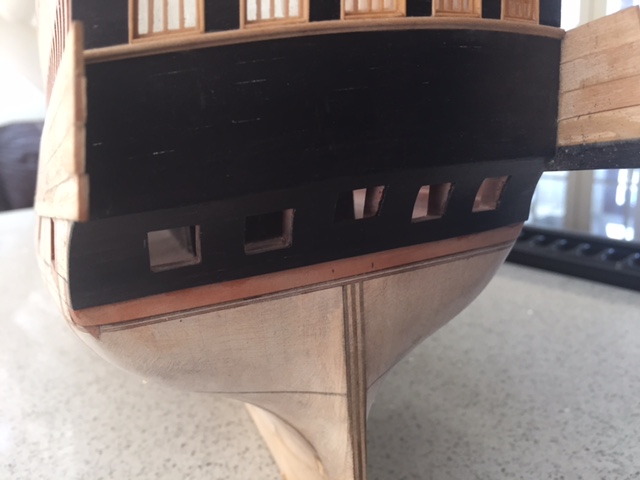
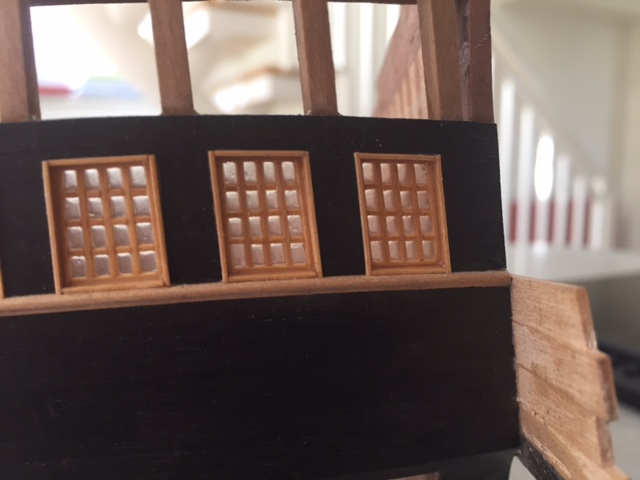
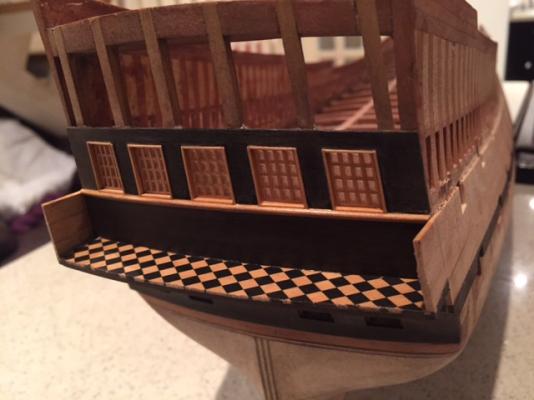
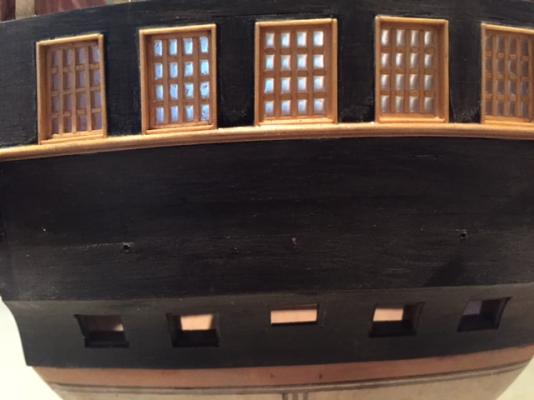
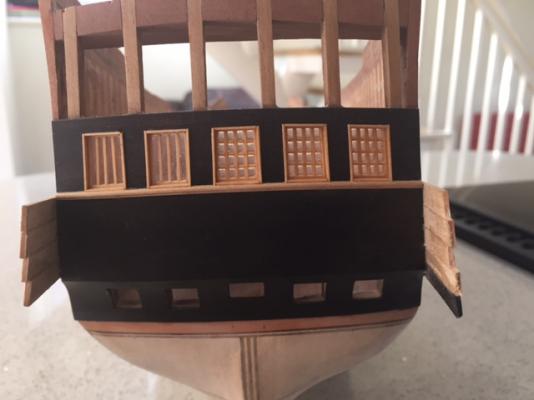
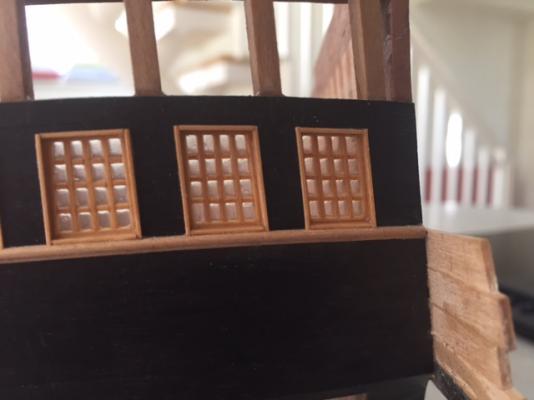
I have finally fitted the remaining glazing bars in the lower stern windows(yes another five to go above these and numerous ones on the deck bulkheads ) The three on the right are complete,the two on the left have had the bars sanded flat and awaiting another coat of matt poly. I have now moved on to fitting the balcony floor.Three copper pins were bonded into the edge of the floor and correspond to holes drilled in the transom.The softwood former underneath is temporary,it is purely there to hold the correct camber as I had a small amount of springback when the floor was released from it's jig.The floor has been epoxied to the transom and lower edge of the planking.The protuding sides will be trimmed and sanded flush when the epoxy has cured.This will also release the softwood former which is held with blobs of epoxy at each end. I am looking forward to the next stage,I had a lightbulb moment this week.I have worked out how to produce decorative paneling in boxwood with an ebony architrave detail.It is based on DrMike's technique for creating these panels,but with my own twist.All will be revealed in due course Kind Regards Nigel
-
Having downloaded the instructions on your website Daniel,I can see just how much work has gone into the development of this kit.I have said 'no more kits from now on',however this is the one I have been patiently waiting for and it is a potential game changer. I must congratulate you on the design,the potential is there for the builder to model all the gundecks if they so choose due to the frame design of the bulkheads and also the special jig to maintain alignment of the upper bulkheads. I already have permission from my other half to put my name down,some brief explanation of what is made of what,i.e.what is photoetched and what timbers are used would help push me off the fence I assume I would just need to click on the 'buy now' on your website and follow the instructions,am I correct? Kind Regards Nigel
-
Excellent work Michael and attention to detail The 'tops' look great and the bowsprit is coming on well.I think it goes to show that masting and rigging can amount to nearly 50% of the total build if you decide to go to town with the details. Kind Regards Nigel
-
Excellent planking work Nick!!!! .Your hard work has paid off in spades. I fully understand where you are coming from,there is a definite contrast between the prow and the hull and finish will only exaggerate it. Kind Regards Nigel
-
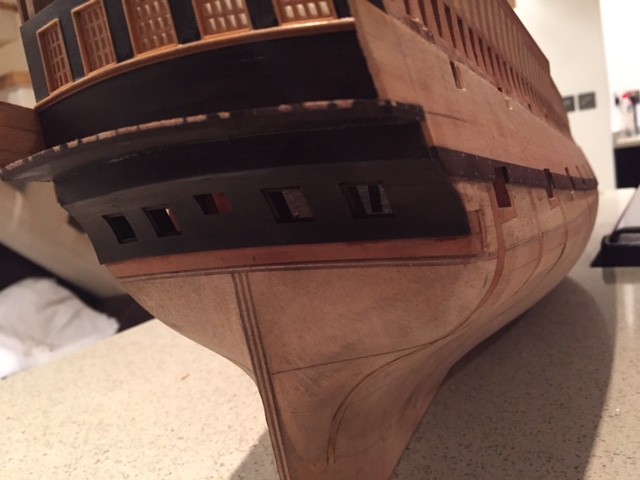
Thank you very much Nigel Yes the ports will be modelled open.The brown timber is indeed swiss pear and part of the counter framing.This will be covered by a boxwood moulding and the lower hull planking. Kind Regards Nigel
-
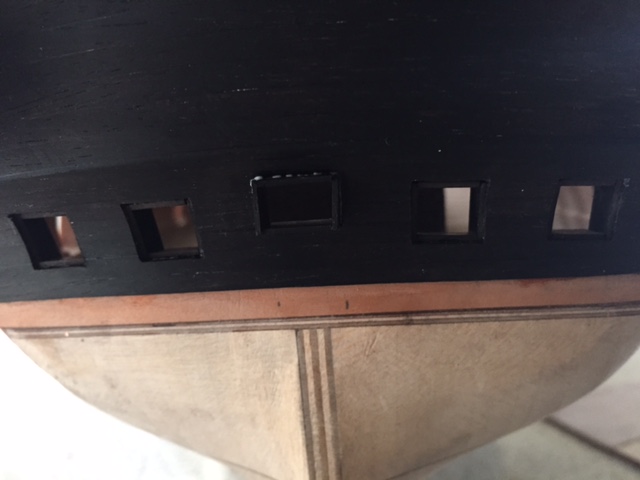
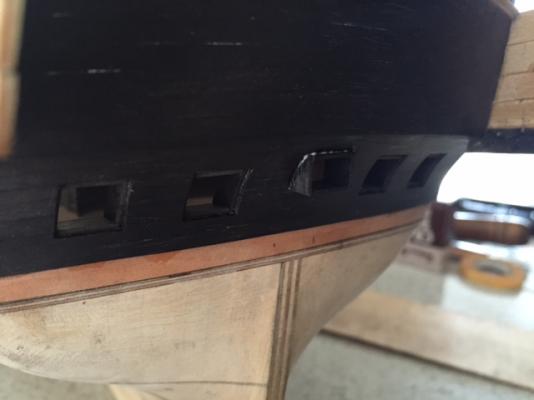
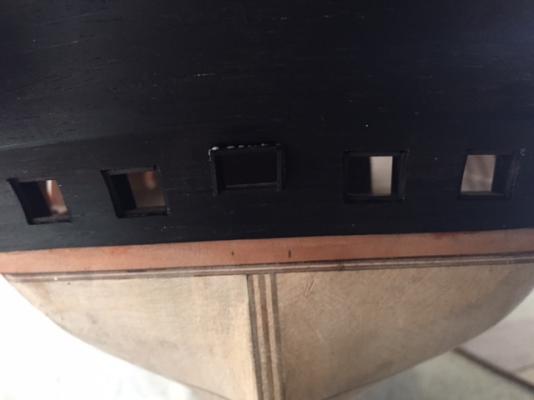
The stern chaser ports have now been lined with Ebony and I have also lined the hole for the tiller arm.The linings on this hole need to be flush with the stern counter,so I figured it easier to assemble a simple Ebony box.This will be trimmed and sanded flush with the counter after being left for a couple of days to ensure the glue is fully hard.Apologies for the pics,not easy to pick the details out when everything is black Kind Regards Nigel
-
As you may know Danny,I broke up a model of this vessel and salvaged most of the fittings.I intended to finish her,but found her hull to be 50% plaster.If you let me know what you need,I will put them in the post for you. Kind Regards Nigel
- 59 replies
-
- 4
-

-
- norske lowe
- billing boats
- (and 1 more)
-
No problem at all Michael,I nearly posted a link myself I thought a pic would show instantly what I meant.If you like the pics,you will love this http://forum.modelsworld.ru/topic8019.html And yes,he built two!!!more economically viable as he does this for a living Kind Regards Nigel
-
Fabulous work Brian!! Kind Regards Nigel
- 831 replies
-
- 2
-
-
- Armed Virginia Sloop
- Model Shipways
- (and 1 more)
-
Thank you very much indeed B.E.,Michael and Nick sadly B.E.,we currently live in a most unpicturesque part of Yorkshire,I hope to be within 'spitting' distance of the 'white horse' if we ever get moved,so that should change I think one of my biggest influences in the choice of woodtones Nick,is Dr Mike's Rivoli,I am simply in awe of this model and his use of colour Kind Regards Nigel
-
Thank you very much indeed Patrick Sorry no Piano making background,but my Father could play one,does that count? Kind Regards Nigel
-
I have completed varnishing the balcony deck and is rubbed down and burnished with steel wool.This will allow adhesion with of a final spray application of matt poly once the model is complete. I have framed another two windows(hard going on the eyes) and applied one coat of matt poly to the panes.Another coat will be required before I can sand the face of the glazing bars smooth. The stern chaser ports and opening for the tiller arm have been cut out.I have prepared a piece of ebony to 0.8mm thick to form the linings for these openings. Kind Regards Nigel

-
Good to see you back on your build Jason but sorry to see the rework,however it happens to us all.With something like this,I have walked away and come back to resolve it later. Definitely something to do with a cool head. Kind Regards Nigel
-
Truly amazing work Patrick!!!!!!!!I am once again in awe of your ability to work with such minute details. Kind Regards Nigel
-
Thank you Jeff and Nils I am about to add coat five of poly to the deck,it looked super smooth when I sanded it,but after the first coat,it was apparent there was a lot of grain in the Ebony.I don't mind this on hull sections,but not on a deck.I didn't have this issue with the Ebony used on Royal Caroline,just goes to show there is variation in this very dense timber. Kind Regards Nigel
-
Excellent work Jeff I would imagine many of the details you are adding are not illustrated on the Panart plans.Unfortunately my reference material is the same as yours,however the plethora of images of her on google may answer your question Kind Regards Nigel
-
Rather than hijack your log Ulises,if you google Royal Louis 1759 and 1758 you will find what I have so far.She was laid down in 1757 and launched in 59 which somewhat explains having to search more than one year.In google images there are several pictures of the museum model.Her relatively short career is the only explanation I can come up with why there is so little information on her. Kind Regards Nigel
- 786 replies
-
- 3
-
-
- Royal Louis
- Finished
- (and 1 more)
-
Your planking is coming on great Ulises I have recently bought Mamoli's plans for this vessel and do propose to build her in 1/60.Other than cutting and assembling the skeleton,this build is a little in the future for me. The mention of coppering is something I have been thinking of.Mamoli's model clearly represents the vessel of 1759 and is almost an exact replica of the model in the Paris museum.This vessel was wrecked whilst in drydock in 1772 after seeing active service in the seven years war.I am debating whether she would have actually ever been coppered as this was a little early for the French Navy.She certainly wouldn't have been when built. I concur that this model in 1/90 is rather large particularly in breadth and having cut out half the bulkheads,in 1/60 it is huge!!!!! Kind Regards Nigel
- 786 replies
-
- 4
-
-
- Royal Louis
- Finished
- (and 1 more)
-
Thank you very much indeed Jason and Patrick I have made scrapers in the past for mouldings Jason and had great success so all is not lost Kind Regards Nigel
-
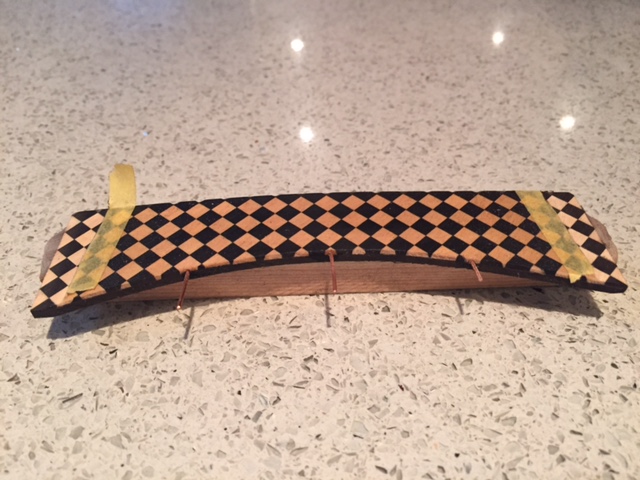
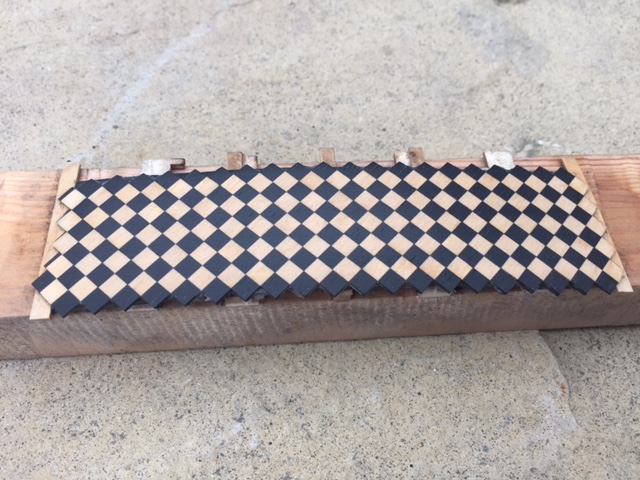
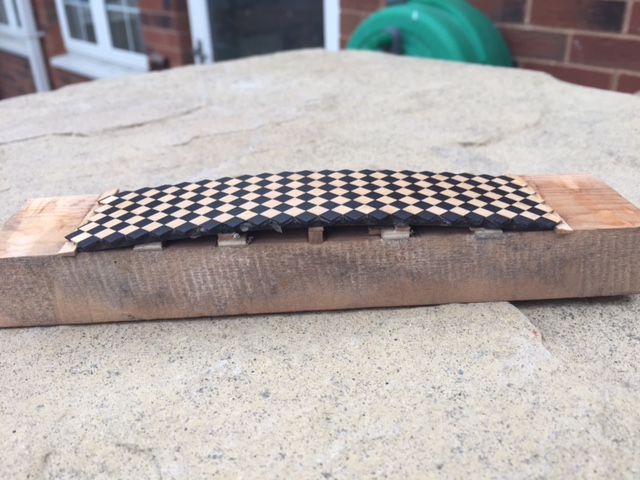
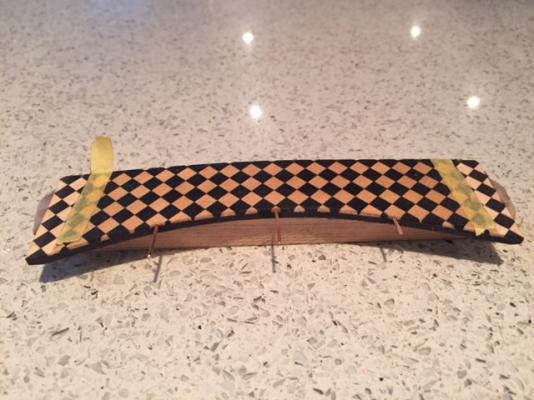
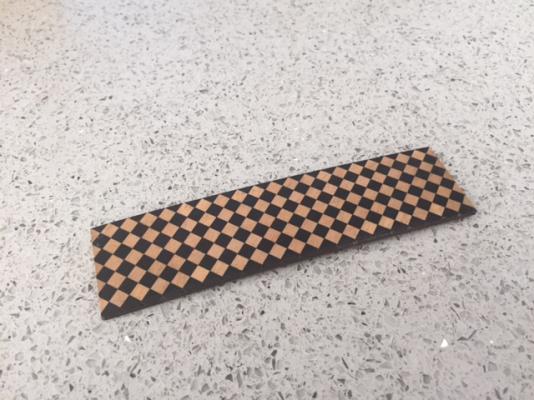
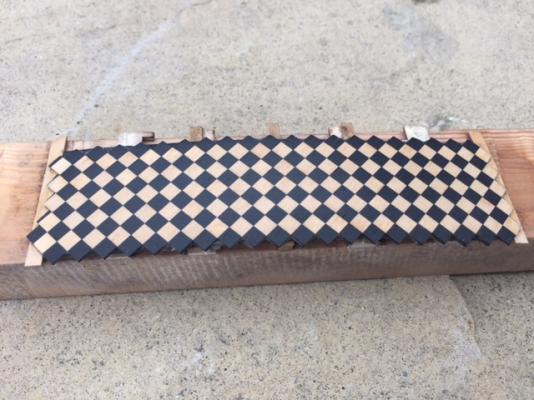
One mini project I have been working on in conjunction with everything else,is what will be the floor of the balcony.I mentioned earlier that this was a grated deck,but I wanted something a little more visually appealing. I have prebent a piece of 1.5mm Ebony on a jig and this was secured at the ends with some scrap boxwood and cyano.I have then tiled the upper surface with 4mm square boxwood and ebony.I haven't photographed the manufacturing techniques for this as it is covered in many other logs.A propose to apply a few light coats of Poly prior to removal and shaping. Kind Regards Nigel

-
Thank you very much Jason No I shaped it by setting a fence up on the MF70 miller and fed the strip through gently.I went this route as I had to reduce the boxwood stock down in size as well.The corners were radiused by hand with a sanding stick followed by final finishing with steel wool Kind Regards Nigel
-
Thank you very much Mark,Kevin and Jeff Kind Regards Nigel
-
Hi Nick Two sales fallen through,so house is going to auction 1st October.We desperately need to move so we just want an end to it all Kind Regards Nigel