HOLIDAY DONATION DRIVE - SUPPORT MSW - DO YOUR PART TO KEEP THIS GREAT FORUM GOING! (Only 68 donations so far out of 49,000 members - Can we at least get 100? C'mon guys!)
×


NMBROOK
-
Posts
2,305 -
Joined
-
Last visited
Content Type
Profiles
Forums
Gallery
Events
Everything posted by NMBROOK
-
 Thank you very much indeed Janos It means a great deal coming from yourself that my carvings are up to scratch I still regard myself very much in the amateur league in that respect I also post on a facebook group.Several posts down from my pics is the work of Ivan Trtanj on his Royal Caroline,BIG reality check . The first carving is acting as a prototype and being used as constant point of reference for the other three.Indeed it does help having them side by side.Still playing with colours to try and match the boxwood.I have had another play,but it is a long time since I did art at school and colour mixing is a distant memory Yellow ochre too dark,add titanium buff too pale I am going to end up carving everything at this rate The paste is 'Goldfinger' sovereign gold.It looks better in the flesh than my pic.You brush it on and then work it with the brush and it buffs up and the excess is removed leaving a very thin film. Kind Regards Nigel
 -
Thank you Michael I have carved a few Turkeys on Xmas day in my time but would fancy doing it with a rotary tool Kind Regards Nigel
-
OK,I have to admit everyone knows me better than I know myself,the carvings will be natural finish,just need to buy something to strip this one back to natural wood If I use the kit castings,the challenge will be on to find a paint colour that mimics this timber when the poly has been applied No pics for a while,I have now started the second carving,it may take some time to produce all four Kind Regards Nigel
-
Jason I do think this taper is frequently overlooked by Kit builders.Whilst I am not familiar with kits from American manufacturers,the only European kit maker that depicts this taper and indeed that of the prow is Euromodel.I feel that addressing this point Jason,will take you model away from one of the typical 'kit traits'.You only need to look in the scratch build section and see how many parallel stern posts you can find I can only applaud your decision for going this route Kind Regards Nigel P.S.you probably know me better than I know myself My carvings will be returning to natural wood
-
Thank you Grant and Bob I tried the paint route,didn't look right,so that idea aborted The issue is the massive difference in colour between the boxwood I use for carving and the box used for general construction and planking. This is further complicated by the fact I am not prepared to carve every detail on the model,kit castings will be used where appropriate. The plan is that everything was always going to be box and ebony,no other colours anywhere.I am prepared to make one exception and that is the decoration,so now I have tried my 'get out of jail card'. The pic is of the carving with gilding paste applied.This stuff buffs up to a high sheen,does not obscure detail and does not have the metallic flakes prominent like paint. This does present another problem in that you cannot cover it with Poly,even if you spray it on,it turns milky.This would mean doweling the carvings and fitting all the ornamentation when the hull and decks are complete and fitted out. The pic really doesn't do it justice.The combination of iphone camera and a dark and dingy wet day don't help. Kind Regards Nigel

-
I am with Carl Jason,I don't think you will be happy unless you make the changes to the sternpost.I think you have two choices,either buy some boxwood large enough or laminate two pieces of the 5mm. Kind Regards Nigel
-
Thank you Nils I will see how it turns out,it is easy enough to strip off.What the photos don't illustrate is how glaringly yellow the boxwood is.I can't see poly on it's own killing this yellow. Kind Regards Nigel
-
An excellent rework and some super clean and neat work Jason Few kits do depict the taper on the sternpost,but it is quite a prominent feature on many vessels. if you are chasing authenticity.In actual fact,the keel should actually taper on most vessels over roughly the first and last third.Personally I would fit the tapered sternpost but not mess with the keel provided it is the correct width at the stern. Kind Regards Nigel
-
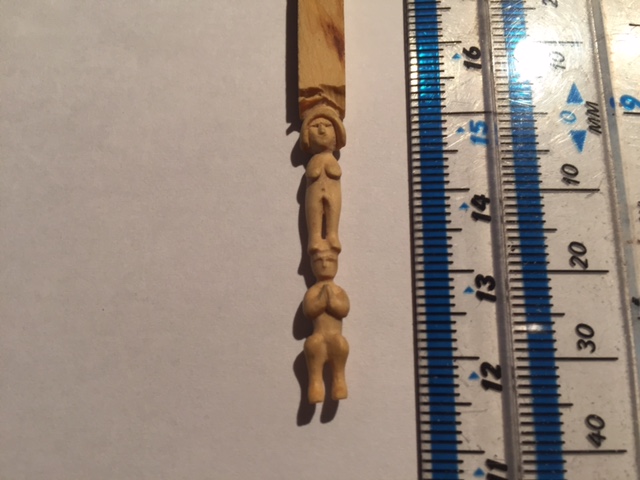
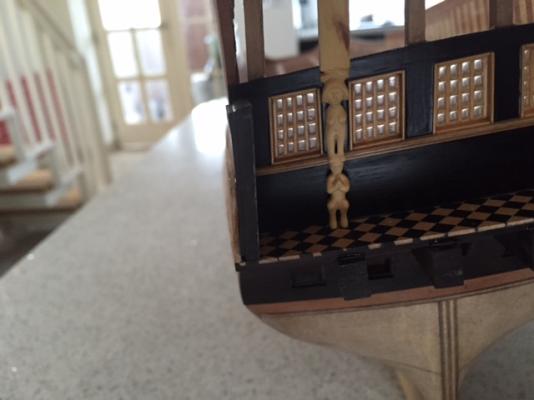
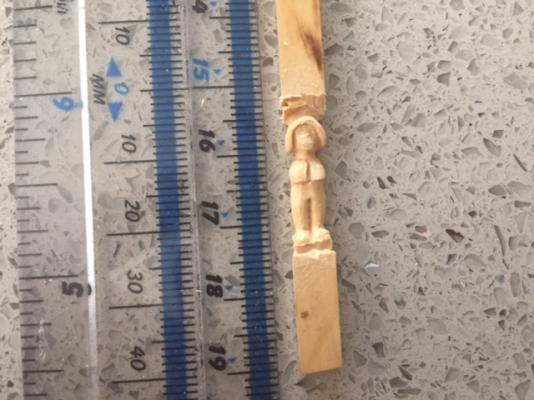
After shaping the bottom figure,I decided to relieve the back of the carving.This lended to a more 3d appearance allowing me to open up the area between the legs. Since taking these pics,the carving has been separated from the stock and has had a thin coat of yellow ochre acrylic.The reasoning behind this is that the wood I use for carving is far too yellow for this model.The carving would not blend with other boxwood the hull is planked with. I hope that after applying a coat of poly it will blend better.If not,it is small enough to strip and try again to find a suitable method.If I get this right,it means I can use the cast wreaths around the gunports.These are good quality from a detail point of view and a better alternative to carving 22 identical ones!! Kind Regards Nigel

-
Thank you Grant and Mark I have to admit Grant,carving is the one thing that really does test my patience Lots of work on a 'blob' it is only the final stages where it takes shape Kind Regards Nigel
-
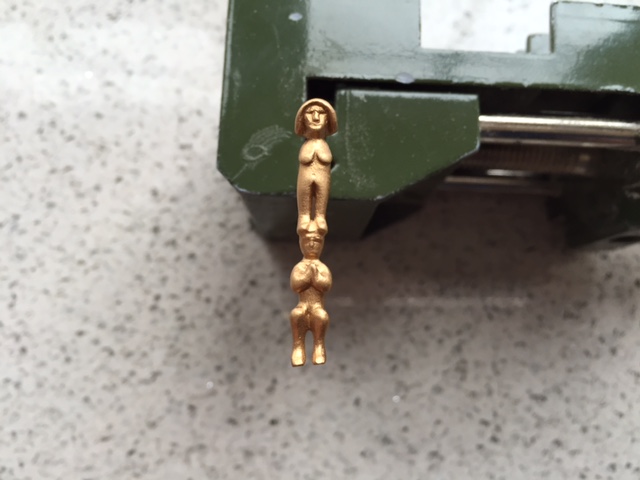
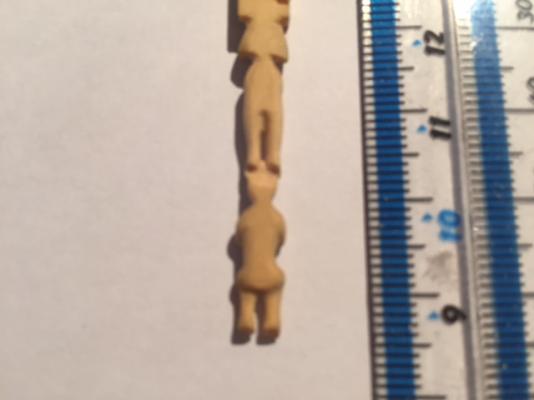
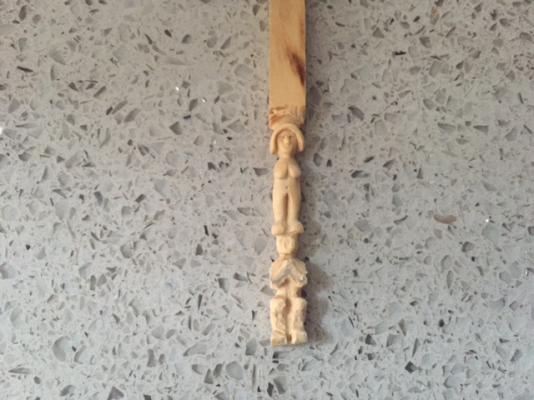
Thank you very much indeed Nigel The upper character is now complete(well apart from the great lump of boxwood to be cut off later ) I have now started on roughing out the lower one.This one is crouched down with hands together Kind Regards Nigel
-
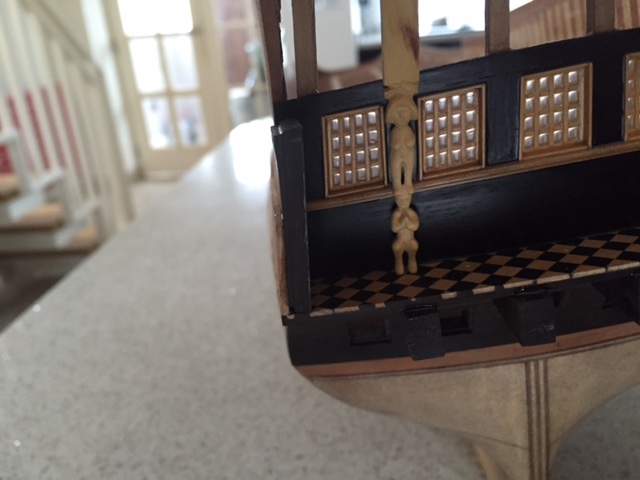
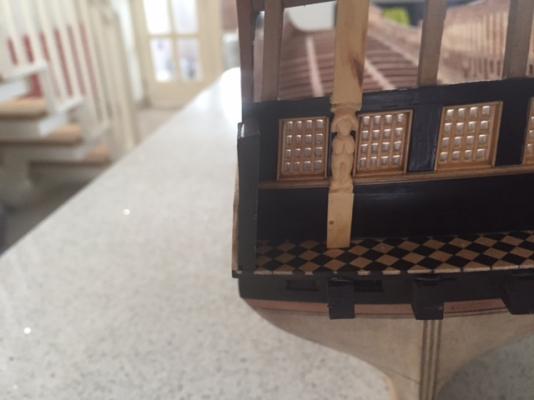
Thank you very much Don and Jason The reason I chose epoxy in this instance Jason is two fold.Firstly,I couldn't guarantee a perfect fit to the inside of the planking.The epoxy fills gaps whereas pva does not.Secondly,epoxy sticks to ebony better than pva and I needed this joint to be as strong as possible. Ok,I have now started work on the decorative figures that run between the windows.These are to be carved out of boxwood(yes I know,I can see where this is heading )I could cast them,but they are all different due to the angles involved.I am trying to mirror what is illustrated on the kit castings. This is the start of the first piece.It comprises of two figures on top of one another.I have started with the top one as I want the feet to fall on the rail below the windows.This is very much in the roughing stage.Weight loss,breast reduction,then detailing are on the menu Kind Regards Nigel
-
A very enjoyable read and some fantastic work Grant! Kind Regards Nigel
- 456 replies
-
- 7
-

-
- finished
- bomb ketch
- (and 2 more)
-
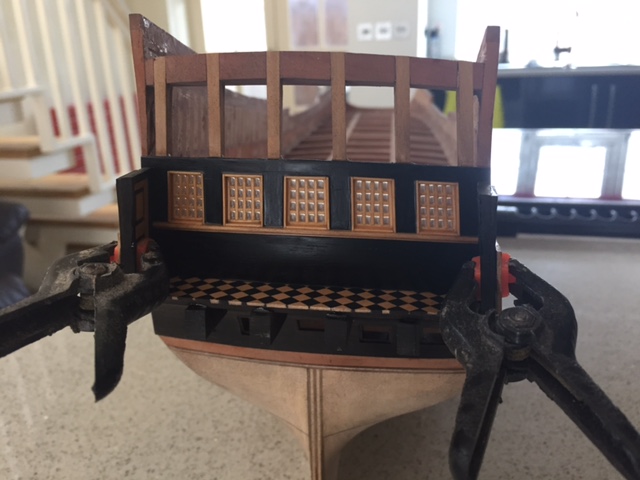
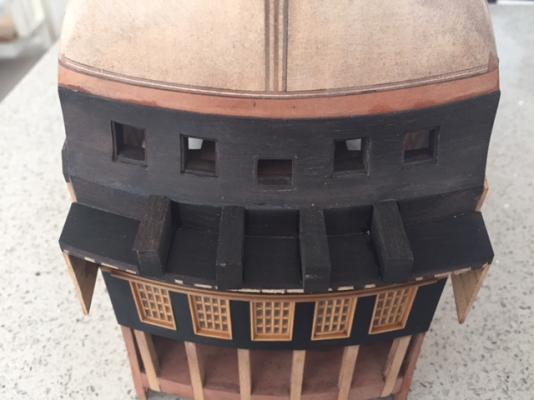
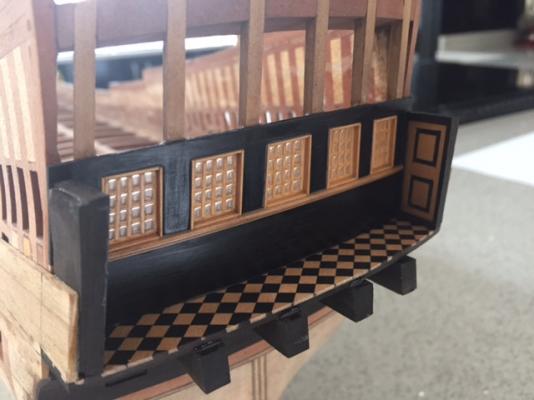
I have framed the doors in Ebony using a machined angle profile.They have been given a coat of poly.I am varnishing as I go as,if nothing else,it protects the boxwood from Ebony dust which can mark the boxwood and requires sanding to remove. I have fitted four of the gallows?brackets under the balcony.There are two more still to fit at the transom sides.These will be shaped later as it is much easier to make sure the compound shapes line through. The rear of the doors have been shaped where they fit to the existing planking.These have been epoxied into position.The upper section will be faired later before the planking continues upwards. There is a dubious sheen to the matt poly at the moment.A later coat sprayed on will kill this and produce an even finish Kind Regards Nigel
-
Thank you Eamonn and Brian Kind Regards Nigel
-
Wow Daniel,those are exciting planned releases You will have to have a chat with my friend regarding Trinnidad Here his log on 3D modelling her stern http://modelshipworld.com/index.php/topic/1990-stern-gallery-of-santissima-trinidad/page-1 A 3D printed stern of this design included would really raise the bar in the kit world and would build into a mind blowing model Kind Regards NIgel
-
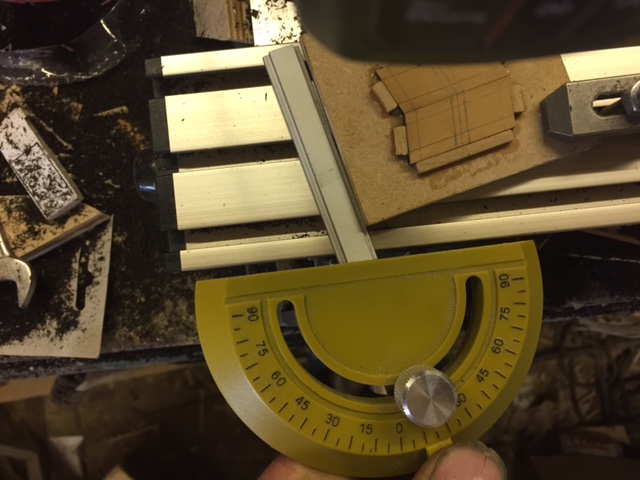
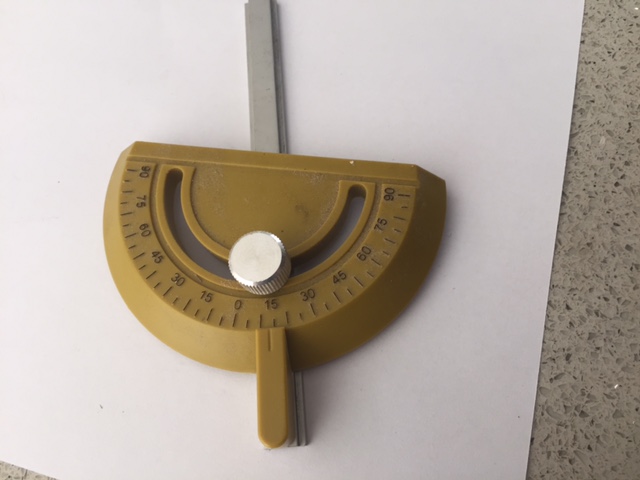
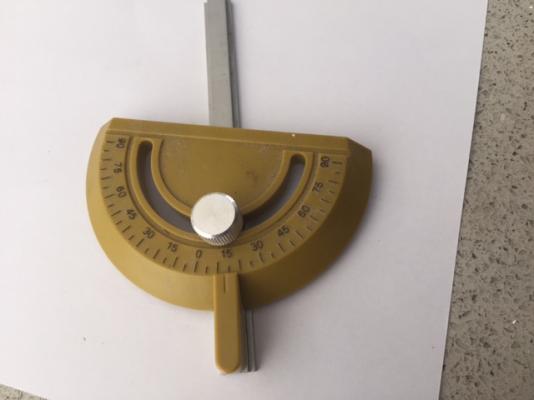
Thank you very indeed Jeff,Grant,Janos and Don The bevel guide was actually off the Proxxon disc sander Don.The idea being,that the angle set was used to sand the ends of the doors to the correct angle and had been checked on the model.The table saw has a similar one(the guide is actually fatter on the saw one),but cutting the ends on the table saw would have risked material breakout on the trailing edge. Kind Regards Nigel
-
Thank you very much indeed Mark Kind Regards Nigel
-
Thank you very much indeed Jparsley,John,Nils and Bob Kind Regards Nigel
-
Cutter Cheerful 1806 by rafine - FINISHED
NMBROOK replied to rafine's topic in - Build logs for subjects built 1801 - 1850
Excellent work Bob The treenailing looks great,to be honest,I have used every material for doing these bar fishing line,but I don't think the filler route looses anything to the others unless you are after a structural fixing Kind Regards Nigel- 525 replies
-
- 4
-
-
- cheerful
- Syren Ship Model Company
- (and 1 more)
-
That makes two of us Ken ,I ordered mine on Saturday as well.No plans on starting it for the foreseeable future,however the discount is massive,it would be silly to pass up. Kind Regards Nigel
-
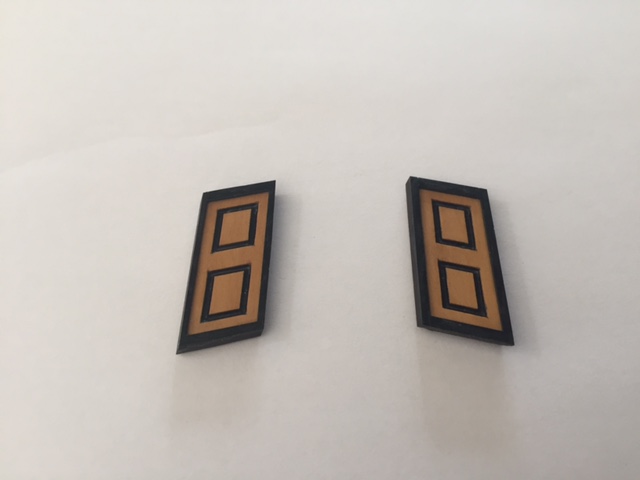
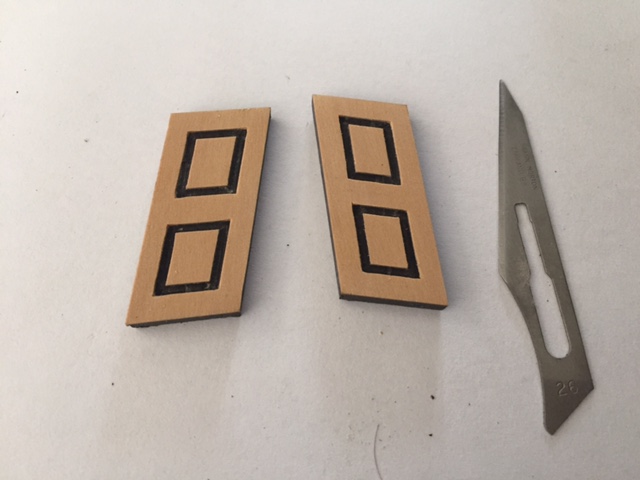
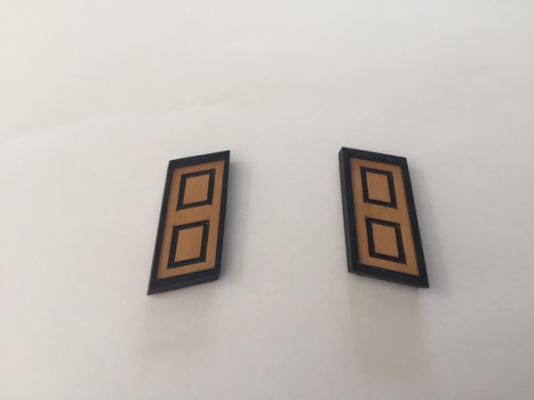
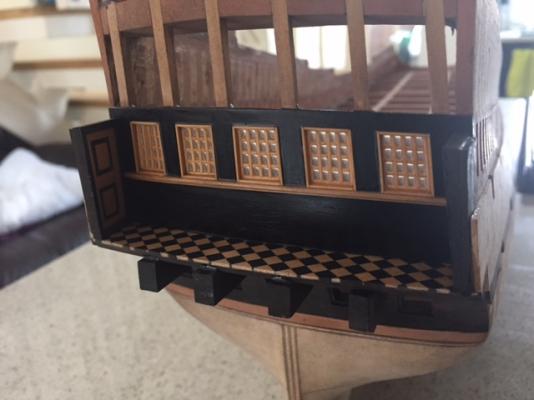
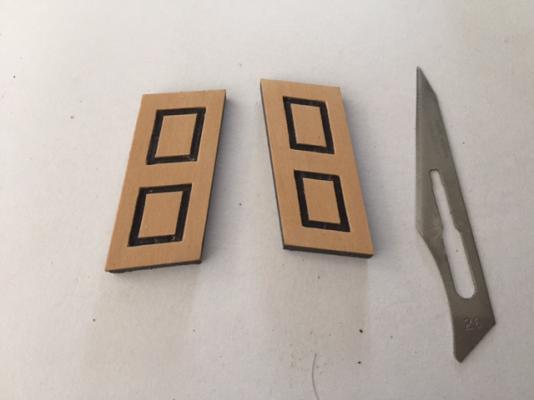
And finally part three Using a dremel ball end cutter 1.2mm diameter the grooves were machined between the lines previously marked in several light passes,the total depth being 1.5mm.The fixture was then moved parallel to the table to mill the vertical grooves in the doors. After a light sand the corners were 'squared' using the tip of a scalpel blade and job done. Now to make the ebony panels these sit into so they can be fitted on the model Kind Regards Nigel

-
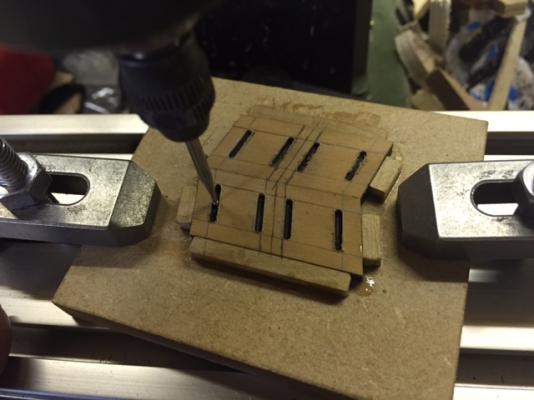
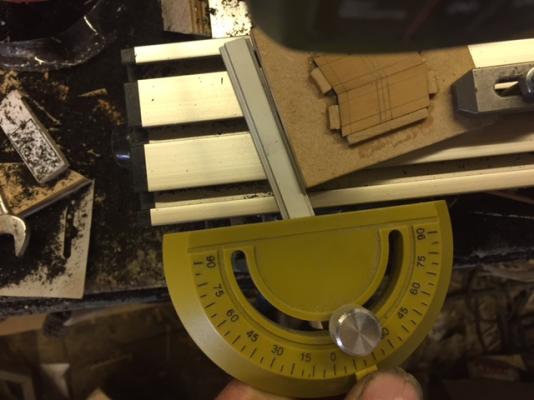
Part two Standing the mdf on edge and using some scrap strip as a spacer,the first boxwood stop was glued to the MDF(this ensures it is parallel to the edge).The rest of the fixture was then assembled,the pics are self explanatory,but note the doors are only glued with tiny spots of epoxy at the corners,the boxwood is thoroughly glued to the MDF. Next the fixture is set on the mill table,the sander guide is used to set the angle so that the grooves running across the doors can be milled. Kind Regards Nigel
-
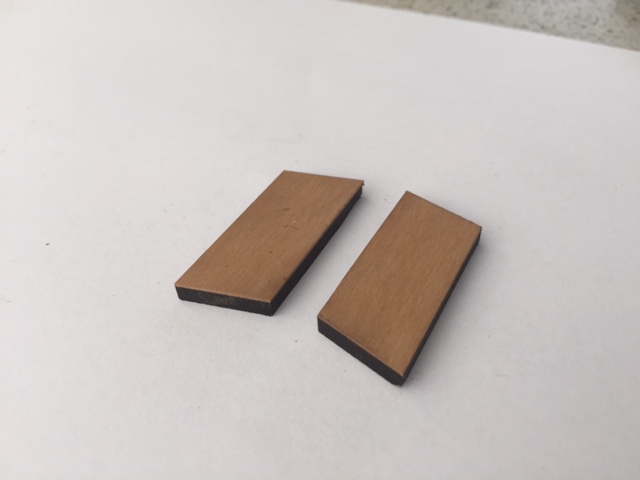
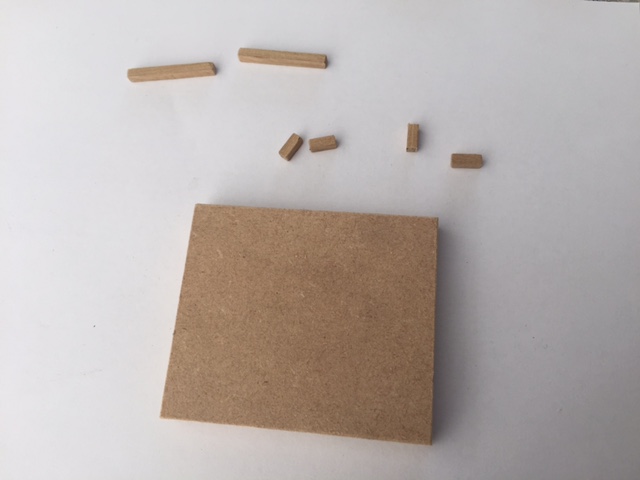
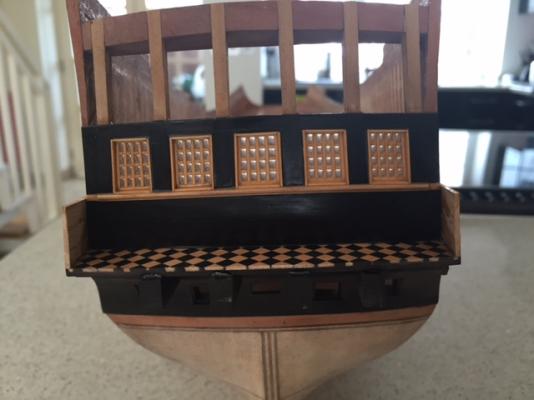
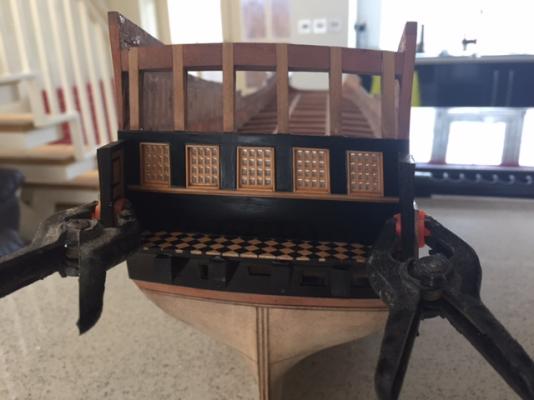
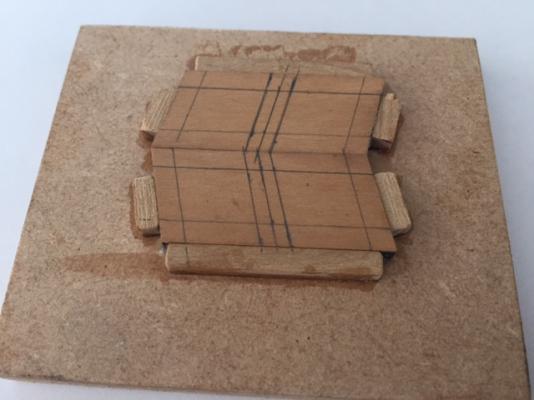
I have successfully completed the two pocket doors that will go either side of the stern balcony.The lightbulb idea worked I have taken MANY pics of the actually quite simple process.To make it easier,it will be in several posts. Part one After making a template for the angle(all the panel detail on the stern comprises of parallelograms ) I cut two doors and the top and bottom angle was set on the proxxon disc sander.The blank comprises of 3mm ebony laminated with 0.6mm boxwood veneer.The parts for a fixture for the miller was cut from scrap MDF and boxwwod strip.The MDF was perfectly square and parallel(this is important later on )The guide for the proxxon sander was kept set as this will be used later.Note the only reason the ebony is so thick is that the back will be shaped to mate with the inside of the hull planking. TBC Kind Regards Nigel


-
Thank you JP Yes I am big fan of Ebony,it is a pig to work with,but you can produce effects that would be an absolute nightmare to achieve using dyes or paint. Kind Regards Nigel