rschissler
-
Posts
94 -
Joined
-
Last visited


-
 PatrickA reacted to a post in a topic:
Golden Hind 1580 by rschissler - Mamoli - Galleon
PatrickA reacted to a post in a topic:
Golden Hind 1580 by rschissler - Mamoli - Galleon
-
Knocklouder reacted to a post in a topic:
Golden Hind 1580 by rschissler - Mamoli - Galleon
-
Knocklouder reacted to a post in a topic:
Golden Hind 1580 by rschissler - Mamoli - Galleon
-
ships88 reacted to a post in a topic:
Golden Hind 1580 by rschissler - Mamoli - Galleon
-
Snug Harbor Johnny reacted to a post in a topic:
Golden Hind 1580 by rschissler - Mamoli - Galleon
-
Bill Morrison reacted to a post in a topic:
Golden Hind 1580 by rschissler - Mamoli - Galleon
-
Bill Morrison reacted to a post in a topic:
Golden Hind 1580 by rschissler - Mamoli - Galleon
-
Bill Morrison reacted to a post in a topic:
Golden Hind 1580 by rschissler - Mamoli - Galleon
-
Bill Morrison reacted to a post in a topic:
Golden Hind 1580 by rschissler - Mamoli - Galleon
-
Bill Morrison reacted to a post in a topic:
Golden Hind 1580 by rschissler - Mamoli - Galleon
-
rschissler reacted to a post in a topic:
Wasa by md1400cs - FINISHED - Corel - 1:75
-
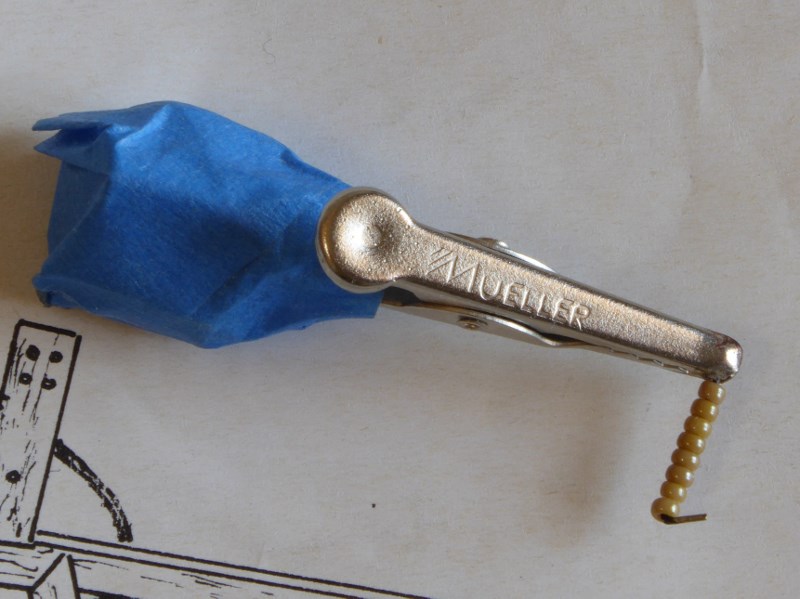
hoocat/Steve: I used a #17 chisel blade on a x-acto knife. -Randy
-
rschissler reacted to a post in a topic:
Golden Hind 1580 by rschissler - Mamoli - Galleon
-
rschissler reacted to a post in a topic:
Golden Hind 1580 by rschissler - Mamoli - Galleon
-
mdc1400cs: Sorry it took me so long to reply. I've been involved in something else right now and haven't been able to finish my model. From ear to ear, they are 2.80-2.90mm. There are some others in the Viking set that are 2.60-2.70mm. -Randy
-
Believe it or not, I had the same problem with the twisted hull. I wish I had paid more attention in how the decks fit, as they were flawed, and I think that was the main source of the problem. Nothing you can do about it now. I would suggest you sand a little more on the uneven planks at the front though. I used a drill press for my masts and spars, as that let me use two hands for the tapering. I drilled a hole, slightly bigger than the dowel being tapered in a piece of wood and clamped it to the drill press table. So, one end in the chuck and the other in the piece of wood, like a vertical lathe. I used files and sanding blocks of wood to taper them. For the squared ends of the masts, they were easier to do than I expected. They are too small to use a small plane. I just made some cuts with a #17 Xacto chisel blade, and then used a sanding block to make them square. When gluing the other mast sections and flagpoles together, lay them out on a flat counter top, and turn them from side to side. This will help you ensure that they maintain parallelity with each other. Remember that I reduced the size of my mast caps, as I thought they were too bulky for the masts. If you want to do sails, I would recommend Wolfgang Mondeld's book. There is a drawing of an English galleon in the beginning part of the book, that seems almost identical to the Golden Hind kit. There is a lot of other rigging info in the book, so you have to research. The biggest challenge is that you have to add extra belaying points. I used 3mm blocks for the gun rigging, from Chuck's Syren Model Ship Supply. I would think he would ship to the UK, so I would contact him. He is quick to answer email. In fact, I thought most of the blocks in the kit are junk, so all my blocks, deadeyes, and rigging thread came from Syren. I searched for commercial triangular deadeyes, and there are none less than 5mm anywhere. That's when I found Syren could make custom ones. If you use the same 8mm belaying pins I did, from Amati, they are available in the UK. I know, because I got some from there. For the balcony, The rear wall is curved, so when you glue the floor to it, it should maintain the curve. I left the inner cutout of the floor planking a little oversize for final fitting. So, when fitting the finished balcony to the rear hull, you just have to adjust it, by sanding, little by little until it fits tight and square. Of course you have to make the little cutouts in the short sides,to fit around the wale. If you are talking about the three holes above the gunports, on the outside of the ship, the two lower ones are for the pins to the hinge castings, and the upper middle one is a through hole for a rope to hold the door open. I did some filing on the hinge castings to bring them to a sharp point, glued them to the doors, then individually set and labeled each door for later installation. Installing the gun doors will probably be the last thing I do to the kit, as they would easily get knocked off while doing other things. Randy
-
Ciaran (Kihon): Thanks. I'll try to answer your questions on your own log. I've been busy with some things, and with travel plans I probably won't be able to get back to this ship until late July. Randy
-
rschissler reacted to a post in a topic:
Golden Hind by Kihon - Mamoli - Scale 1:53 - circa 1577
-
I like the way everything is so neat and clean. Very nice!
- 71 replies
-
- 3
-
-
- Santa Maria
- Tehnodiktata
- (and 1 more)
-
rschissler reacted to a post in a topic:
Santa Maria by igorsr - FINISHED - Tehnodiktata - Scale 1:66
-
rschissler reacted to a post in a topic:
Trabakul by donrobinson - FINISHED - MarisStella - 1:32 scale
-
rschissler reacted to a post in a topic:
Syren by JesseLee - FINISHED - Model Shipways - scale: 1:64
-
Mizzen sail rigged. Like I've mentioned before, that kit had no accommodation for sails. So, I had to figure out the shape and size of the sails, what lines were needed to rig the sails, where to belay the lines to, and how to add extra belaying points. The Wolfgang Mondfeld book was a great help for this. I used Amati sailcloth for the sails, dyeing them in weak coffee so they wouldn't be so stark white. In making the sails I somewhat followed Landluber Mike's technique for furled sails (found in the Masting section). He promotes greatly reducing the size of the sails, especially on the sides. I machine sewed the sails to simulate seams and individual cloths, with a thread that has close to the sail color. I know some people like to use a very contrasting thread for this, but I think it makes the sails less realistic. For the boltropes, the sails were much too small to hand sew to the edge, which seems to be the recommended way. So, I glued rope to the edge with wood glue to make mine. Maybe sometime later I'll describe how I furled sails to the yards, which is somewhat different than what Mike did, but it involved applying thinned wood glue to the sails to keep the shape. The thinned wood glue added more color to the sails, but that was good for me because I ultimately want a somewhat weathered model appearance. All the blocks, hook, and thread are from Chuck of Syren.

-
rschissler reacted to a post in a topic:
The Pinta by Torbogdan - FINISHED - Dusek shipmodels - 1:72
-
I think it looks great! I would consider changing out the round deadeyes to triangular ones, though.
-
rschissler reacted to a post in a topic:
Excess rope coils?
-
rschissler reacted to a post in a topic:
Excess rope coils?
-
You know, the excess rope coils that hang on the belaying pins? Should all the pins have these excess coils of rope? Why does a ship need so much extra rope anyway?
-
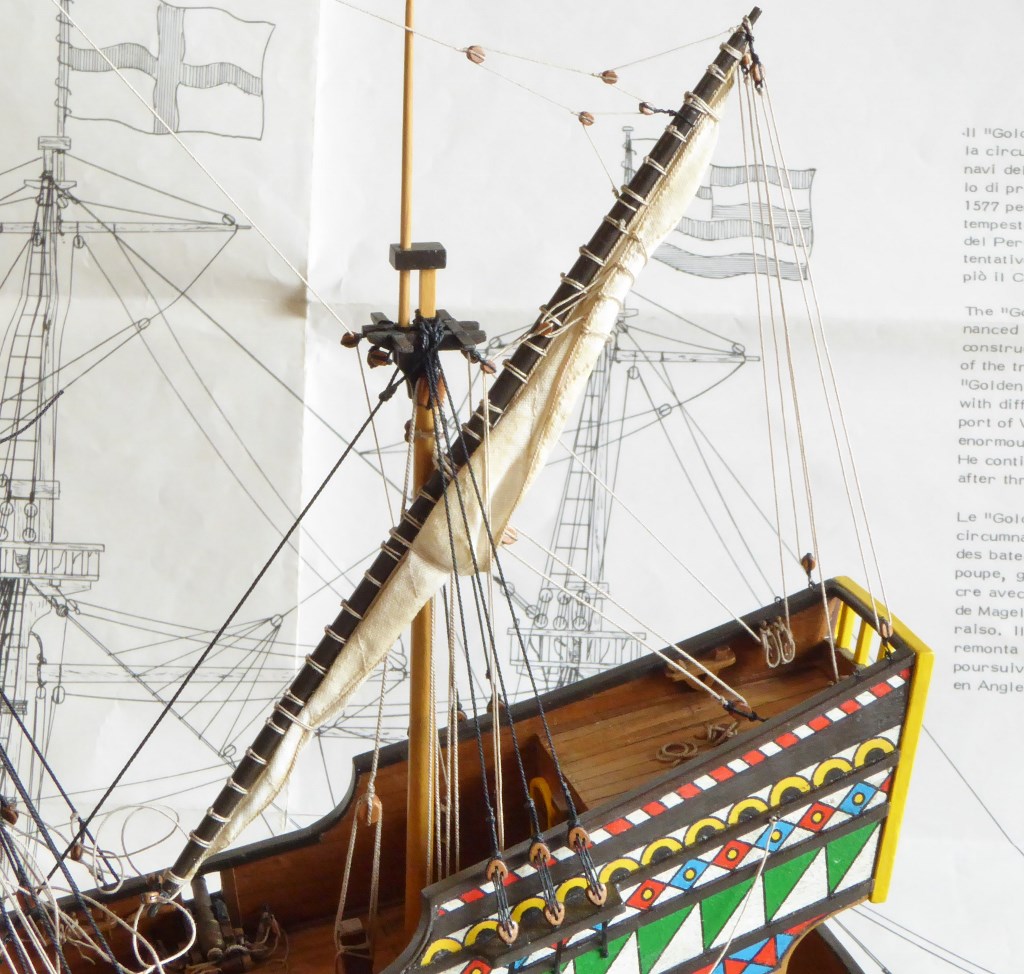
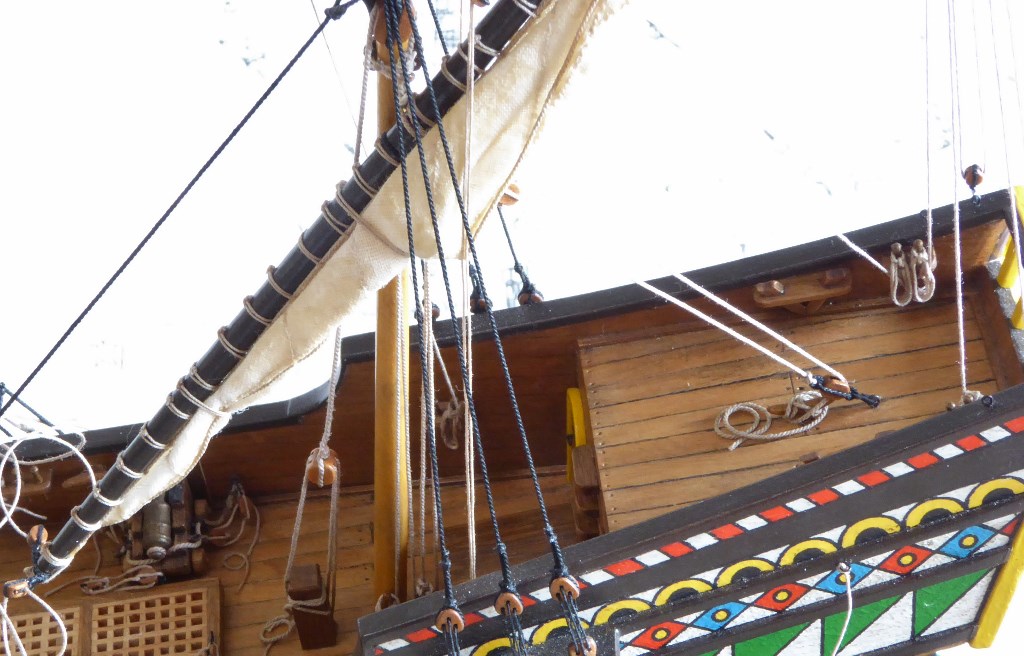
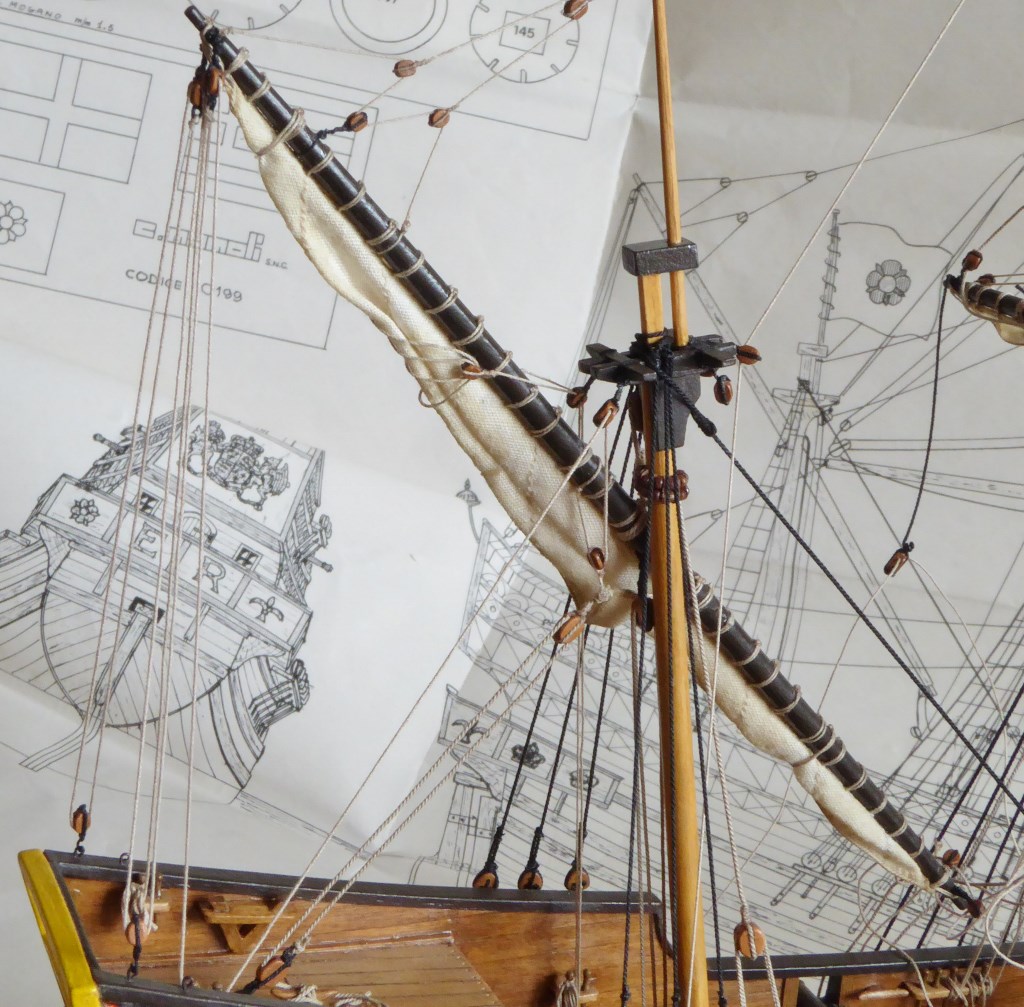
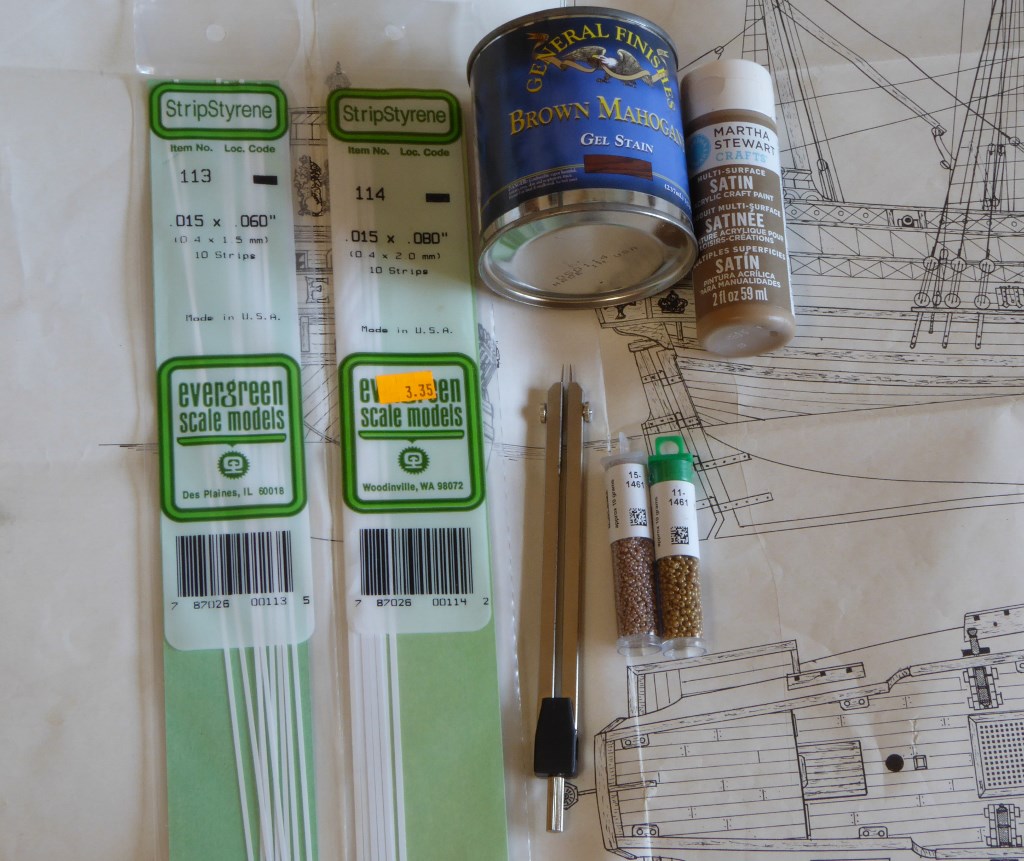
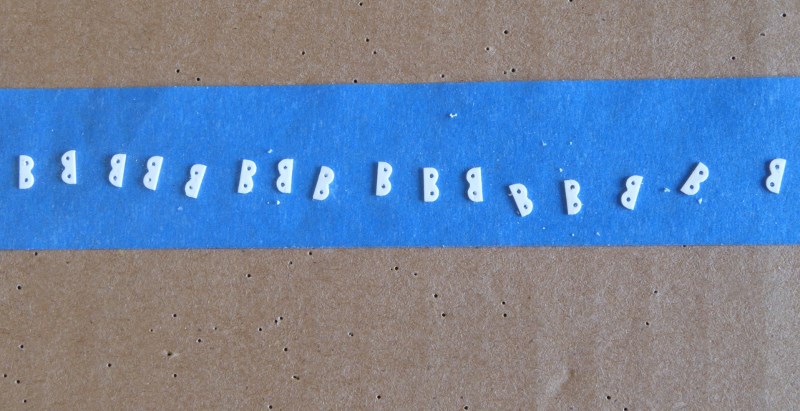
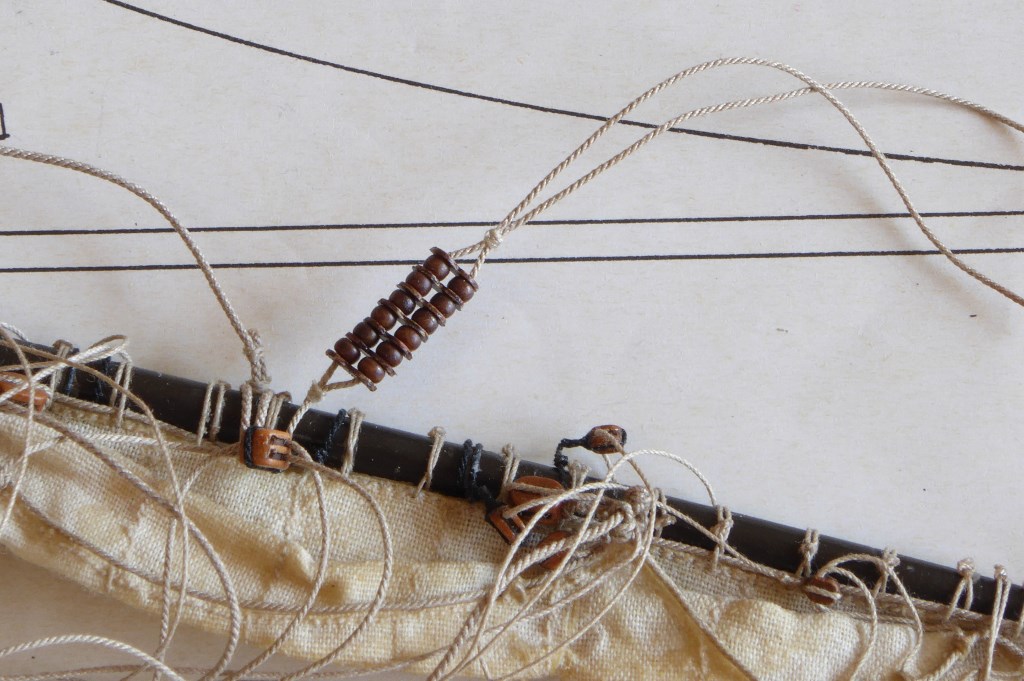
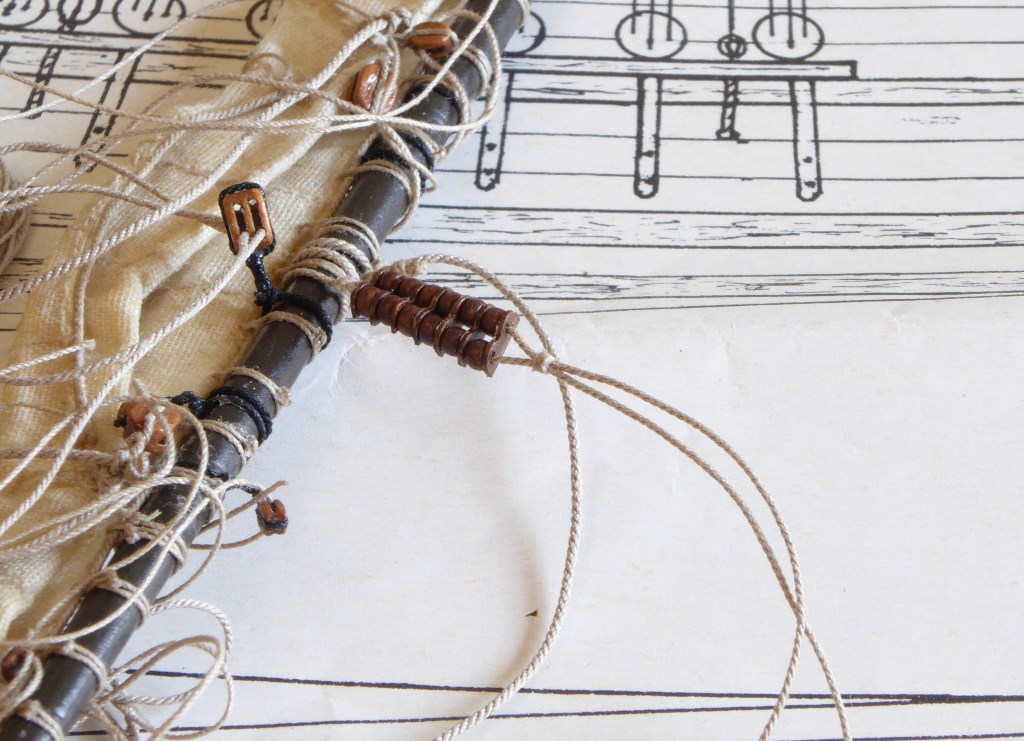
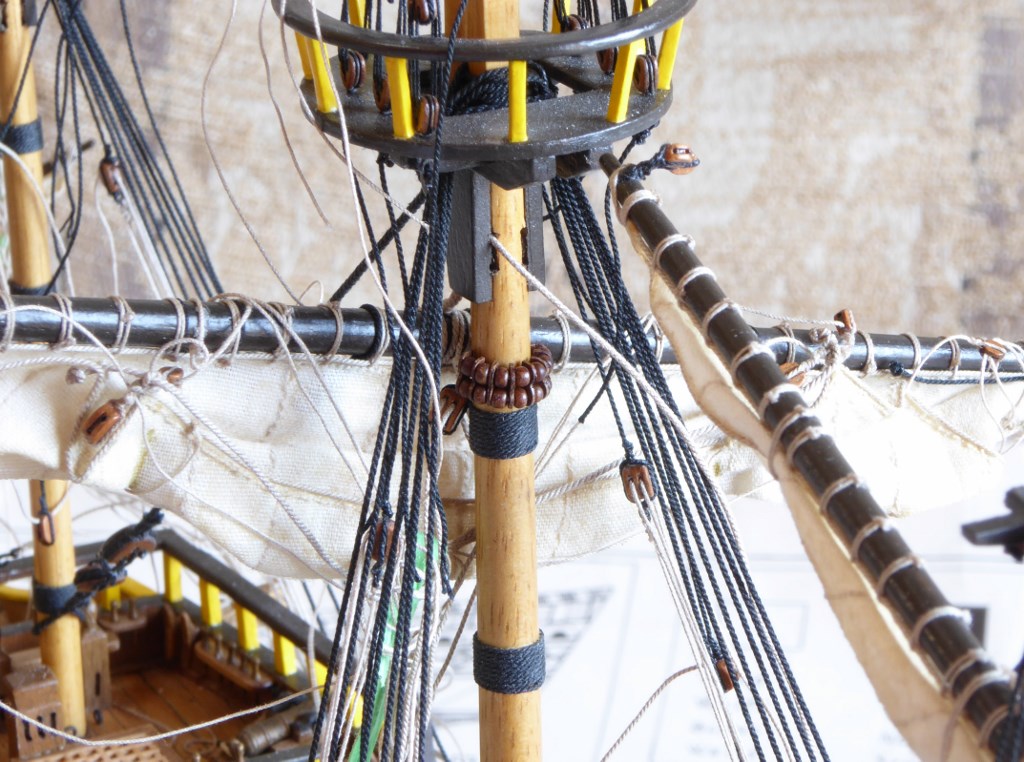
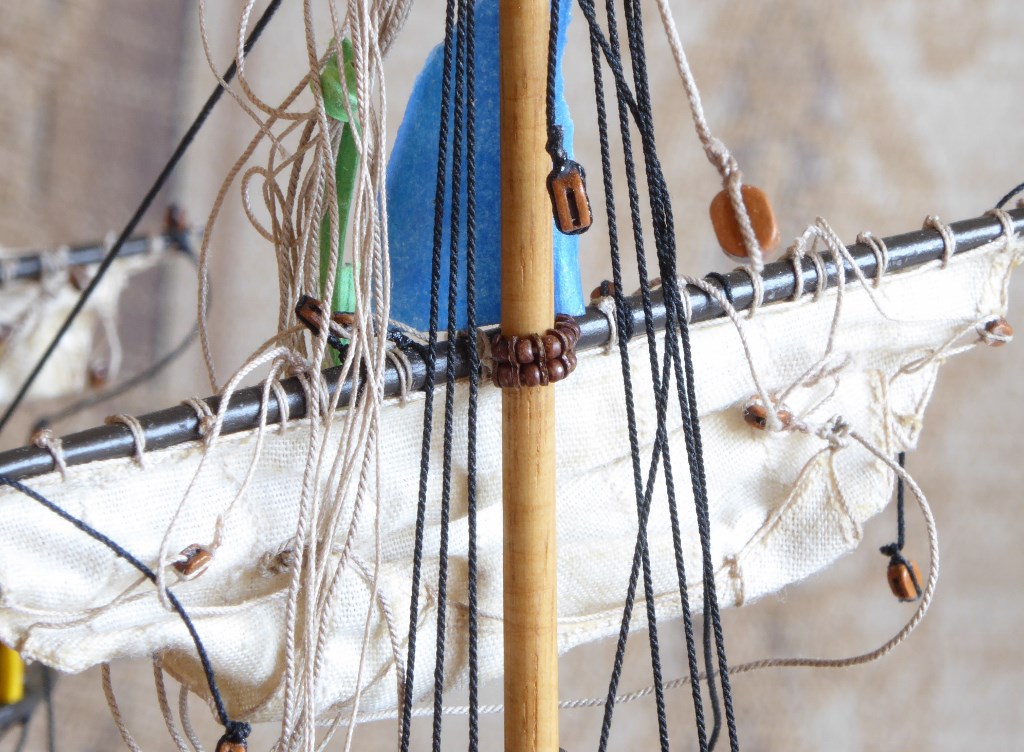
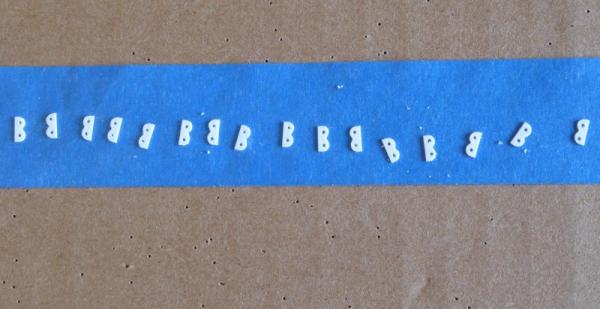
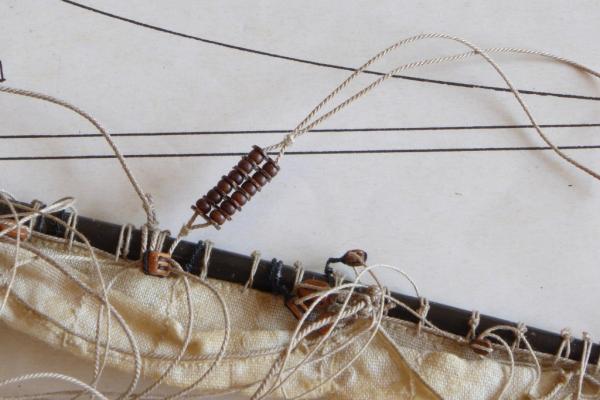
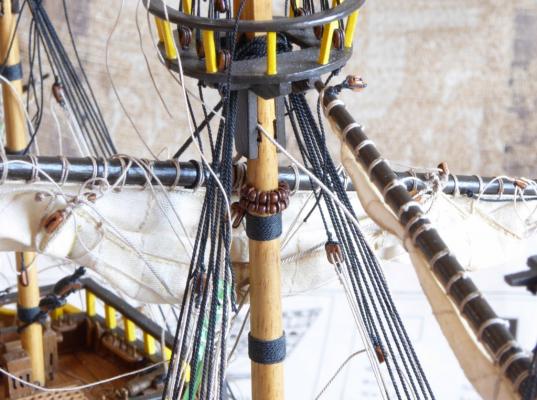
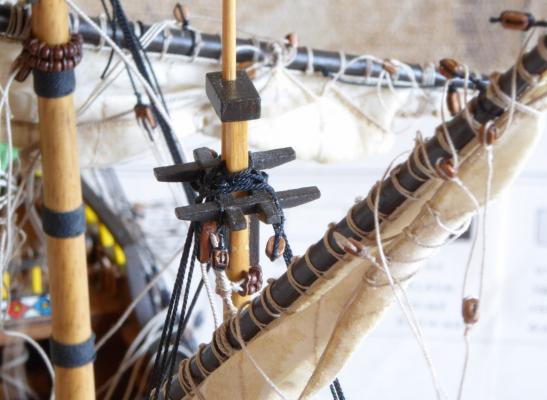
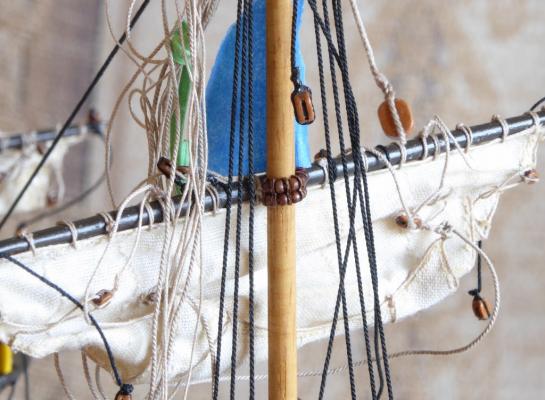
Parrels. Of course there was no mention of these in the kit plans, and I thought of omitting them. Mainly because I couldn't see how I could make something so small, and still looked good and consistent from one to the next . What I didn't want were parrels that were way out of scale or clunky looking. For the smaller masts I needed parrel balls or trucks that were smaller than 2mm diameter. Somewhere I saw a listing for 2mm trucks, but I wondered how rounded they really were, and there was nothing smaller, so probably wouldn't work. As far as making them from scratch, I couldn't imagine how I could make them consistent in size and shape. I got the idea of using Japanese round seed beads and that's what I used. The smallest sizes available are the #15 and #11 Miyuki beads. The #15 Miyuki beads are 1.5mm diameter and I used these for the top main, top fore, mizzen, and spirit. The #11 Miyuki's are 2mm and I used these for the main and fore courses. There are no opaque brown colored beads so I knew I'd have to color them somehow. I chose the closest to a tan color I could find, as that would be good for a base color, and that was a Latte. If you look in the supplies picture you will see that both Latte bead sizes are totally different in color, though they are from the same maker. Anyway, it didn't seem to matter because when I applied the wood color gel stain, they came out pretty much the same color. Usually when using a gel stain, you wipe off the excess, but here I just painted on some light coats with a small brush. I found it easier to string them on a brass rod first before staining. I was really surprised how the stain adhered to the beads, as they are slick glass, but it worked well. For the ribs, I tried sanding down some walnut strip to about .4mm and drilling holes in it, but the thin strips kept splitting at the holes. Or, if my holes were successful, they split while trying to round them off. Since this wasn't going to work I had to come up with another idea. Since my parrel beads were kind of narrow in width, I knew thick ribs would look bad. I used strip styrene shown in the supplies picture, since they were easy to shape and didn't break in the process. To make them all the same length, I used a chopper tool that has a stop fence. To mark the drill holes, I used a divider to keep them consistent. For coloring the stark white styrene, I first painted them a tan base coat, then applied the stain, and a light clear finish on top. I used some fine sandpaper to clean up any paint flashing, and used a brown Sharpie marker to touch up any areas needed. The W. Mondfeld book shows thimbles and eye loops on the rope ends of the parrels, but I felt that with them so small and congested, I would just seize the lines and tie them off around the spar. I don't regret that at all. I thought this would be a very difficult task, but I was very happy the way my parrels turned out. It came out better than I thought it would. Randy


-
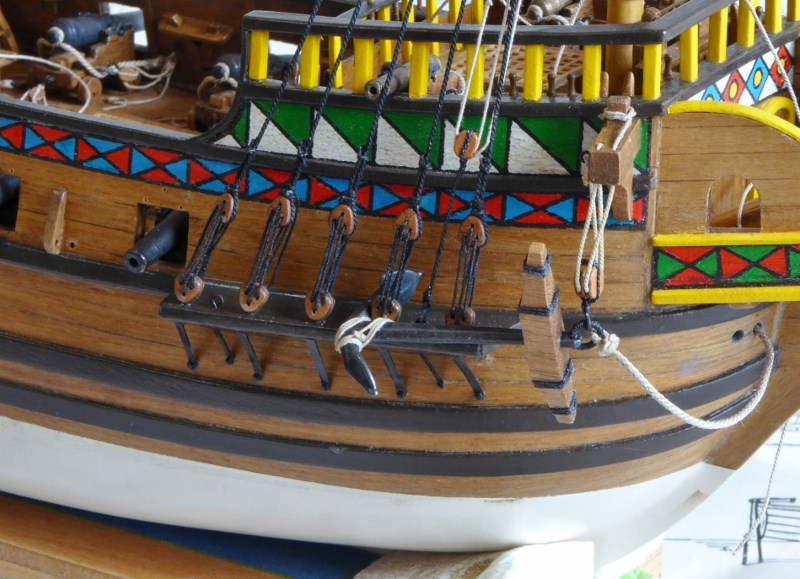
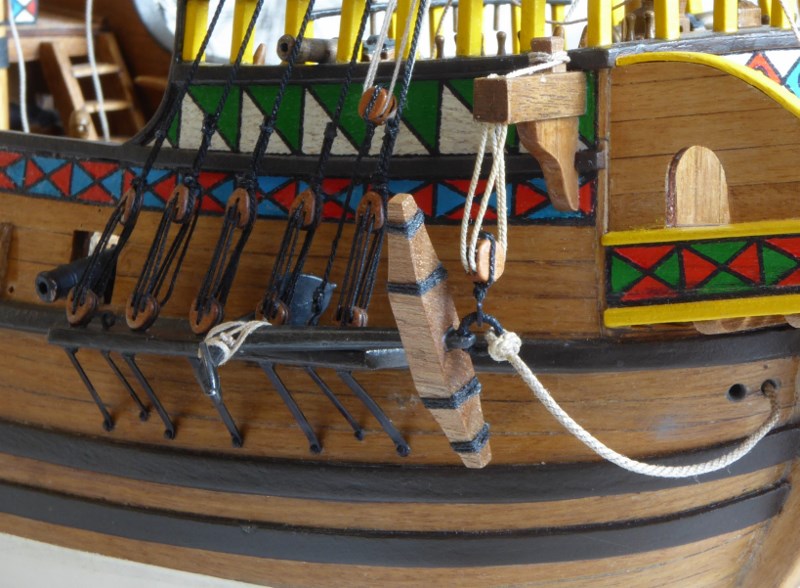
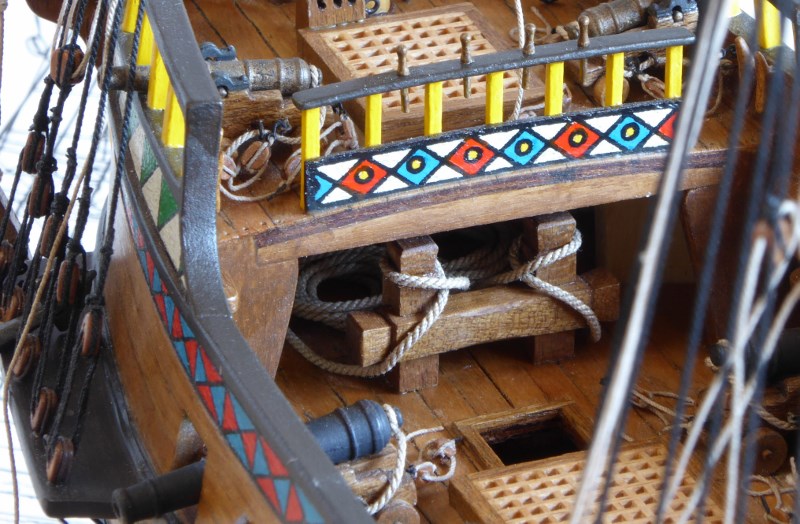
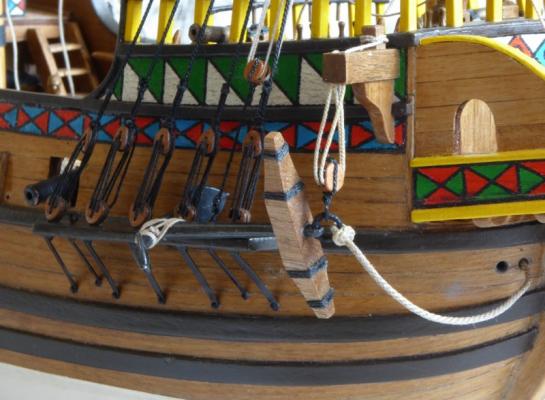
I attached the anchor assembly. I even did the puddening, which I originally wasn't going to bother with. I did it by wrapping thin thread around the ring by itself, a few coils at a time, before applying a tiny amount of CA to the last coil, before doing a few more coils. Then, I closed the ring to the anchor body using a flat face pliers, so as not to damage the thread. On the catheads, I did them a little different from the plans. I attached a eyebolt to the side to seize one end of the rope to, and attached a timberhead I made to the top of the cathead, to belay the other end of the line to. The plans had a eyebolt on top to belay to, which didn't seem right. The hook is one of Chuck of Syren's 4mm plastic hooks. The interior picture of the large riding bitt, shows the anchor line coiled behind it, to stow it. The anchor line doesn't actually pass through the hawse holes to here, because there is a closed bulkhead in the way. But I don't think anyone will notice. I'm wondering if the hawse holes need a protective cover? I did bevel the outer edges of the holes somewhat.


-
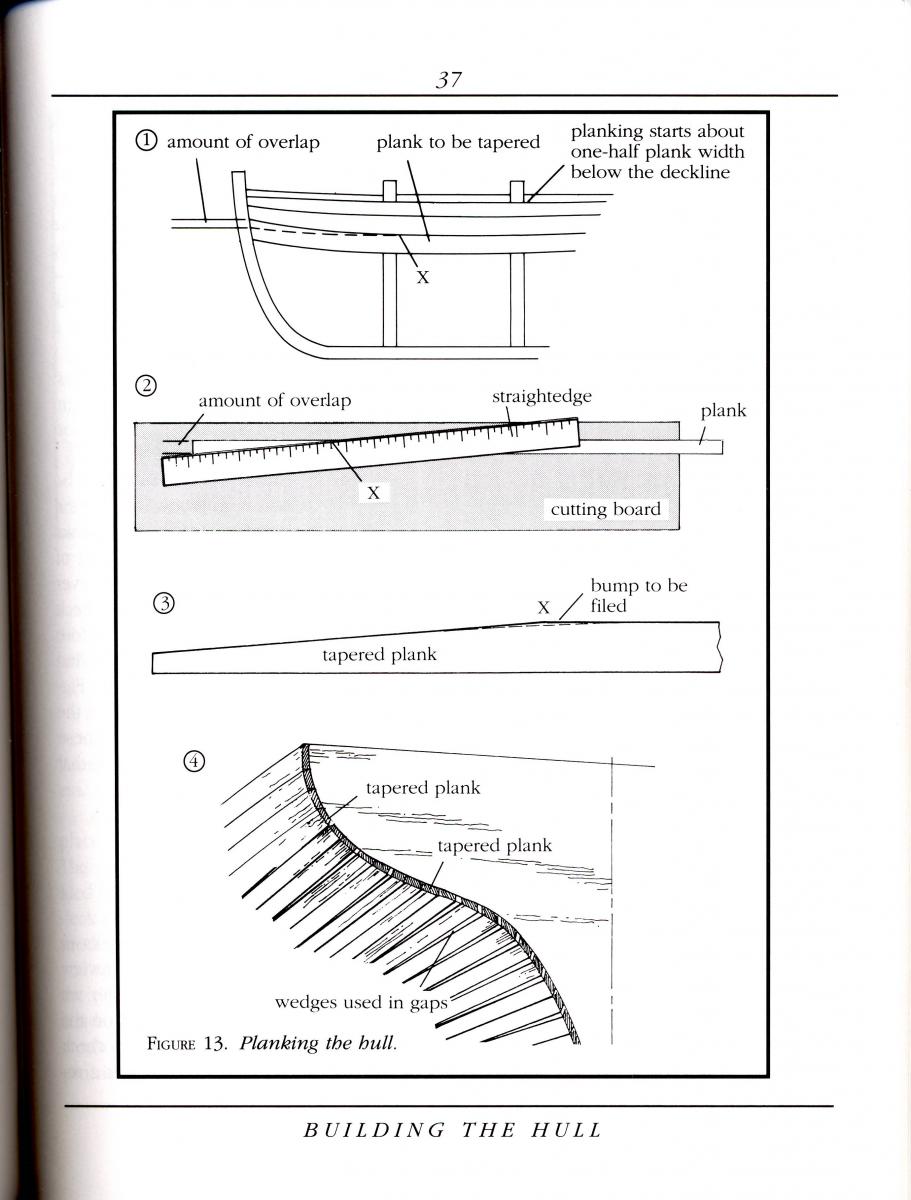
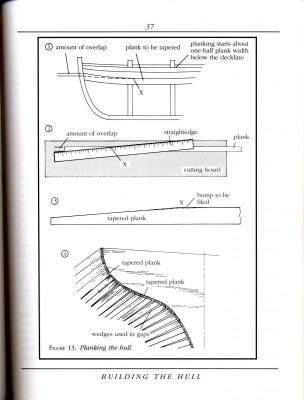
Take a look at this scan I made from one of my books. Also look up "stealer planks".
- 79 replies
-
- 3
-
-
- lady nelson
- amati
- (and 2 more)
-
I guess I don't understand then. You can always have a few narrower and tapered planks here and there. How do you think they do real ships? Still, I would start laying down that first layer of planks. It doesn't have to be that perfect, because the main purpose is to get the overall shape. Then use some filler and sand the rough spots. The first layer will help you realize what problems you may have with the second layer, and how to make them fit. Nothing wrong with sanding the second layer too.
- 79 replies
-
- 3
-
-
- lady nelson
- amati
- (and 2 more)