


dafi
-
Posts
2,387 -
Joined
-
Last visited
Content Type
Profiles
Forums
Gallery
Events
Everything posted by dafi
-
 As I had some dicussions about this topic on the modelling conference in Evian, France, this weekend, I would like to bring this back to attention. Perhaps new prooves popped up? Cheers, Daniel
 -
For the next level, I prepared the top mast shrouds. Even if Steel doesn't mention it explicitly, in most modern sources the foremost shroud is also dressed here, so that's what I decided to do. The sisterblock is also integrated between the two forward shrouds. But first come the hangers / burton tackles ... ... then the sister blocks ... ... and everything in place. Here you can see again the difference between the dressed and undressed shrouds. Unfortunately, in contrast to my self-made ropes, the purchased ropes do fluff a little, but this is not visible to the naked eye. To continue working, I tensioned the shrouds down with clamps and gravity. And dark ropes in front of a dark background are somewhat annoying even with good lighting, so I made a white cardboard template for this spot. Here you can see again the difference between the dressed and undressed shrouds. Unfortunately, in contrast to my self-made ropes, the purchased ropes do fluff a little, but this is not visible to the naked eye. To continue working, I tensioned the shrouds down again with clamps and gravity. And dark ropes in front of a dark background are a bit annoying even with good lighting, so I made a white cardboard template for this spot. Then the dead eyes were bound in as the lower ones. To compensate for the lack of a third hand, I then tied the shroud to be worked on with a thread to the yardarm, see green arrows, helps immensely. XXXDAn
-
After the fighting top had found its place, it was finally time to fit the futtock shrouds. The work preparation was the blackening of the etched parts and the painting of the dead eyes. Then the irons of the dead eyes were bent open, the dead eyes inserted and everything squeezed shut and secured with some glue. The upper hooks were then tied into the shrouds. This shroud was fully dressed, again using my technique with white glue as for my scale. First test of the dead eyes in the holes of the fighting top and the shrouds hooked in. Now you can see where the holes in the fighting top need to be reworked so that the irons don't sit at an angle. The lower shrouds have also been marked with a thread to hold the futtock shrouds. Next, the dressing of the lower shrouds was completed and brought to the same height. Finally the futtock shrouds could be hooked in, wrapped once around the futtock stave and tied to the shroud. After trimming, this is what came out http://www.shipmodels.info/mws_forum/images/smilies/icon_smile.gif XXXDAn
-
Next, I took care of the cleats for the hangers of the jeer blocks. In Portsmouth they are in the form of a bracket. All other literature that does not base on the restored ship show a shoulder piece. So the brackets from my printed parts go into the bin. Its up to the shoulder I took the opportunity to determine the length of the hangers, as I don't know how they will be accessible later. But more on the jeers later. And then it's finally its turn, the top mast. Placed in front of the mast, it is threaded through the trestle trees of the fighting top and pulled upwards using 2 pulleys in the foot. Here are some older pictures. The top gallant mast was also raised in this way, it is basically a very simple telescopic lift. XXXDAn
-
And the next stage was already on the agenda, I had just glued the fightig top onto the trestle trees when I remembered all the blocks that were needed underneath ... ... so I quickly tore the fightig top off and removed the glue residue. Well, that's the way it always goes with me. At least 4 small single blocks for the leech line and two double blocks for the buntlines have to go under there. But as I can't say for sure that that's all there is - as always, there are very many different sources - I have also fitted the other suspension points with blocks. But cutting them off is always easier than retrofitting them once all other things are installed. Based on the tests I had already presented some time ago, the first block still took just as long as the other eleven. But I had to develop a good strategy for them. First, I pressed the block onto a needle as usual and stropped it in. I secured the strop well with glue and only cut off the short end of the strop, but not the seizing ends. Then tie the remaining long leg with the seizing as a loop. The seizing has a double knot, but is not glued so that the loop can move. A thin thread with slip-through protection is passed through the hole from above ... ... and threads the loop of the block on the underside and ... ... pulls the loop onto the top and secure it temporarily with a wire hook. Then pull the long leg on the underside to bring the block to the correct length. Then carefully pull out the wire on the upper side, insert the toggle and tighten it again from below. Now a drop of glue on the through hole and knot and neaten everything up. Done. A little hint in between: And always take documentary photos of the rope thicknesses http://www.shipmodels.info/mws_forum/images/smilies/icon_wink.gif And the result looks like this. And the exciting moment, the fightig top can finally really be glued in http://www.shipmodels.info/mws_forum/images/smilies/icon_smile.gif And then finally: another milestone reached! Even my little Midshipman is happy. XXXDAn
-
Thak you for the pictures! The Victory in the last picture is the precessor of 1737, Balchen´s Victory. XXXDAn
-
Once the shrouds are tightened, the futtock staves could be fixed for good. Fortunately, I had only tacked them on so far, as the position was visibly out of line after the shrouds had been tensioned. The last status was this: To align the futtock staves, I placed crosspieces on the protrusions of the two staves and was thus able to adjust them well. Then the futtock staves and the shrouds were knotted together and the overhang cut off. It is amazing how much these futtock staves contribute to the stability of the shrouds, even in a model. XXXDAn
-
Wonderful picture !!! 🙂 🙂 🙂 Thank you for the comment. This is the Pettersen drawing, I realised already having a seizing too much. I remembered 3 seizings, but forgot that the eye seizing is counted with it. I will correct this with the next ones. But in Pettersen the seizing is not complete either, the middle turns are missing. XXXDAn
-
Objection your honor! Not Ship-Shape! Not Bristol Fashion! Somehow I remembered that the free ends of the deadeye lanyards were tied up that high. I searched for a while to see what reference I had for the high-tie - but I couldn't find anything that had got me there. The old section model didn't look like that either. That's why I got protest elsewhere, which I had nothing to counter except for: Demolition! Fortunately, I only use very little glue thanks to my fine glue nozzles 🙂 It was still a fiddle to get the stuff out of the rope. But now it actually looks much neater. XXXDAn
-
As the mooring lines of Victory were passed through the stern ports and also the poop deck was quite high above the water, I would expect Victorys fairleads on the poop to quarter deck to be associated with the normal running rigging. Any heavier load like gaff claw and peak, also the mizen topyard etc. are all heavy weights and the poop deck is quite small. On the Vic they are still in the days of manpower and not the winchesm so the crew could pull from somewhere more spacious. 🙂 XXXDAn
-
This was the last stand, the deadeyes tied into the shroud and the lanyards threaded in but still loose. The next step was to pull the lanyards through over the deadeye and under the shroud eye. I always use a threader from my sewing supplies, it's simply the best help for this. Then, when wrapping the lanyard around the shroud, pass it under the last row of yarn from the deadeye, so that it clamps itself, then make 5 more turns and tie the end to the shroud. Yay, another milestone victory! As my shrouds are slightly elastic, I also used this to adjust the upper deadeyes a little when tensioning the lanyards. I don't like it completely leveled anyway, as you can also see in the originals and in contemporary models that the different elasticity of the manually made ropes leads to different lengths of the shrouds when tensioning, and thus to slightly varying heights of the deadeyes. XXXDAn
-
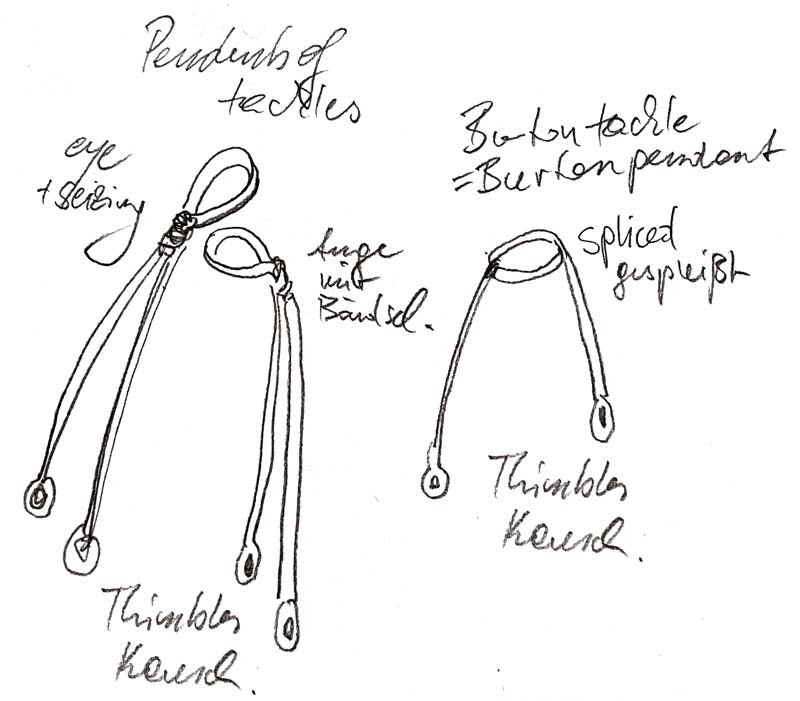
That would be my interpretation for the pendents so far: Pendents of Tackles Double Pendent with eye and seizing lower fore and main mast Burton Tackle = Burton Pendents Double sided tackle with **** splice. mizen lower mast, fore + main top mast Mizen topmast no hanger/tackle? Also still the question about serving the first shroud of the topmasts. Also aft mourn lower shroud as in later times? XXXDAn
-
A few questions about the shrouds on my Victory and her contemporaries. 1 - Steel and all the others state that the foremast and mainmast shrouds are fully dressed. Since this information is generally missing in Steels description for the topmast shrouds and mizen shrouds, I assume that these are to be left undressed. This leads to the question to why they were not needed to be dressed to protect sail and shroud like the lower ones? Also the French in La Creole some time later also dress the foreward topmast shrouds, as seen on archjofos wonderful build. Also Schrage describes the foremost topmost shroud as being dressed. Marquardt does not mention the dressing in the text but shows it in the drawings. 2 - What is the difference between Pendants of Tackles and Burton Tackles? Steel makes a distinction by saying" ..., but burton tackles are used on the mizen mast, instead of pendents of tackles." But Longridge and others use the term synonymously. Is the difference in Steel possibly that the pendents of tackles are like shrouds in a pairs with an eye for the masthead and the Burtons as a single strand on both sides with a cut splice? 3 - Steel does not specify Burton Pendents/Tackles for the mizen topmast. Correct? 4 - I was a bit confused at first about the "swifters", which according to Steel are put over the masthead between shrouds and stays. Then I found out that this refers to the rear shrouds, which are not like the shrouds a pair with an eye, but are one rope with a horseshoe splice. Correct? As always, questions upon questions, Daniel
-
Slowly and carefully we went on, and then the time had come ... ... both sides of the deadeyes were integrated into the shrouds and tidied up. Final alignment of the deadeyes angle comes when I tighten the lanyards. The angle is also almost right. I mean the mast, of course, the fighting top is hanging so crooked on purpose http://www.shipmodels.info/mws_forum/images/smilies/icon_wink.gif I now also have a good system for tying in the deadeyes. Materials, 1 set of upper deadeyes starboard and port, a cable 0.9 mm, lanyards with half of it 0.45 mm and the seizings with 0.15 mm. First assign all shrouds to the lower deadeyes. Secure with an auxiliary thread. It will then look like what you have already seen. For the sake of clarity, we will now continue with a single shroud. The deadeyes are easy to hold with pointed tweezers, the ends should ideally protrude at the back. A cardboard template on the chain board helps to maintain the correct height. One hand holds the shroud in the correct line to the lower target deadeye, a micro portion of superglue is placed at 3 o'clock in the groove of the deadeye, and by placing the protruding tips of the tweezers on the top edge of the template, the deadeye is pressed against the shroud at the correct angle of rotation. Then, if necessary, apply a micro portion of superglue at 9 o'clock and position the free end behind the shroud. Then close the eye with 2 knots. A little space must be left between the deadeye and the knot, as in a later phase 3-4 more knots must be added to the eye and the thicker lanyard must also be passed through there. I don't glue the two knots at this stage because I can still correct the eye if necessary. Then the lower seizing of the 3 ones of the free end is secured and aligned. Depending on the era and nation, the shroud and free end either run in mirror image or asymmetrically with the shroud directed towards the center of the deadeye and the free end running out tangentially and then tied on at the top. And then the lanyard can already be integrated and provisionally fixed above. Only when all the shrouds have been fitted in this way will the remaining turns on the eye and the 3 upper seizings be completed, see above. The final step will be to bring the lanyard forward over the deadeye under the knpt and tie it on above. It actually went quite quickly, was looking even enough and, above all, the potential for frustration was manageable. XXXDAn
-
As this feature is also shown in drawings of the Victory as mentioned above, I had a closer look at the possible purposes. There are many ropes on the mizzen mast but little space. In case of "overpopulation the lines could possibly be handled fom the quarterdeck, as I know from personal experience that the gaff peak and fall need larger crews to get hoisted, leaving little space on the poop for all the other lines and duties. Just a thought but logical to me. The fair lead would keep the rope in place and avoids scarfing an the edge of the higher deck. To be operated properly this would possibly also needs a pulley on the lower sitting deck to get the rope in a suitable workable height. XXXDAn
-
Thank you for the feedback druxey, very appreciated! The futtock staves will only be trimmed once all the shrouds are in place and fixed, in case I need to reposition them for any reason. And for the spelling, I first had futtock but when double checking my translation in Marquardt german edition*** his translation for the term was with a "b" in the start to my great surprise. So I just found a spelling mistake in this classic 🙂 XXXDAn ***PS: And it is a book dear to me, as the copy I use has a personal dedication from him to me, as I helped him with his original homepage back then 🙂 https://karl-heinz-marquardt.com/ PPS: I corrected the wrong spelling. A buttock stave is actually an expression existing in german regarding a stiff person, one says he/she has a b...
-
Here you can clearly see the difference between the wooden dead eyes from the early stages of my model and the new printed ones at the top of the shroud. With the wooden dead eyes, I had to close the unsymmetrical holes and re-drill them. It was a lot of work. In addition, the lower dead eyes have an incorrect all-round groove: As with the upper dead eyes, this is wide to accommodate the heavy shroud. For the lower dead eyes, however, the groove should be significantly narrower, i.e. only a slot, which only had to accommodate the thinner iron fitting. The appearance is also more even. In addition, the groove is not circumferential, but interrupted in the area of the connection to the iron or shroud. This also prevents the juffer from rotating. And even a careless model builder like me gets a subtle hint from the resulting bulge in the shroud if he is about to bind the dead eye the wrong way round ... In the picture you can see the comparison of the lower dead eye on the left with the narrow groove and on the right the upper one with the wide groove. XXXDAn
-
The next step was dead on onto the dead eyes 🙂 Before I started, I lifted the fighting top and checked that all the shrouds were in the right order. And indeed, there were two pairs on the starboard side in the area of the landlubbers hole that were lying crosswise. Then the shrouds below were assigned to their dead eyes. God bless the inventor of the hair clips! There is almost nothing better for pre-tightening some rigging than wooden clothespins in combination with gravity. Then came a rough binding on both ship´s sides to get an even pull on both directions. As I had reinforced the mast well with a wooden rod at the time, there was no movement in any direction. It still looks wild, but it does the job. To stabilize the rigging further further, I inserted the futtock stave. This stave is served over its entire length, in the original its a rope slightly thinner than the shroud, for the modeI I chose a core of 0.5 mm brass wire for stability reasons. The official calculation is slightly different, but by analogy the following measure gives the same figures: Distance upper edge of cross tree to lower edge of mast cap ... ... is the same as the upper edge of the cross tree to the futtock stave. Once the futtock stave was in place the "white glue serving" was also brought to the correct length. Afterwards, I will continue the serving evenly below the sausage by a few millimetres and also use black paint to ensure a uniform appearance. At the moment only the outer shrouds are attached so that the other shrouds can still work. Nevertheless, this already stiffens the whole construction. This also allowed me to start tidying up the dead eyes. Four seizings for the dead eye in the shroud, and crossing of the lanyard on the back of the dead eye and tied to the side after a few windings. And then it's on to the happy dead eye tying http://www.shipmodels.info/mws_forum/images/smilies/icon_smile.gif XXXDAn
-
Then came a new adventure, the shrouds. Somehow, all the interesting things I wanted to try always came to the point where the shrouds would have been installed. So I couldn't avoid it any longer, so I set off on a new adventure. I ordered the cables for the shrouds and stays from www.modellbau-takelgarn.de. They had the complete range in tenths of a millimeter increments, and the standing rigging is a deep brown and not the usual bluish deep black. The brown allowed me to achieve the color I wanted. First I made the ropes a whole lot darker with heavily diluted black artist's ink. What a mess that was. The lawn in the garden still looks sunburnt, but the new appearance is now a deep deep brown compared to the original. ... To dress the eyes around the masthead and the first shroud, I went back to the glue fake method that I had already used for the bopstays. To do this, I measured the area to be dressed and always made a marker knot at the borders with a makeshift yarn as a glue border. Then I applied the fake dressing. This involved the eyes below the crosstrees on a length corresponding to the masthead´s height and the foremost shroud along the entire length. The procedure was always the same: apply a generous layer of white glue with a small wooden stick then spread the glue well with your fingers using the three-finger method and smooth with spit, allow to dry, then repeat and finally seal with black paint. The shrouds were now ready for further assembly. Next, I determined the circumference of the masthead ... ... and made a template. A 10 mm round stick was wrapped with paper until the required 11 mm of the test loop was obtained. The loop of the shroud was fixed with a pair of clamping tweezers ... ... tied with 10 knots - 5 at the top and alternating 5 at the bottom ... ... and the package neatly secured with a seizing. The two pendants were given their thimbles. As there is an odd number of shrouds, the rearmost one was joined to the opposite side in a horseshoe splice. And then there was the first trial assembly. Pendant starboard, pendant port, first pair of shrouds sb, first pair of shrouds bb and so on. This allowed me to check whether the aft shrouds would fit under the aft cross tree - they didn't at first. So I raised the pairs of shrouds again and successively turned all the pairs further forward. And then it did fit. When the stays came to lie on top, everything was tightened up even more and now keeps the rear cross tree well clear. XXXDAn PS: Here you can see again how model builder's impatience would take revenge if you had already glued the mast cap or even the fighting top ...
-
My understanding always was that the capstans were used using the top rope scuttles to lead the ropes via a blocks on the capstan´s level deck to hoist the boats. But seeing the drawings, the complexity of coordinating the 4 ropes and the attached calculations of resulting weights, the conclusion of no capstan but enough men being used is the far more attractive to me 🙂 XXXDAn
- 18 replies
-
- 2
-

-
- capstan
- small boats
- (and 1 more)
-
Thank you Patrick! Next I noticed that the boarding spikes were still missing. There are two rings to be doubled on my etched parts set, so I stapled the through-holes together using 3 suitable wires. And even this corner improved as a result. XXXDAn
-
After objection to the visible separation of the bitts at deck level, what I do best was done, demolition ... ... on the right the old two-part bitts and on the left the new one-part bitt http://www.shipmodels.info/mws_forum/images/smilies/icon_smile.gif The next step was the planking of the deck. To do this, I built a first template ... ... only to realize that this shape impairs the view too much and shadows everything below. So V2 with the first few meters of the gangway. After that, I first had to extend the substructure. The first impressions of the deck during planking are always a bit gruesome ... ... but after sanding it fits. As always, I put some cotton pads in to clean up the edge of the waist. And being very high-spirited, I decided to use another original kit part. But the holes for the eyebolts were too big, so they were sealed with 1 mm Evergreen round material and re-drilled with 0.5 mm. A few more etched ring bolts from my set resulted in a nice new corner on the ship. XXXDAn
-
Main mast area, summer 2024: Some new deck pillars have found their way onto the ship, increasing the number of original kit parts used immensely but because of this, some of the incorrectly placed ones had to make way for others. Some coamings were also newly created ... ... and then the internal structures around the main mast were added. XXXDAn

