Gaetan Bordeleau
-
Posts
1,307 -
Joined
-
Last visited
Content Type
Profiles
Forums
Gallery
Events
Everything posted by Gaetan Bordeleau
-
 You cannot build Le Fleuron 1729 with the monography only. You also need other references. The main 2 I use: 74 canons is from 1780 which is still good for most details. In addition, Blaise Ollivier Traité de construction 1736 explains many details, reedited in 1992.
 -
Mills...Spindle Speed
Gaetan Bordeleau replied to Bill Hime's topic in Modeling tools and Workshop Equipment
speed and feed work together you can use a speed of 500 tpm if you want but the feed will need to be slower 20,000 is a more accurate speed because it will leave as smoother finish on a long run you could probably do molding at a very slow speed but a slow feed would means it would take 10 times longer to do The idea is to find a middle speed of a motor which will give a reasonable feed you could go to 50000 tpm for wood or metal but especially with metal, such a speed will throw metal shavings many feet away if you do not stop it -
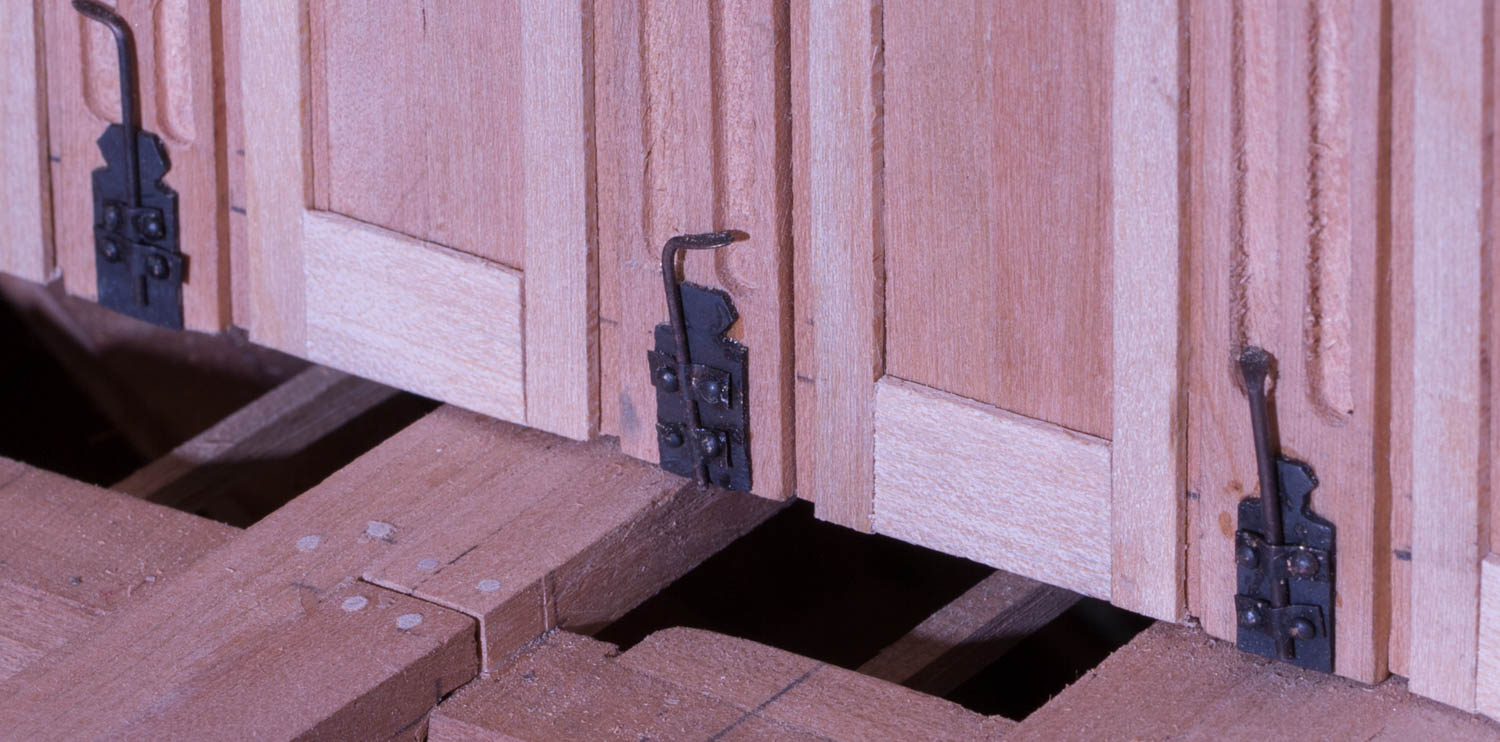
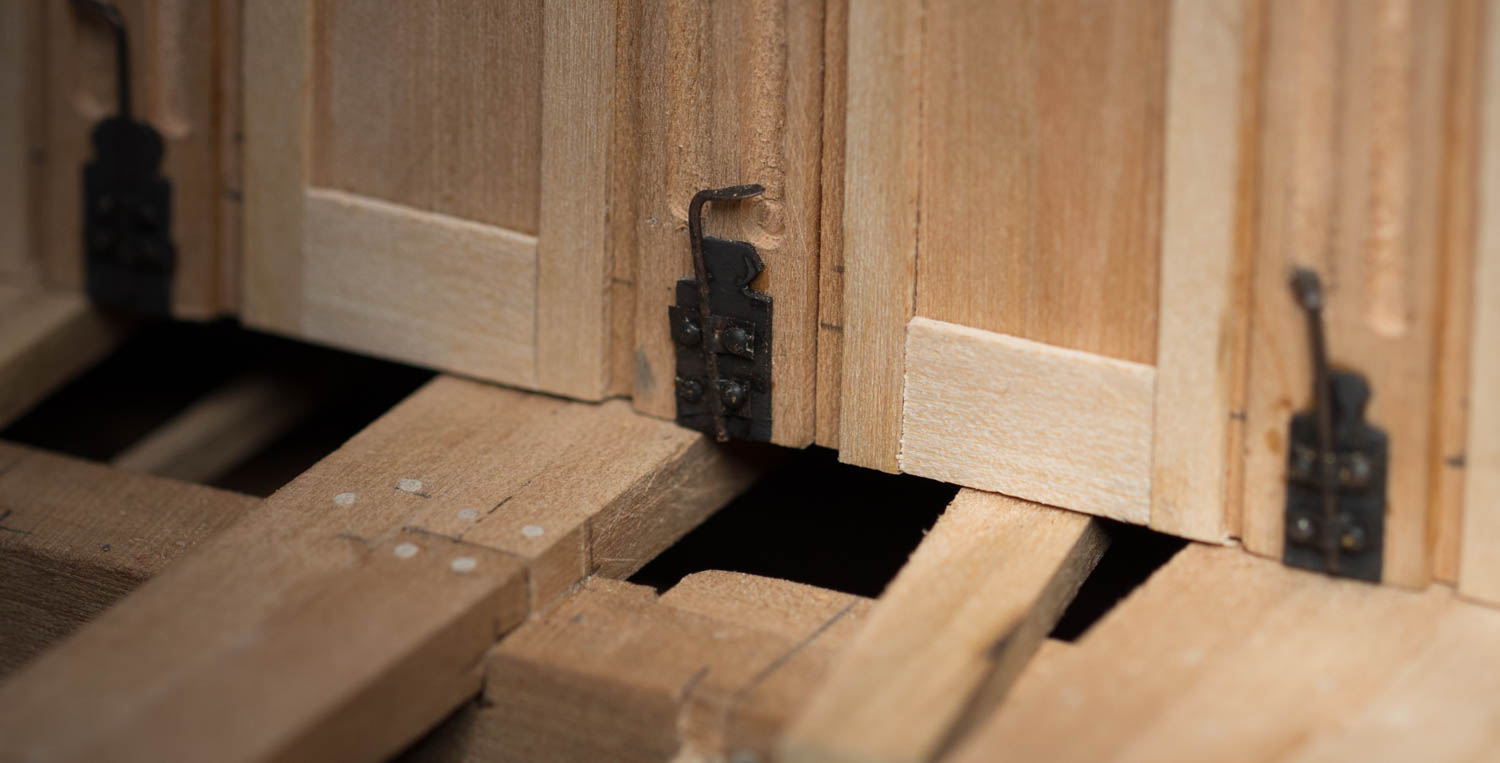
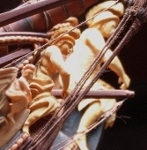
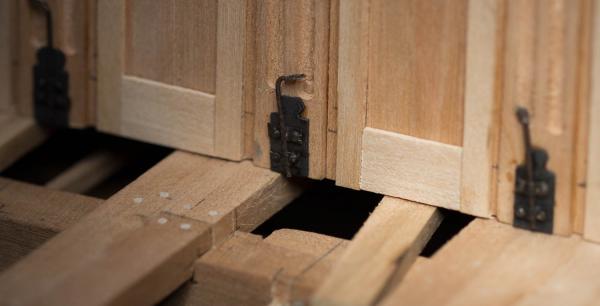
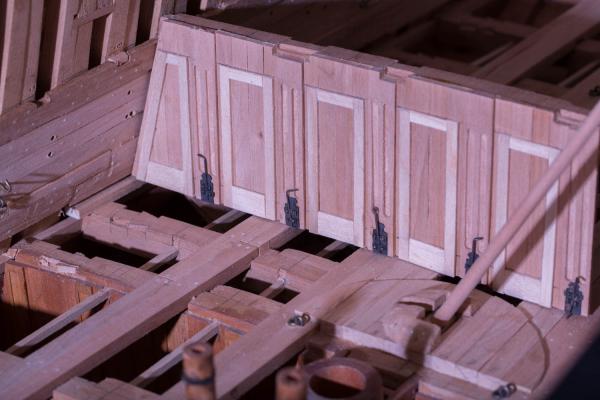
Adding some little details. Here are some ideas about the 2 doors aft the second deck to go to the bathrooms. Door knobs are always installed to the right because most of the peoples are right handed. The port one open from front to aft. The starboard one opens from aft to front. Knowing that deck is higher aft than fore; It is easy to open the starboard one and there would be some space under when open. The port one was a bit more complicated because the door opening from fore to aft would want to enter in the deck which is impossible. The easy way to solve this is to cut the door from the bottom so that the bottom does not get stopped by the deck. In addition reinforcement wood angles are installed in each corner. The height of these pieces passes just in front of these doors. May be all of this is false. If We compare with a picture already shown in this forum, there are 2 doors. On one the door knob is to the right and on the other the door knob is to the left. But at least we agree on 1 thing the bottom of the door had to be lift so that the door could be opened.


- 728 replies
-
- 16
-

-
- le fleuron
- 64 gun
- (and 1 more)
-
Carl, -no attention or correction was given to the color, the red could be corrected before and/or after the picture -attention was given only to sharpness -the difficulty is this image is to see the 2 black straps on a black plate Is the focus in the first image? May be. Would it have been possible to do as well with the 3 images? probably with more time, it was just a fast comparison The idea was just to demonstrate: the importance of lighting which is neglected as much in model building as in photography and the possibility to see more with a good lighting
- 728 replies
-
- 3
-
-
- le fleuron
- 64 gun
- (and 1 more)
-
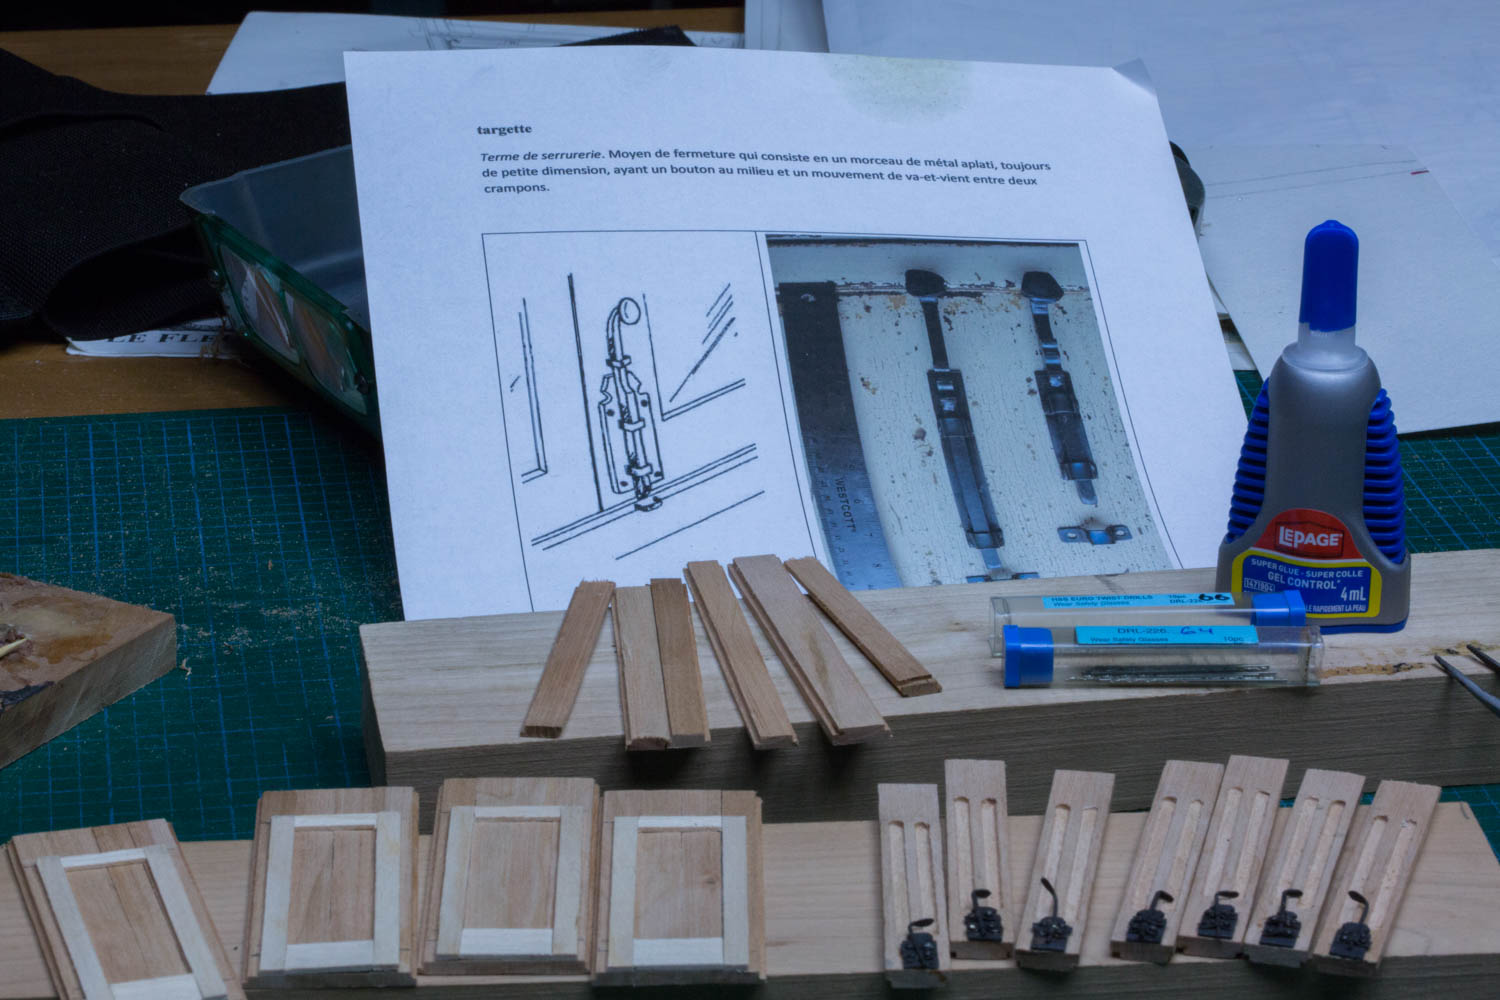
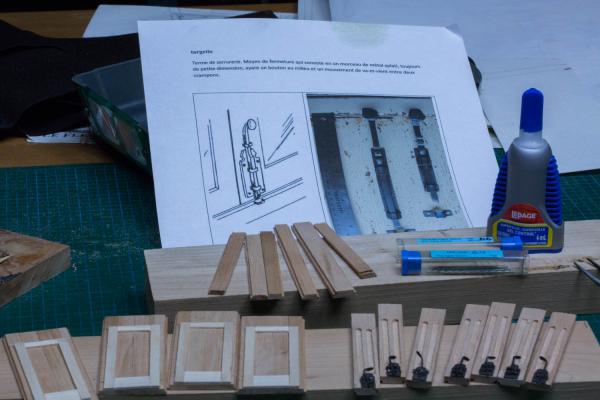
Here are the ''targettes"". first 3 pictures with different lighting : Off camera flash Speedlight Ambient light No flash, no details Without flash, it is difficult and sometimes impossible to see small parts details. For these pictures, scale is 1/24, which is big, so imagine at 1/100 without flash!


- 728 replies
-
- 21
-
-
- le fleuron
- 64 gun
- (and 1 more)
-
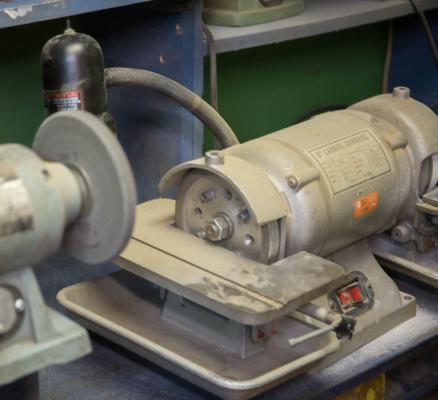
Wood chisels are made of different steel and sharpening technics remains quite similar since many years. Comparatively with metal turning, tools have evolved a lot more in the use of different material from high speed steel, to carbide, ceramic and diamond. These materials being harder than the steel of wood chisel, other sharpening methods had to be developed. My prefered method is to use the diamond wheel. All sharpening operations can be performed in 1 step and in few seconds. And the results are as good than the traditionnal methods.
-
Great work Druxey, Did you take a picture from the barge; front front and under to see how how thin it is?
- 641 replies
-
- 3
-
-
- greenwich hospital
- barge
- (and 1 more)
-
Trying to duplicate this material is difficult because the softness of the scale. A different approach would be to use wood where you can use a knife to add as many folds as you want.
-
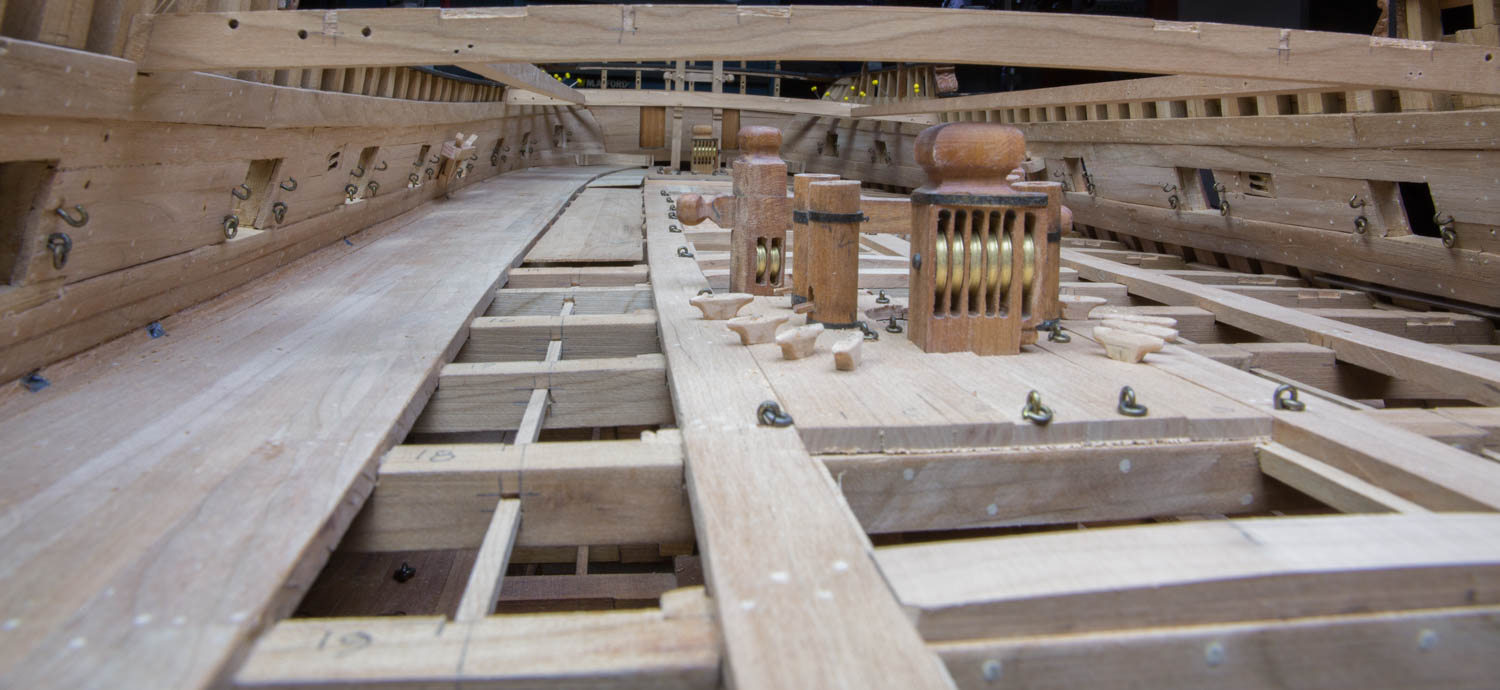
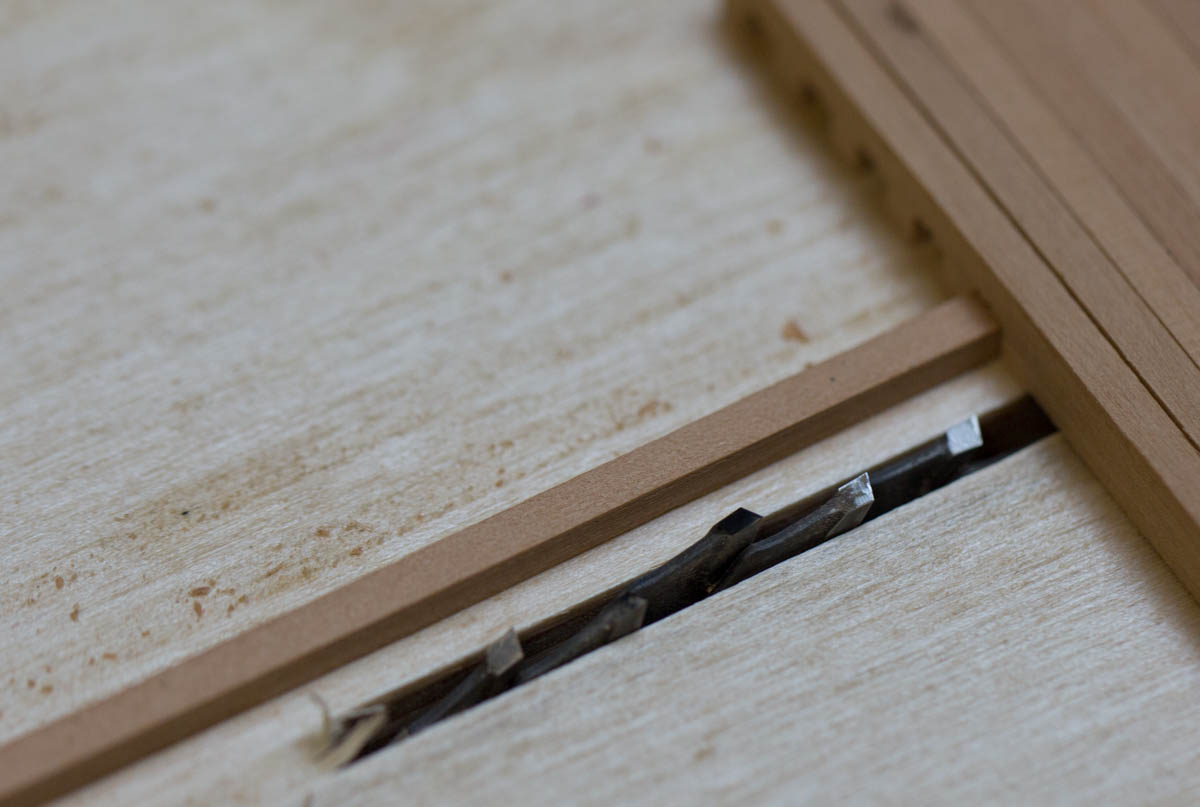
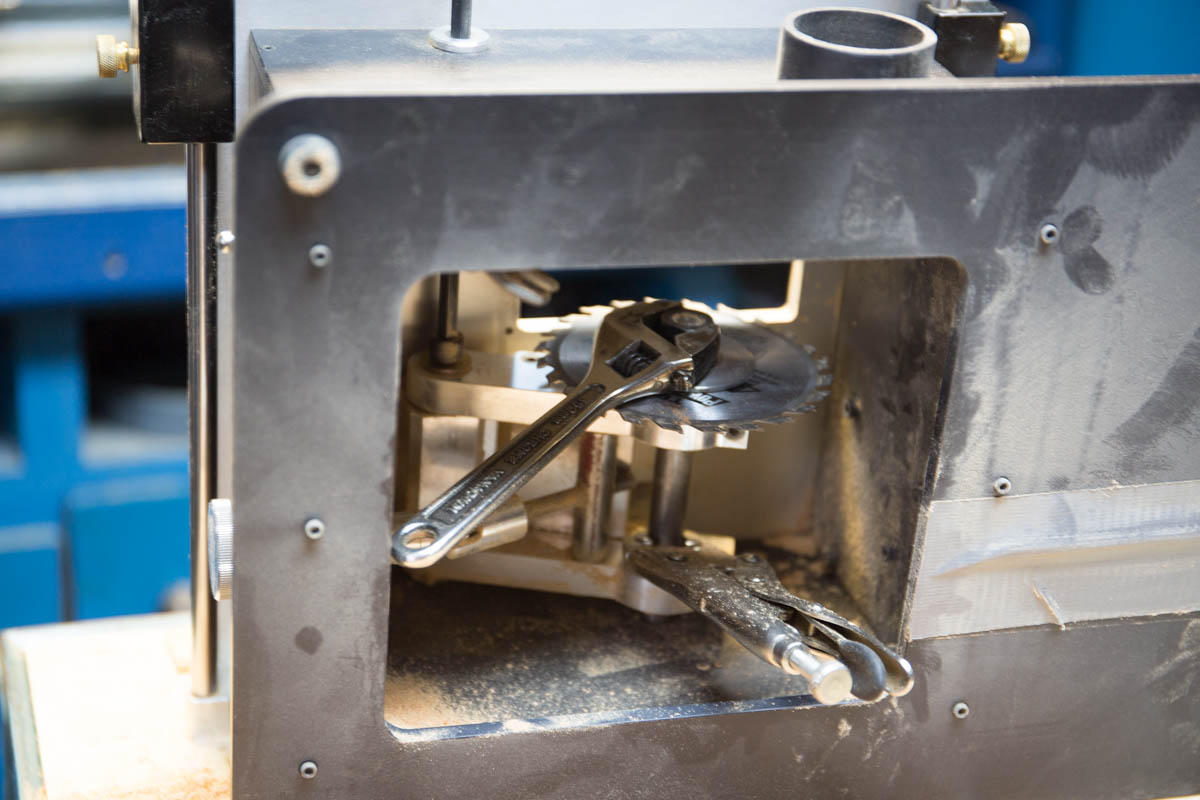
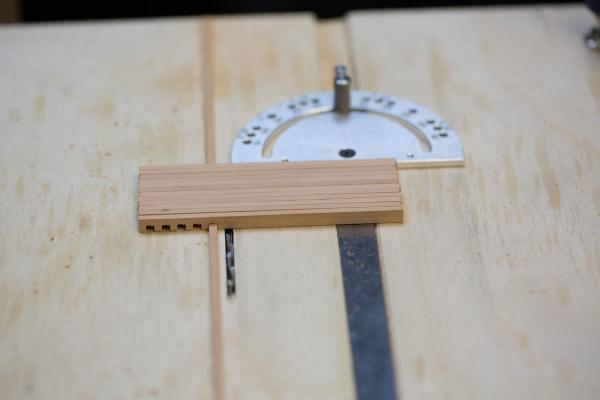
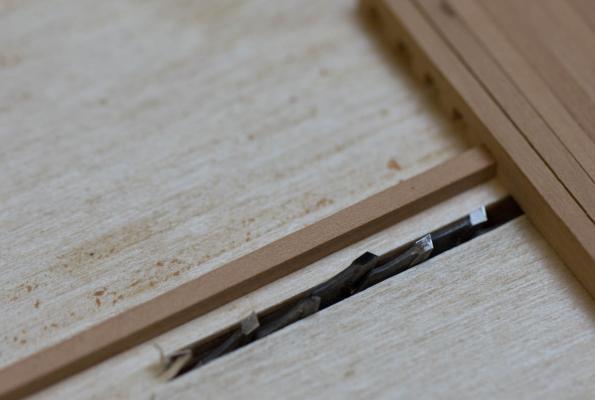
You are right Richard. To get the correct teeth thickness, 2 blades were used. It is a lot easier to make every teeth in one pass instead of 2 (when the width is larger tan 1 blade).
- 728 replies
-
- 2
-
-
- le fleuron
- 64 gun
- (and 1 more)
-
Help in Identifying an Unknown Tool
Gaetan Bordeleau replied to BANYAN's topic in Modeling tools and Workshop Equipment
Rick is right
-
Help in Identifying an Unknown Tool
Gaetan Bordeleau replied to BANYAN's topic in Modeling tools and Workshop Equipment
H. DISSTON AND SONS USA 95 1/2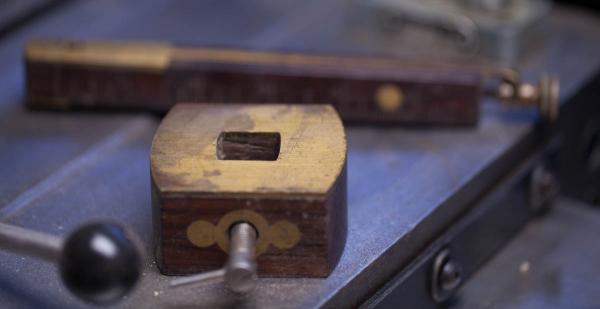
-
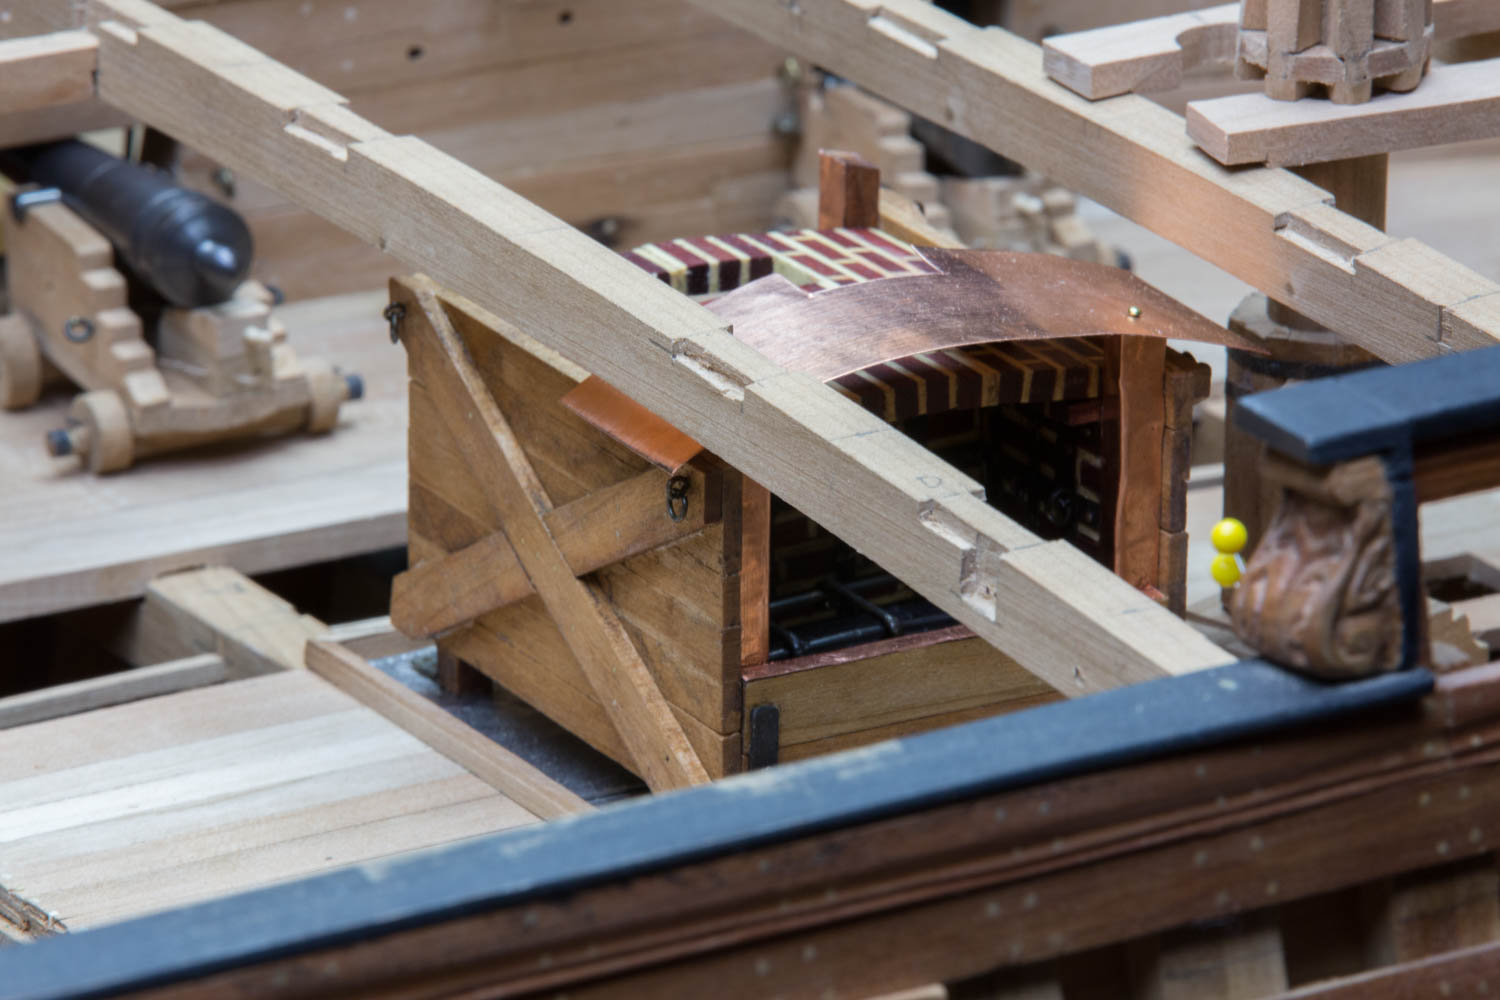
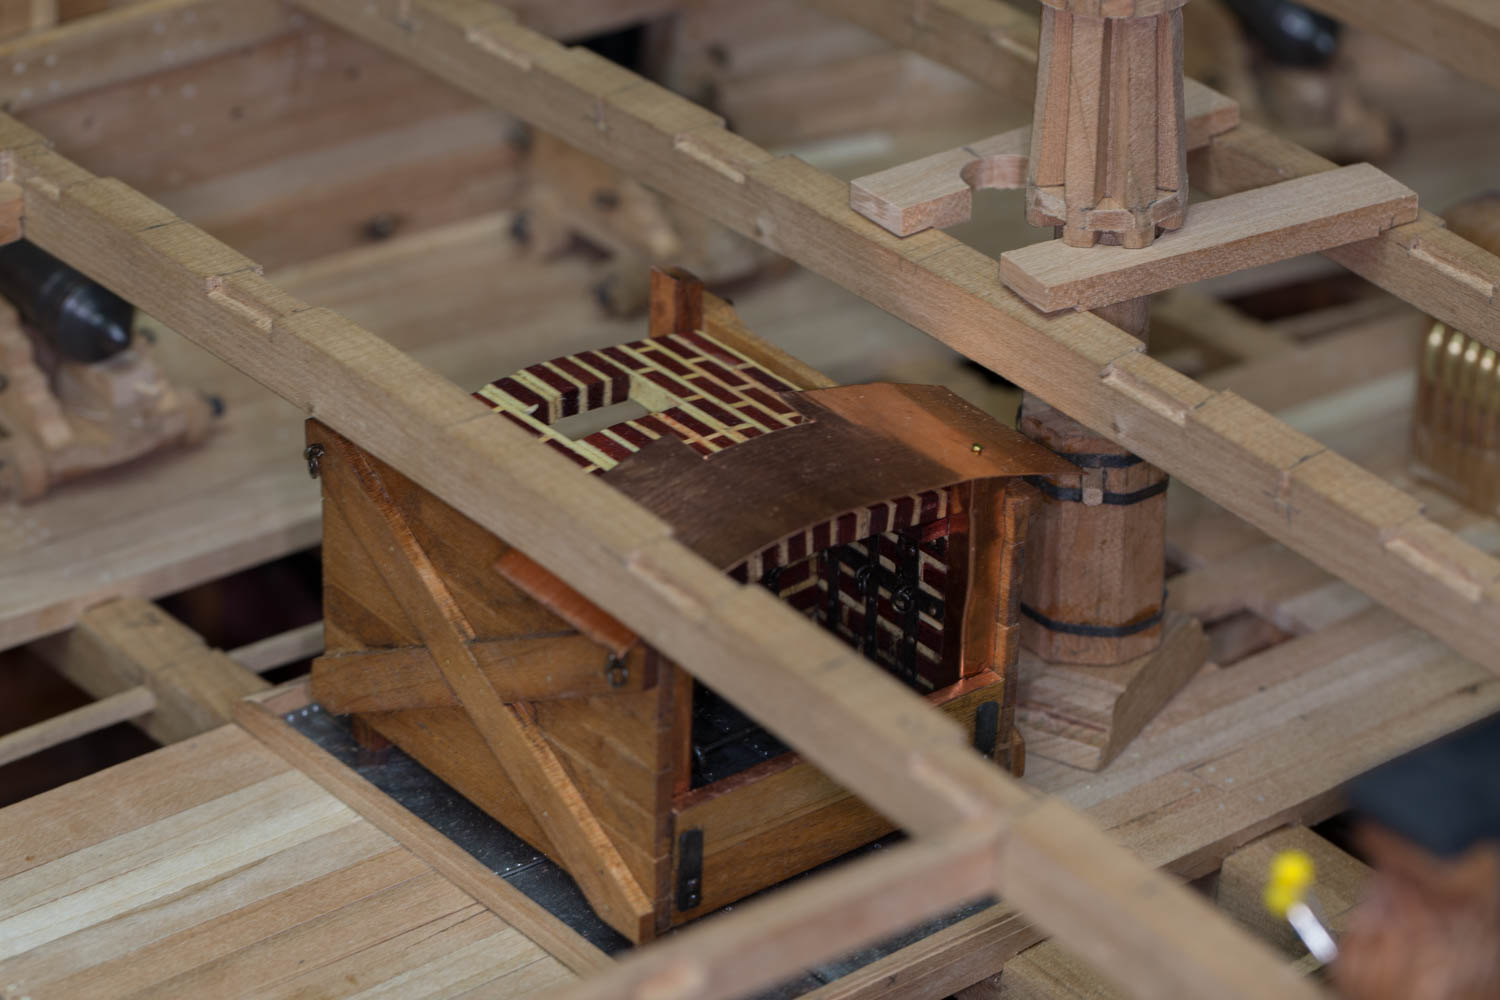
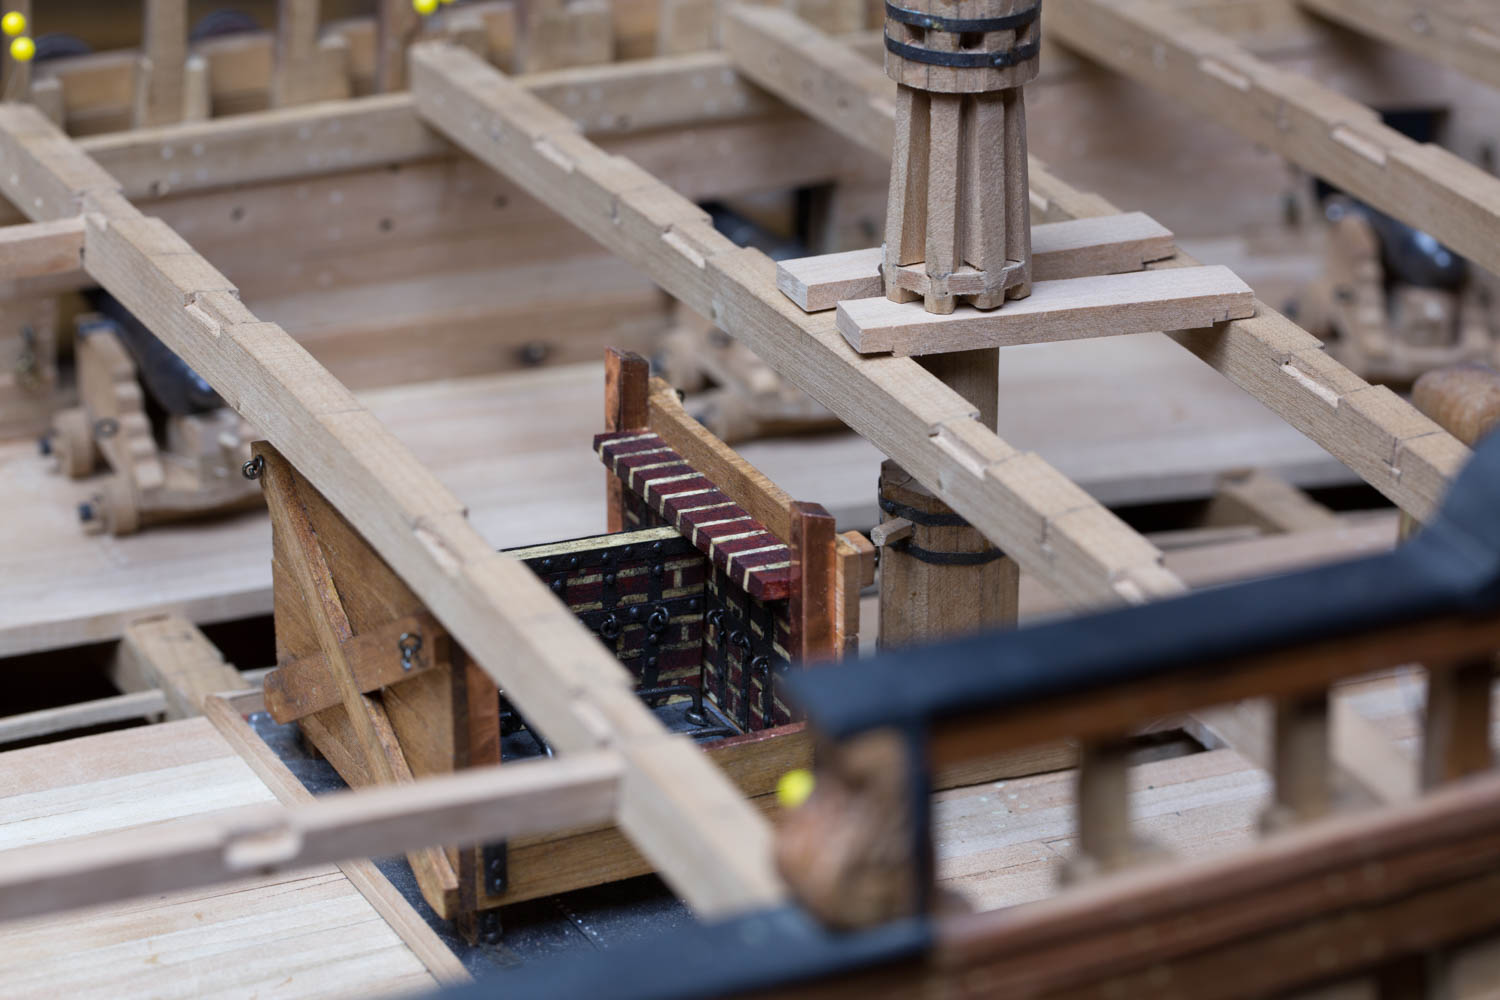
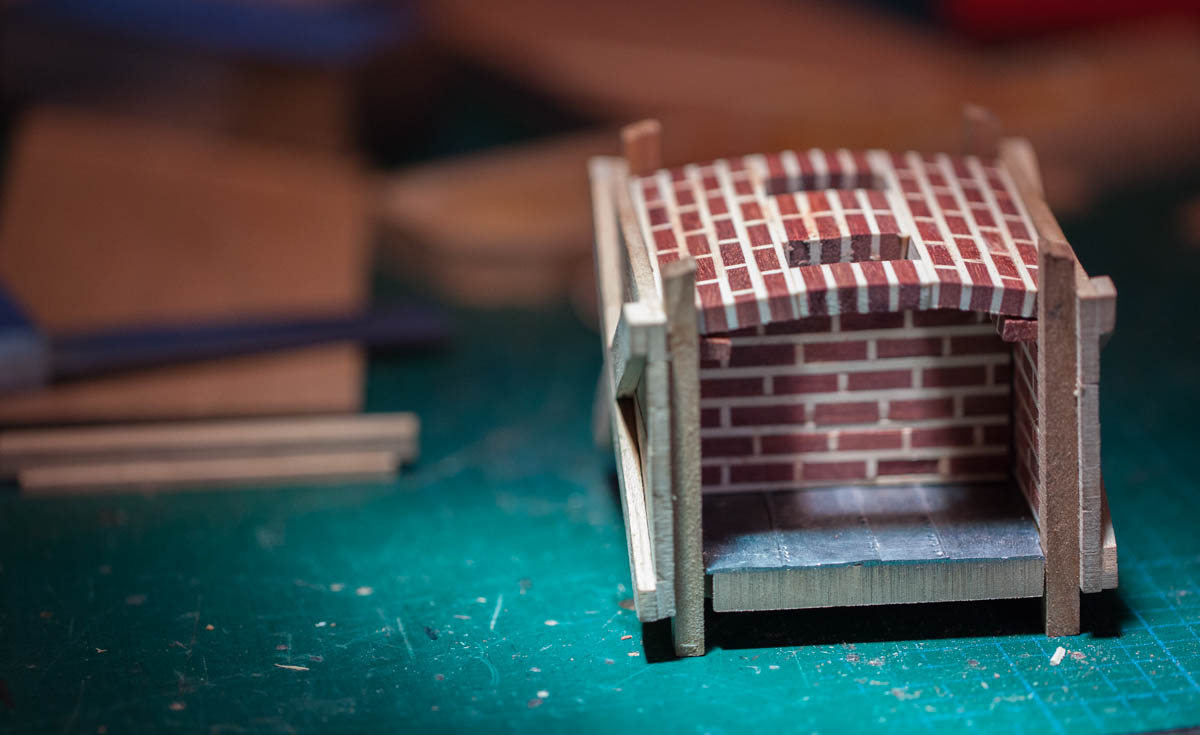
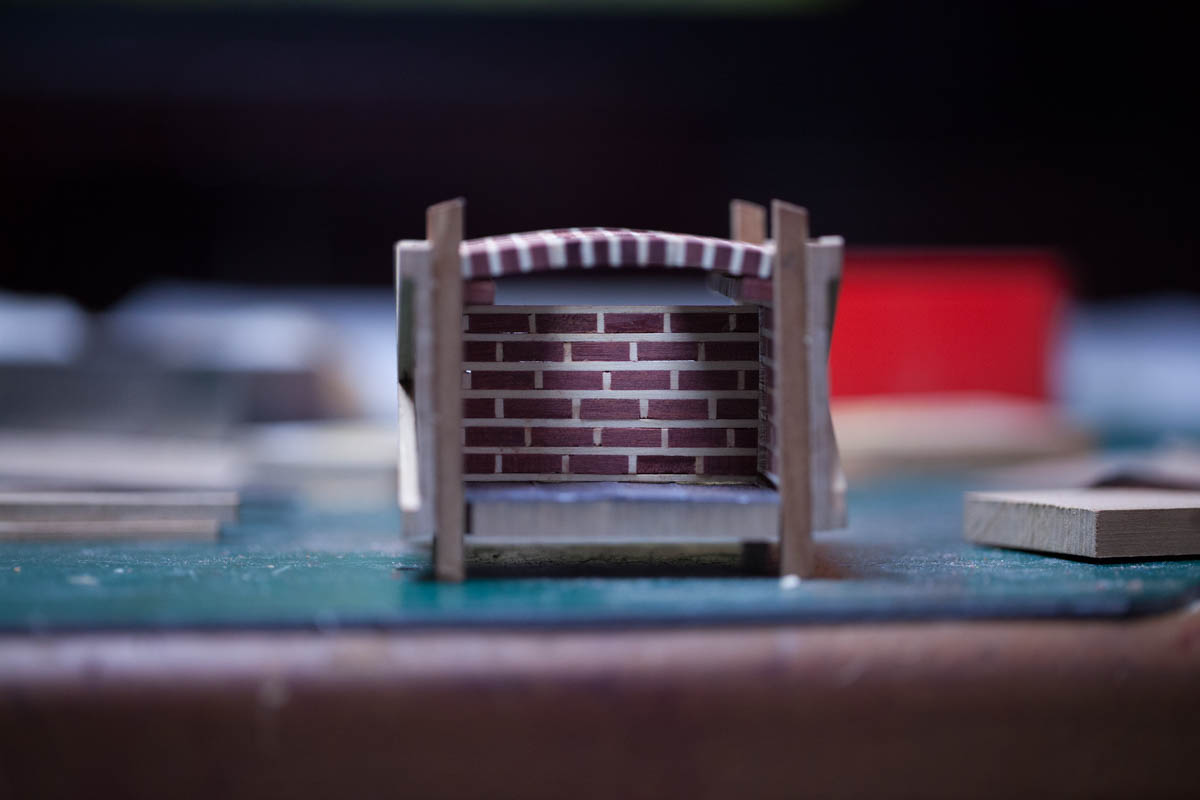
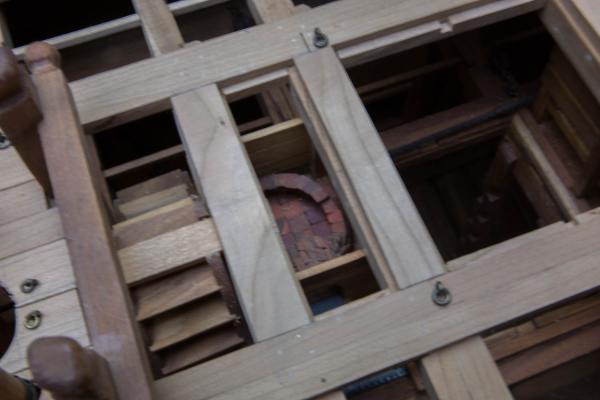
Hi Druxey, Darker white will be last. With this stove, I want brick and mortar but there are many difficulties. First the colors, could be right by painting as I tried earlier with the bakery oven for the bricks but no mortar. With this stove lines are straight and it should be easier to introduce mortar. Again it would be too soon to paint the mortar because at the end of assembly, sanding will be needed and it would sand a lot of paint. So to retain the color I choose a full color in the wood. The mortar is surely too white, I realize it is also too thick when I look at the pictures, even if I taught the thickness proportion was fine when I cut it. I did it by eye but I should have done calculate some proportions. The most difficult width to obtain is the top panel with the curve. Ideally I should have done the panel and then do sides and bottom, but I did the contrary and the width does not fit exactly so I had 2 layers of mortar at 2 places. Assembly is not so easy also. horizontal mortar lines are easy but not the vertical lines are difficult because it is difficult to cut to the good lenght and to install. In fact this is exactly for this kind of reasons that I prefer to build at a bigger scale, to have a bigger ease to hold parts and enjoy the construction instead of worrying how to hold the small parts. I do not know what would be the best method yet but it is surely fun to try few ones.
- 728 replies
-
- 5
-
-
- le fleuron
- 64 gun
- (and 1 more)
-
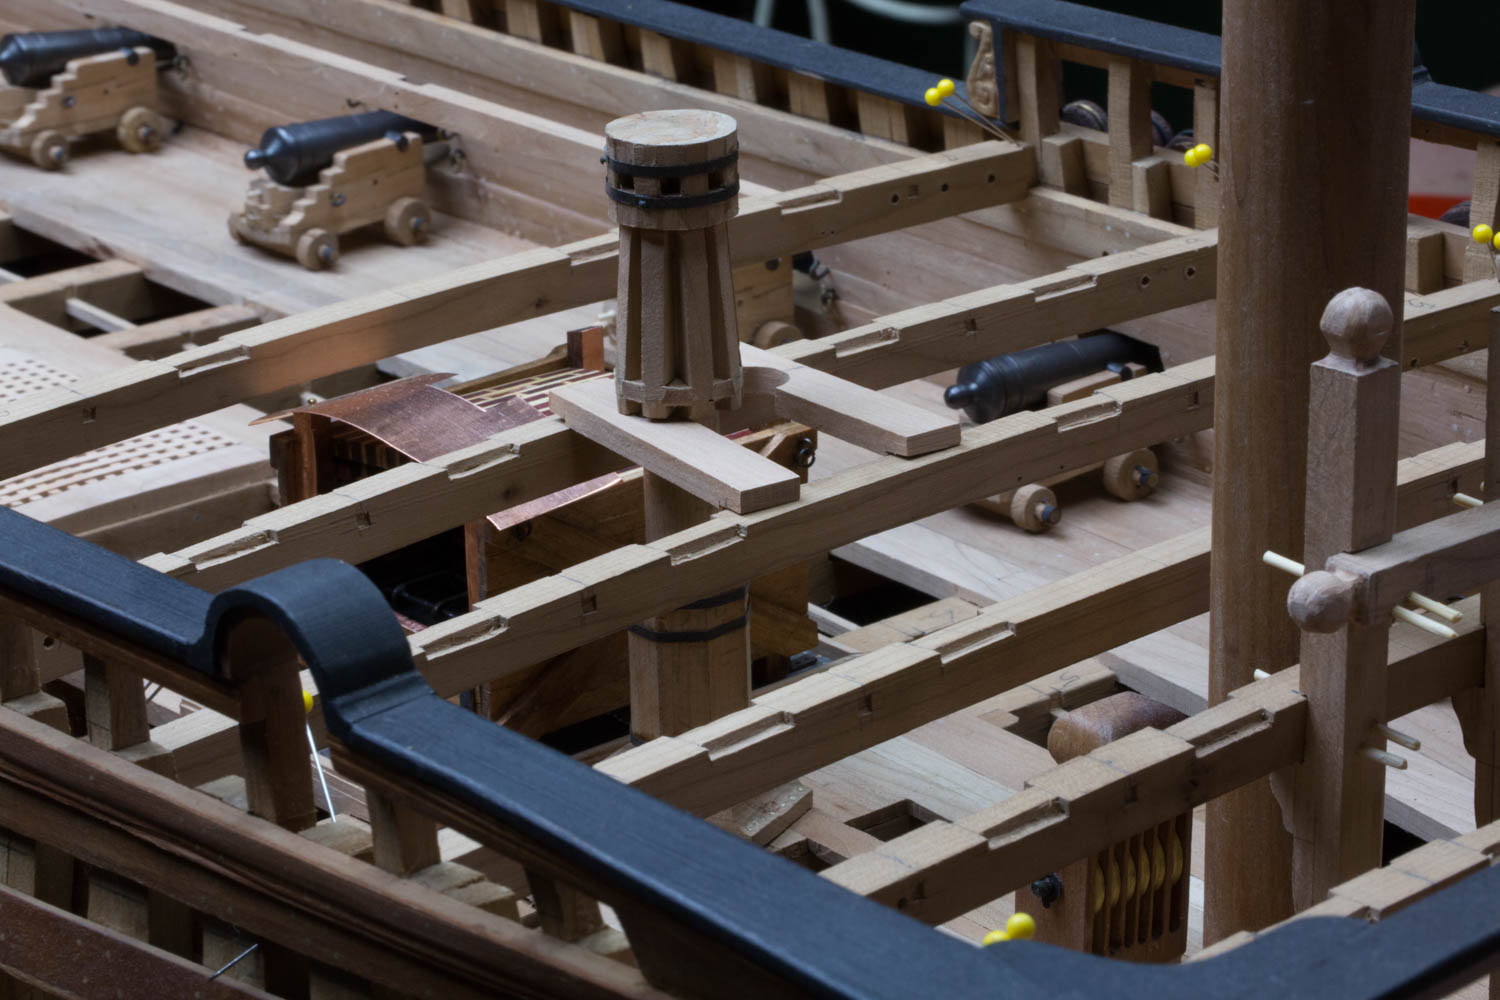
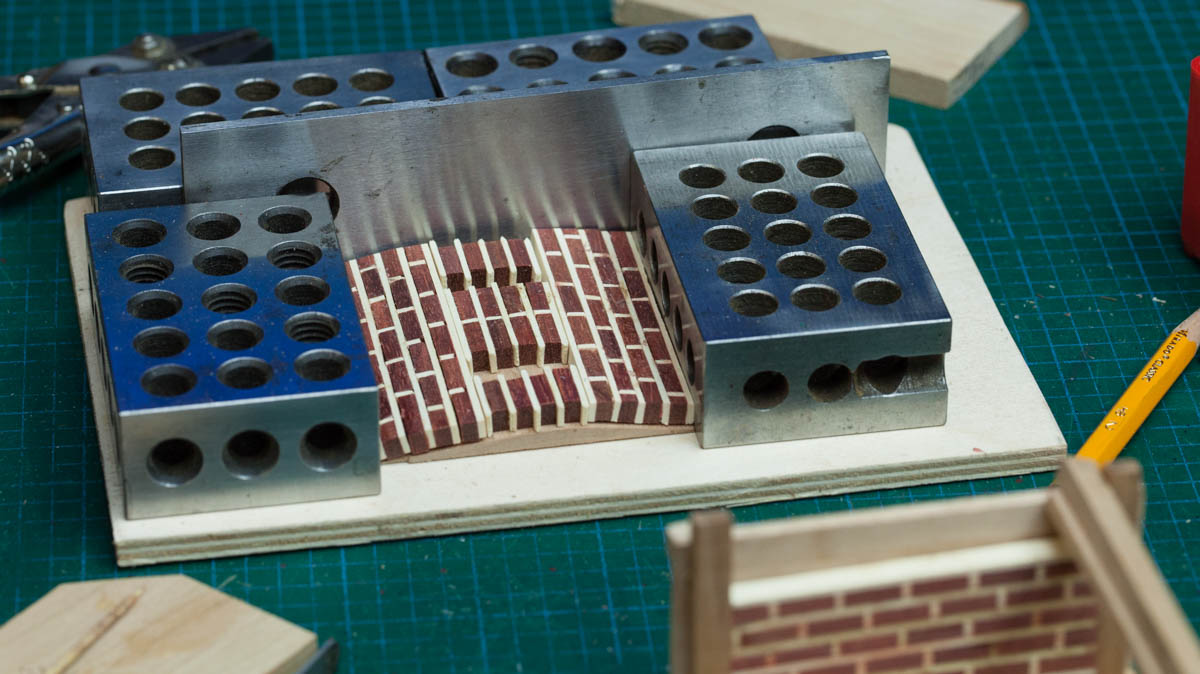
I did some experiment with the last lens. On the forth picture the photo is twisted. Actually I am doing bricklaying for the oven.


- 728 replies
-
- 25
-
-
- le fleuron
- 64 gun
- (and 1 more)
-
Sand/Cut a Corner Edge
Gaetan Bordeleau replied to mikiek's topic in Modeling tools and Workshop Equipment
you wrote your solution use a larger piece use your disk sander use your Byrnes Table Saw to cut 1/8 strip -
Thank you Ed , You push my comprehension 1 step further. I see how you mix 2 products which cannot be mix together in applying them separately. I knew very well that the rag darkened with the stain but I did not Knew why. I realize that I did basics experimentation with total ignorance of what is happening. The only result I was looking for is will it dry in a non sticky finish? For the french construction in 1730 about 50 years before copper plating a thick tar was used. In my effort to try to replicate this process I mixed : -turpentine or tung oil I am not exactly sure which one is the solvent ( I mean I am not sure if tung oil can be use as a solvent) with as much asphalt it can bring it in a liquid form to darken the mixture -tung oil to darken the color -bee wax brought to a liquid form with turpentine to give it a texture that I like on large wood surface I see that asphalt and bee wax have somethinfg in common; both are in a solid form and we need to bring the 2 in a liquid form so that we can apply it on wood. Also it is easier to bring the dry ingredients wet and then mix all together at the end As you can see I had no idea what I was doing but I can retry some of these mix and now understand a little better what is happening Wood penetration, to be honest does not mean much to me, I mean that I am more interested in the color result. It is clear that paint does not penetrate it is just on surface. May be I should try; -tung oil 2 coats –tung oil + turpentine 1 coat + tung oil 2 coats and observe color difference
- 3,618 replies
-
- 5
-
-
- young america
- clipper
- (and 1 more)
-
1 coat for the dye, 3 coats for tung oil: 4 coats.... this is a lot of coats Ed if you do it separately, I guess that chemical reactions of tung oil seals better the dye so to speak. Many coats means build up the thickness of tung oil. I try to put when possible 1 coat of tung oil because when I take a photo the lens sees the thickness as some kind of a mirror and reflects the light and it makes a spot on the photo. The first times I used tung oil I was applying regularly 2 coats and sometimes 3. With cherry I get better results with 1 coat. it seems to results in a greater homogenity to the eye and to the lens. I ask myself this question: Is it possible to do it in 1 coat only ( walnut or other natural dye + tung oil). I see no advantage to use turpentine. It only means apply 50% less in the mix and the only reason we see is to increase penetration. If the oil penetrates .001" deeper will that help a boat modeler; I do not think, but I think it could help a fisherman who uses tung oil as a water sealant for his wood boat.
- 3,618 replies
-
- 5
-
-
- young america
- clipper
- (and 1 more)
-
"They need to be fixed with a binder like Tung Oil, linseed, soya, shellac, varnish, acrylic, etc. " Very interesting Ed, I tried some mixes, but I did not really know which component was "the fixer agent". I just knew that I wanted to add color in Tung oil.
- 3,618 replies
-
- 4
-
-
- young america
- clipper
- (and 1 more)
-
http://waxine.com/produit/4/brou-de-noix This is the product I use. My understanding is that it is remains if water is use and fix if some kind of alcohol is use soluble. I do not know what is aniline. Also, I like to do some mixes with Tung oil. http://modelshipworld.com/index.php/topic/327-le-fleuron-by-gaetan-bordeleau-124/page-21 Also I did some experiments with some of these products. My guess is that turpentine is a fixer but I cannot certify this fact. Dark brown is a good choice of color for English ropes. For the French ropes around 1780 ropes were pine tarred with a quality tar coming from the north of Europe Swedish tar maker introduced the fabrication in France. The best tar came from Scandinavian forest. It is clear, fine and a bit red. tarred rope is weaker and less flexible than a white rope, however it is more resistant to moisture. Extraits de Traité de la fabrique des manoeuvres pour les vaisseaux ou L'ART de la CORDERIE PERFECTIONNÉ de Mon Sieur Duhamel du Monceau paru en M. DCC. LXIX ( 1769 - seconde édition ) à Paris chez Desaint, Libraire, rue du Foin. Just to liven things up (so to speak), here are two excerpts from Alexander D. Fordyce: Outline of Naval Routine (1837)http://books.google....id=vPANAQAAMAAJ RATLING RIGGING (pages 45 - 46) Girt out the Rigging with a Fore and Aft Swifter, but not very much out of the straight line; then spar it down with spare Spars, Studding-sail Yards, Boat's Oars or Hand-spikes, all seized on carefully square. Nettle-stuff made from Bolt-rope Yarns, or something equivalent, is very necessary for seizing the Ratlings with; and, if new, it ought to be well and carefully stretched previous to cutting. The best Seizing-stuff should be preserved till the new Ratlings have been a little worn. Fourteen or sixteen inches is a good distance between the Ratlings, and their places should be calked off all the way up and down before commencing. Each man employed should have a measure within his reach, and special care should be taken to make the Ratlings of the one side correspond in parallel direction with those of the other. This can only be seen from outside. If the Rigging is to blacked after Ratling down, it is best to leave the Spars on till that is done; but if the Rigging is not to be blacked, the Spars may be taken off as the new Seizings are finished and blacked. BLACKING RIGGING. (pages 46-47) When blacking new Rigging for the first time, the best mixture will perhaps be found to be Stockholm Tar, Coal Tar, and Salt Water, in equal proportions, and heated up in the Fish Kettle, over which a Sentry should be placed. After the first blacking, half the quantity of Stockholm Tar is sufficient; Coal Tar alone being always used for the Yards and Bends. The most convenient method of Blacking Rigging is with Top-gallant Masts on deck, but Royal and Top-gallant Rigging placed at Mast-heads; for the men who ride down and black the Topmast Stays, can then at the same time black the Topgallant and Royal Stays handily; or, what is handier still, men at the Mast-head haul over and black these small Stays, and pay them down forward when done; the men, also, who black down the Topmast Backstays, can carry on at the same time with Topgallant and Royal Backstays. In addition to all which, the Masts are kept clean. If, on the other hand, Top-gallant Masts be kept up when Blacking, the Small Stays and Backstays must be let go, in order that they may be got at by the men on the Topmast Stays and Backstays; consequently, the Masts must be adrift, and exhibit a specimen of slovenliness unbecoming a Man-of-War. The Masts will, moreover, be daubed over with Blacking; and if it come on to blow so as to render it necessary to get Topgallant Masts on deck before the Rigging be dry, much injury must result to the Blacking. Previous to commencing, the Decks should be well sanded, and the Paint-work and Figure-head carefully covered with old Canvas and Hammocks. The Quarter Tackle should be clapped on one side of Main Yard, and a Burton on the other, ready for Provisioning and Clearing Boats. The Hammocks should also be covered, and the Quarter Boats lowered out of the way. The finer and warmer the day, the better. The Blacking will lay on so much the smoother and thinner; but commencement should be delayed till the dew is well dried off. Topsail and Lower-lifts should be blacked first; the men having to stand upon the Yards to do them. A smooth, calm day is required for the Bends ; for the Blacking will not take effect, unless the surface it is laid upon be dry.
- 3,618 replies
-
- 15
-
-
- young america
- clipper
- (and 1 more)
-
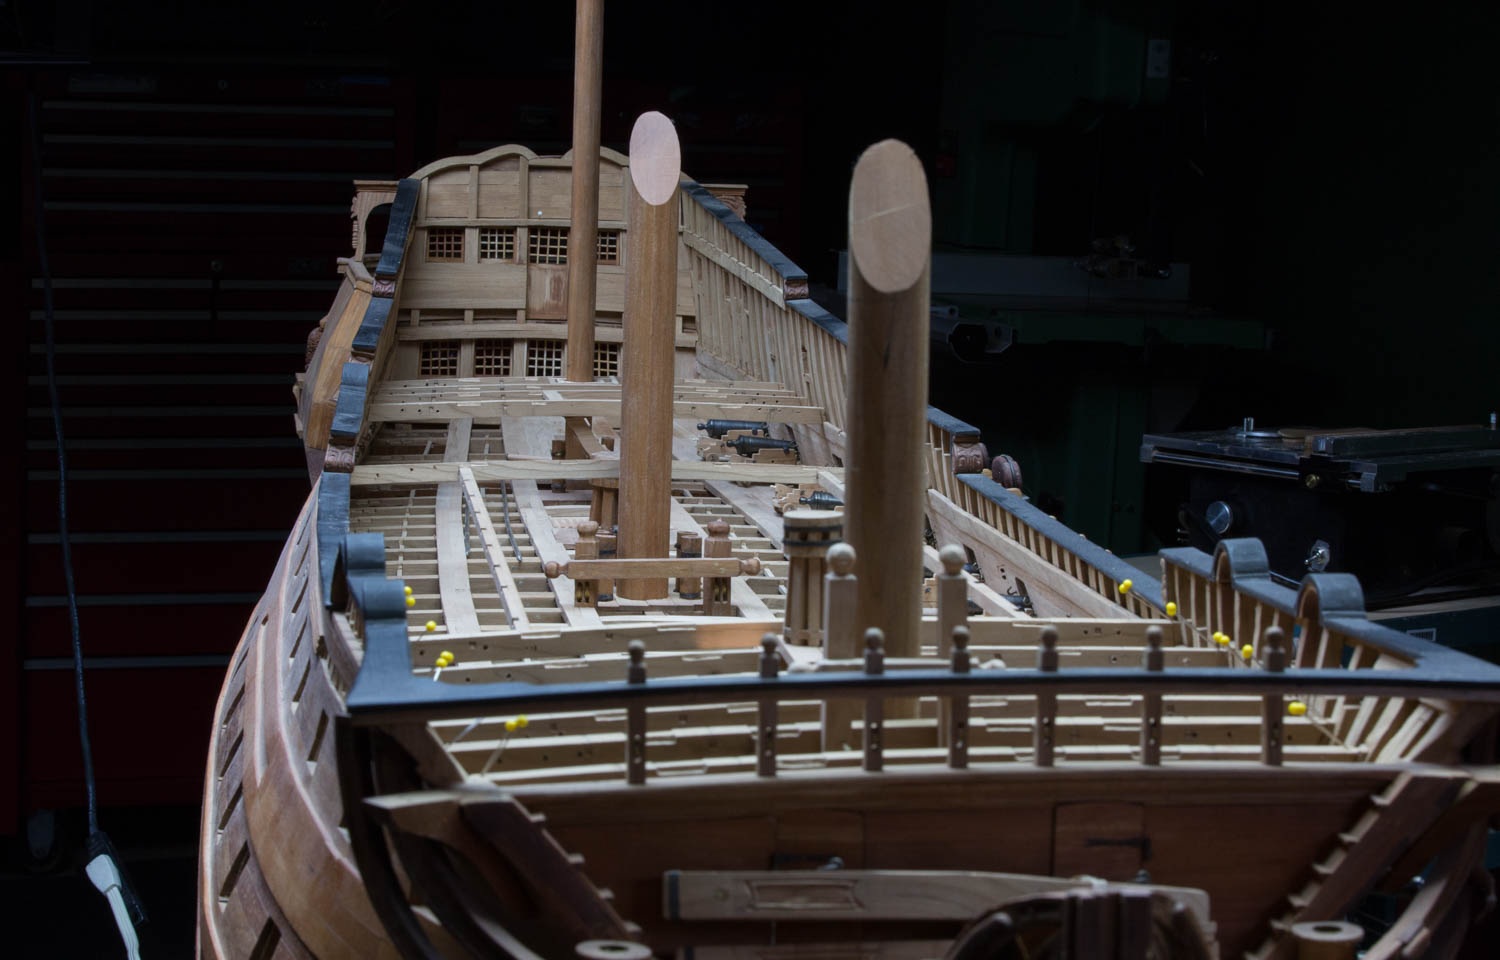
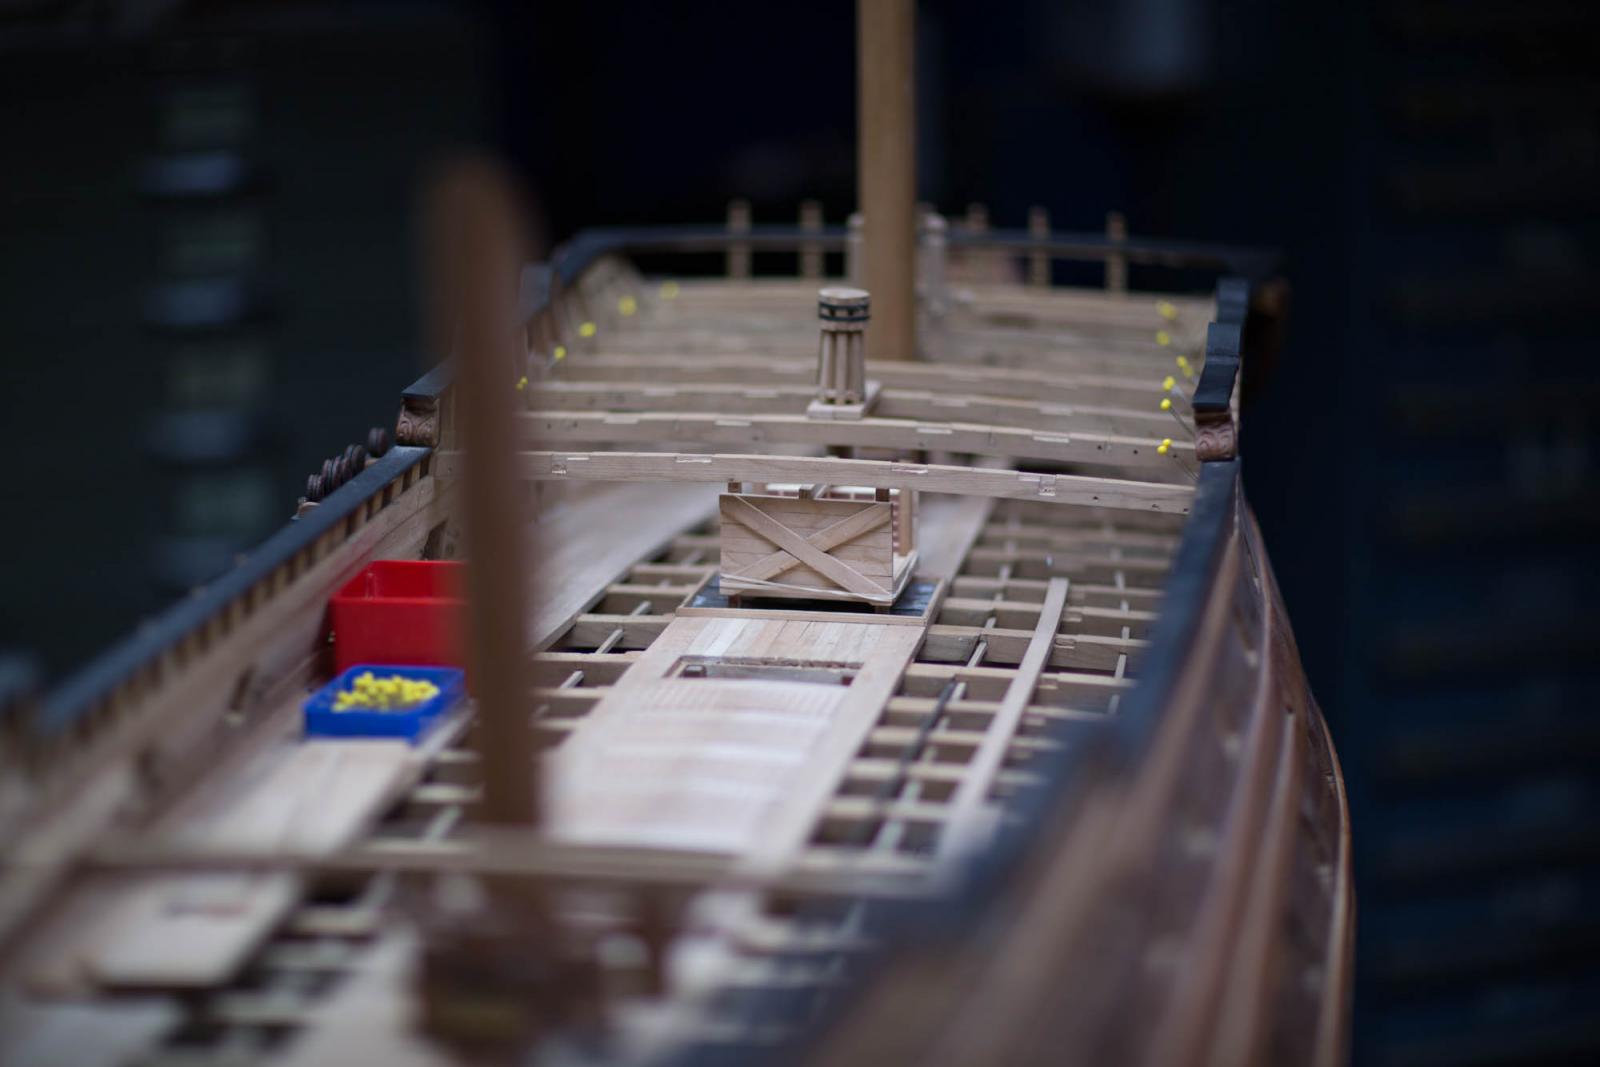
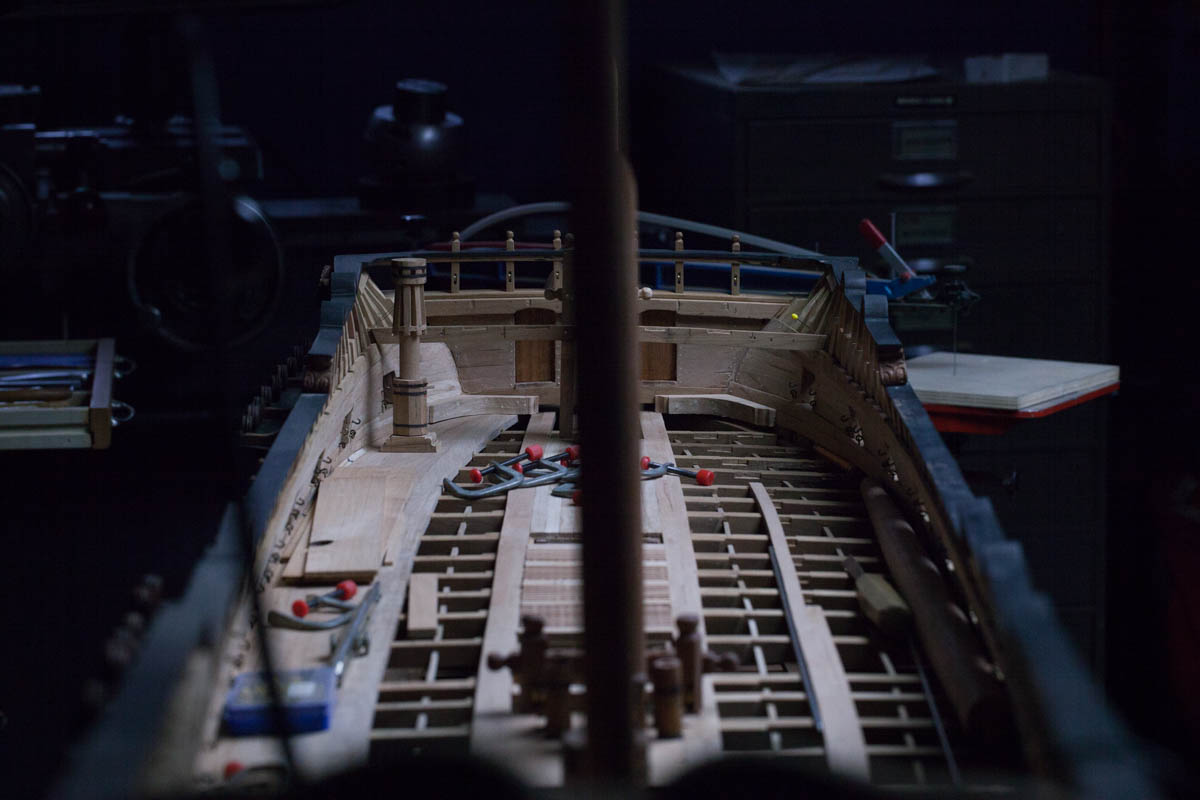
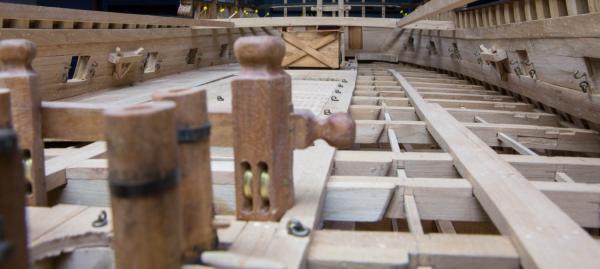
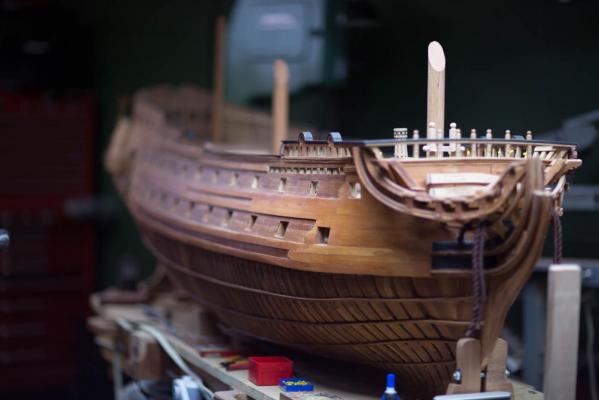
Ed, it is never too late! I think that the greatest joy of a bigger scale, larger than 1/36 is the ease to hold small parts between your finger Needing less concentration to hold the parts, you can concentrate more on the construction itself. When you add these little details, the sum is close to the nirvana! Also by magnifying the scale, you see bigger witout the trouble of wearing magnifying glass. A bigger scale bring you closer to the full scale. Details are easier to see, you can introduce new details that smaller scale will not allow you. What is mostly interesting a bigger scale allows you to think at scale 1-1. This is like opening new doors. One of the thing that you will see behind these doors is the joinery, you become more aware of how the wood parts would be assemble in real life.
- 728 replies
-
- 8
-
-
- le fleuron
- 64 gun
- (and 1 more)
-
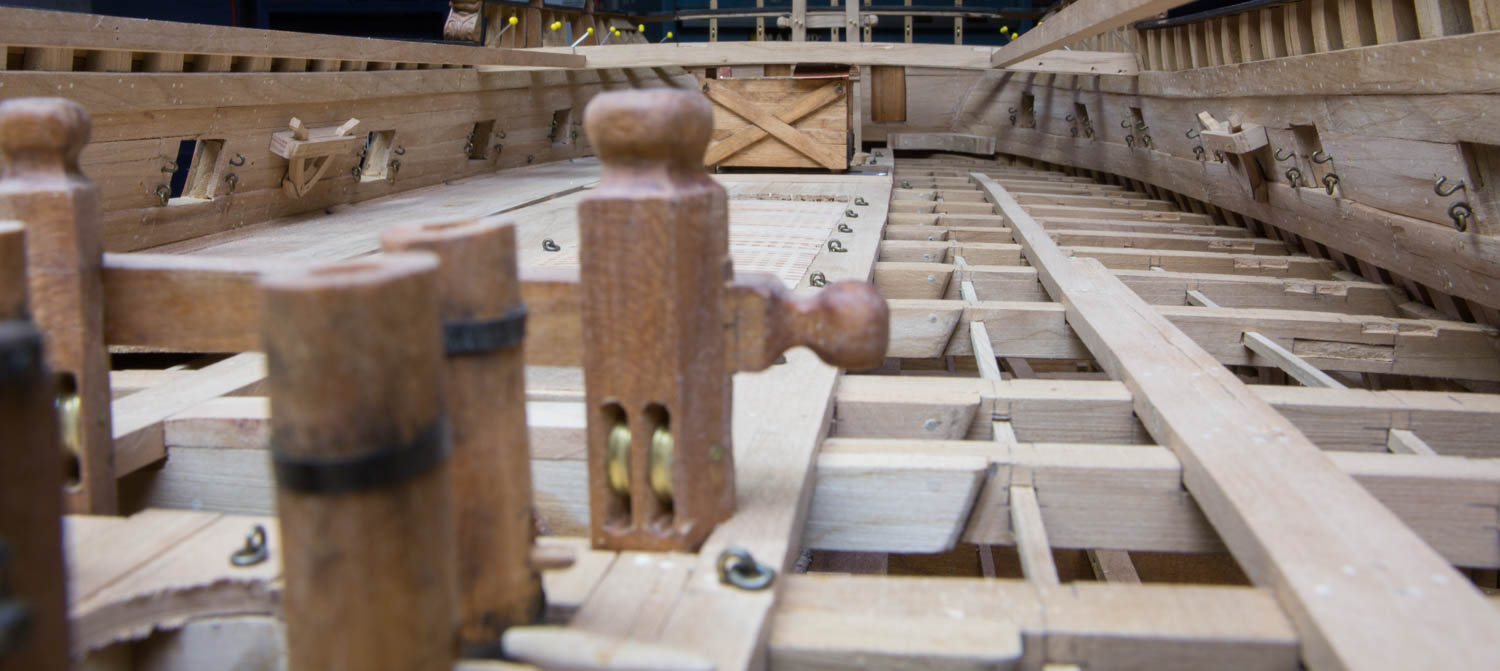
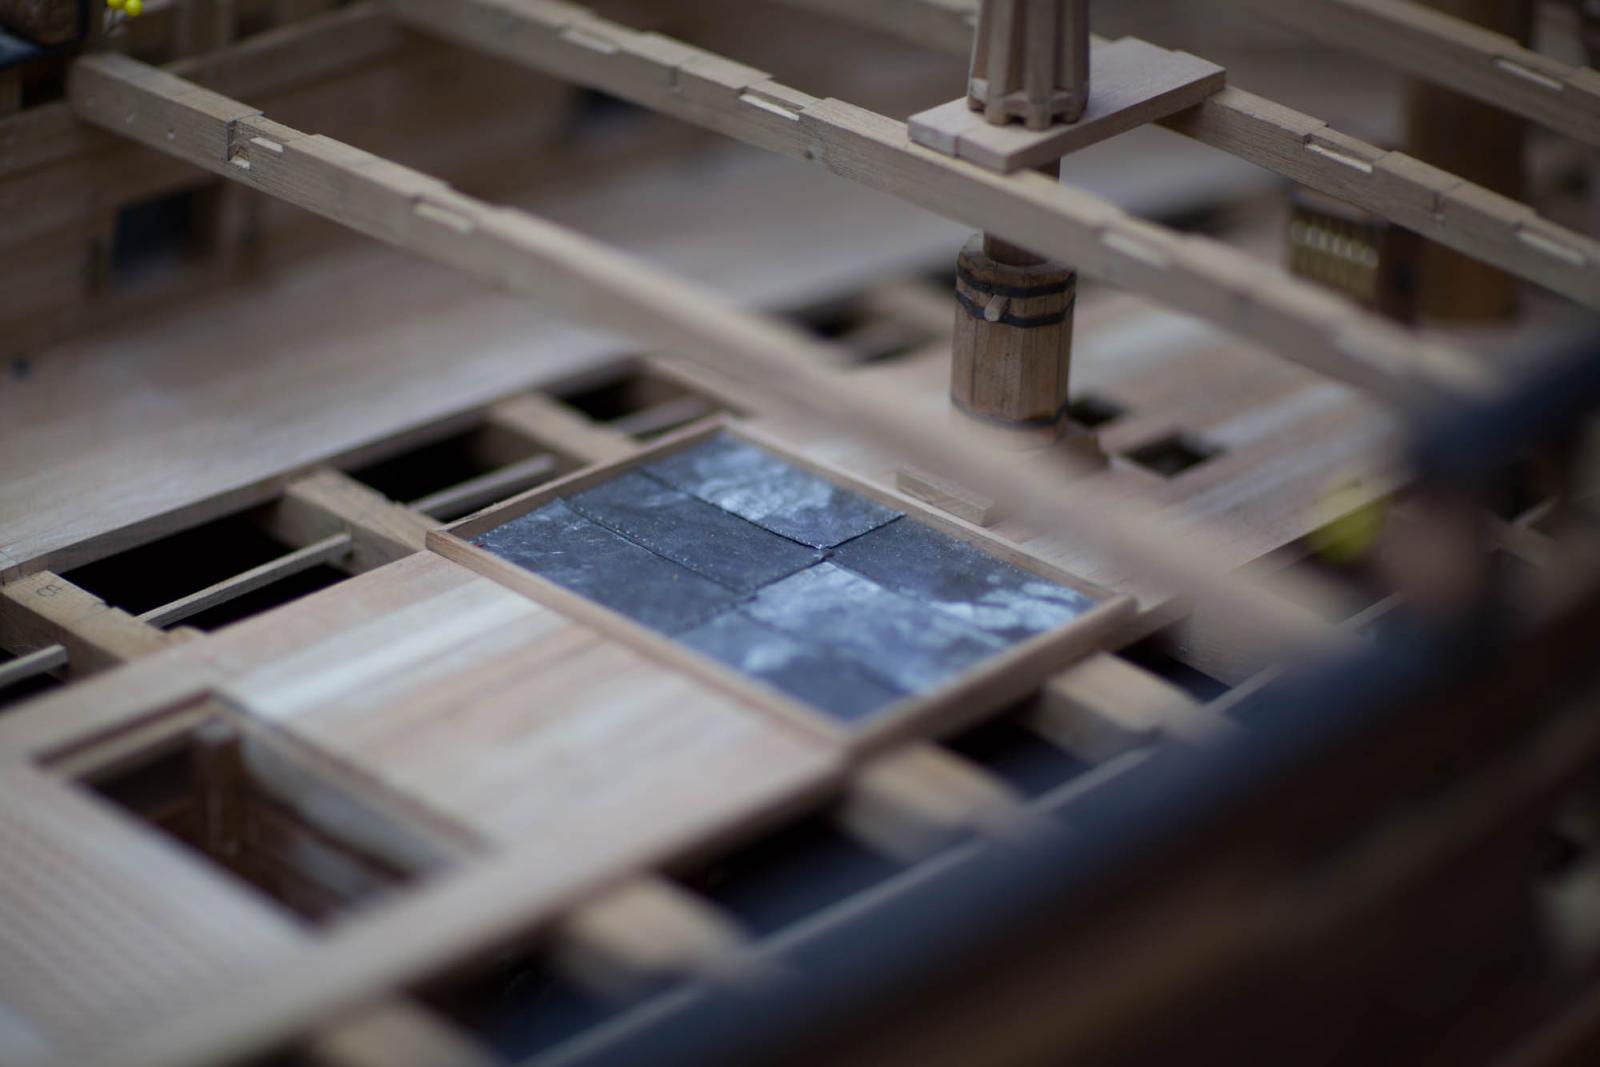
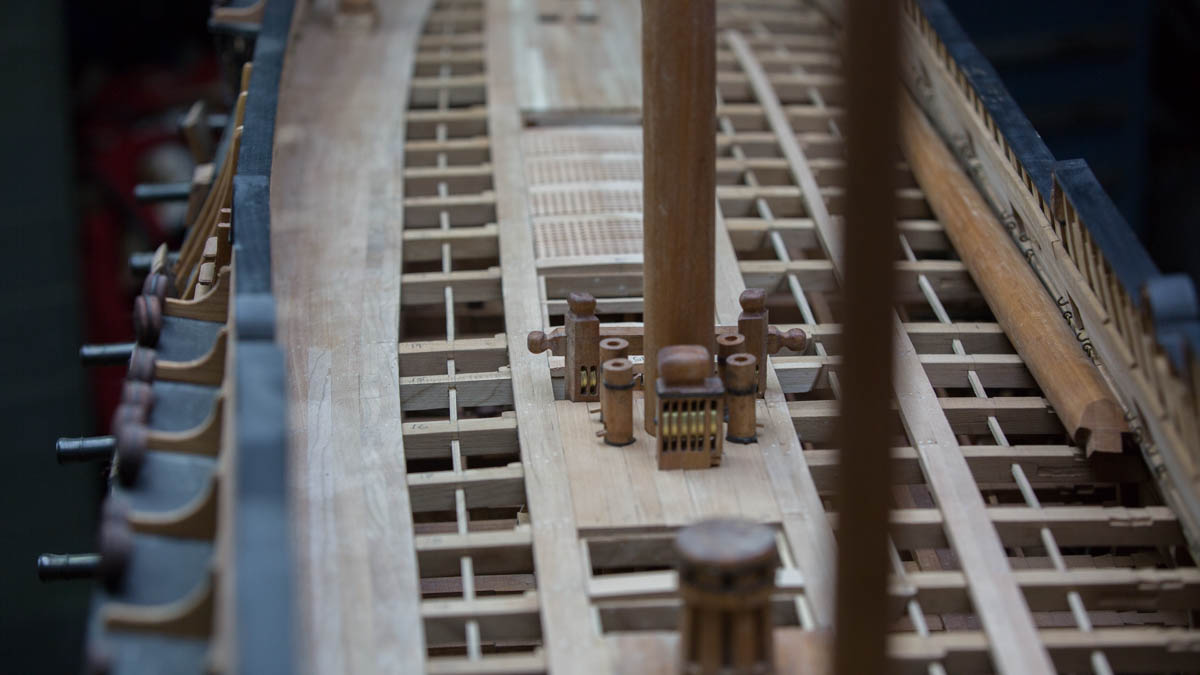
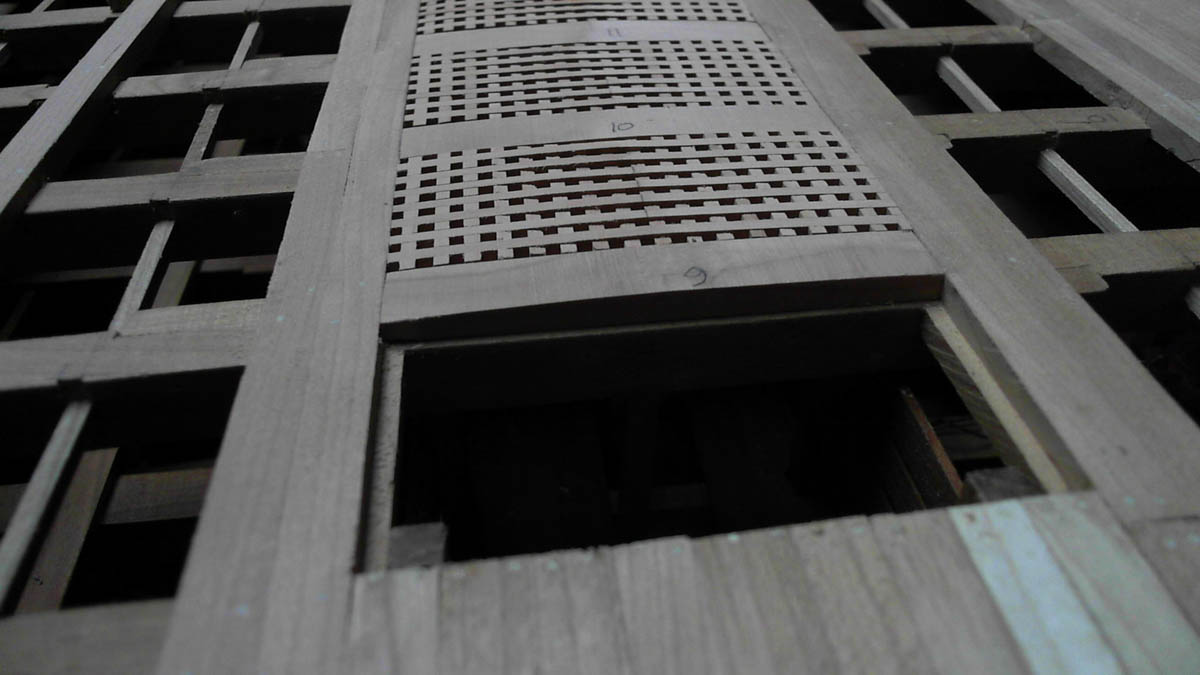
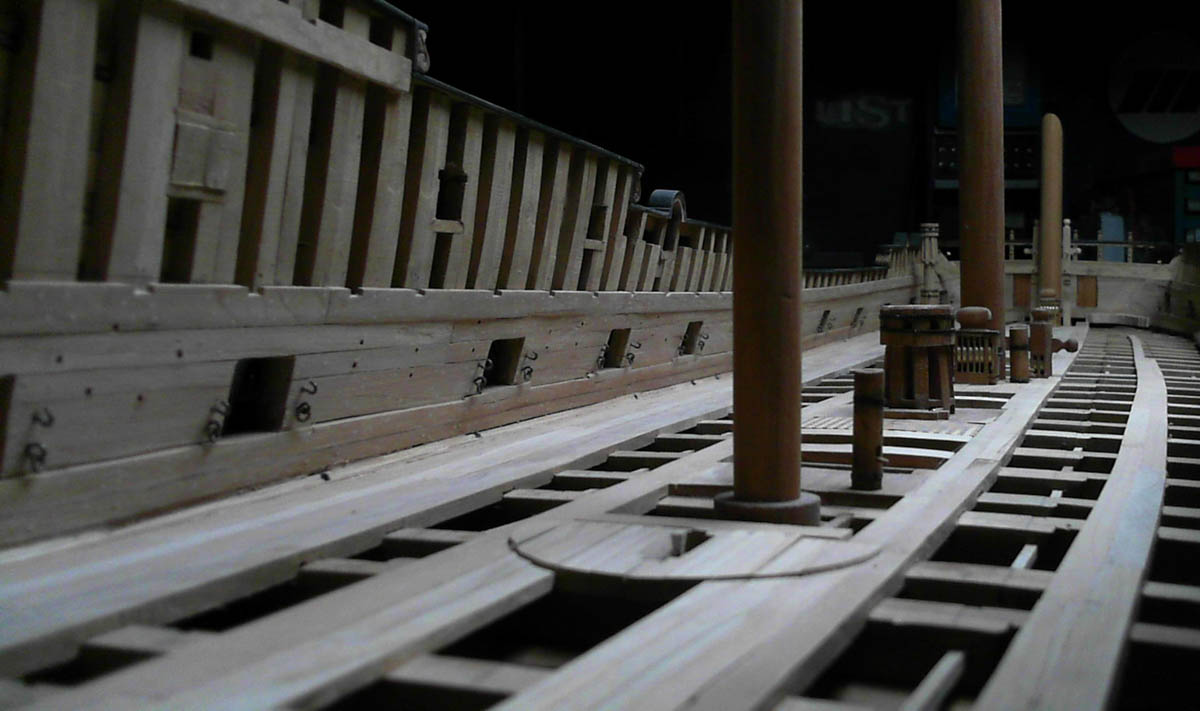
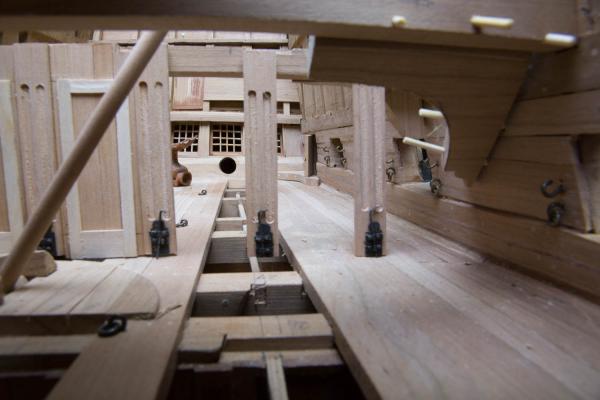
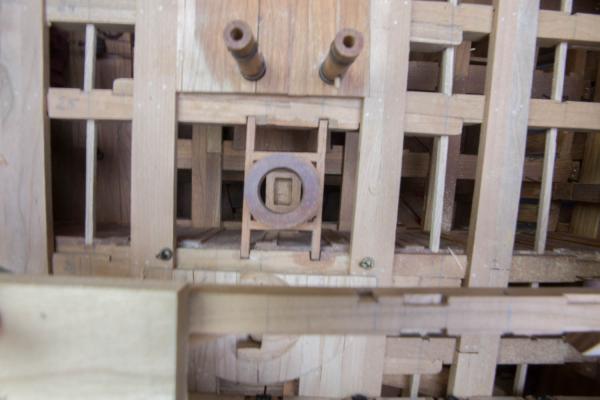
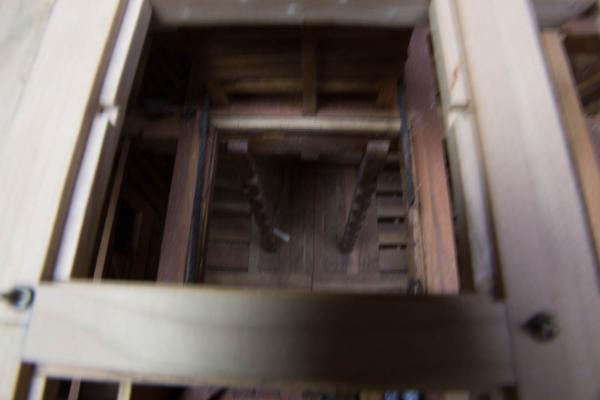
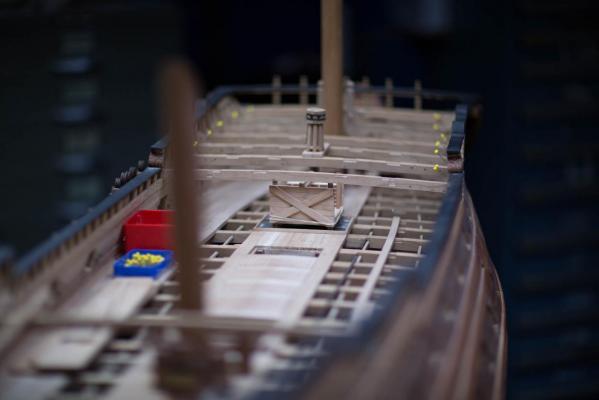
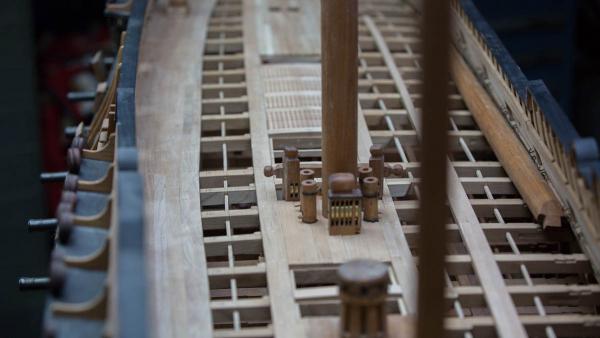
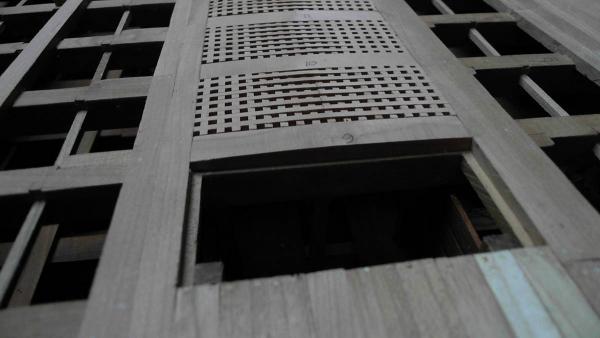
Middle part of the second deck Making gratings is just like working metal, it is almost faster to do than the set-up. The idea is to have a guide located at the same distance of 1 space (the thicknes of the wood). To get the correct thickness, 2 blades are stacked and 1 pair of wise grip is needed to unscrew the nut by blocking the shaft. A small curve is sanded in the gratings. Most of the works recently done is still unglued. The drawings for the middle of the second deck are very inconsistent and incomplete so a lot of modifications are done trying to think how the builders would have done it. Playing this ropleplay is very formative.


- 728 replies
-
- 27
-
-
- le fleuron
- 64 gun
- (and 1 more)
-
Rope Making Basics
Gaetan Bordeleau replied to mikiek's topic in Rope Making/Ropewalks's Discussions about Rope Making
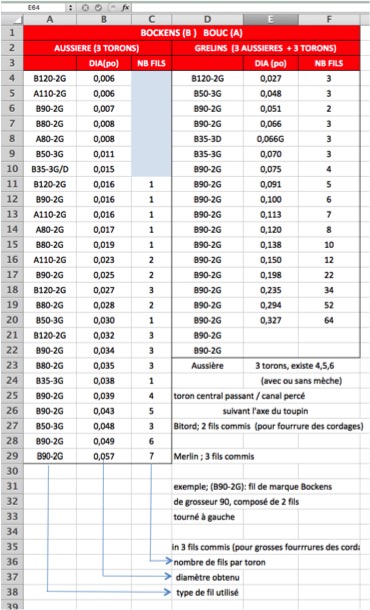
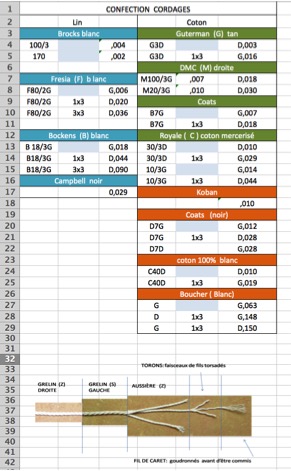
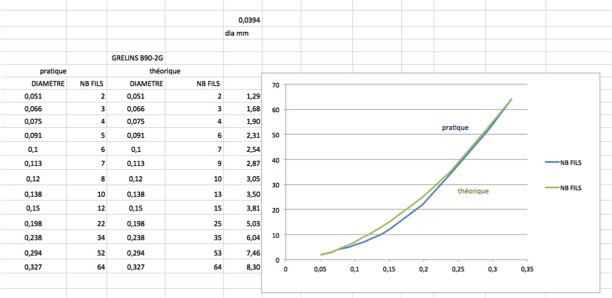
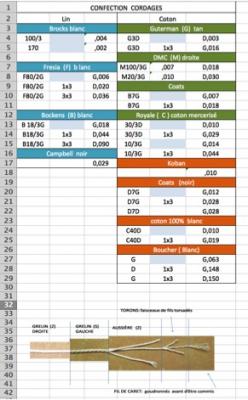
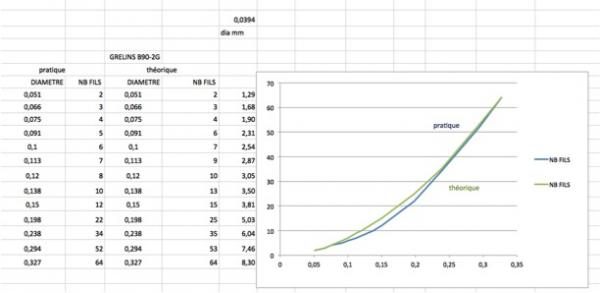
Mike you are right I work at 1/24 scale and I make all the ropes with linen 90 -2 left, .007 ‘’ The smallest size available is about linen 120- 2g, .006 ‘’ Both are very resistant thread you can easily work with Some samples of threads in the following tables
-
Rope Making Basics
Gaetan Bordeleau replied to mikiek's topic in Rope Making/Ropewalks's Discussions about Rope Making
Mike DMC cordonnet special size 20 to 100 I know the size because I tried it. I do not use DMC because it is cotton and by definition cotton is extensible I buy linen from Netherlands in quantity I choose, but it is expensive; few years ago I bought 1 pound for $500 -
Rope Making Basics
Gaetan Bordeleau replied to mikiek's topic in Rope Making/Ropewalks's Discussions about Rope Making
DMC size 100 3 left : (.007") turned to 3 right: .018"