xken
-
Posts
841 -
Joined
-
Last visited
Content Type
Profiles
Forums
Gallery
Events
Everything posted by xken
-
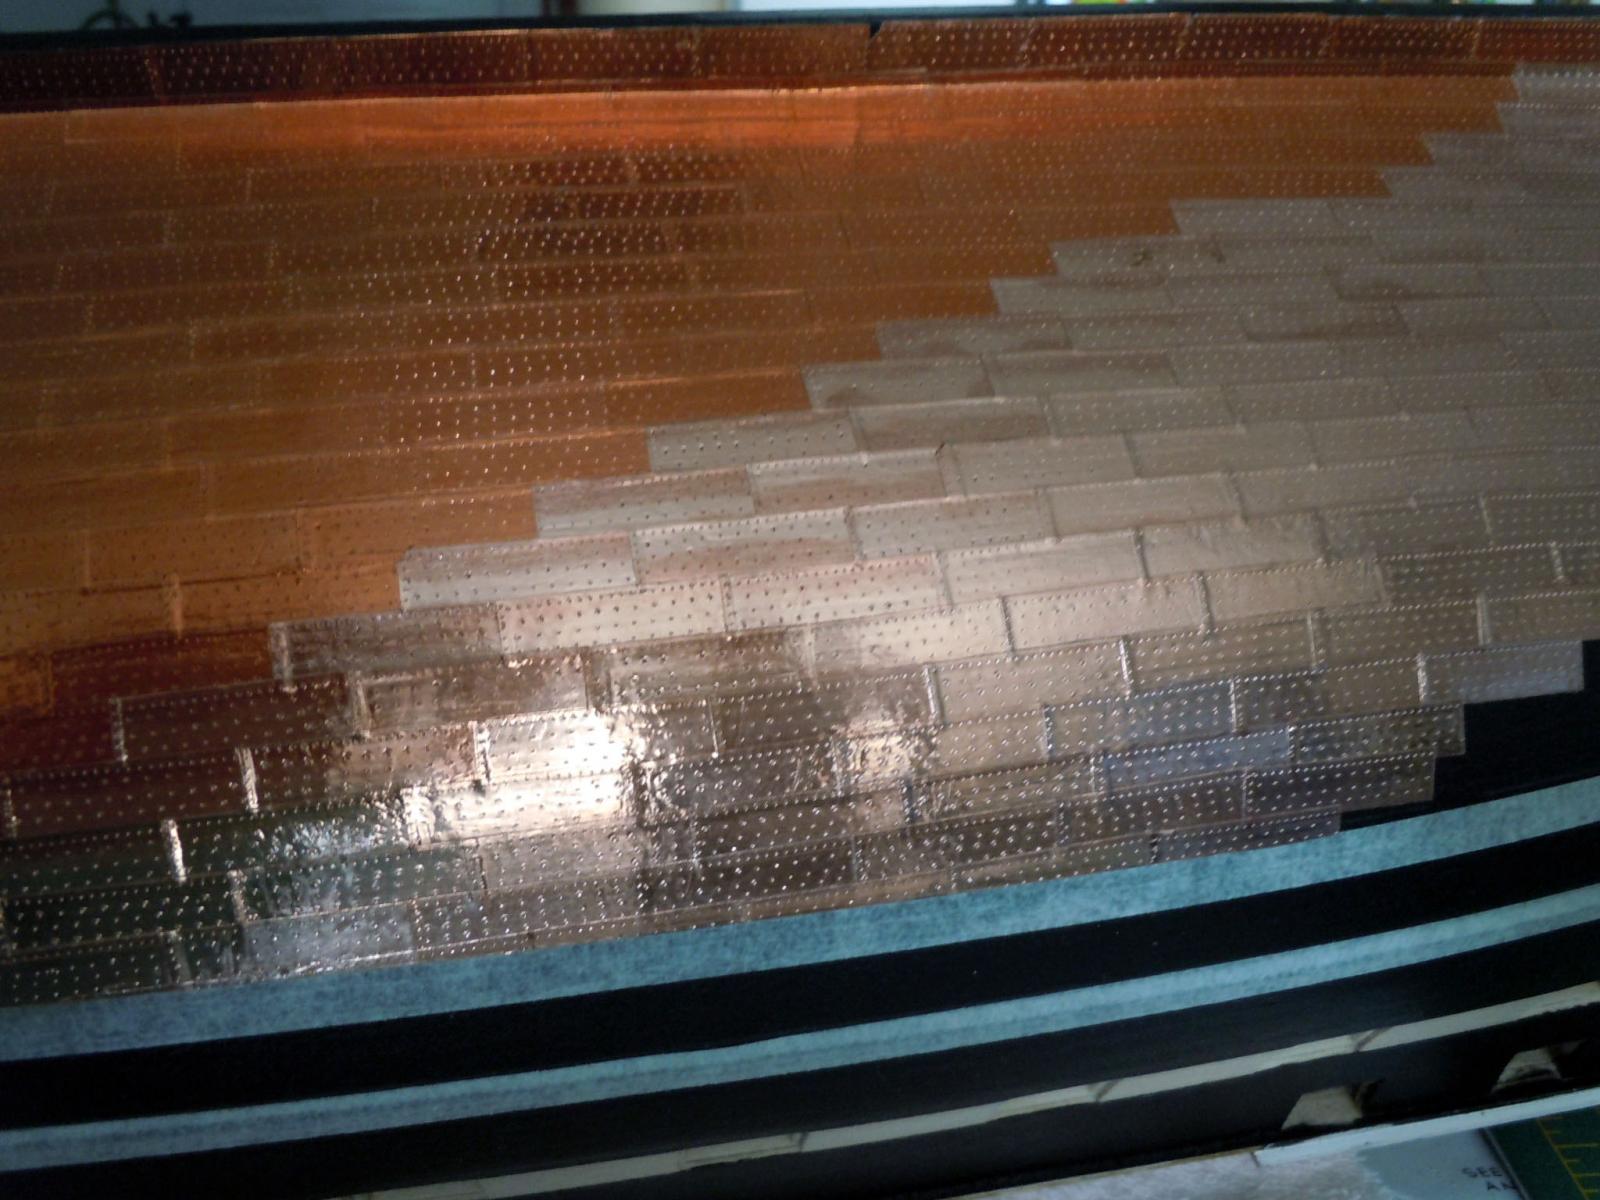
 Jonathan you are absolutely correct. Necessity is the mother of invention and I opened my Flying Fish box and retrieved the roll of copper foil from it to continue on. Request for replacements from ME have not been very timely and having masking tape on the hull I want to get it off so there is no tape residue on the hull. Especially with the regular type tape. Here is how different the two finishes are. The roll in the Flying Fish is like a shiny new penny versus the tarnished one already applied. I will let the new tape set awhile to see if it comes in line with the existing one; otherwise I may have to use Brasso with it's wadding to clean them all to the same finish and allow them to start tarnishing all over again. Never a dull moment in modelling.
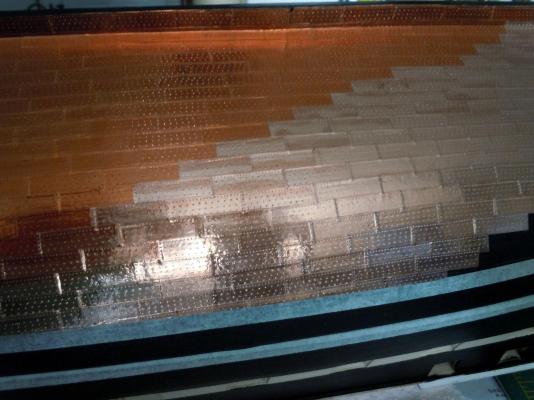
-
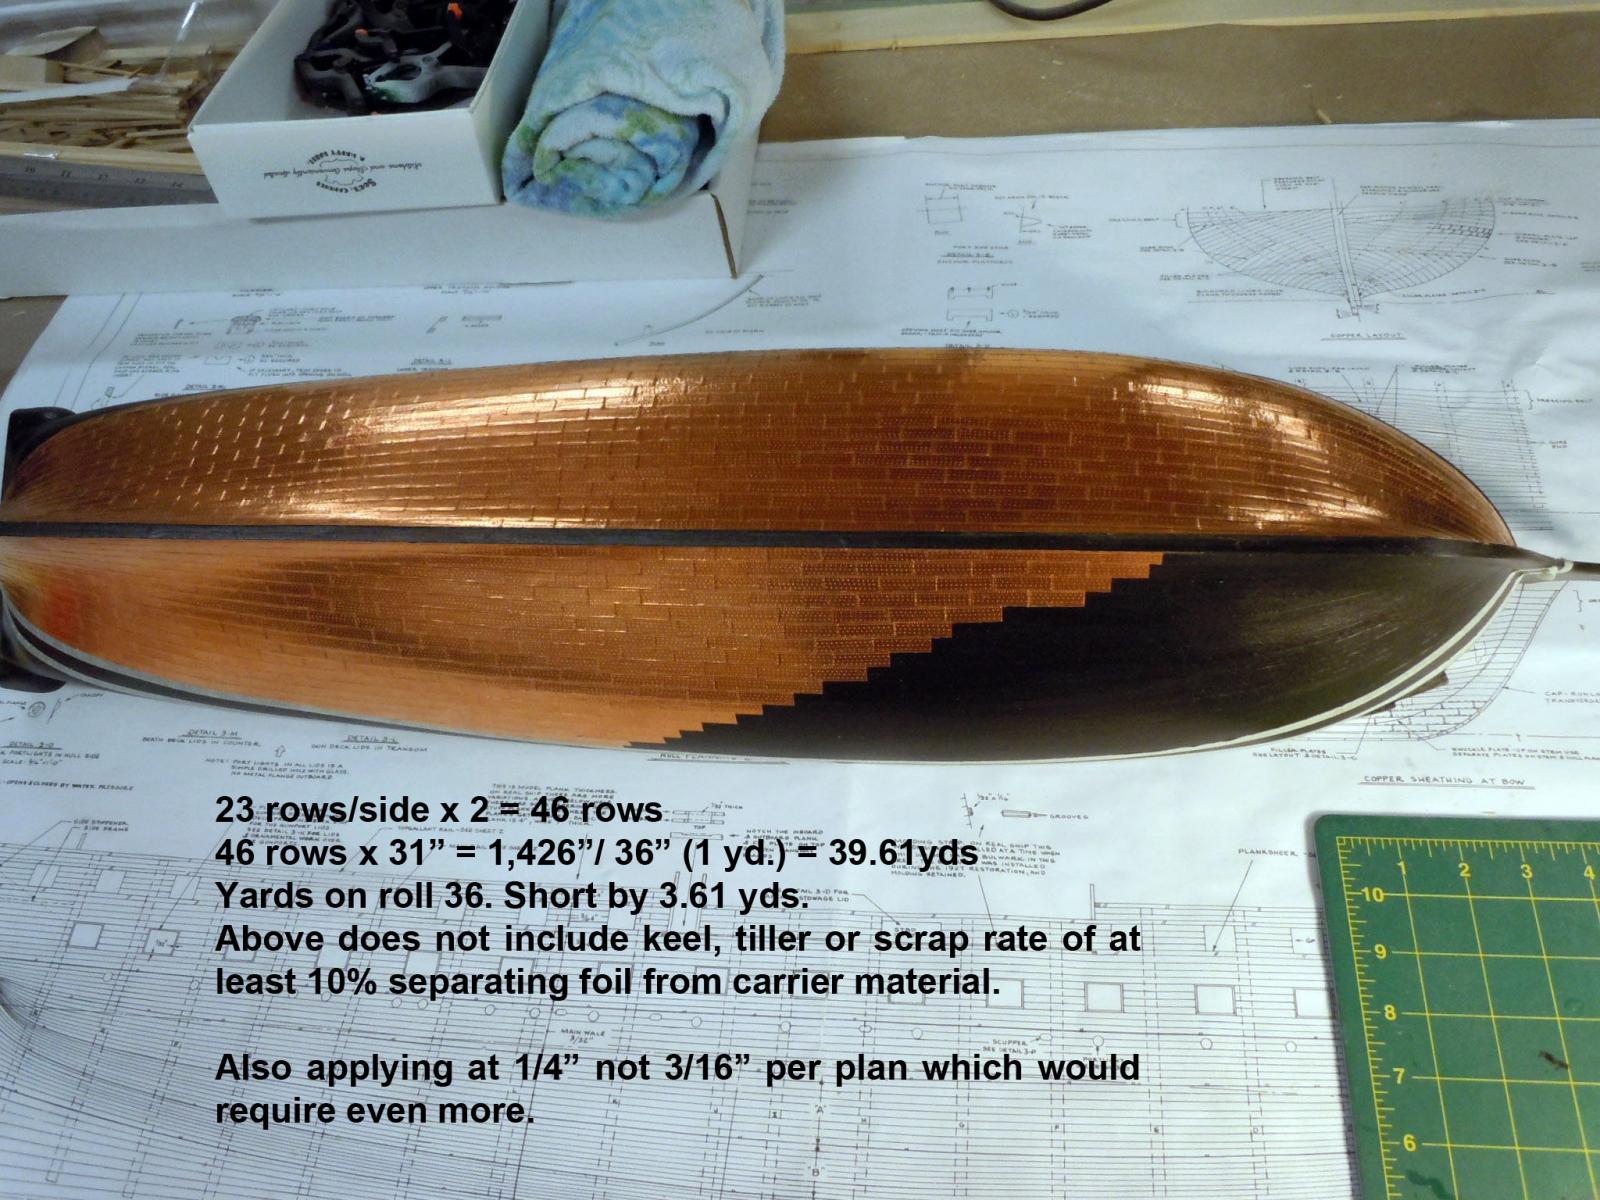
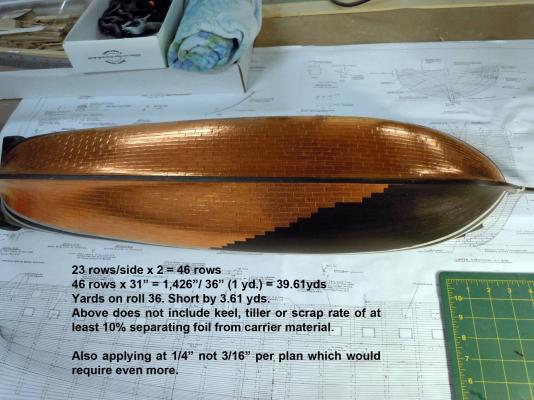
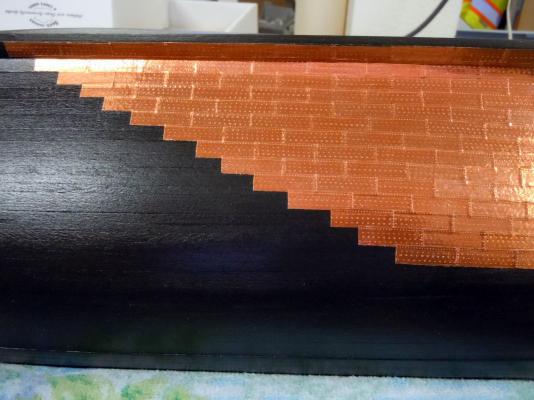
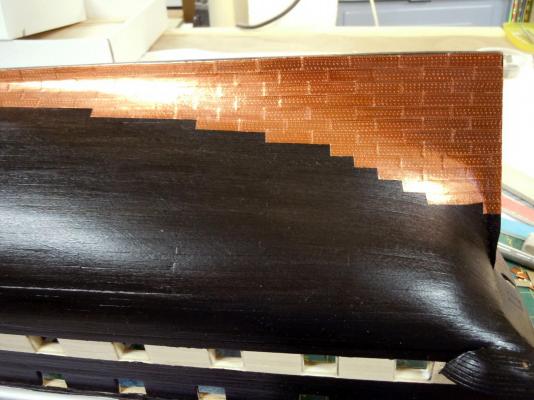
Last evening I ran out of copper foil I went back and did some math to verify and it turns out not enough is supplied on one roll to do the job using the single plate process. Also I probably did have a little higher scrap rate separating the foil form the carrier on individual plates; but not 3.6 yards worth. Just sent an email to Model Expo and will see how long it takes to get another roll. Here is where I ended up with the one roll.
-
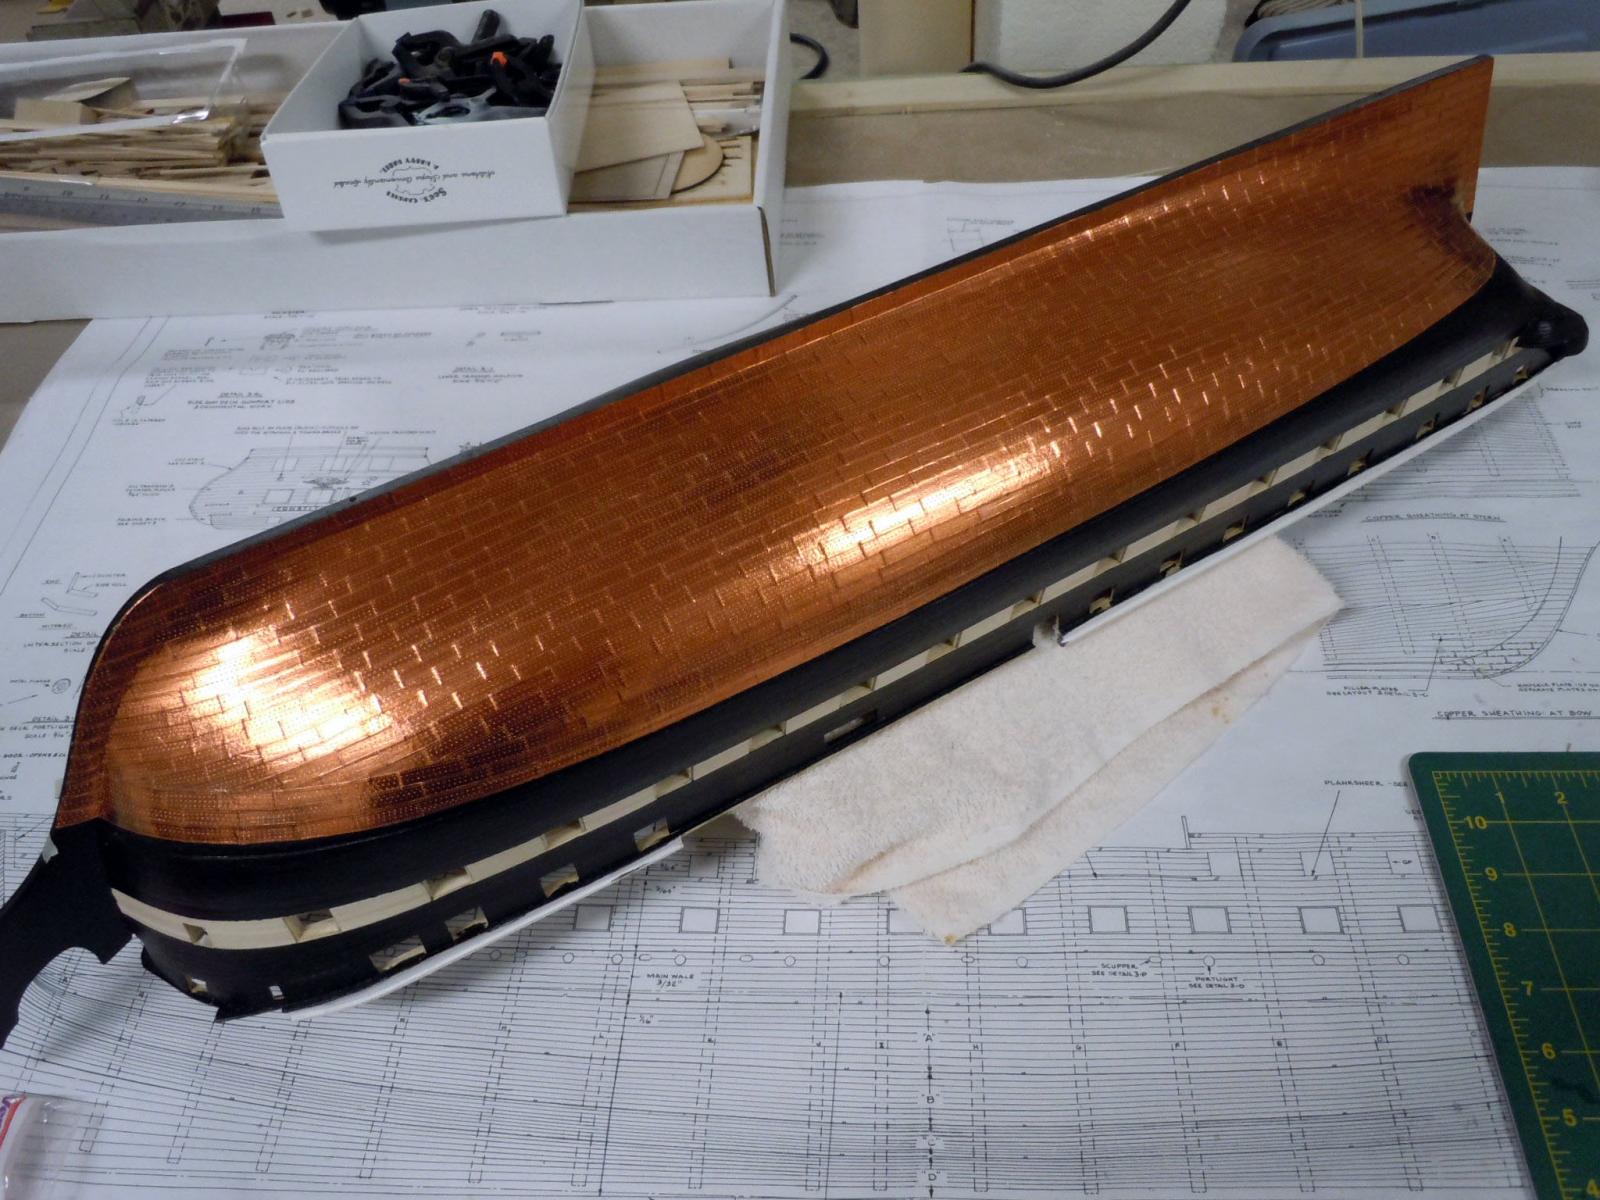
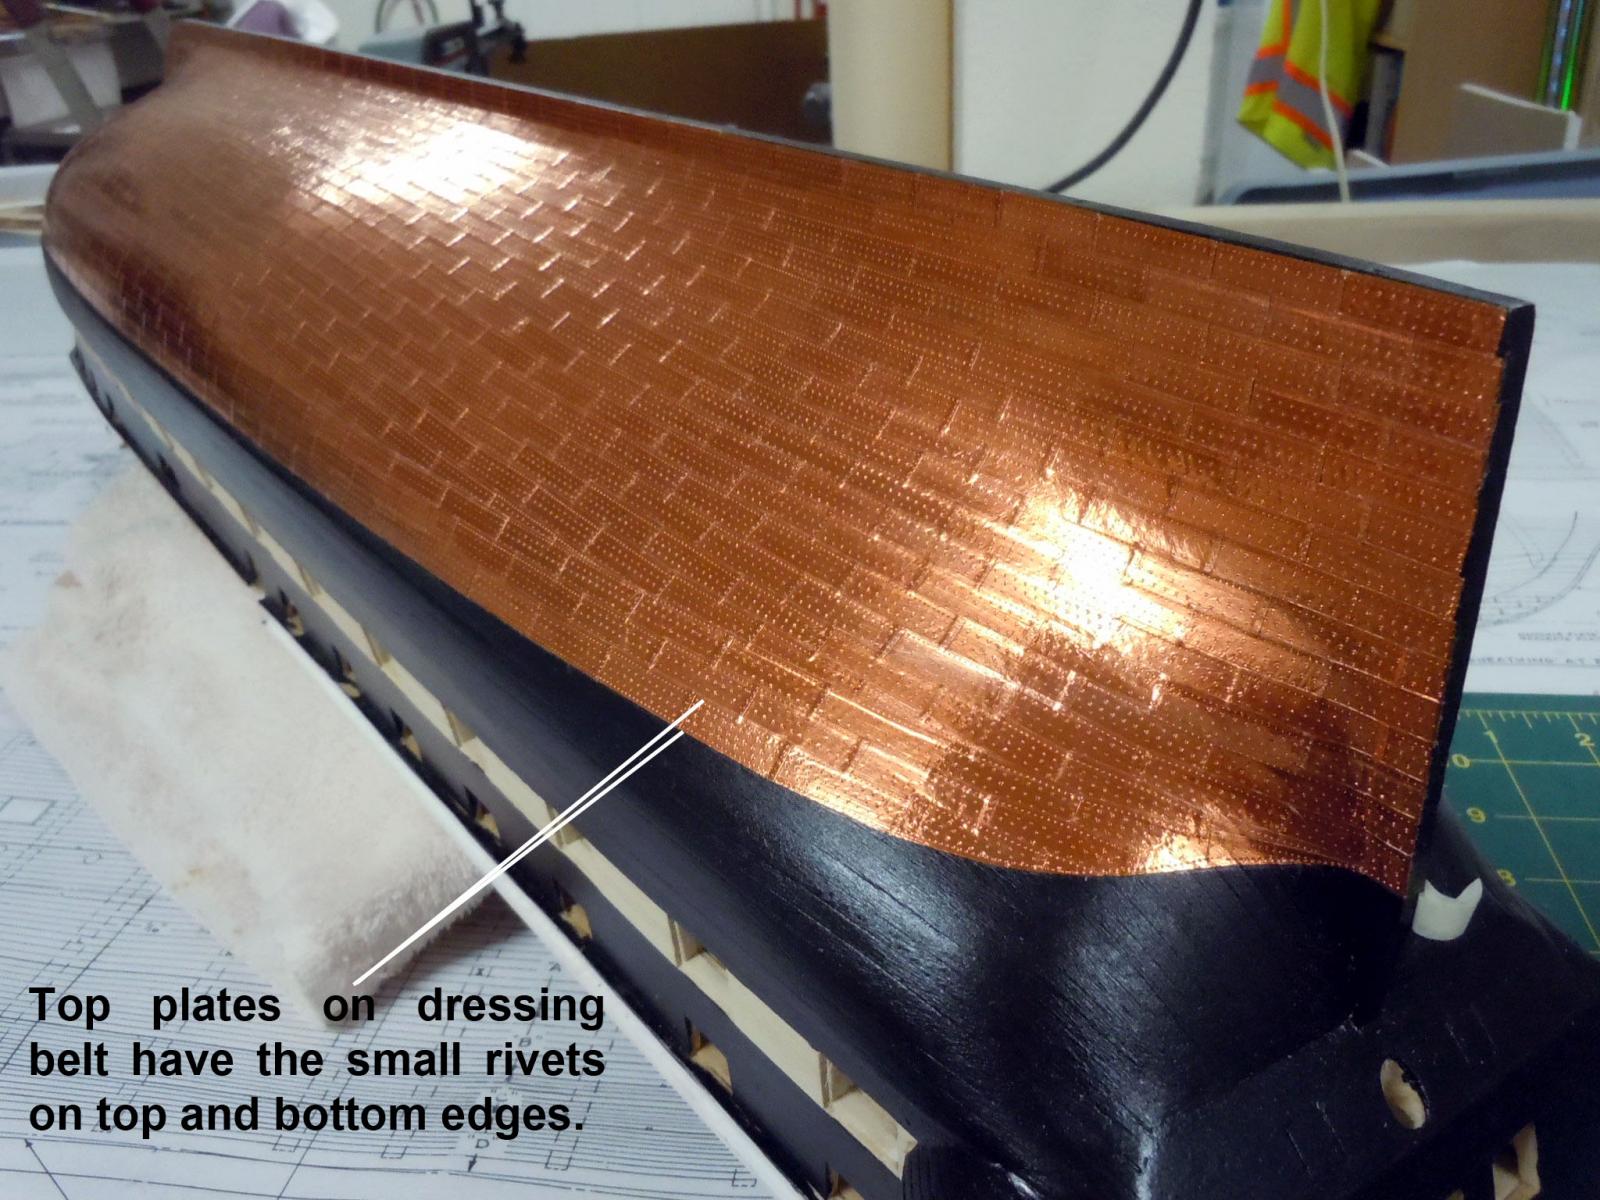
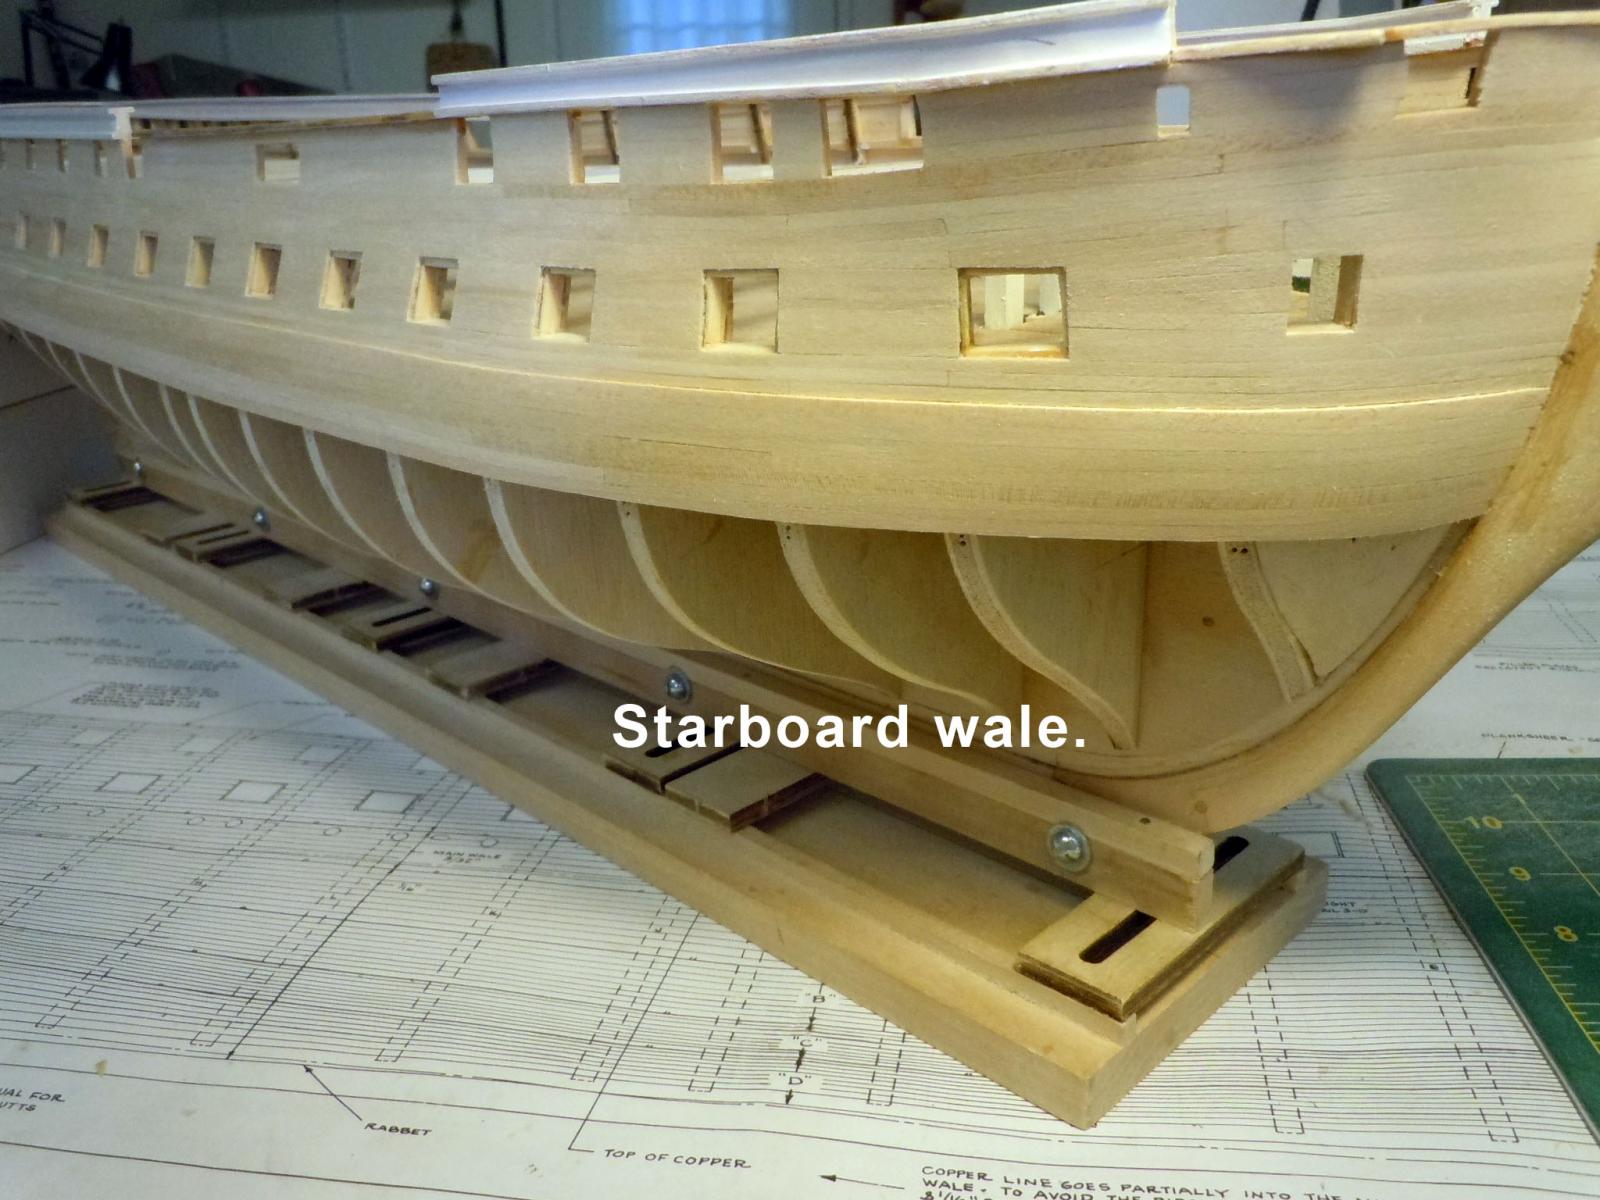
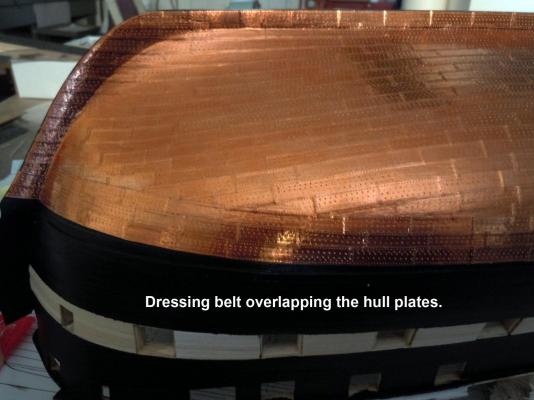
Jonathan, George, Jack thank you for your kind words. This is my first attempt at hull plating and I am posting the process I am using for the benefit of those new to ship building. In searching around I could not find a detailed process of doing it and even found incorrect applications not including the dressing belt. Here are images showing the dressing belt and how the hull plates intersect the dressing belt. Here are a couple of overall views with the second showing that the top row has the small rivets at both the top and bottom edges. In the picture of the stern area the small wheel was carefully used on the hull once the plates were cut to fit in place. Now on to plating the port side, keep in mind these will have the left edge with the small rivets. One question I do have is about the red lead paint applied on the dressing belt; it appears in photographs of the real ship to cover the three rows of the dressing belt and about half a plate dimension down into the hull plates. There is no mention of it in the instructions. I would appreciate any thought or comments others might have on this painted stripe.


-
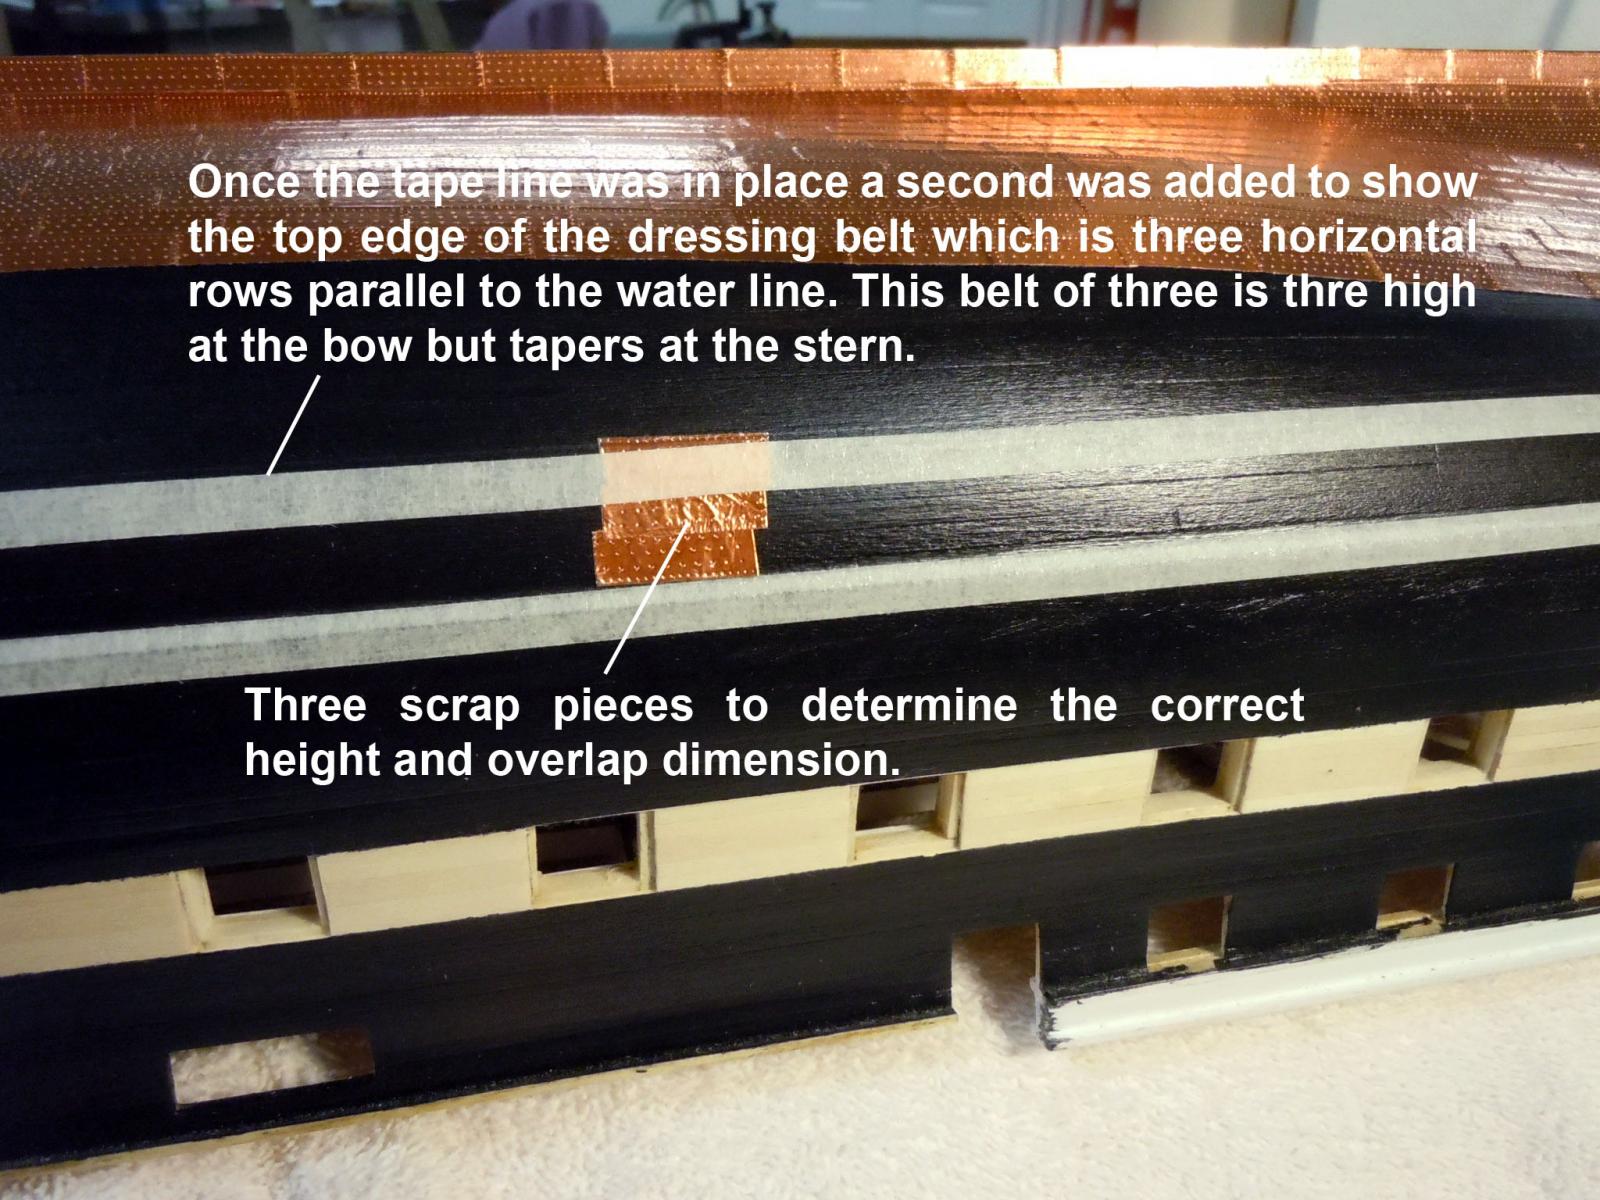
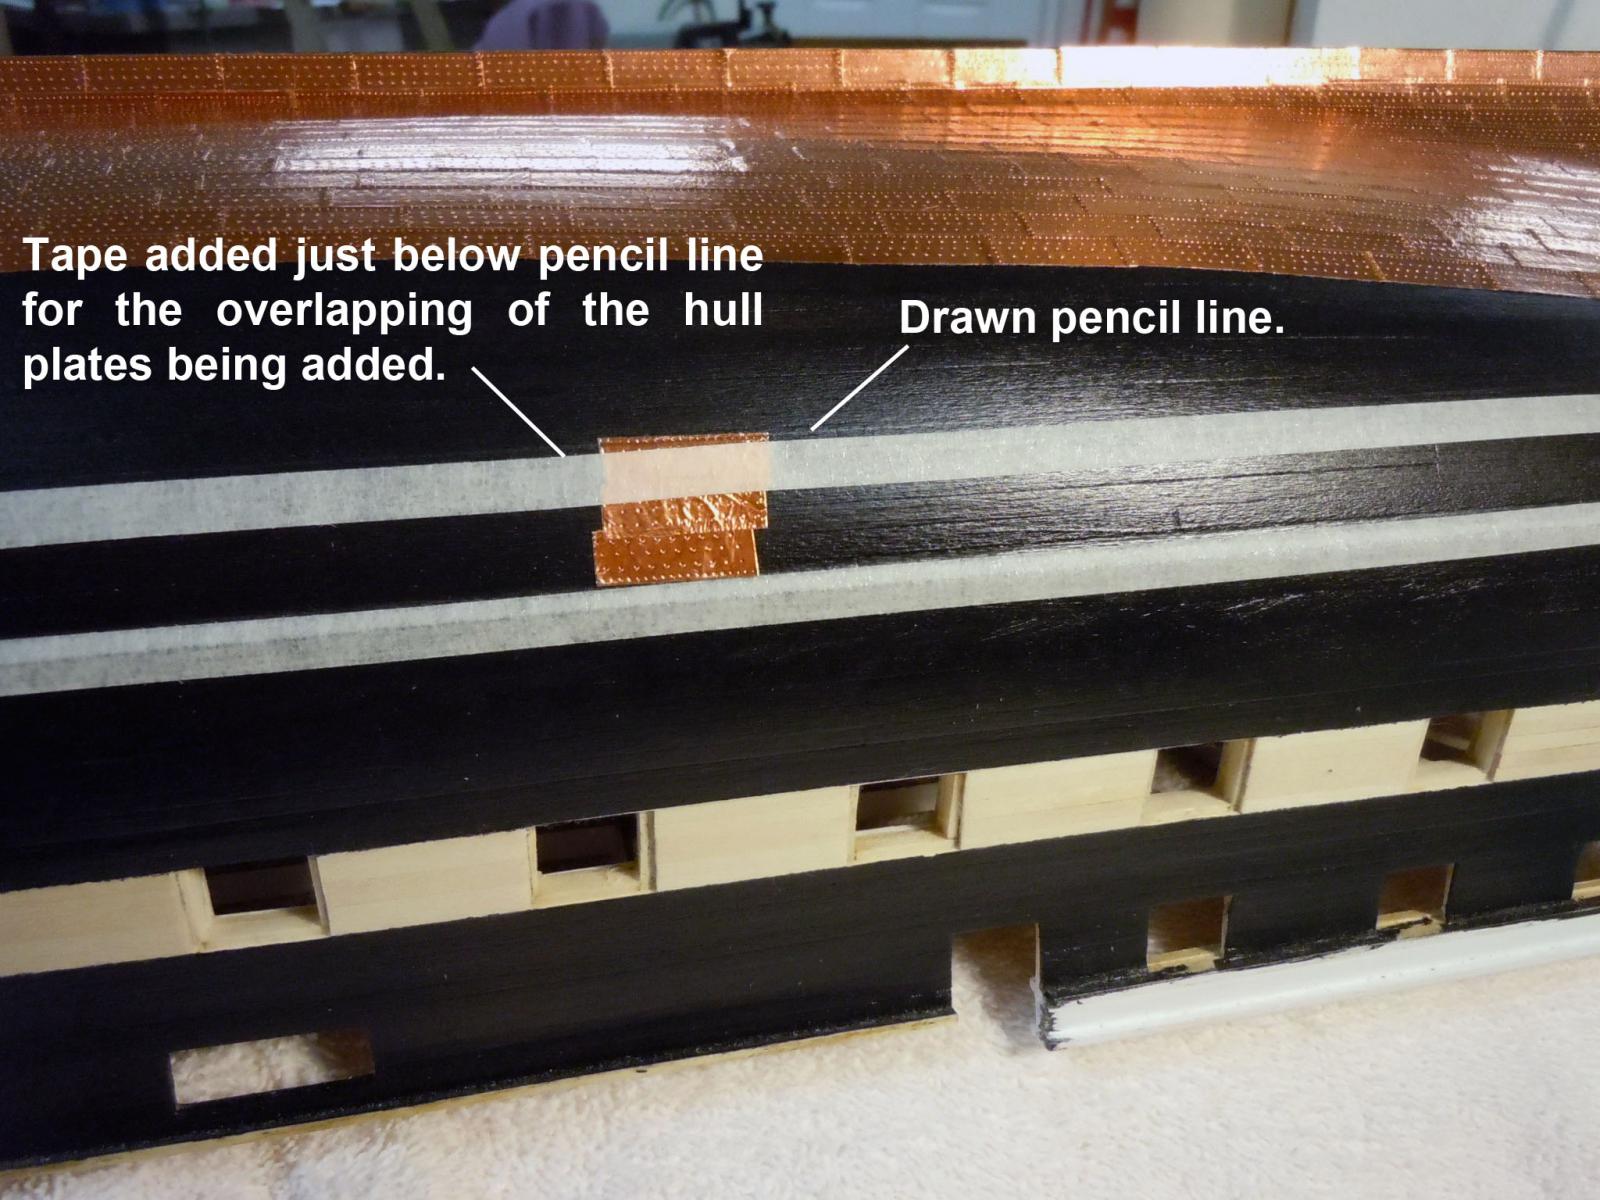
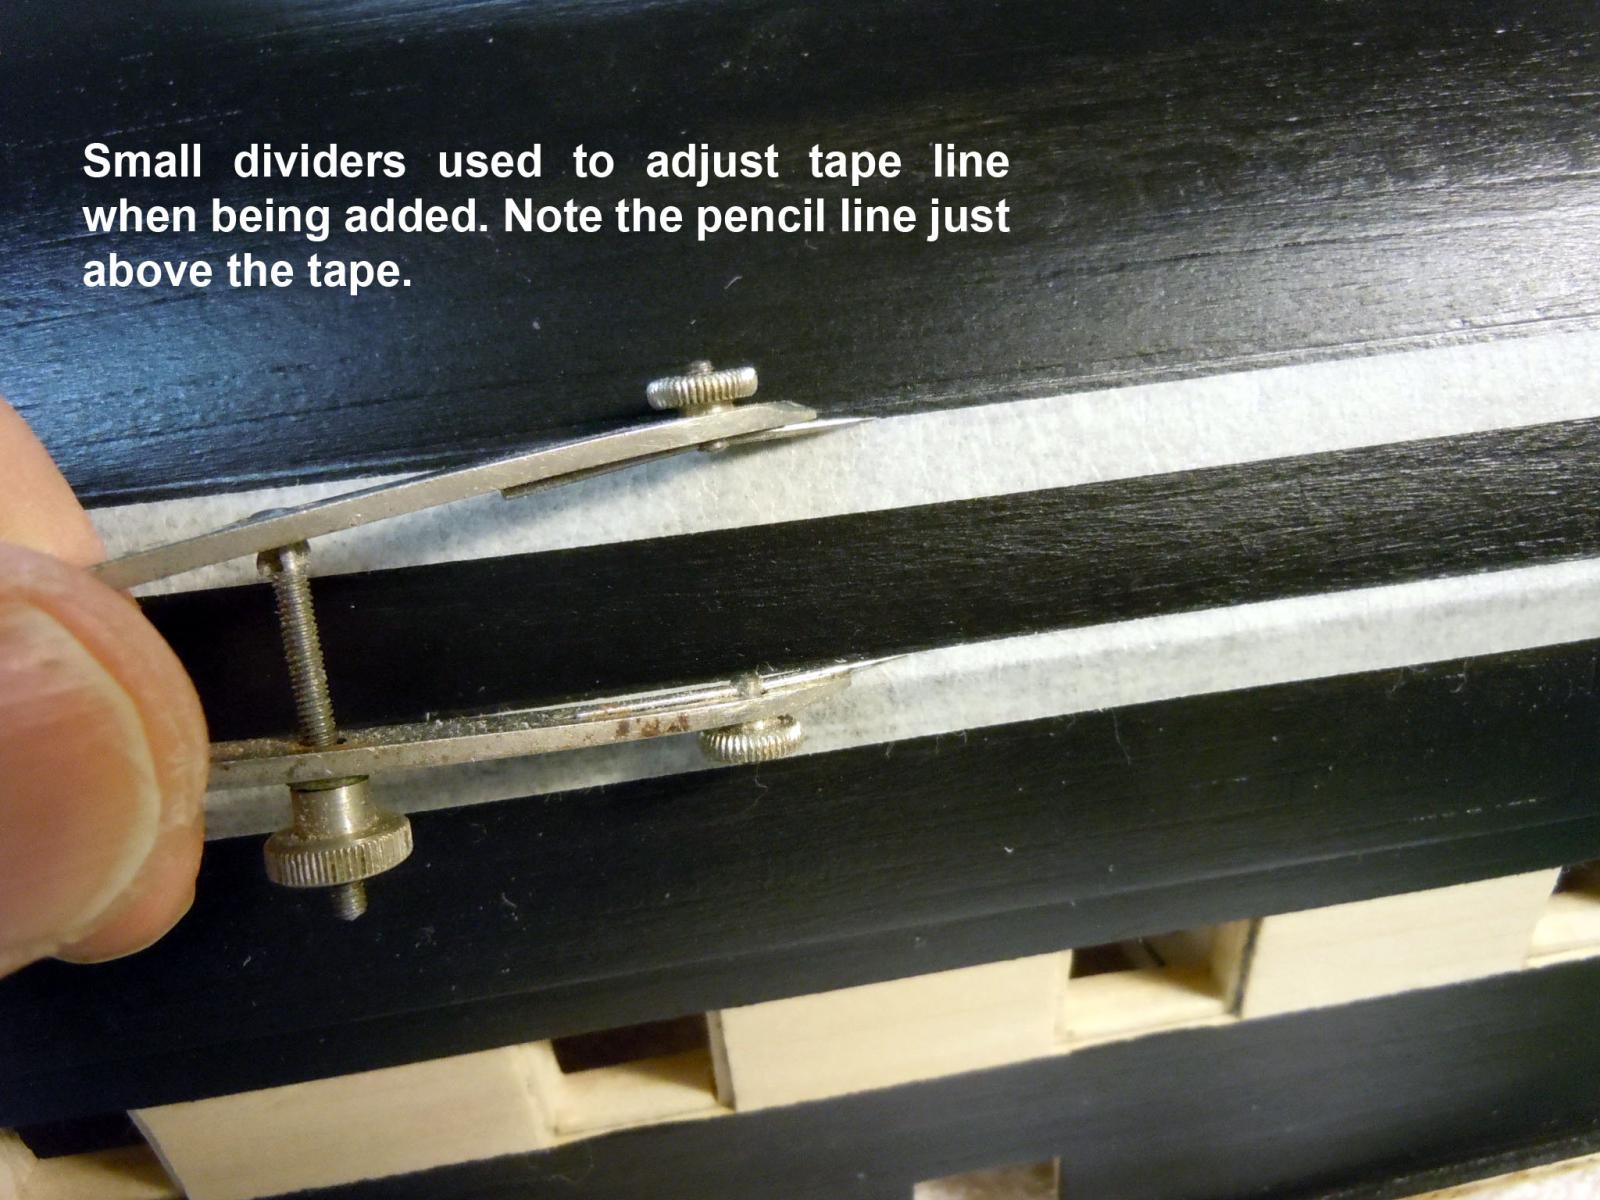
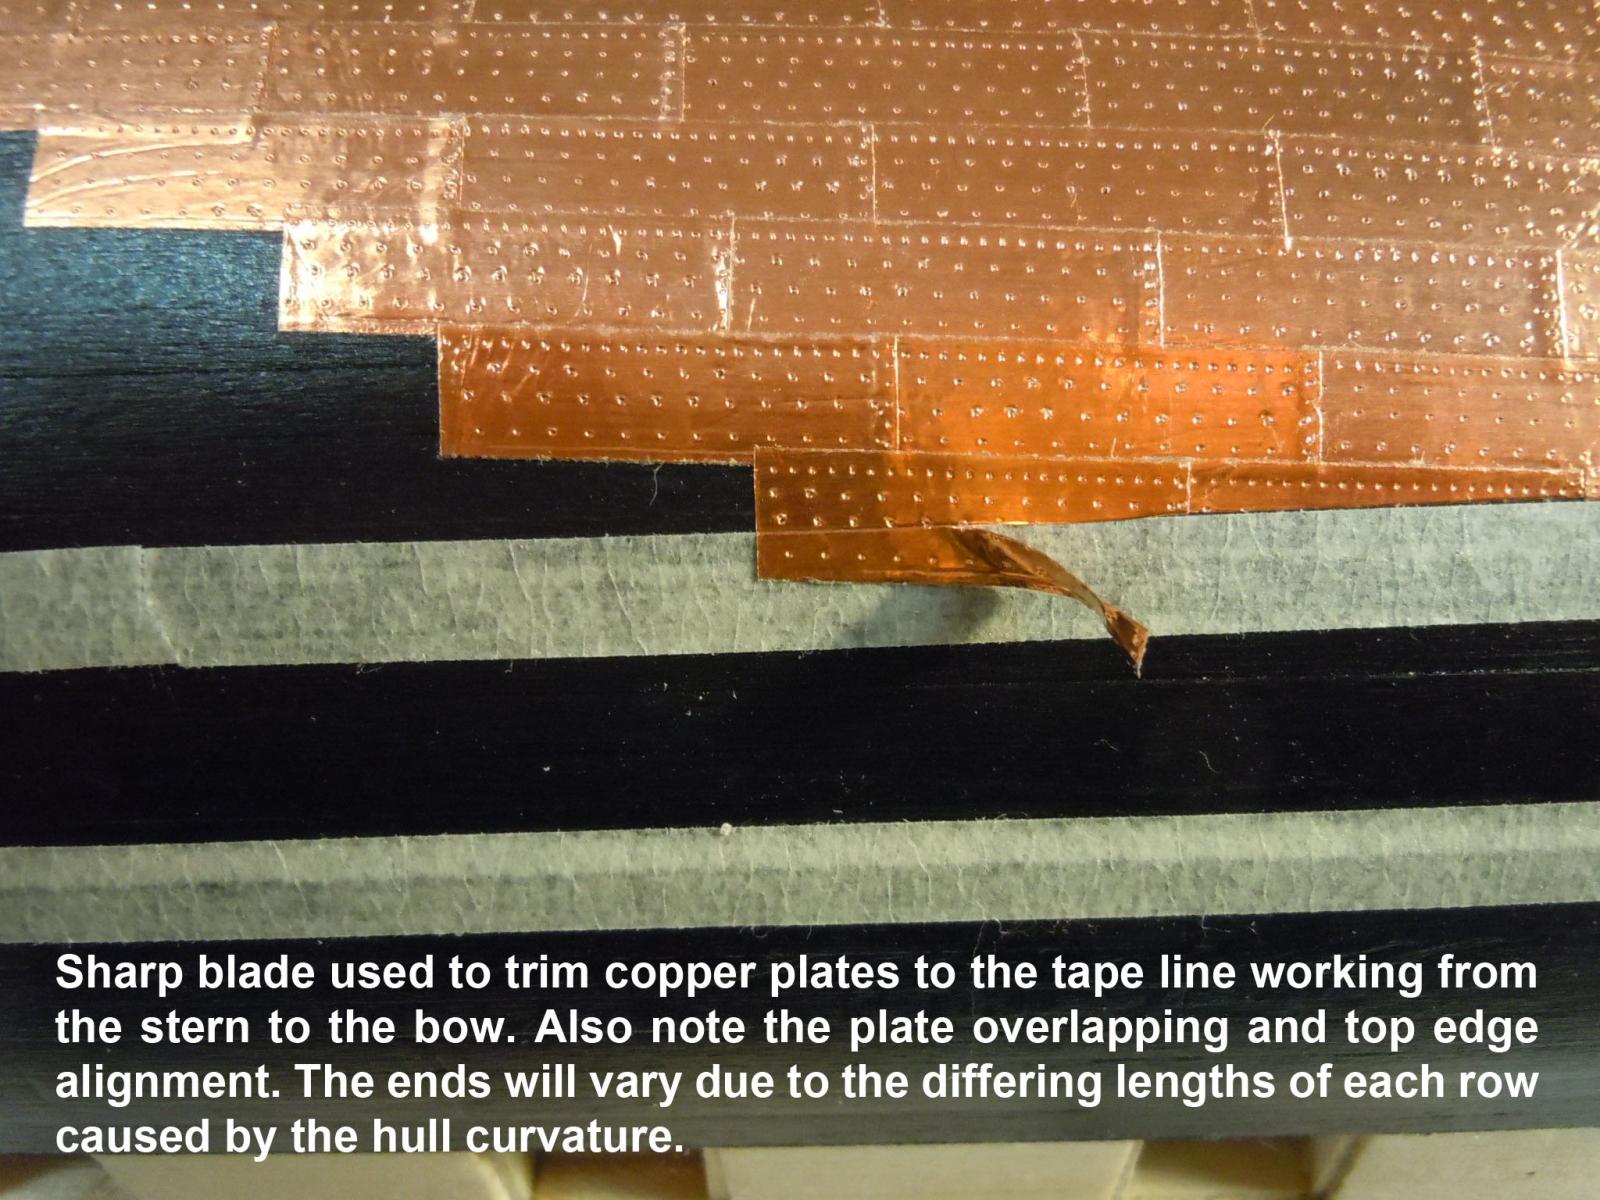
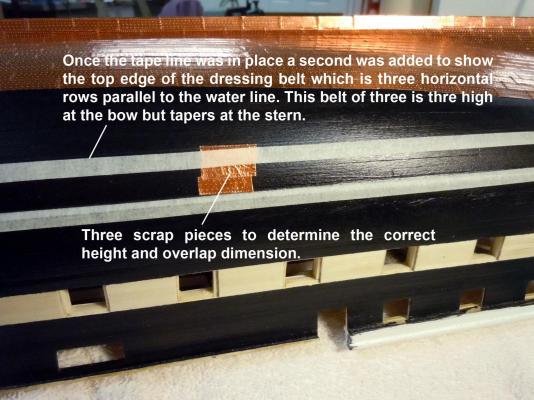
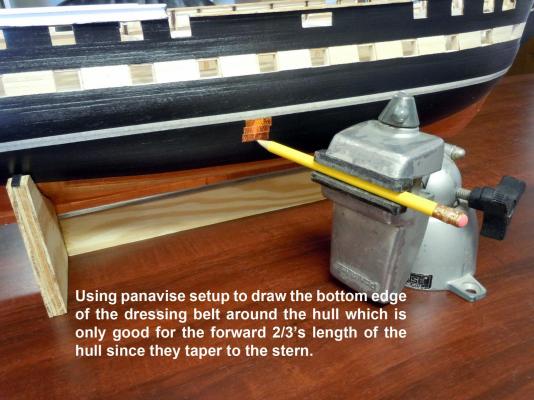
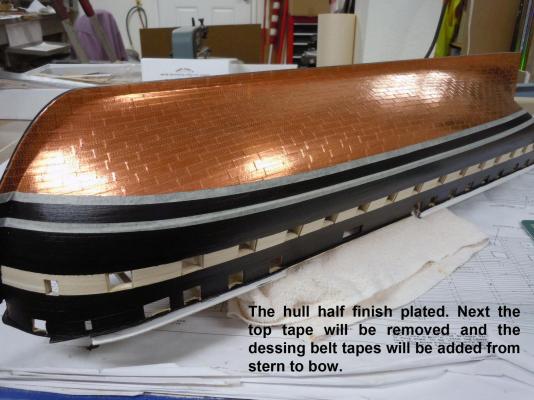
Before adding the rest of the hull plates I searched around to understand and verify the "Dressing Belt" per the plans. In looking at pictures of the real ship there was in fact three rows of plates for the dressing belt. They are full height at the bow and taper at the stern. Here is a sequence showing how I added the necessary tape lines. Also note the tape setback for the hull plates to be trimmed to and that the dressing belt will overlap. First I used my panavise to mark the line which will only be good 2/3's down the hull and then they taper to the stern. This shows the tape in place allowing for the overlap. Here I am using a divider to position and adjust the tape line. This shows the hull plates intersecting the dressing belt and being trimmed with a sharp blade for a clean cut. This shows the finished hull plates. Next the top tape will be removed and the dressing belt added starting at the stern.


-
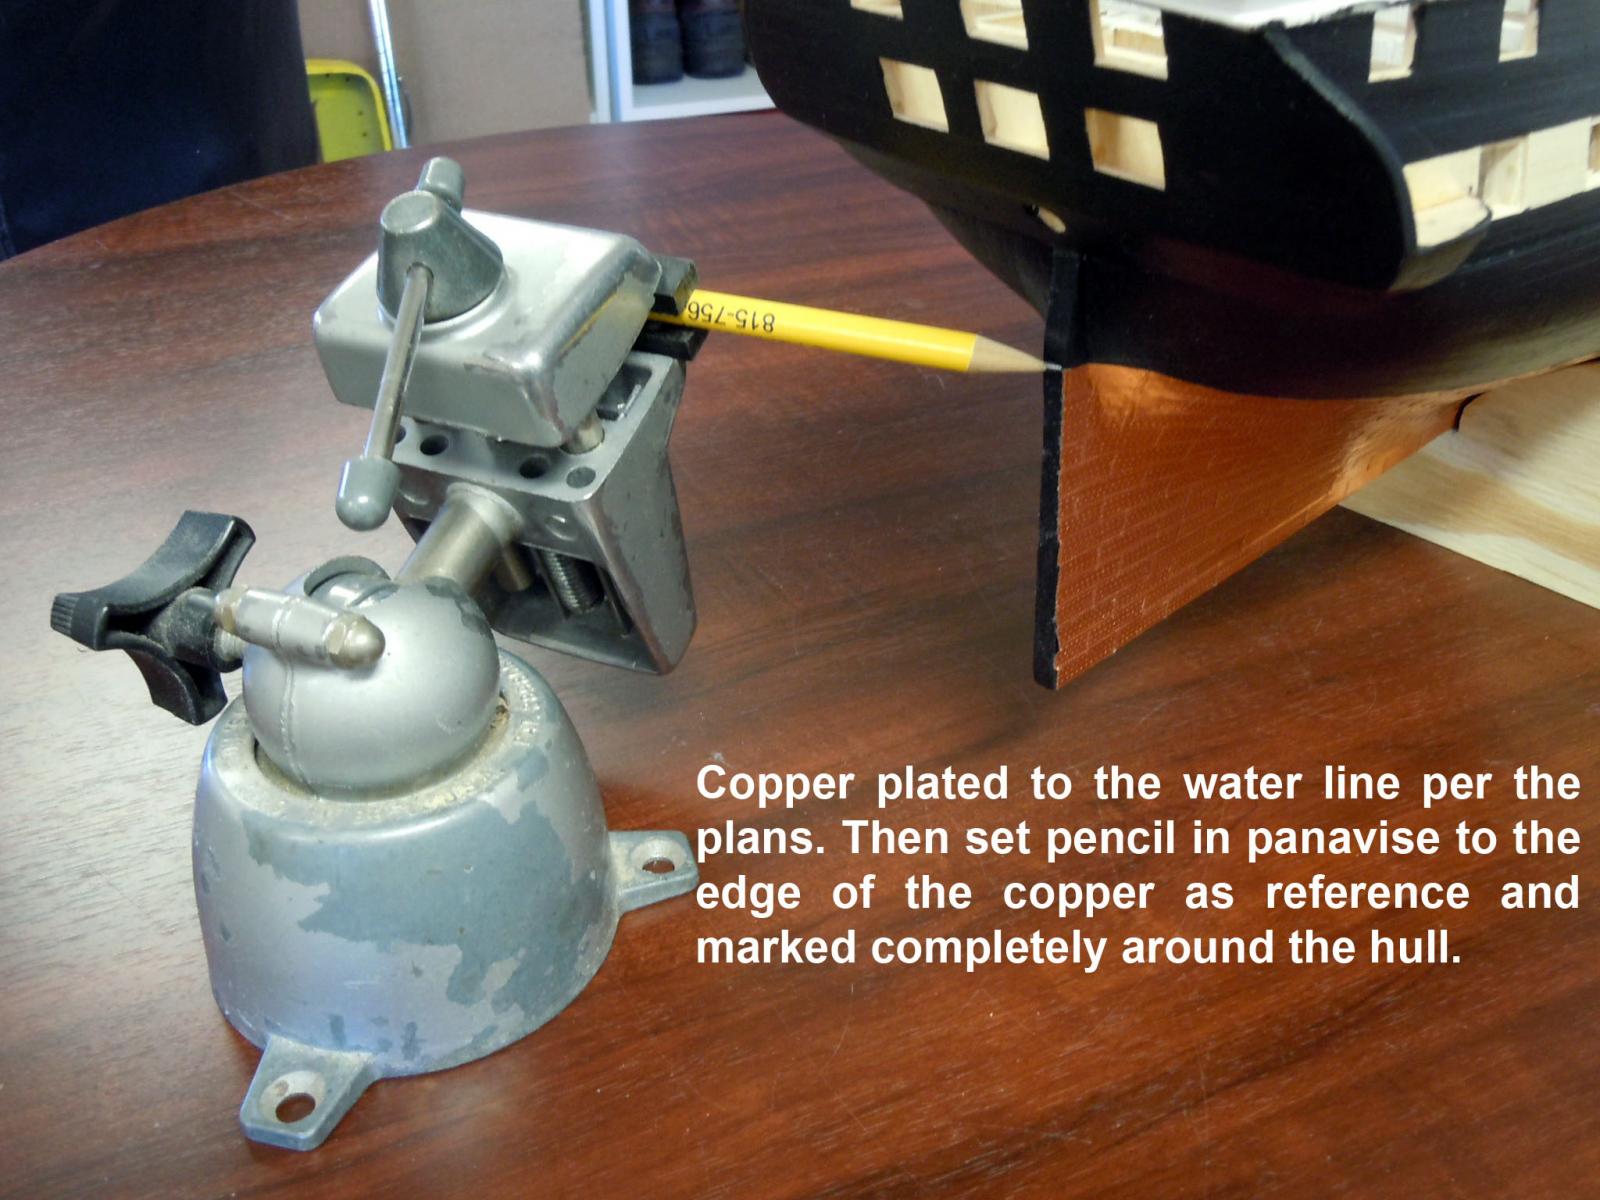
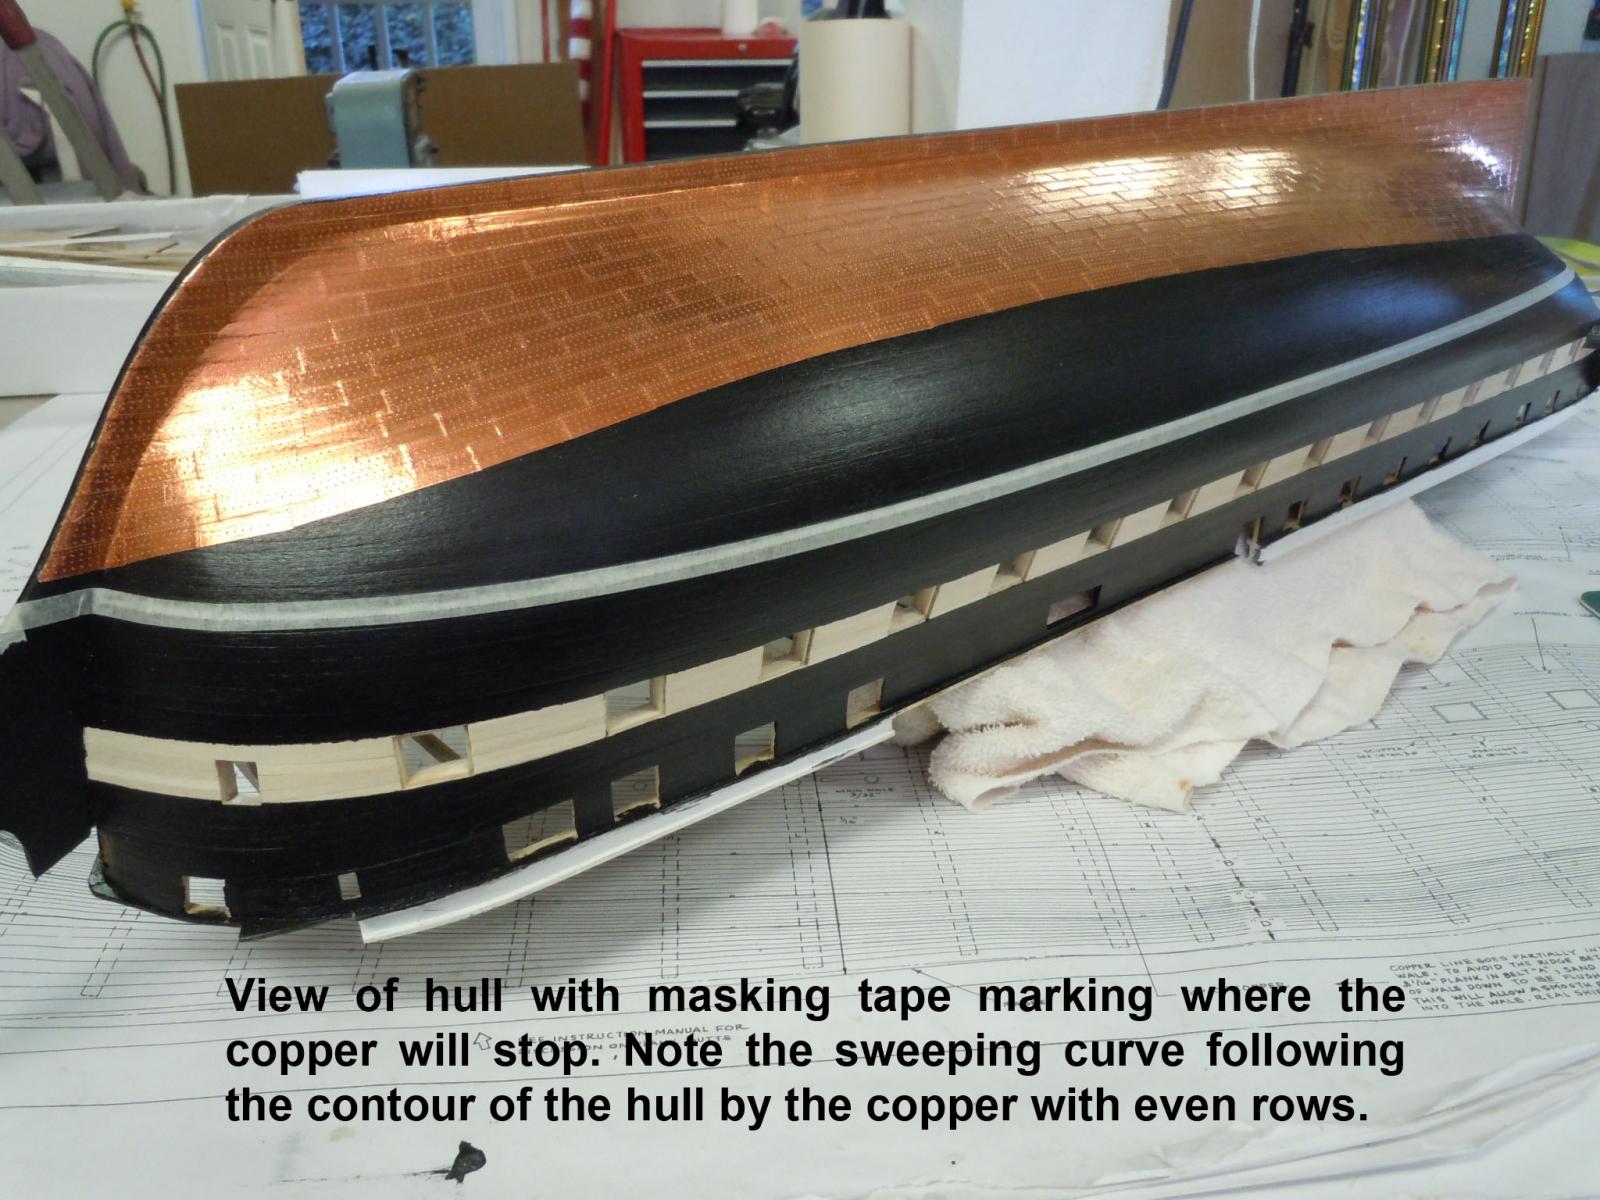
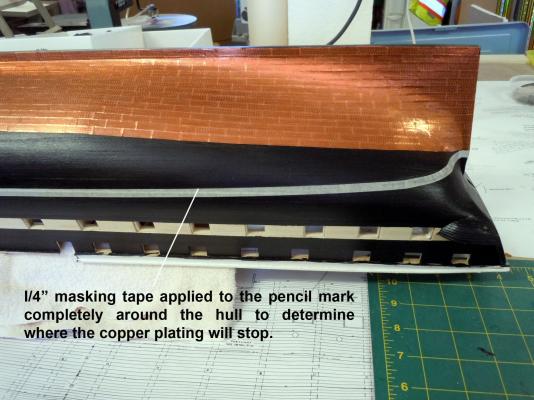
Reached a stopping point to mark off the hull where the copper will end. Rigged up my trusty panavise with a pencil and set it to the copper edge at the stern which ends at the water line based on the plans. The hull was set in the working cradle and leveled fore and aft and port to starboard and then marked the pencil line. Once the line was completed I then removed the hull from the cradle; inverted it and applied 1/4" masking tape on the pencil line which was easy to see even though it was on the black hull. Here is a view down the side showing the sweeping curve that developed applying the copper plates. This shows 14 rows of plates. Now back to plating and will be checking photographs for how the plates terminate at the water line.


-
Jonathan, just stopped by to check out your w order foul build. Keep up the great work! I saw the dialog about machines and if you are pondering purchaseing machines check out Sherline Inc. they are incredible machines with a full line of accessories. I use my lathe for all my wood turning as well as metal.
-
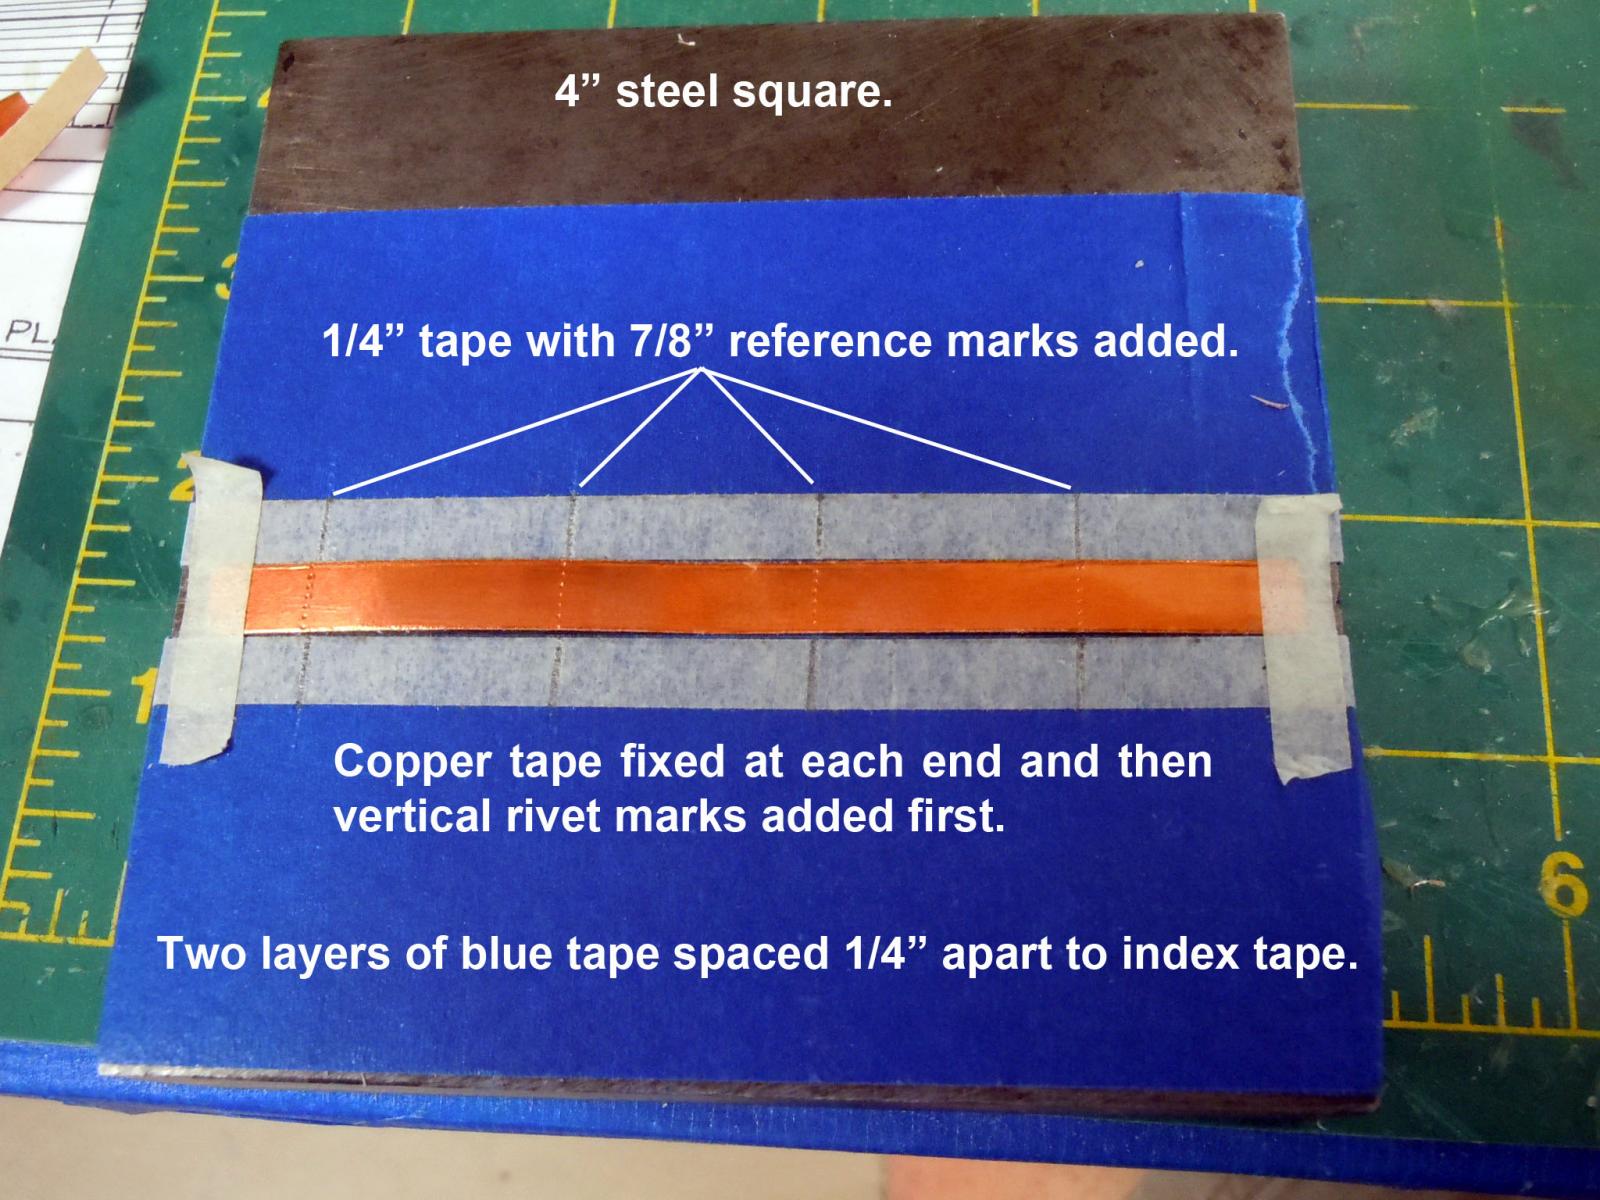
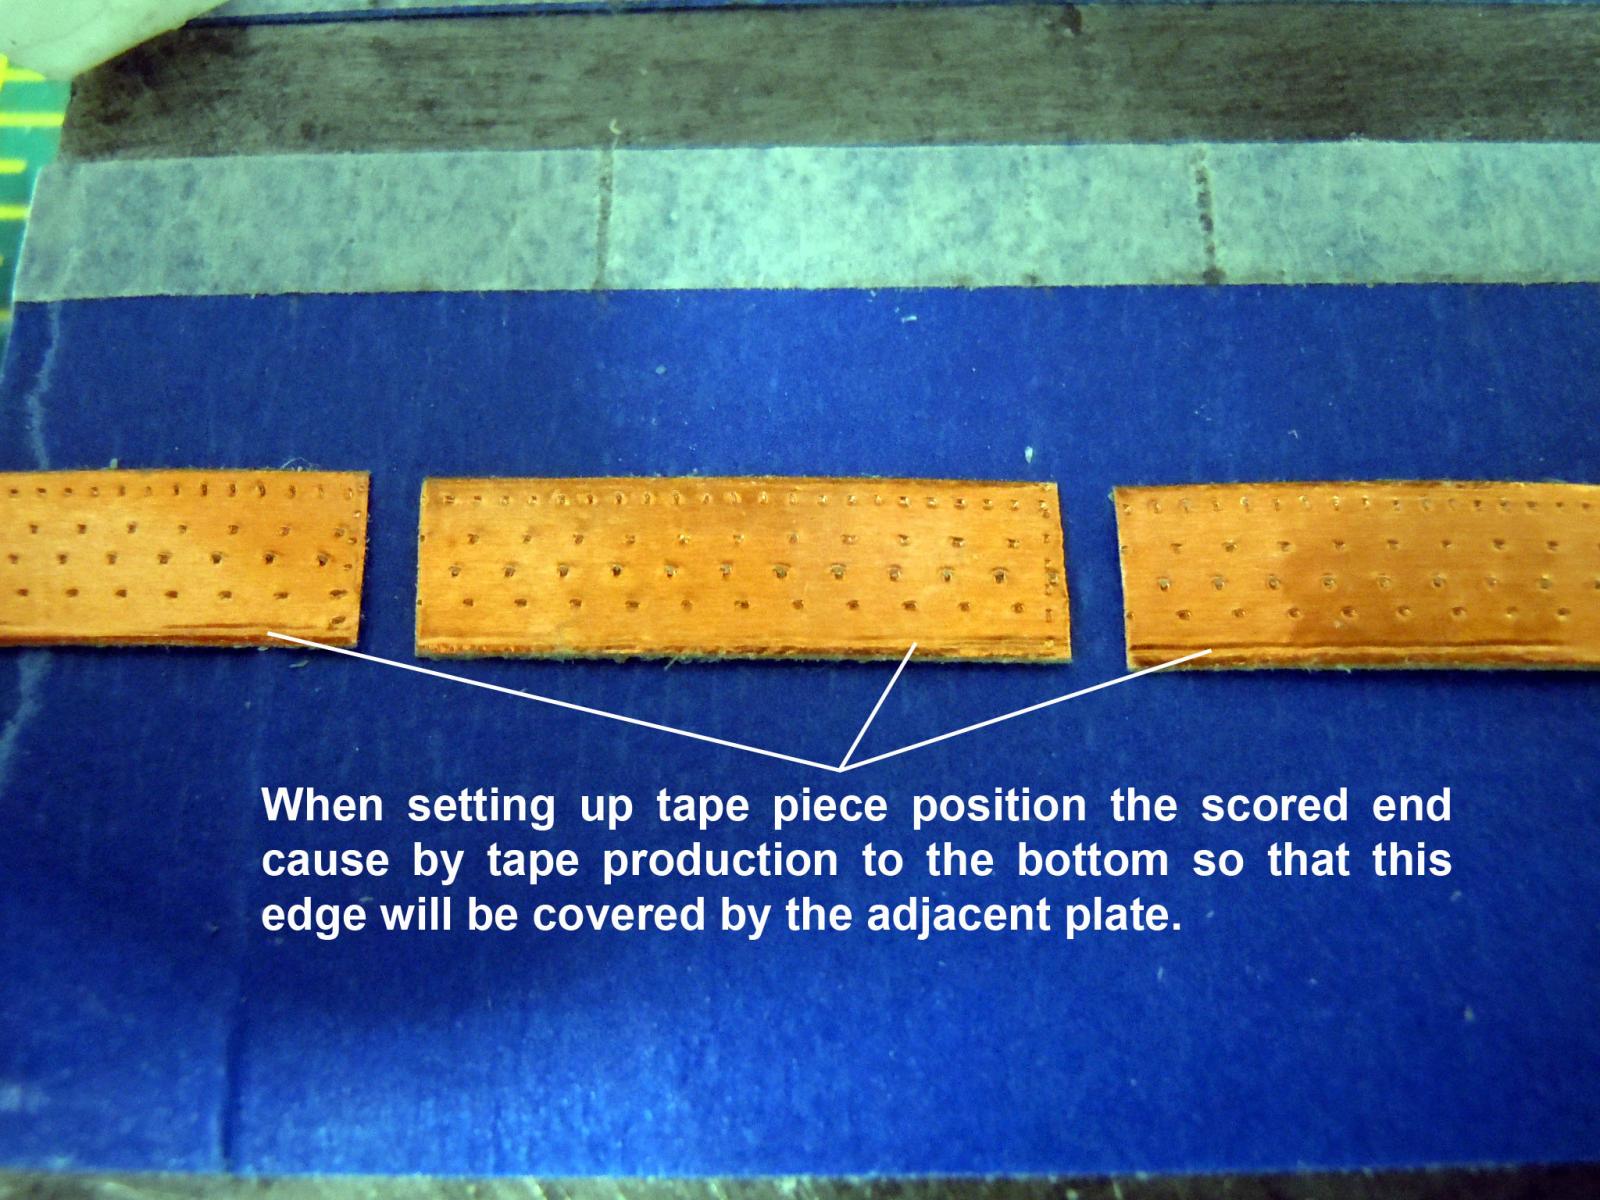
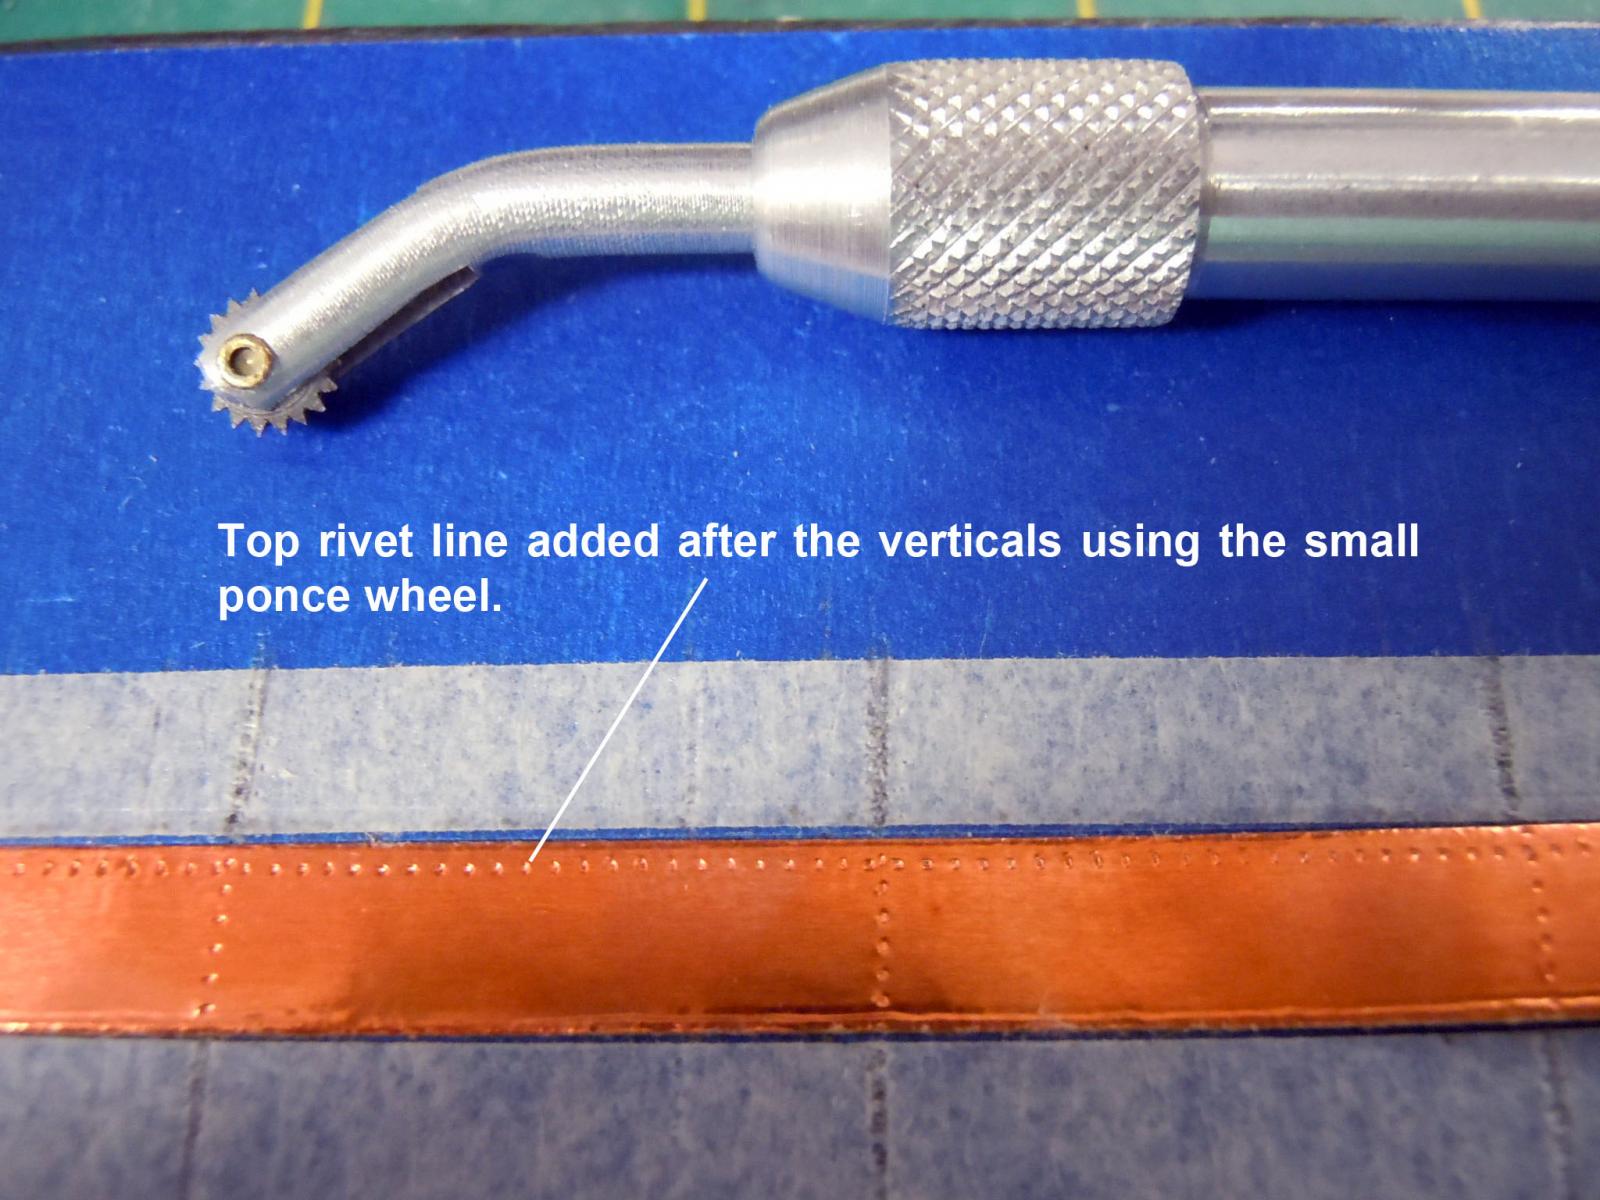
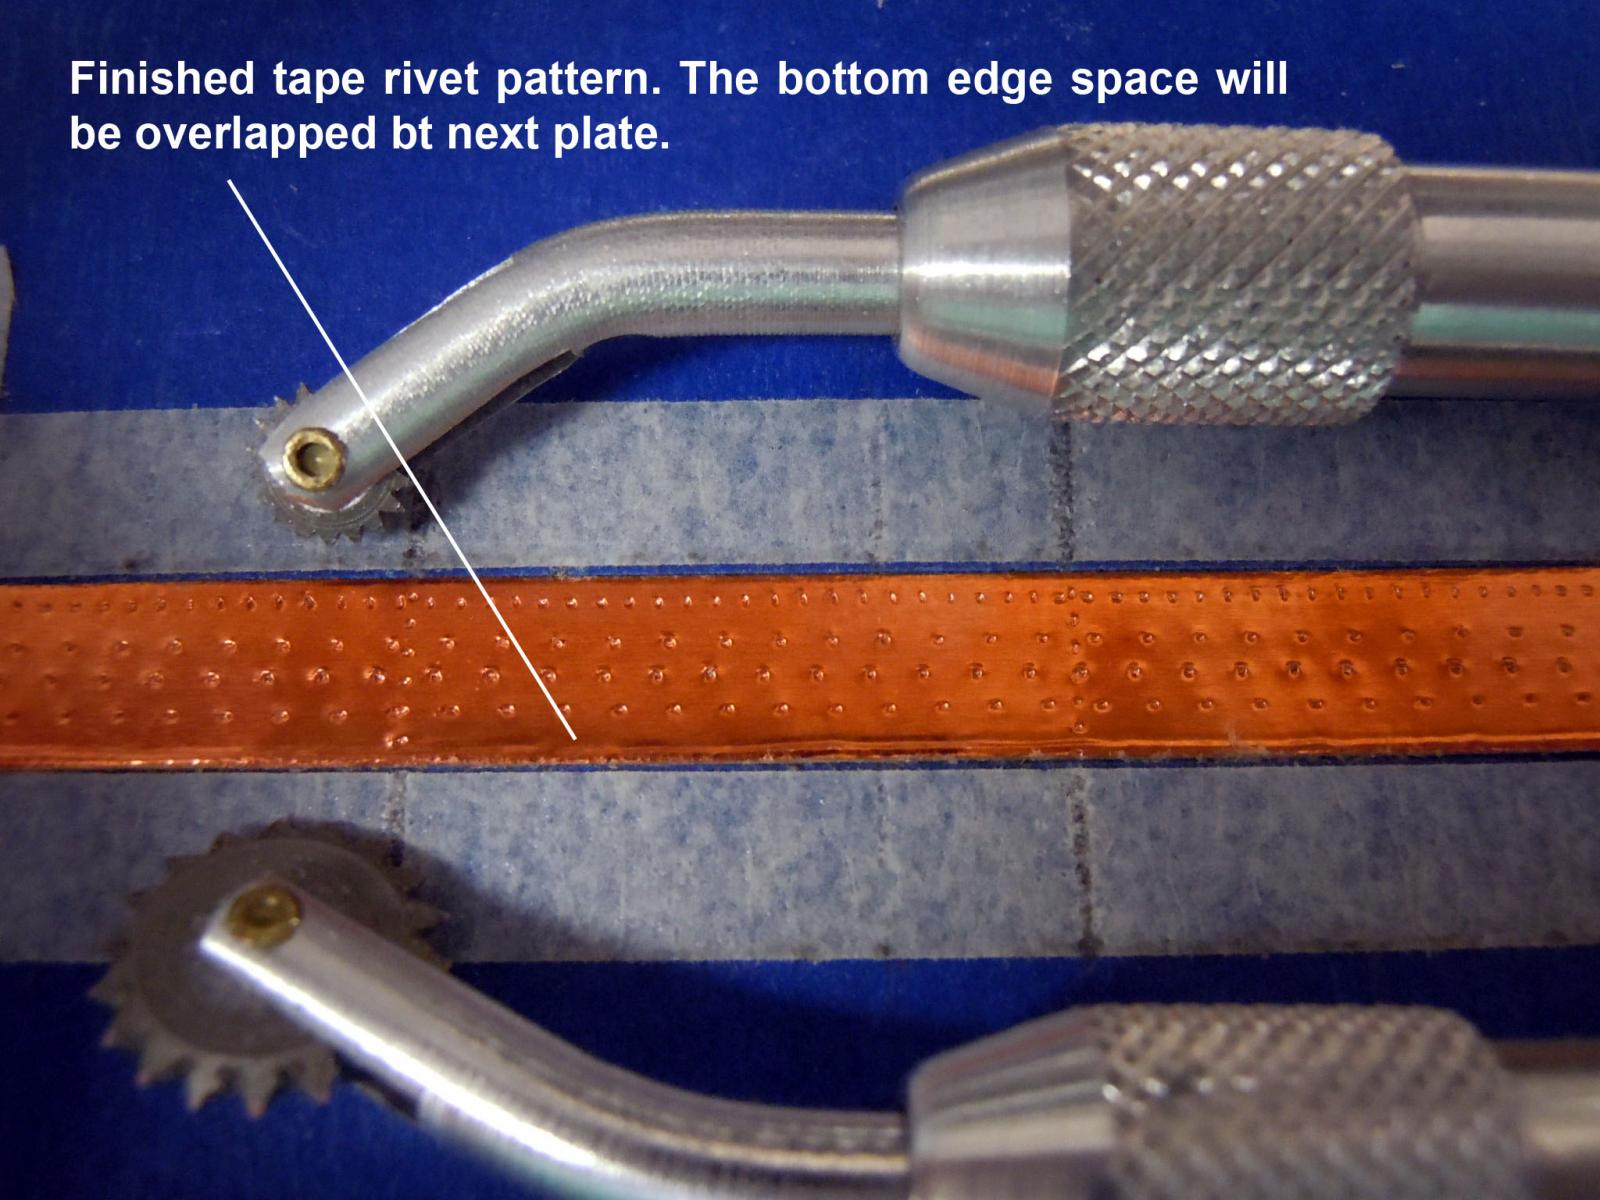
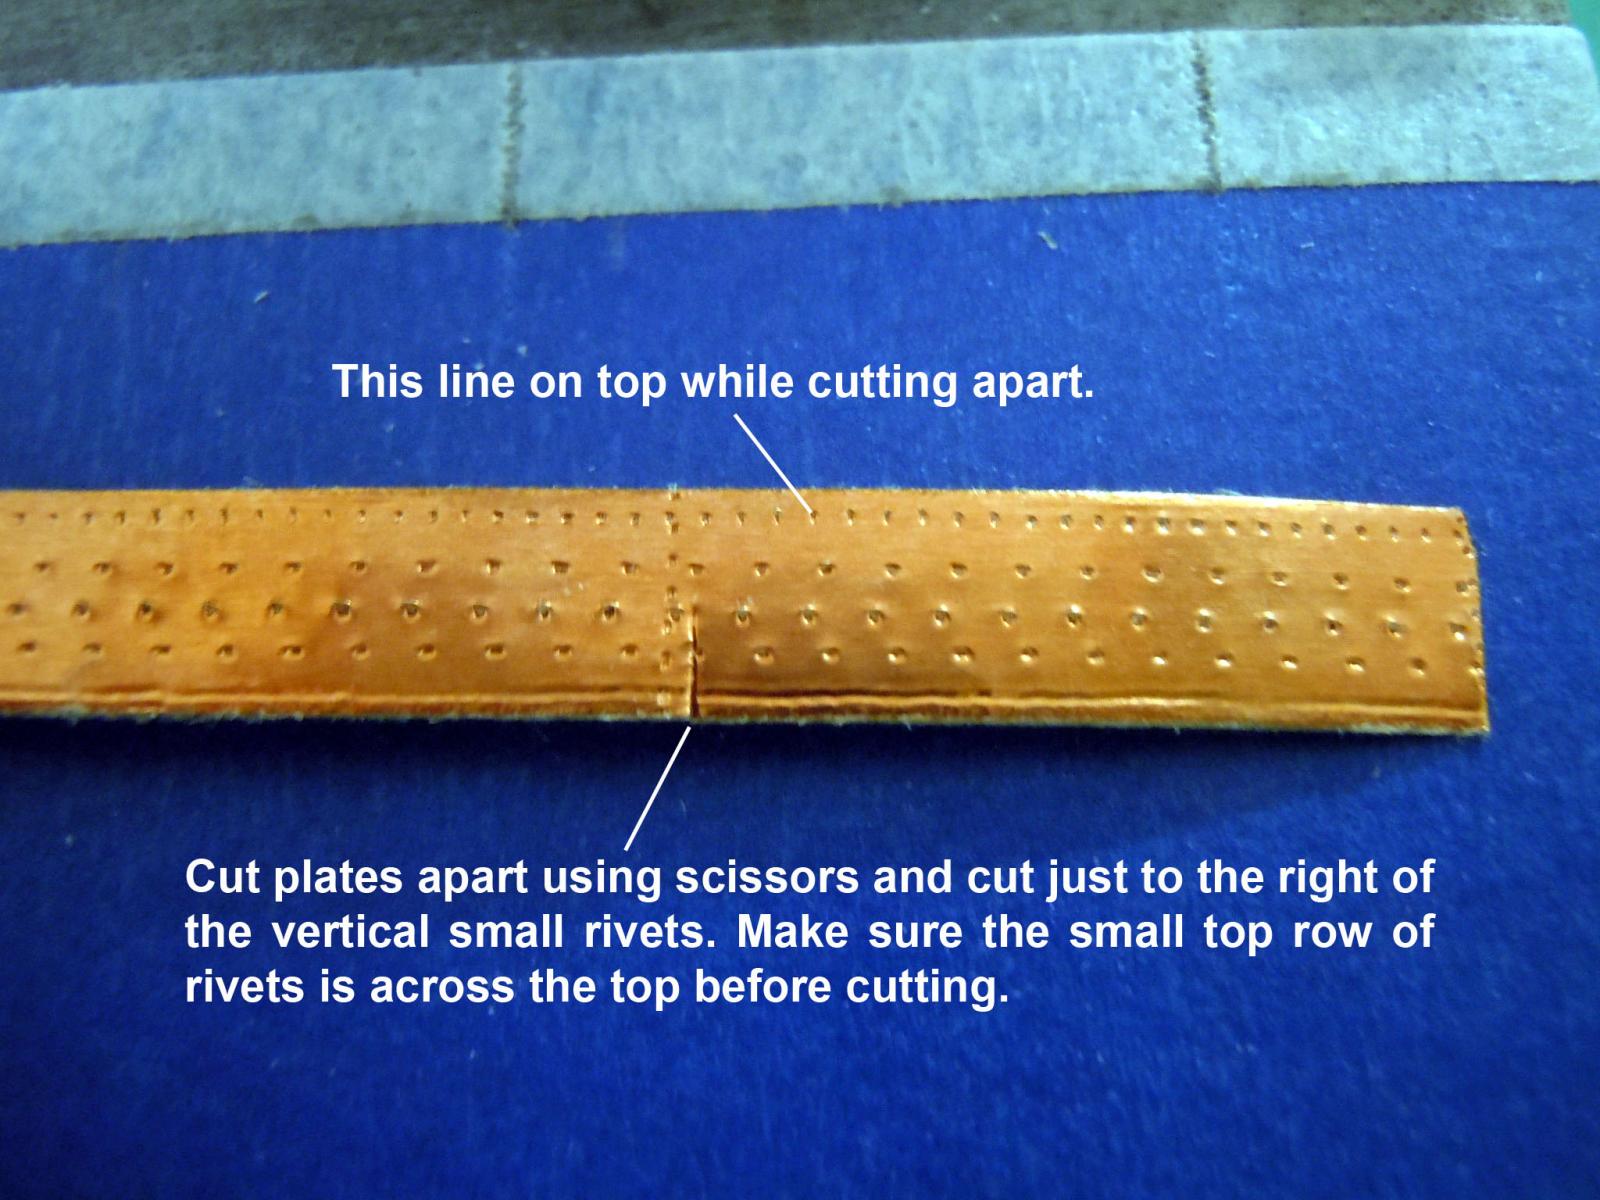
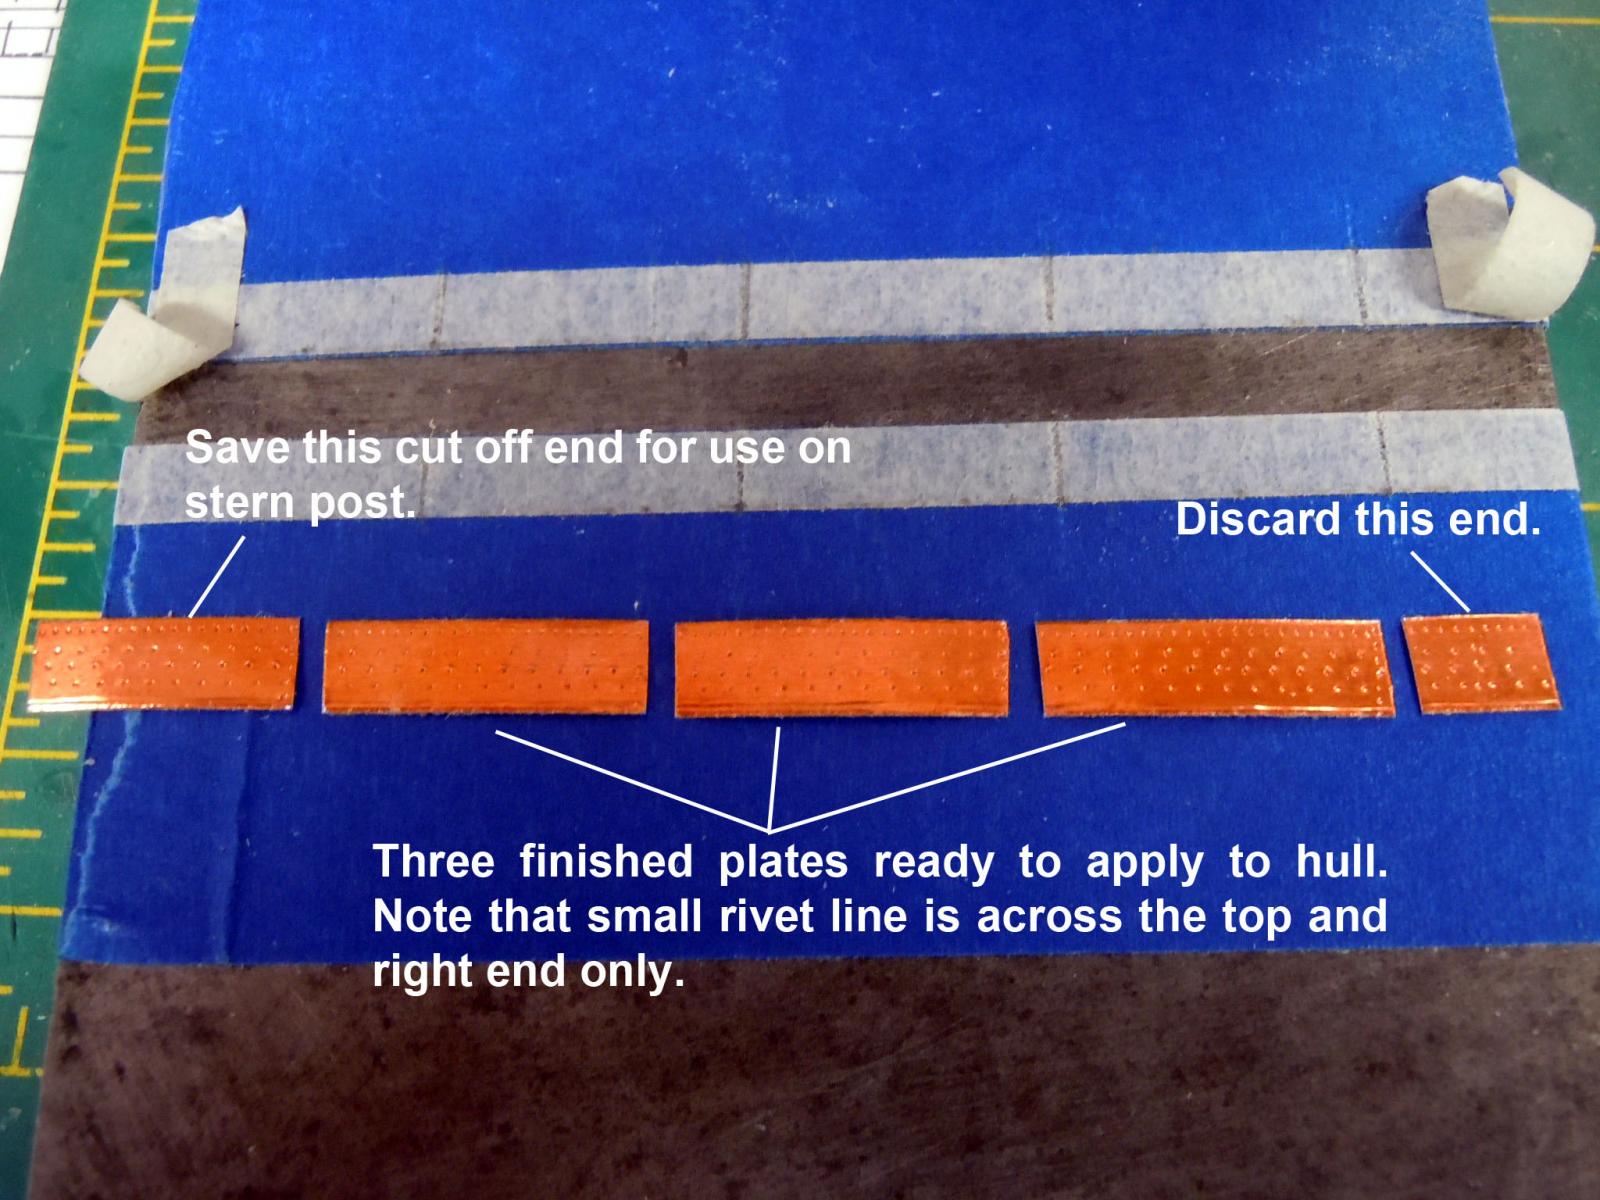
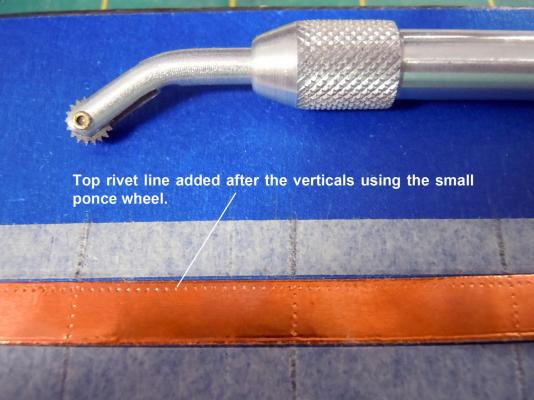
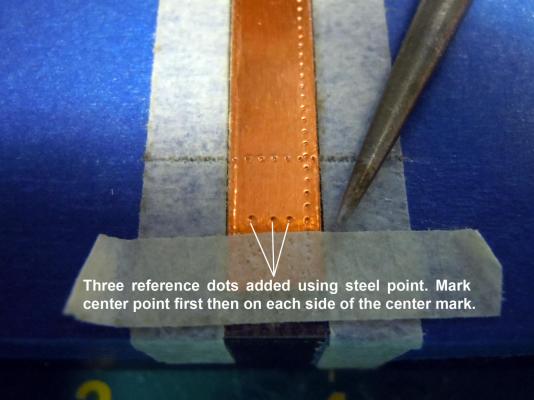
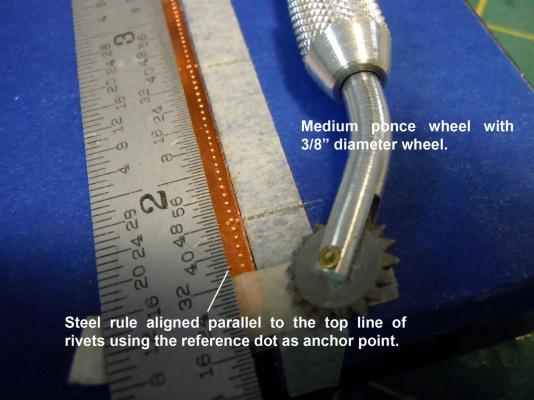
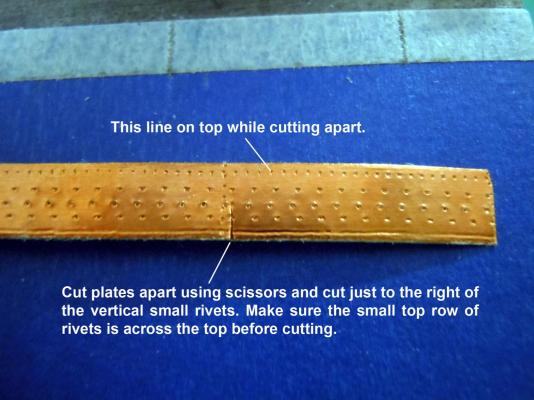
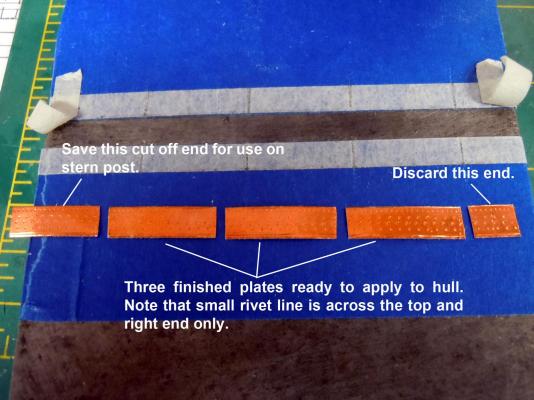
Mike, Thanks for the link to the green stain I will have to look into getting some. I think the white may just have to be paint with a little thinning to reduce the build up. Here is a sequence on making the individual plates. I believe in the KISS principle in building processes so you will see a simple but effective fixturing to get three plates at a time. I started using a 4" steel block for these reasons; it is movable, provides finger clearance from the work table, allows a hard surface for the wheels to work against resulting in consistent crisp rivet indentations; and allows firm grip of 6" rule as the guides for the wheels to run against. One thing to keep in mind that the copper foil tape may have one crimped edge for the production process and this edge should be positioned along the bottom edge and will be covered by the over lapping plate. This shows how the steel block is taped with both wide blue and regular 1/4" tapes. Make sure the top blue tape is aligned to the top edge of the block so a square can be used to mark the vertical reference lines. Then both the verticals and the top edge marks are added with the small wheel. Then the square can be turned to add reference dots for the center area lines. Locate the center dot first and then the additional two spacing them evenly. I did all by eye. Now align the edge of the 6" thin rule to the top dot and parallel to the row of small dots and using the larger wheel add the three rows aligning each to the previous row and to it's reference dot. Take care not to press the wheel too hard and move the tape out of position. Practice a couple to get the feel of both wheels. Also check the wheel head for wheel wobble side to side. If needed carefully tap the center pivot rivet with a small hammer and sneak up on the tightening, don't hit too hard or you can lock up the wheel. I had to do this with the large wheel. This is what the tape should look like with all rows in place. Now with sharp scissors and working under a desk light to highlight the dots cut the plates apart. Note keep the small dot top row up and cut just right of the small dot vertical line. Here are the plates cut apart. Note save the longer left end for keel and bow work. Here they are in place brick work style. I use the #11 Xacto blade to separate the tape backing from the foil with the foil face down with backing up along the edge of the steel block (this will require a little getting use to to do) I hold the foil flat on the tape with the blade and slowly remove the backing. The foil on the end of the blade can carefully be straightened out and I position the lower right corner on the existing plate on the hull and align the edges parallel with the ones above and press into position with my finger from right to left. If re-positioning is needed now is the time to do it; otherwise I firmly press the plate in place using the edge of my thumb nail or finger whichever works best based on location. Once in place repeat for all adding from stern to bow and down from the keel to waterline. Now back to more plating.


-
Jonathan, here is the set that I have from MicroMark which I purchased years ago when building WWI planes. http://www.micromark.com/3-piece-pounce-wheel-set,6668.html If you are not familiar with these folks get a catalog from them; they also have a wood yard as well. Just remember one can never have too many tools!
-
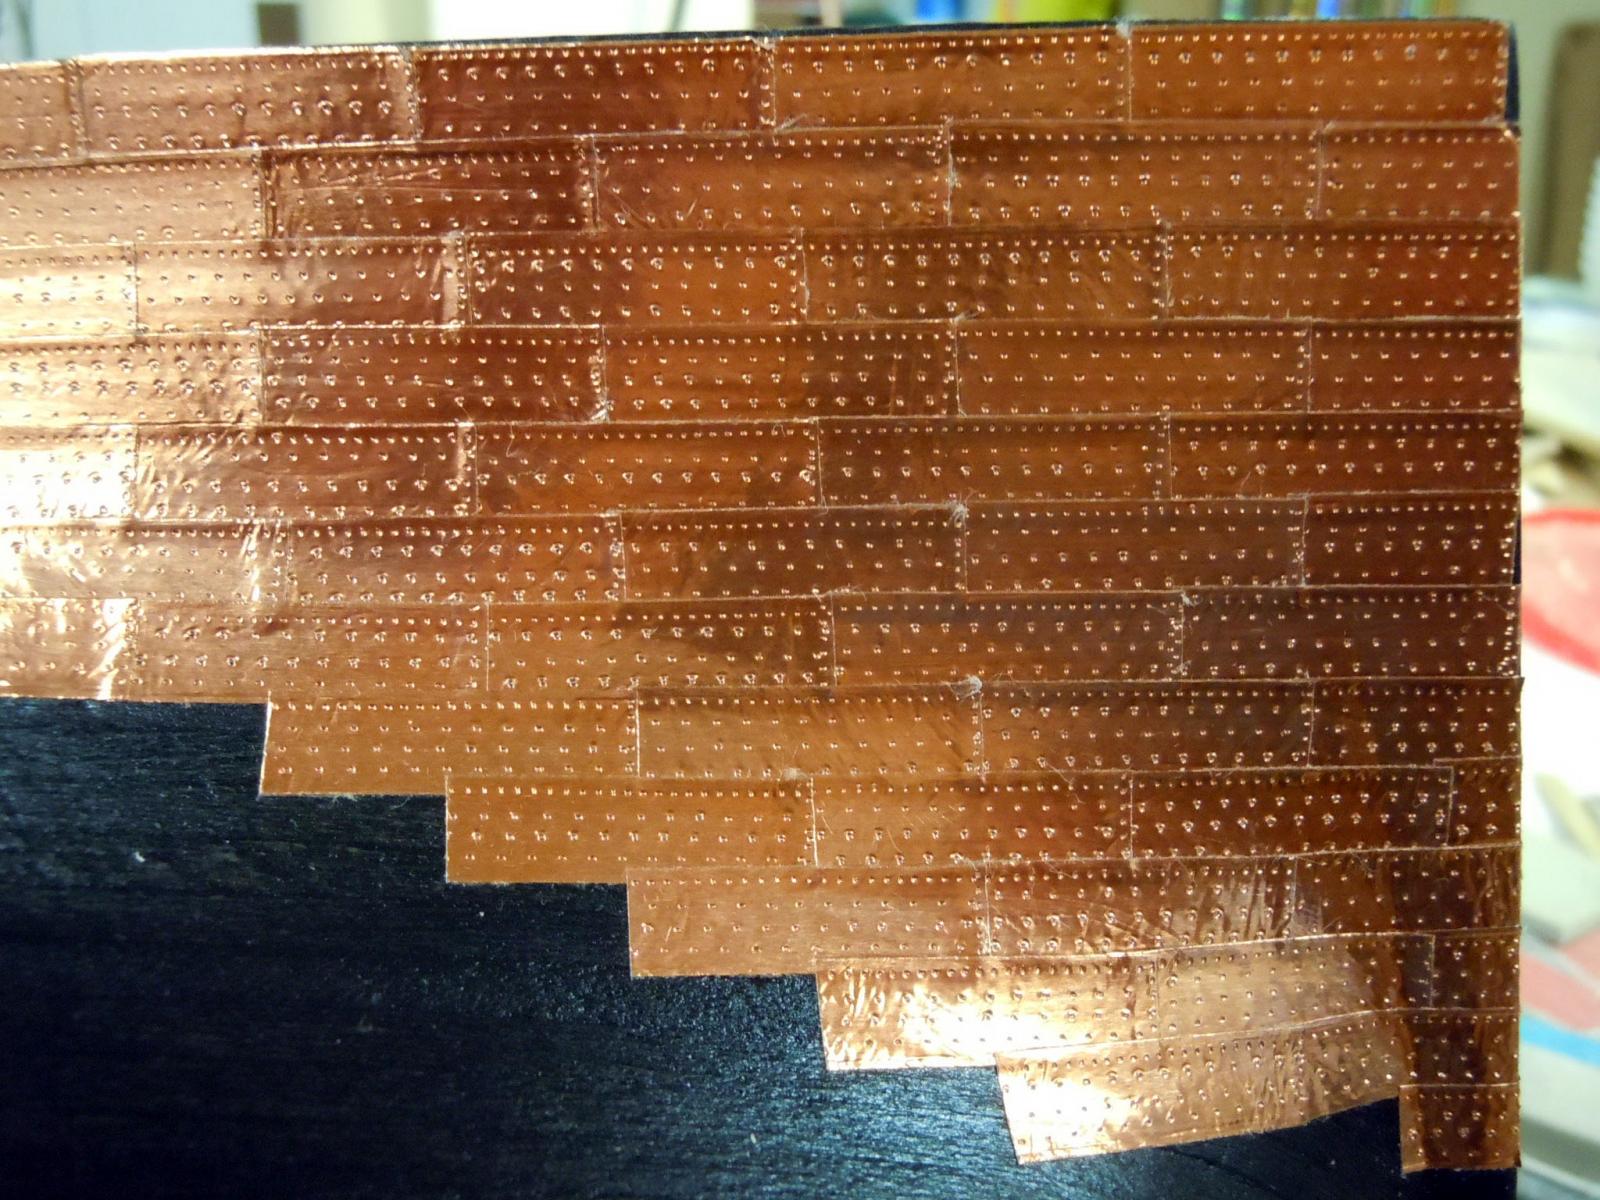
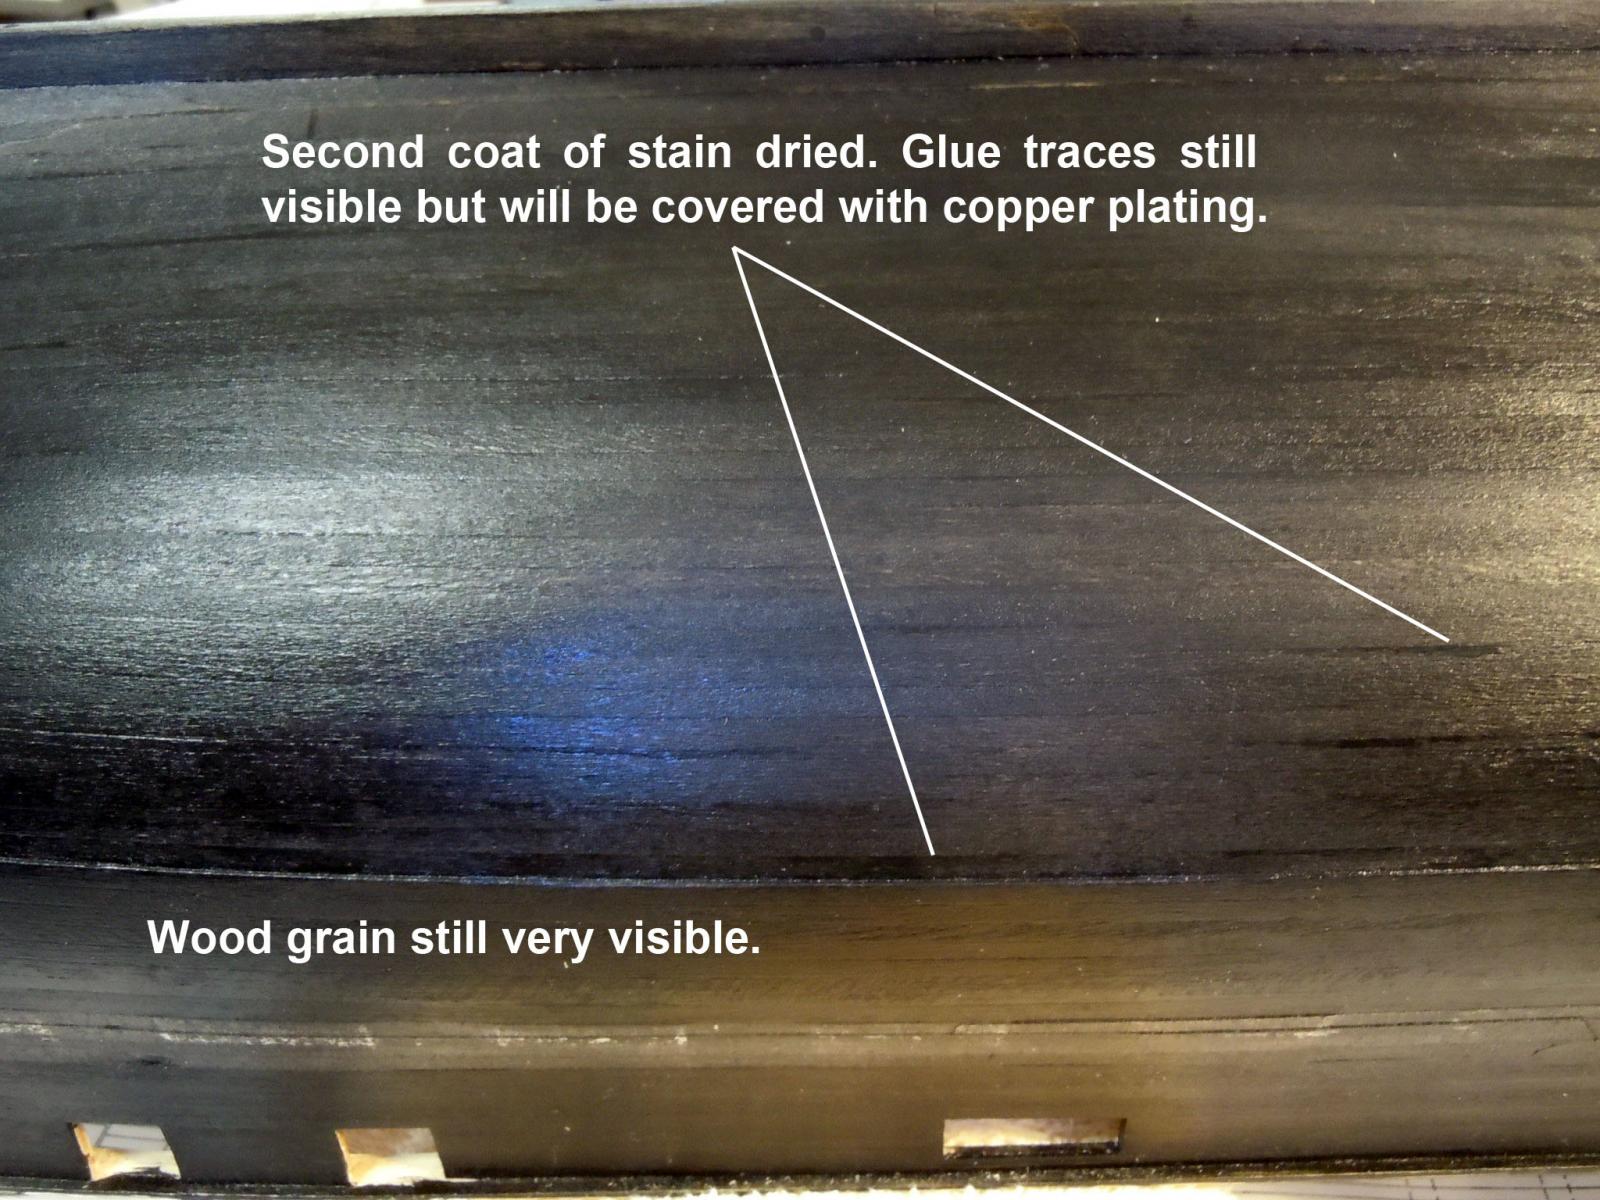
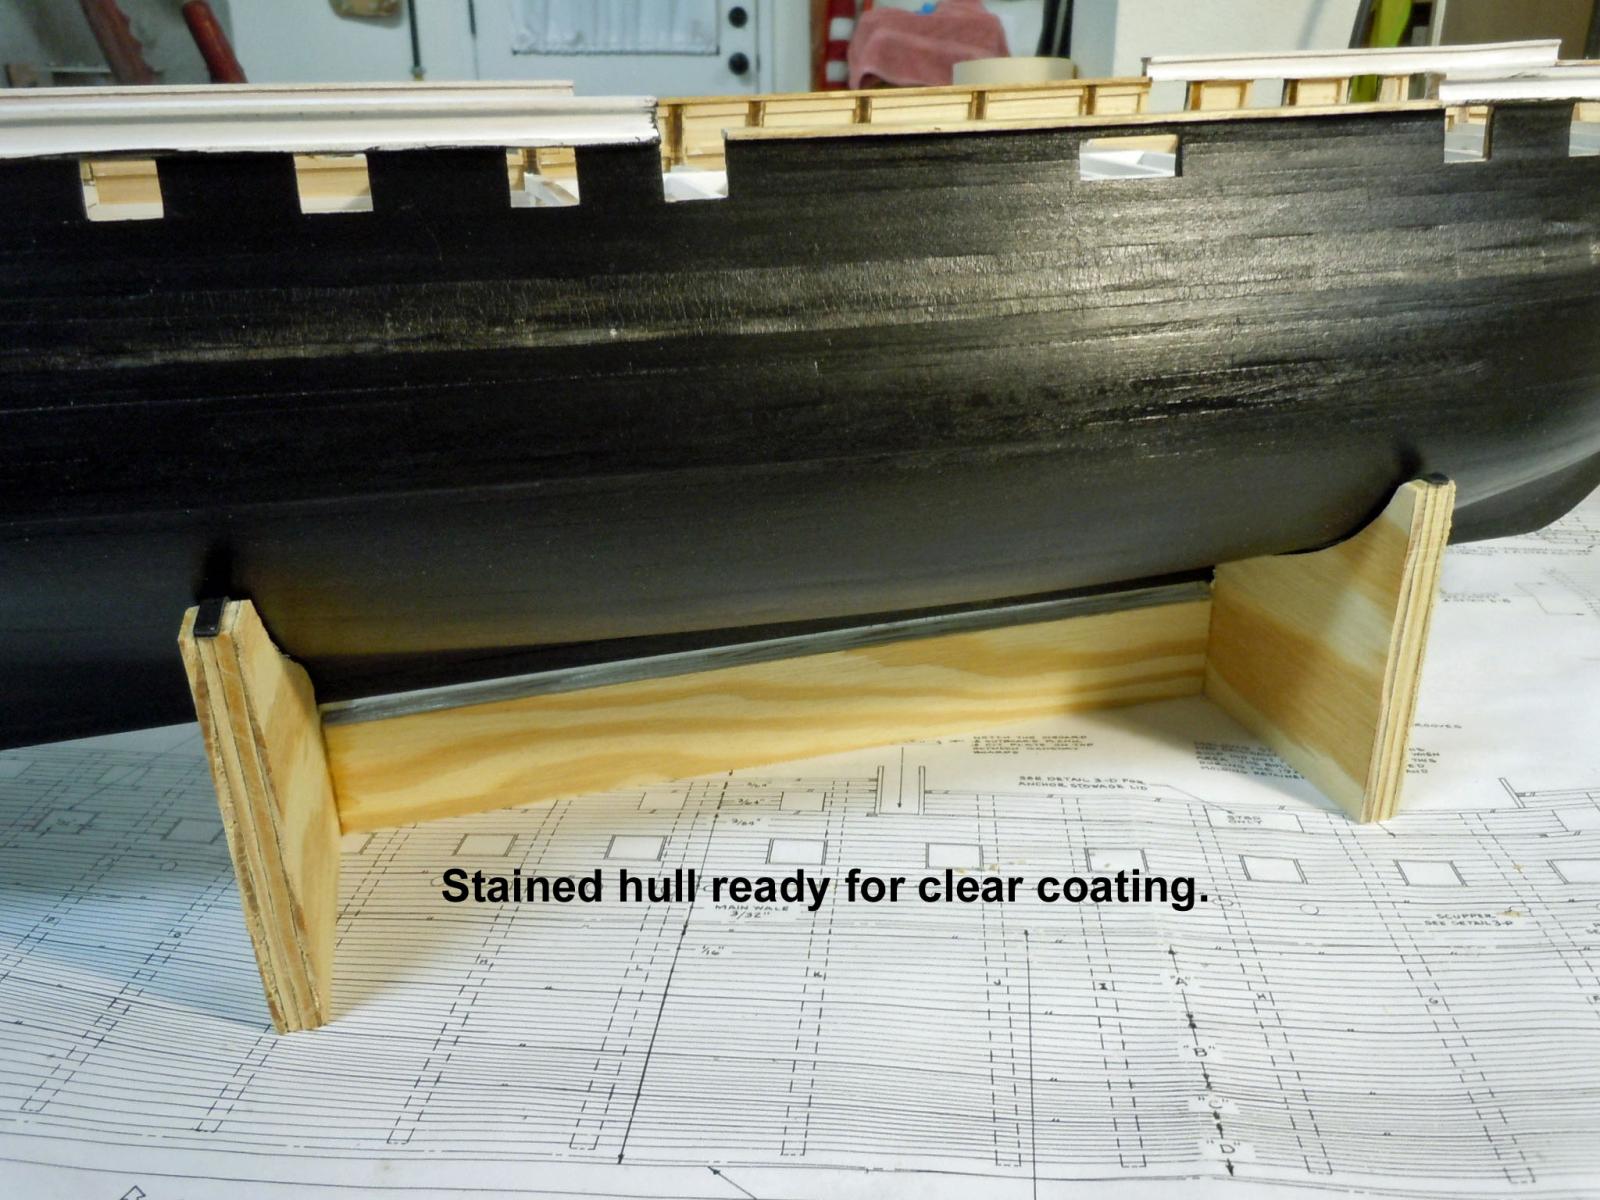
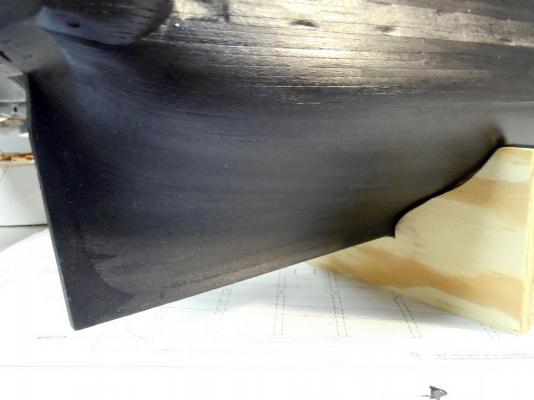
Thank you for your compliments on the hull. I am extremely satisfied on how the staining process work out and that you can still see the wood details of the planking unlike paint which would just cover them up. I probably did not need to stain the entire hull because of the coppering; but I did it for the learning experience. I moved on with the coppering using the Test 3 sample. The plates I calculated to be 1/4" x 7/8" to be in scale using the 1/4" as the key dimension. I may post a series on the technique I am using with the kit supplied foil tape. They are hard to photograph since they are so shiny and pickup the over head lights. Also you can see the hull detail with the Satin Clear spray overcoat on the stain. For now I am off and running with the plating process and here are a couple of pictures of where I am at right now. Here is a close up. I am using the smallest ponce wheel across the top and down the right side and then the medium size for the three center area rows. The overlapping plates negates the need for the small wheel on the bottom edge and left side. The cap plates for the keel and stern post will be done last. I am using a "brick" method rather than the "row" so I can mix and match the plates since I am adding them one at a time per original. Now back to plating which will become good therapy for the next few days.

-
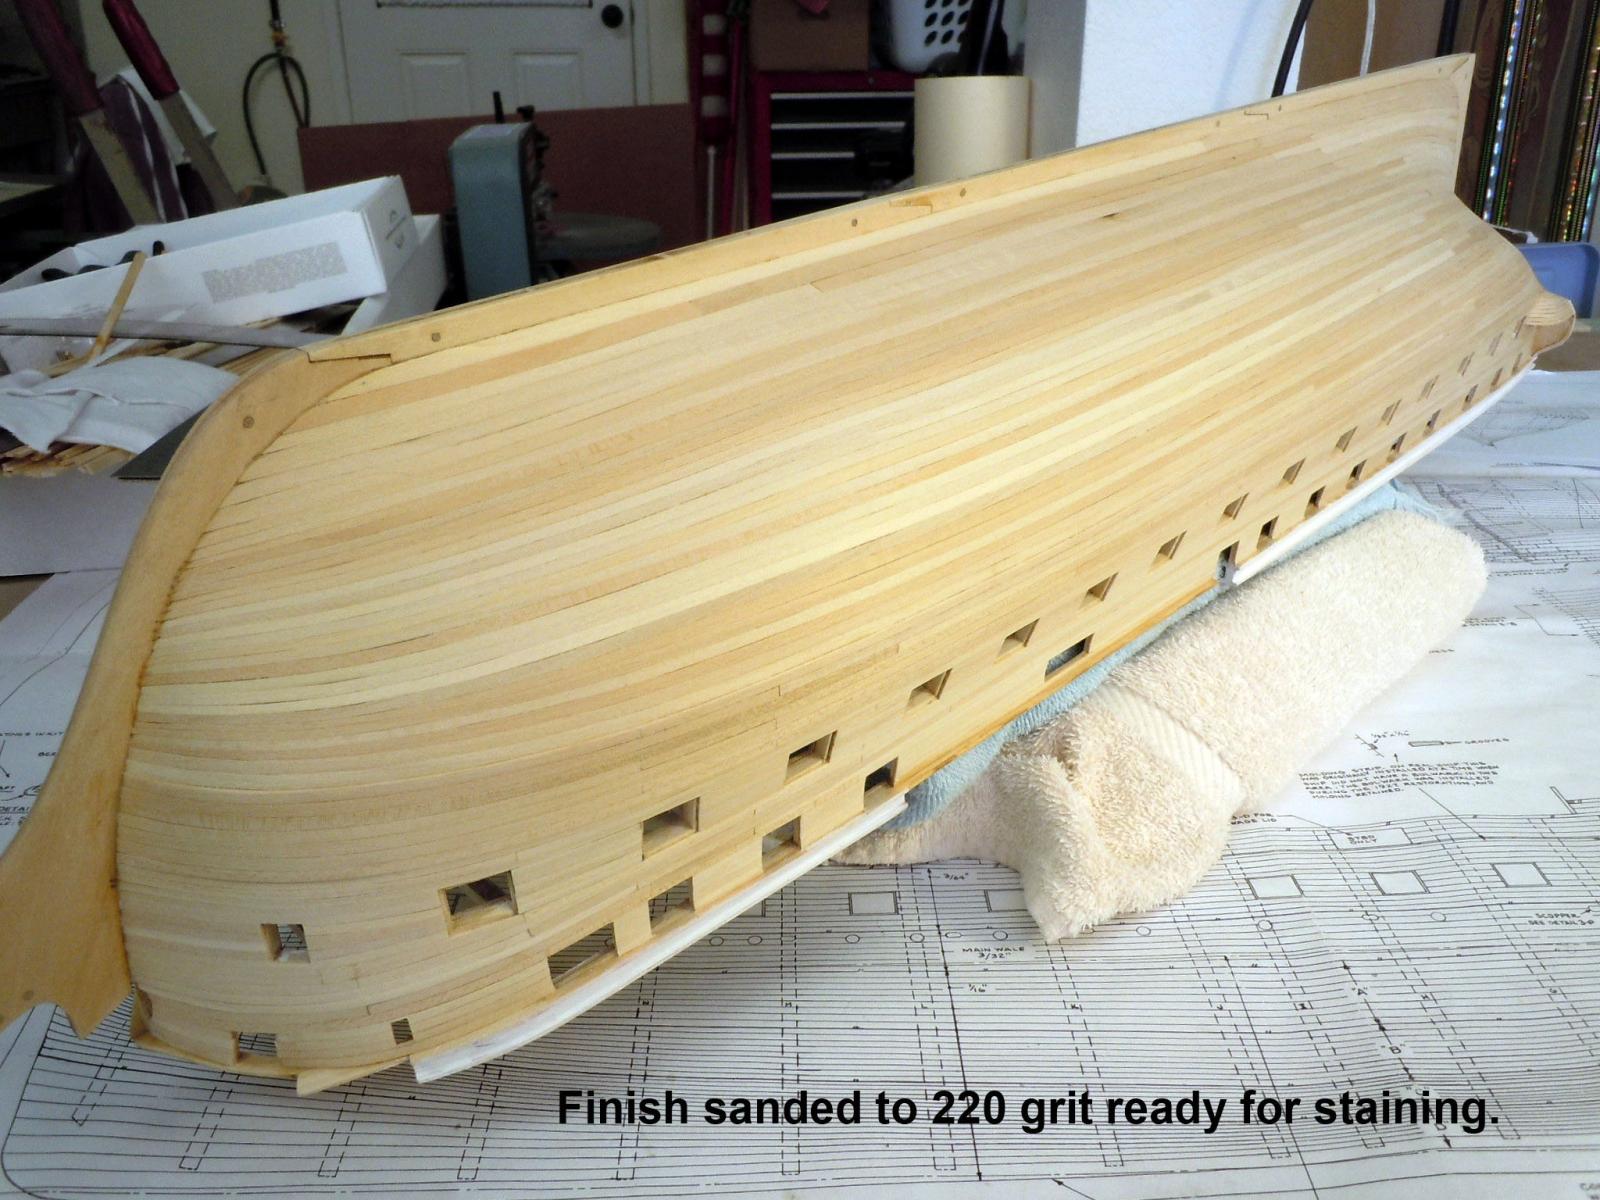
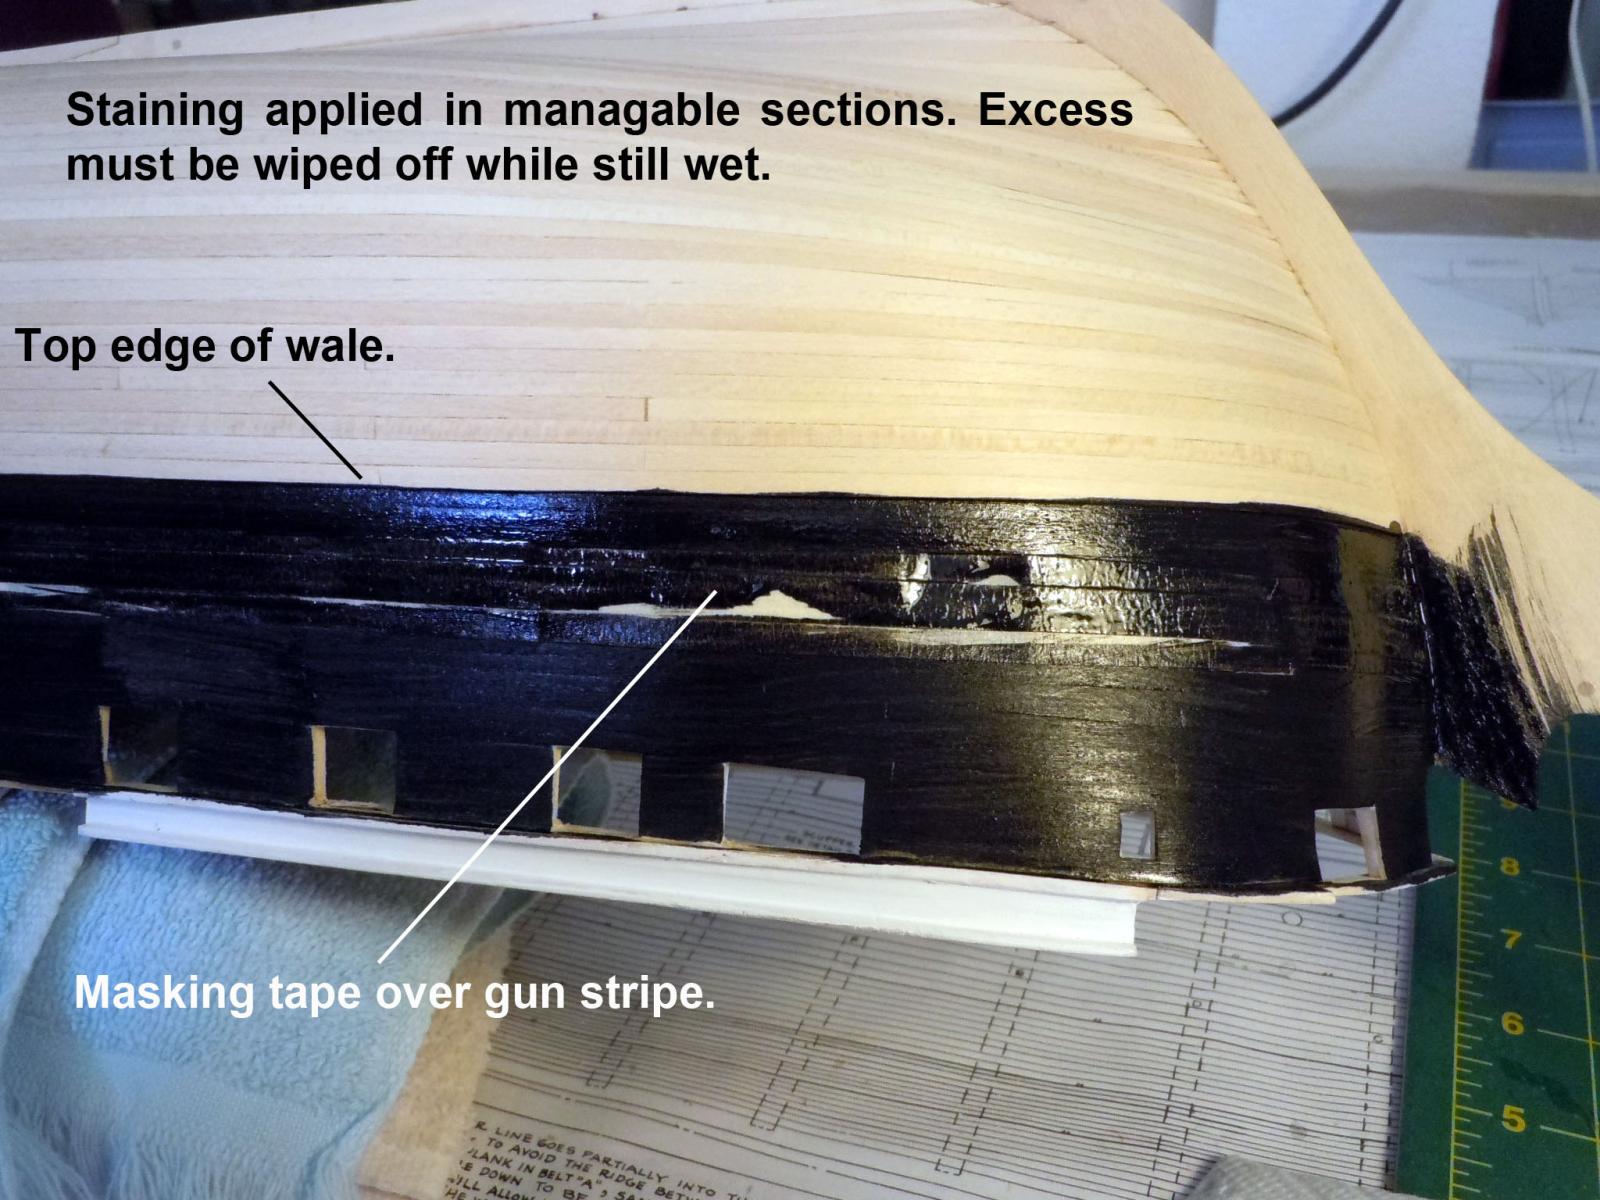
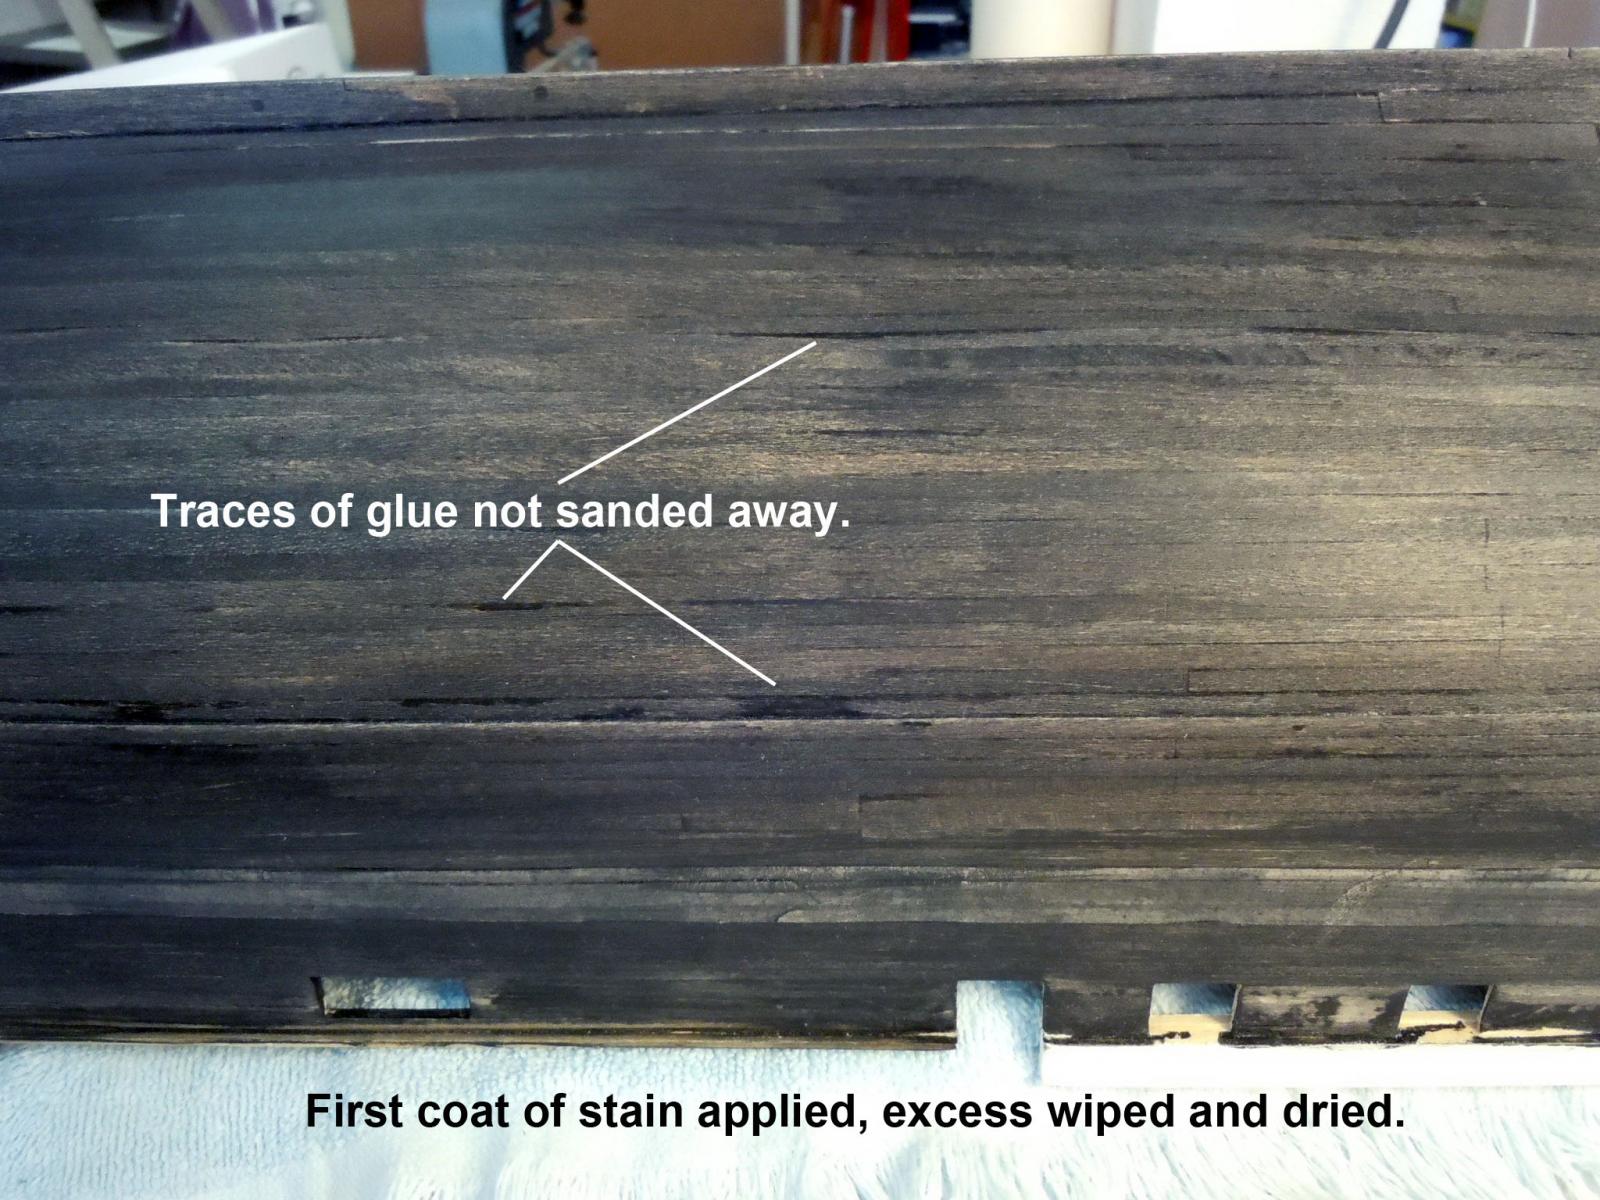
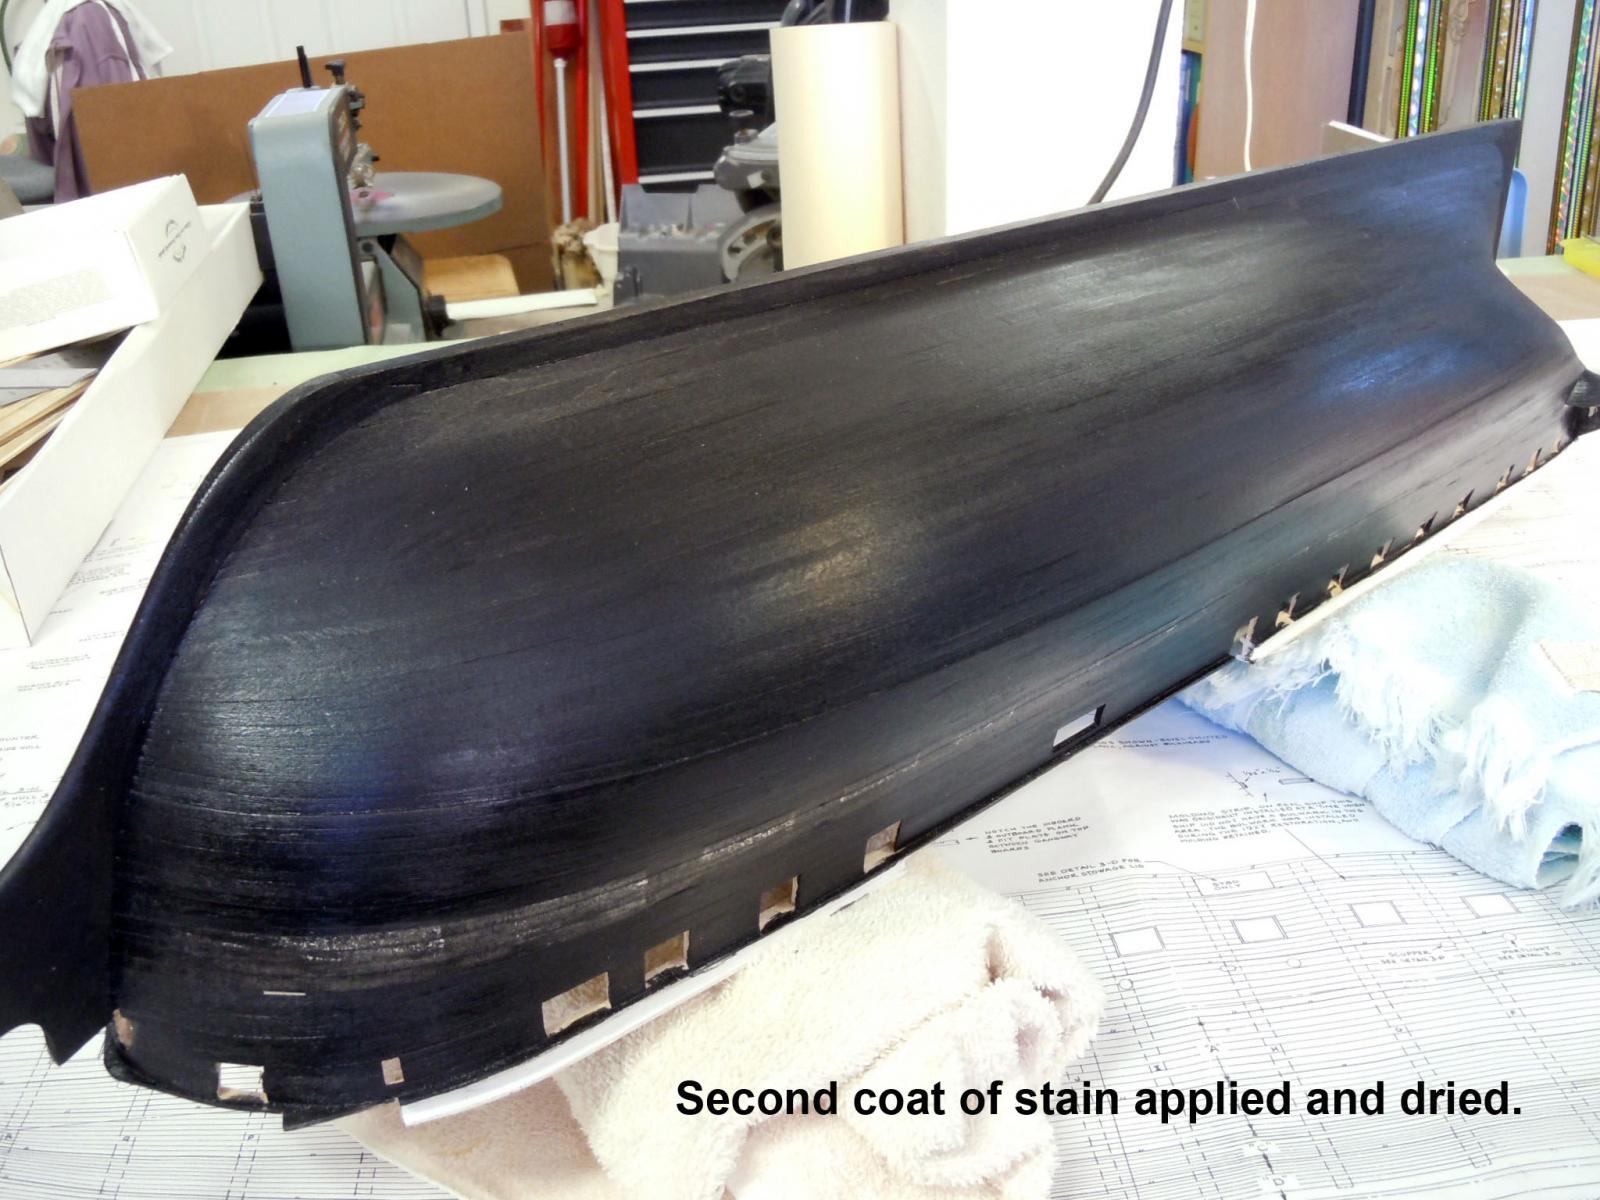
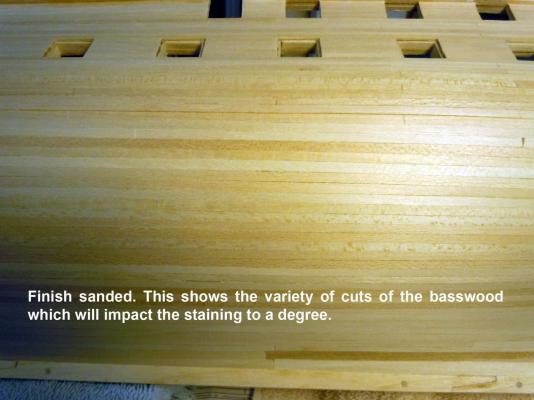
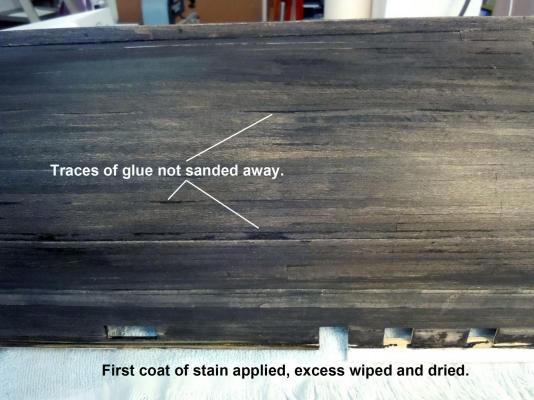
Finally finished up the sanding to a 220 grit finish. I used the round sanding sticks, nail finger files and 60 grit, 150 sandpaper and 220 grit flexible pad. Just a slow careful process to get all surfaces to match with the different characteristics of the basswood. This shows the variances within the wood stock supplied. I applied the pre-stain conditioner as suggested and I is like painting water, however you can feel the difference once it is dry. This is the first time I have used a water based black stain and I broke down the process into sections to stain since the excess stain must be wipe off while wet. I used a 1" foam brush which worked perfectly. The hull definitely needed to be stained twice, this shows the first coat. Here are views of the stained hull. I made a support based to be used while working while waiting for the stain to dry. Here are a couple of views of the stain dried and satin clear coating will be next. While waiting for the clear coat to dry I tried a couple of tests of coppering using foil tape. My wife uses 3/16" in her work so I tried it out using the small ponce wheel on the perimeter and the larger wheel for the center area. I think I will go with Test 3 using the 1/4" tape. Also after looking at the real ship photos I decided that only the lower edge and left end need to be marked since the next plate will overlap with it's marks. I also tested the center area using the larger wheel. The center area on the real ship has three rows. Now back to working on the hull.


-
Mike, thanks again and the basswood with it's various inconsistencies will benefit using the conditioner which is like painting with water. I did purchase the opaque stain which should really help. Tom, thanks that is encouraging to hear that you have used it. You are correct, the smoother the finish the better the adhesion of the tape. One of the things I am trying to sort out is the staining below the copper and I think it will be good to do especially if I clear coat and sand for a smoother finish. If I can get the hull to be like the small test everything should work fine. Thanks again for your help!
-
Ken, Thanks for the feedback. Yes it seemed to spread more evenly on the test piece. However, the instructions say nothing about the 2 hour time frame. Just wipe off excess after letting set for up to 5 minutes. Then allow to dry 15 -30 minutes and sand with 220 grit before staining. Once complete apply a clear coat. The challenge I see is applying conditioner and staining around all the gunports within the time frames. Will just have to work quickly.
-
A question for anyone? I am using a water based black stain and I have checked the MinWax site and they recommend using a pre-stain conditioner. My question is...Does anyone have experience using this conditioner on hulls before staining and applying the copper treatment? In taking breaks from sanding I am checking on how to apply the copper foil and most recommend a smooth as possible wood finish for best tape adhesion. Just wondering if anyone has advice before I start the staining process. In my previous test I clear coated after staining which would provide a sandable surface. Thank you all for your likes on this build so far!
-
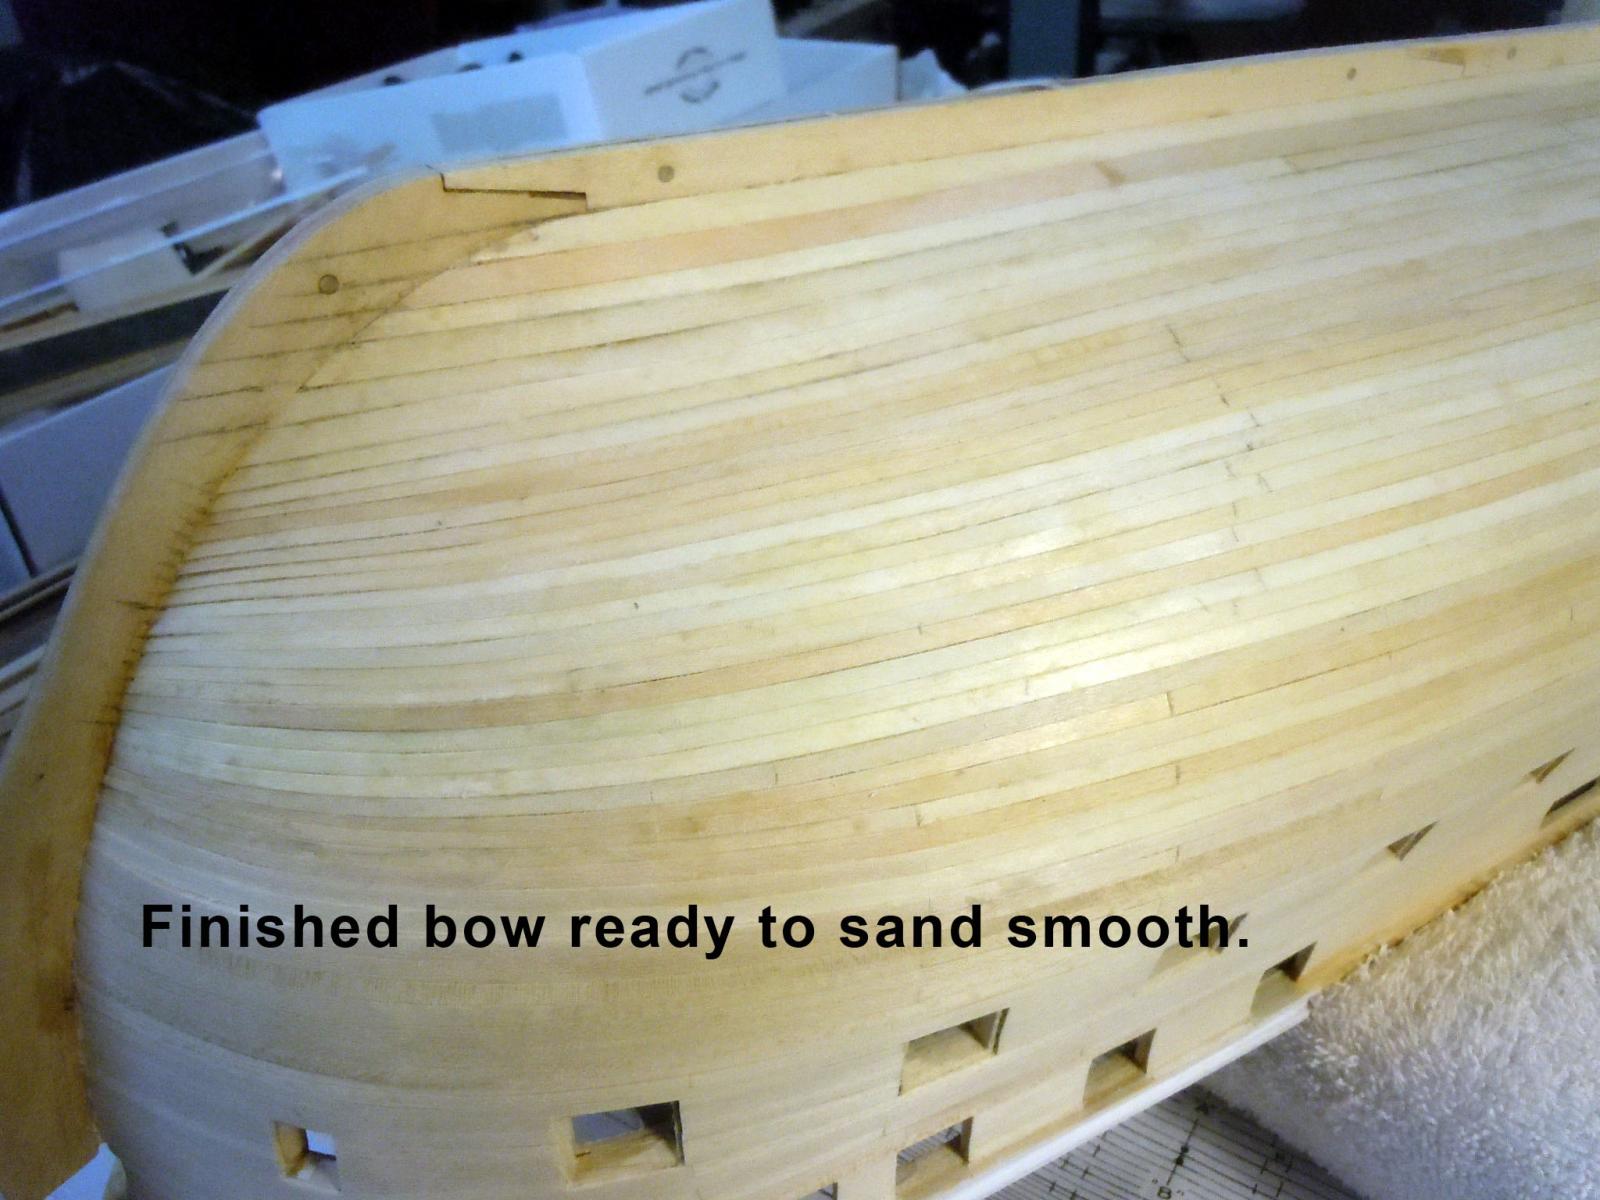
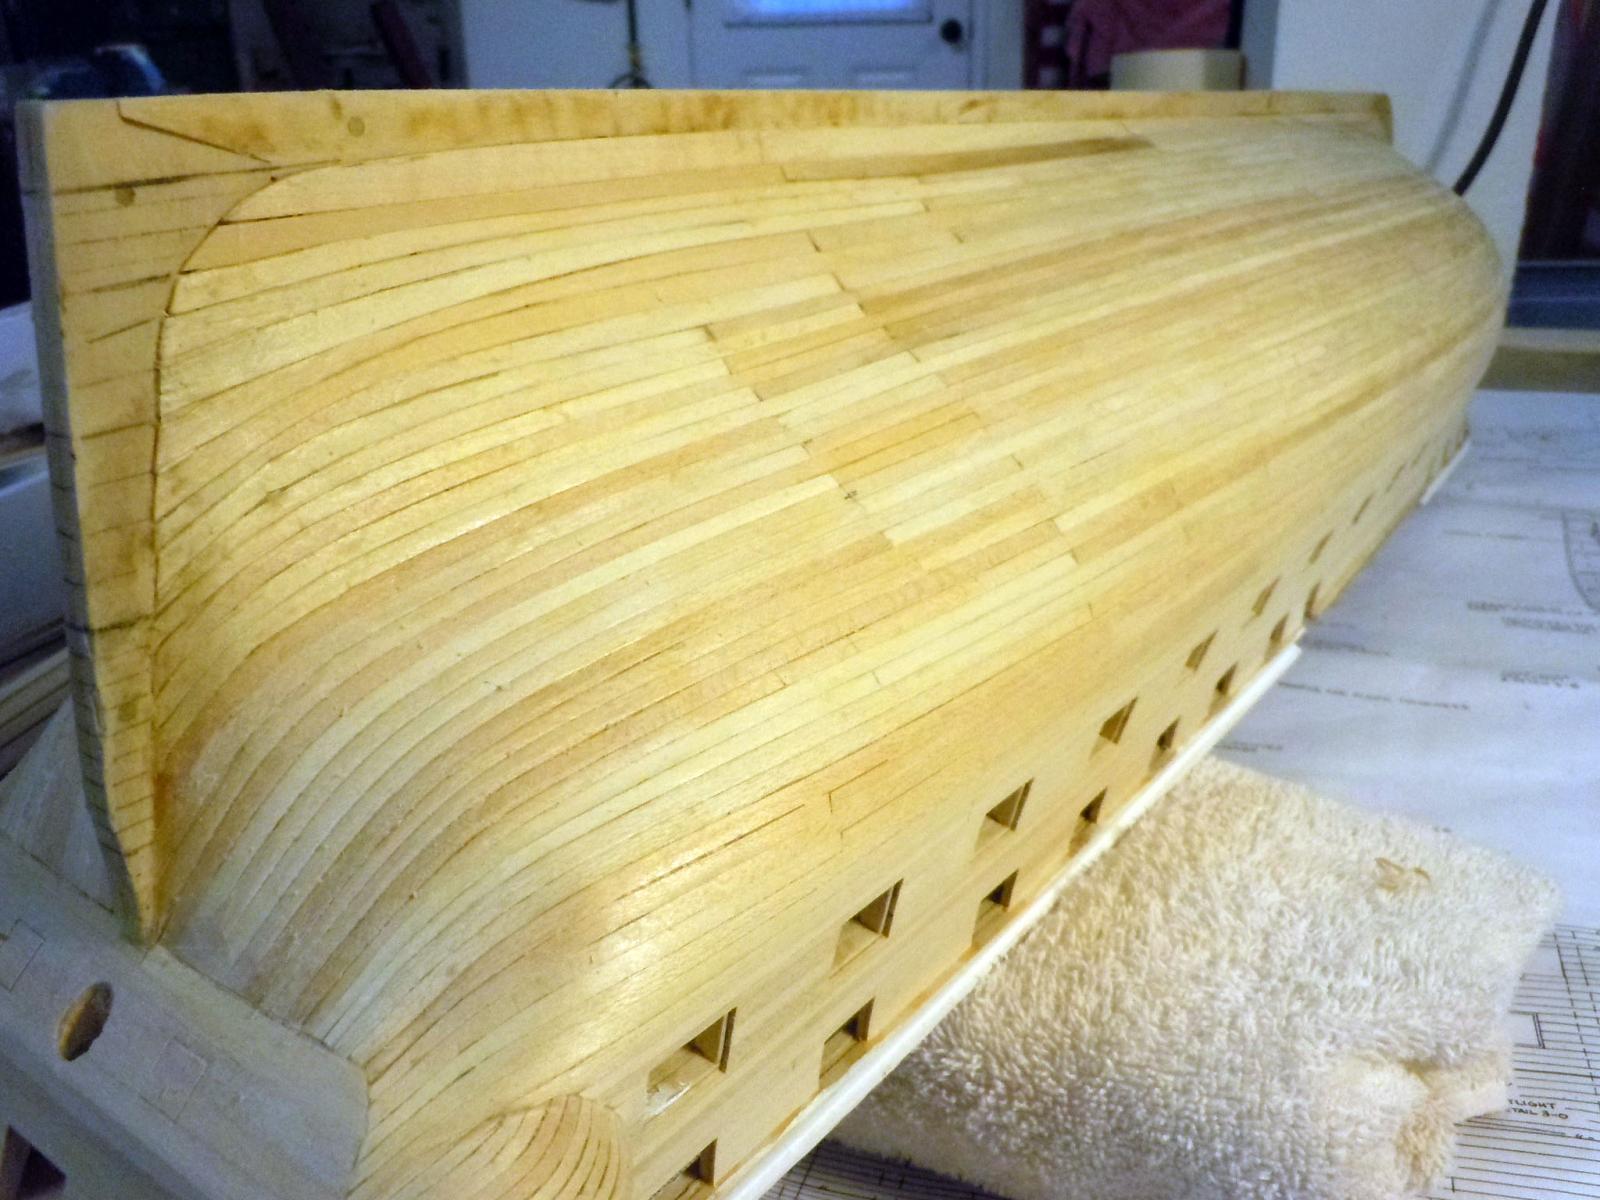
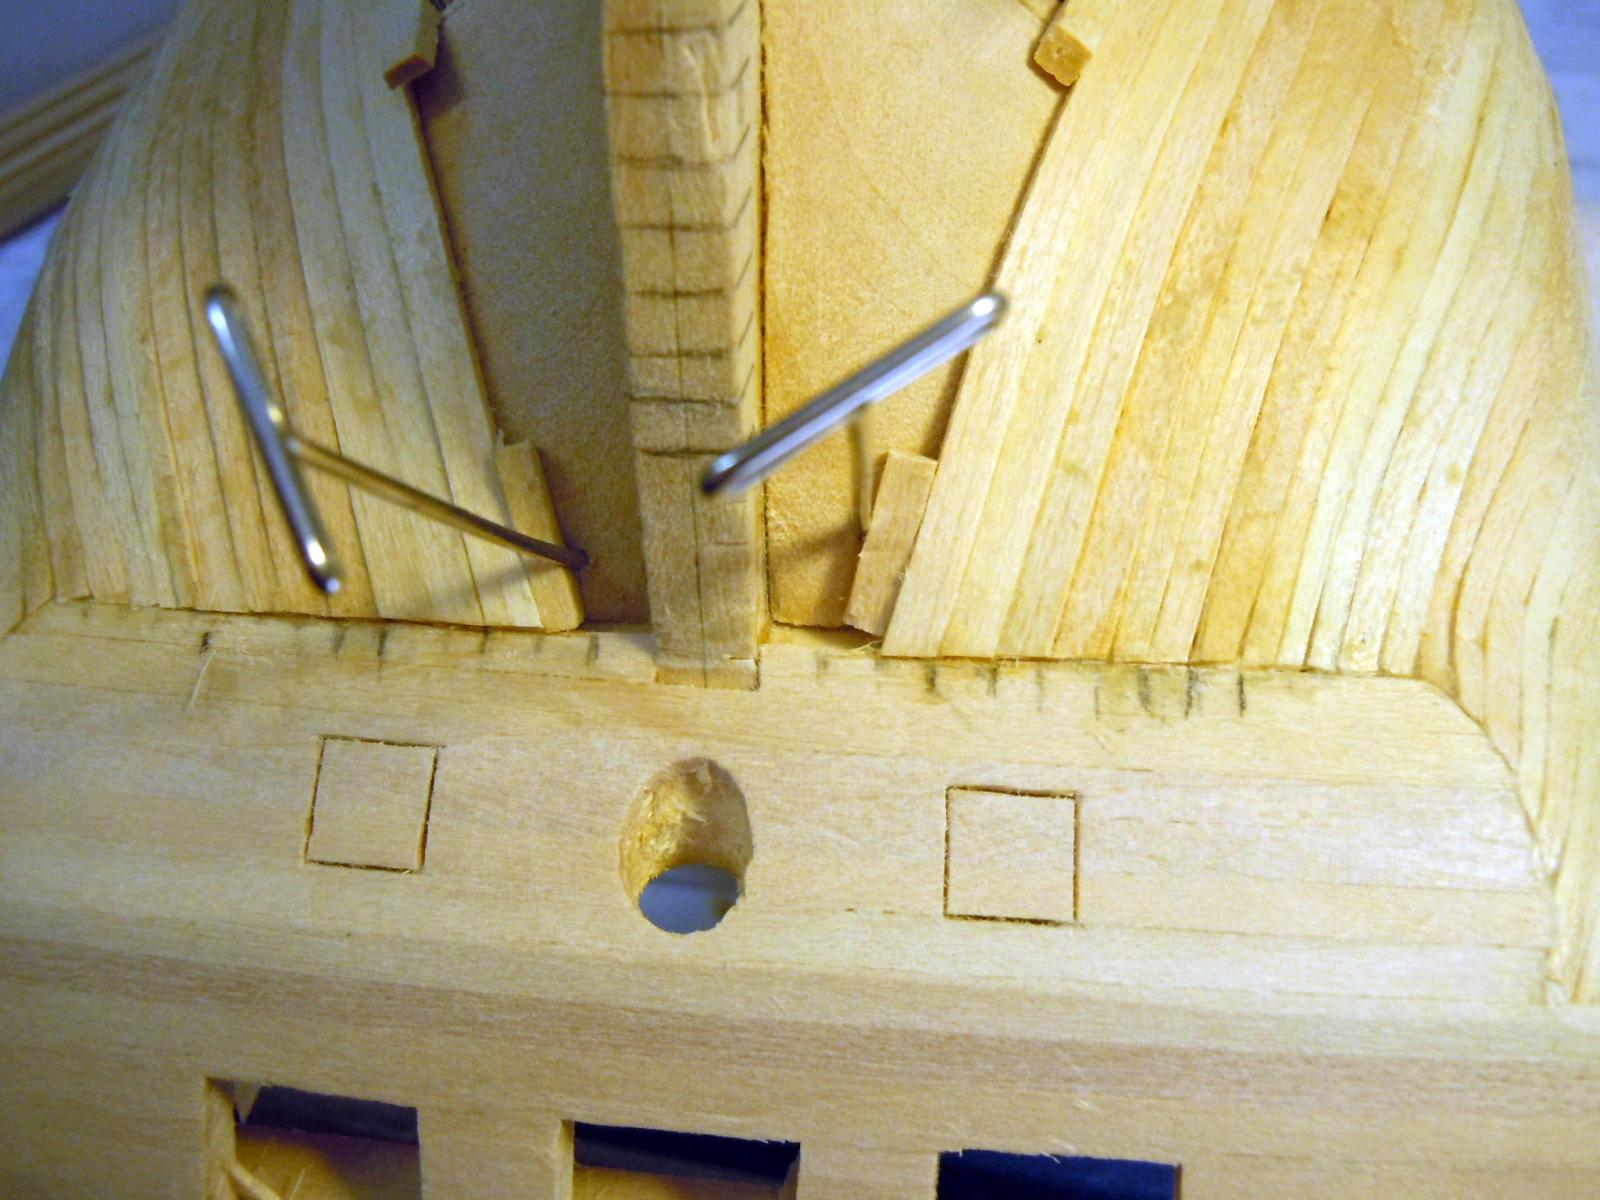
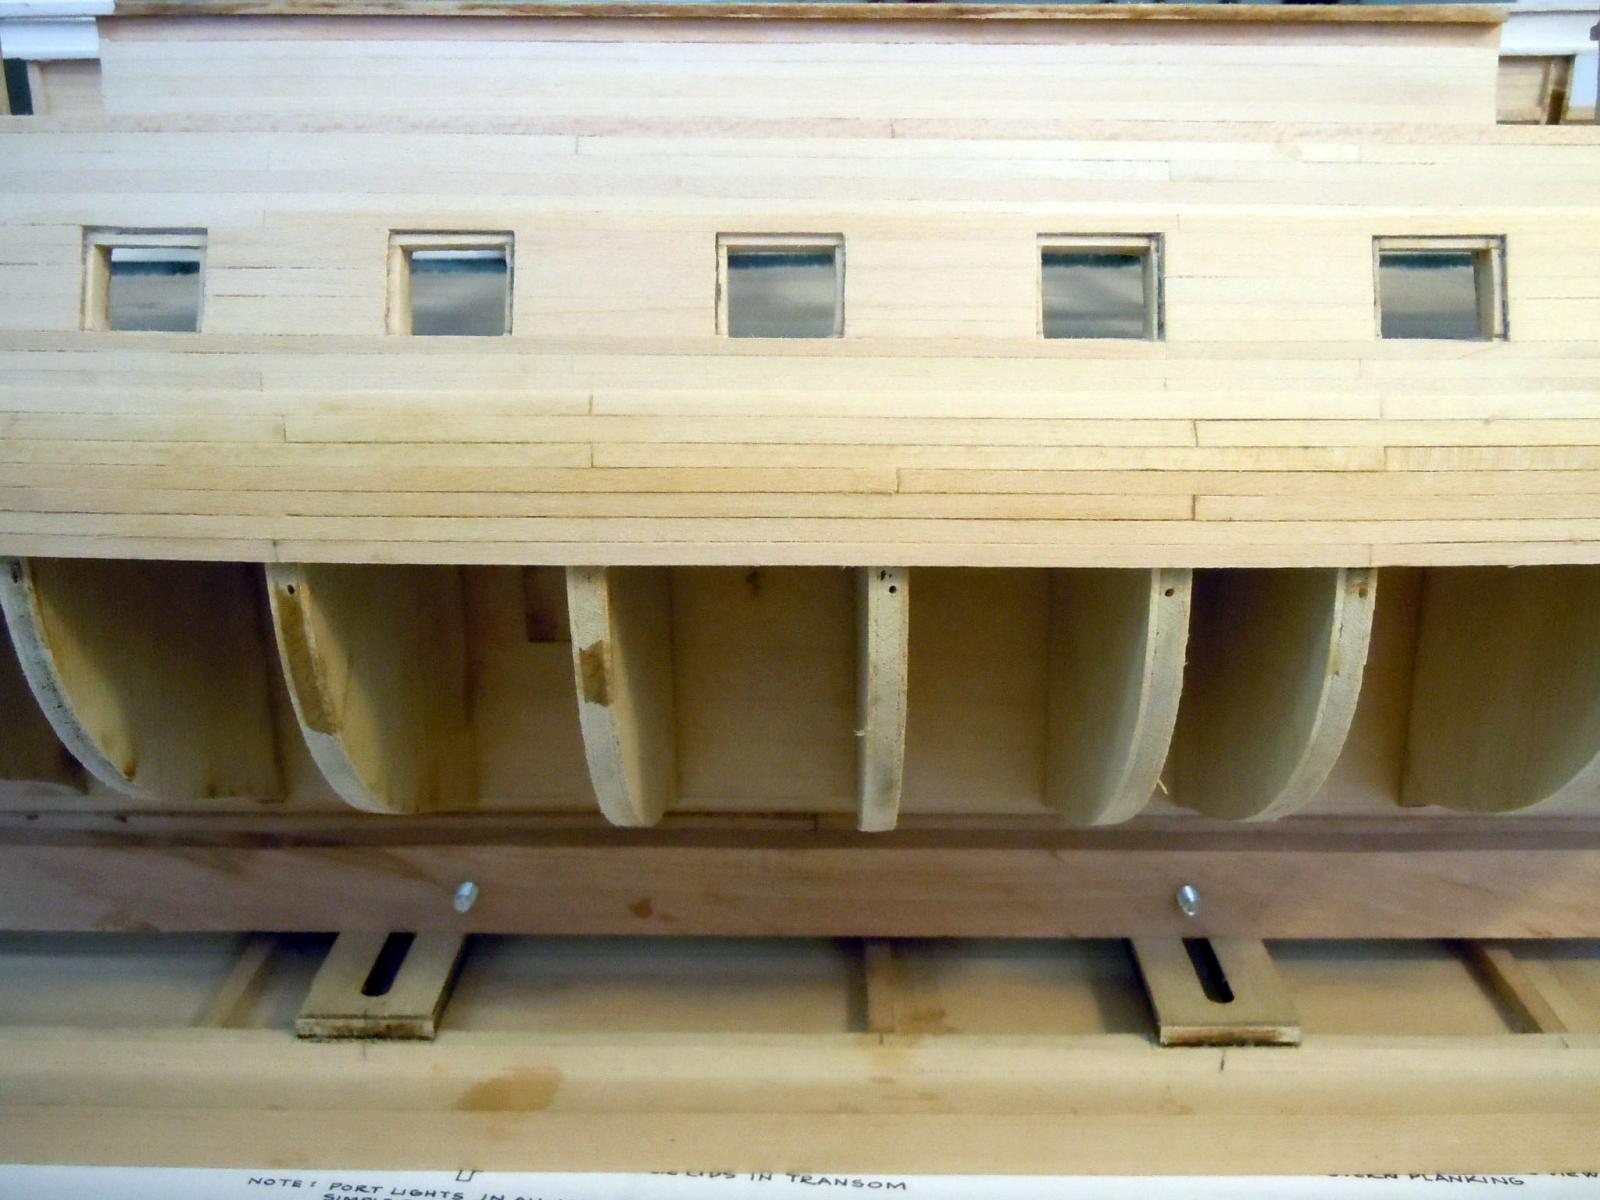
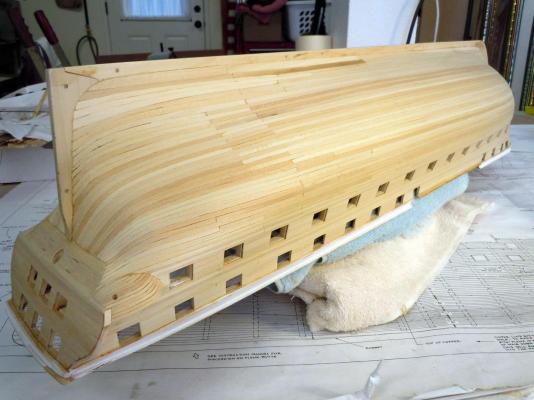
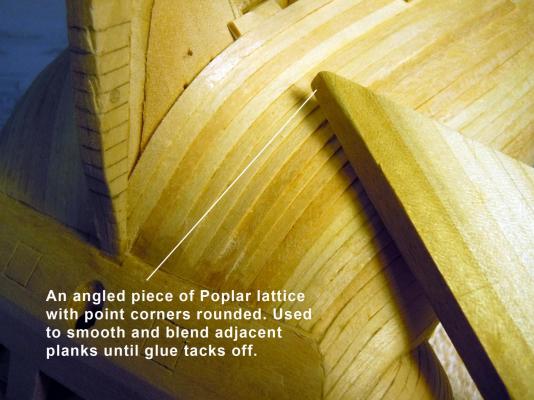
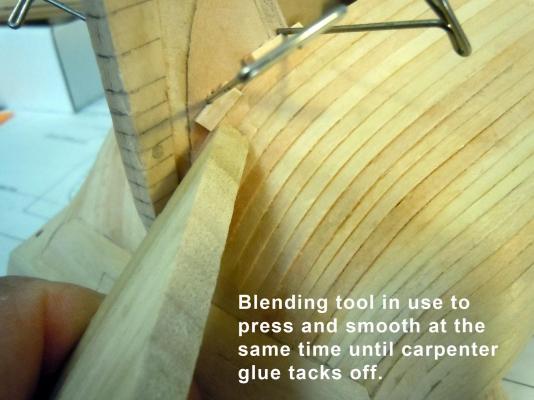
Finally finished up the lower hull planking. I was not impressed with the quality of the planking strips with the variations in width, hardness and thickness then finally gave up trying to sort them for adjacent planks when adding them. Major sanding will be needed to smooth out, but I am sure others have also discovered this as well. Here is a series showing the planking and my goal was to strive for a result with no gaps suitable for staining. I also followed the individual planking length down to the copper covered area and then went to longer lengths for smooth blending. I am also glad that I finished up the top rails given the rough handling and moving the hull went through during the planking process. I carefully angled the top edges of the planks for a tight fit and applied carpenter's glue the entire length of the plank to assure a tight bond. There is no way to avoid this being a messy process; but a wet paper towel at the ready did help to wipe away the excess glue while pinning. I quickly realized that I needed more than my glued up finger tips to position and adjust the planks as they were being positioned. I found a piece of Poplar lattice left over from a kitchen project (1/4" x 1-1/2") and cut at 45 degree angle with the tip edges being slightly rounded so as not to cause dents in the wet planks. Here it is in use being applied to both planks so that the edges align as much as possible. Here are the results. This shows the stern area and how the planks set around the counter and tiller post. The same tool was used at the bow and was a great help with the narrower tips into the rabbet. Here is an overview of the finished planking ready for sanding and smoothing. Now to start sanding which I will take care and some time to do prior to the coppering process.


-
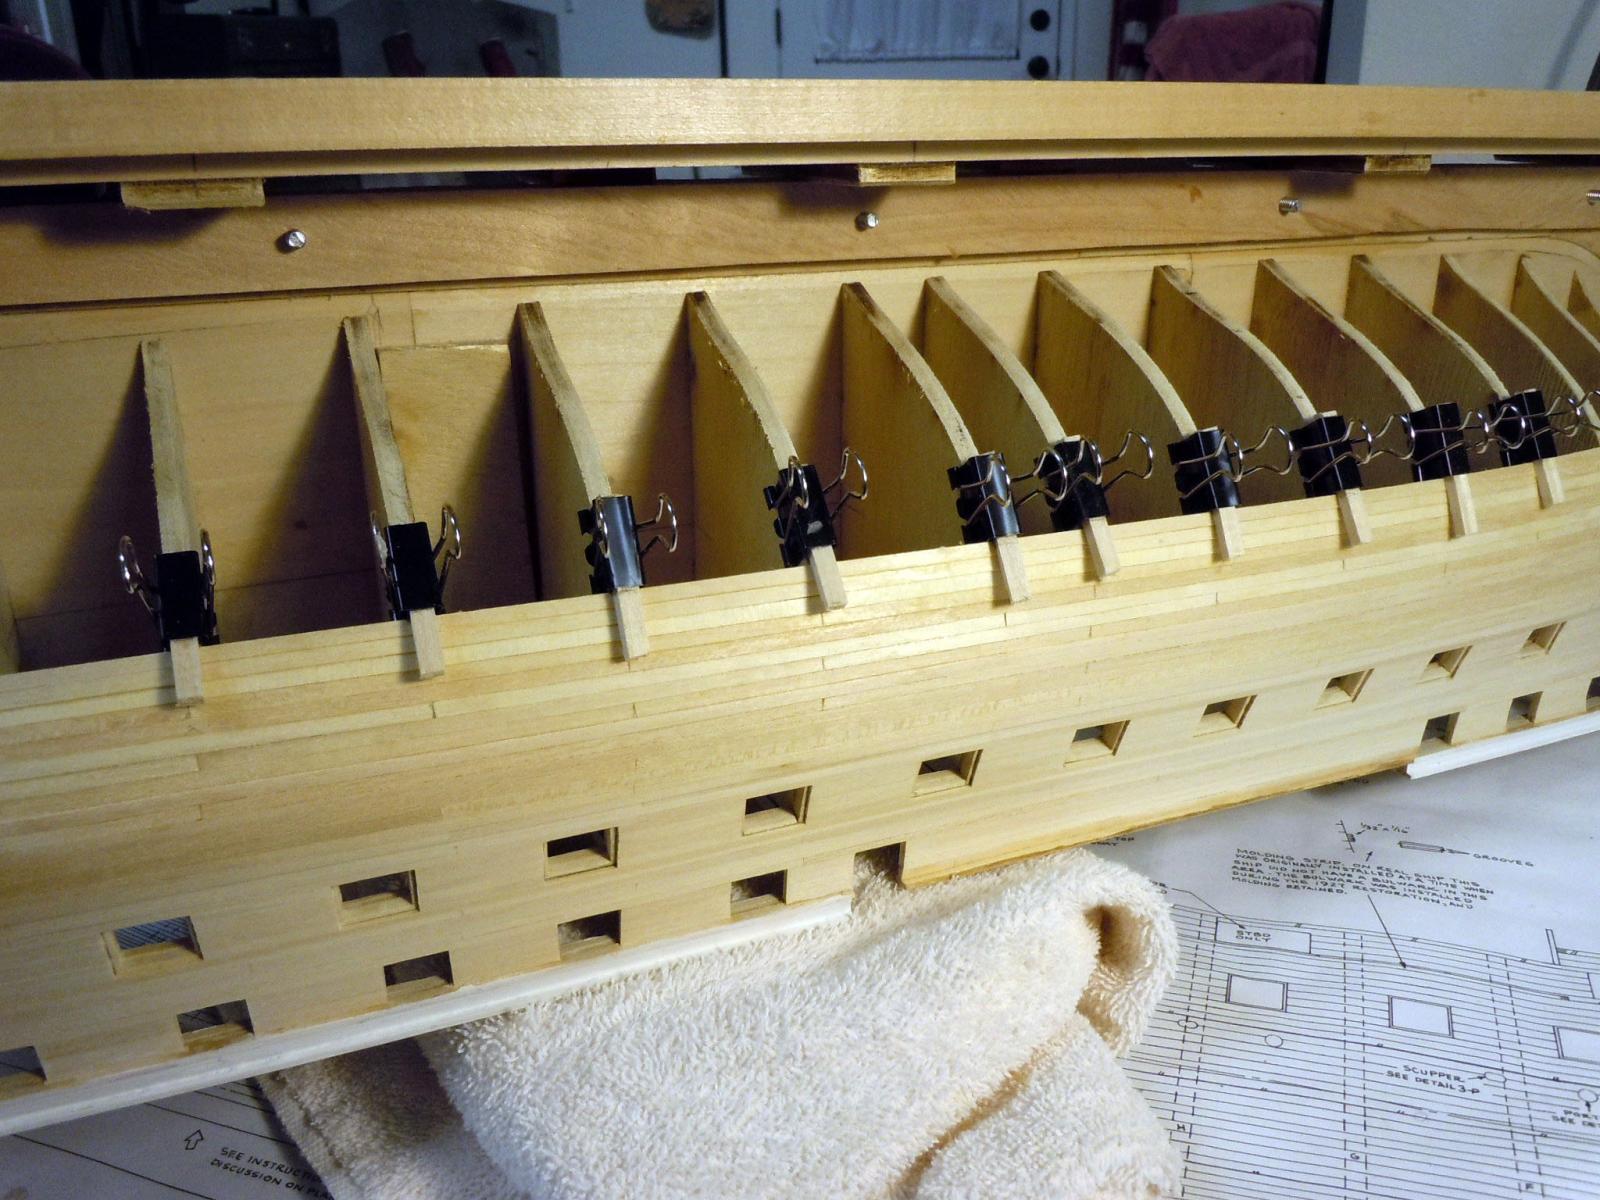
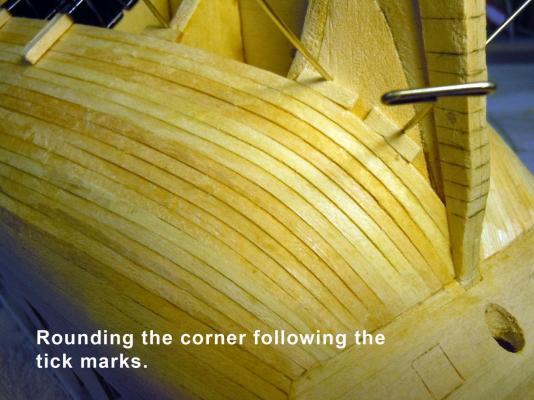
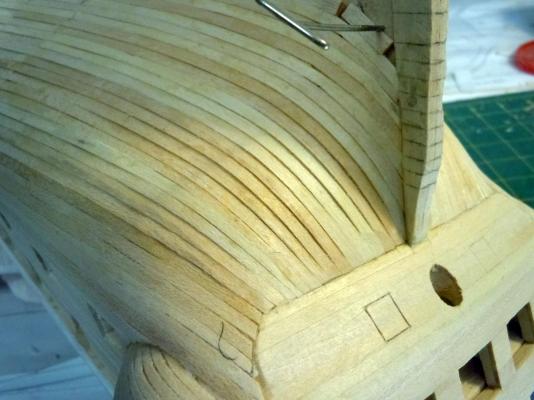
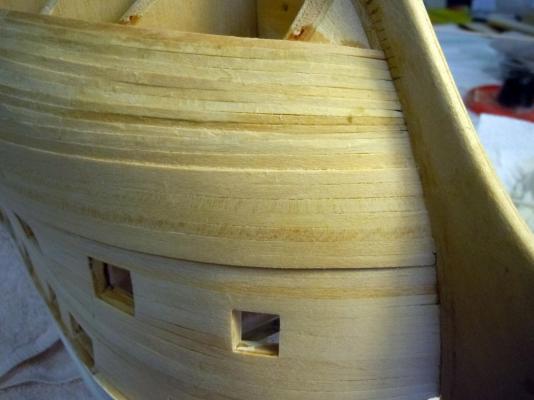
Moving down below the wale with the hull planking and going slow and carefully trying not to have any gaps to avoid any filler. I am also adding glue the full length of each plank on the mating edge. I have been wetting the ends involved with the bow and stern which are also tapered to fit the tick marks as required. I also made some clamps using spring clips and wood stock that work along the sides but I still need to use spacer blocks and T pins at the bow and stern. Here are a few in progress pictures of the hull planking with belt A complete and moving through belt B. This shows the spring clamps in place down the side. Here is a picture of the stern. And the bow section. Back to the hull planking.


-
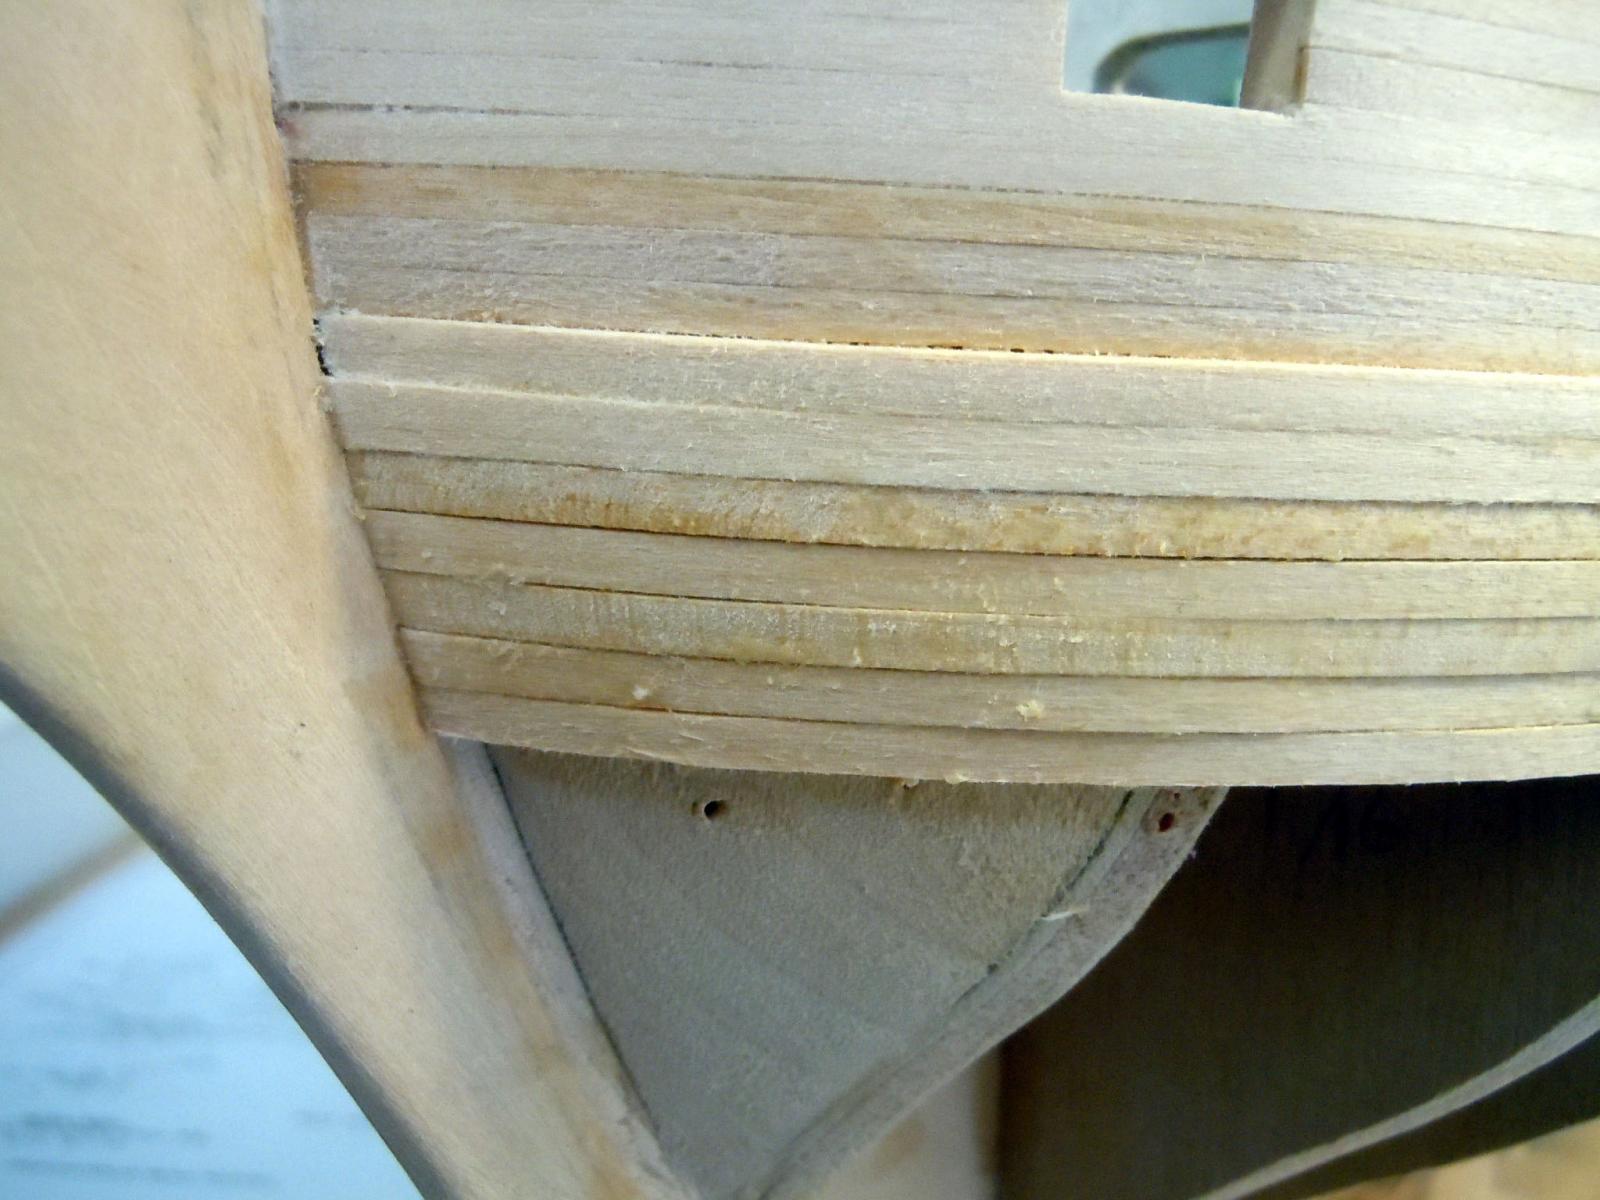
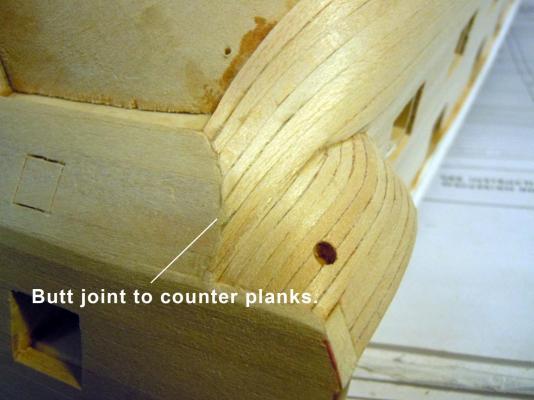
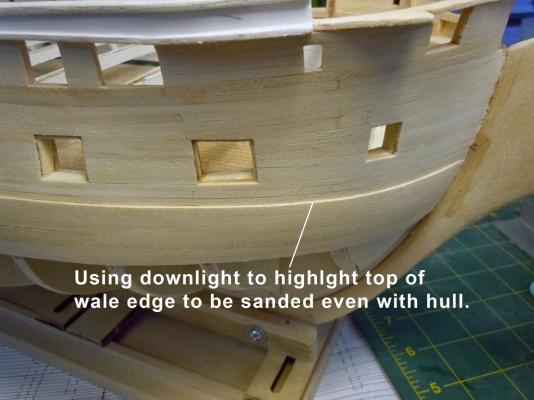
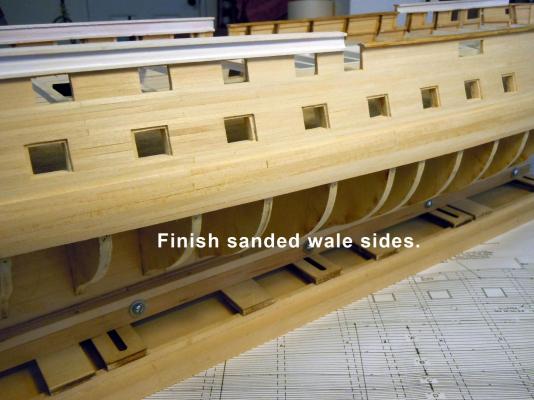
Just finished up installing the main wales on both sides. I think I am finally getting the hang of planking without gaps. I started at the bow for each strake and worked to the stern; I also measured the lengths needed for the stern element and soaked it in water as I added the other sections. I also learned that while adding the bow pieces in the curve, the top edge needed to be slightly beveled for a tight fit to the one above it. Here are the finish bow view of the wale needing finish sanding. The stern needed some real carving and twisting to butt properly to the counter planks. While wet I first cut away the back side of the plank from just before the last bulkhead to the tip and thinned it down to 1/32". I then cut a taper from the thinned point to about 1/16" all this while still wet. I then carefully added it and pinned it in place at the bulkheads and very carefully bent and twisted it into place and then trimmed the end to match the counter. Once satisfied with the fit it was glued in place. Here is a view of the center portion in place ready to sand. Keep in mind I glued it to both the bulkheads and edge glued to the adjacent one above it. You can also see the random butt joints against bulkheads. I doubt these will be seen when stained, but I hope a hint of them will. Once all the glue was set and for a period of time setting in the sun to dry I then started to sand. I used my round sanding sticks; sanding board with 150 grit, finger nail sticks 80 grit (orange), 120/240 grit (blue). The most important part of sanding was using a movable desk light point straight down to highlight the highs and lows of the planking. The down light was also used to assure an even gap at the top of the wale relative to the hull planking. Here are a couple of views showing the finished wales ready to stain when the time comes. So far no use of filler other than the carpenter glue which is stainable. A bow view. Now to add the planking below the wale, but first ticking strips need to be marked as needed.


-
Ken, The sample I did was decking from the Niagara. I have not tried it other than that. I will be using it on the hull which will be shaped and supported. I imagine the warping will occur like you said on thin sheet stock; how thin I do not know. However, if you have a warped sheet like you described after staining wet the backside with water and lay it down on a piece of wax paper and weight it down evenly and it should flatten back out when dry. The wax paper allows slow moisture penetration.
-
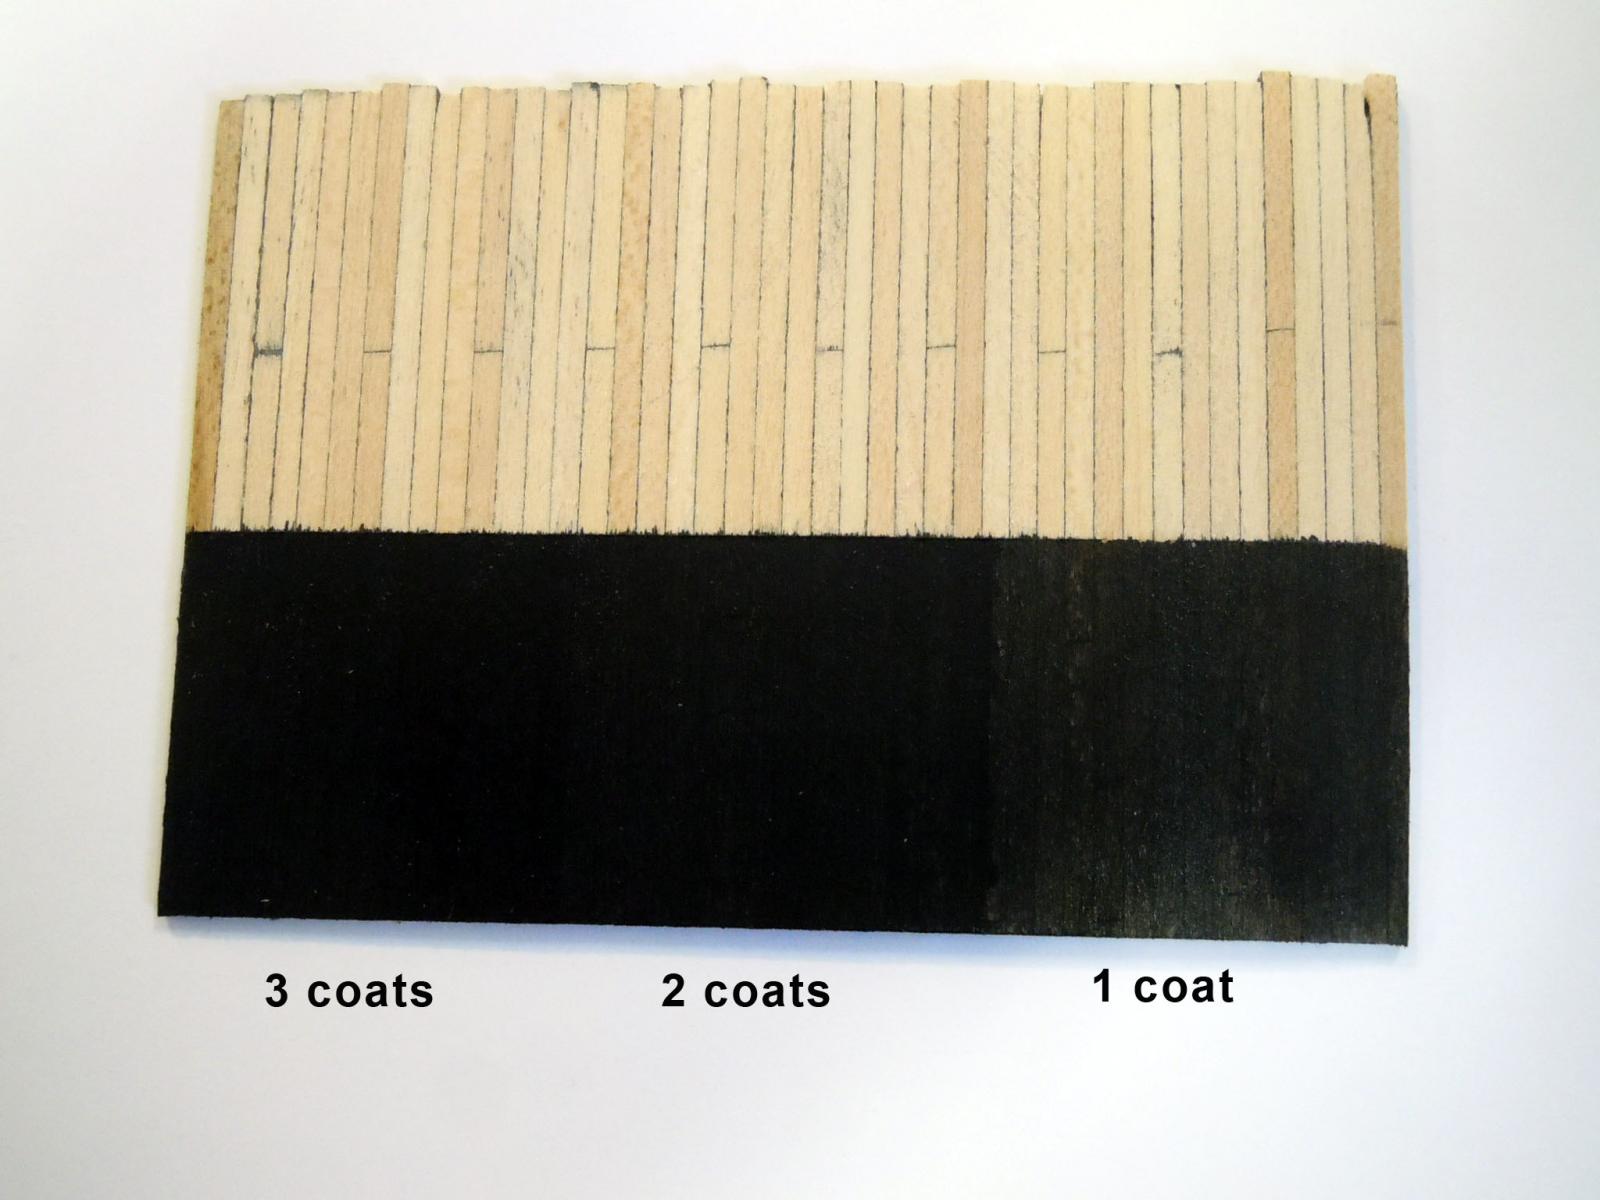
Well the test is completed and the results are outstanding as far as I am concerned. The sample test below shows 1,2, and three coats applied then two spray coats of Satin Clear, a light sanding of the clear and then a final top coat of clear. It was a deck lamination of basswood. The first coat one can still see light wood apparent in the finish. (Light finish) With two coats a medium black coverage is attained and may be good enough for a final finish depending upon the wood type. (Medium finish) The three coats is about as black as you can get or would want. (Dark finish) No odors, fast drying, easy brushing on and compatible with Krylon Clear Satin even with a heavy wet coat. A clear coat is recommended on the instructions. MinWax offers Clear Coat in quart cans with brush on application. I would recommend for other to do further testing with the types of wood to be applied to; but I doubt there would be any issues. I had to purchase a quart (not offered in smaller units) and it was mixed while I waited; enough to paint a fleet of ships. Now back to wale planking.

-
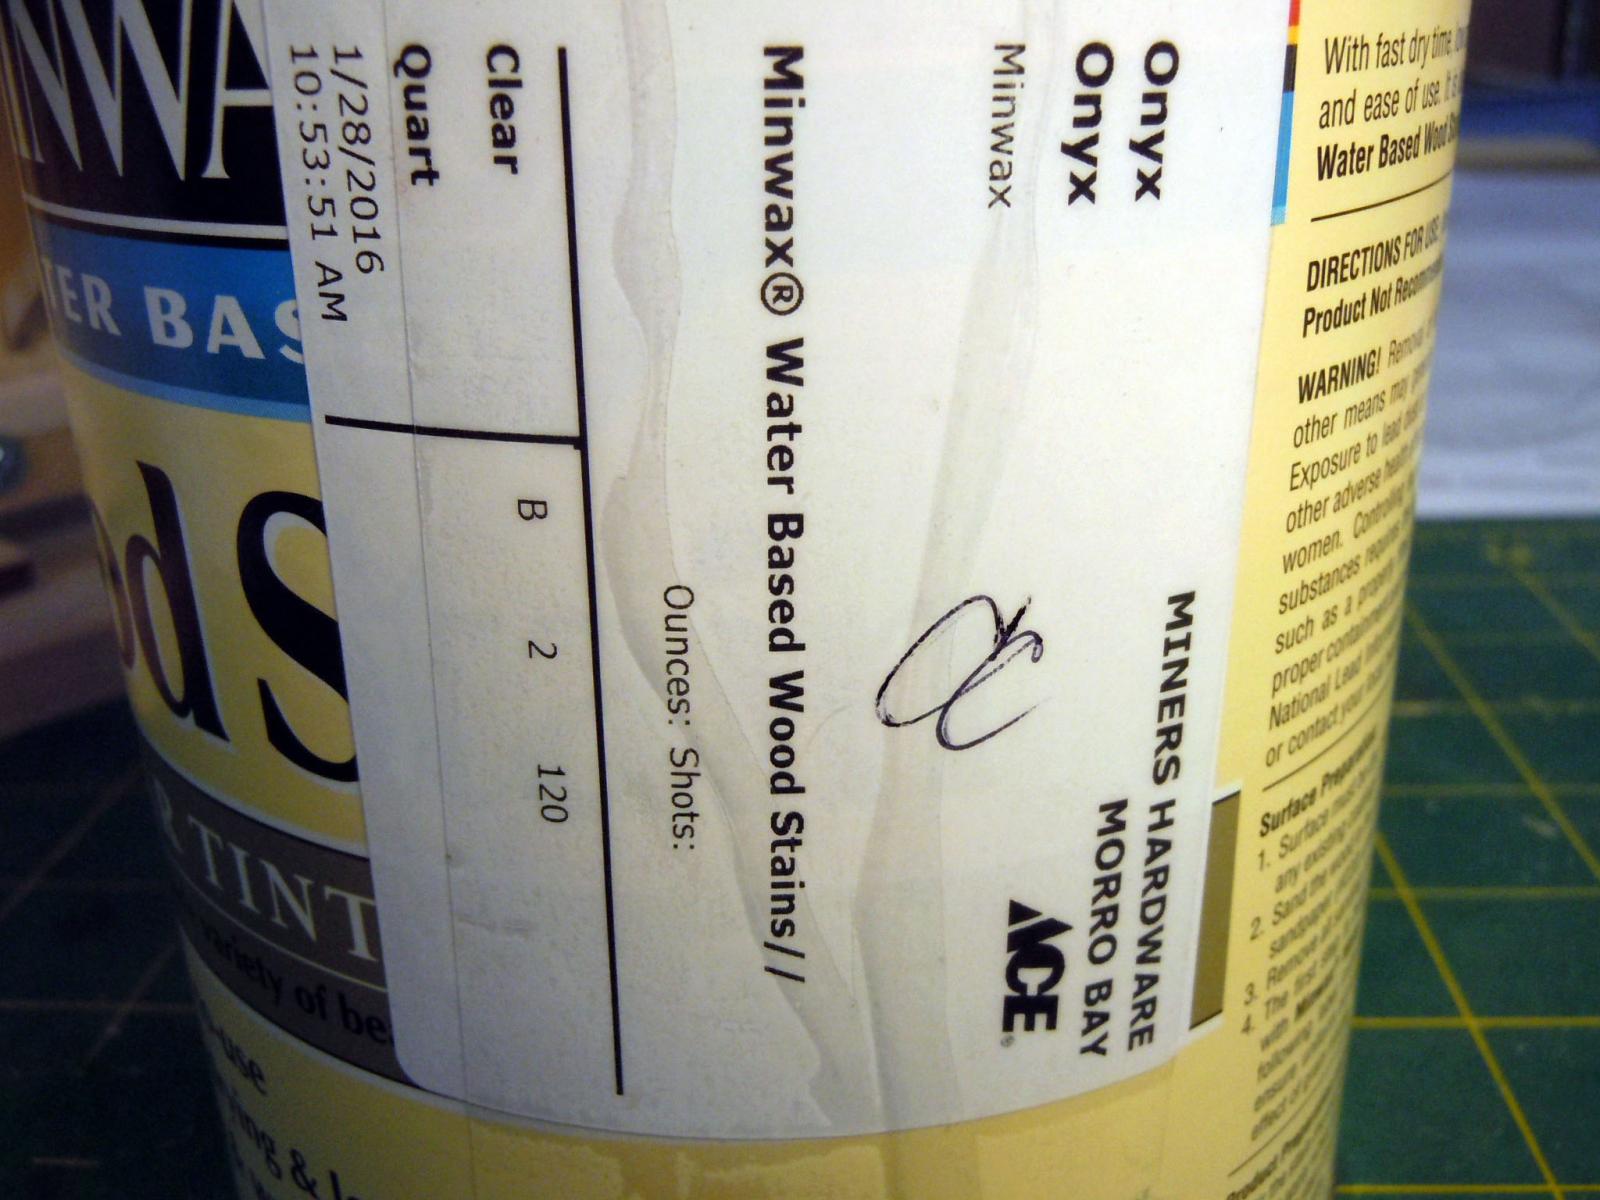
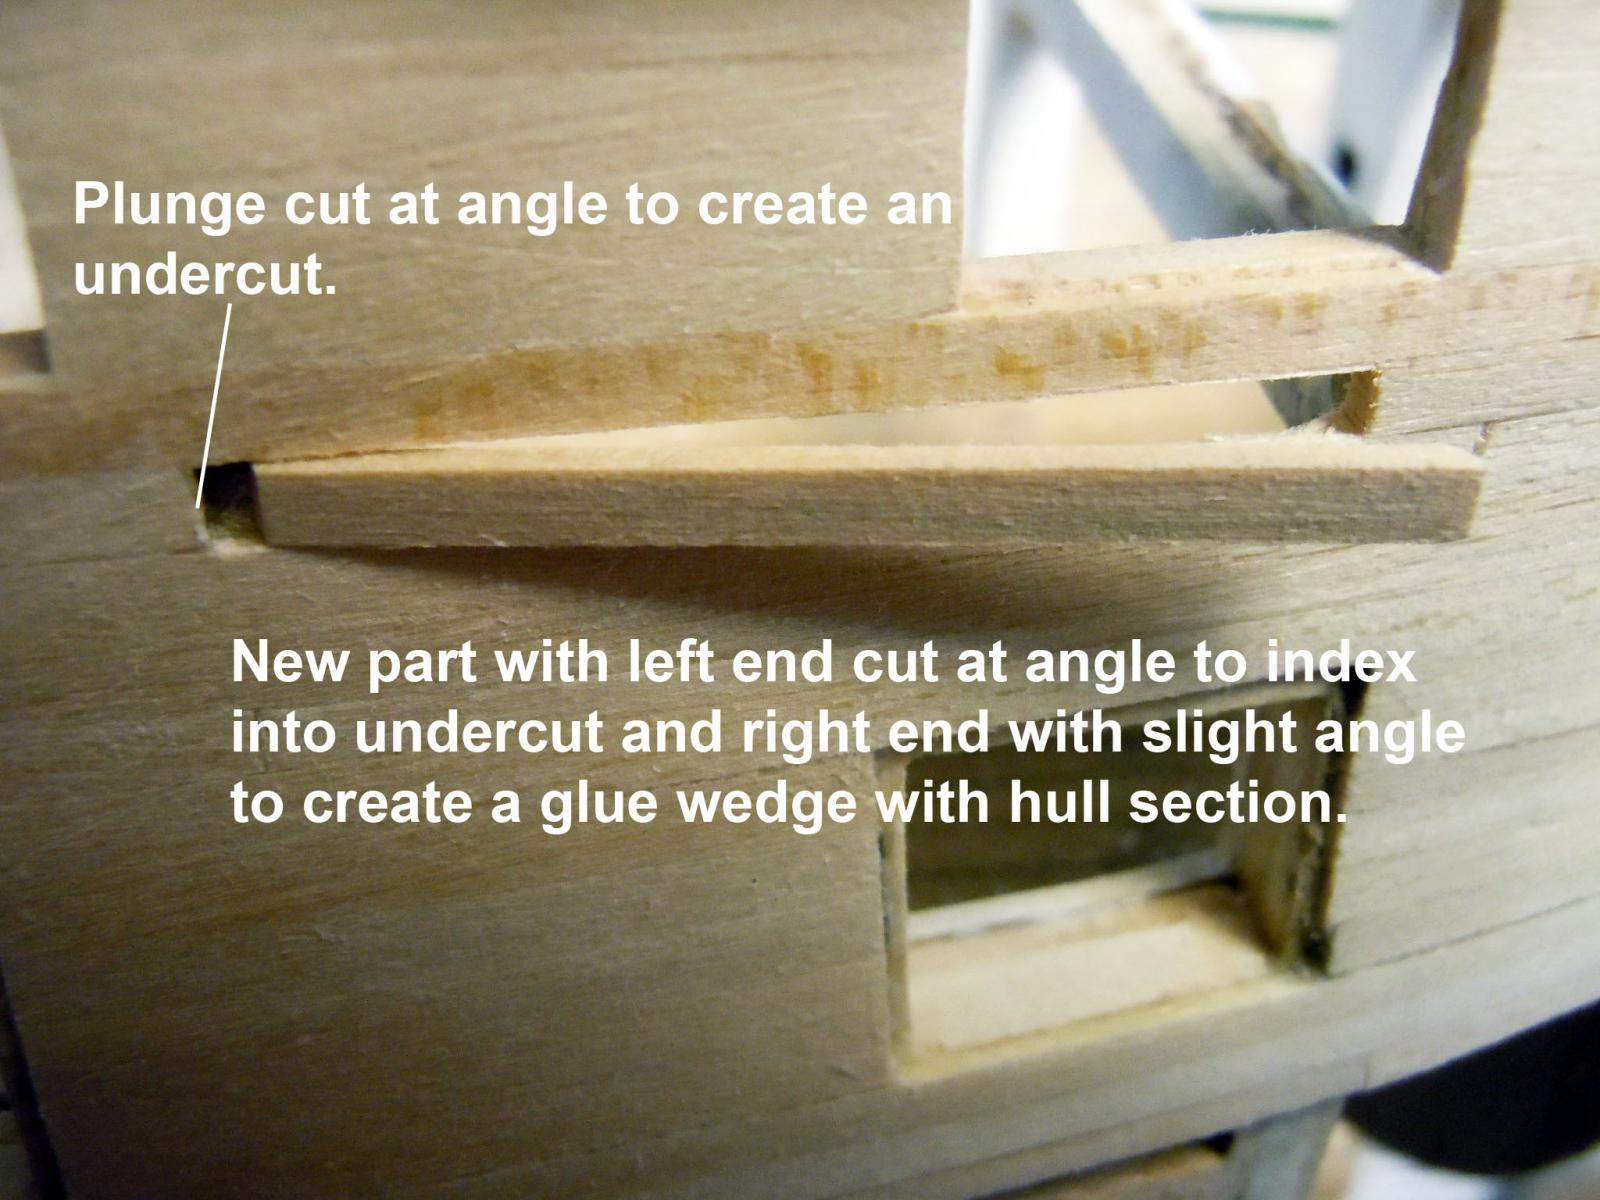
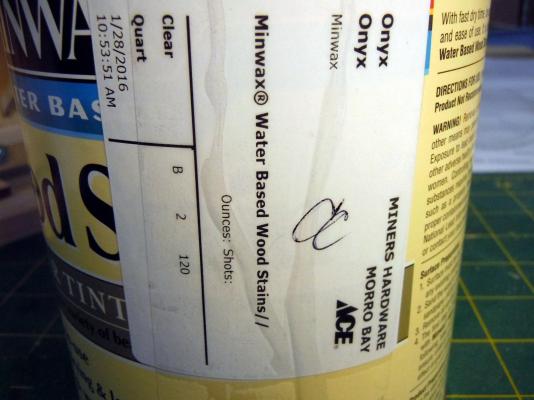
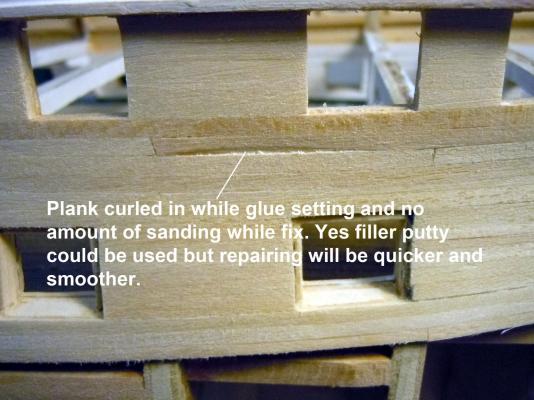
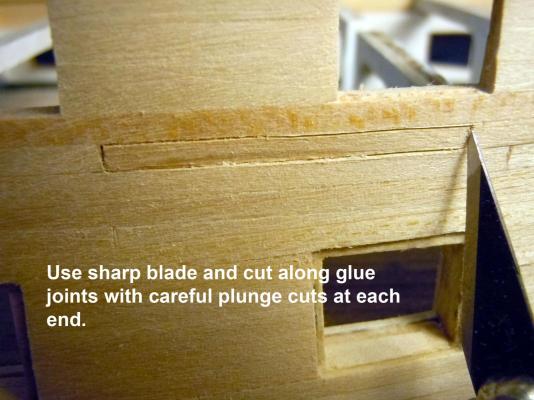
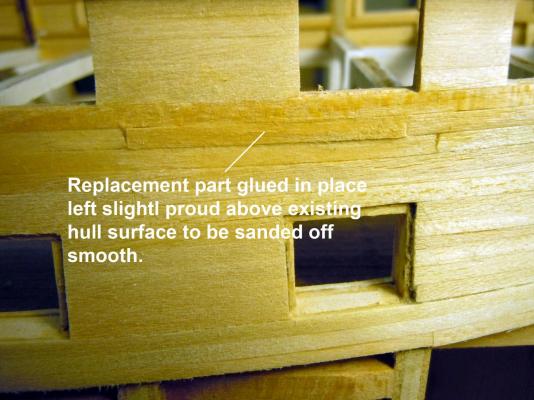
Thank you all for your comments, video links and suggestions. I purchased a qt. can of the water based MinWax Onyx black stain. and the test is on with the first coat on and looking great so far. I have to wait 2 hours before applying a second coat. The final stain while require being clear coated when dry. This is the same process I have used for the airplane builds I have done. We checked the formulas of the two black stains available; Classic Black and the Onyx. The Classic Black uses a transparent dye while the Onyx uses a solid dye which makes it the "blacker" than the transparent Classic Black. This also "wife friendly" with water clean up and no odor. Hear is a picture of the label. I will update when the test is complete and clear coated. In the meantime hear is a sequence of repairing a hull plank when it gets a mind of it's own and curls while glue drying and setting. This is easy and faster than wood putty which would impact the final finish. They again are self explanatory. Now back to adding the wale planks which is proving interesting to do at the stern with aggressive twisting and bending required.


-
Grant thanks for the great video and it is very interesting. MicroMark sells a solution for weathering wood in the train section of their catalog that does something similar. Tomorrow I will check by the hardware store for a water based stain which they only sell in quarts so I may have a lifetime supply. The reason for the water based stain is is that it does not smell, and when dry glue will adhere and can be clear coated over with no problems. I learned years ago that oil based stains cause very weak glue joints and some over time even let go. I have had great success with water based Golden Oak which I have used on many of my WWI plane builds. For now I think I will venture with what I know will work for sure and keep the wife happy with no foul smells. Thanks again for sharing and will keep it in mind should I ever need to do it. Mike, thanks for taking the time to share the photo link, it just reconfirmed my direction I am headed in with the water based stain.
-
Mike, Thanks for the reference to your build. You are doing a great job and like you I may have to do a little experimenting as well. Thanks again and keep up the great job you are doing. I will be visiting again and looking over your shoulder. Ken
-
Steve, does your Black Japan have a brand name? ls it oil or water based? The product I have seen is a Minwax item, I guess I will have to some more experimenting.
-
Greg, they were cut from a strip 1/2" wide x .032" thick x length needed. I cut them on a small shear I have but could easily be cut using a jeweler's saw. I like using the brass because as a cutting guide it does not dull the blade edge like steel would but strong enough to keep the edge straight. Questions are always welcome. In fact I have a question for anyone out there...Has anyone ever used Ebony Stain as the hull finish rather than black paint?
-
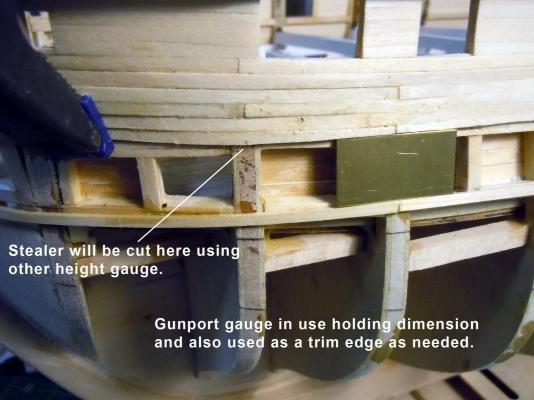
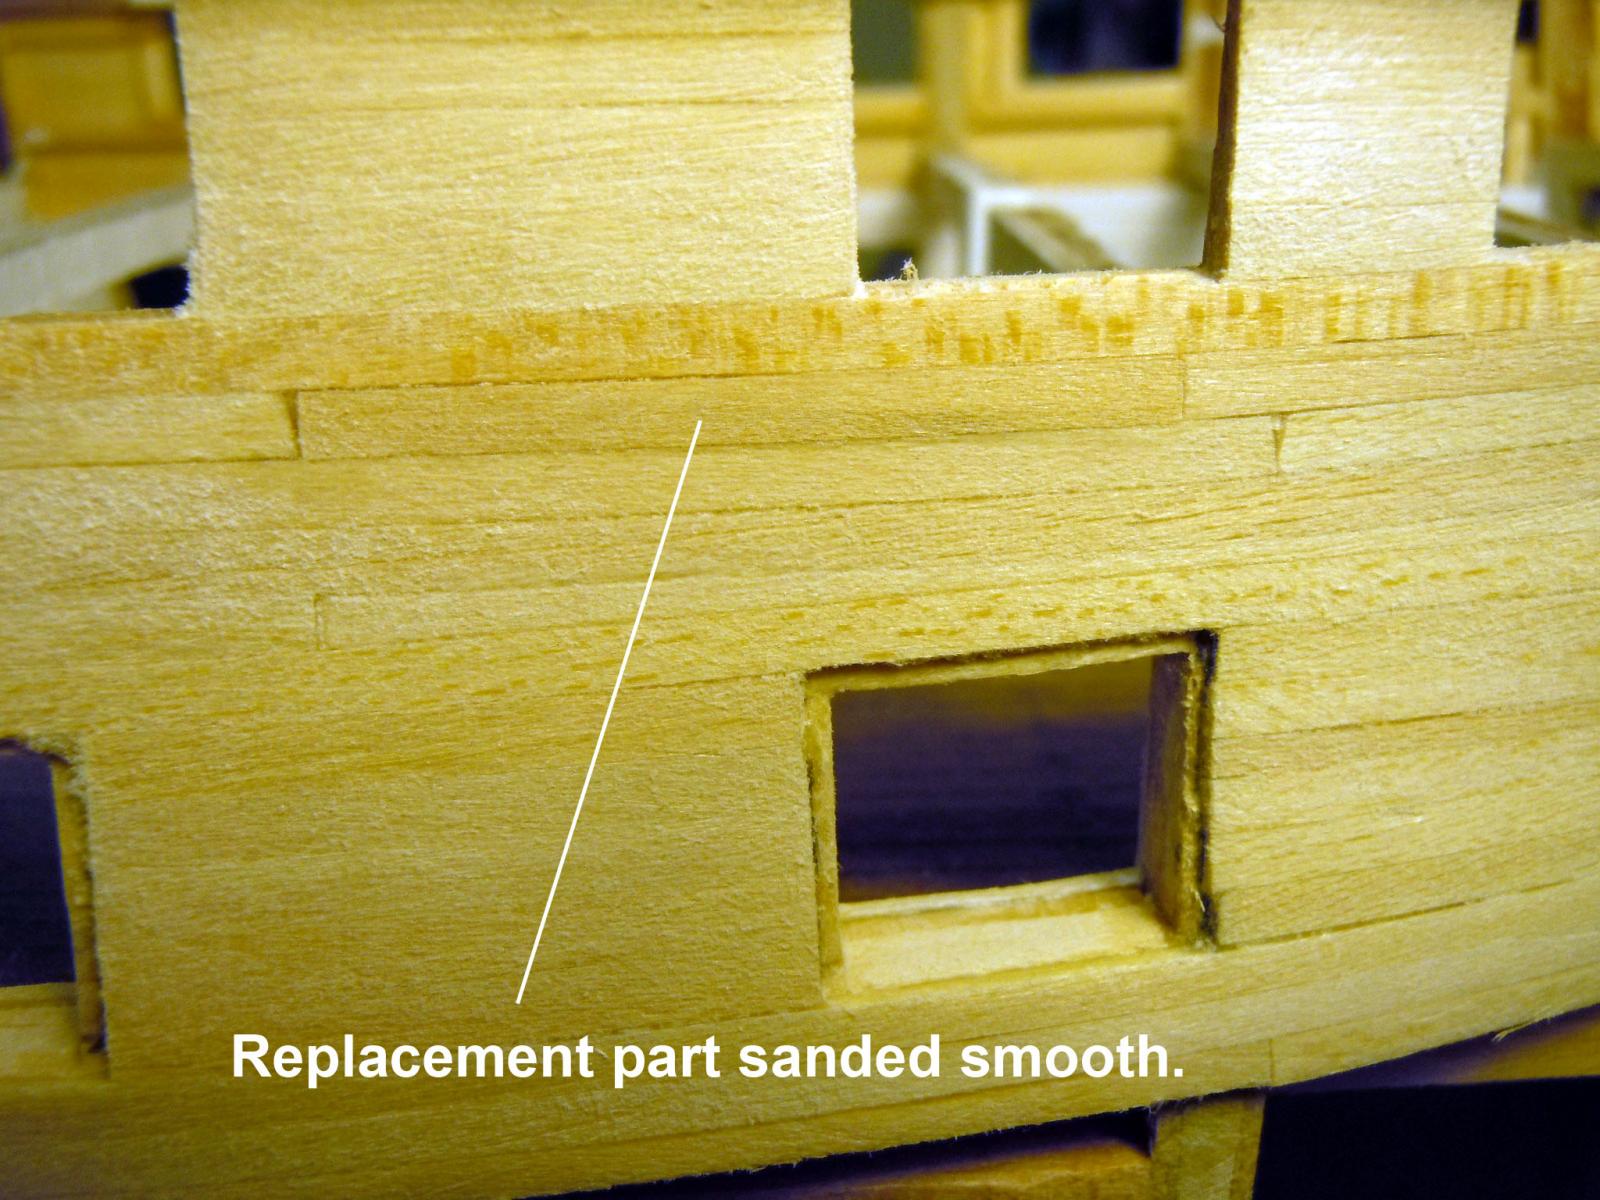
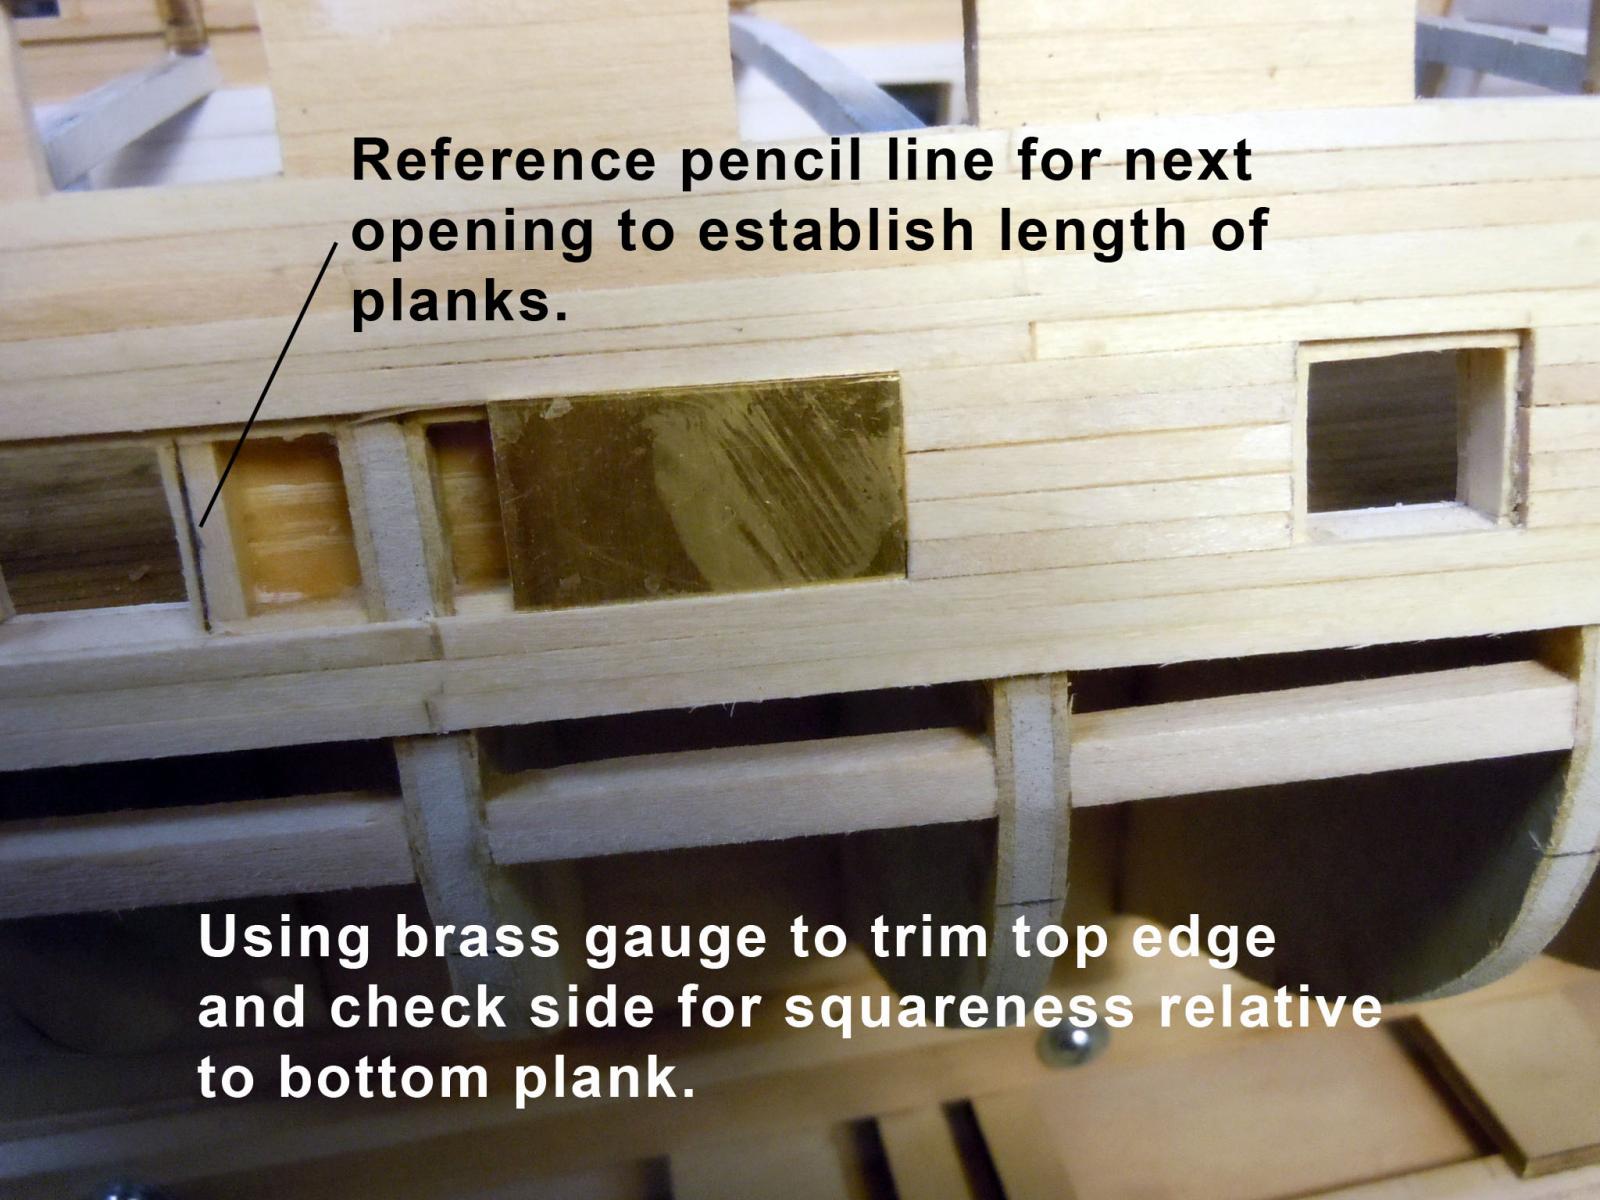
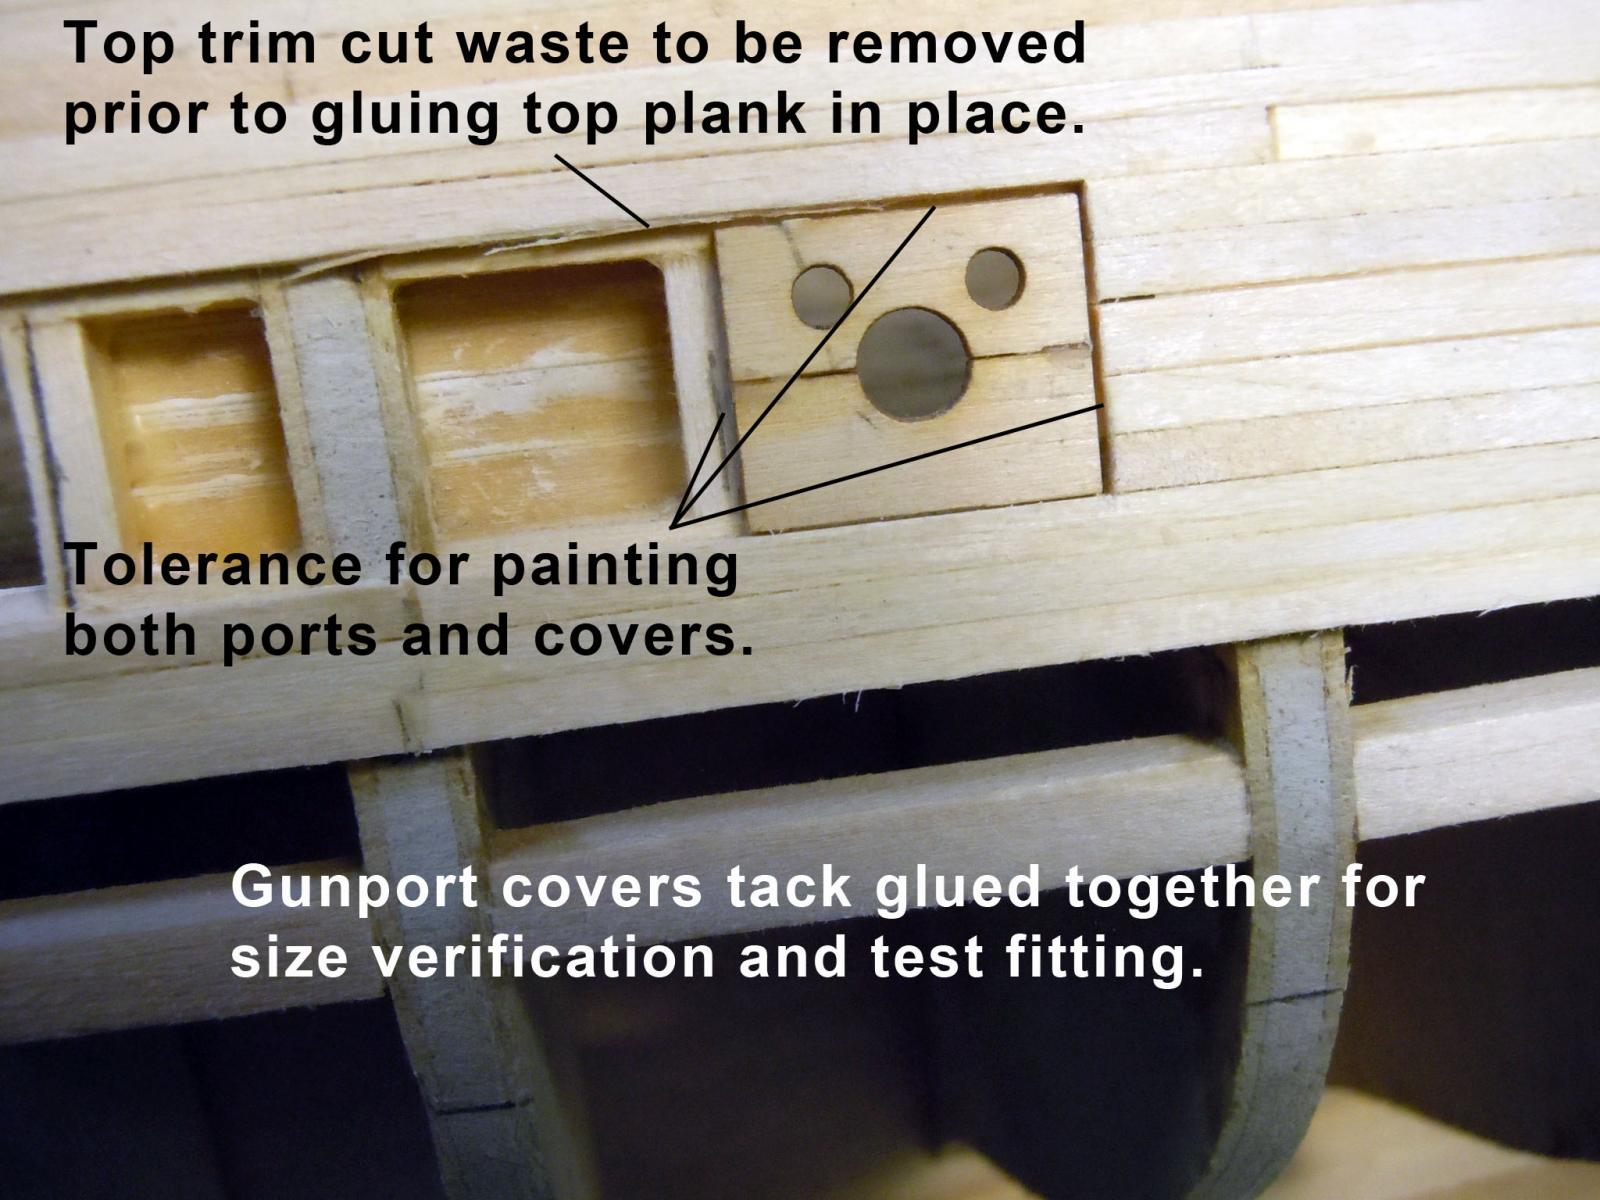
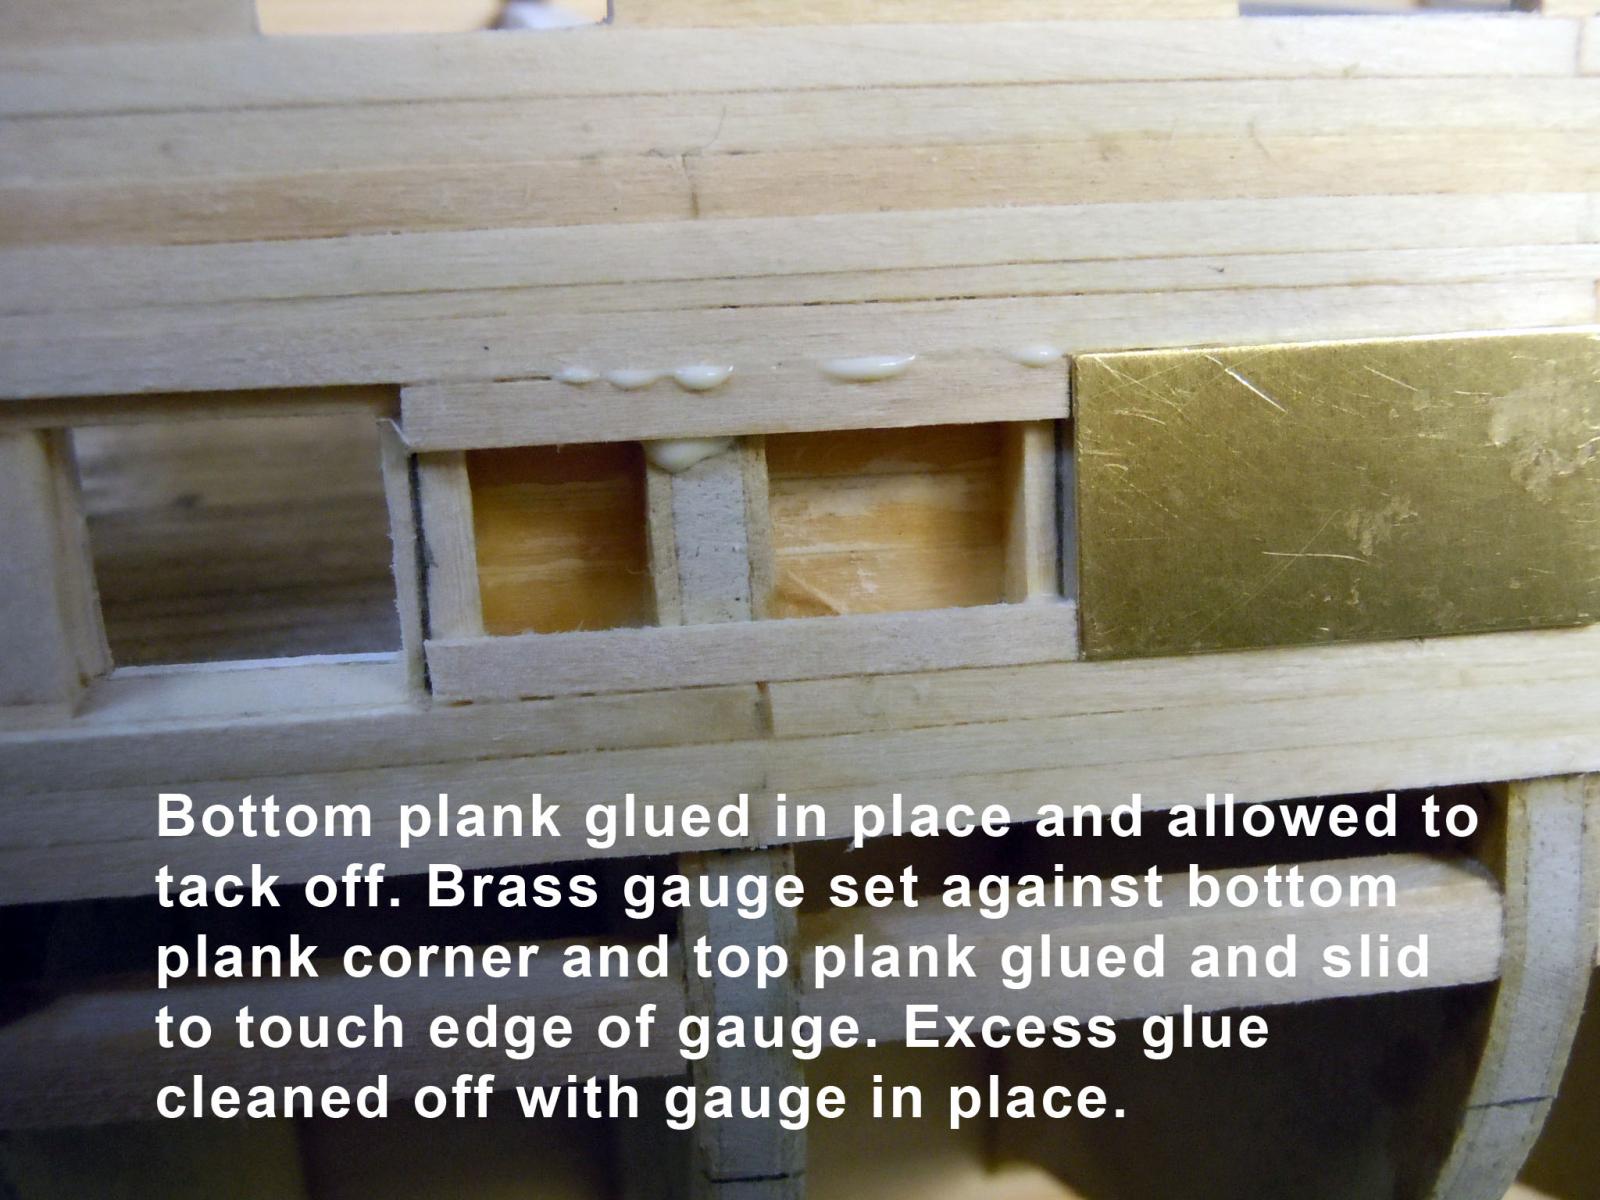
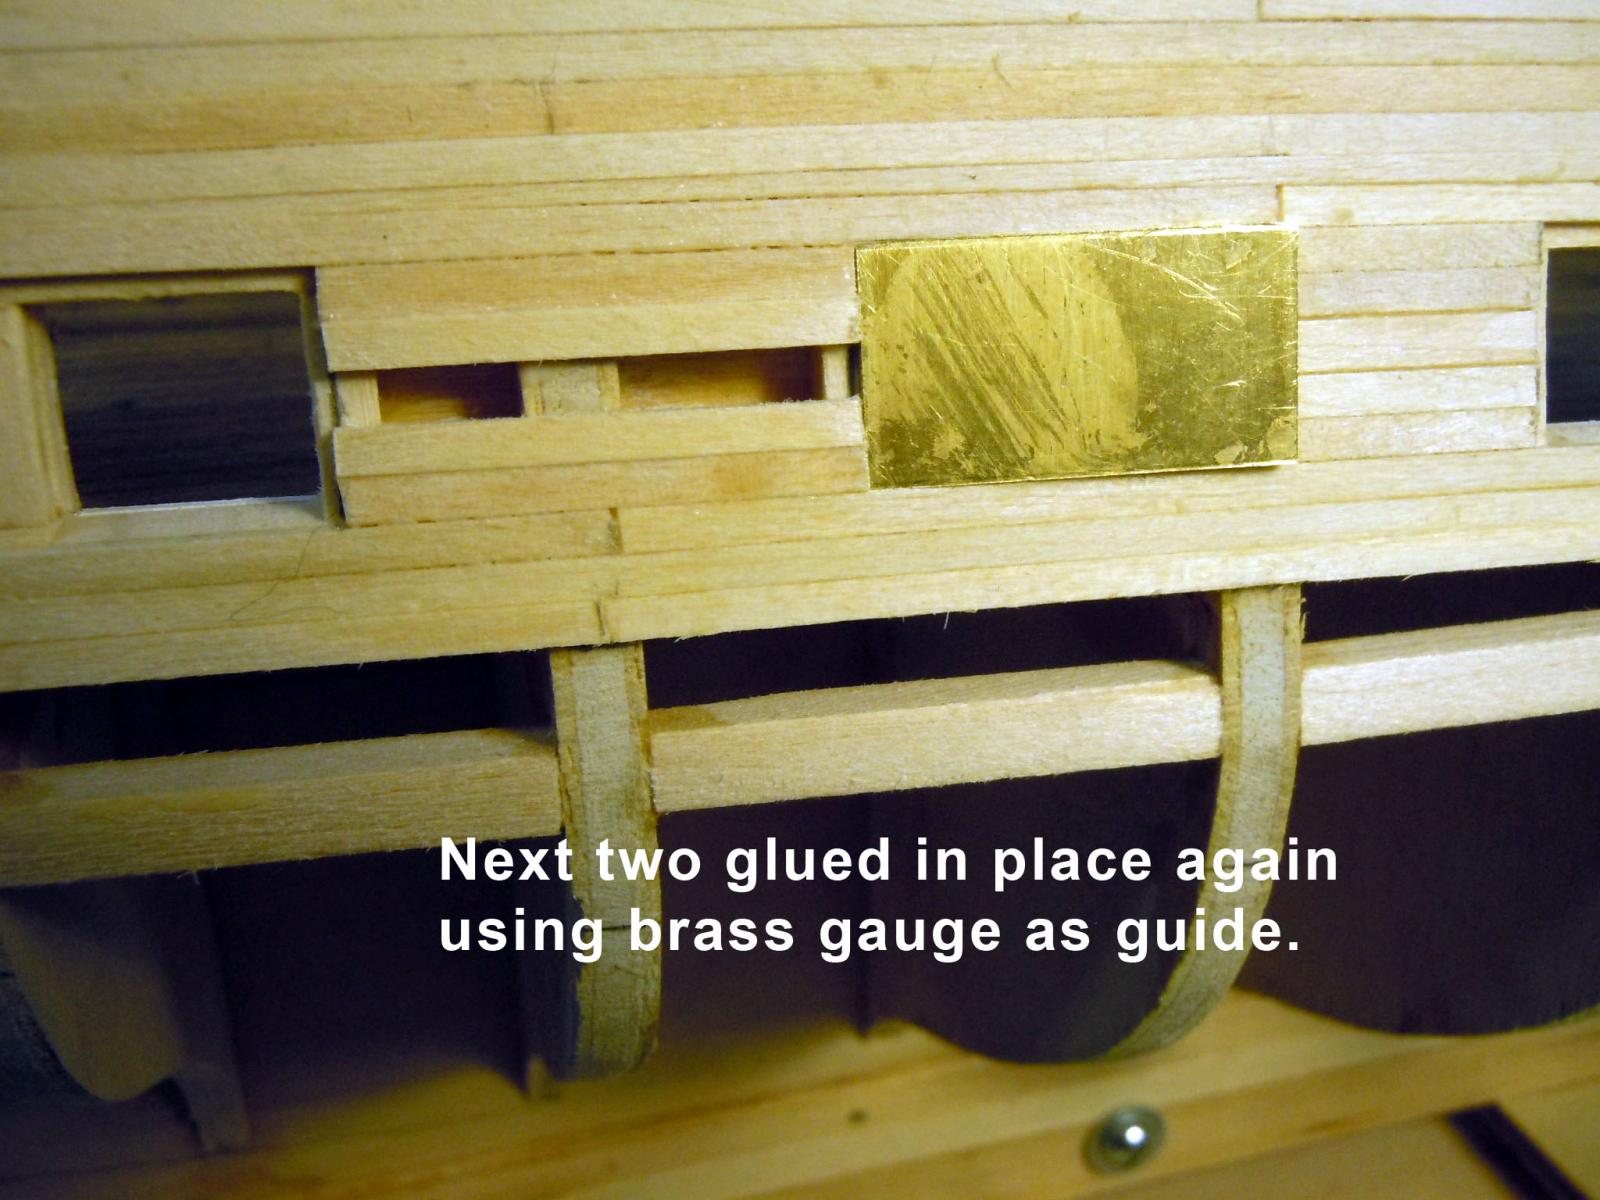
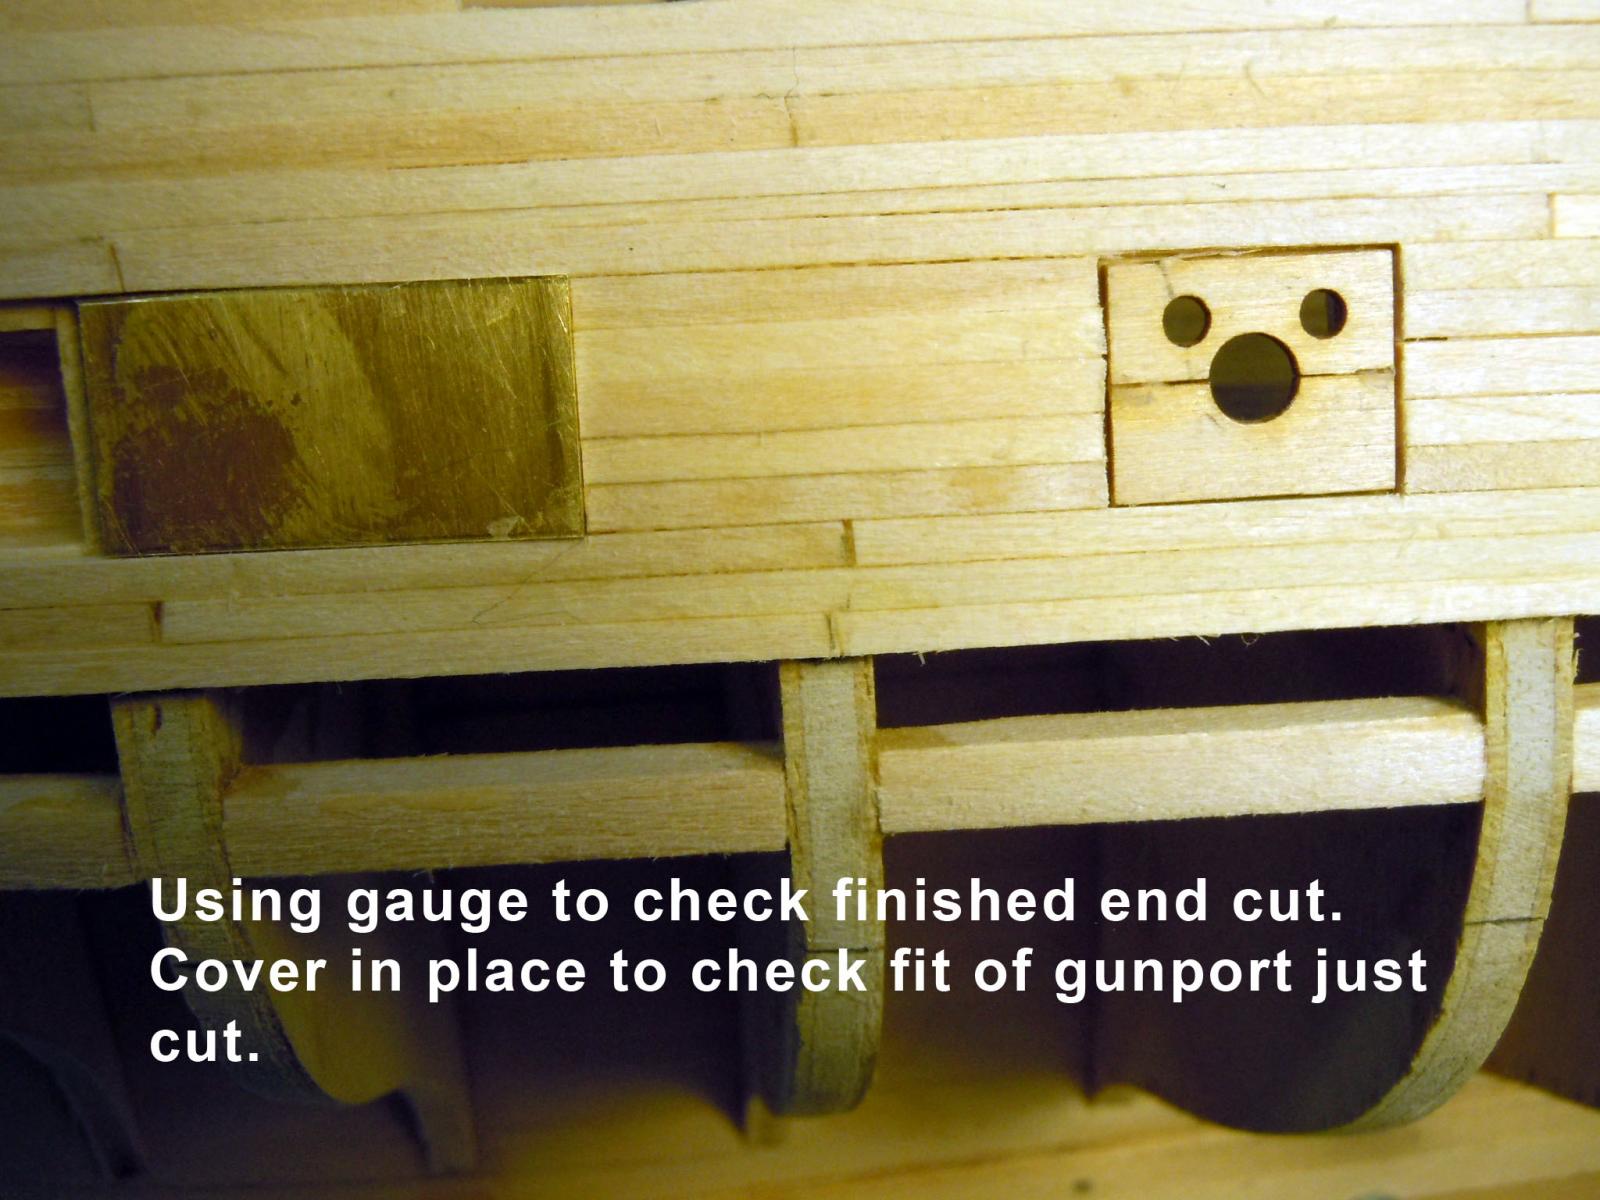
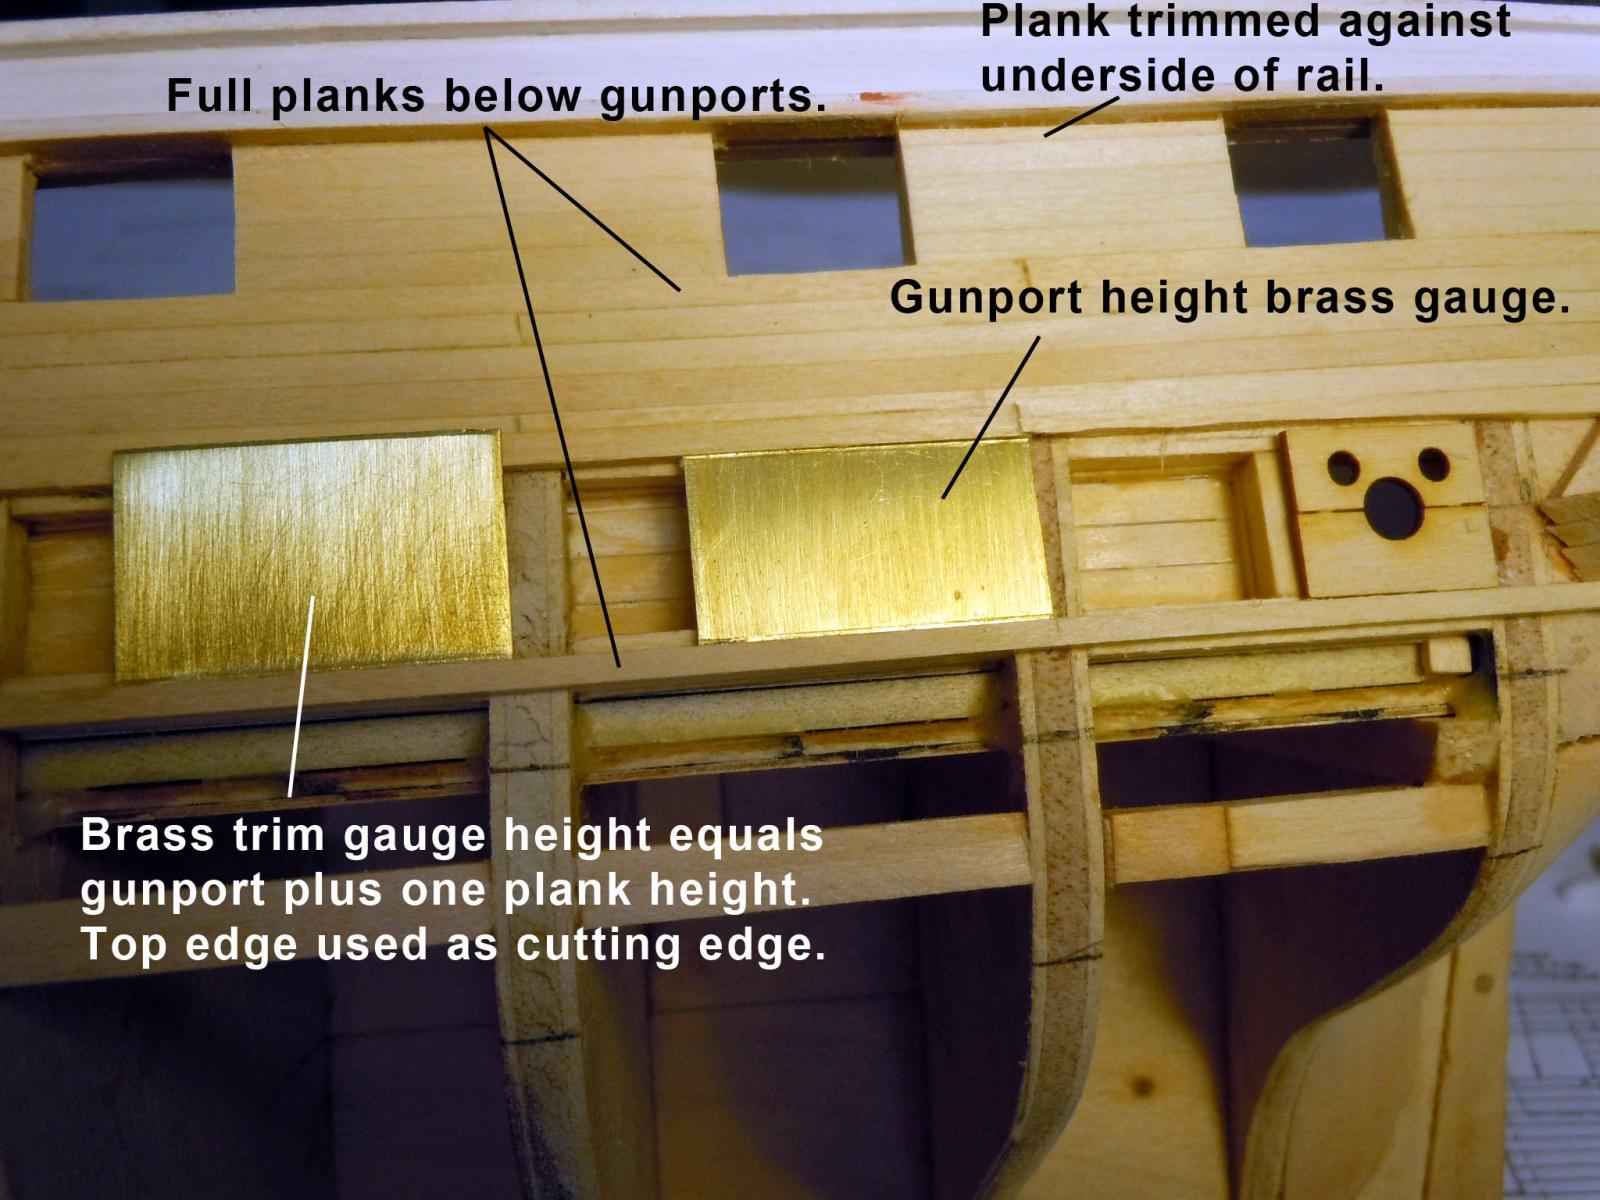
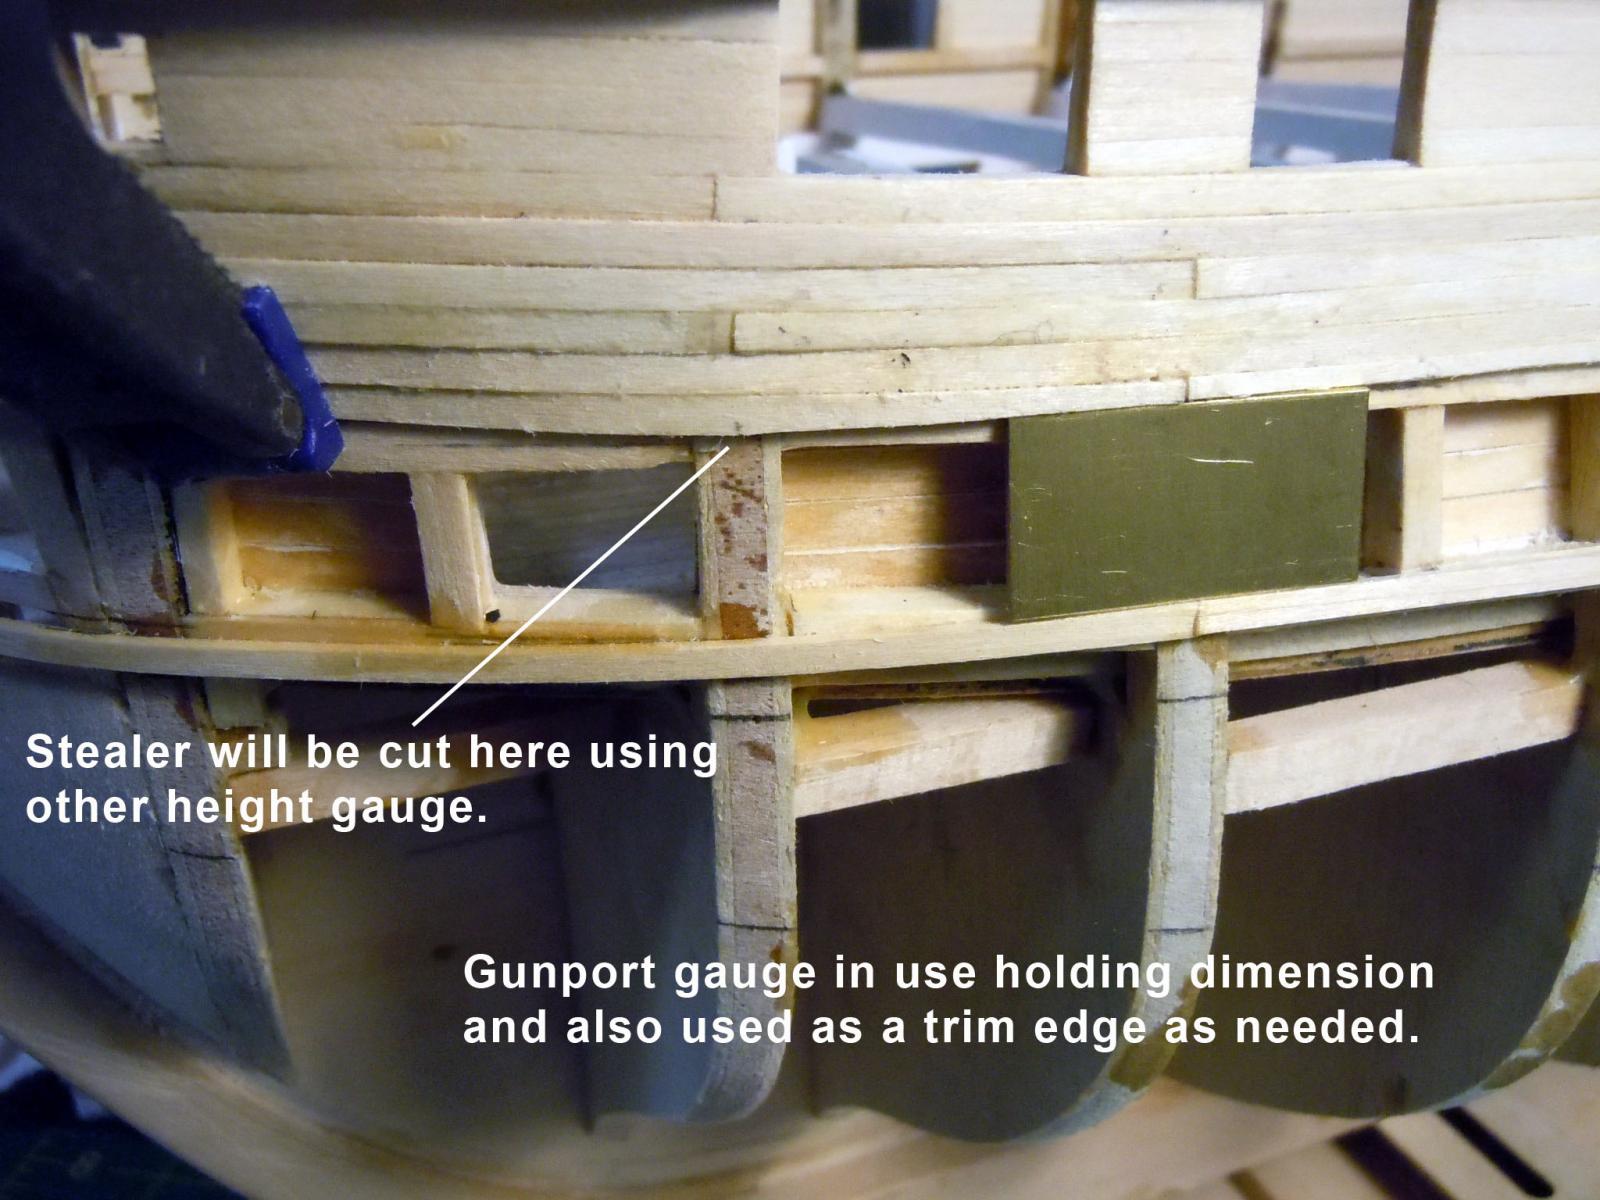
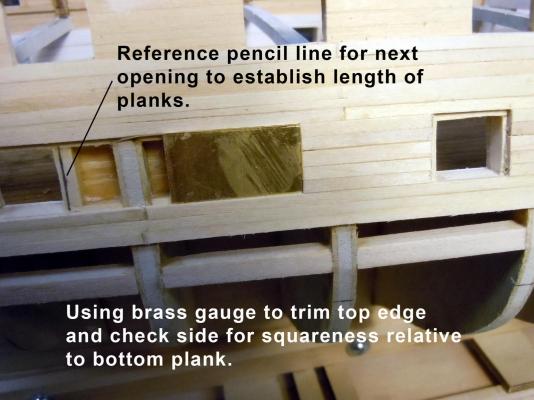
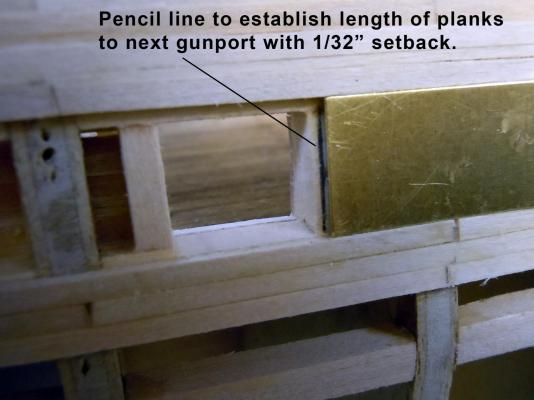
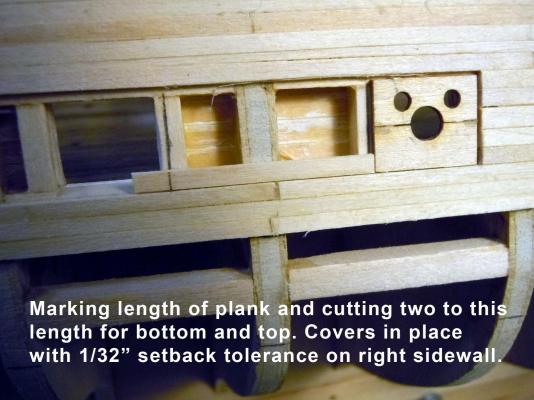
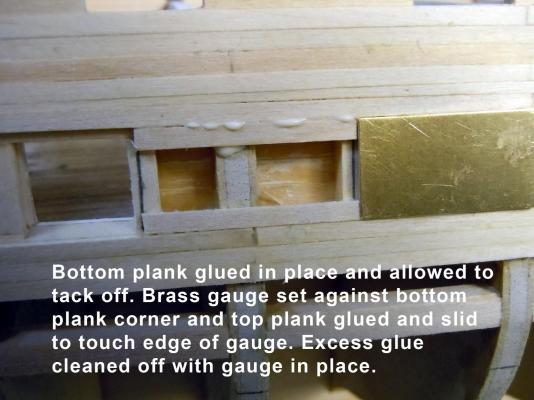
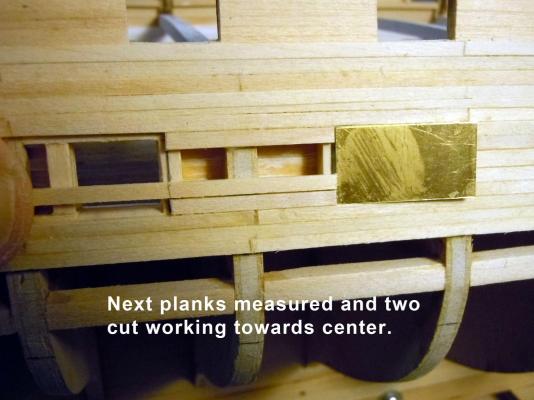
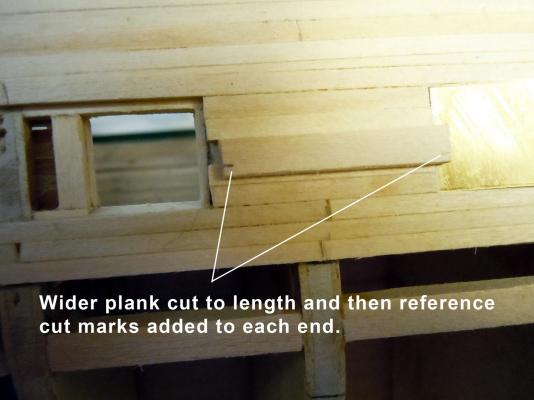
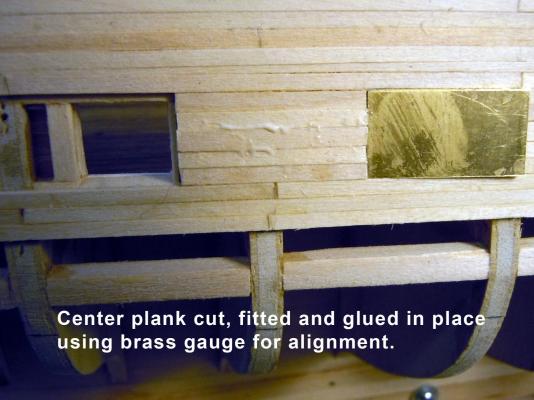
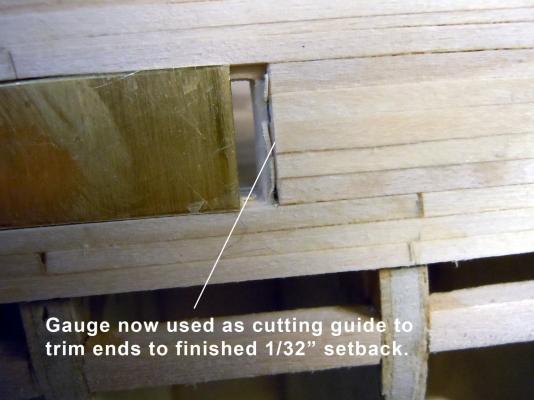
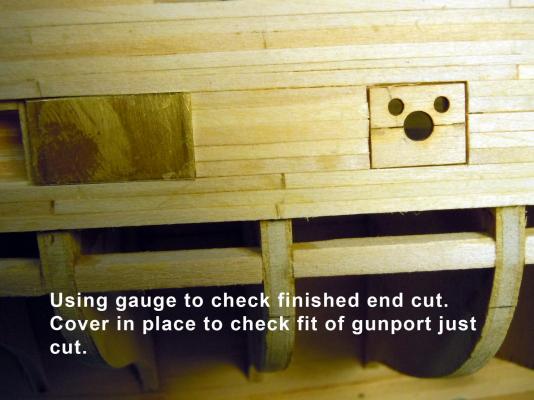
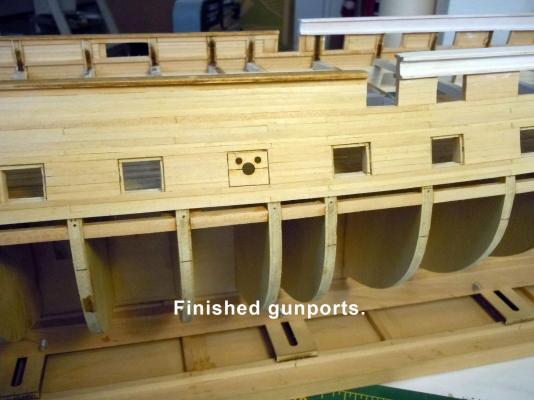
Here is a detailed step by step sequence of using the brass gunport height gauge to add the wall planking between gunports. I found the gauge along with the gunport covers tack glued together to be very effective and fast with great results. Sorry if to lengthy and basic for some but for those new like me it may save so time and frustration. They are fairly self explanatory. Now to finish up the few to go then sanding down before adding the 1/16" thick wale planks so as not to ruin their edges.


-
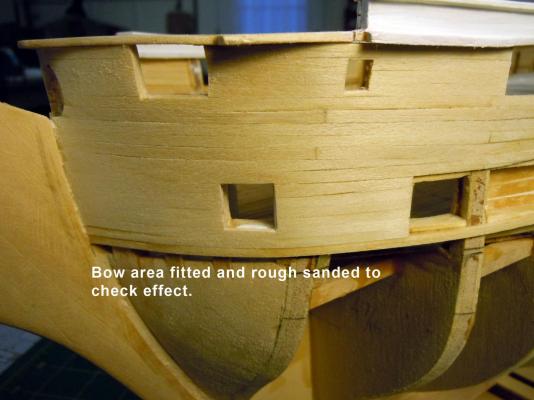
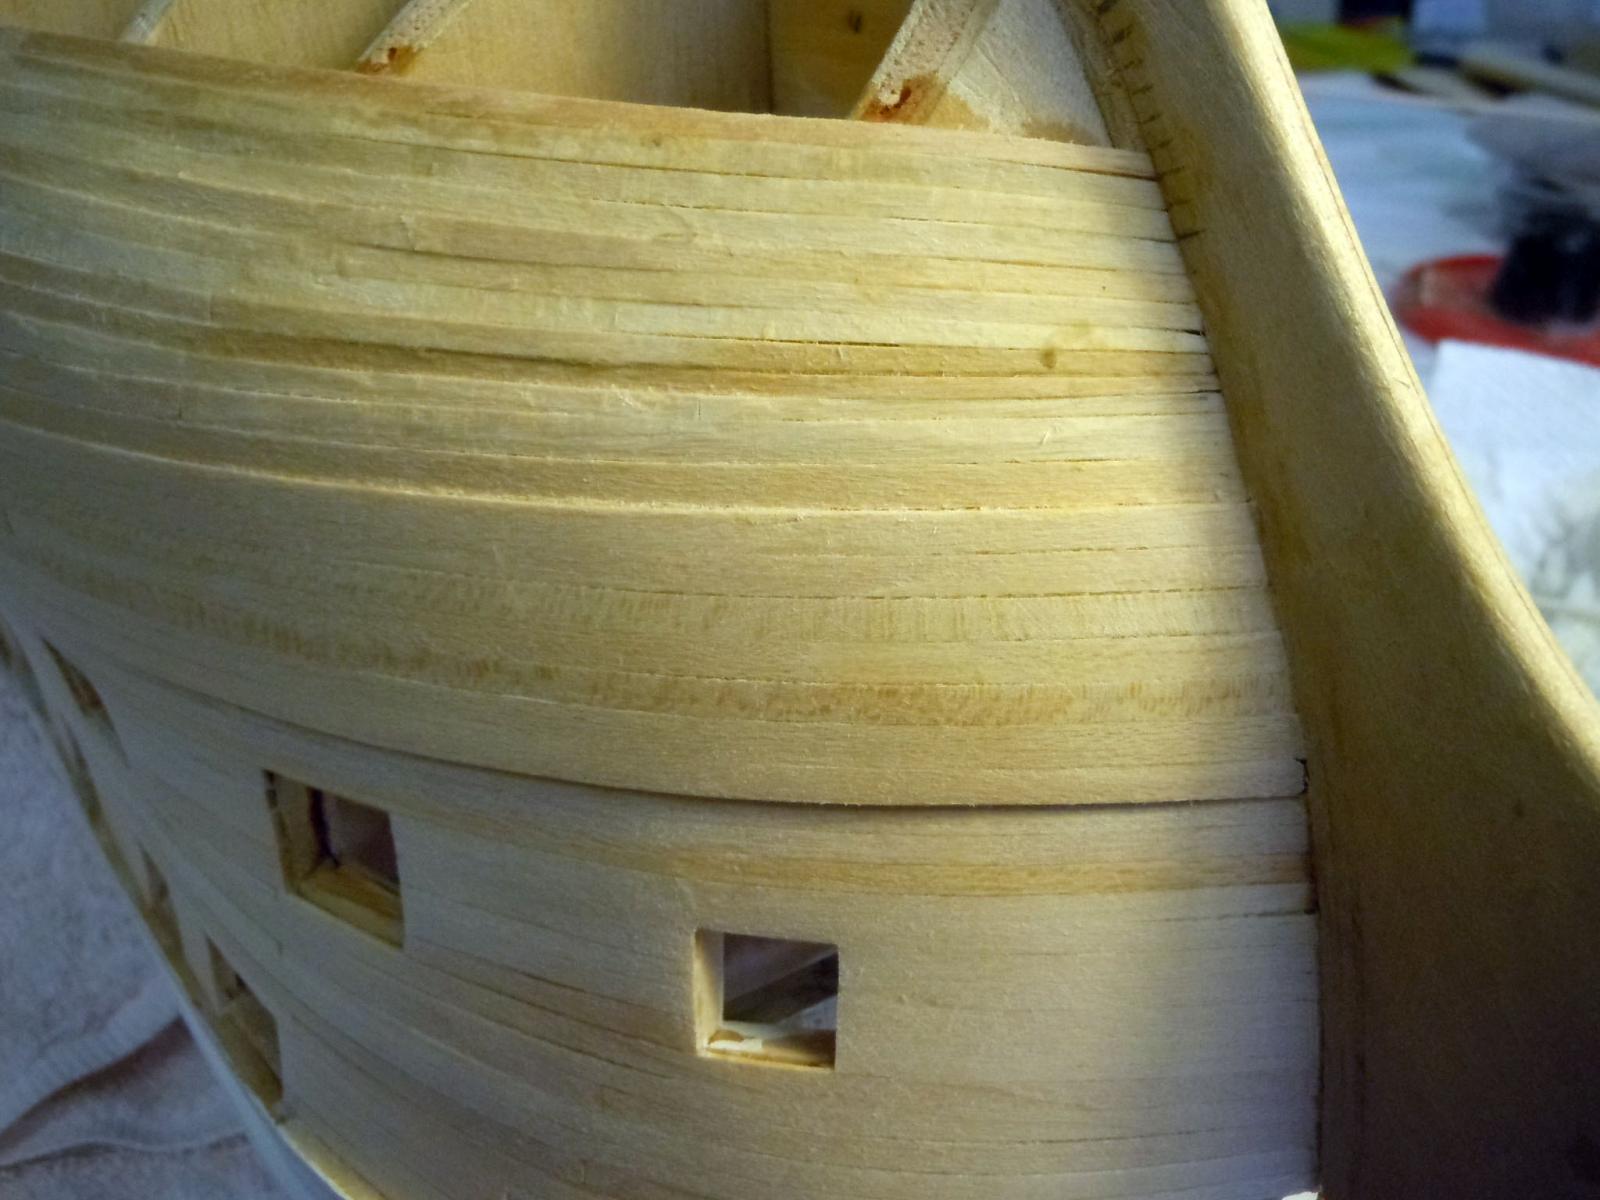
In progress planking update; and yes a slight trip up following the plans in planking. I guess I got lucky adding planks and landed a full plank below the spar deck gunports and proceeded on adding planks down to the gundeck and realized a problem was starting to present the fact that a half plank was going to land on the top of the gunports including the 1/32" set back for the gunport covers. I then decided to make two brass gauges before going any farther; one the height of the gunport opening including the 1/32" set back top and bottom, the second with the gunport height plus the width of a full plank. The latter would be used to cut and trim using the top edge as a guide. I I also paid more attention to the width of the planks which I found varied slightly one to another. I also added a full plank the full length set 1/32" below the gunport openings. This would be used as the reference plank that the brass guides would be set on for cutting and trimming with a full plank landing on the top of the gunports. I did this so the cut plank would be just above the full plank. I think it was the variation of the plank thicknesses that accumulated and deviated from the plans. The planks are not a full 1/8" as drawn on the plans. Here are some pictures that may help explain this be better understood. Since this is my second ship build I am sure it is my inexperience that is catching up with me. Here I started at the rear and planked forward to the bow. Here is a picture showing the transition around the curve of the bow which required the use of a couple of stealers. Here is a quick rough sand to show the effect at the bow area; I will plank down to the wale which are the pencil marks on the bulkheads. I will finish up this side and then move to the starboard side.