Chuck
-
Posts
9,694 -
Joined
-
Last visited
Content Type
Profiles
Forums
Gallery
Events
Everything posted by Chuck
-
 Yes indeed. Each plank is cut to length based on the shifting bulkheads. Usually 4 planks per strake (or row of planks). Sometimes you get lucky and there are only three. But usually four planks cut to length. They will all be different and you must custom cut the lengths (and widths with a taper) for each plank as you proceed. Chuck
- 1,784 replies
-
- 4
-

-
- winchelsea
- Syren Ship Model Company
- (and 1 more)
-
Good start.....but yes you have a long way to go with that fairing. It takes a while but will make or break whether or not the product is successful. Just take it slow and steady. Chuck
- 105 replies
-
- 1
-
-
- winchelsea
- Syren Ship Model Company
- (and 1 more)
-
Yes they must be curved to match the hull shape or they wouldnt close. Its the only way to make them. Doesnt everyone? That is a very extreme case you show and I suspect that is more warped than bent to match the hull curvature. On our model it is much more subtle but should be there none the less. I plan to show that port closed as well so it is even more important that is matches the curved hull shape. Chuck
- 1,784 replies
-
- 5
-
-
- winchelsea
- Syren Ship Model Company
- (and 1 more)
-
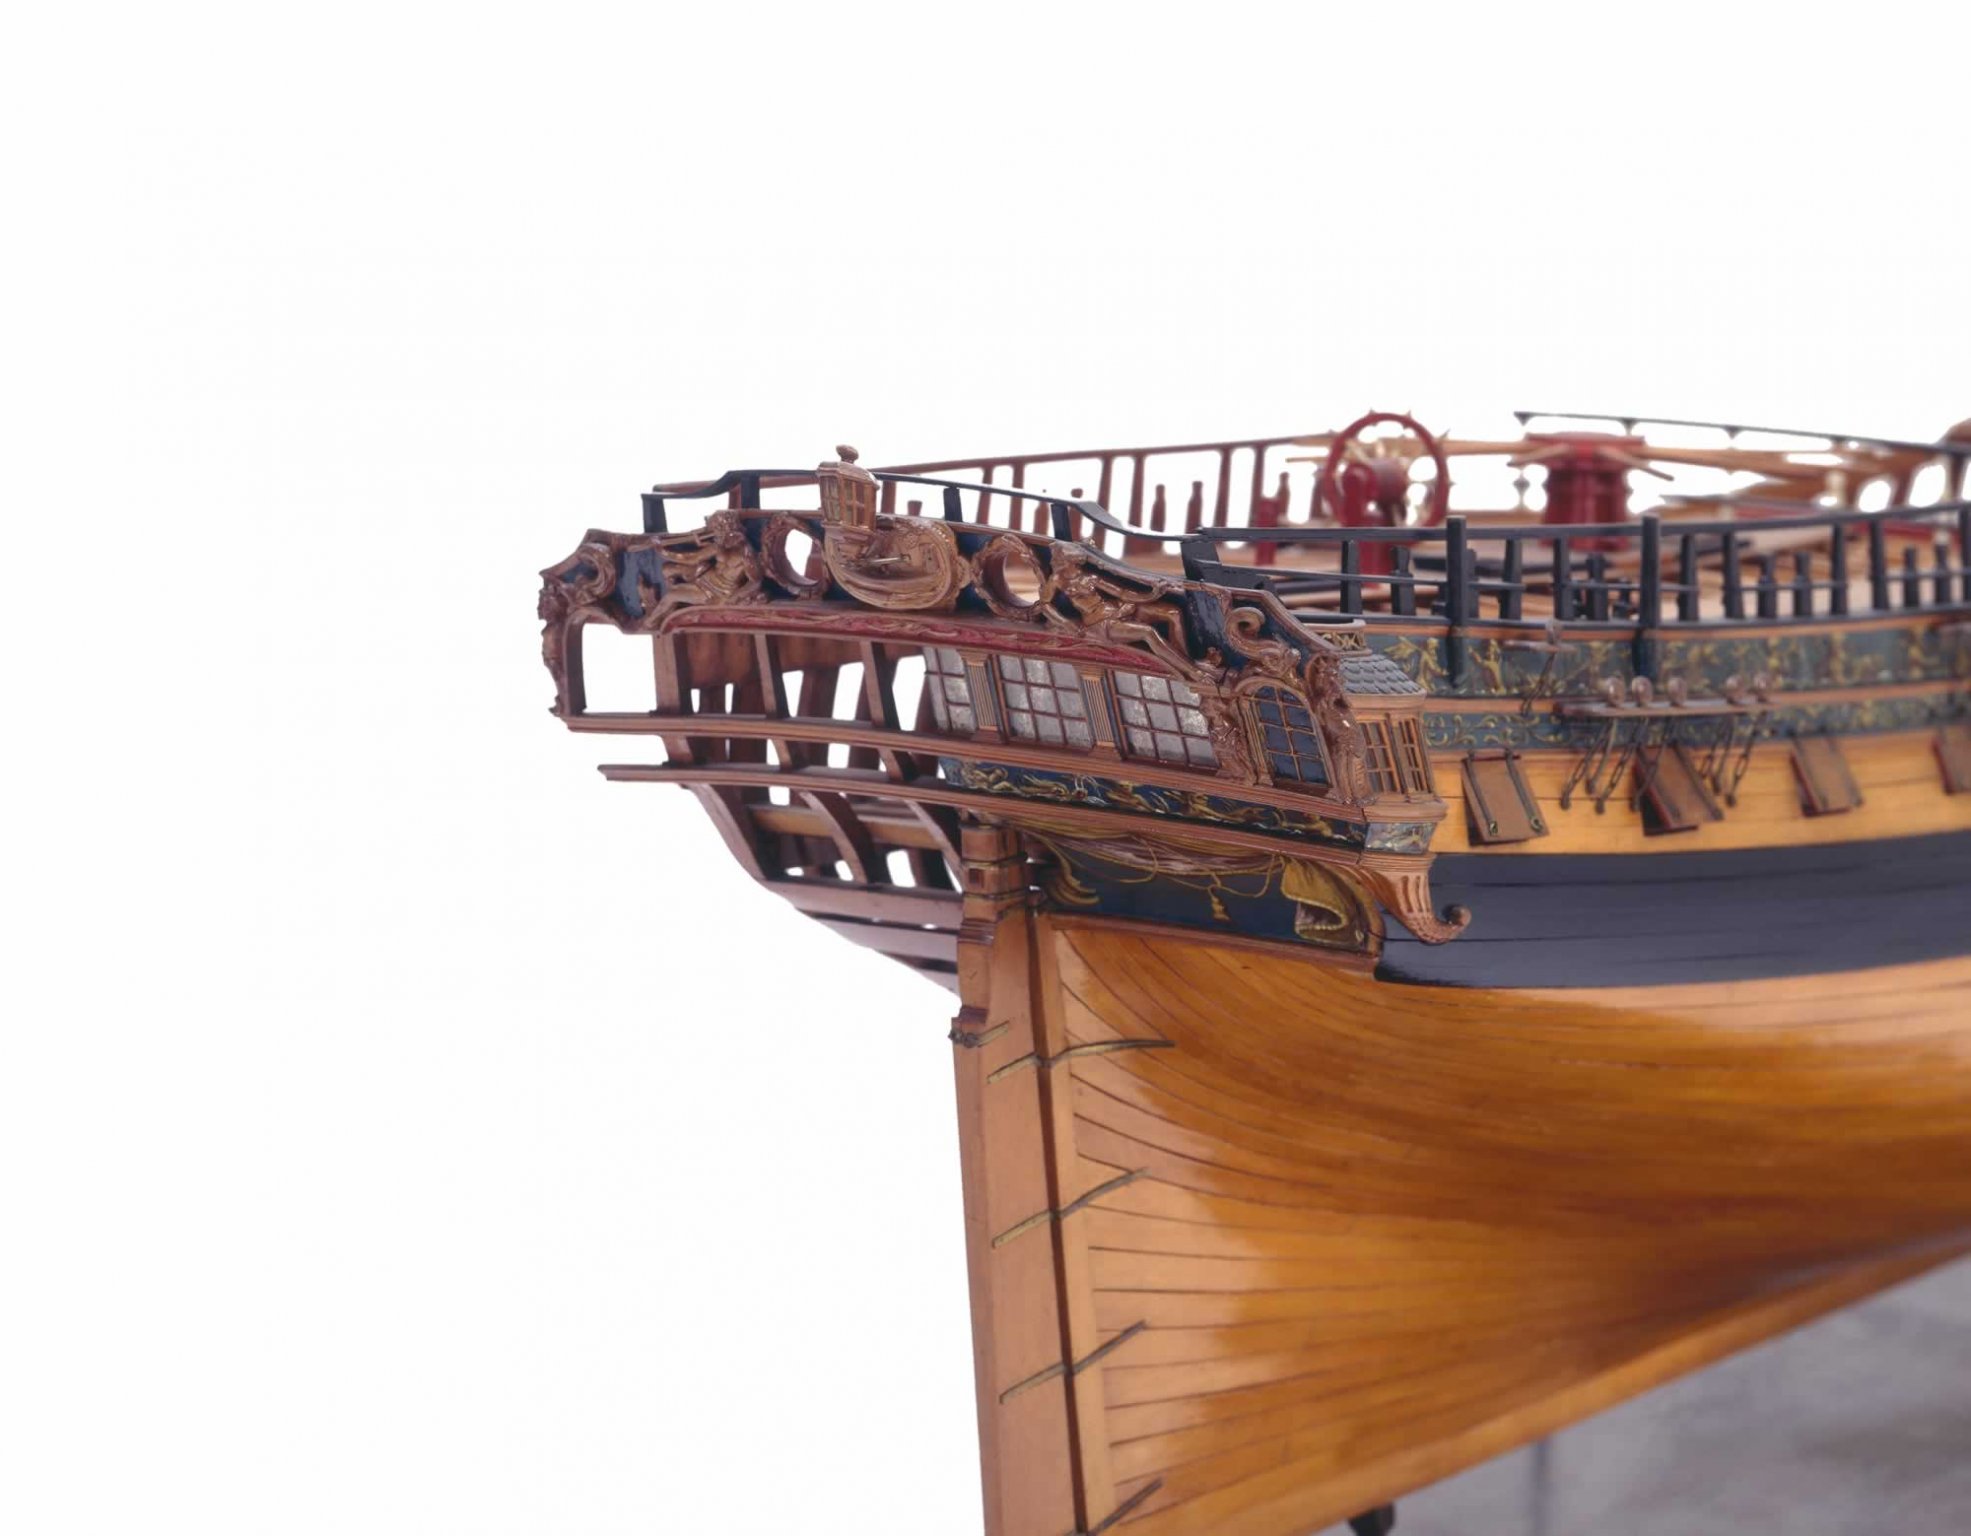
Not sure what you mean, but if you are referring to painted friezes and red bulwarks/fittings, then yes. I am pretty much following the contemporary model for colors and appearance with the addition of a few other details. In addition, because we are building her to the 1780ish configuration there will be some differences. For example, the counter at the stern will have the friezes but also the ships name as this was mandated by the admiralty at this time. Chuck
- 1,784 replies
-
- 5
-
-
- winchelsea
- Syren Ship Model Company
- (and 1 more)
-
Ed, You are very welcome.... This group is certainly more active and you might be able to apply what you see on this project to the Triton full hull as that is a more independent and fully scratch endeavor. Its up to you but we would love to see another build log and group member. The more the merrier. Chuck
- 1,784 replies
-
- 2
-
-
- winchelsea
- Syren Ship Model Company
- (and 1 more)
-
Lately I have been preferring the more classical approach. I like the cleaner end result achieved by the contemporary builders of models. I think we can get carried away with all the details which make some models appear too busy and overly clinical rather than an aesthetic work of the craft. Literally "less is more". I am finding the need to show every joint less and less. For example....certainly you have seen some builders make a rudder showing the tabled joints so every part/segment of it shows on the model. I find this particularly distracting. It would be so easy for me to laser cut those pieces and have them fit perfectly.... But I now prefer the more elegant and classical approach which I find more eye appealing and less "Look I made all the parts and made sure you can see them all" See how clean this looks with a rudder in one piece? I will still try and add a few extra details but I will no longer go crazy with them. I just dont think it looks good. I am still leaning toward not even adding treenails to the hull planking. The model below looks just as good without them. I think concentrating on my craftsmanship and neatness is more important.....rather than sloppy joints but I showed all of them. Just to give you guys my current philosophy so you know where I am going with this model. It also leaves more for you guys who might want to bash it and add all of that stuff. More power to you!!!

- 1,784 replies
-
- 10
-
-
- winchelsea
- Syren Ship Model Company
- (and 1 more)
-
Have a look at those lids in that photo of the contemporary model. I will use brass strip and shape them just like that. But no soldering will be needed. There arent that many of them so it shouldnt be too bad but it will take some time to make them all. They will be working hinges made with wire...the hinge strap at the back end is thinned down and bent into a loop to accept the wire hinge pin. The wire hinge pin is bent into an "L" and one end is glued into a hole in the hull planking.....this is done while the "L" wire pins are inserted into the hinges. It will be easier to show it done than explain......in a little bit. No need for micro tubes as this will be a simplified approach....which being good enough for the contemporary builders will work just as good for us. But Dirks method is fine also....just more involved. In the end they will look almost identical. I wont be adding the many bolts as Dirk did either. Not only is that much extra work but if its not done perfectly and they are misaligned it looks sloppy. I also think it looks way too busy and over-done that way.....a kitchen sink approach. For my own aesthetics I will follow contemporary practices and keep them clean and free from bolts. "Less is more" Chuck

- 1,784 replies
-
- 3
-
-
- winchelsea
- Syren Ship Model Company
- (and 1 more)
-
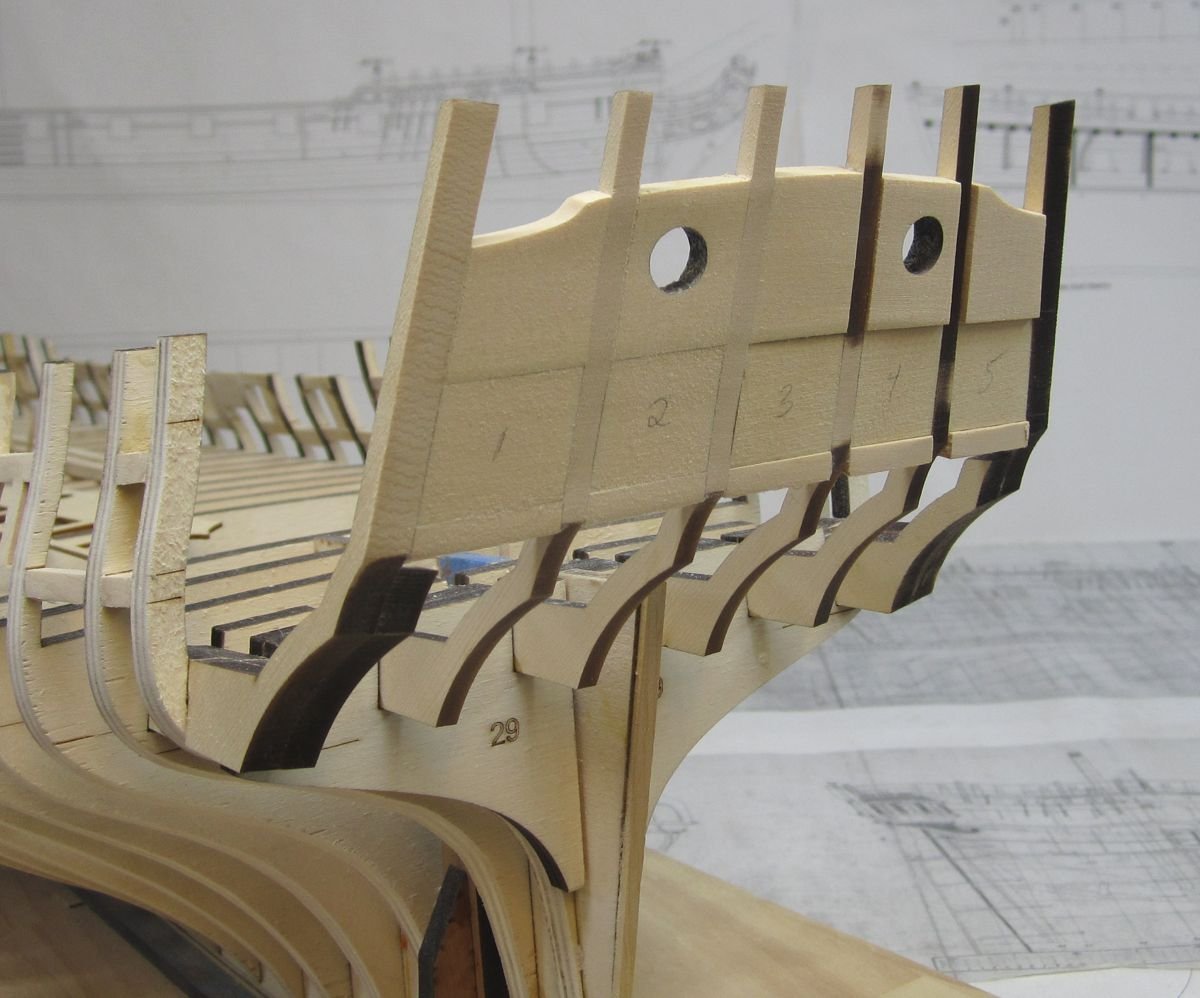
Bulkhead 29 placement......go here. Should be positioned after or while adding the stern frames so the notches for the frames line up properly. Otherwise they may throw off the angles of the stern frames left to right if they are shifted one way or the other. It basically doubles up bulkhead 28. They are glued on either side of the bulkhead former and there is no slot for them.

-
Thank you guys!!! I hope to have chapter two ready for you guys to download real soon.
- 1,784 replies
-
- 1
-
-
- winchelsea
- Syren Ship Model Company
- (and 1 more)
-
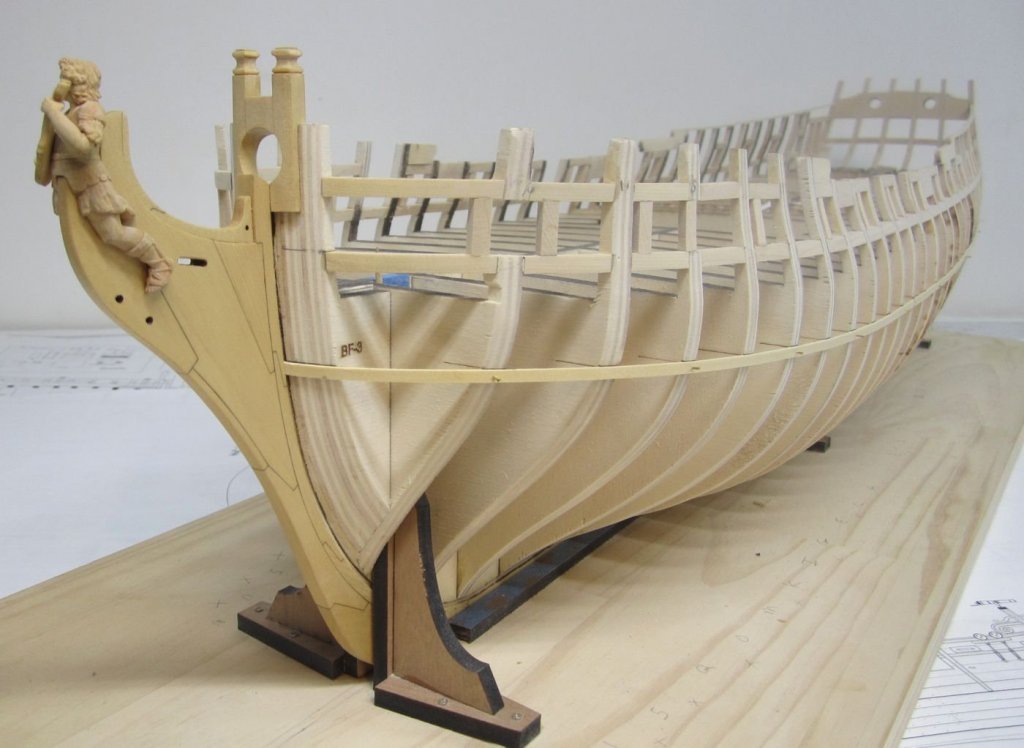
Joe....read ahead and examine the plans....they are added later when adding the stern frames. It is best not to add them until you are ready to insert the stern frames. You can see them below.
- 642 replies
-
- 12
-
-
- winchelsea
- Syren Ship Model Company
- (and 1 more)
-
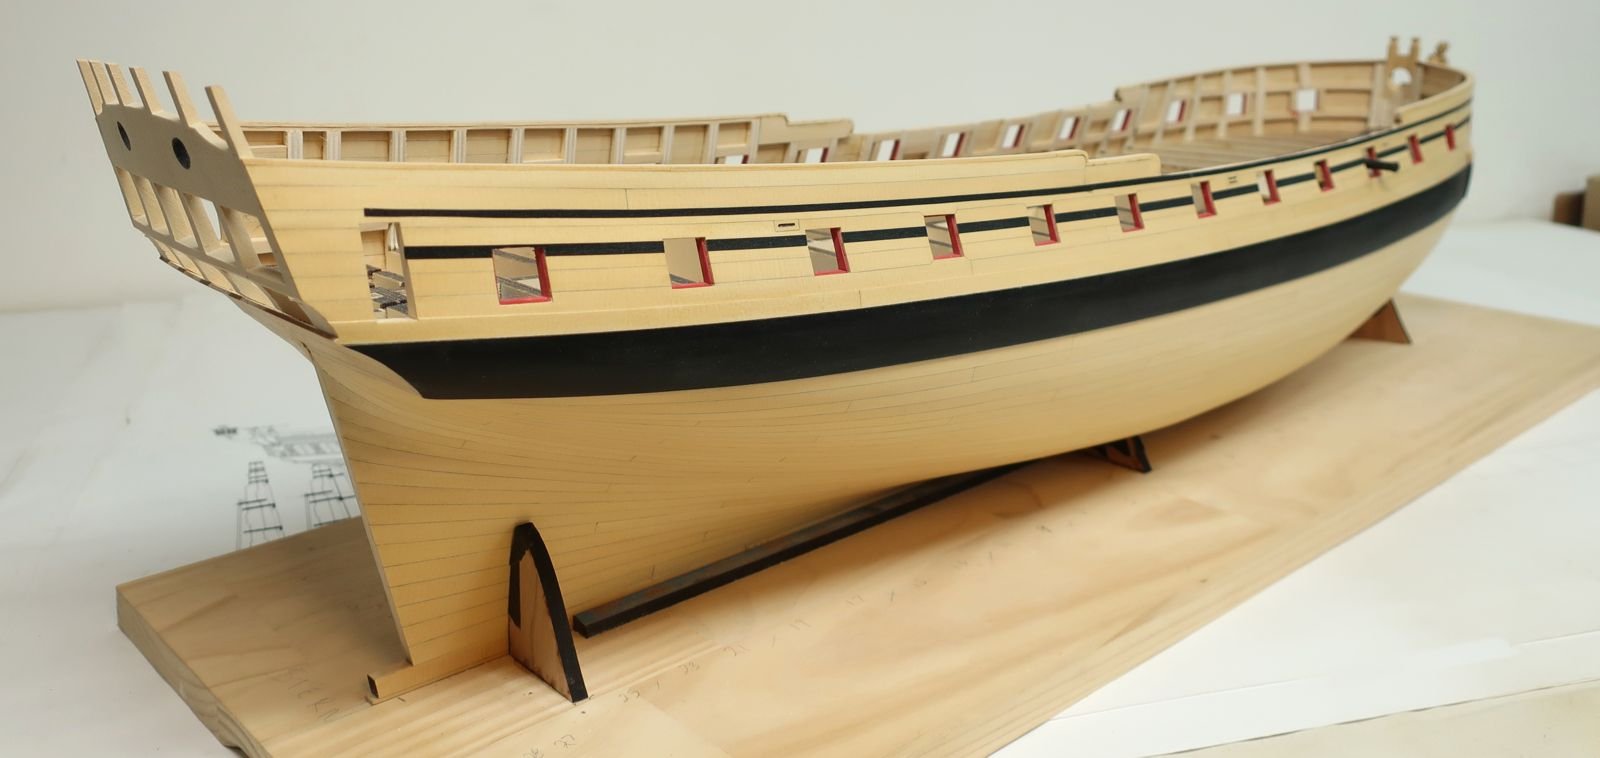
Planking is now finished on the starboard side....I did celebrate a little and I am glad it is all done. Next up I will add the stern post. I already sanded the planking flush with the stern rabbet and now all I have to do is tweak the laser cut stern post and glue it in position. You will also notice those black bands across the hull. You guys know how I like to check and double and triple check stuff using tape and other stuff. What you see is black masking tape cut to 3/32" wide for the top band and 1/8" wide for the band that runs through the center of the gun ports. I had been looking at my test molding strips and thought that the molding I had used for the lower band was too wimpy at 3/32" wide. I had originally matched the width of the one above above it. You can see it in the photo below. I have also been examining the contemporary model and original draft a lot more with regard to the moldings. They show a heavier lower molding running through the gun ports. So I used the tape to check out what a wider molding would look like. I really recommend that you guys go through this exercise. It will help you establish the proper run for them. You can tweak them to you hearts content. Then mark the top edge with a pencil so you have a guide when actually adding the molding. Even though you might be able to use the planking seams as a guide, that isnt always perfect and may have gone waavy or too high in spots. Mine did in some areas so I was able to correct it with the tape and mark it for later. You cant notice it when just looking at the planks but it would have been noticeable after the molding went on. Especially at the bow. It also helps me get consistent on both sides which your planking may not be perfectly aligned. I am going to go with a wider molding. Here is the contemporary model... Once the stern post is on it will complete chapter two....I am working on the written chapter right now. Shouldnt be long until I post it. Chapter three will consist of stern transom and quarter gallery construction.....fun times!!!


- 1,784 replies
-
- 33
-
-
- winchelsea
- Syren Ship Model Company
- (and 1 more)
-
Looks good but I will go on record that your clamping is a really bad idea. The planks are too fragile for rubber bands and so are those this frames. There is a really good chance they will break under that pressure. Be very very careful....bending them is bad at all and because they are so thin its better to bend them off the model. Just my opinion... Chuck
- 221 replies
-
- 3
-
-
- queen anne barge
- Syren Ship Model Company
- (and 1 more)
-
Maybe somebody will jump in and become a supplier wood sheets???? I can no longer supply it because I just dont have the time to do so. Surely there is someone out there who has the means to mill sheets of Pear, Holly, and Boxwood. Its a good way to make a few bucks if you can do it well. Chuck
-
Wonderful News.......glad to have you on board!!! I am hoping to finish my planking this week if all goes well. Chuck
-
BF1 BF2 and BF3 are the are the small pieces at the bow...BF1 is just 3/64" thick cedar I believe. You can see BF 3 in the photo......BF2 and 3 are 1/4" thick laser cut ply. BF1 is cut from cedar on your 3/64" thick sheet. Its shown on the framing plan. Ask these questions in your log as more folks might have the same question. Not on my profile. I can actually see them on the plan hanging behind your model. Upper right side. They are on either side of the stem and frame where the bollards will go.
- 105 replies
-
- 3
-
-
- winchelsea
- Syren Ship Model Company
- (and 1 more)
-
Im surprised it fit on that. But it looks good.😀
- 105 replies
-
- 1
-
-
- winchelsea
- Syren Ship Model Company
- (and 1 more)
-
Welcome to the group. I am sure you will enjoy the project.
- 137 replies
-
- 1
-
-
- winchelsea
- Syren Ship Model Company
- (and 1 more)
-
I would rather buy a Byrnes saw for that money. That is crazy at $400. Or buy another kit or two......or $400 worth of boxwood or swiss pear sheets. I am sure there are far less expensive way to cut basswood and styrene. Chuck
- 23 replies
-
- 14
-
-
Looks very good. 😀
-
You can see the prices Jack gave on the wood several posts back. The price of the whole set of boxwood sculptures including the figurehead is $320, including postage. Order direct through Jack. Jujube $270, including postage too. Order Direct through Jack. Resin sets are $120....and discounted to $95 if you started a buildlog and are active within it and the other logs in the group....Order through Chuck in his online store. The resin carvings should be ready in a few weeks. I do have four sets now but I have to package them up and create a store item for them. I should be getting 20 more sets in a few weeks. Chuck
-
These people are just not bright. They must be printed with no scale......I just dont understand.....ugh. "as in document" Let us know how it goes. Chuck
- 105 replies
-
- 1
-
-
- winchelsea
- Syren Ship Model Company
- (and 1 more)
-
Looks pretty good to my eye. Nice work. Its coming together.😁
-
They are just cut from regular printer paper with a #11 blade. No adhesive needed. You can hold them against the bulkhead with one hand while you mark the tick marks with the other. I cut them around 5/16" wide. Chuck
- 1,784 replies
-
- 2
-
-
- winchelsea
- Syren Ship Model Company
- (and 1 more)