


Chuck
-
Posts
9,673 -
Joined
-
Last visited
Content Type
Profiles
Forums
Gallery
Events
Everything posted by Chuck
-

Why second hull plank?
Chuck replied to bigcreekdad's topic in Building, Framing, Planking and plating a ships hull and deck
Double planked hulls usually dont have a rabbet. That is problematic. Double planked hulls as said were done because the MFG usually cheaped out on the number of bulkheads..... If your kit has few bulkheads and is single planked that would be a huge problem.... If you have a lot of bulkheads or frames......Why would you plank twice if you take your time and do it right the first time. If your hull is painted or plated, why plank it twice? If it is not and you dont know how to plank, then it doesnt matter if you you plank the first layer poorly because chances are that the second layer will also be poor. Best to plank it once and plank it correctly. Single planked hulls force folks to learn proper planking techniques as well. My advice would be to start a log and post some photos.....also ask a lot of questions. Its not easy to plank a hull and it requires some practice. With lots of failures along the way.- 6 replies
-
- 10
-

-
Almost forgot to mention....at this stage you can remove the brackets on your baseboard. They did their job. You will need t make a work cradle. To do this, use the templates for the bulkheads which have the curve and shape needed. I will use three pairs just like the brackets. They will be positioned where the brackets were. You will see those on the next update.
- 1,784 replies
-
- 8
-
-
- winchelsea
- Syren Ship Model Company
- (and 1 more)
-
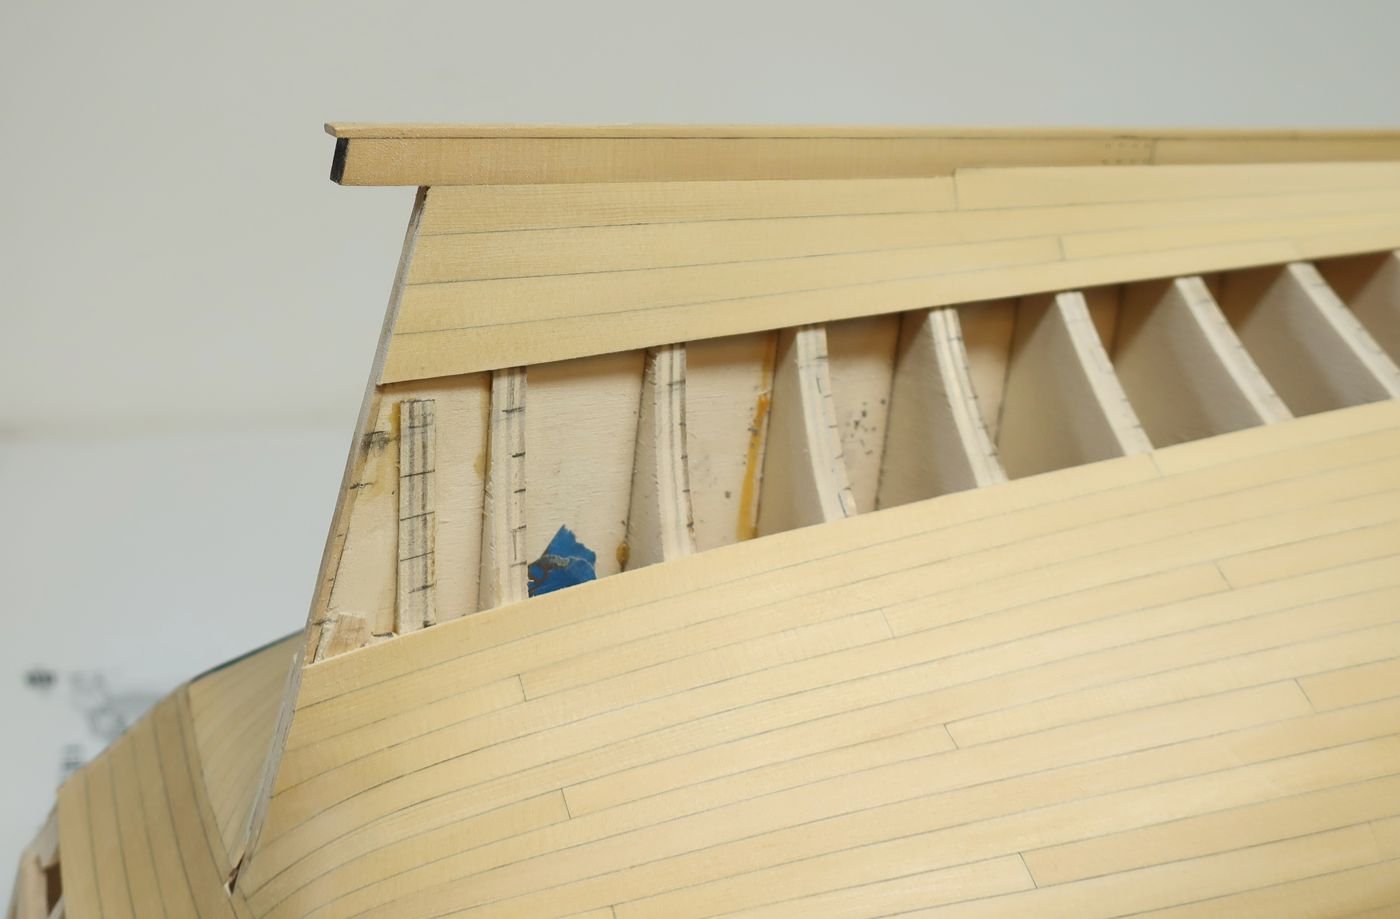
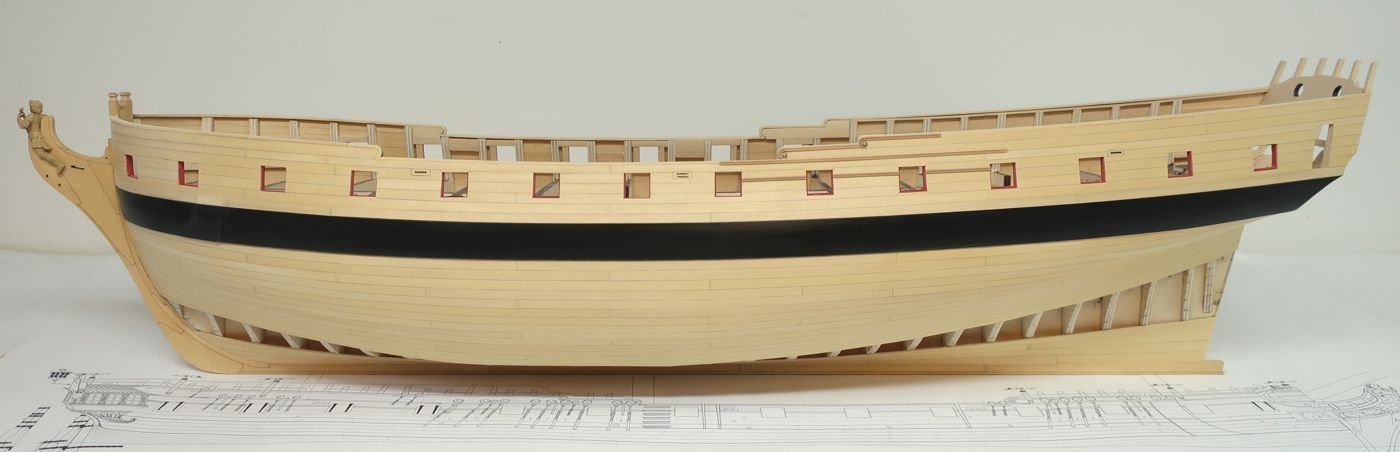
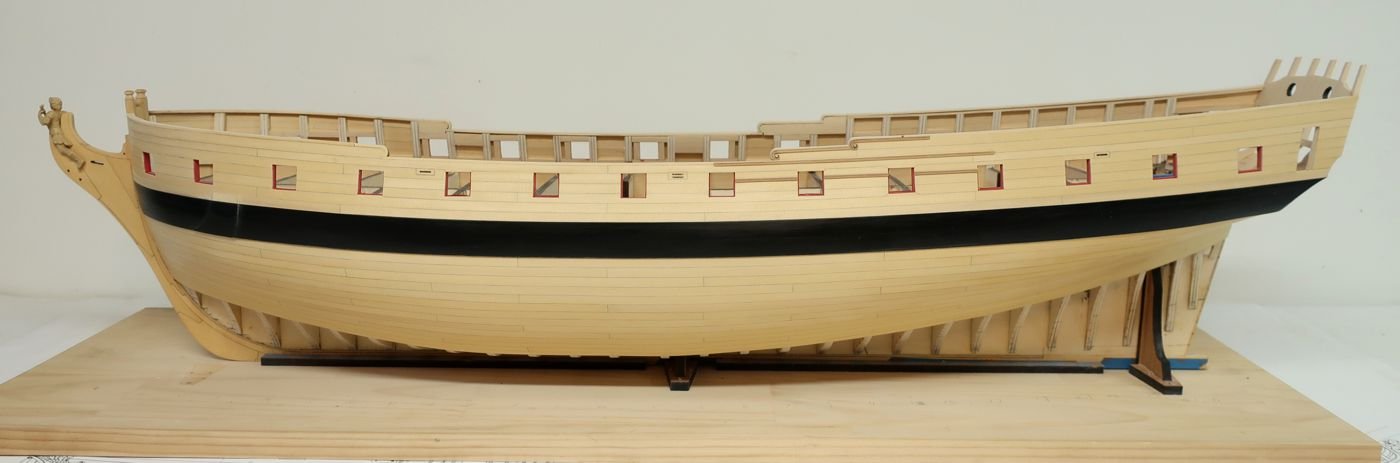
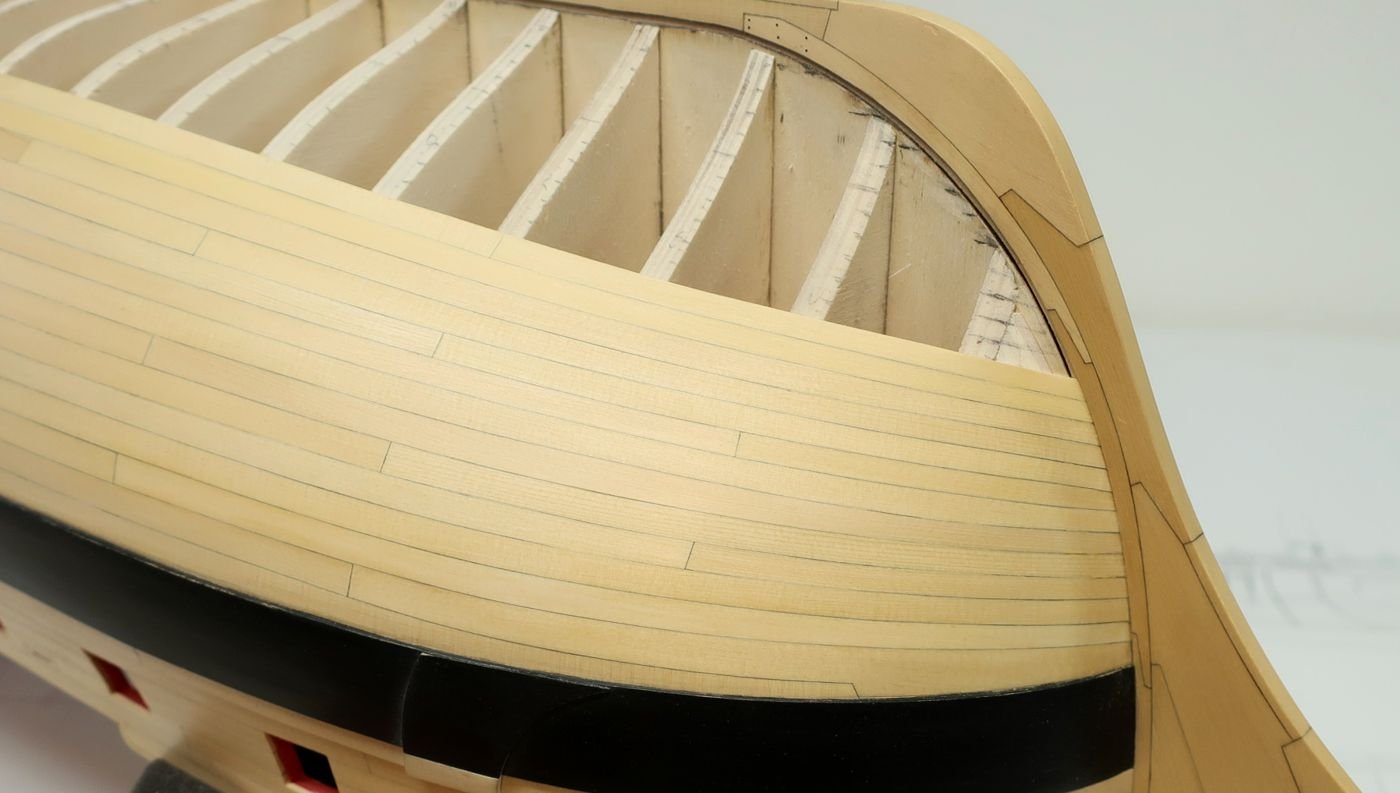
Planking continues....it is important for me to go slow and take care to make this a neat planking job. The planked hull is so visually important because of the size of this model that I am being very deliberate with each plank added. I am planking with the hull upside down and although the strakes look very good when viewed upside down, after I finish each strake I will flip the hull over so I can view it right side up. The run of the planks will look very different and this allows me the opportunity to make adjustments with the next strake if needed. I want a nice slope up of the planks at the stern.....but also at the lower bow. So even though I am following my tick marks very closely....I am still making adjustments when I see a dip or bump in the run develop. Remember that there are NO stealers at the stern. There is only that one drop plank at the bow. With these lower belts, you can run the planks off the stern post rabbet and then sand them back flush. We will add the stern post when planking is completed. Note the front of the garboard and its shape along with where it ends in relation to the scarf joint on the keel. It is not too far forward and its not too far aft. The end is about 1/16" forward of that joint on the keel. At the stern, the strakes were sanded flush to the rabbet.....and note the gentle slope upward being created. I only have six more strakes left on this side and you can see how I am following my lining out. You can see the remaining tick marks and picture the run of the remaining planking. At the stern on this lower belt, you must switch to wider 5/16" planks and shape them according to your tick marks. The planks along the stern post do get wider as one would expect. Let me know if you have any questions !!!! Comments are welcomed. No stealers at the stern which matches the contemporary model and will look very distracting. There is absolutely no need to use them.

- 1,784 replies
-
- 37
-
-

-
- winchelsea
- Syren Ship Model Company
- (and 1 more)
-
Really looking good!!! Keep it going....
-
That looks really good. Moving right along and it looks as it should at this stage. Well done. Chuck
-
Very nice....that looks just like it should.
-
The best advice i can give you is to go slow. Its going to take you a lot of time. It will take several days to fair each side properly. Having said this, you can ask five people and you will get five different answers. Everyone has their preferred methods. I just take some sand paper about five inches long and cup it in my hands and go to work. I use a course grit of 150 ish. At the bow and stern i will use sharp chisels to remove the bulk of the material initially and then finish it off with hand sanding as stated. use a batten to test your progress as you go.
-
Very nice progress!!!!
-
Nicely done Mark!! Planking is going really well. Having a nice stash like that would be really nice.
-
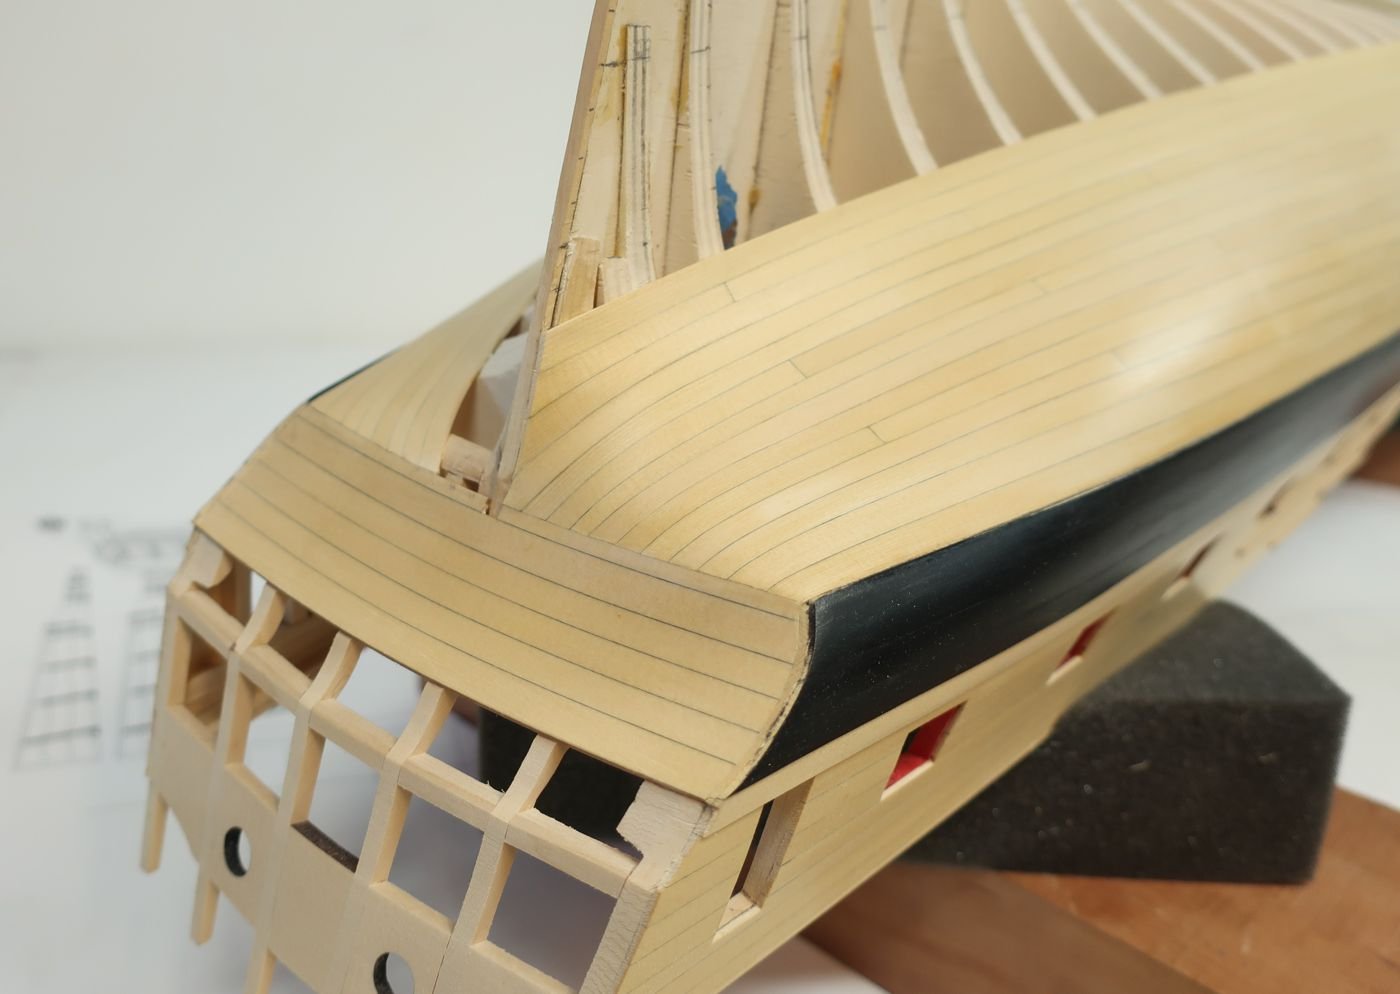
Just letting you guys know that I have been steadily making progress. Planking is not something that can be rushed. No matter how well you make all of the other fittings and parts on a model, if your planking is bad that is all anyone will ever notice. So go slow and keep it clean and neat with tight joints. If you see yourself going off your lining off tick marks with a strake, no need to worry. Then you should correct it with the next strake or two in order to get back on your marks. Keep flipping the hull "right-side-up".....as you should check your run of planks every strake or two and make adjustments when needed. Below you can see the tapered planks along the tuck and the transition of the planks onto the stern post rabbet. Note the plank in the corner where the ends transition from the counter to along the rabbet strip. The cedar is working out nicely and I think the color looks good on a model this size. You guys can of course judge for yourselves but if you are building a frigate or other larger subject, this is a good choice. Its a bit soft bu once you get accustomed to using it, it really looks good. I have only used a bit of wipe on poly on the planking. I have completed two belts on the port side and am finishing of the second belt on the starboard. Once completed I will reverse direction and start planking from the keel ....upward in order to finish up the hull planking. You can see my planks entering the stem rabbet below. Questions and comments are always welcome from the group. Chuck
- 1,784 replies
-
- 36
-
-
- winchelsea
- Syren Ship Model Company
- (and 1 more)
-
Nice work mike. Good to see you back at it. Yes indeed, as with any new technique it requires a bit of practice to find its limitations. You will soon discover that that its easier ti bend a little in two or three places along a curve rather than a lot in one place for certain bends. Give it a try. Basically find the apex to bend and then move the strip a little one way or the other and bend it again maybe an inch away from the last center point. It extends and elongates the bend needed.
- 968 replies
-
- 5
-
-
- hahn
- oliver cromwell
- (and 1 more)
-
Planking the hull
Chuck replied to shortgrass's topic in Building, Framing, Planking and plating a ships hull and deck
I use medium CA for planking. I use any brand i can find on sale. Whatever is on sale. I havent experienced an issue . I have always used either boxwood and now yellow cedar. I also used used it on cherry planking and never had an issue. -
Nicely done Steve. That stem looks very good, nice tight seams.
- 99 replies
-
- 2
-
-
- winchelsea
- Syren Ship Model Company
- (and 1 more)
-
You are off and running!!! I am so glad to see you dive in the deep end Rusty. I am looking forward to seeing your progress. Chuck
- 642 replies
-
- 2
-
-
- winchelsea
- Syren Ship Model Company
- (and 1 more)
-
You can paint them but using the contemporary models as a basis of inspiration, they are normally left natural. Just apply a finish coat like wipe on poly. In fact I would recommend not using wipe on poly and instead just using some sanding sealer or even spraying with a light coat of matte fixative spray. You dont want them to darken too much or discolor along the end grain so this would be my preferred option. Chuck
-
Yes they need to be different....the bottom sill needs to be longer because the angle is different and the length it spans a bit different. Either way they will need to be cut and angled appropriately.....the one on the plans is long enough for both. These pieces cant be laser cut precisely and need some work by the builder to fit properly. The bevel is in both directions. Chuck
-
Planking the hull
Chuck replied to shortgrass's topic in Building, Framing, Planking and plating a ships hull and deck
If they are the right shape and curved correctly.....no clamping is needed. I do use CA for them though. They should fit in position with no forcing or pining. If you have to force them or pin them then dont use the plank....toss it and make another one. Chuck -
Planking the hull
Chuck replied to shortgrass's topic in Building, Framing, Planking and plating a ships hull and deck
Here is some info on planking and lining off the longboat which is very similar. I hope this helps. file:///C:/Users/Chuck/Documents/PartTwo.pdf Also check out these videos I put together which should help in figuring out why the planks dont lay flat against the bulkheads. I hull like that should be lined off and the planks curved appropriately to lay flat against each bulkhead.
-
That is too bad.....live and learn.....check every piece against the plans before proceeding the next. It will come out even better teh second time around. Chuck
-
HMS Winchelsea by shihawk
Chuck replied to shihawk's topic in HMS Winchelsea 1764's Member Build logs for the HMS Winchelsea
Nice work!!! -
Nice!!! What other small craft at 1/2" scale would you like to do? Maybe I will take the plunge as well. Chuck
- 64 replies
-
- 3
-
-
- medway longboat
- Syren Ship Model Company
- (and 1 more)
-
That really looks nice.....I am so glad you left the planking off to match the barge. It looks really nice that way. I was tempted to do that myself. Chuck
- 64 replies
-
- 1
-
-
- medway longboat
- Syren Ship Model Company
- (and 1 more)
-
HMS Winchelsea by shihawk
Chuck replied to shihawk's topic in HMS Winchelsea 1764's Member Build logs for the HMS Winchelsea
Variation is a good thing. Your model is progressing very nicely. Looking forward to seeing more -
On this model at 1/4” scale the planks are much wider. Therefore they need more heat in my opinion. In addition, the hair dryer will work but it will take a lot longer to heat up the plank enough. I think mike is using a hair dryer and its fine. The method of heat delivery isnt as important as the overall concept. But i do find that the iron works quicker and is more effective. i am still using a hair dryer elsewhere when a plank needs to be bent the other way or twisted. For example at the stern where the planks bend and twist into the tuck of the counter. So i am really using both. Different tools for different situations that work best for that type of bending.
-
HMS Winchelsea by shihawk
Chuck replied to shihawk's topic in HMS Winchelsea 1764's Member Build logs for the HMS Winchelsea
Really nice work there. Well done.
