
HOLIDAY DONATION DRIVE - SUPPORT MSW - DO YOUR PART TO KEEP THIS GREAT FORUM GOING! (Only 72 donations so far out of 49,000 members - Can we at least get 100? C'mon guys!)
×


Chuck
-
Posts
9,673 -
Joined
-
Last visited
Content Type
Profiles
Forums
Gallery
Events
Everything posted by Chuck
-
 They all look very good. Which one are you going to use? I think the cherry version would look great. Chuck
 -
How about some pictures?
-
That looks very good⚓️
-
HMS Winchelsea (1764) 32 gun frigate GROUP PROJECT INFO
Chuck replied to Chuck's topic in Group Projects on Model Ship World
Mike...you can wait until you are ready to set up a build log. Also download the materials list for each chapter which will detail all the wood sizes you will need. It’s all listed. But hurry up and finish that model do you can join us. -
That planking really looks good. Nicely and carefully done!!!
-
Welcome Bill....glad t have you aboard. Just remember to go slow and take your time. Dont hesitate to ask me any questions. And most important....have fun with it.
-
So you are back in business!!!! Well done.
-
My thoughts so far is that there will be both a longboat and a pinnace. The cradles will be needed as you start planking the belt along the keel. Its just a matter of using three bulkhead plansheets to take the curves from after adding and including a slot for the keel. They will be placed in the same three locations as the brackets. Chuck
-
HMS Winchelsea by shihawk
Chuck replied to shihawk's topic in HMS Winchelsea 1764's Member Build logs for the HMS Winchelsea
I suppose it will have to do. But it is not optimal. -
HMS Winchelsea by shihawk
Chuck replied to shihawk's topic in HMS Winchelsea 1764's Member Build logs for the HMS Winchelsea
Yes indeed that would be problematic. That would screw up the placement of all the gun ports. I was initially going to use it on the prototype and abandoned the idea because I couldn’t make it work because of how it shifted too many things. You really have to use 1/4” or 6mn. -
Nice trick 😀
-
Fine work...that is looking excellent. 😊
-
Thats the way to go.....you will be fine with that.
-
Yes always cut outside your line and then clean it up. In fact other than making sure that your slots are finished so you get a snug fit, I would leave them cut about 1/64" outside there lines until you do a test fit in your bulkhead former. Chuck
-
I think you could just glue some 1/4" wide strips to the bottom of each bulkhead and fair them in. I dont know how thick but I am sure you can figure that out easily enough. Then print out the bulkheads and hold them in position so you can mark the new corrected shape on the side if the strip. Then fair to your new line carefully and slowly.... The trick here is to go slow and check the shape as you go. It will be fine. Chuck
-
HMS Triton (28 Gun Frigate) Group Build Project
Chuck replied to Chuck's topic in Group Projects on Model Ship World
What seems to be the issue. These plans were done so long ago that there isnt much I can do for you. I dont have those plans and wasnt really involved with its set up. If I remember correctly you must go to kinkos or another facilty because its a larger file. Chuck -
That would work but you might be able to just shim the bottoms. I would just print out the bulkheads and test them to see if it is the bulkheads or the bulkhead former. If it’s the false keel it would be more ch easier.
-
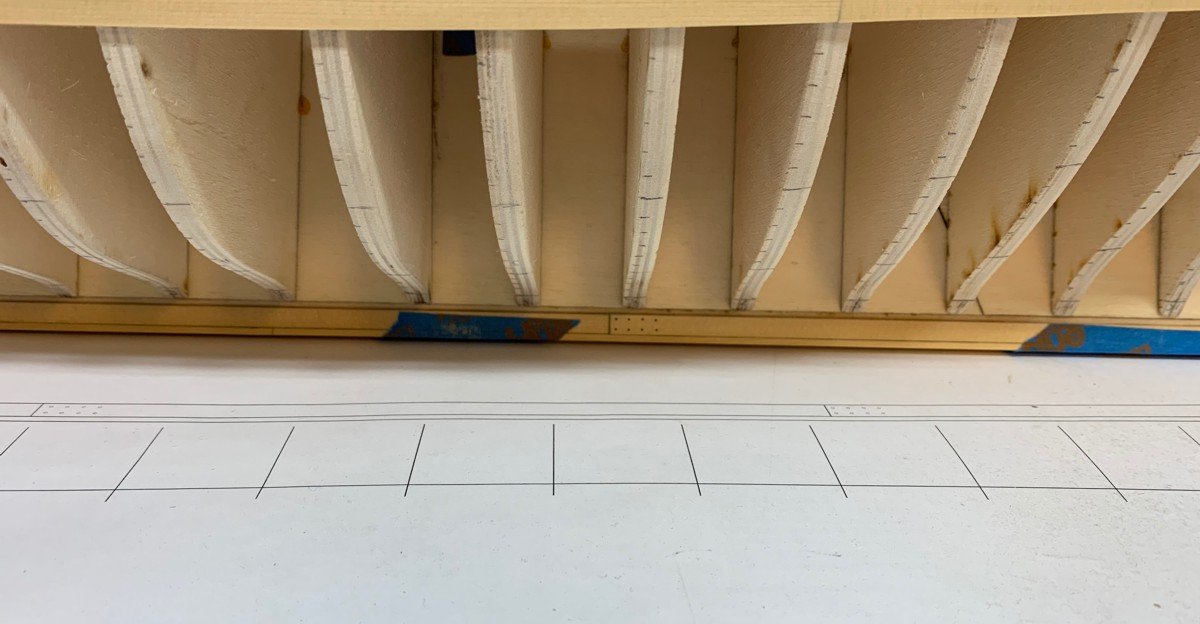
Make sure the bottoms of all those bulkheads touch the rabbet strip like this. They should end flush or nearly so to the bottom of the bulkhead former. You will need to adjust your slots so that is the case. The only ones that dont are at the stern from say bulkhead 19 or so. Those will follow the bearding line. Chuck Chuck

-
something is off on all of those bulokheads. The bulkheads should sit lower and right on the rabbet line. Yours look like they are about 1/8" too high. That will be a problem. Its probably throwing off your fairing too. have a look here. Chuck
-
Thank You!!!! No short cuts here but it will be a lot easier than a pof build. I would resist the urge to mix and match too many woods. It will look pretty awful. Basically we are gonna use two colors. Black and red. If you think ahead and visualize the finished model. Too many wood choices along with a painted freeze will look like a Christmas tree....Way to much. keep it simple and folks will actually finish.
- 1,784 replies
-
- 5
-

-
- winchelsea
- Syren Ship Model Company
- (and 1 more)
-
Download it again....
-
Chapter one is much longer...at 27 pages...you only read the first half. Download it again. It looks very good.
-
Yes you should def. start over. I could send you a new sheet of stem parts if you pay five bucks for shipping. Send me a pm with your address.
-
You are making some excellent progress.