
Supplies of the Ship Modeler's Handbook are running out. Get your copy NOW before they are gone! Click on photo to order.
×


Chuck
-
Posts
9,455 -
Joined
-
Last visited
Reputation Activity
-

 Chuck got a reaction from Saburo in WASHINGTON GALLEY by yamsterman - 1/48 scale - POF
I would absolutely change the direction of the scarf joints to what is more commonly acceptable. I looked over the plans very carefully before publishing as did others, and had made several recommendations for changes. This was actually one I had overlooked.
I will certainly make this a new recommendation to Jeff to possibly change it in the guide and plans for future printings. Nice catch. But I will talk to him and see where he is on the subject. But in my opinion, yes the scarfs should go in the other plain as is commonly seen.
Cheers,
Chuck
-
 Chuck got a reaction from mtaylor in HM Cutter Cheerful 1806 by Chuck - FINISHED - 1:48 scale - kit prototype
Yes indeed...they are shown on the plans.
-
 Chuck got a reaction from mtbediz in HM Cutter Cheerful 1806 by Chuck - FINISHED - 1:48 scale - kit prototype
Thank you very much.
I finally finished treenailing this side. I am glad that is over. I tried my best to take pictures of the treenails really close. I had to mess with the settings of the camera to get the best shot. But at least you can see the shape and detail. They are not perfect by any stretch of the imagination. But it does the trick. Remember these are #78 holes.
Interesting though...the last two photos are identical shots except I changed the settings. On my camera I changed from Fluorescent to outdoor....on a setting and look at the color difference. Freaky. I could swear that both are representative as well. Its funny the tricks your eyes play on you. Only after seeing them side by side does it get so clearly different. I couldnt even tell you which is better. After looking at both for so long it all just blends together and gets confusing. I think I like the third one down the best and wont change the settings again until my kids steel the camera and screw up how I set it up. Then I have to start all over again.
I hope this helps.
Chuck
-
 Chuck got a reaction from Nirvana in HM Cutter Cheerful 1806 by Chuck - FINISHED - 1:48 scale - kit prototype
Thanks...Yes indeed I do
But it all gets done eventually. I really like coffee.
Chuck
-
 Chuck got a reaction from FrankWouts in HM Cutter Cheerful 1806 by Chuck - FINISHED - 1:48 scale - kit prototype
Today I laser cut the bulkheads and false keel from 1/4' thick ply. It was comforting that the laser cutter will have no problem cutting through this thickness of ply. That is really good. Normally you will see 3/16" thick bulkheads. I have started to use the thicker stuff in my latest designs. I think it really helps with the stability and strength of the hull. Its just a better thickness to go with in my opinion if you choose POB. When you no longer have to worry about mass production and kit MFG profit vs. loss, you are free to do these things. Its a great feeling and in the end make the modeling experience so much better.
The parts fit really well. You can see how large in comparison to the Winnie in the background. I made the bulkhead former in two pieces as you can see. I think its important to make these in shorter lengths. If they are too long they have a tendency to warp and bend. The slots cut for the bulkheads makes this even more of a problem. It helps the warping become even worse. You will also notice the many, many bulkheads. I have added a picture of the Sherbourne cutter by Caldercraft for comparison of design. With bulkheads that far apart the planking is going to be tough.
Chuck
-
 Chuck reacted to Ian B in HM Cutter Cheerful 1806 by Chuck - FINISHED - 1:48 scale - kit prototype
ha ha I thought they were rings on the plans and something to do with the rigging silly me
-
Chuck reacted to KenW in HM Cutter Cheerful 1806 by Chuck - FINISHED - 1:48 scale - kit prototype
It's really quite amazing, but now that I look at the plans for the boat I'm building (the Rattlesnake), the deck planks are curved just like you say.
I never noticed before.
-
 Chuck got a reaction from fatih79 in HM Cutter Cheerful 1806 by Chuck - FINISHED - 1:48 scale - kit prototype
Deck planking has started.
Just a quick note about the two styles of deck planking. There were the times when deck planking was straight and nibbed into the waterway. Most are familiar with this style. I in fact drafted the plans for Cheerful this way. However, I believe that the earlier style was still in practice at this time and probably both were used. More like a transition period. In my opinion up to possibly 1820 or even later. This second style would be where tapered and hooked scarf joints were used. No nibbing into the waterway.
I have decided to use the second style as the first is so common. You see it all the time. I find this more pleasing to look at as the planks are curved. Straight planks are to harsh in contrast with the curves all over the rest of the model. Folks can choose which method they prefer. I did use the scarfed method on the Confederacy but I simplified it with straight planks. In reality the planks would have tapered and curved a bit at the bow and stern. Like this below.
Also note the curvature of the planking on this contemporary model.
After gluing the six deck structures in position, I drew reference lines for where the deck beams would be located. This will become important later. Then I planked down the center with one strake (3/16" wide). I followed that with 2 on either side of that one. These were straight-non-tapered planks. Then I started lining off the deck much like I did for the hull planking. Although in hindsight, I should have probably tapered these 5 center planks as well. See the contemporary model image above. But they are already done, so I am moving on....
First I measured with a tick strip in 3/16" increments at the deck's widest point. The beam reference line on the forward side of the main hatch. This showed that I still have ten deck planks to put on each side.
I used blue tape in thin strips to separate the deck into two belts both port and starboard. The inner belt on each side has 6 planks....the outer has four.
I manipulated the tape until it curved nicely from bow to stern. Remember these are not straight deck planks. The curve is not very drastic. But it has to be taped out so you can visually check the symmetry port and starboard. Once I was happy with it, I traced the inside edge of the tape to define each belt. I removed one strip of tape in the photos below. Note the curve of the blue tape still on deck.
Then, just like I did for the hull. I used my planking fan and tick strips to divide the deck up at each reference line for a deck beam. This will show me how much taper I will need in each deck plank. Its just a matter of measuring the total distance at each deck beam and transferring it to a tick strip. Then you take that tick strip to your planking fan and divide that space into six equal parts. Then you come back and transfer those ticks to your deck beam reference line.
All of the planks in this inner belt will be cut flat on the ends with no scarf joints yet. I find that on most contemporary models there are only a few scarf joints.... as opposed to modern models where the builder uses way to many. I have always seen just two or three and on the rarest of occasions four hooked scarf joints against the waterway. Most people start way too early and end up with too many of them and it looks very busy. This is also true of just plain nibbing into the waterway. In addition, by curving and tapering the planks it actually reduces the need for that many of them.
Thats it for now as I continue to use tick strips to define the width of the planks at each deck beam location. Then I will start cutting more wood.
-
 Chuck got a reaction from GLakie in HM Cutter Cheerful 1806 by Chuck - FINISHED - 1:48 scale - kit prototype
Yes indeed...they are shown on the plans.
-
 Chuck got a reaction from de_kryger in HM Cutter Cheerful 1806 by Chuck - FINISHED - 1:48 scale - kit prototype
Unknown...circa 1950-60 maybe...
Some people save stray dogs I save models that are destined for the dumpster.
Unknown Dutch Fishing vessel...Maybe??? Circa 1950ish maybe. Who knows.
-
Chuck got a reaction from mtbediz in HM Cutter Cheerful 1806 by Chuck - FINISHED - 1:48 scale - kit prototype
And just to round out the images of where I spend 10 - 12 hours per day...
This is the other side of the shop which is in my basement...yes I know it is an absolute bloody mess. In total its about 25 feet long and 18 feet wide with that little hallway which leads to my kids man cave.
This is my block making station where yesterday I finished up milling 2000 2mm blocks. Theres a lot of sawdust on the floor....and my shop mascot snuck in the picture. You can see a drill press behind my hi-tech dust control system...the fan. , Byrnes saw and Sherline mill.
This is one half of my rope making station...You can see one half of that cheapo ME ropewalk on the table as well as all of the scraps from making a few thousand feet of rope over the last few days....I WANT TO BELIEVE.
I will be bringing all of that rope making stuff to St Louis to do a demo for the NRg Conference. I will be showuing how I make 20 - 23 foot lengths of rope on that little Model Shipways rope walk....thats how I make all of it.
And then looking down the length of my basement and down the 30 foot long hallway to the other end of the rope making station. This is where I make my rope. Nothing too terribly exciting. Alond the wall is my library and a bunch of old models...including the 18th century model that I should really find a better place for. There is another old Dutch model there too that is crying out for some love and restoration. I have no idea what it is but looks about 60 - 70 years old. Maybe. By God I have to tidy up this place...there is crap all over. I am embarrassed.
-
 Chuck got a reaction from CaptnBirdseye in HM Cutter Cheerful 1806 by Chuck - FINISHED - 1:48 scale - kit prototype
Today I laser cut the bulkheads and false keel from 1/4' thick ply. It was comforting that the laser cutter will have no problem cutting through this thickness of ply. That is really good. Normally you will see 3/16" thick bulkheads. I have started to use the thicker stuff in my latest designs. I think it really helps with the stability and strength of the hull. Its just a better thickness to go with in my opinion if you choose POB. When you no longer have to worry about mass production and kit MFG profit vs. loss, you are free to do these things. Its a great feeling and in the end make the modeling experience so much better.
The parts fit really well. You can see how large in comparison to the Winnie in the background. I made the bulkhead former in two pieces as you can see. I think its important to make these in shorter lengths. If they are too long they have a tendency to warp and bend. The slots cut for the bulkheads makes this even more of a problem. It helps the warping become even worse. You will also notice the many, many bulkheads. I have added a picture of the Sherbourne cutter by Caldercraft for comparison of design. With bulkheads that far apart the planking is going to be tough.
Chuck
-
 Chuck got a reaction from FrankWouts in HM Cutter Cheerful 1806 by Chuck - FINISHED - 1:48 scale - kit prototype
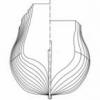
This will mark the beginning of my project to build the prototype for the Cutter Cheerful. The plans are completed and I am getting ready to release the plans in a few months. I will be building her out of Boxwood or possibly even Pau marfin. I havent decided. This project is a POB build as you can see from the details in the plans posted below. Its not a very cumbersome project with just a cutter rig to deal with. She is carvel planked and not Clinker planked. This is one of the reasons why I chose it as a subject.
Once I have the skeleton built and the hull planked, the plans will be released. The remainder of the project is pretty straight forward and doesnt need much of an explanation. I just need to prove out the design concepts for the hull skeleton. It shouldnt take too long. I will be writing a monograph as I build her and posting it on my website for free download as well as here on MSW should folks want to read it. But as I stated, I wont need to finish the entire project to release the plans as they are really straight forward. At a 1/4" scale...the hull will be 28 inches long and 26" tall. A nice size yet built at a larger scale to show some great details.
I am finally at a point with the Syren store where my inventory is quite full and I will be able to enjoy working on both the Winnie and the Cheerful for several hours each day. I just cant wait to get started. Having a laser cutter doesnt hurt either. It will save me much time.
Chuck
-
 Chuck got a reaction from CharlieZardoz in HM Cutter Cheerful 1806 by Chuck - FINISHED - 1:48 scale - kit prototype
Thanks John
The beauty of lining off the deck is that it allows you to create a great plan of attack. If you connect all of your tick marks you will have a really good idea of how it will look. If it needs adjustment then just sand it off and start over. You can do all of this before you lay one deck plank. Imagine if you just wing it and have half the deck planked...you are sunk. Lining off the hull first helps you avoid this.
I will do this at the stern next and then start cutting wood.
Now if you were just going with straight planks nibbed into the waterway, would you need to line off the deck like this? Maybe not. But I think it is worth the extra work. And keep in mind you want have to cut into your waterway and risk a cutting error with a bad joint while nibbing. That takes a huge amount of time and careful chisel work. So its pretty much a wash as far as the amount of time and effort goes.
The contemorary model of a cutter shown below also has tapered and scarfed deck planks vs. nibbing. You can see the tapering very clearly here.
Chuck
-
Chuck reacted to Nirvana in 18th Century Longboat by Nirvana - FINISHED - Model Shipways - 1:48
Thank you Chuck,
I am trying to give this longboat the right justice for it's detail.
Thanks again for creating this kit for us!
-
 Chuck got a reaction from qwerty2008 in HM Cutter Cheerful 1806 by Chuck - FINISHED - 1:48 scale - kit prototype
Thanks John
The beauty of lining off the deck is that it allows you to create a great plan of attack. If you connect all of your tick marks you will have a really good idea of how it will look. If it needs adjustment then just sand it off and start over. You can do all of this before you lay one deck plank. Imagine if you just wing it and have half the deck planked...you are sunk. Lining off the hull first helps you avoid this.
I will do this at the stern next and then start cutting wood.
Now if you were just going with straight planks nibbed into the waterway, would you need to line off the deck like this? Maybe not. But I think it is worth the extra work. And keep in mind you want have to cut into your waterway and risk a cutting error with a bad joint while nibbing. That takes a huge amount of time and careful chisel work. So its pretty much a wash as far as the amount of time and effort goes.
The contemorary model of a cutter shown below also has tapered and scarfed deck planks vs. nibbing. You can see the tapering very clearly here.
Chuck
-
Chuck got a reaction from qwerty2008 in HM Cutter Cheerful 1806 by Chuck - FINISHED - 1:48 scale - kit prototype
Deck planking has started.
Just a quick note about the two styles of deck planking. There were the times when deck planking was straight and nibbed into the waterway. Most are familiar with this style. I in fact drafted the plans for Cheerful this way. However, I believe that the earlier style was still in practice at this time and probably both were used. More like a transition period. In my opinion up to possibly 1820 or even later. This second style would be where tapered and hooked scarf joints were used. No nibbing into the waterway.
I have decided to use the second style as the first is so common. You see it all the time. I find this more pleasing to look at as the planks are curved. Straight planks are to harsh in contrast with the curves all over the rest of the model. Folks can choose which method they prefer. I did use the scarfed method on the Confederacy but I simplified it with straight planks. In reality the planks would have tapered and curved a bit at the bow and stern. Like this below.
Also note the curvature of the planking on this contemporary model.
After gluing the six deck structures in position, I drew reference lines for where the deck beams would be located. This will become important later. Then I planked down the center with one strake (3/16" wide). I followed that with 2 on either side of that one. These were straight-non-tapered planks. Then I started lining off the deck much like I did for the hull planking. Although in hindsight, I should have probably tapered these 5 center planks as well. See the contemporary model image above. But they are already done, so I am moving on....
First I measured with a tick strip in 3/16" increments at the deck's widest point. The beam reference line on the forward side of the main hatch. This showed that I still have ten deck planks to put on each side.
I used blue tape in thin strips to separate the deck into two belts both port and starboard. The inner belt on each side has 6 planks....the outer has four.
I manipulated the tape until it curved nicely from bow to stern. Remember these are not straight deck planks. The curve is not very drastic. But it has to be taped out so you can visually check the symmetry port and starboard. Once I was happy with it, I traced the inside edge of the tape to define each belt. I removed one strip of tape in the photos below. Note the curve of the blue tape still on deck.
Then, just like I did for the hull. I used my planking fan and tick strips to divide the deck up at each reference line for a deck beam. This will show me how much taper I will need in each deck plank. Its just a matter of measuring the total distance at each deck beam and transferring it to a tick strip. Then you take that tick strip to your planking fan and divide that space into six equal parts. Then you come back and transfer those ticks to your deck beam reference line.
All of the planks in this inner belt will be cut flat on the ends with no scarf joints yet. I find that on most contemporary models there are only a few scarf joints.... as opposed to modern models where the builder uses way to many. I have always seen just two or three and on the rarest of occasions four hooked scarf joints against the waterway. Most people start way too early and end up with too many of them and it looks very busy. This is also true of just plain nibbing into the waterway. In addition, by curving and tapering the planks it actually reduces the need for that many of them.
Thats it for now as I continue to use tick strips to define the width of the planks at each deck beam location. Then I will start cutting more wood.
-
 Chuck got a reaction from tlevine in HM Cutter Cheerful 1806 by Chuck - FINISHED - 1:48 scale - kit prototype
Thanks John
The beauty of lining off the deck is that it allows you to create a great plan of attack. If you connect all of your tick marks you will have a really good idea of how it will look. If it needs adjustment then just sand it off and start over. You can do all of this before you lay one deck plank. Imagine if you just wing it and have half the deck planked...you are sunk. Lining off the hull first helps you avoid this.
I will do this at the stern next and then start cutting wood.
Now if you were just going with straight planks nibbed into the waterway, would you need to line off the deck like this? Maybe not. But I think it is worth the extra work. And keep in mind you want have to cut into your waterway and risk a cutting error with a bad joint while nibbing. That takes a huge amount of time and careful chisel work. So its pretty much a wash as far as the amount of time and effort goes.
The contemorary model of a cutter shown below also has tapered and scarfed deck planks vs. nibbing. You can see the tapering very clearly here.
Chuck
-
 Chuck got a reaction from Elmer Cornish in HM Cutter Cheerful 1806 by Chuck - FINISHED - 1:48 scale - kit prototype
Thanks John
The beauty of lining off the deck is that it allows you to create a great plan of attack. If you connect all of your tick marks you will have a really good idea of how it will look. If it needs adjustment then just sand it off and start over. You can do all of this before you lay one deck plank. Imagine if you just wing it and have half the deck planked...you are sunk. Lining off the hull first helps you avoid this.
I will do this at the stern next and then start cutting wood.
Now if you were just going with straight planks nibbed into the waterway, would you need to line off the deck like this? Maybe not. But I think it is worth the extra work. And keep in mind you want have to cut into your waterway and risk a cutting error with a bad joint while nibbing. That takes a huge amount of time and careful chisel work. So its pretty much a wash as far as the amount of time and effort goes.
The contemorary model of a cutter shown below also has tapered and scarfed deck planks vs. nibbing. You can see the tapering very clearly here.
Chuck
-
 Chuck got a reaction from catopower in HM Cutter Cheerful 1806 by Chuck - FINISHED - 1:48 scale - kit prototype
Thanks John
The beauty of lining off the deck is that it allows you to create a great plan of attack. If you connect all of your tick marks you will have a really good idea of how it will look. If it needs adjustment then just sand it off and start over. You can do all of this before you lay one deck plank. Imagine if you just wing it and have half the deck planked...you are sunk. Lining off the hull first helps you avoid this.
I will do this at the stern next and then start cutting wood.
Now if you were just going with straight planks nibbed into the waterway, would you need to line off the deck like this? Maybe not. But I think it is worth the extra work. And keep in mind you want have to cut into your waterway and risk a cutting error with a bad joint while nibbing. That takes a huge amount of time and careful chisel work. So its pretty much a wash as far as the amount of time and effort goes.
The contemorary model of a cutter shown below also has tapered and scarfed deck planks vs. nibbing. You can see the tapering very clearly here.
Chuck
-
 Chuck got a reaction from Model Mariner in HM Cutter Cheerful 1806 by Chuck - FINISHED - 1:48 scale - kit prototype
Deck planking has started.
Just a quick note about the two styles of deck planking. There were the times when deck planking was straight and nibbed into the waterway. Most are familiar with this style. I in fact drafted the plans for Cheerful this way. However, I believe that the earlier style was still in practice at this time and probably both were used. More like a transition period. In my opinion up to possibly 1820 or even later. This second style would be where tapered and hooked scarf joints were used. No nibbing into the waterway.
I have decided to use the second style as the first is so common. You see it all the time. I find this more pleasing to look at as the planks are curved. Straight planks are to harsh in contrast with the curves all over the rest of the model. Folks can choose which method they prefer. I did use the scarfed method on the Confederacy but I simplified it with straight planks. In reality the planks would have tapered and curved a bit at the bow and stern. Like this below.
Also note the curvature of the planking on this contemporary model.
After gluing the six deck structures in position, I drew reference lines for where the deck beams would be located. This will become important later. Then I planked down the center with one strake (3/16" wide). I followed that with 2 on either side of that one. These were straight-non-tapered planks. Then I started lining off the deck much like I did for the hull planking. Although in hindsight, I should have probably tapered these 5 center planks as well. See the contemporary model image above. But they are already done, so I am moving on....
First I measured with a tick strip in 3/16" increments at the deck's widest point. The beam reference line on the forward side of the main hatch. This showed that I still have ten deck planks to put on each side.
I used blue tape in thin strips to separate the deck into two belts both port and starboard. The inner belt on each side has 6 planks....the outer has four.
I manipulated the tape until it curved nicely from bow to stern. Remember these are not straight deck planks. The curve is not very drastic. But it has to be taped out so you can visually check the symmetry port and starboard. Once I was happy with it, I traced the inside edge of the tape to define each belt. I removed one strip of tape in the photos below. Note the curve of the blue tape still on deck.
Then, just like I did for the hull. I used my planking fan and tick strips to divide the deck up at each reference line for a deck beam. This will show me how much taper I will need in each deck plank. Its just a matter of measuring the total distance at each deck beam and transferring it to a tick strip. Then you take that tick strip to your planking fan and divide that space into six equal parts. Then you come back and transfer those ticks to your deck beam reference line.
All of the planks in this inner belt will be cut flat on the ends with no scarf joints yet. I find that on most contemporary models there are only a few scarf joints.... as opposed to modern models where the builder uses way to many. I have always seen just two or three and on the rarest of occasions four hooked scarf joints against the waterway. Most people start way too early and end up with too many of them and it looks very busy. This is also true of just plain nibbing into the waterway. In addition, by curving and tapering the planks it actually reduces the need for that many of them.
Thats it for now as I continue to use tick strips to define the width of the planks at each deck beam location. Then I will start cutting more wood.
-
 Chuck got a reaction from mikegerber in HM Cutter Cheerful 1806 by Chuck - FINISHED - 1:48 scale - kit prototype
Thanks John
The beauty of lining off the deck is that it allows you to create a great plan of attack. If you connect all of your tick marks you will have a really good idea of how it will look. If it needs adjustment then just sand it off and start over. You can do all of this before you lay one deck plank. Imagine if you just wing it and have half the deck planked...you are sunk. Lining off the hull first helps you avoid this.
I will do this at the stern next and then start cutting wood.
Now if you were just going with straight planks nibbed into the waterway, would you need to line off the deck like this? Maybe not. But I think it is worth the extra work. And keep in mind you want have to cut into your waterway and risk a cutting error with a bad joint while nibbing. That takes a huge amount of time and careful chisel work. So its pretty much a wash as far as the amount of time and effort goes.
The contemorary model of a cutter shown below also has tapered and scarfed deck planks vs. nibbing. You can see the tapering very clearly here.
Chuck
-
Chuck got a reaction from Elmer Cornish in HM Cutter Cheerful 1806 by Chuck - FINISHED - 1:48 scale - kit prototype
Deck planking has started.
Just a quick note about the two styles of deck planking. There were the times when deck planking was straight and nibbed into the waterway. Most are familiar with this style. I in fact drafted the plans for Cheerful this way. However, I believe that the earlier style was still in practice at this time and probably both were used. More like a transition period. In my opinion up to possibly 1820 or even later. This second style would be where tapered and hooked scarf joints were used. No nibbing into the waterway.
I have decided to use the second style as the first is so common. You see it all the time. I find this more pleasing to look at as the planks are curved. Straight planks are to harsh in contrast with the curves all over the rest of the model. Folks can choose which method they prefer. I did use the scarfed method on the Confederacy but I simplified it with straight planks. In reality the planks would have tapered and curved a bit at the bow and stern. Like this below.
Also note the curvature of the planking on this contemporary model.
After gluing the six deck structures in position, I drew reference lines for where the deck beams would be located. This will become important later. Then I planked down the center with one strake (3/16" wide). I followed that with 2 on either side of that one. These were straight-non-tapered planks. Then I started lining off the deck much like I did for the hull planking. Although in hindsight, I should have probably tapered these 5 center planks as well. See the contemporary model image above. But they are already done, so I am moving on....
First I measured with a tick strip in 3/16" increments at the deck's widest point. The beam reference line on the forward side of the main hatch. This showed that I still have ten deck planks to put on each side.
I used blue tape in thin strips to separate the deck into two belts both port and starboard. The inner belt on each side has 6 planks....the outer has four.
I manipulated the tape until it curved nicely from bow to stern. Remember these are not straight deck planks. The curve is not very drastic. But it has to be taped out so you can visually check the symmetry port and starboard. Once I was happy with it, I traced the inside edge of the tape to define each belt. I removed one strip of tape in the photos below. Note the curve of the blue tape still on deck.
Then, just like I did for the hull. I used my planking fan and tick strips to divide the deck up at each reference line for a deck beam. This will show me how much taper I will need in each deck plank. Its just a matter of measuring the total distance at each deck beam and transferring it to a tick strip. Then you take that tick strip to your planking fan and divide that space into six equal parts. Then you come back and transfer those ticks to your deck beam reference line.
All of the planks in this inner belt will be cut flat on the ends with no scarf joints yet. I find that on most contemporary models there are only a few scarf joints.... as opposed to modern models where the builder uses way to many. I have always seen just two or three and on the rarest of occasions four hooked scarf joints against the waterway. Most people start way too early and end up with too many of them and it looks very busy. This is also true of just plain nibbing into the waterway. In addition, by curving and tapering the planks it actually reduces the need for that many of them.
Thats it for now as I continue to use tick strips to define the width of the planks at each deck beam location. Then I will start cutting more wood.
-
Chuck got a reaction from Nirvana in 18th Century Longboat by Nirvana - FINISHED - Model Shipways - 1:48
That looks great....nice photography as well.
Chuck
-
 Chuck got a reaction from egkb in HM Cutter Cheerful 1806 by Chuck - FINISHED - 1:48 scale - kit prototype
Thanks John
The beauty of lining off the deck is that it allows you to create a great plan of attack. If you connect all of your tick marks you will have a really good idea of how it will look. If it needs adjustment then just sand it off and start over. You can do all of this before you lay one deck plank. Imagine if you just wing it and have half the deck planked...you are sunk. Lining off the hull first helps you avoid this.
I will do this at the stern next and then start cutting wood.
Now if you were just going with straight planks nibbed into the waterway, would you need to line off the deck like this? Maybe not. But I think it is worth the extra work. And keep in mind you want have to cut into your waterway and risk a cutting error with a bad joint while nibbing. That takes a huge amount of time and careful chisel work. So its pretty much a wash as far as the amount of time and effort goes.
The contemorary model of a cutter shown below also has tapered and scarfed deck planks vs. nibbing. You can see the tapering very clearly here.
Chuck