


Dee_Dee
-
Posts
286 -
Joined
Content Type
Profiles
Forums
Gallery
Events
Posts posted by Dee_Dee
-
-
Spirketting - My new word for today! I like it! Not the word, the spridetting on your deck!
Are these the same color? Or is it just the way the light is hitting it?
I did some 'go fast' stripes on my Bluenose - They're a bit over stated / too bold.
Looking good!
Dee Dee
- MarisStella.hr and egkb
-
 2
2
-
Did it work?

Your chatty posts are fun to read, this one is just on one tiny little detail. Anyway, don't you have some homework to do? ha ha!
-
Normally, between build posts, I like to accomplish more than I have with this post, (adding just one plank.) However, I came across something that is so "WOW?" and wanted to share with you. Whilst this is a bit long, if your planning on building this boat, you might find this helpful.
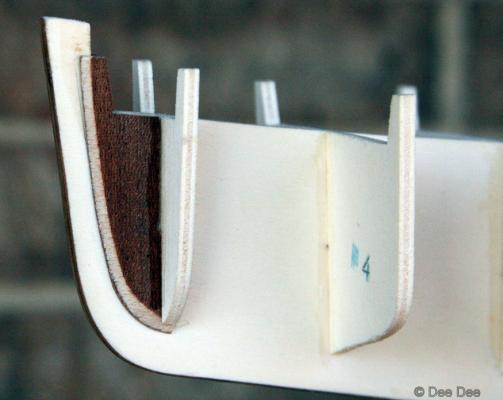
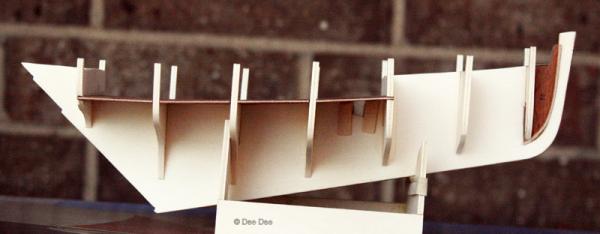
The transom height is one of the planned changes, so before I glued the transom, I layered on a piece of 1/32" birch plywood. I glued the transom to the false keel and started playing with the first plank and fitting it along the tops of the bulkheads. For some reason, it just did not look right.
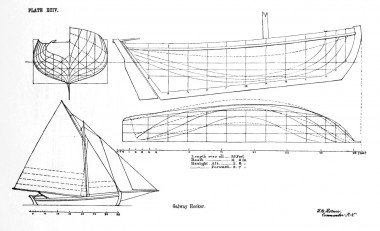
This construction drawing shows the first plank following the tops of the bulkheads, even spacing between the top plank and each deck and the top of the plank level with the top of the transom. It wasn't happening, not even close.
I did some comparison measuring of the blue print of the distance from the top of the decking to the top of the top of the top plank and some variances showed up. The blue numbers are measurements in mm from the blue print. The red numbers show what the measurements would be if the top plank was aligned with the top of the bulkheads. With the exception of the aft deck (5.0 vs 3.3), it doesn't look like a lot of variance, but it all compounds and there is no way to get that even spacing.
(Please note: I made an oops with the bow deck actual, the 8.1 should be 7.5)
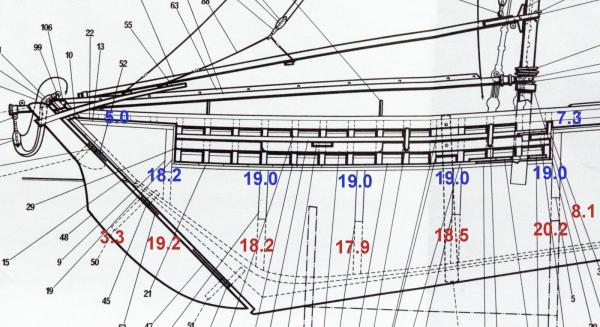
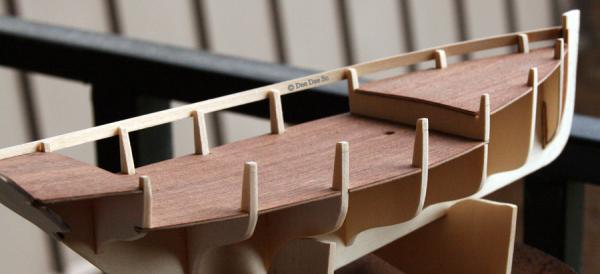
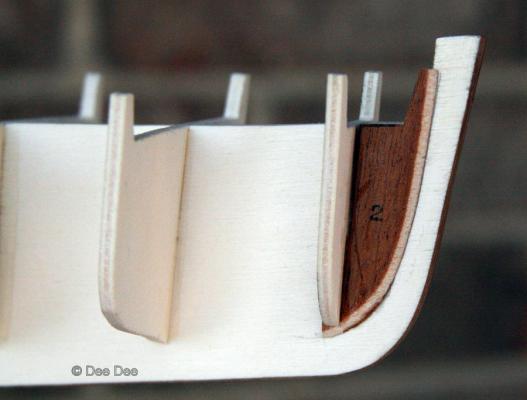
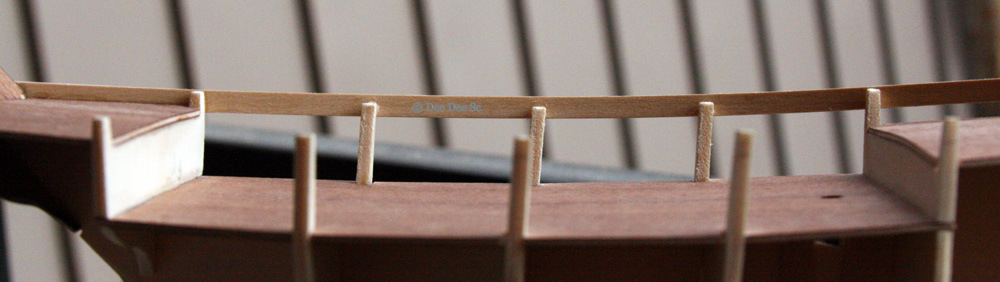
It took a while, but I finally figured out how to resolve. The critical section is the cockpit and that distance measures 19mm at each bulkhead. Since the planking is 5mm wide, I measured up from the top deck 14.5mm (0.5mm fudge factor) and marked off where the bottom of the first plank would line up with. This line was carried forward to the bow deck and aft to the aft deck. This will make more sense with pictures.
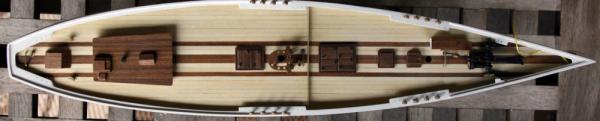
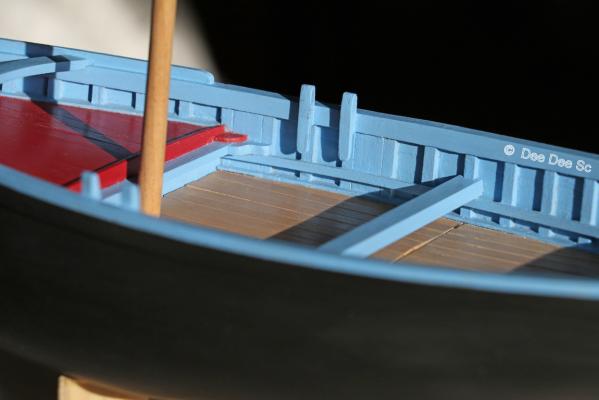
This first photo shows how short the cockpit bulkheads are. The first plank was glued on with an even spacing for the length of the entire deck. (I wanted to raise this plank another couple of mm, but the bulkhead in the middle only half of the plank is attached to it.)
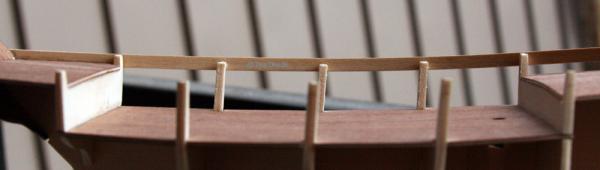
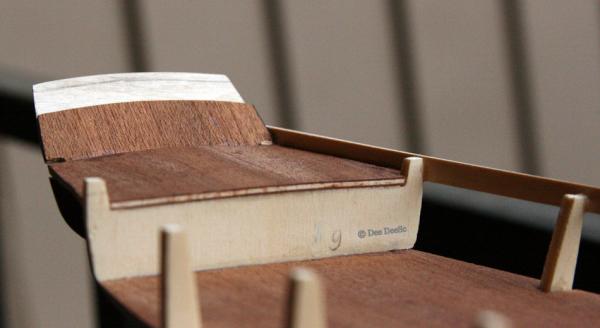
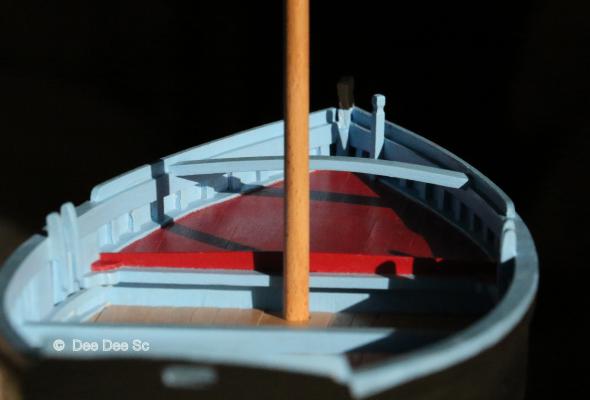
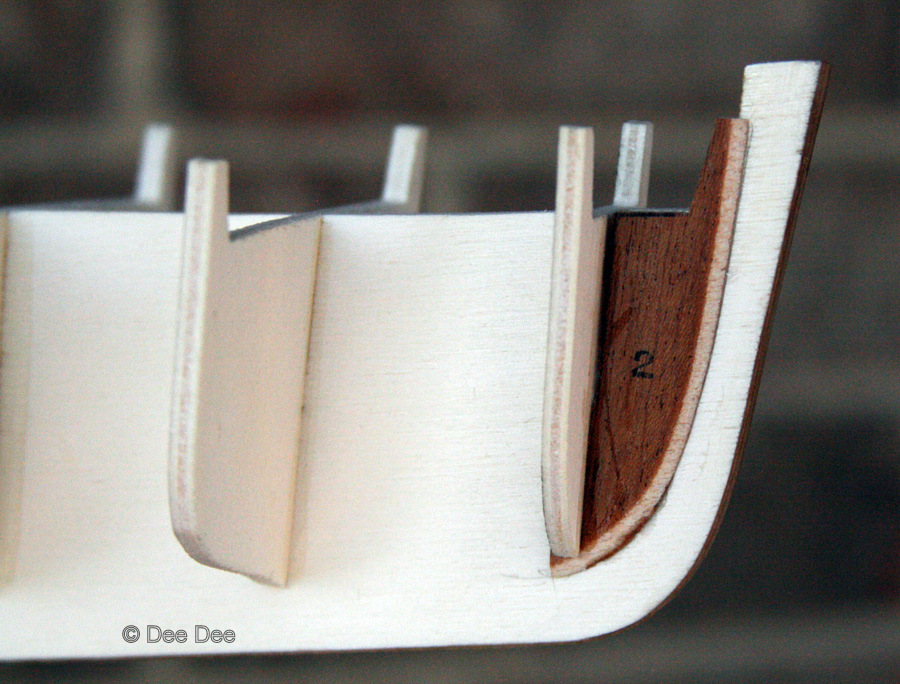
Here's the bow and the even spacing continues, the top of the deck is 8" below the top of the plank. The cap rail will add another 2".
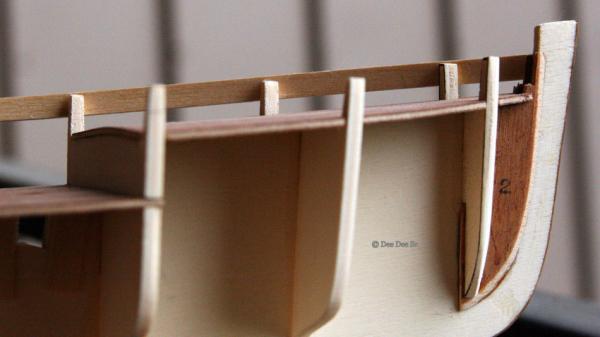
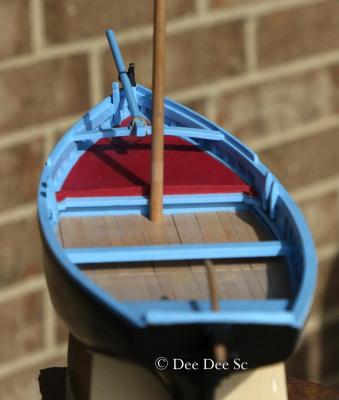
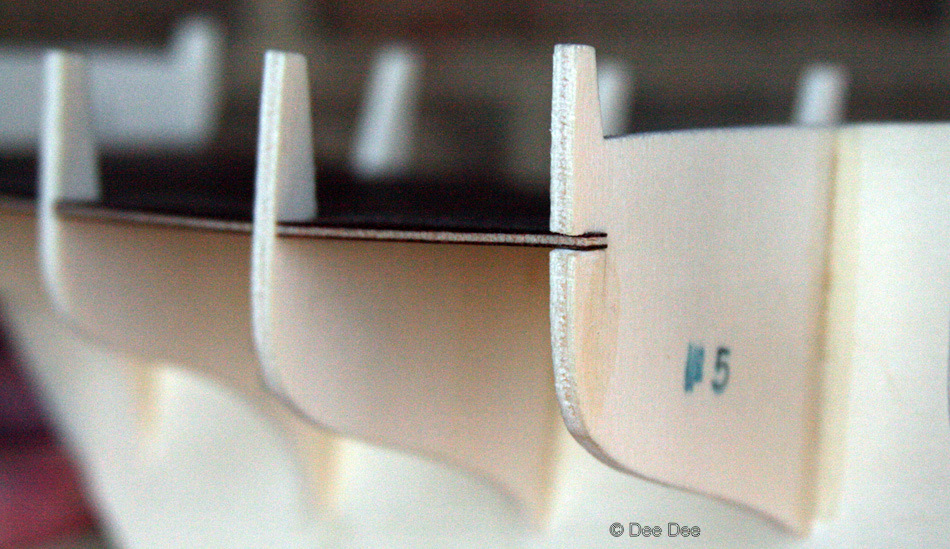
The fore deck and main deck
Well, it looks like I didn't need to add the extension to the transom! The extension is 10mm and was planning to take it down to 3". It's only 1/32" thick, so I will just leave it on and make adjustments with the thickness of the transom planking.
This may not seem like a big deal, but it will be a big deal when I start adding the inner planking.
Thanks for stopping by and wading through this long post.
Dee Dee
-
Josh
What I like about working boats are the stories they tell, about the people that work on them and the people who live in the small towns along the coast. Tugs are cool boats, they all do the same thing, but yet, they are so different, pending where they ply their trade. Have you seen Russ' scratch build of a Biloxi Schooner? Russ has done a few other working boats from the Biloxi area and his build logs are fascinating reads.
Dee Dee
-
-
Eamon,
This is where I got the info for on the Kinsale. This books sounds really fascinating. Check out all the various publications under the publication tab.
http://www.tradboats.ie/index.php
Dee Dee
-
Finally figured out the major changes I'll be making in this build
Single Planked - This is a no brainer I'll use the kit supplied lime wood, which is a bit heavier / harder than basswood. My goal: NO FILLER ALLOWED! So I will need to take my time with each plank to get it right. And if it's not right, well, I will just have to do it over! (Fingers crossed!)
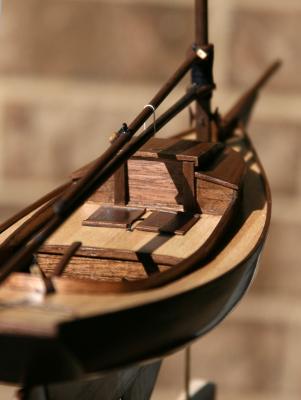
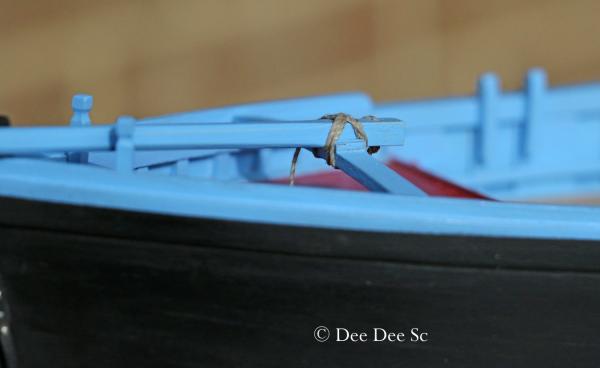
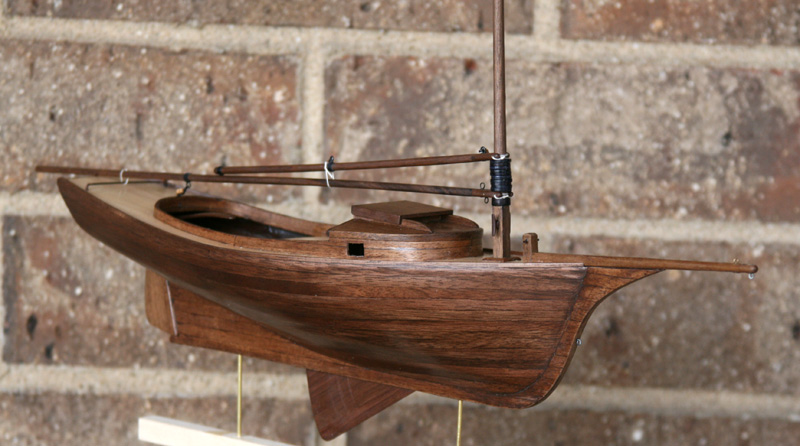
Bowsprit - Definitely will add a bowsprit using the black iron ring mounted on the bow stem and anchored on the bow thwart. The back end of the bow sprit is square, and fits between two pieced of wood mounted on the bow thwart. A rope runs through the bowsprit to anchor it to the thwart. In post #2 (above), in the 6th photo, you can see the squared end of the bowsprit and the two pieces of wood on the bow thwart.
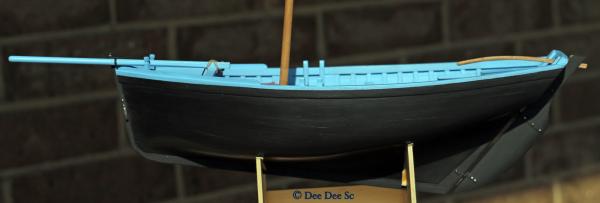
Transom Height - In the kit, the top of the transom is at the same height as the cap rail. In post #2, the 5th photo, you can see the top of the transom is 5-6" higher than the cap rails. This looks much nicer. I'll build this up in layers.
Access door under rear deck
This photo gives a great view of the hinged doors to access storage under the rear deck.
This photo is copyright protected, so please copy and paste this link. Really nice photo! http://www.pbase.com/image/65376766
However, to do these, I will most likely need to extend the length of the rear deck. Currently, it measures 40", but thinking I might lengthen it a bit, or raise it. ..... or neither and just install the doors.
Access hatch on fore deck
This is another copyright protected photo of the same boat and another really nice photo: http://www.pbase.com/debetencourt/image/65376767
This one shows some nice details of the rigging. At the bottom of the mast and to the right, there appears to be some type of hardware that might be the access to the storage under the fore deck. So, humm, an opportunity to add detail.
Fish wells
In this same photo, you can there is a definite split on the cockpit decking. The instructions for these boards are sort of goofy, but the prints show that after the decking is done, add 3 planks at 90*, but do not glue them down. I'll scan the drawing when I get there and hopefully someone else will know or have a better idea.
Cleats - The kit came with 12" long, metal cleats and all of the lines were tied off on a cleat. These cleats are so big, they remind me of clown shoes, you know, about 7" too long! But no metal cleats allowed on this build. Instead, I will use belaying pins or wooden cleats as shown in the photos above. (Yeah! I finally have a reason to order something from Model Expo and I can finally get the 5mm cleats I need to finish my MBLS!)

So, those are the changes I've decided on so far, there may be more. Since none of these changes are impacted by the planking, I can finish off adding the transom, fore and aft false decking and start planking!
Yeah!
Thanks for stopping by, questions and comments are welcome!
Dee Dee
-
Thank Crackers.
This is the only project I have going.
Eamonn
Yep, you're in from the Get Go! Welcome aboard!
You are spot on the coquille is similar to the Galway and Kinsale Hooker. So far, the major difference I see is the sides of hull on the Galway and Kinsale Hooker curve inboard, whilst the sides of the coquille are vertical. Here are some prints from the Galway and Kinsale Hooker.
http://www.tradboats.ie/index.php

Sails? Yes, I will be adding sails. The coquille kit came with sails, but they are not the best quality, so I will make my own.
Josh, thanks for stopping by. Hope the house hunting in the Big Easy is going well. From New Jersey to the Big Easy, that is definitely a 'Culture Shock!' The boats of the
Check out Russ' scratch build Biloxi Schooner.
Thanks again for stopping by
Dee Dee
- egkb, IgorSky, popeye the sailor and 6 others
-
9
-
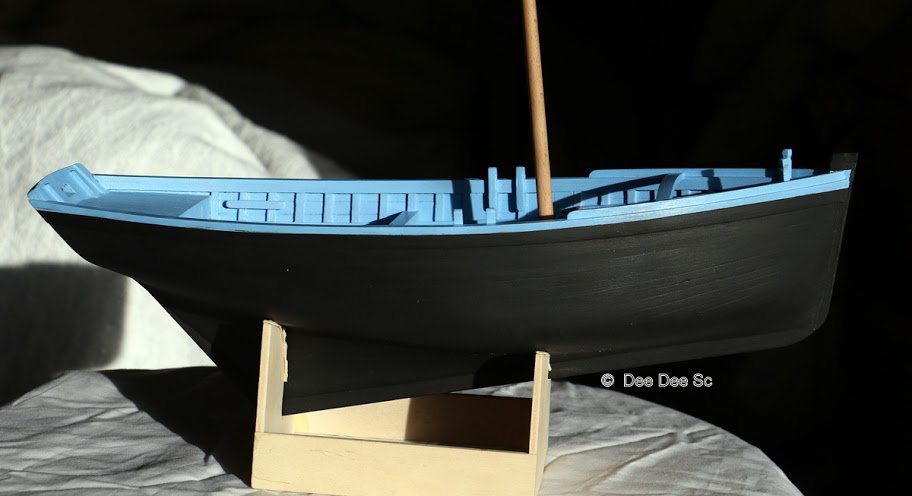
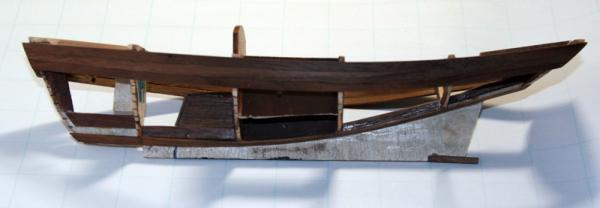
And the build begins!
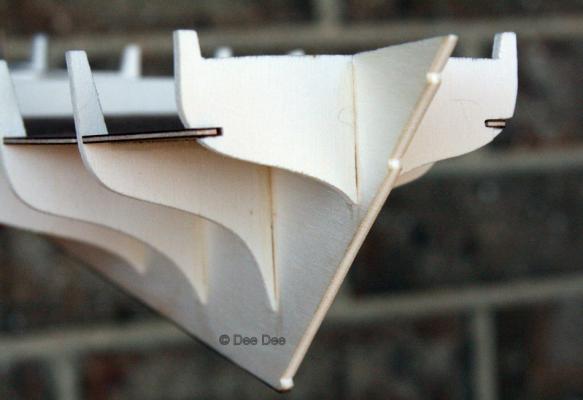
First part to be added to the false keel was the bow filler. The leading edge was faired for added glue surface for the planking.
Bulkheads #3, 4 and 5 were added using blocks to keep them square. The cockpit false decking is integrated with the 5th thru 9th bulkhead, so these were all fitted as one and then glued. The false deck made it easy to make sure the bulkheads were square and level.
The false decking has tabs that fit into #5 and #9 bulkheads.
Forward false decking tab

Aft false decking tab
Cover photo from the kit box.

Before I start the planking, I need to do some planning and make final decisions on the changes I want to make and when I need to make them.
Thanks for stopping by, comments and suggestions are welcome.
Dee Dee
-
Bob,
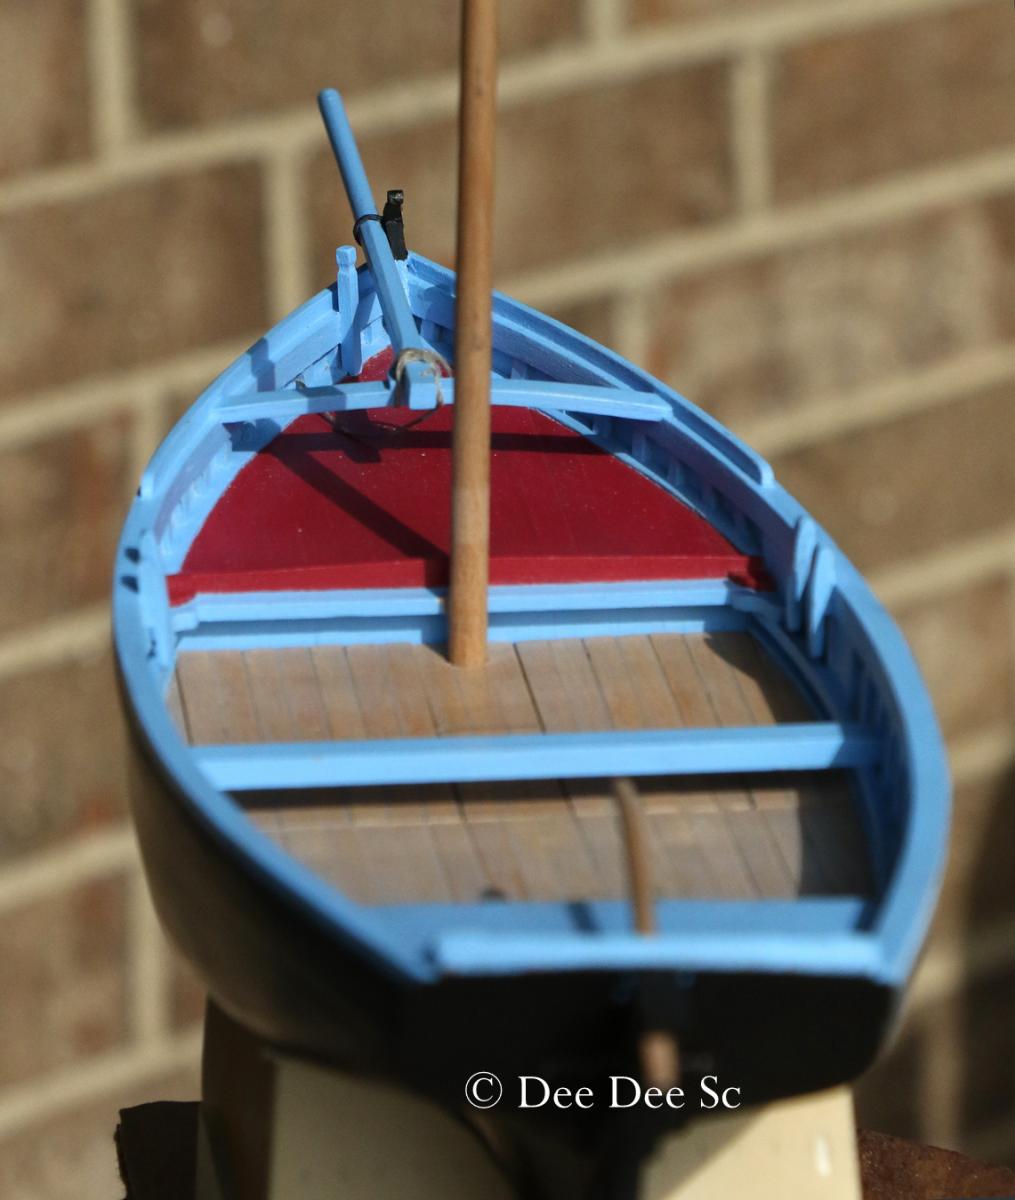
I really like these boats, they are like a living history that is celebrated. I definitely plan on adding the bow registration numbers. Most likely, the hull will be black, with a blue two tone cockpit and maybe a highlight strip, but I do like those red decks. But there's a lot to do before I get to the painting.
Bob,
Glad to have you following, I've learned so much following your Lettie G. Howard build.
Ben,
Welcome aboard. I like to do a lot of research about the boat I'm building, reading, photos, the photos in the above post were from a French blog. So, there will be lots of photos! If you have any questions, please do not hesitate to ask.
Dee Dee
-
RESEARCHING INFORMATION
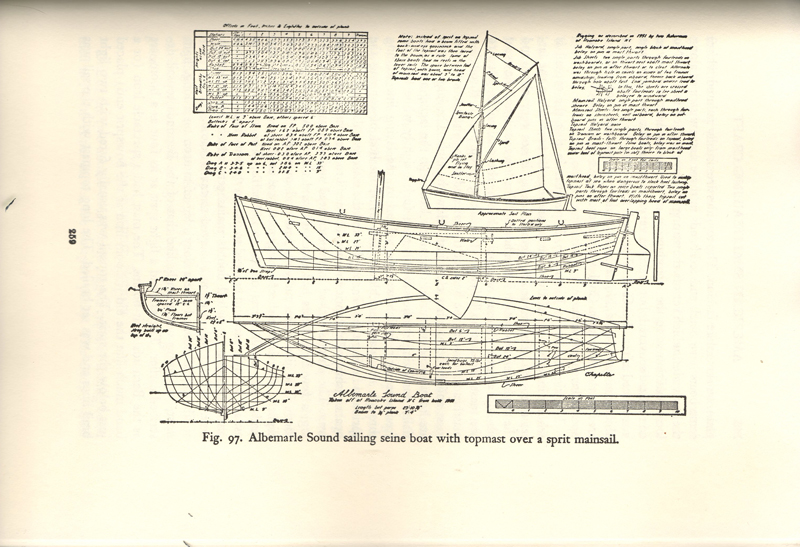
Chapelle's book was invaluable to build the Muscongus Bay Lobster Smack and I spent many hours researching the build. Uhmm, maybe I need to plan a trip to Brittany to do some research......

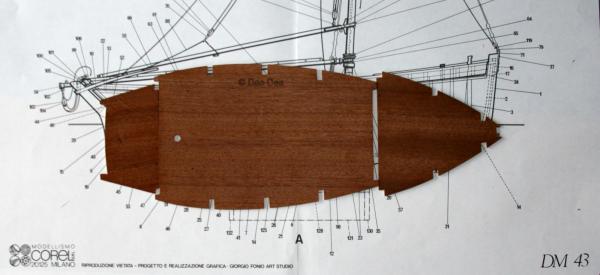
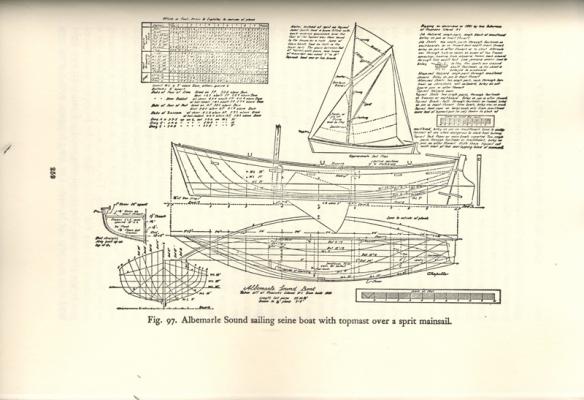
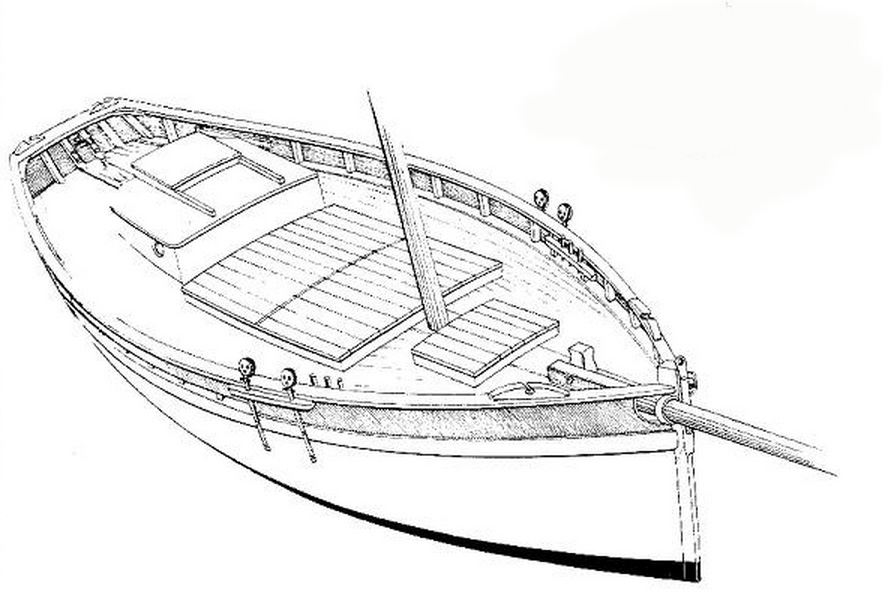
I found this drawing of a hull that is very similar to the coquillier. This coquillier is about a foot longer than the MBLS, however the beam is almost two feet wider. This drawing also shows one way to build the bow sprit, sliding through an opening in the hull and pinned to the samson post and ideas for accessing the fish wells and fore deck storage. Also shows the use of belay pins, which I prefer. Oh, so many changes I need to start planning for.
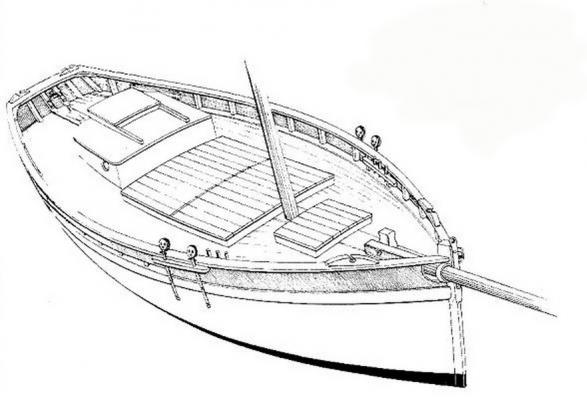
Another way to do the bowsprit is an iron ring attached to the bow stem.
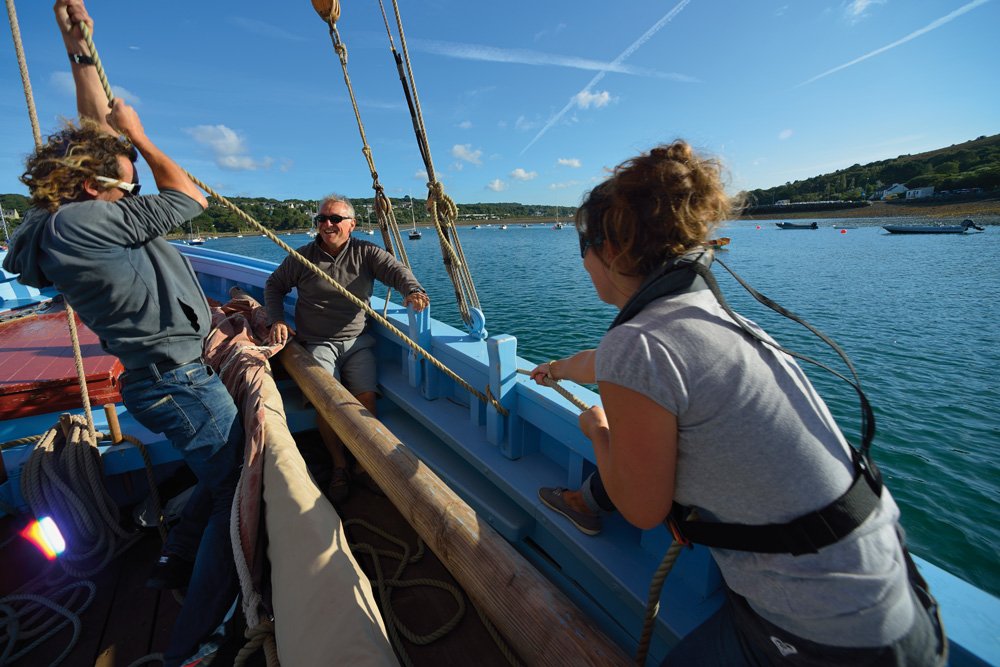
This photo is from Sophie's Maze's blog. Sophie has numerous fantastic photos of various boats and great information in her blog from the area of Brittany. I highly recommend visiting Sophie's blog.
From https://sophie-g.net/photo/bret/brest/bergere13.htm Lot's of good photos and fantastic stories about the region.
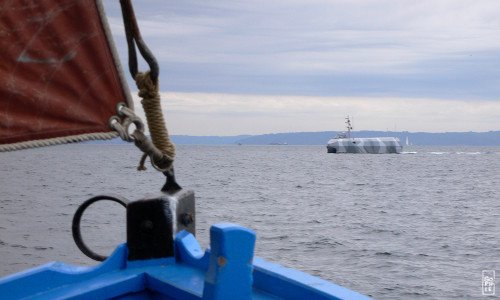
I found numerous photos in this blog that show lots of little details. Please visit this link for more photos.
http://www.laroyale-modelisme.net/t9662-la-bergere-de-domremy
Fore deck detail, the bowsprit slides through an iron ring attached to the stem and is anchored to the bow thwart. The bitts on the kit drawing are 3" x 3", this photo confirms these are oversized.
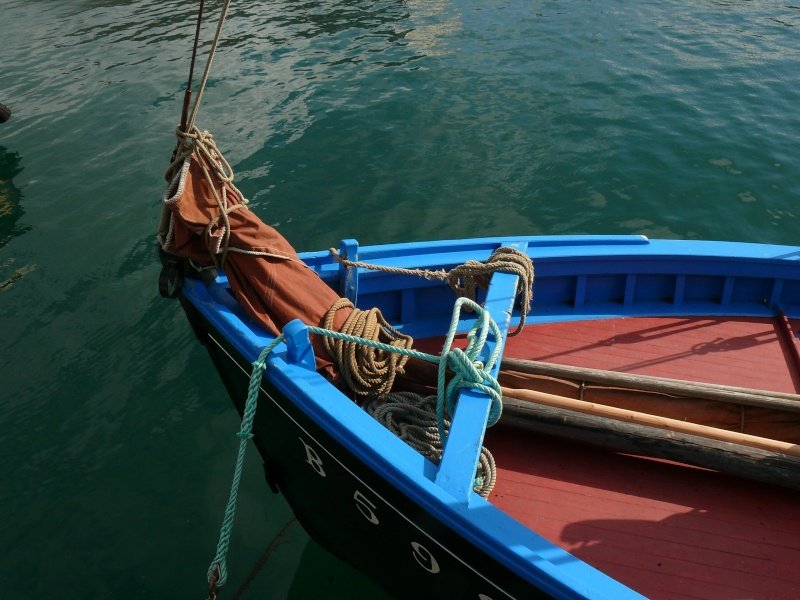
There are two pieces of wood on the bow thwart that are used to anchor the bow sprit. Need to find an photo that shows how the ropes were used to secure the bowsprit.
You can see some latches on the doors to access the rear deck storage. These cockpit deck planks appear to be about 6" wide.
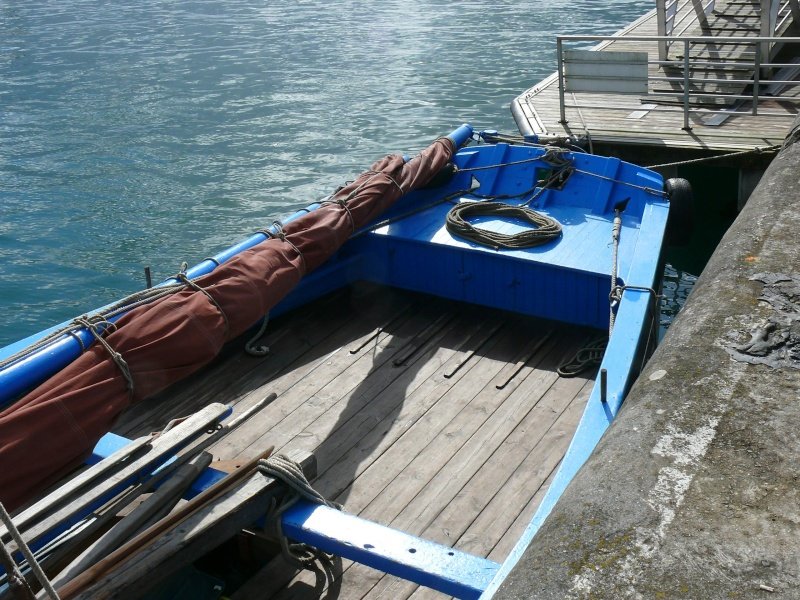
The bow sprit, a couple of pairs of oars and the tiller being stored on top of the dinghy. The cockpit decking shows a seam underneath the thwart.
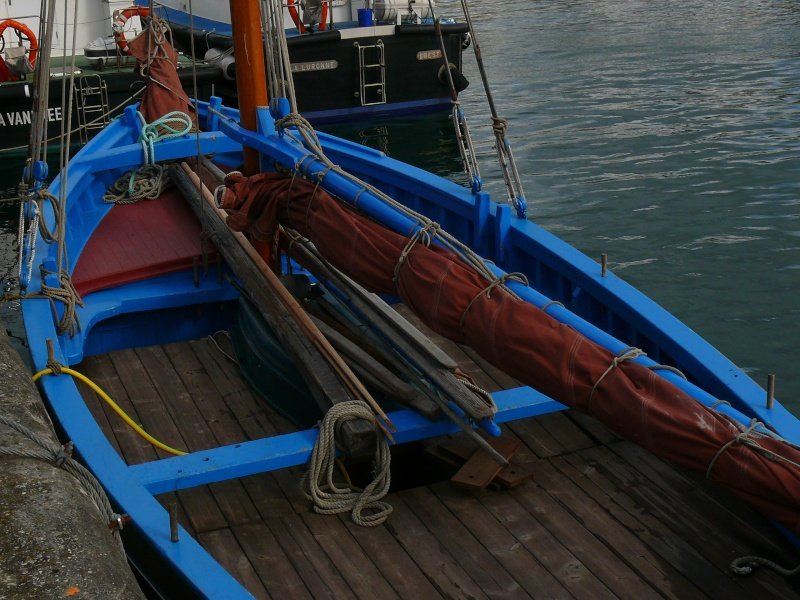
This photo shows how the hull cleats for the halyards were made and used. This boat is a lot longer and shows the height of the free board and again, you can see the size of the foredeck planking. That 'telephone pole' is the bow sprit.
This photo from 'Boating in Brittany', located in Brest, France, they offer sailing classes on these classic boats.
Find more information here: http://nautismebretagne.fr/fr/pages/detail/603/229/
The history of these boats are celebrated at various festivals, such as the Breast and Douarnenez Festivals. I need to find and add some photos from these festivals to show the various paint schemes.
Need to go through the prints and decide on some of the changes I'll be making and start building.
Thanks for stopping by
Dee Dee
- Salty Sea Dog, yvesvidal, SGraham and 10 others
-
13
-
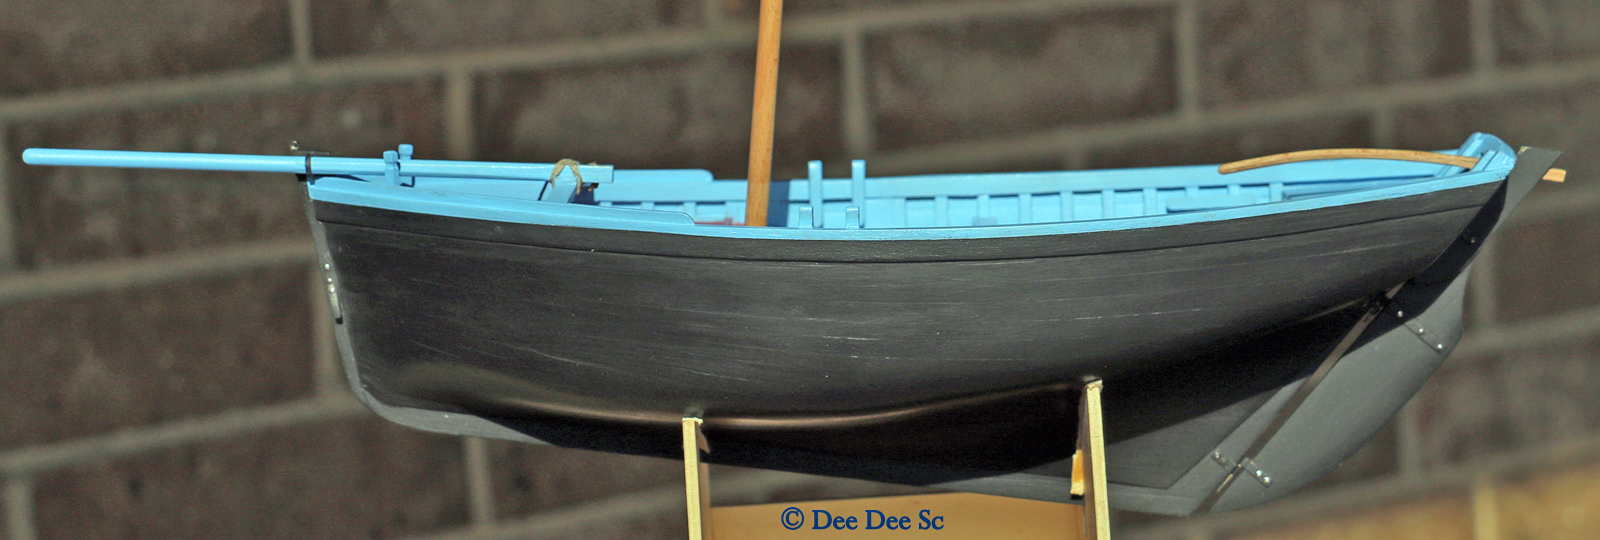
Thanks for stopping by my Corel Sloup build log.
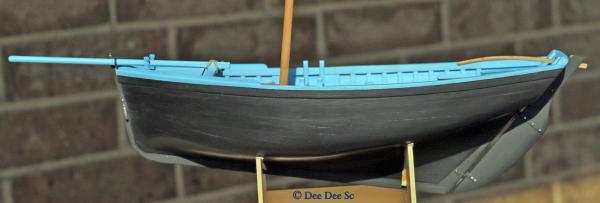
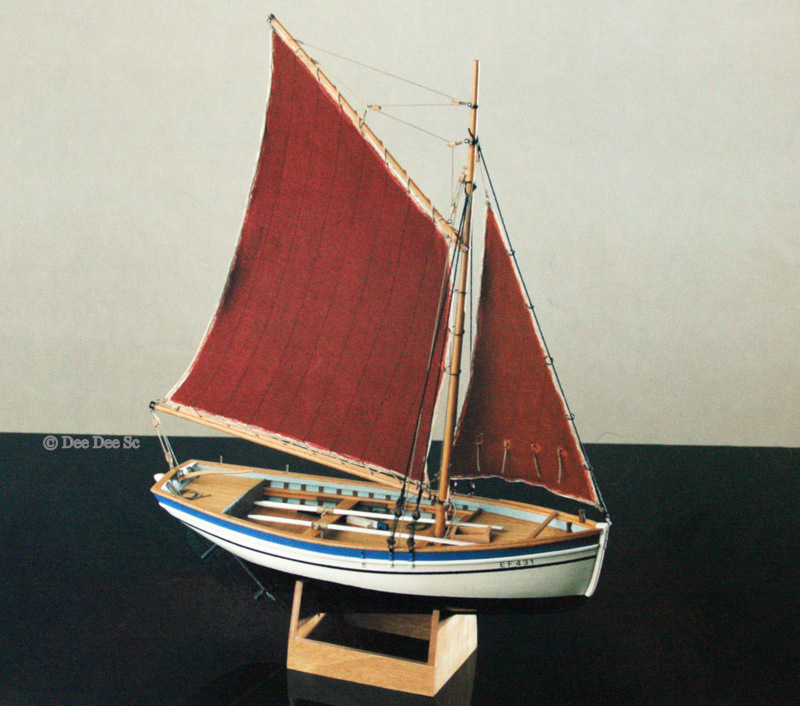
The first photo shows the current status of my build and will be updated as the build progresses.

Corel missed the boat (pun intended) with labeling this model as 'Sloop'. IMHO, there would be more interest if the kit was marketed as 'Sloup Coquillier / Shell fish Sloop'. The Sloop Coquillier is a celebrated work boat with a long history from the coast of Brtittany, France, to the shores of the UK and beyond.
From Corel's instructions: The "sloup coquillier" was a boat typical of the Anchorage of Brest, in the Department on Finistere in Brittany (on the north-west coast of France), used to collect shellfish, in particular Saint Jacques shells ("Pecten Jacobaeus, the Venetian "Cape Sante"), and, to a lesser extent, oysters and other types of shell fish. Attributable to the vast range of French boats with "cul carre" and "quille tombante" (square bow and strongly sloping keel), the sloup, like all popular boats, was the result of a complex historical evolution and structural adjustment to uses and environments. The hull, little immersed and rather full astern, proceeding from the main frame towards bow, gradually took on a deep, net hollow V-section, culminating in the peak fishing point.
Going forward, I will refer to this build as the 'coquillier' (AKA oyster smack.)
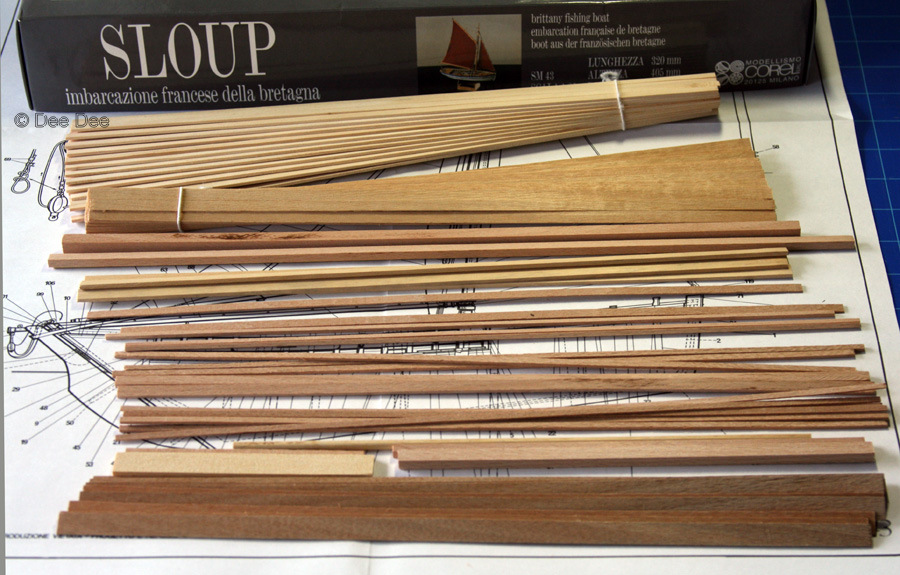
The obligatory kit info:
With no burn marks on the keel or bulkheads, it appears these were machine / die cut. The quality is very good and these parts fit snug.
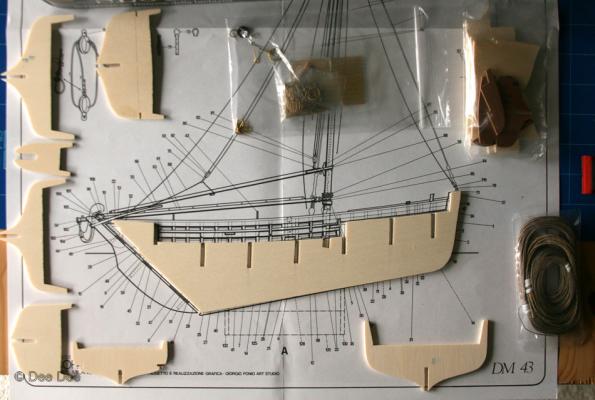
The quality of Corel lumber is a bit above average. The first layer of planking is lime wood, a bit nicer than basswood. The second planking is tanganika and most of the dimensional lumber is beech. The decking is plywood and appears to be mahogany, it's excellent quality and very flat.
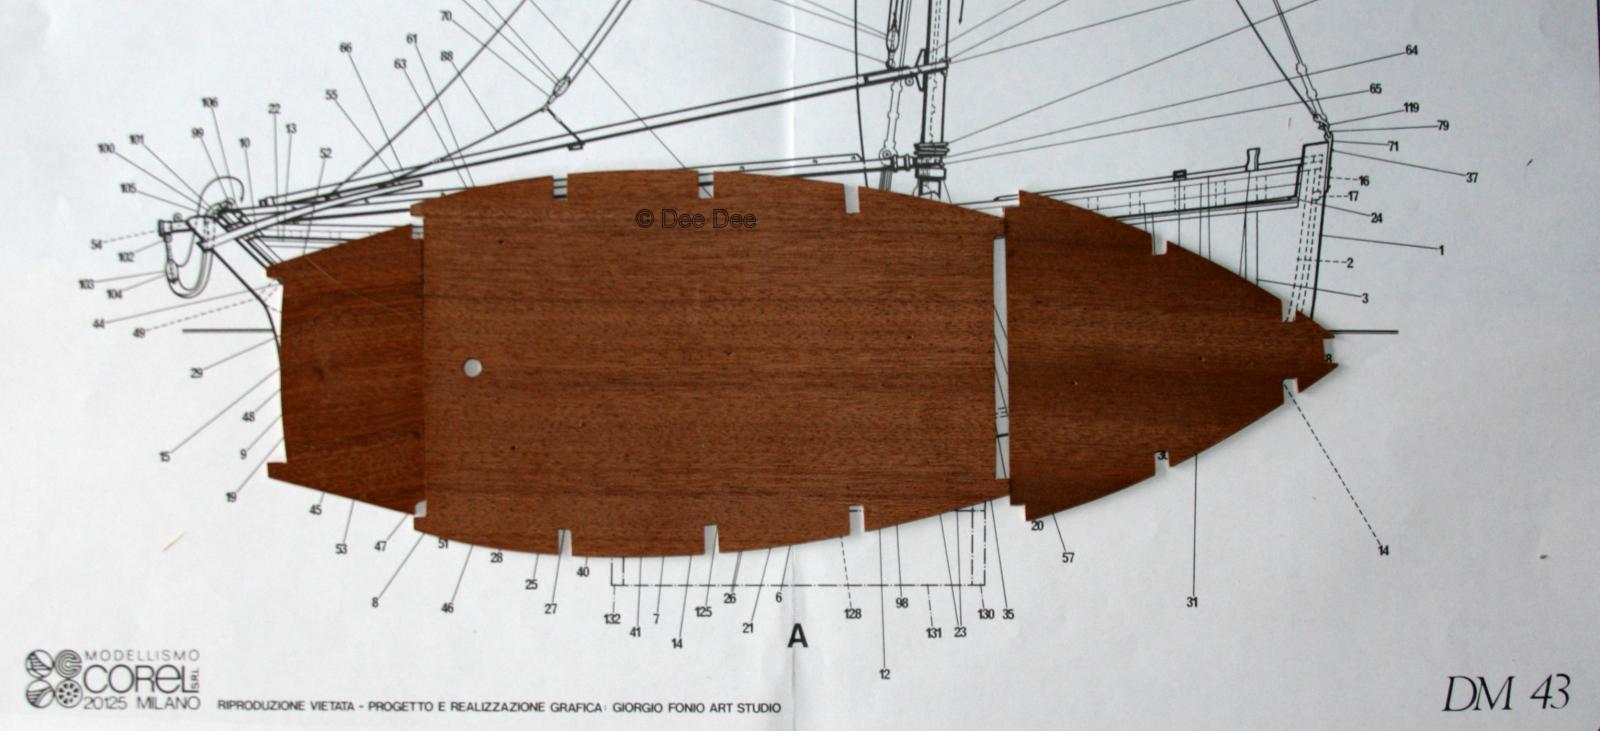
Corel instructions assume that the builder has some experience. While there are 11 pages of instructions, (two pages / sheet), after removing the 'fluff', we're down to about two pages. But the lack of instructions is more than made up for with the four sheets of drawings that progress in a logical manner. The drawings are very detailed, contain a wealth of information and numerous part specific detailed drawings.

I'm looking forward to building this boat and learning more about its history.
Dee Dee
Edited on 8-3-2014 to update photos with ©
-
-
-
Bob,
I'll rescan this in higher detail and send to you.
Dee Dee
-
Matti,
Damitol! There is no "LOVE IT" button!
- Salty Sea Dog and NAZGÛL
-
2
-
Eamon,
Another timber quandary...... you must have mystery visitors at night stealing it........
As for digital calipers - the best thing since sliced bread, a good bottle of wine / glass of beer and a few other things. Originally my mast hoops were 1.8mm thick, then reduced them to 1.5mm. That's 0.3mm / hoop or a total of 3mm. Just before I added the mast, I reduced them to 1.2mm. Now, 0.6mm doesn't sound like much, but with 10 mast hoops, the stack height of all the hoops was reduced from 18mm down to 12mm!
Hammer, camera lens, don't forget the stapler and a hard soled shoes.
I'm watching your planking - because I might add this detail to my next build!
Dee Dee
-
-
Jack,
I never had an interest in Viking boats. But after reading thru you build log and your photos, I hope you don't mind if I pull up a chair and sit a while.
Your build is enchanting.
Dee Dee
-
Josh
You just had what I call the 'Ahhhhhhhhh moment.' When you slow down and start adding the details. I could easily build one of these boats in a week or so, but adding details gives my build the personality I'm looking for.
On this build, I used basswood for the decking and two species of walnut. The slide cover is made of walnut.
Since you are painting your Sharpie deck furniture, there should be no need to cut into the cabin. You can do an 'eye trick' to achieve the same detail.
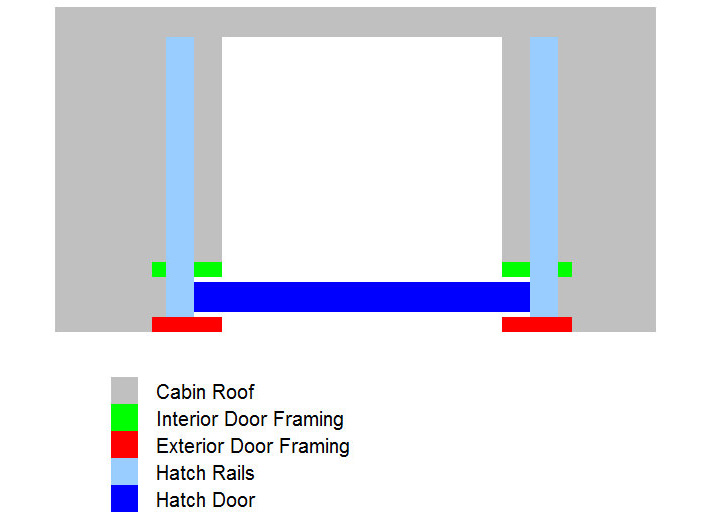
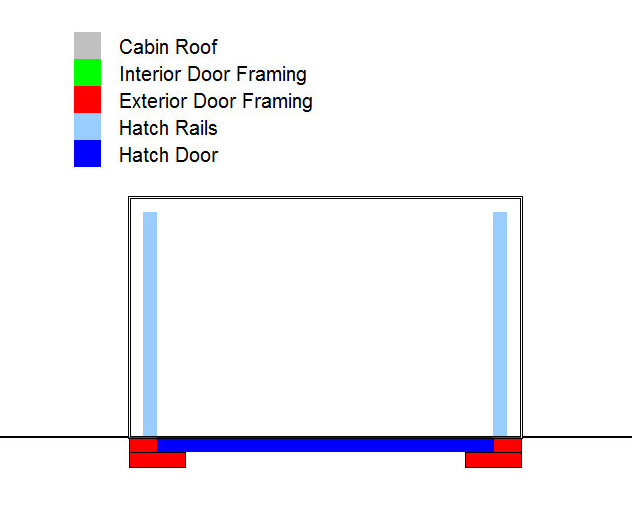
Here's a simple top view diagram how I did my companionway:
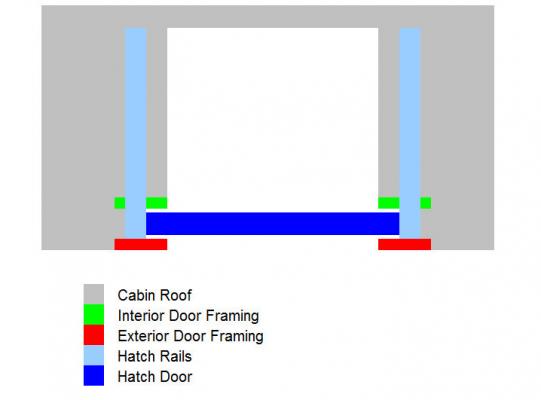
You should be able to get similar results using something like this. The double black line is the outline for the cover. Notice the exterior door framing is made from two pieces of wood.
Instead of placing the door directly on the decking, add a 'step' that was used to keep water out of the cabin. You will need to do some tweaking on it so the cover covers the door. Try making some mockups in card stock.

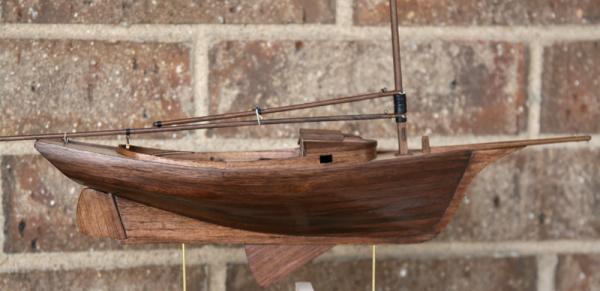
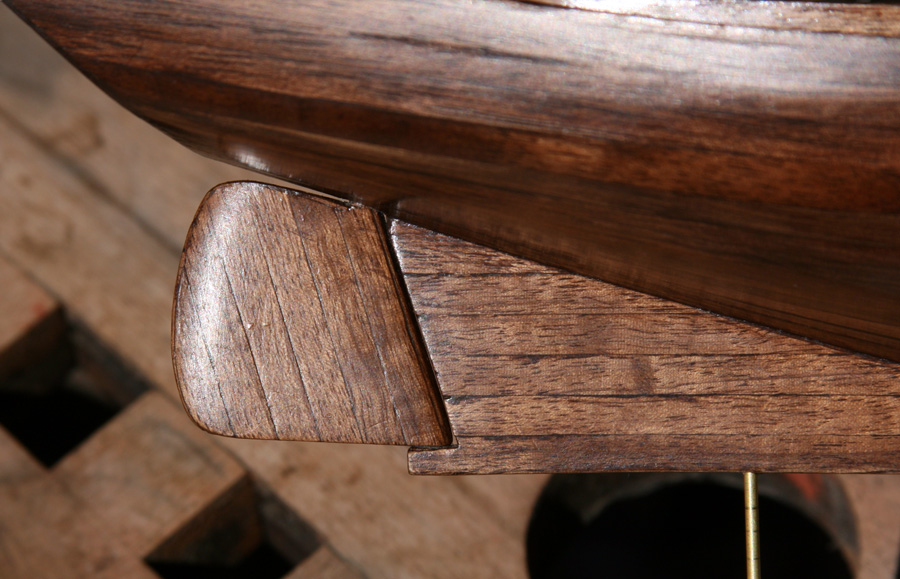
Here are some photos on how I made the keel hung rudder. I was planning on doing this on my first build, but couldn't figure out the details, specifically how to install the rudder once I added the block on the bottom of the keel. On my second build, I figured it out and added this detail. Since the rudder was fully operating, the block was pinned for strength. One of the reasons for a keel hung rudder is it reduces the chance of a net or lines getting caught / snagged if they drift under the boat.
First Build

Second Build
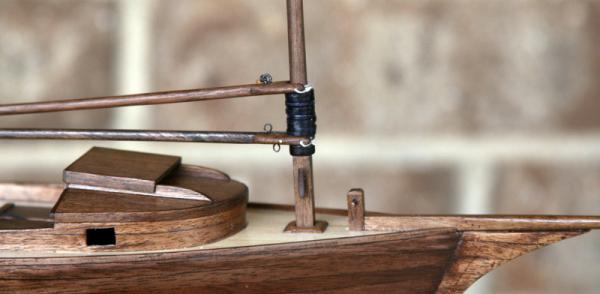
Here's a close up of a rudder from my first build. It was made from 1/8" x 1/8" basswood strips and a bamboo BBQ skewer as the post. Take your time to get a nice taper on the trailing edge of the rudder. The rudder was then veneered with 1/64" strips of walnut.

Here's one of those rudders on this build, before it was veneered in walnut.

Finished rudder close up. You can see the taper with the light reflection.

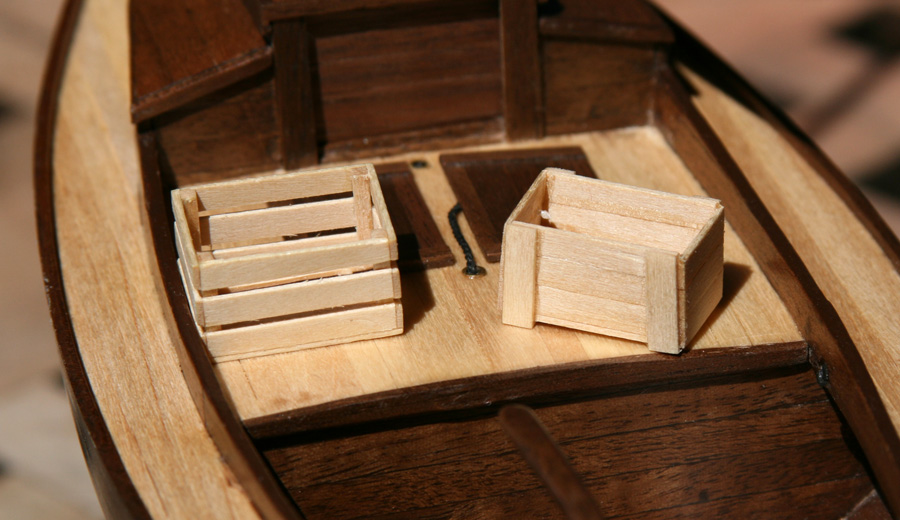
To add some personality........ Making these crates is a fun exercise.
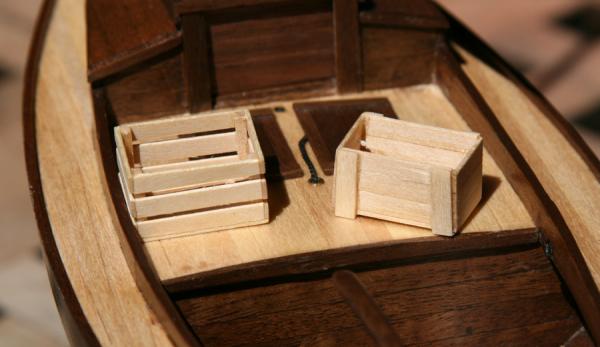
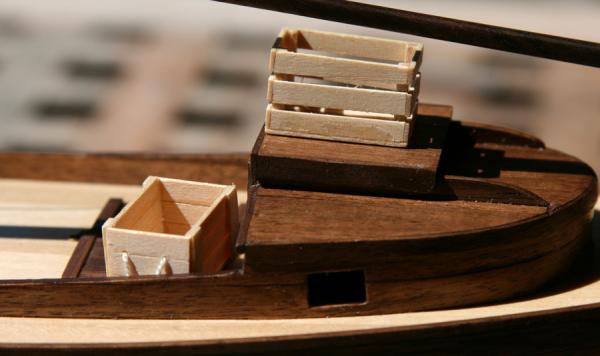
Hope this helps Josh!
Dee Dee
PHOTOS GONE MISSING - BYE BYE PHOTOS!
- Aussie048, hexnut, TurkSailor and 4 others
-
7
-
I need to order some cleats to finish the rigging. It will be a while before I order the new cleats, so before I start my next build and while my thoughts are still fresh, I thought I would do my wrap up post.
From the beginning of this build, I took Remco's signature line to heart:. Treat each part as if it is a model on its own, you will finish more models in a day than others do in a lifetime.
My goal with this build, was to build a MBLS as it looked and functioned back in the day. So it all started with research, digging for information and reading lots of build lots. The scratch build logs are great for problem solving and the kit build logs help with everything. My copy of Chapelle's book has taken a serious beating! The spine is broken open to the MBLS chapter and the pages are covered with penciled in notes. I read lots of build logs. And I found a few good websites. Did I mention I read lots of build logs?
When I started this build, I made a list of all the changes I wanted to make. I posted this list in the opening build and have been updating it as my build progressed. Having built this kit before, helped to develop this plan and a skill I can take forward to future builds. As for plans: A plan is not etched in stone and it's OK to add / delete items and OK to step back and put a build on hold.
I learned a lot about problem solving: The biggest problem that had to solved was also the most critical part to the entire build, the false keel. It had to be right, as over half of the changes I was planning to make depended on it being right. The hatch opening! On the third try, I finally figured it out and I'm over the moon with how it turned out! I built five prototypes for the cockpit floor boards, until I figured out the height of the cockpit keel needed to be reduced. But when it came to the cockpit combings, I nearly tossed the build out the window, but I took a deep breath. Then, there was the cabin keel and the mast step. Also, the hull planking, every plank, (not to mention the walnut that was only 3/32" thick.) Also, the fish well openings, hanging the rudder on the keel, deck planking and I had all my fingers and toes crossed when fitting the cutwater - it was a near perfect fit.
I had one major failure and there is nothing I can do about it, because it goes all the way back to the very beginning. I didn't have the right size of chain to operate the centerboard, so I used a length of silk cord. The centerboard still works perfectly, but not sure how long the silk cord will hold up. What really irks me is I knew I should have used chain. And THAT's why I am waiting for the proper sized cleats to finish off!
My favorite part was the very first part: The sandwiched false keel. It turned out better than I had planned.
The part I sweated the most: Adding the cutwater. On the sandwich keel, I should have made a rabbit to land the planking. With a big sigh of relief, the cutwater fits snugly.
I have a long list of changes I would make if I was to build this boat again. but most of them are minor and will be easy to do on my next build.
I had fun with this build and have enjoyed sharing it with you.


I have seven kits on the shelf and I really want to dive into build a few of them. But I know I don't have the skills (nor tools) needed to achieve the results I want. I have great respect for this craft and I will go slowly and learn.
All my modeling tools will fit inside of a shoe box with room enough for the shoes. I need to add saws, miter box, chopper, sanding and a Dremel is at the top of the list.
Uhmm, what's on the shelf and what am I going to build next........
The Glad Tidings, Emma C. Berry and Corel Dragon will stay on the shelf. I need to learn a bit more before building these and I need a few more tools.
AL Swift: The quality of the wood and fittings is not the best and needs to be replaced. So I'm thinking I'll morph this into something like the Rouse Simmons, AKA, the Christmas Tree Schooner.
Mamoli Gretel, I'll build this one in the near future, but there are a lot of angles on this boat, so I need some cutting and sanding tools.
The MS Longboat: I learned in this build that single planking is a challenge. My plan is to build without rigging and build as a side build.
The Winner Is: The Corel Sloop, a Brittany, France oyster smack. There is a lot of online information for this working boat and a great opportunity to add lots of detail, including that sliding or pivoting bow sprit.
When I finally get the cleats, I'll post some final photos.
Thanks for following and I'll see you in my next build!
Dee Dee
-
Keith
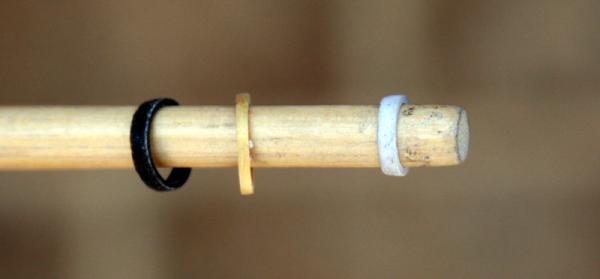
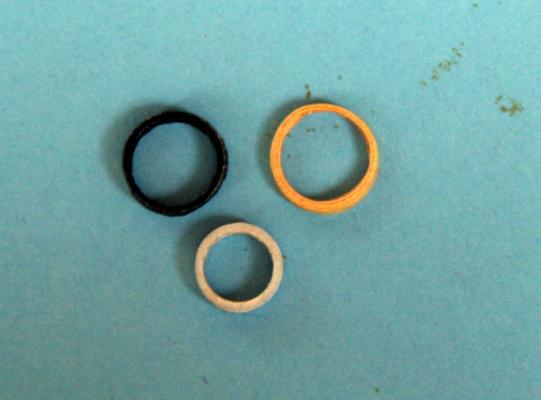
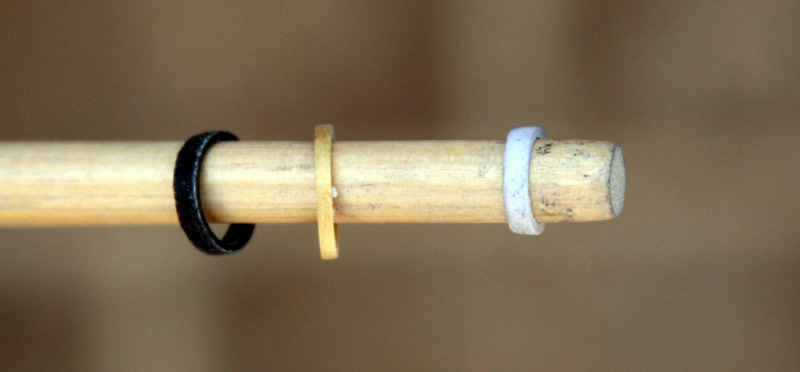
Paper is definitely more flexible than veneer. Do you have any cherry you can make shavings from? A shaving is already curled making it easier to wrap. I like the results using the under layers of white birch bark, that can be stained to get desired color. Below I have included a close up photo of various materials.
Bob
Eventually you will get to this point - And your hull looks magnificent!
Jesse
Ditto! Learning something new is priceless!
Eamonn
Yes, a £5 note is a bit expensive to use for mast hoops. There are other papers that will provide excellent results. The white mast hoop was made from high rag content stationary. The paper is a bit thicker, so I 'flexed' the paper before using and it looks good. You should be able to purchase various papers from an art supply store or a printer that specialized in invitations.
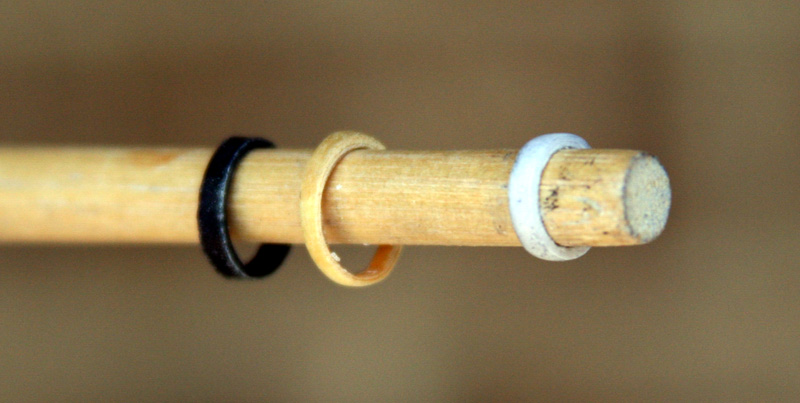
Here's a few more close ups: From left to right, dollar bill, inner layers of birch bark (this one is 1.1mm thick) and the white one is high rag content stationary. On the side view you can see the three layers of the birch bark.

-
-
Tim,
I had started building this model once before, had the hull planked and painted and part of the decking when disaster struck. Sort of like humpty dumpty. It was a rather violent end, as after the second planking, the hull could be used as a lethal weapon. There are lots of photos of these boats on line and again, I plan on making a lot of changes. The boat is about 12" long and 4.5" wide.
Also, the wood that comes with Corel models is always nice.
Dee Dee
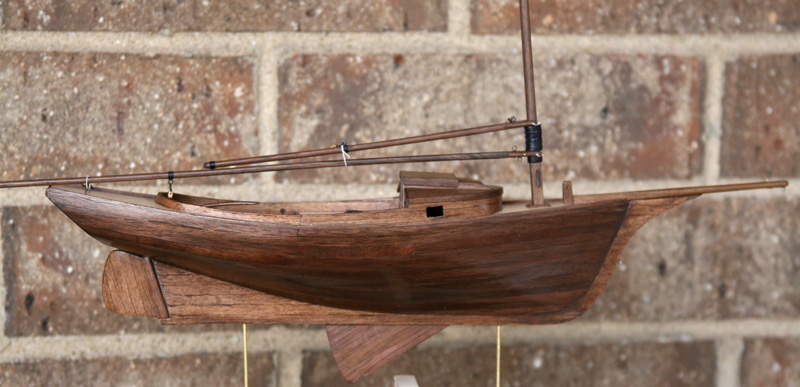
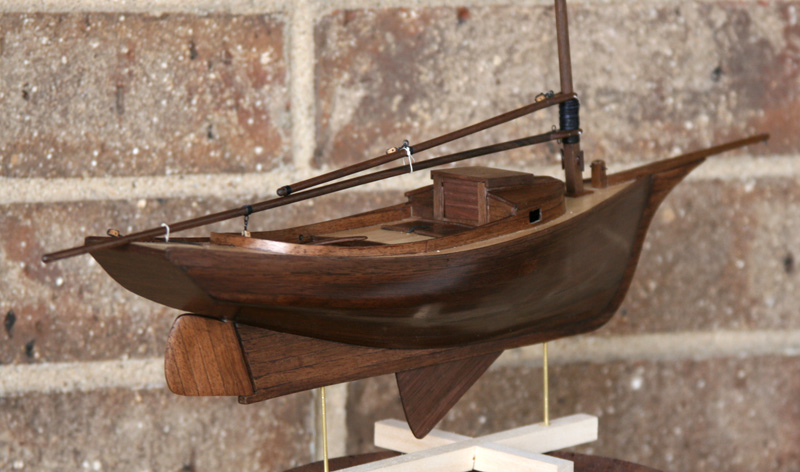
(Update: I'm almost done with my build, here are some photos.)


HM Schooner Ballahoo by egkb - FINISHED - Caldercraft - 1:64 Scale - First Proper Wood Build
in - Kit build logs for subjects built from 1801 - 1850
Posted
Ditto! The Balahoo is looking swell!
Dee Dee