


Dee_Dee
-
Posts
290 -
Joined
Content Type
Profiles
Forums
Gallery
Events
Posts posted by Dee_Dee
-
-
Robert Moran (1857-1943) and his three brothers were Seattle ship builders. The Moran boat yard was located about where Safeco Field is today. In 1887, at 30 years of age, Robert Moran was elected to the City Council and in 1888 elected Mayor of Seattle. Seattle was destroyed by the great fire of June 6, 1889.
A number of years ago, I vacationed on the San Juan Islands. Highly recommended! I visited Rosario, the estate of Robert Moran. What really caught my eye and interest, were the tiny details and the mechanics within the estate, especially the butterfly door hinges.
After hiking up Mt. Constitution on Orcas Island, I purchased a book in the tiny gift shop, titled "Rosario Yesterdays", by Christopher M. Peacock. The first half of this 72 page book detailed the Moran Ship building business, the second half detailed the Rosario estate.
Library of Congress Catalog Number: 85-51170
ISBN: 0-9614970-0-9
Published: 1985
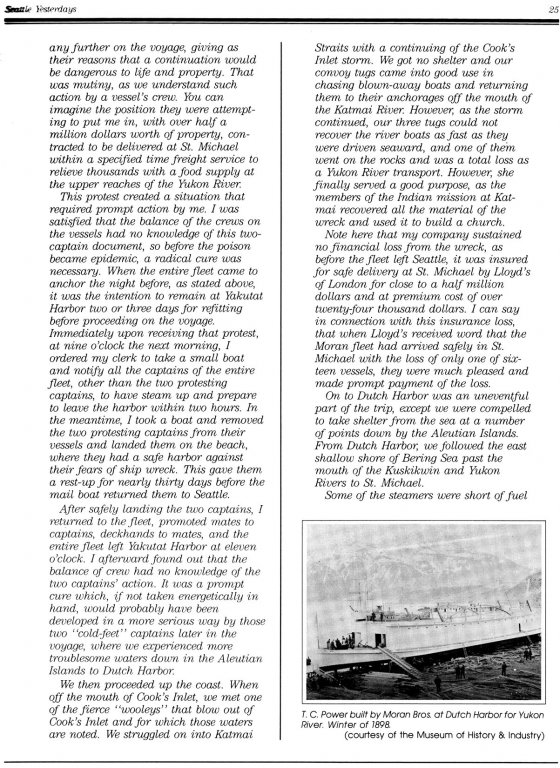
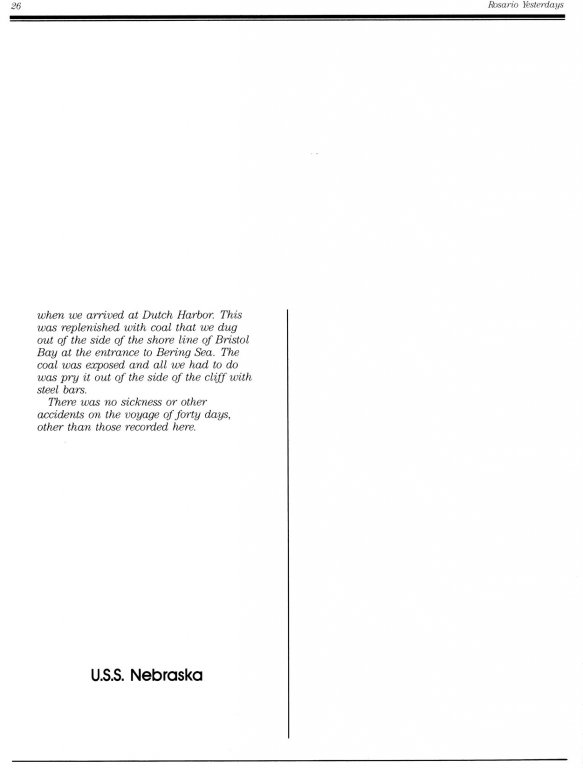
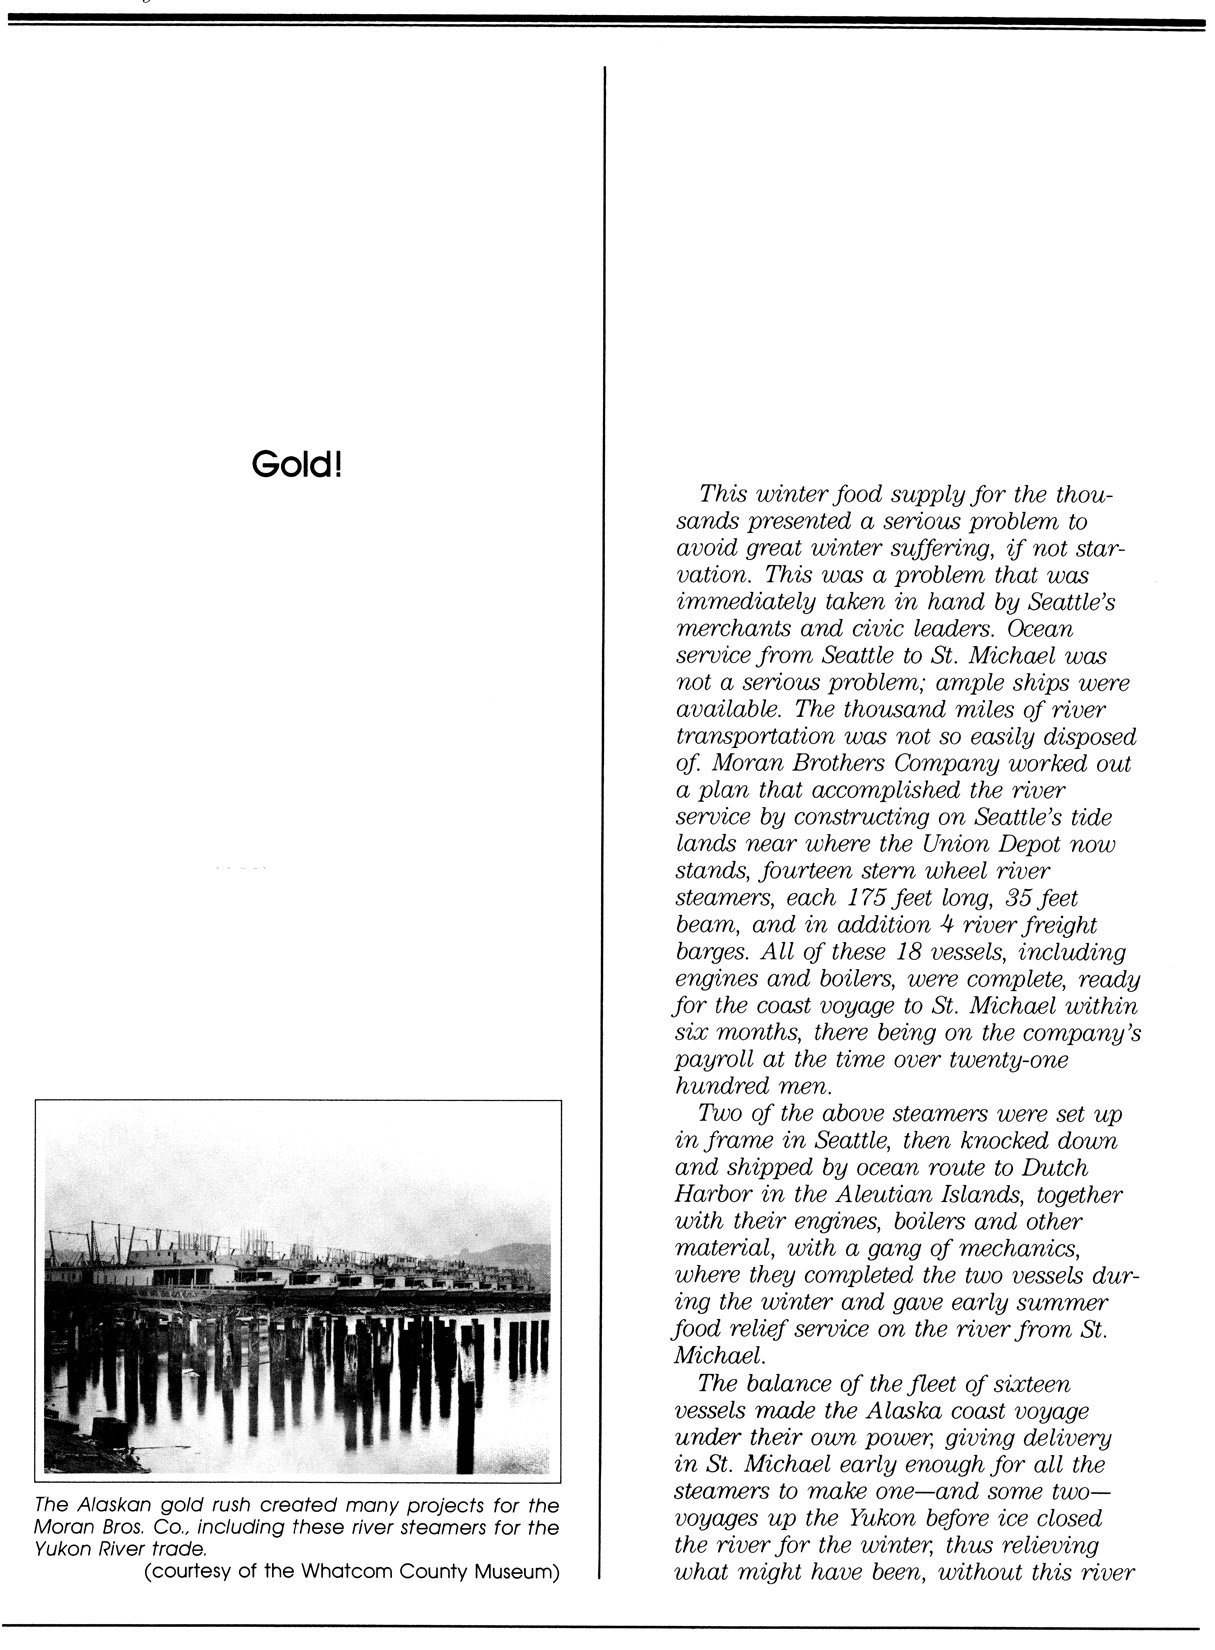
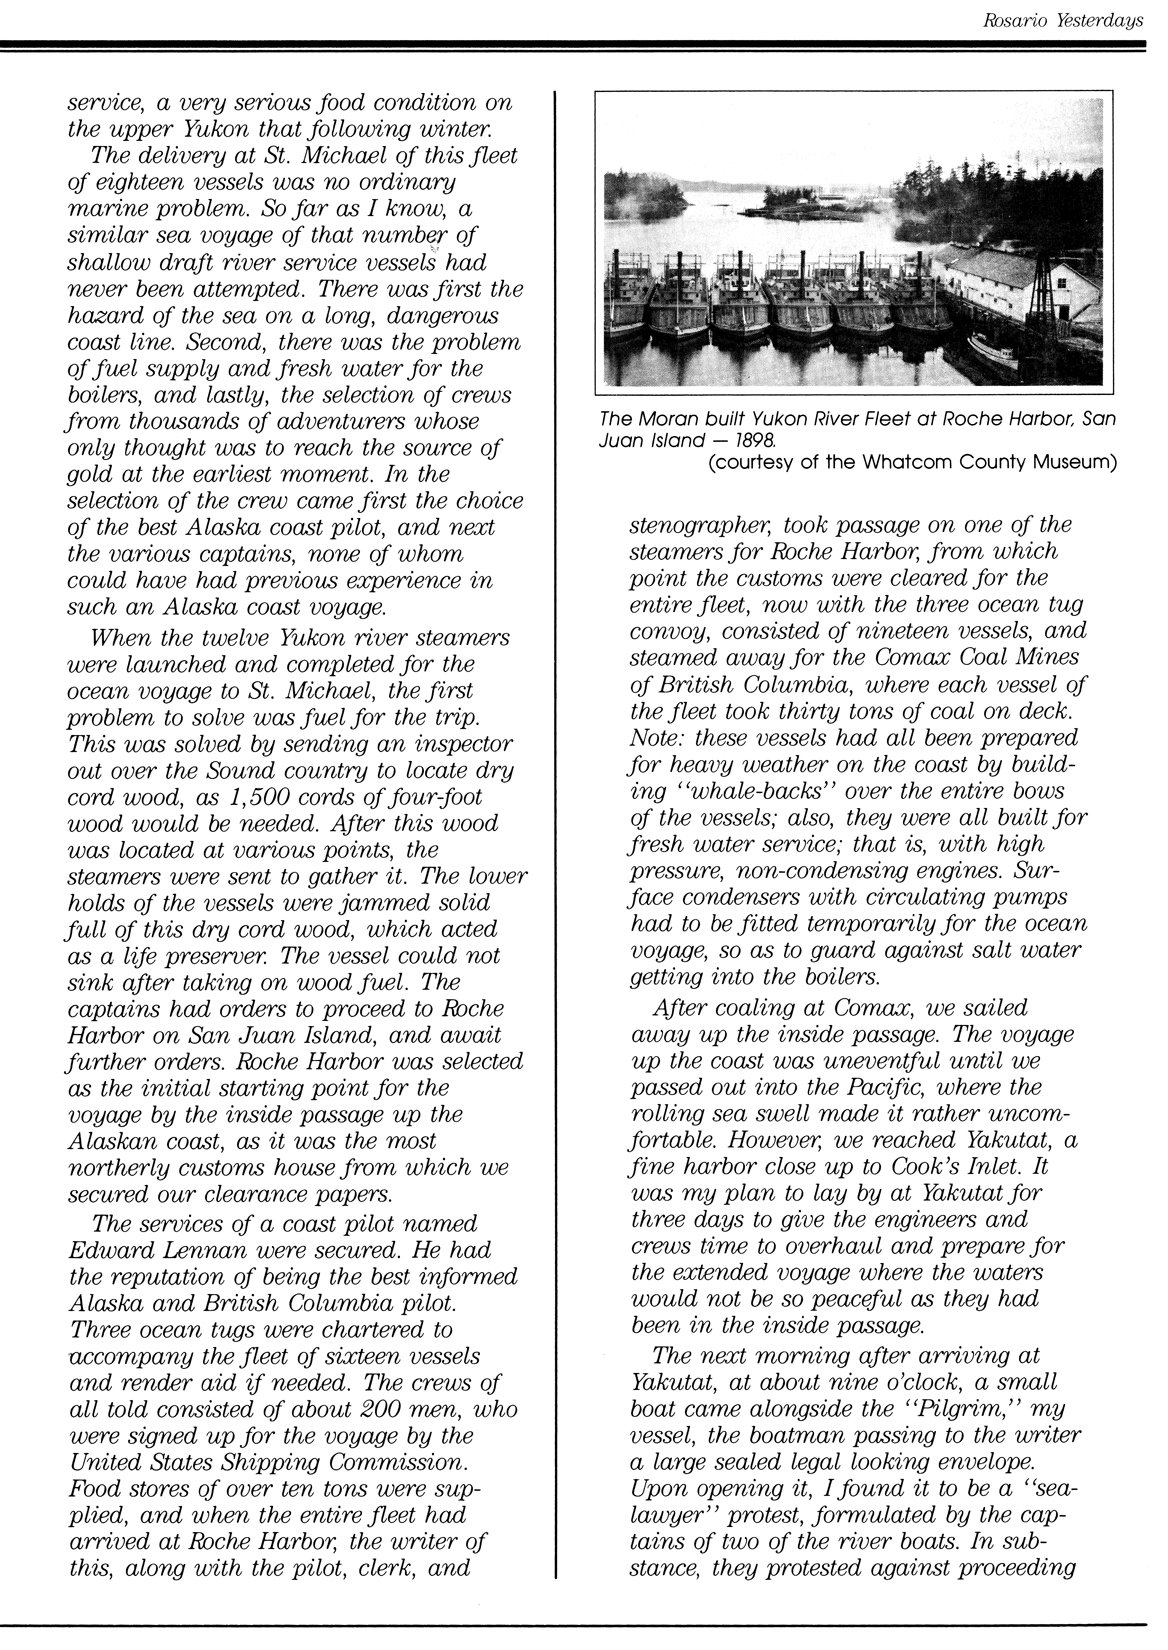
Peacock's book "Rosario Yesterdays" contains extensive quotes from Robert Moran's Memoirs from 1939. These four photos are of text from "Rosario Yesterdays", specific to Robert Moran's Memoirs, about the gold strike in the Yukon and the riverboats the Moran Brothers built to carry supplies.


-
Patrick,
Welcome to MSW.
The mast on the lightning is approx 2" x 3". The deck opening for the mast is approx 2" x 4"-5". These blocks are used to set the proper rake or angle of the mast.
The mast shoe, below the deck, built into the keel, is also about the same size and requires the use of these wedges / blocks to set the rake.
These blocks have changed over time. We owned a Lightning, with a four digit hull number that was built in the 1950's. The blocks used to set the mast rake evolved to "T" shaped blocks and were about 1/2" thick. There were 6-7 "T's" each on the deck and keel.
-
At 1:50, the boat that is sailing in front of and to the left has a hull number B5929, which is the Bergère de Domrémy. This is the boat that I based my Corel Sloup build on!
- hof00, Nirvana and popeye the sailor
-
 3
3
-
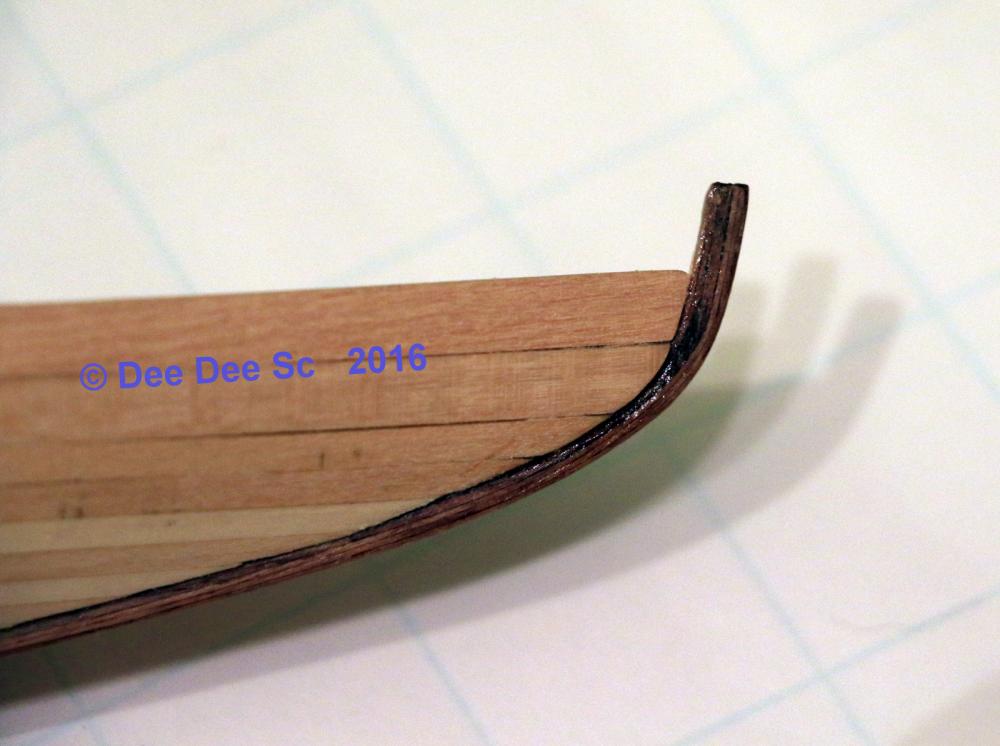
After numerous small builds, I've started a larger build, Glad Tidings. When I first saw the Glad Tidings kit in the Model Expo catalog, I couldn't get past the paint scheme. But then I saw the video Jamie Peghiny posted of the launch of the pinky schooner Ardelle in MSW 1.0. I fell in love with the design of the Pinky and purchased the Glad Tidings kit.
What is unusual for this build for me, is this is the first build where there are build logs on MSW I can refer to! These MSW build logs will provide invaluable information! While I'm not one to build per instructions, since there's so much to learn on this build, I'll stay close, but if I see something I like, I'll make some changes. (Expect changes, starting with the planking.......)
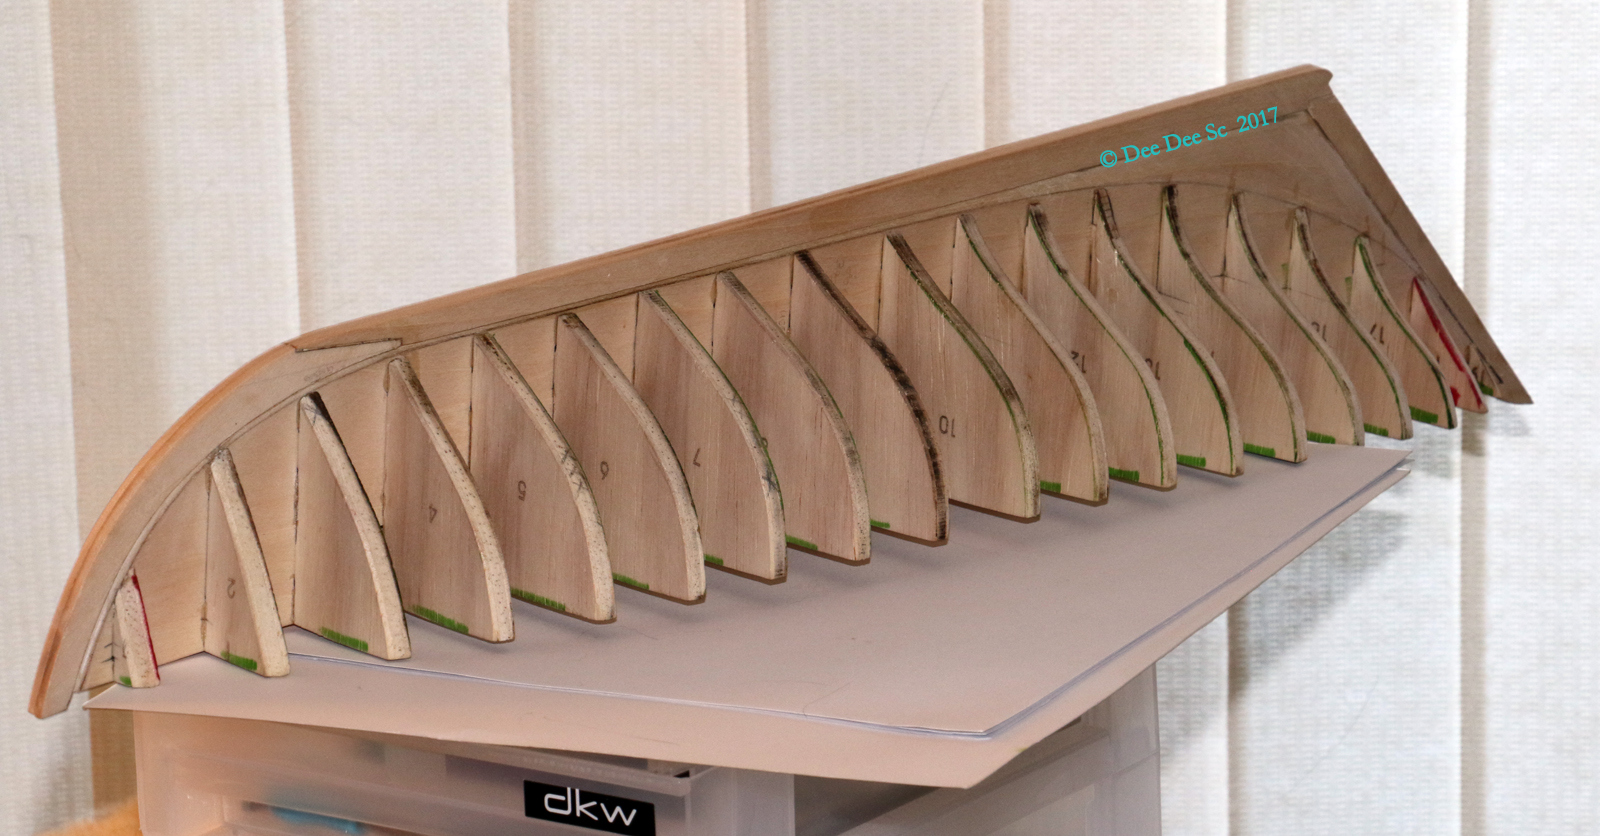
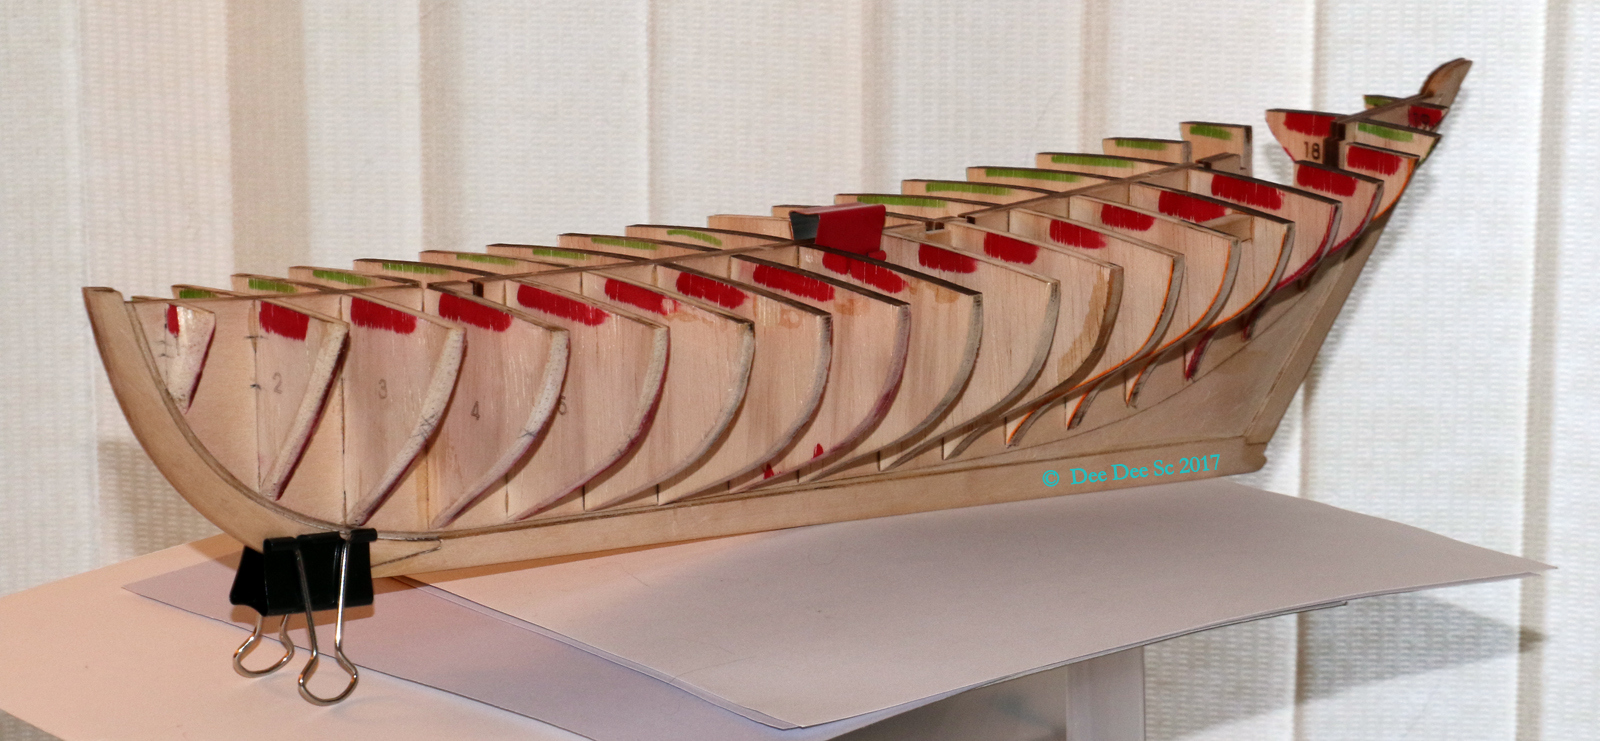
Before cutting out the bulkheads, they were color coded. I nearly lost it when #18 ended up backwards. Then I realized this bulkhead was sideways on the sheet.
I found out that CA glue doesn't like the ink in Sharpie markers.
The top of green #11 is about 1/2mm low, so a thin strip will be added. #5 on the starboard side and #3 & #4 on the port side, each have a small bump that needs to be sanded out.

And a few more photos


-
Here's a link to a post I made August 28, 2013 about the Yukon River Fleet.
http://modelshipworld.com/index.php/topic/3295-bulk-carriers-around-1900/#entry94974
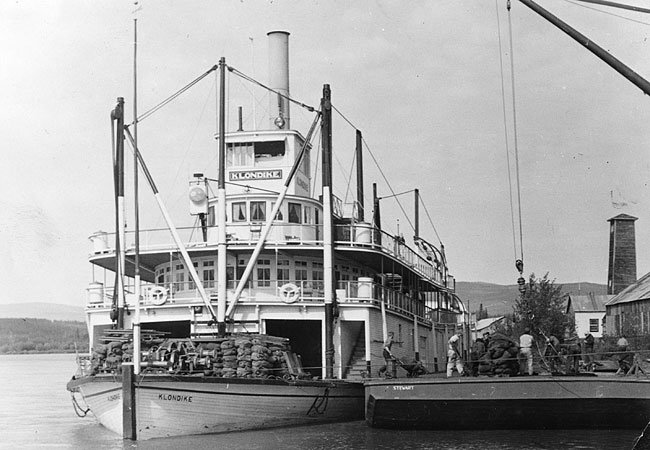
The SS Klondike, was the largest sternwheeler in the White Pass fleet. Now a national historic site in Whitehorse. She was once capable of carrying heavy loads of ore and passengers. This post contains four links to other bulk carriers of the era.
-
Another "Family" of paddlewheel steamers whose history has been forgotten are the stern wheel paddlewheel steamers that carried supplies for the 1898 Yukon Gold Rush.
The Moran Bros built twelve paddle wheel steamers in their boat yard in Seattle (now a pro sport stadium) that supplied the 1898 Yukon Gold Rush. These paddlewheel steamers began their travel to the Yukon River from Roche Harbor.
This Wiki link has info on eleven of the twelve Moran Bros stern wheelers (one was wrecked in route to the Yukon). https://en.wikipedia...n_sternwheelers
There's a good story about transferring these steamers from Seattle and the Captains to the mouth of the Yukon. It's in one of the books I have, I'll find it and post.
-
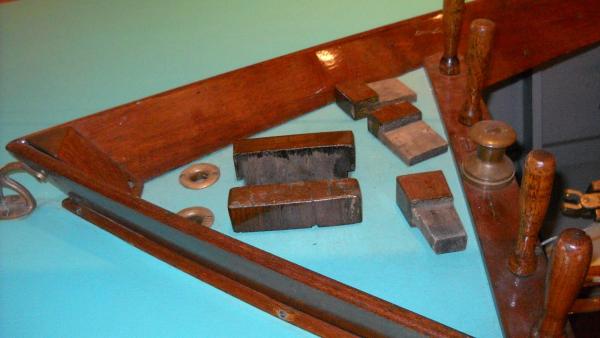
I purchased this partial kit for all the hand tools that were included in the auction. I'm happy.
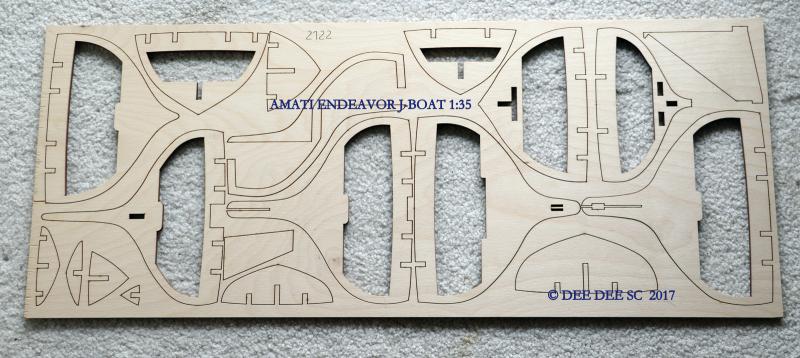
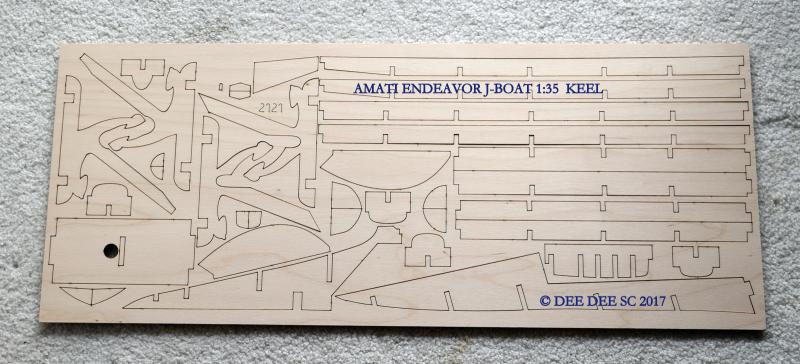
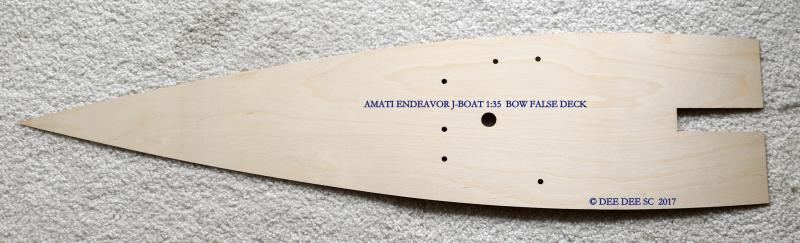
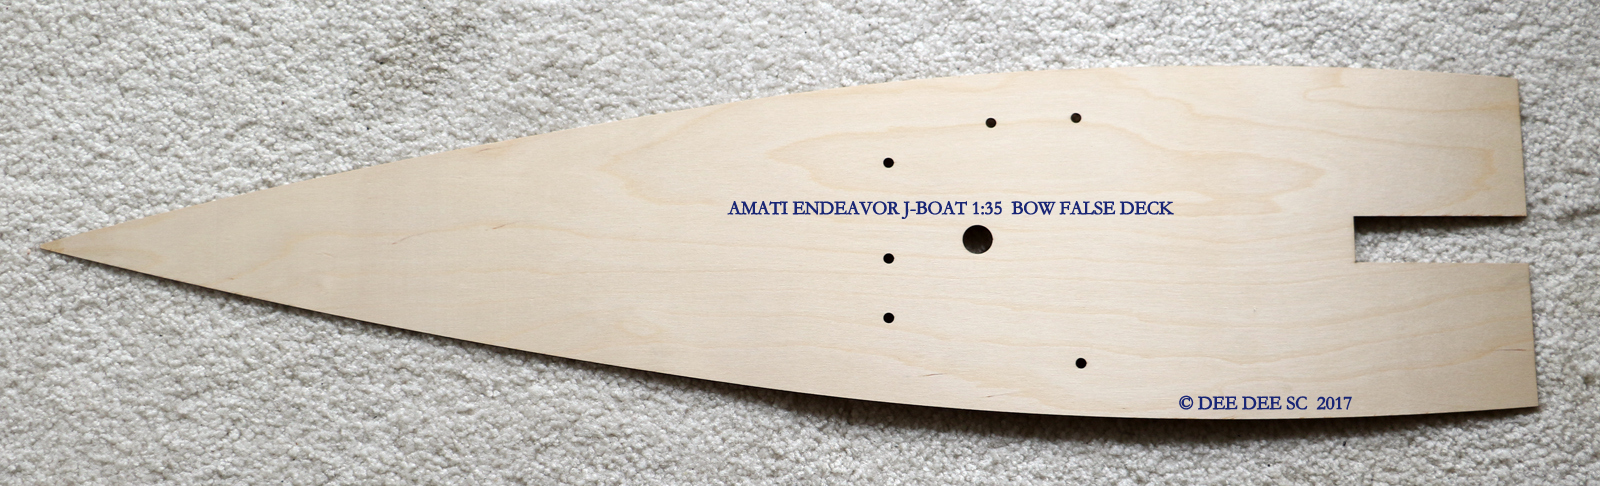
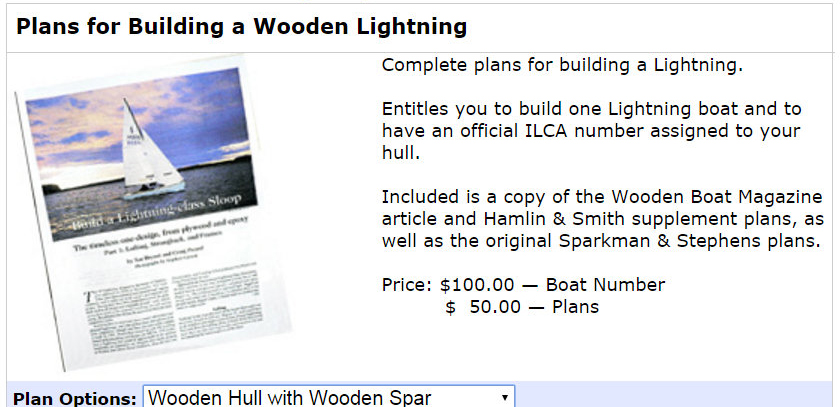
I'm starting Spring Cleaning early and I need to sell the two sheets of plywood that contain the false keel and bulkheads and one sheet of the bow deck. From these parts, you can build just the hull, or you can purchase the plans from Cornwall at this link here and do a semi-scratch build.
There's a few small parts that I will also add in.
Due to the size of the package (36" x 14" x 2"), shipping only to lower 48.
Asking $60 + $10 shipping
Payment via Paypal
Please send me a PM if interested
Thank You
-
Popeye,
I have this kit on the shelf and I've been following from the beginning. You're giving me some good ideas of how to bash the heck out of it when I build it. On MSW 1.0, someone posted an old black and white photo of numerous Flatties that were 'beached'. Even though it was all shades of gray, you could see that each boat had a unique paint scheme.
On all of my builds, I used a dollar bill to make mast hoops and made them one by one. It takes just one or two tries to get the hang of making them, after that, they're fairly easy to make. On my phantom, the mast hoops range in thickness from 0.62mm - 0.90mm and on my sloup, they range from 1.2 - 1.3mm.
I did a short tutorial on my MBLS build log, in post #86. I experimented making mast hoops using high rag content paper and the inner bark from a silver birch tree, I liked the birch bark hoops the best, because they look most realistic.
Dee Dee
- popeye the sailor, Piet and mtaylor
-
3
-
Julie,
I'm enjoying your Endeavor build.
My Corel Dragon has a similar hull design / raked transom as your Endeavor, just a bit smaller in size. I planked the transom with 1/64" horizontal planks, which gave the transom optical definition. Then, when I added a clear finish, the open wood grain darkened, giving further definition to the transom.
What ever you decide, it will look fabulous!
Dee Dee
-
PART 5 - DECK PLANKING
Per the kit, the deck was to be planked with walnut - very boring. Instead, the king plank is mahogany, same as the cockpit and the balance is basswood. I've already added a couple of layers of poly, which brings out the color variations in the basswood. In hindsight, I should have used two strips of mahogany for the king plank. Some of the planks are a big squiggly, but only if you look closely.
Per the kit, the cockpit was the cockpit should be painted. Instead, I laminated all of the kit parts with 1/64" mahogany and then added numerous coats of poly for a smooth finish. I still need to add the benches to the cockpit.
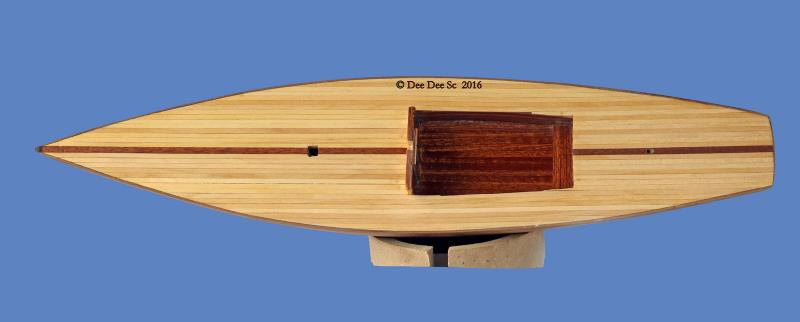
The hull planking is done, I just need to do a little bit more shaping on the keel. I have another event tomorrow, so I'll get some photos of the full hull on Monday.
Thanks for stopping by,
Dee Dee
2/05/2017 update: Finished!
- BLACK VIKING, GuntherMT and ccoyle
-
3
-
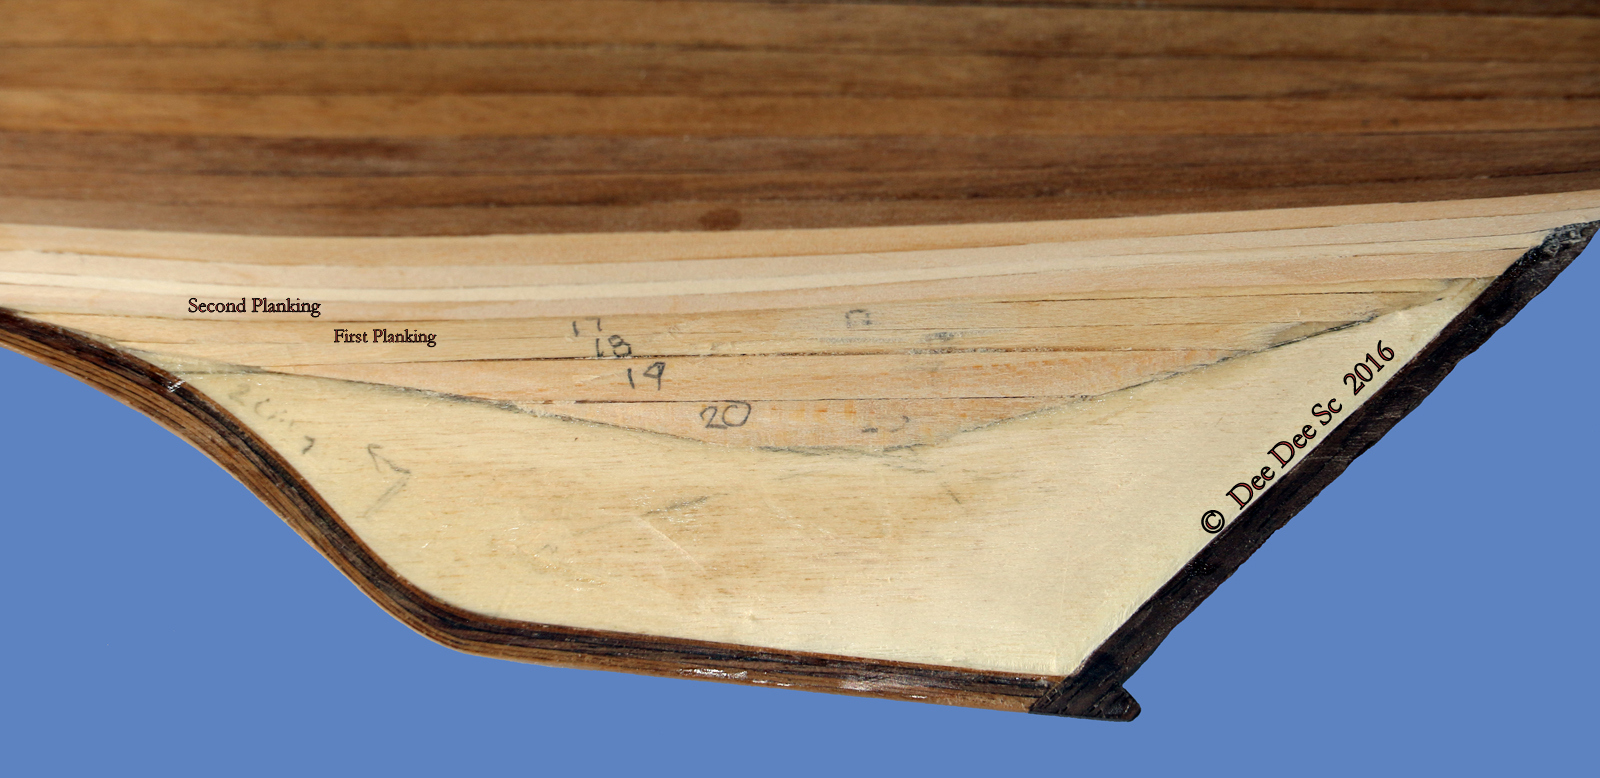
PART 4 SECOND PLANKING
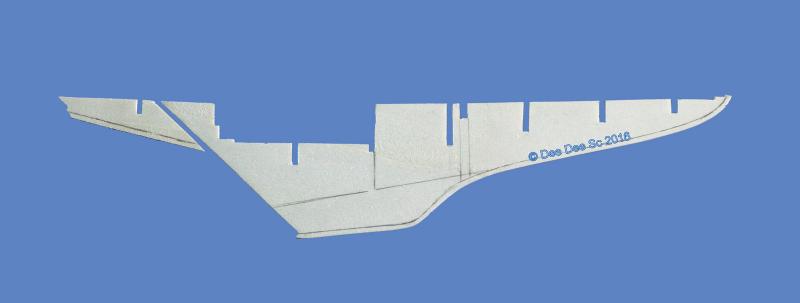
The wood for the second planking is 4mm x 1mm, I would have preferred 3mm x 1mm, especially between the waterline and the bolt on keel, where I used some 2mm wide strips. Below the waterline, I switched to basswood in various widths. In this photo, you can see some of the first planking.
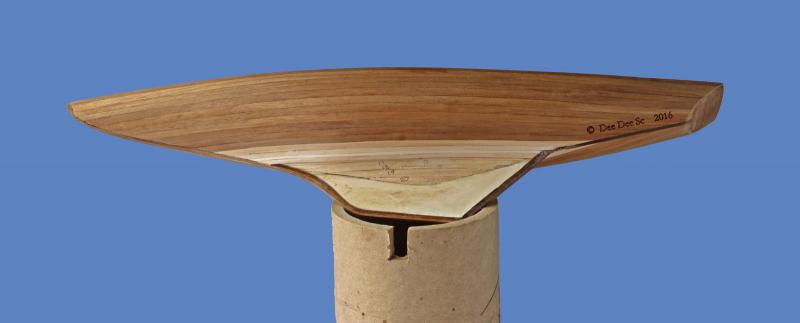
Bow Planking, about the 4th plank, I finally got the hang of getting a good fit.
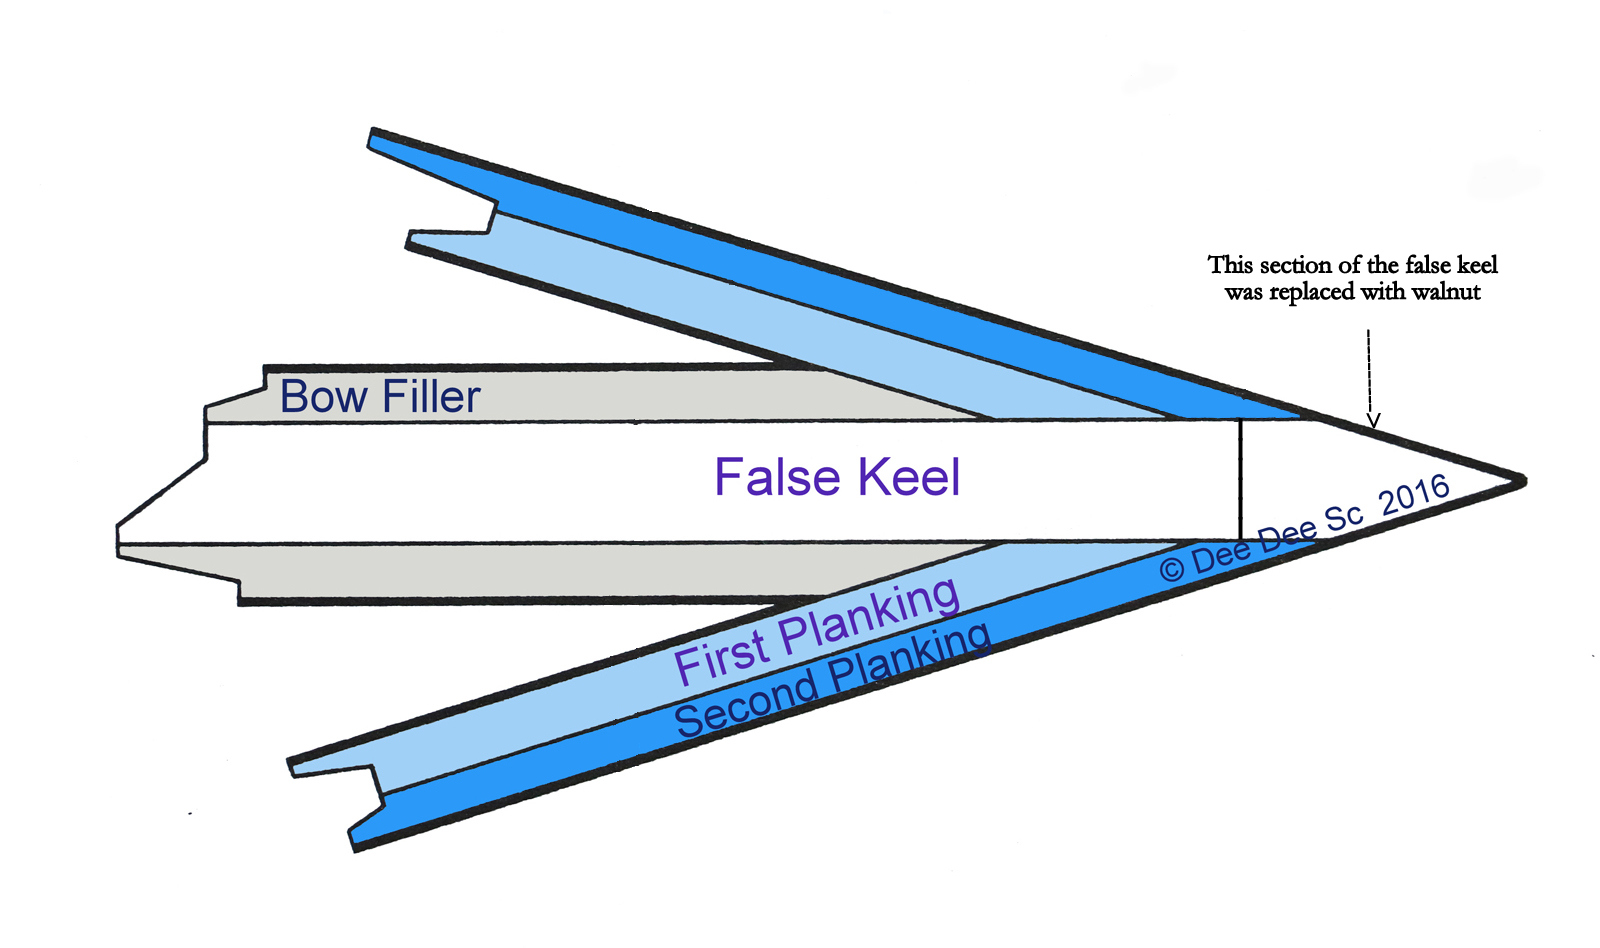
Planking meets the stern section of the false keel. When I altered the false keel, I added a 1/8" x 1/8" strip of walnut. The obvious is that this walnut is a much darker species.
It was going to be a challenge to get a tight fit, so after the first planking, I removed the excess false keel. When I added the second planking, I made a 1/8" channel with slightly beveled sides.
I also slightly beveled the sides of the walnut filler strip, when I got a good 'press fit', I glued it in, then filed it down.
I didn't plan those alternating color strips - It just turned out that way. And oops, the planking is slightly off.
Dee Dee
-
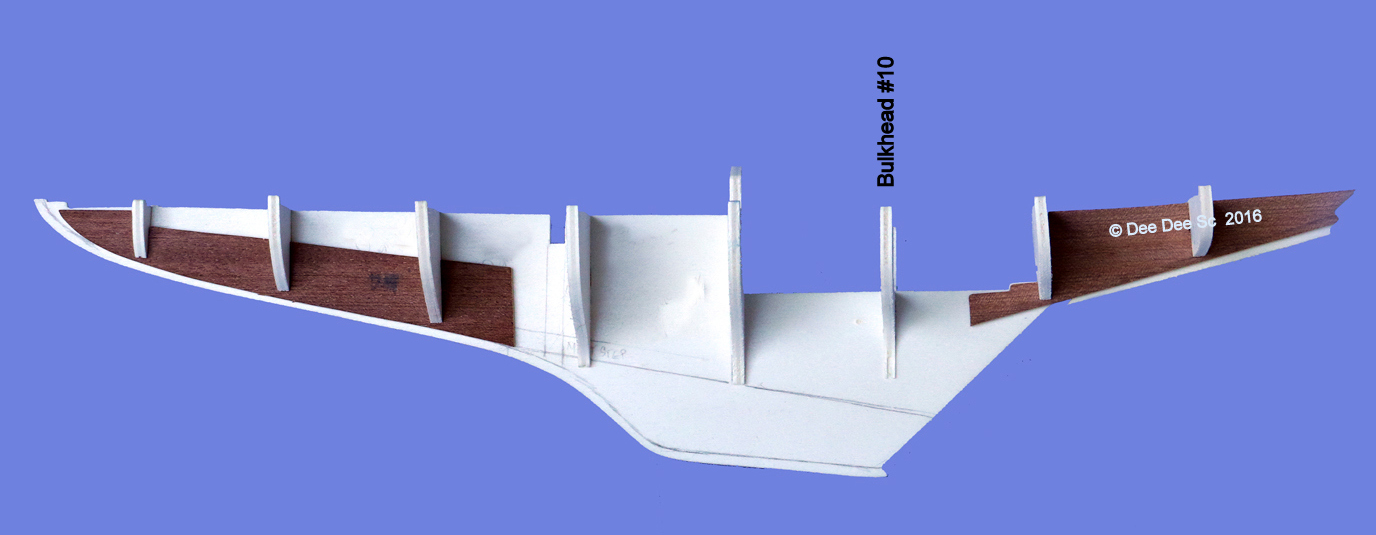
PART 2 - The Bulk heads
OK! Here's the first problem part - Bulkhead #10.
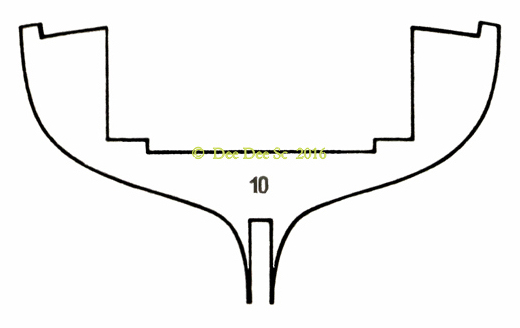
The bulkheads are made of basswood plywood and #10 became very distorted.
When I glued the false deck on, the port side ended up being 1/4" lower than the starboard side! My eyes started to get watery, thinking I would have to start all over.
 After a good think session I came up with a plan. I built up the droopy false deck section with layers of wood, filler and paper. I wish I had taken a photo, it really was 1/4" lower!
 I added numerous cuts to the top of the deck to help the false deck curve, but it wasn't enough. Next time, I'll steam the false deck to fit the curve.
If you're going to build this kit (highly recommended!), I suggest laminating bulkhead #10 with layers of 1/32" birch plywood on both sides. Do this before you do any test fitting, this bulkhead is extremely fragile and will start to distort the first time you pick it up.
Those pieces attached to the false keel are bulkhead fillers. Per the print, I beveled them on the bottom side. If I build this model again, I would just lop off 1/8" and let the first planking land on false keel. This would make the first planking a lot easier.

PART 3 - COCKPIT AND FIRST PLANKING
I don't have any photos building the cockpit. All I can say is there's a logical order that the parts all fit. Just figure it out, understand that the sides of the cockpit need to bow outward. Also, I added numerous 'glue blocks' to the bulkheads to increase the glue surface for the cockpit parts.
The wood for the first planking is lime wood and measures 13/64" wide x 1/16" thick (5mm x 1.6mm). This is my next complaint about this kit - This wood is way too wide for this hull shape. I replace it with basswood, measuring 1/8", 3/32", 1/16" x 1/16". This narrower wood was much easier to work with on the first planking.
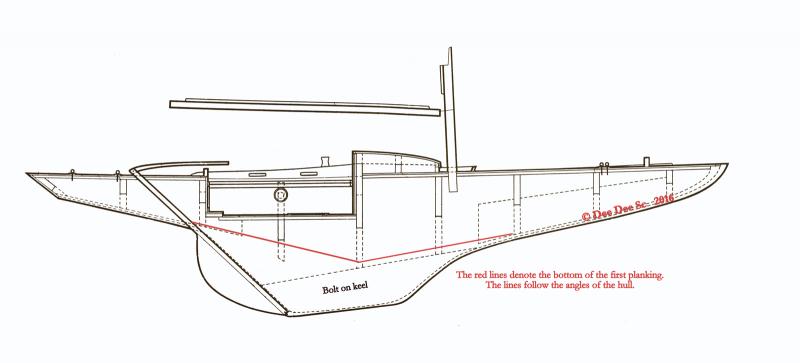
Trying to figure out where the first planking should end took a while to figure out. The back end of the keel needs to be the same 1/8" and the second planking needs to blend into the bolt on keel. So, the bottom of the first planking had to end above the bolt on keel, and also keep the curve of the hull.
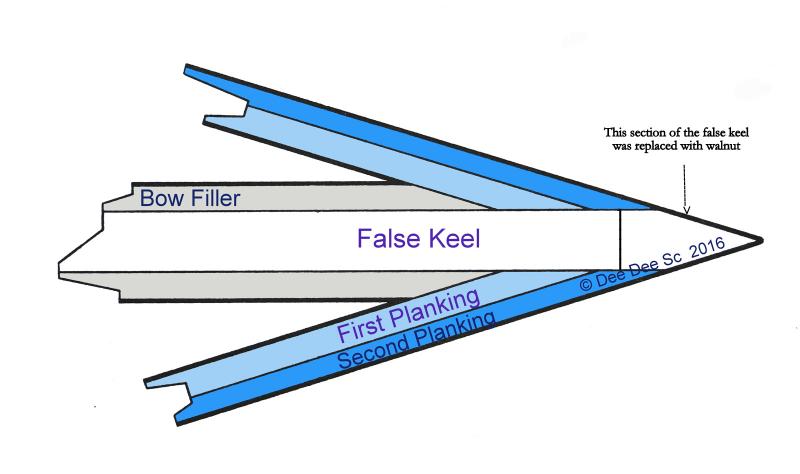
I don't have any photos of just the first planking. Here's a drawing from the prints, I removed all of the extra lines so it would be easier to see. The red lines show where I ended the first planking. The lines are extension of the hull lines. Next time, I would move these lines up, about 1/8".
I do have this photo which shows the bottom of the first planking. The dragon has a bolt on keel, so the first planking needs to end above where the keel is bolted on.

Half way through the first planking, I found this photo from PhD student Leonardo Bortolami, University of Ferrara for his thesis about best practice in the restoration of historical vessels. This drawing confirmed my first planking plan was right.
http://www.classicboat.co.uk/news/yard-news/yard-news-january-2013/
http://www.veledepocaverbano.com/2014/07/19/bentornato-acanto/
Lots of photos here: http://leonardobortolamienglish.weebly.com/dragon-d-27-acanto-1966.html
Dee Dee
-
PART 1 Preparing the Keel
OK! Here we go!
In my sloup build, I learned the importance of doing all the changes / additions to the false keel BEFORE I start building. This is how the false keel looked out of the box. YEP! That spot at the back of the cockpit is a weak spot and I broke it off while making the changes.
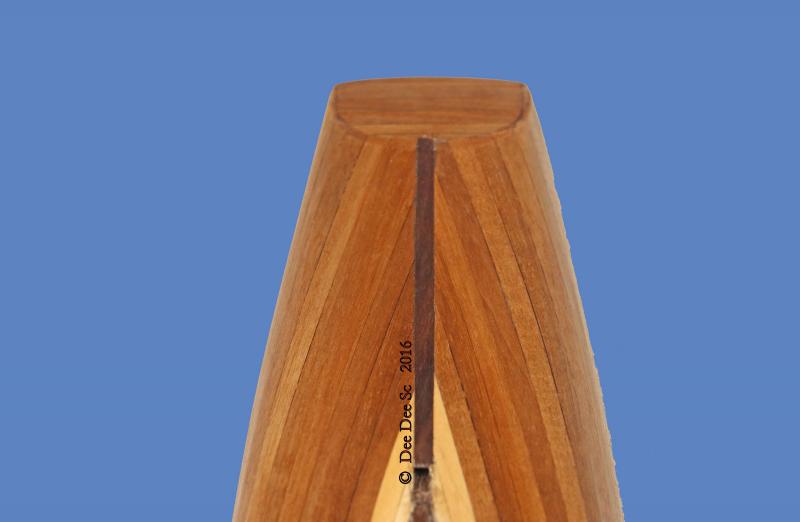
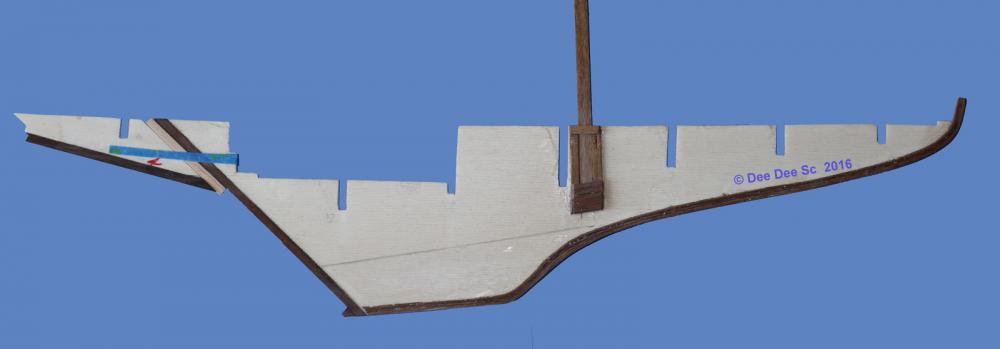
And this is how the keel looked after the changes!
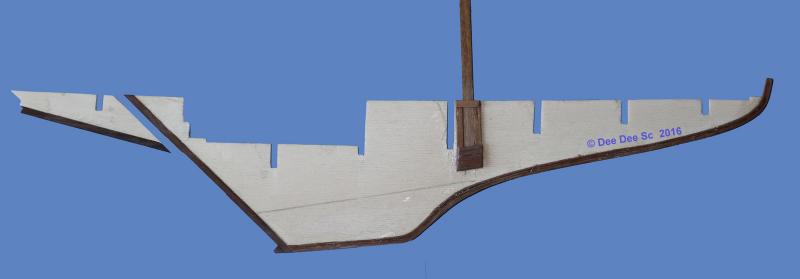
I removed 1/8" from the keel and replaced it with walnut. The curve section was built back up with strips of 1/64" walnut and CA and the straight parts with 1/8" walnut stock. The Dragon mast shoe also needed some work! The mast rises +16" above the deck, but the mast shoe was only 1/4" deep. The slot for the mast was increased, on both sides it's lined / reinforced and it's a very snug fit!
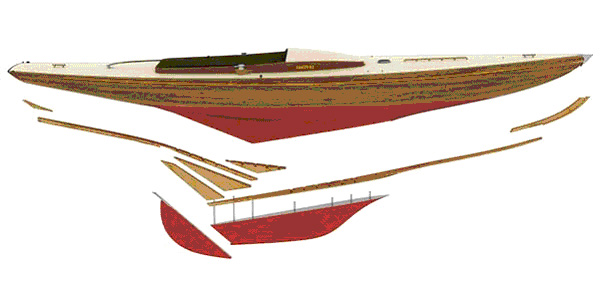
This drawing shows the kit planking plan. If the hull was painted, I would only add a strip of 1/64" walnut to the basswood keel to prevent the wood from eroding. But I'm not painting the hull above the waterline and don't want white basswood showing when I plank.
Dee Dee
-
The classic wood Dragon sailboat.
The Dragon was designed by Johan Anker from Norway in 1929. The original design had two berths and was ideally suited for cruising in his home waters of Norway. The boat quickly attracted owners and within ten years it had spread all over Europe. It's one of the worlds most popular keelboats with Dragon Fleets the world over. Between 1948 and 1972 the Dragon class was raced in the Olympic Games. The early boats were constructed of wood but during the early 1970s fiberglass boats were developed. The controlled development of the class has lead to a classic yet modern keelboat.
Back in the day, there were two Dragons moored at Montrose Harbor, 'Sea Pup' was one. Dragons sit low in the water and they are the fastest looking boats in the harbor. The classic wood Dragons are just plain gorgeous! Be still my heart.
I purchased the Corel 1:25 Dragon kit a few years ago. As usual I'll be making some changes to the build. Most significant change is the hull will only be painted below the water line. The wood that came with the kit is nice and will look good with a varnish finish. My collection of modeling tools will fit inside a shoe box with room for the shoes: Straightedge razor blades, metal files in two sizes, X-acto knife with #11 blades, wire cutters, various sanding sticks that I made, sandpaper, micro drill, CA and PVA glue, a digital caliper and a 6" metal ruler that doubles as a scraper. For some of the decking and mast, I'll add a soldering iron.
On woodenboat.com there's a thread titled "Time for a Dragon Thread" with lots of eye candy photos. Check it out! The new Dragons are high tech boats. Here's an except from an article about Dragons by Matthew Sheahan in Yachting World, July 3, 2015. The new fiberglass Dragons look fast, but they have too many "strings". Check out that photo of the bolt on keel being machined.
The Corel Dragon kit is the typical Corel kit, great drawings, nice wood, lots of little parts and instructions that are less than so-so. But the drawings are great and have logic to the way they are laid out.
I started building 'Puff' last Spring. But between June 1 and August 30, I spent 35 days on the road at out of state events, another 25 days at local events and a few more days for event preparation and post event paperwork and poof! Where did the summer go?
The hull planking is done and starting to work on the cuddy and add the benches to the cockpit. The hull will be painted below the waterline, right now I'm thinking a teal blue or ultramarine blue. Above the waterline, I'll add a few coats of poly.
I don't have a lot of photos, but enough to recreate the build.
Dee Dee
Chris Destano, 5 River Road #123, Wilton CT
-
There's a couple of ways of attaching grommets: a grommet press ($60 - $300) or a pair of grommet pliers ($5) (minimum size 3/32"). Or you can make your own 'press' that uses a hammer, but these usually don't work too well and the $5 pliers are a better option. What ever you use, these grommets will be too bulky and heavy.
Here's a couple of suggestions for grommets:
Option One:
Make some very small brass rings from brass wire or saw off ultra thin slices from a brass tube. To stiffen the sail fabric and to keep it from fraying / snagging / twisting, sparingly apply a small dab of CA glue to the location for the grommet. When the CA glue is dry, drill a hole in the center of the glue spot, just large enough to fit the brass ring. Then glue the brass ring into the center of the hole in the sail with minimal amount of glue.
Option Two:
Punch some 'circles' out of gold or brass color paper, not too thick. (Look for a small hole punches at Michaels.) Glue one circle to each side of the sail, take your time to get these perfectly matched up. Here's a trick to getting the two sides perfectly matched: Poke a hole smack dab in the center of each circle with a pin. When the first side is dry, put a pin thru the pinhole in the glued on circle and then add the second circle. Test the alignment, if it looks good, add glue to the second circle and press to sail cloth. Leave the pin in for a few minutes, until the glue has started to set.
When the glue is dry, flatten the sail and hold it taught on a piece of soft scrap wood. Slowly 'drill out' / 'file out' the center of the gold circle. When done drilling out, touch up the inside of the circle with some gold or brass color paint.
Experiment with glue; If you have fabric specific glue, that's best. Elmers, slightly diluted should also work well. Use CA glue sparingly. Be sure to press the two circles together snug and flat.
-
Julie,
I'm currently building the Corel Dragon which has a similar hull style. Your thoughts about a laminated keel is what I did with the Dragon keel. However, I laminated the keel as the very first step of this build. Here's what the Dragon false keel looked like this out of the box.
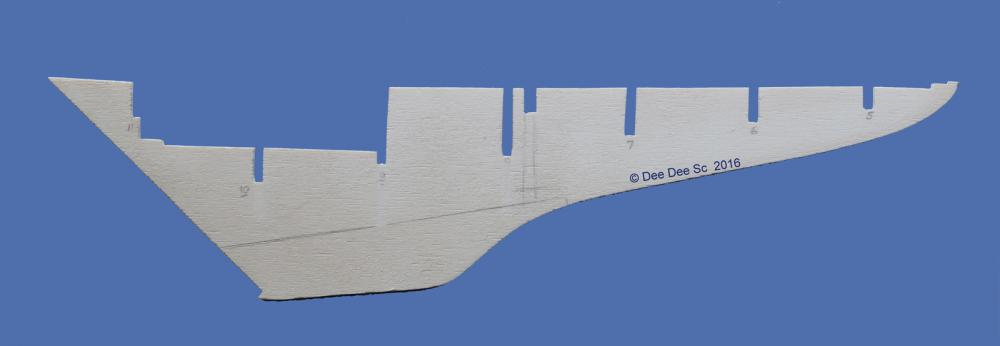
If I was going to paint the hull, I'd just add one layer of 1/64" walnut to minimize the erosion of the basswood. But since this hull will be 'au natural', I altered the false keel before starting the build. I removed ~1/8" of the false keel and then I built it back up with layers of 1/64" walnut and CA glue. And this is how the false keel looked before I started building. The mast shoe is a very snug fit!
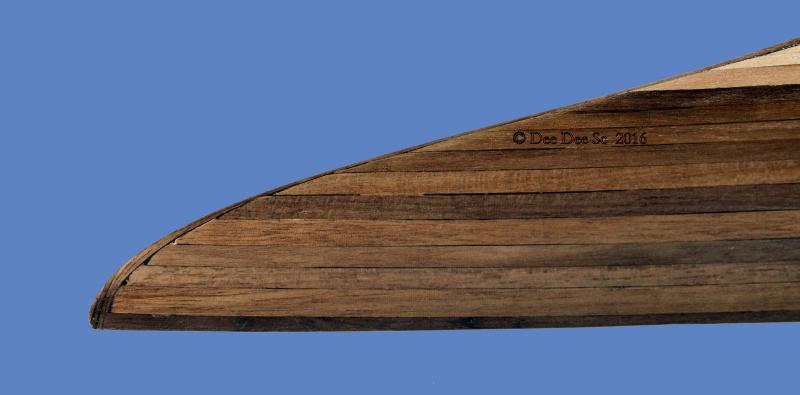
Getting back to your original question: Yes, it's possible to adjust the false keel. I'm just about done with the first planking and I had to do this on the walnut under the stern section. The walnut turned dark and didn't match the second planking. I removed the walnut and added back a few layers of walnut.
Here's a photo of the bow with the first planking. I trimmed a bit of the first planking, to make sure the second planking will have a smooth and even run and landing.
Hope this helps.
Dee Dee
-
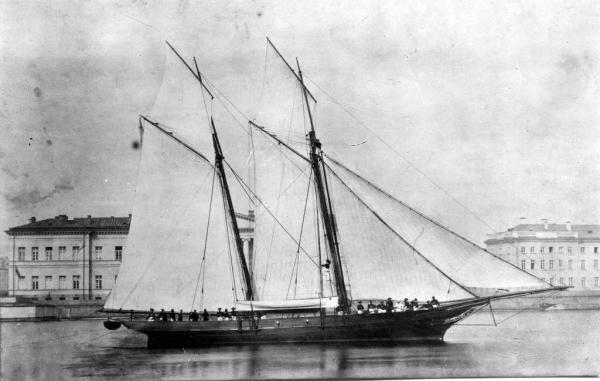
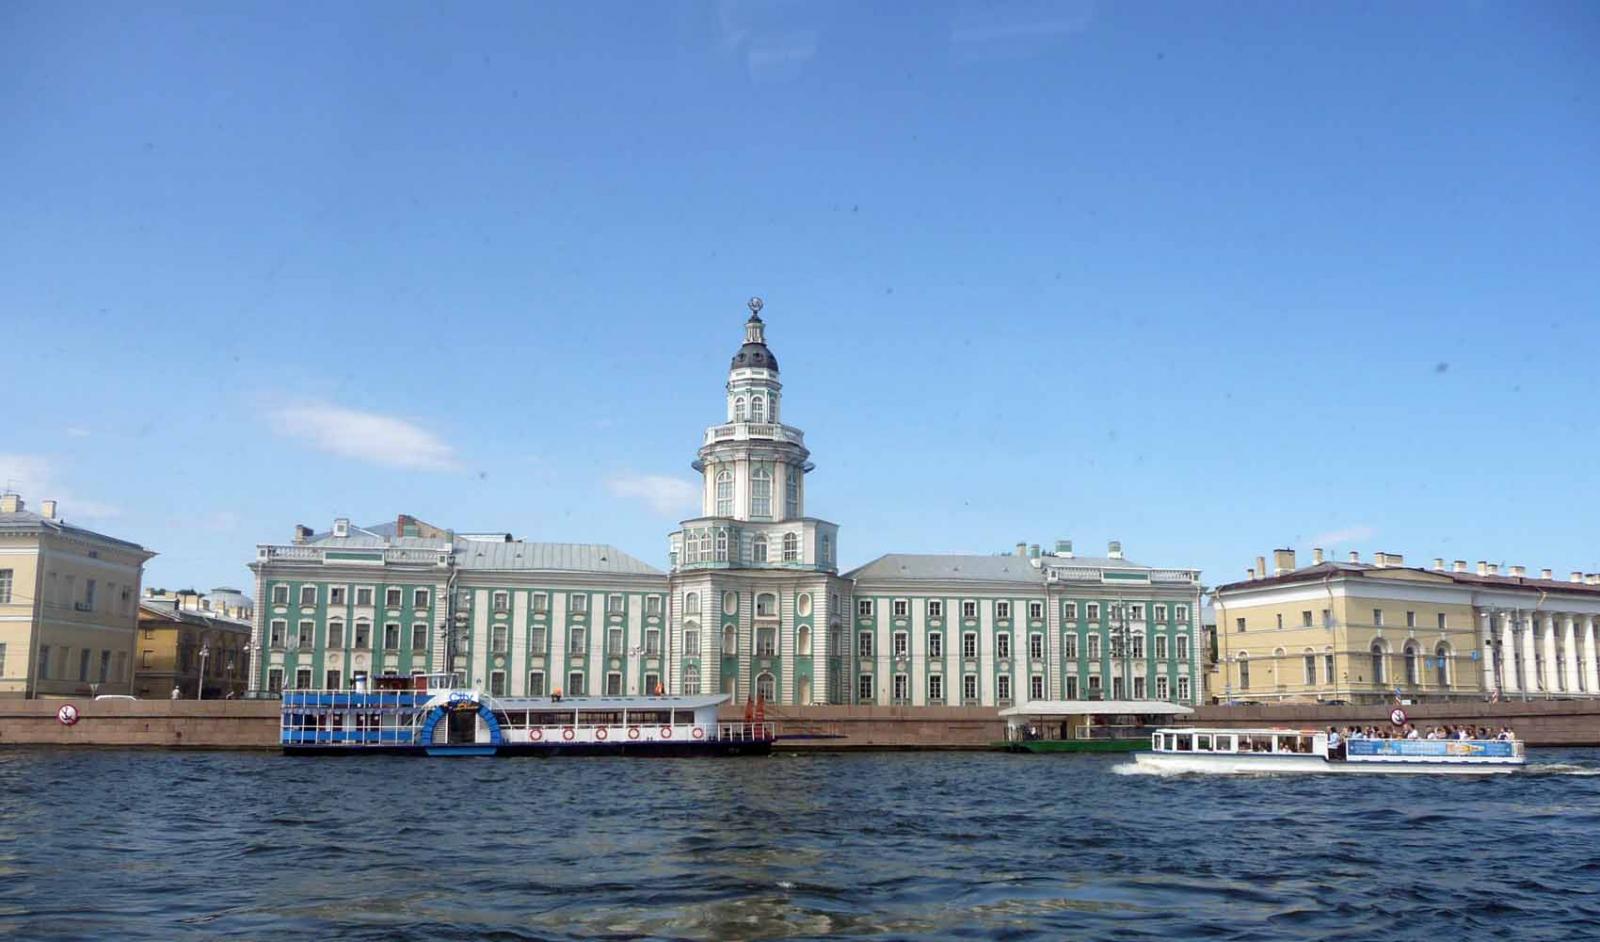
FWIW, I can identify the buildings behind this ship: The location is the Neva River in St. Petersburg, the building to the left of the ship is the Academy of Sciences and to the right, is the Kunstkammer, Museum of Anthropology and Ethnolography of Peoples of the World, located on Vasilievsky Island. The only detail that does not match are the rain gutters which are easily moved.
For a hundred years, Vasilievsky Island was the site of St. Petersburg port. At the beginning of the 19th century, the port was moved further downstream.


-
My Gretel kit appears to be newer, the keel and bulkheads are laser cut from a sheet of plywood and came in the full sheet of plywood they were cut from. I compared a few bulkheads to print, they are fairly close to print and the edges are very clean. There does appear to be a bit of difference from one side to the other, but less than 1mm. A while back I did a test fitting of the bulkheads and they are all very tight. They will still need some work, but not as much as you needed to do.
The decking was also laser cut and in its full sheet of mahogany plywood and terribly warped. After lots of steaming and pressing, those parts are finally flat.
The only other difference I can see at this time are the number of ladder steps; my kit only has enough side rails for five ladder steps.
Edits highlighted in red:
-
I have Gretel on the shelf, your retrospective build log will be invaluable. I remember the Gretel build log on MSW 1. The scale is 1:54, which isn't small, but the hull itself is small, only 8" in length. I've also been thinking about adding cabin detail, your cabin mock up is a great idea! So many ideas.....
Thanks for posting this.
-
-
Julie,
Looking forward to watching your build!
Would it be possible to post more photos of the keel, bulkheads and all of the cross bracing? The reason I ask, is I purchased this kit on eBay last winter 'for parts', actually, I purchased it for the tools that were included. But, when I opened the box, I got more parts than expected: Included were the two sheets of bulkheads / false keel, all of the strip wood and some of the small parts. Missing were most of the small parts, deck furniture, instructions and prints.
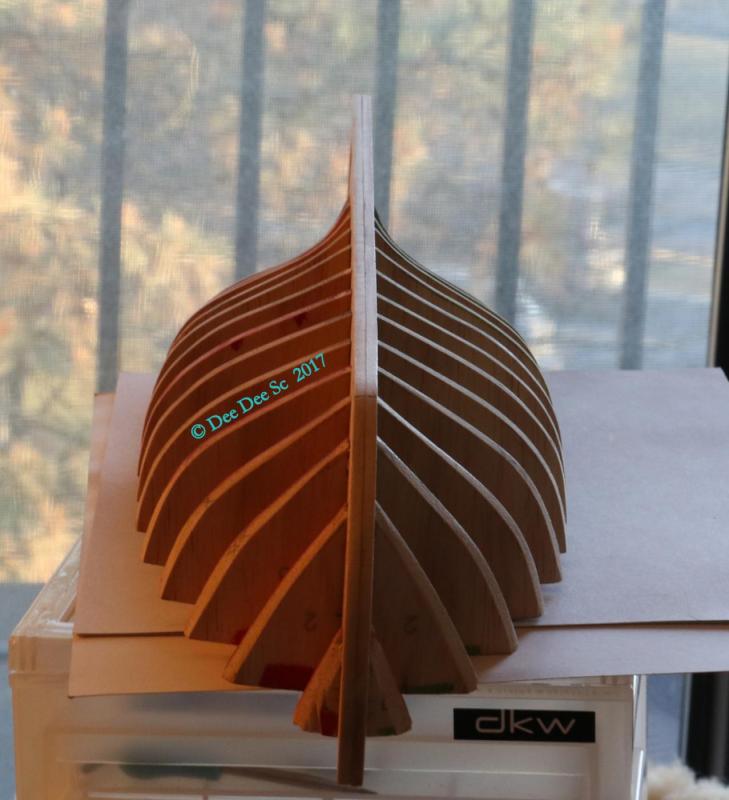
I don't have the room to even think about displaying the finished boat. However, I'm thinking about building this as a 'half hull' or the hull only for a friend.
Any additional photos of how the hull fits together would be greatly appreciated.
Thanks
Dee Dee
-
Andrew,
Your lightning is coming along really well! The head stay fitting looks great!
Love the photos of Lightning #1! Do post more photos!
I have those same turnbuckles for my Corel Dragon. They're a bit oversized and was planning on modifying them the same as Michael and you showed. I don't have any extras, so I better get it right!
I found an article on the ILCA website about Lightning #1. Interesting stuff, including info about the skeg! Here's the link: http://lightningclass.org/resources/historyLightning/numberOne.asp
Previously you asked: "Do you have this good a memory for everything, or did you just really cherish that Lightning?" I remember a lot of details about our Lightning: The lifting lugs, self bailer, hiking straps, tiller extension, location of the hull number, boom vang hardware (bicycle chain), rigging hardware, motor well and more. But, I don't remember the hull number nor the hull color below the water line.

392, love your build! Would love to see more photos of your build - Can you start a build log? Even if it's just photos, that would be great!
Dee Dee
- sailboat392, dgbot and Andrew J.
-
3
-
I agree with Gary, the canvas texture is visible. Due to wear patterns, the texture varies and reflects light differently.
Mold is usually a problem if your cover doesn't fit right, leaks or has poor air circulation.
An old recipe for laying on new canvas: white lead, linseed oil, turpentine, terabim and a few other bits of witches brew. Just a bit toxic!
On our Lightning, when the centerboard was drawn up, there was a 1/4" steel pin attached to the centerboard trunk by a thin cable or chain and was put through a small hole in the centerboard and acted like a 'stop'. There were two 6" x 1/2" / 1/8" strips of steel, one on each side of the centerboard trunk that this pin rested on. When we dropped the centerboard, there was a pin imbedded in the board that would land on this same section of 6" steel. Back then, the centerboards were iron or brass and painted with a bronze color protective paint.
As I mentioned earlier, the rudder on our Lightning was solid mahogany with a high gloss finish. All of the Lightning's from the 1950's had a high gloss varnished mahogany rudder. If you're going to display your model at the Skaneateles Country Club, it would be fitting if it had a solid mahogany rudder. If you don't have any mahogany stock to make the rudder, I have a stash of 1/64" mahogany strip stock I can share with you. The strips would need to be glued up / laminated to make a solid mahogany blank in the shape of the rudder. With multi coats of high gloss it would look like the real thing.
Dee Dee
.
-


Where to buy thread for ropewalk machines?
in Rope Materials and parts resources
Posted
Londonderry linen thread is a high quality linen thread with a smooth finish. It's available online from Threadneedle Street, located in Issaquah WA. It's expensive, but you get what you pay for. Their website has numerous pages, below is the direct link for the page with the linen thread. Scroll to bottom for colors to make rope.
https://www.threadneedlestreet.com/linthrd.htm