Dee_Dee
-
Posts
290 -
Joined
Content Type
Profiles
Forums
Gallery
Events
Everything posted by Dee_Dee
-
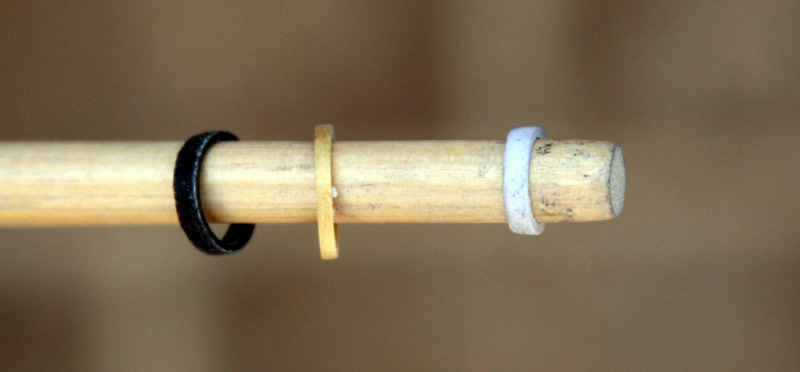
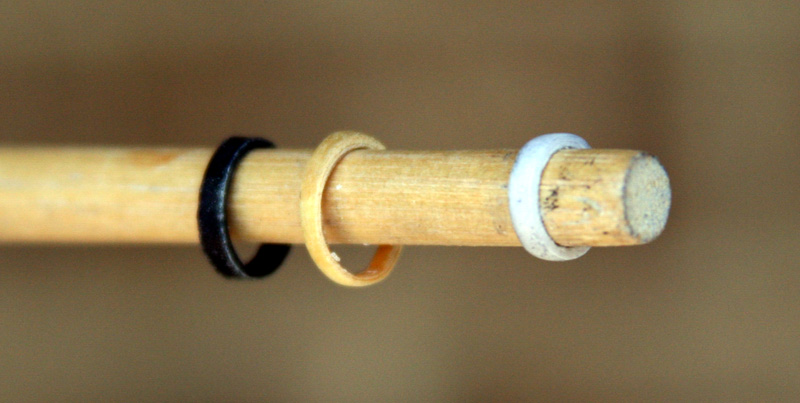
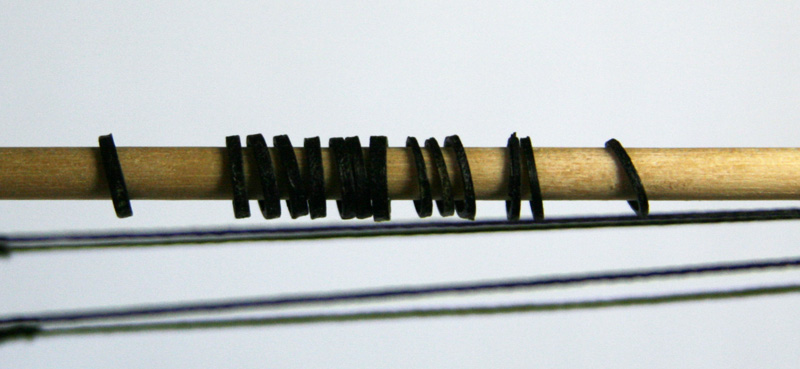
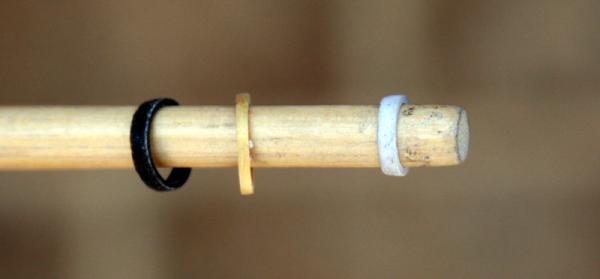
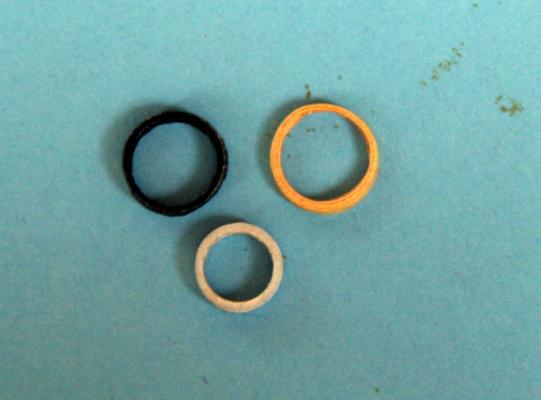
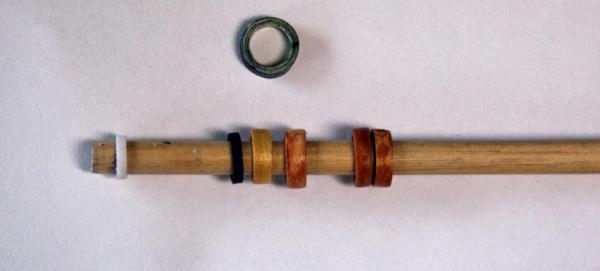
Keith Paper is definitely more flexible than veneer. Do you have any cherry you can make shavings from? A shaving is already curled making it easier to wrap. I like the results using the under layers of white birch bark, that can be stained to get desired color. Below I have included a close up photo of various materials. Bob Eventually you will get to this point - And your hull looks magnificent! Jesse Ditto! Learning something new is priceless! Eamonn Yes, a £5 note is a bit expensive to use for mast hoops. There are other papers that will provide excellent results. The white mast hoop was made from high rag content stationary. The paper is a bit thicker, so I 'flexed' the paper before using and it looks good. You should be able to purchase various papers from an art supply store or a printer that specialized in invitations. Here's a few more close ups: From left to right, dollar bill, inner layers of birch bark (this one is 1.1mm thick) and the white one is high rag content stationary. On the side view you can see the three layers of the birch bark.

-
Bob, Looks fantastic! I agree with Michael, the blanking will go smoothly! Dee Dee
- 86 replies
-
- 1
-

-
- muscongus bay lobster smack
- Midwest Products
- (and 1 more)
-
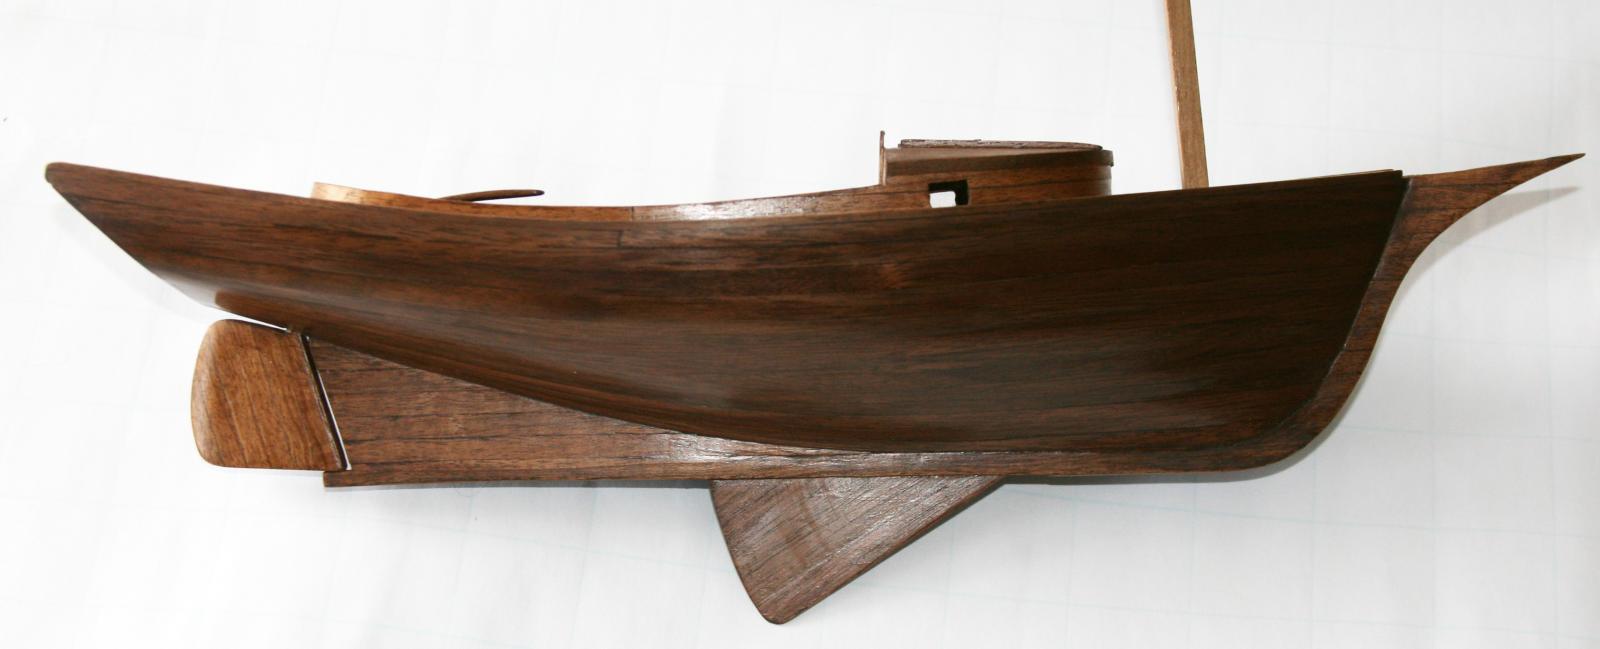
Tim, I had started building this model once before, had the hull planked and painted and part of the decking when disaster struck. Sort of like humpty dumpty. It was a rather violent end, as after the second planking, the hull could be used as a lethal weapon. There are lots of photos of these boats on line and again, I plan on making a lot of changes. The boat is about 12" long and 4.5" wide. Also, the wood that comes with Corel models is always nice. Dee Dee (Update: I'm almost done with my build, here are some photos.)

-
WOW! Simply WOW! This is just fabulous!
- 86 replies
-
- 2
-
-
- muscongus bay lobster smack
- Midwest Products
- (and 1 more)
-
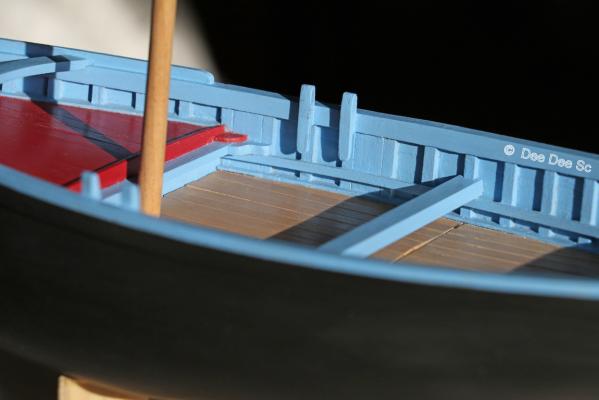
Ditto, the third photo is fantastic and shows the symmetry you have achieved on both sides.
- 607 replies
-
- 1
-
-
- scottish maid
- artesania latina
- (and 1 more)
-
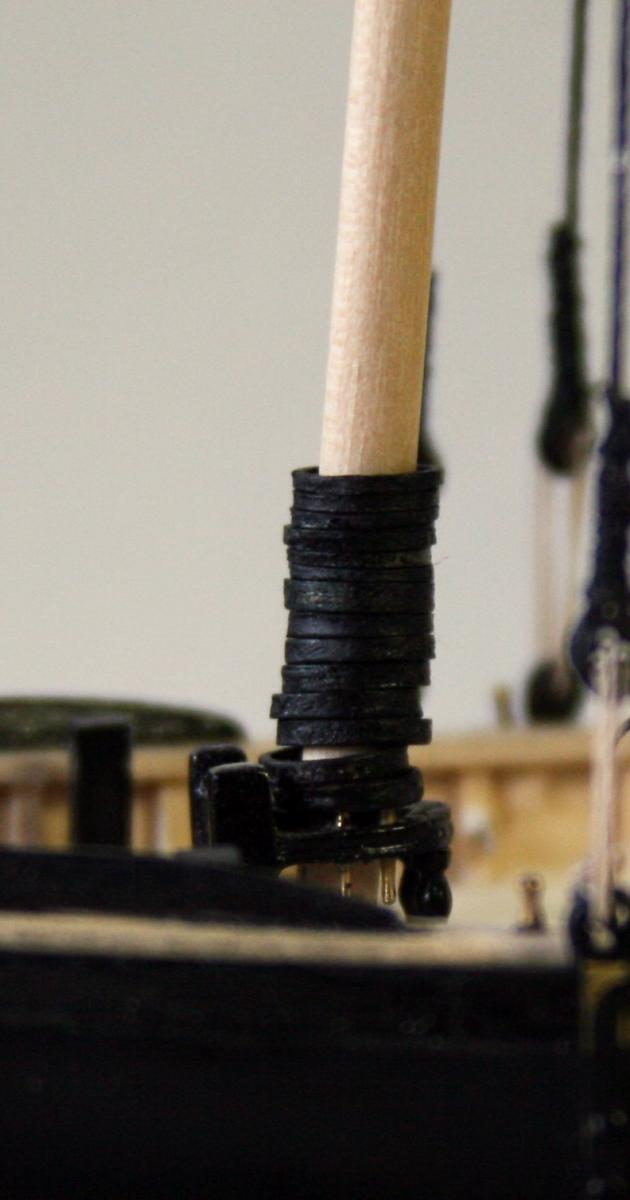
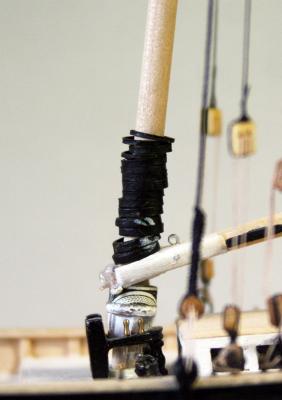
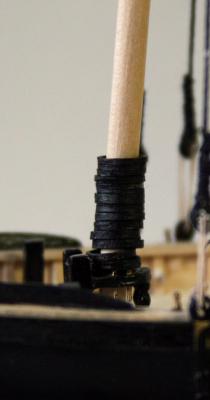
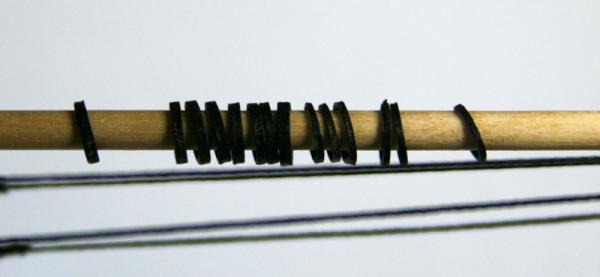
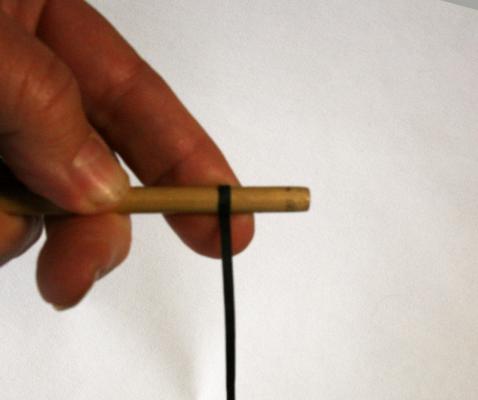
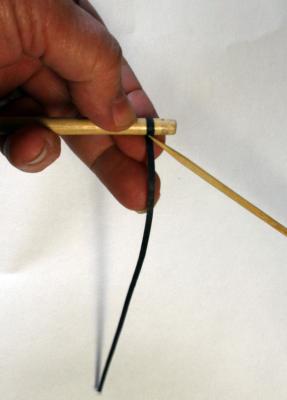
Keith and Jesse asked about how I made my mast hoops. I use a process similar to how others make mast hoops out of wood shaving, I'm just using a different material. When I was building my Phantom, I didn't like the idea of using a strip of manila file folder for the mast hoops, so I came up with an alternative way to make them. I've been using this method whenever a wood mast hoop was needed. The hoops for the main mast were made first. This is where I learned that I needed to color the paper before wrapping. If you look close, you can still see some green. The foremast on my Phantom has 14 mast hoops with a total stack height of 11mm, the hoops average .7mm. The main mast has 15 mast hoops and you can still see some green. The foremast has 14 mast hoops and look better Some of the foremast hoops are .5mm thick. My preference is a dollar bill with a little bit of even wear, primarily because it is economical. Other options include stationary with high rag content, parchment paper. One of the best and most authentic looking materials I've experimented with to make mast hoops is silver birch bark. I used the under bark and the mast hoops look like they were made from cherry. Samples of various materials: Stationary with high rag content, dollar bill and four made from the bark of a silver birch. The mast hoop on top was not blackened until after it was made, impossible to get a permanent color on the top and bottom The paper should be strong enough to facilitate wrapping, yet worn enough to wrap smoothly and allow the CA glue to soak through. Please don't get put off with CA glue. With a little bit of tweaking, PVA or other glues can be used, I've just never tried using other glues. Please! Experiment and add your findings. So far, I've only used a black Sharpie permanent marker to ink both sides of the dollar bill. Yep, it's boring, yet correct since many mast hoops were tarred. Sharpies permanent markers also come in brown. The color needs to be added before gluing. There are other color options, but whatever you use, it just needs to soak through the paper completely. The first step is to add color to the paper while it is still a full sheet. Add color to both sides. I used black since some mast hoops were tarred. Cut thin strips of paper. The width of these strips will vary per the finished size of the mast hoop. For my MBLS, the strips were 2mm wide and the finished height is 1.5mm or 1.5" in scale Curl one end of the paper strip to start the wrapping. The MBLS mast is 5mm, so I used a 6mm dowel for form the mast hoops. Wax the dowel to prevent hoops from sticking. Do 1.5 wraps before adding glue, add a small dab of glue to start the wrapping. I use a bamboo skewer to apply the glue. Check to make sure future wraps will be straight and even. Add glue to the next inch of strip and wrap. Any excess glue will get squeezed forward. Add glue to the next inch of strip and wrap. Repeat to desired thickness. Take your time with wrapping, if the wrapping is straight and even, less sanding will be needed. The finished size of the MBLS are 1.5mm. At this point, the hoops have some strength, but they need more. Give hoops a good soaking in gap filling CA, then place on waxed paper and allow to cure for at least two hours. Finishing the hoops is straight forward: Sand the ID to get rid of any excess glue. Sand the OD to blend the edge of the paper. Sand the top and bottom edges down to desired height, When sanding, be sure to keep the hoop on the center of your fingertip to sand evenly. If your wrapping is straight, you can start with a strip that is close to the finished size. I repeat the soak in gap filler to fill any new gaps and sanding. I think it's a good idea, but it's up to you. Touch up the color and add a thin coat of glue to seal. I buffed mine for a final smooth finish. And VOILA! You have mast rings.

-
Keith, I can only speculate why the shrouds were added. Glad you are enjoying the ride. This build has been fun and a learning process on how to research! My copy of Chapelle's book has taken a beating, the spine is broken open to the MBLS chapter and the pages are covered with penciled in notes. I found a couple of good websites with corroborating info and my conversations with Hexnut Bob have been priceless. When I said 'ala Remco', I was referring to Remco's signature line: 'Treat each part as if it is a model on its own, you will finish more models in a day than others do in a lifetime.' I took this line to heart when I started this build. I'll do a 'how to' post for the mast hoops with info and photos. Eamonn, Yep! Three times a charm! I cut off the chain this morning and it looks like I will do a rope bobstay. But I'm still not sure this is right, due to the cutwater. How's your juggling going? Popeye, as always, thank you for stopping by. I've been reading all of your build logs and learning lots of neat stuff! Jesse, Thanks, I've put together a how to for these and will add it next. They're easy to make. And many thanks for the likes! Dee Dee
-
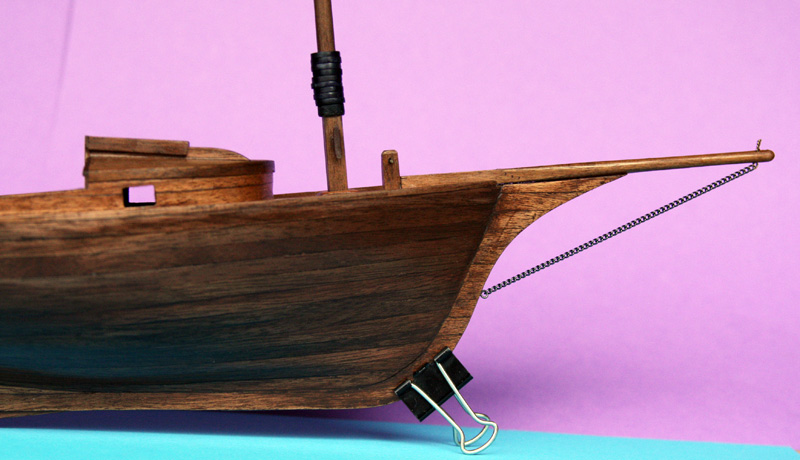
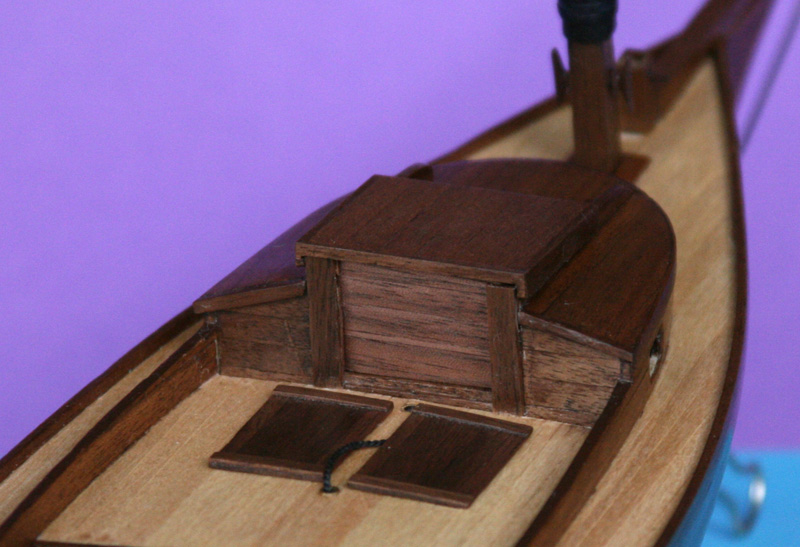
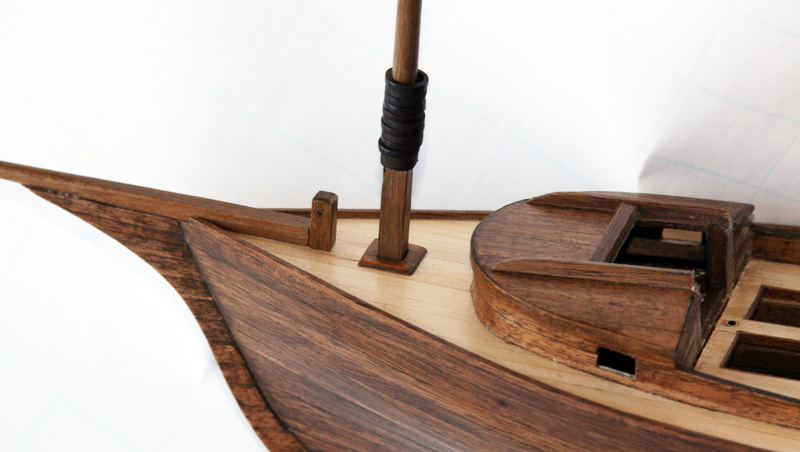
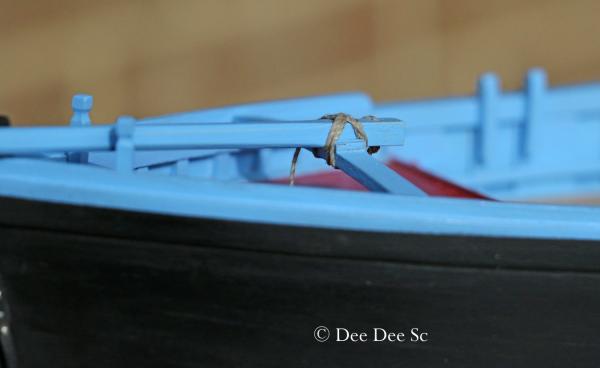
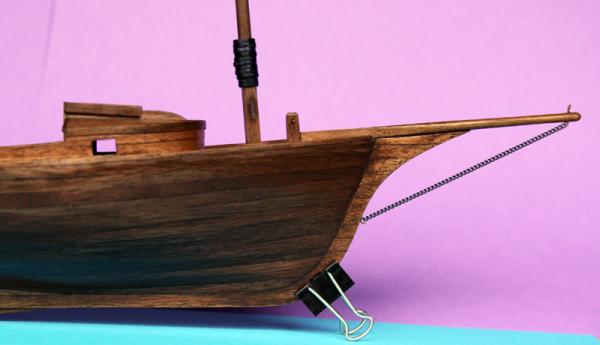
All the small stuff is done. I found some plastic cleats that were the absolute perfect size and shape, I need 6 cleats, but only had three cleats, I used these on mast and bowsprit. I had some 8mm metal cleats that were reduced down to 5mm, but they looked chunky and clunky. So, I'm going to go on a treasure hunt for the remaining three cleats. Three times a charm! It took three tries to get the hatch right. It was worth it! I added a chain bobstay last night, but the scale of the chain is too big, if I can't find a smaller scale chain, I'll replace it with a rope bobstay or maybe even omit it. You can see one of the cleats on the mast - They measure ~5" x 1". The metal cleats measured 5" x 2" with a chunky base. The three metal cleats were installed in the cockpit, but I removed them a few hours later. Next up is the rigging. Since all of the blocks are made and installed, this will only take a few hours. But the real world is calling and I have some real work to do. Thanks for stopping by Dee Dee

-
Thanks for the visits and the likes. Eamonn, Yep! Med mooring is like trying to parallel park a boat in a space barely large enough for a sardine! Bob, Our conversations have made this build very enjoyable. The basswood deck is finished with poly. It needs refinishing due to all of the 'characteristic traits' it has accumulated during the build. I abandoned the pivoting / sliding bowsprit because it was not right. Definitely a feature for future builds. Dollar bills for the hoops, not quite, I think each one cost about 3 cents. As for the banana shape - something like this?
-
Looking good Eamonn! Nigel's info on painting is spot on! The only thing I can add is very thin coats to avoid ridges. Dee Dee
- 1,039 replies
-
- 2
-
-
- ballahoo
- caldercraft
- (and 2 more)
-
Thanks Tim. Having two 'bows' to plank makes this a challenge! On the three planks completed, were any of these tapered? I'm going to pull out my instructions so I can follow. Thanks again for posting additional planking info! Dee Dee
-
Thanks for all the likes! Tim, My objective with this build is to get close to what the original MBLS looked like and learn the skills I will need for my next build. Yep! I'm looking forward to completing this build and moving on to my next build, but this is not a race. I have the Pinky on the shelf. The Pinky is a challenge to plank and it would be great if you posted your planking progress frequently. (Hint! Hint! ) Eamonn, So far, I know of three types of bow sprits: Fixed, sliding and pivoting. A fixed bowsprit is what I built on the MBLS. The bowsprit is permanently attached to the hull, the samson post and bow chain keeps it in place. A sliding and pivoting bowsprit serve the same purpose, when the jib sail is not needed, the bowsprit is stored, either by sliding it out or folding it up and lashing it to the mast. The pivoting bowsprit was especially needed when the harbor is located up a river with lots of turns and bends. On working boats with long bowsprits navigating up the river could be a challenge. In woodenboat forum, there was a comment 'An elegant way to evade those annoying extra moorage fees on bowsprits.' Photo by Patrick Debetencourt. The French boat Granvillaise, is a spectacular looking boat, its sliding bowsprit is almost as long as the mast is tall. This first photo shows the bowsprit extended and the second shows the bowsprit drawn in as it enters the harbor. A better picture is available directly from this website: http://www.fond-ecran-image.com/galerie-membre,bateau-replique,granville-la-granvillaise-p1220905jpg.php
-
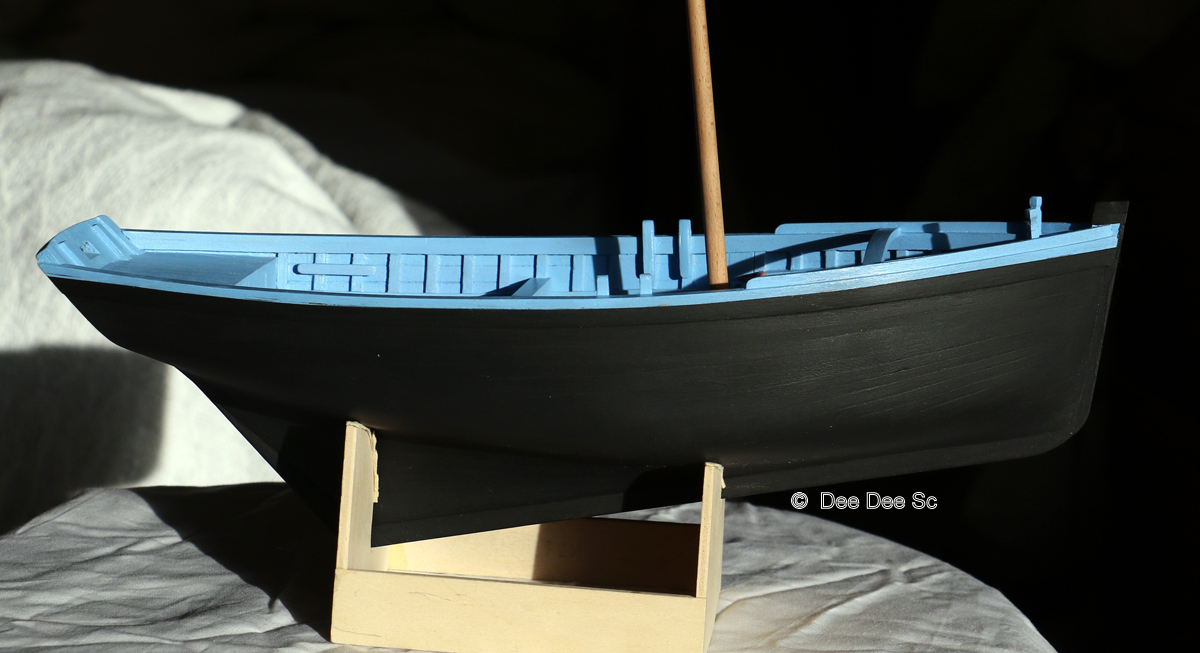
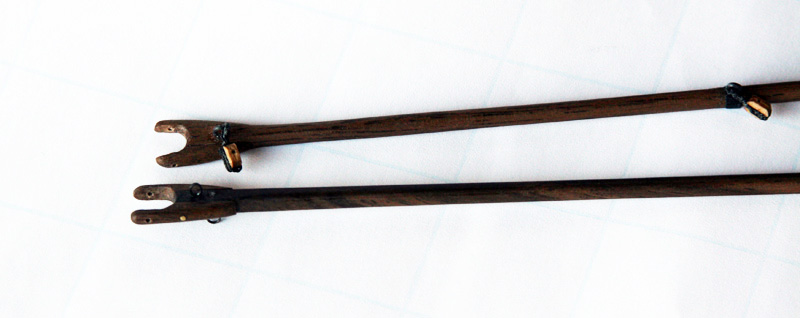
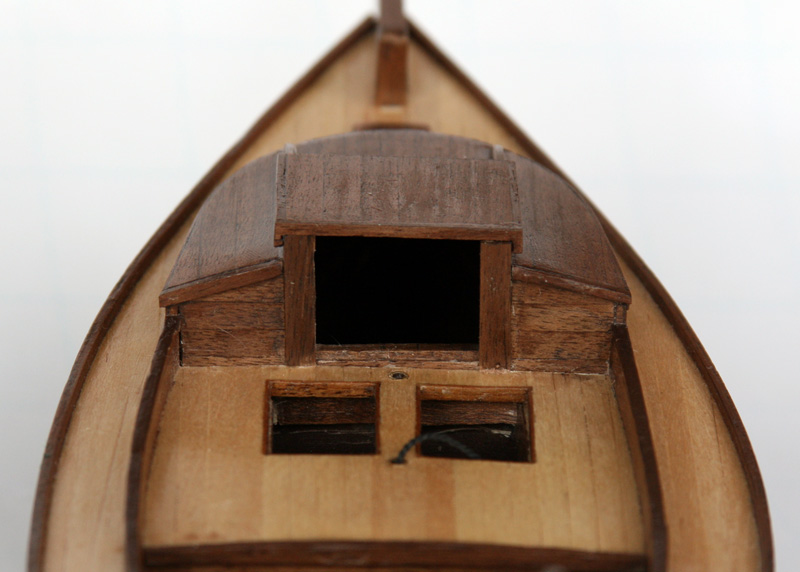
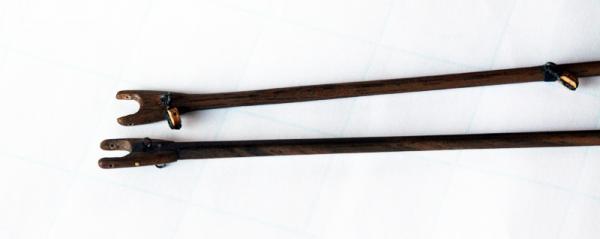
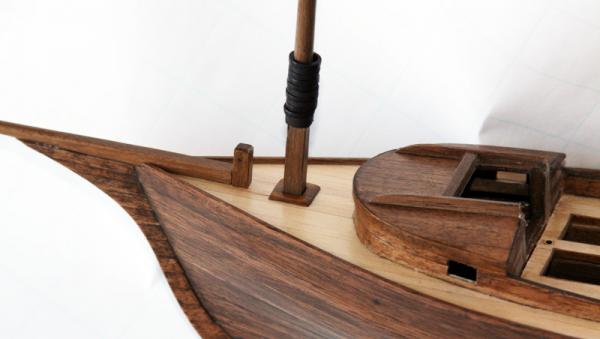
I've reached the tipping point on this build: The learning curve has flattened out and I need to complete this build and move on to something more challenging. The boom and gaff were turned from 3mm x 3mm walnut. These yokes are an improvement over the last yokes I made. I added 'black iron' bands to the boom and gaff, but not sure if these are authentic. The bands were made from rag paper, AKA a dollar bill. The mast hoops will also be made out of this dollar bill. I abandoned the idea of making a pivoting bow sprit. Conceptually, it sounded good! The bow sprit and samson post were made from 5mm x 5mm walnut, sanded down to 4mm x 4mm and tapers down to 2.5mm. The kit mast is 7mm - 7" in scale and that is way too big! This mast was turned from 5mm x 5mm walnut and tapers down to 2.5mm (2.5") at the top. This taper allows the mast to function and bend as it was designed to do. I am starting to like having a square mast step. The mast hoops were also made from that dollar bill. They measure 1.5" high and 1" wide with an ID of 5". These took an afternoon to make (ala Remco) and look good. I started out with 10 mast hoops, but lost one last night. The first hatch opening was a less than stellar, but I figured it out and this one looks much better. It's fully functional and that was my goal! (OK, it's about 4mm too wide and a few mm too short, oh well!) And a final photo of the main sheet horse. In Chapelle's book, the last paragraph in this chapter goes into to detail about the main sheet horse. In working boats, especially working boats with center boards, it was common to have an ultra wide main sheet horse, so when the boom was fully let out, the main sail could still be sheeted down hard. Lot's of little stuff to do and hopefully I can finish this build in the next few days. As always, Thanks for stopping by! Edited to add 'with center boards'

-
Eamonn, We're pretty much all in agreement. The bow section is very sharp and deep, it doesn't start to widen out until the cabin, two feet behind the mast, so there is no chance if the bow is pushed down. Also, the mast was sized to act as a 'safety valve' if over powered, bending to dump the wind or break. But those mast were stayed, negating the safety valve. There was also another issue, the width of the main sheet horse. On working boats, these would be almost the full width of the stern. With the wider horse, when the boom is fully let out, the boom could be sheeted down hard, to avoid the turn in the sail. When a sail has a turn in it, the sail cannot dump the excess wind. This turn in the sail can been seen in the third photo. I would really like to sail one of these boats!
-
Thanks Bob! I forgot about this forum and there has been some update since I last checked it. I read through the posts, lots of good discussion! So far we are in agreement with the size of the sails and the position of the mast. I'm going to add a post asking about the stayed mast. Looking forward to your next build update! Dee Dee
-
Bob, This post only talks about the sail size, which was the first of my 3 points. The last comment I think is spot on! Can you please share this link in wooden boat.com, I would love to read more!
-
Almost done with my build. The mast, gaff and boom are made and spent the afternoon making the 10 mast hoops (Ala Remco.) After I make the change to the hatch opening, I'll post some update photos. I thought this would be a good time to add some side information. In a few MBLS build logs, there are some recurring unanswered questions about the MBLS. 1. How were the sails set while working? 2. Why were there no shrouds? 3. Why the angle of the transom? 4. Why did both Land Apprentices MBLS's sink? I want this build to be close to authentic, so I started digging for answers. Chapelle's book provided a lot of information and also found a couple of websites that had some information. So! Here's what I found. Please add your thoughts HOW WERE THE SAILS SET WHILE WORKING Excerpt from "Stories from Friendship, Maine" In use, this rig was quite handy; the boom was swung out near perpendicular to the centerline of the boat making it easy to see why shrouds would cause trouble. Chafe was a very big concern in these vessels and protecting the only mode of propulsion was paramount. The jib would be sheeted in, hard to the centerline. This would permit the vessel to "lie to" well balanced and under control, where fishing operations could be undertaken without tending the rig. I found a similar quote on another website, "The Hull Story:" When an eighty-year old lobsterman was asked about this, he said, "Lead out the sheet of the mains'l quite a way, and trim the jib tight while you're hauling. The sloop will lay good then." You can hear that Mainer accent WHY WERE THERE NO SHROUDS From "The Hull Story" Free standing rig, meaning no stays or shrouds to hold the stick upright, served a couple of purposes, the first was to provide deck space, free of standing rigging which could foul nets and drags and the other was a safety feature in heavy weather. The solid mast was sized to bend and spill wind in gusts and to break clean, if over powered enough to endanger the vessel. MSW member Capnharv2, refurbished a Friendship Sloop and has an intimate knowledge of these boats. Harv posted similar info on my first MBLS build log: Unstayed masts are not unusual on boats of this era and size. They're designed to bend and spill wind when overpowered. It's alarming, at first, to watch the mast bend 5 feet or so at the top. After a while you begin to understand the unstayed bendy mast is a safety valve when in gusty conditions. WHY THE ANGLE OF THE TRANSOM The angle of the transom is a design feature that many people like about this boat. So simple! From "The Hull Story" The heavily raked counter was to allow nets to be dragged over the transom without fouling the corners and keel hung rudder. A photo in post # 51 shows the keel hung rudder. WHY DID BOTH LAND AND SEA APPRENTICES MBLS SINK? From Land and Sea Apprentices http://apprenticinglandandsea.com/?p=207 It is unfortunate that both boats sank and makes us question the design as a potential factor in why they sank. In both cases, one in Long Island Sound, the other off Portland Head Light, the sloops were sailing just off the wind and submarined. They are lovely, quick and enticing boats. Why they sank is still up for debate. Was it the design of the boat? Was it the seamanship and handling? Both sloops were brought to the surface and are on the hard on Long Island, New York. We do not have many more details…We encourage readers to cast opinions and fill in any details that are missing. From the Hull Story: The solid mast was sized to bend and spill wind in gusts and to break clean, if over powered enough to endanger the vessel. Per Chapelle: "When a Muscongus Bay sloop becomes a yacht, it is usual to dock her main boom and shorten the bowsprit a bit---- 'to bring the sails inboard as much as possible.'" My thoughts: There are a few issues that when combined, caused the boats to submarine and sink. 1. When the shrouds were added, the boom should have been docked and the bowsprit shortened, reducing the sail size. 2. The MBLS mast is set very forward, similar to a cat boat. The bowsprit allows the use of a jib sail 3. While sailing just off the wind, (just off the stern) the shrouded mast was unable to flex and spill the excess wind off the (oversized) sails These photos are from Land and Sea Apprentices website. This first photo shows that boom was not docked, nor the bowsprit shortened. This is a really nice photo. In this photo, they're sailing just off the wind. If you look close, you can see where the shrouds are attached to the mast. This reduces the masts ability to flex and spill excess wind. This is the key photo. In this photo they're sailing just off the wind, the boom is near perpendicular and the jib is fully let out. This photo shows just how forward the mast is set. IMHO, this issue is at the top of the main sail, a small section is now in front of the mast. Since the excess wind cannot be spilled (because of the shrouds) the bow is forced down, resulting in submarine. I've learned a lot while building this humble boat and I'm looking forward to my next build!
-
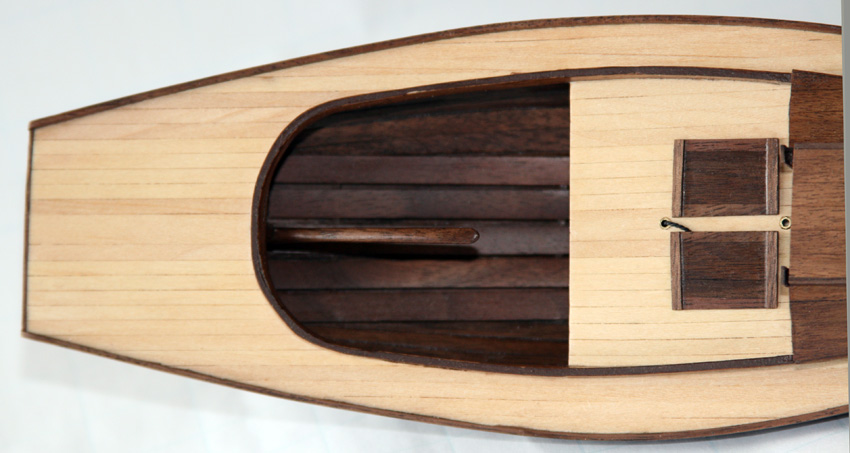
Hex Bob, Wow! This is exciting to see! On our Lightning, a permanent 'pin' in the centerboard rested top of the trunk and that carried the weight. The length of my handle / chain assembly was determined by how far I wanted the centerboard to drop. The handle will act as the stop and carry the weight. That is why I lined the deck opening with a piece of brass, that will be blackened. Theoretically, this centerboard could drop all the way out out of the trunk and just dangle by the pin. Sitting in the front row with eyes as big as saucers! Dee Dee
- 86 replies
-
- 1
-
-
- muscongus bay lobster smack
- Midwest Products
- (and 1 more)
-
Eamomn, I live just north of Chicago and Chicago has a large Irish base. Paddies Day celebration started last Saturday and ended last night, actually, early this morning. This is the start of the celebration - turning the Chicago River green. (It's a food base dye so no harm to the water and the fish.)
-
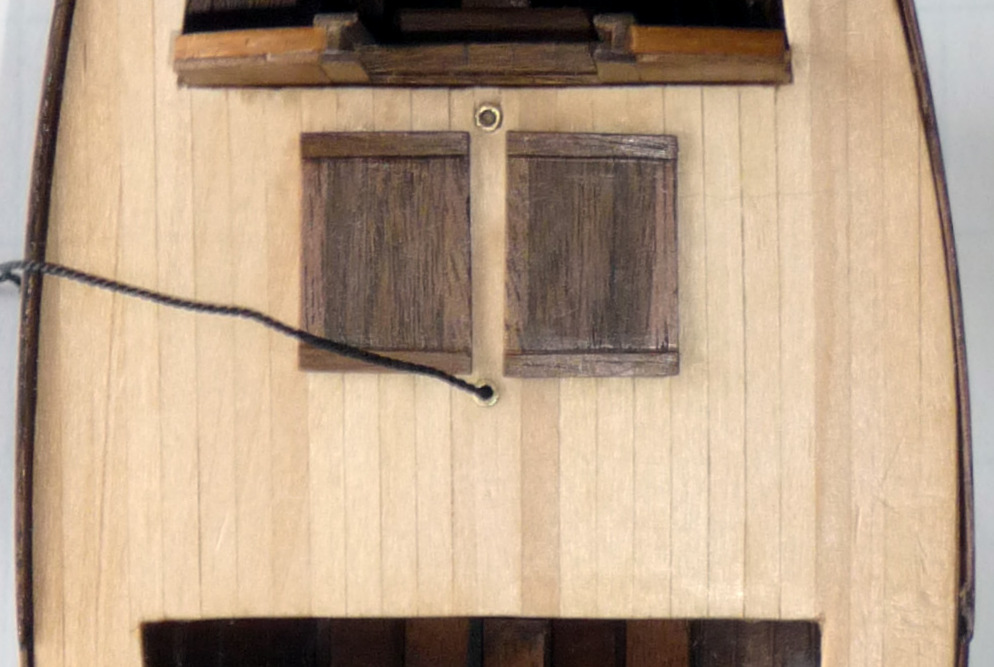
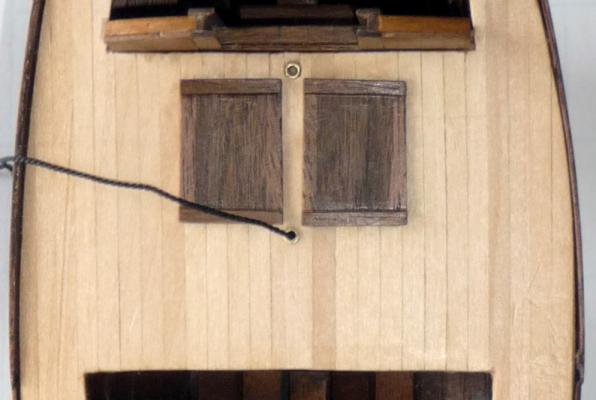
Bob, Thanks for stopping by! I've put the sliding port covers on hold. These are small fiddle parts and trying to make them out of wood was not working. But I have not given up and thinking about making them with paper. I'm working on the bow sprit and your original drawing has given me an idea on how to do the pivoting bow sprit. Eamonn! Hope you have recovered from your St. Patrick's Day celebration! I received my lumber last Friday, but it's too small for the bow sprit. So on to Plan B: The new stuff will be perfect for the boom and gaff and I reworked some larger stock to size. My take away from this lesson: Since a Byrnes saw is not in my future, I need to build up a 'stash / inventory' of lumber. Speaking of take away.............. Did someone say 'kebobs'? Yum! Cap'n'Bob, Thanks for stopping by! This build has been an adventure in learning! Thanks for the info on the Dragon. The Dragon is a lovely boat and I looking forward to building 'Puff'. Popeye, You're the best and I really appreciate your following my build. I've been following ALL of your builds, YEP! ALL of them! Moe, Larry and Curly (have you thought about adding Shemp, Joe and Curly Joe?) Jesse, Thanks Jesse I've been following your Scottish Maid build. Nice job on the planking. I thinking my next build will be the AL Swift and have already replaced all of the kit lumber. I'm working of the samson post. The bow sprit will pivot, it will be a bit different. The mast, boom and gaff will all be made from square stock, so need a warmer day (above 45*) to get outside and make a lot of saw dust.
-
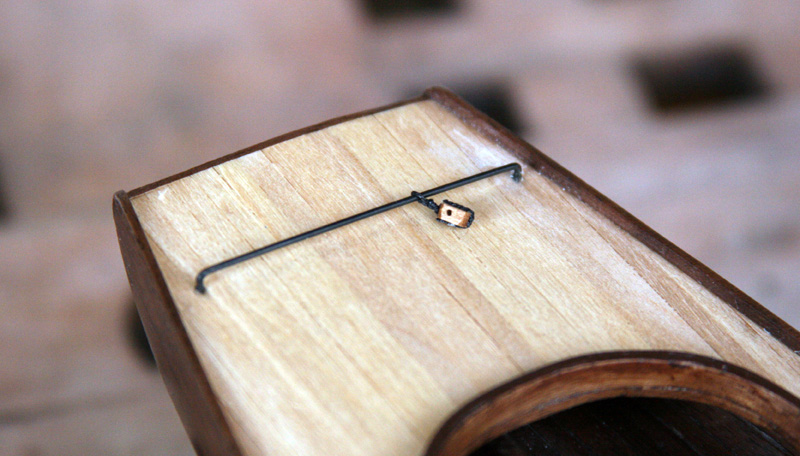
Tim, Your build is looking great! Kudos to you! With all the MBLS that have been built on this site, you are the first builder to see this error. I did a bit of bashing on my build and the centerboard is fully working, so the handle will always be in the right position. Of note, when I was building up the keel, the opening in the deck was moved 18" back, to give better leverage when raising / lowering the centerboard. The long brass bar was replaced with a length of chain and a black iron handle, that will be secured in a second deck opening a few inches behind the cabin door. This second deck opening location was determined by the movement of the centerboard. If you hit one the the rock ledges that the Muscongus Bay is known for, the centerboard needs to be pulled up immediately to prevent damaging it. I still need to attach the black iron handle, but this cropped photo shows the deck openings. The brass in the deck openings will be blackened.
-
Well, THAT'S an understatement. How many frames in total will there be? I was looking at the drawing and saw that the samson post is installed in a similar way to the mast. It goes thru the deck and is anchored in the keelson, about two frames in front of the mast. I thought about drilling a hole in the deck and down into the keelson, but after 10 seconds, I decided against it. You are taking this little boat to a whole new level!
- 86 replies
-
- 2
-
-
- muscongus bay lobster smack
- Midwest Products
- (and 1 more)
-
Eammon Looking good! You're at (what I call) the 'Cinderella' stage of your build, where the personality of your build starts to come out. The fun part! I'm still deciding what I'll build next, I have six in the closet (including the 18thC longboat) and #7 is on it's way. Any more and I will have to start attending meetings for 'Model Ship Builders Anonymous.' I agree with Nigel and Kester about the poly, use the stuff in the can! It's the exact same stuff. The stuff in the can will start to thicken after a couple of years, but at that price, it's cheaper to buy a new can and take the old one to the recycling center. I like the species of walnut I'm using on this build sooooo much better. It's darker in color with a cast of gray and has a tight grain. On a prior build, that walnut species was reddish brown in color and the grain was open, causing the dreaded splintering (and it was a pain to work with.) The last time I had a really good kebab was when I was in Manchester. There's a place just south of the Manchester velodrome and the shop was open late. YUM!
- 1,039 replies
-
- 2
-
-
- ballahoo
- caldercraft
- (and 2 more)
-
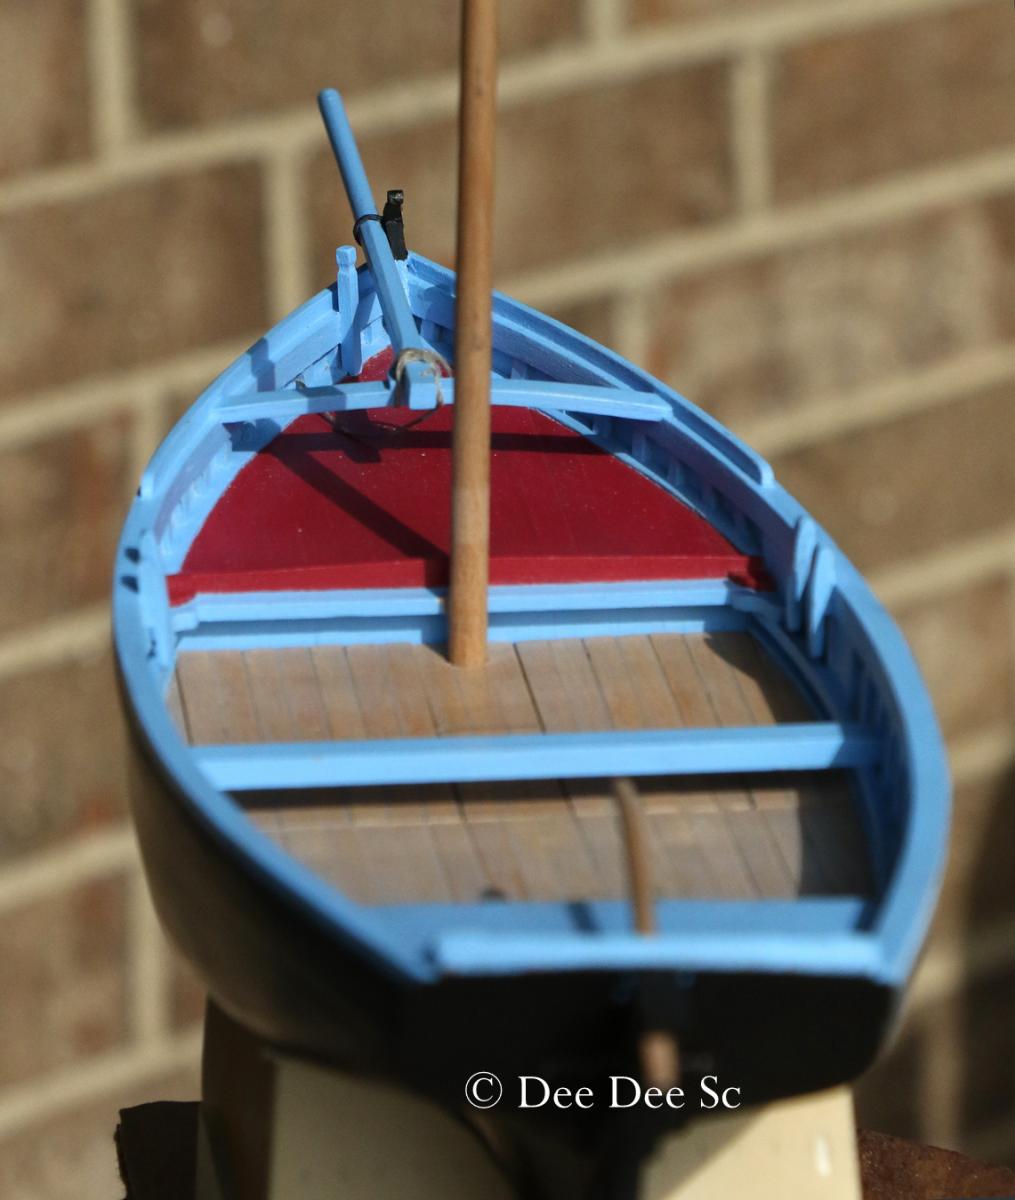
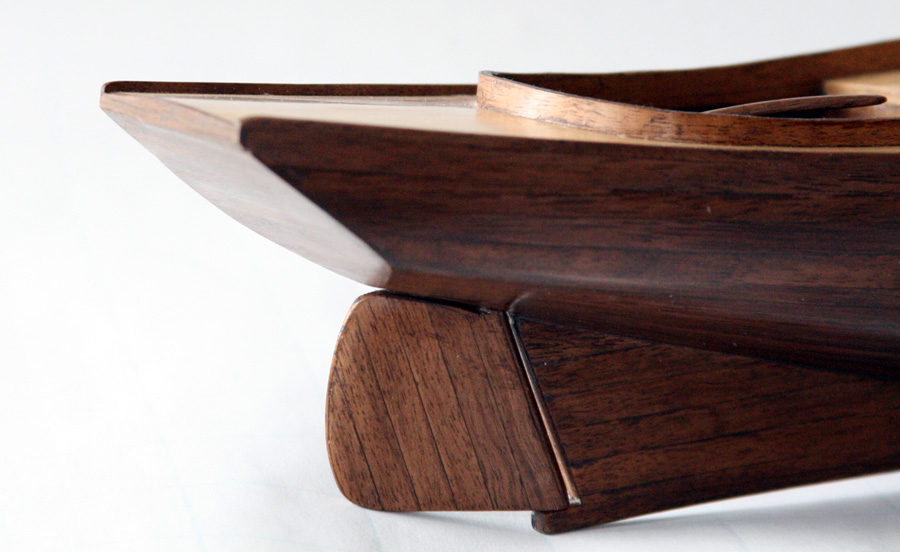
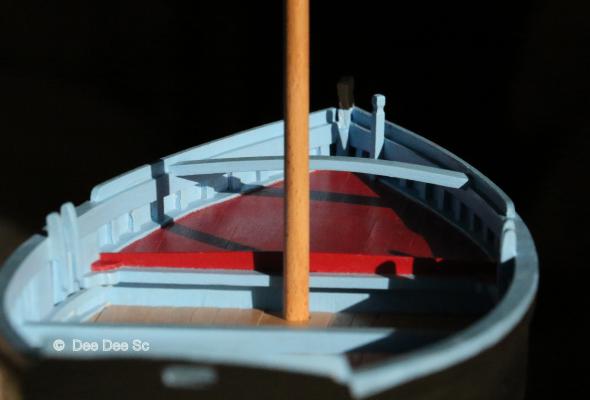
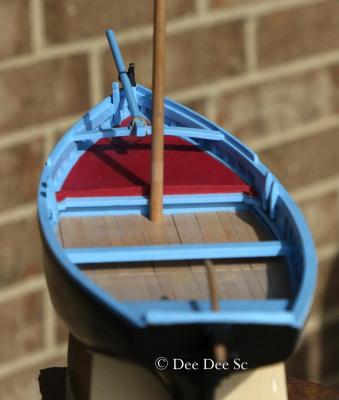
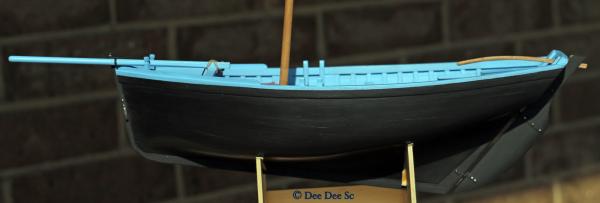
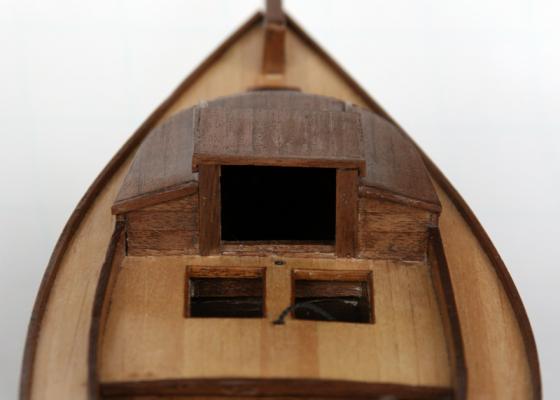
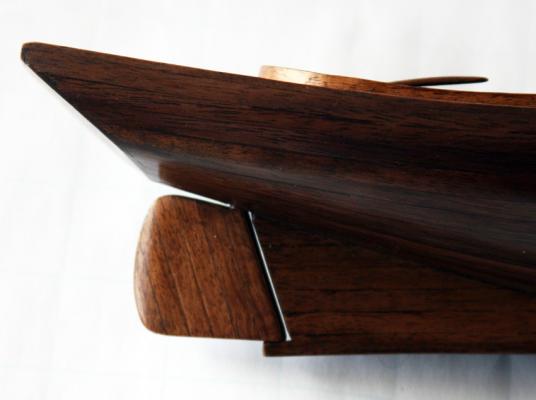
Instructions point you in the right directions of what to do next and give a sense of security. I think I'm close to being over the impulse to reach for those instructions...... Only 8 parts from the kit were used and all were altered; 4 bulkheads (2 were removed,) 1 transom, 2 combings and 1 cut water. The further I got into this build, the errors started to show up and a couple almost derailed this project. But this is an adventure in learning and I worked my way through each one. However, this build has come to a temporary halt due to the problems with the hatch cover. I have thought it through and need to order some specific dimensional lumber so I can rework it and complete this build. The planking turned out really nice. The center board operates smoothly, it's a bit short in length, but it's a cool feature. The transom ended up be straight across, this photo shows the camber of the decking. Since the planking was off a bit, the decking is not even on both sides. But I like the way it turned out, the basswood takes on different colors. Chapelle's drawing shows a bench, but I decided not to install it, this is a working boat! These fish wells are smaller (than my first build) and are very simple in design. Close up of the rudder. Since I didn't add the wrought iron bracing on the centerboard, I decided against adding it on the rudder. This photo gives a nice close up of the hull planking. The base layer for the cabin combing was a bit crooked, but I took my time with adding the veneer and it ended up looking good. I was planning on sliding covers for the windows, but I didn't have the lumber needed to build them. The rectangular windows are per Chapelle's drawings. The bottom of the mast will be square and a foot or so above the deck, it will be rounded. I need to remake the square mast coat, I lost the first one that was a nice tight fit. (This one is just for show and it's not square.) And the build comes to a screeching halt! I need order some lumber to redo the rails the cover slides on. There's a big gap where the rails meet the door and cover So that's where I'm at! While I'm waiting for the lumber, I'm going to start my next build, but I have not decided which one yet. Thoughts and suggestions are welcome.


-
Your Ballahoo is looking good! News Flash! I've found Nessy, well, not really. But I did find 'Wipe on Poly' on the shelf at a small hardware store. As I thought, the wipe on polyurethane and the polyurethane in the cans are the exact same product, only difference being the packaging. Specifically, the closure on the 'Wipe On Poly' can is air tight, which will prolong the total 'shelf life' of the poly product. The wipe on poly costs more, about 50% more, but the extended shelf life makes it a better value. Here's a link to look at the product: http://ecx.images-amazon.com/images/I/81y31%2BpO-WL._SL1500_.jpg
- 1,039 replies
-
- 1
-
-
- ballahoo
- caldercraft
- (and 2 more)