Dee_Dee
-
Posts
290 -
Joined
Content Type
Profiles
Forums
Gallery
Events
Everything posted by Dee_Dee
-
Tim, Well you just learned a lot of skills that are not written in any instruction manual! I just reworked a small part on my build and I did it the exact same way, shaved it off layer by layer. That 'debonding' stuff is great, but use it with discretion. Capillary action may / will cause more parts than wanted to become unglued. This stuff is best when there are only two parts involved, such as the false keel and a bulkhead. The fun is just beginning!
-
The next step... A choice for the next model...
Dee_Dee replied to timo4352's topic in Wood ship model kits
Tim, Selecting a kit to build is a very personal and complex choice. The ideal kit is challenging but build-able. If you're up to the challenge of planking and all of the detail, then I say yes! If you're thinking this might be too much, too soon, here are a four kits where you can develop your skills and will be challenging. Artesiania Latina Swift - List price is $88, but these are regularly available on eBay for much less. Look for the new version (white box). The planking wood in the older version kit (blue green box) will need to be replaced. There are lots of build logs for the Swift on MSW to help you along. Also, this is a good kit to do some 'bashing.' This is next my next build and I will be making a lot of changes. Corel Sloop list price is $125, butwatch for sales at ME, as low as $50, also watch ME's eBay auctions. This boat is a French Oyster Smack. It's double planked, nice quality wood and good for learning. I've built this kit and I learned a lot, also, this kit is open for bashing, ie dropping the height of the cockpit floor. Two more options are: Artesiania Latina Jolly Bounty $70 Artesiania Latina Bon Retour $70 But at the end of the day, it's YOUR DECISION and rest assure, you will have a lot of people helping you here on MSW. If you're not already, be sure to sign up for emails for ME for weekly / monthly sales - excellent pricing! -
I've been 'playing' with some solid wood birch and thinking about trying it on the ME 18th Century long boat. Instead of purchasing birch strips, I purchased a small box of 'coffee stir sticks.' The stir sticks measures 1/4" x 1/16" x 7.5" and cost about $10. Pros: Very easy to work with. After soaking, it will twist and bend to any shape needed. Sands to a nice smooth finish. Able to get a sharp corner. Cons: If used as outer planking, it's easy to sand to the point where the 'definition' of the planks is lost. Not as strong as basswood and may flex if the bulkheads are too far apart. Does not stain well. While playing with the strips, I found that all 8 sides of the plank need to be fitted before bending. This is due to the 'flexy' nature of the wood. Hopes this helps. Dee Dee
-
Tim, The planking looks great! You got a smooth transition between the planks and the carved blocks. It's normal to have a small gap at both ends where the combings meet and this can be filled in with a bit of putty. As for the cabin roof: The kit drawing shows a 2mm overhang at the front of the cabin. This is a bit misleading since the kit part only allows for a 1mm overhang on the front and sides and ~2mm on the aft edge. From the photos, it appears you prefer a wider overhang on all four sides. I like it! The best part is you made the adjustments to the kit cabin roof part to get the overhang! When I added the cutwater to my build, this little boats personality starts to shine! Good job!
- 60 replies
-
- 1
-

-
- muscongus bay lobster smack
- first build
- (and 2 more)
-
Tim, Your MBLS is looking great! Yep, fairing the hull is important and a skill you will do on every wood build. When planking, I frequently use pencil marks on each plank while shaping each plank and especially when I finally glue it on. A couple of suggestions: Go easy when sanding the hull where the two hull planks meet. On my first build, the Sakonnet sail boat, I was a bit over zealous and this area got very thin, really thin, OK, I had a big hole! To fix it, I glued on a piece of tissue paper with CA glue, painted the tissue paper with a coat of CA, then built it up with multiple coats of paint. Also, before you add the cockpit combing, you may want to remove some of the 4th bulkhead. As shown in red in the photo below. This will make this bulkhead look less obtrusive and more like a frame. If you're not sure or comfortable, this can also be removed after the combing is added. Keep up the good work! Dee Dee
- 60 replies
-
- 1
-
-
- muscongus bay lobster smack
- first build
- (and 2 more)
-
Hold on, my bad. I apply Minwax (the brand) fast drying 'poly'urethane with a paper towel. I use this same method for applying Danish (same as Tung) oil.
-
Eamonn, I think 'wipe on poly' is similar to to 'Nessy,' everyone has heard stories about Nessy, but no one has ever seen Nessy. On this side of the pond we call it a 'Snipe Hunt.' I've never seen 'wipe on poly' at the store, but I'm thinking it would be very expensive. The 'wipe on poly' I use is a can fast drying poly by Minwax and I wipe on a coat of poly using a paper towel or a small cotton rag. Any brand of fast drying poly should do the job. To get into tight spots, I'll saturate the area with poly, then use a dry section of the paper towel to soak it all up, leaving just a thin coating. It's one of those things you need to play around with to find out just how much poly you want on your towel. My technique is it's easier to add another coat instead of trying to remove excess poly that has gummed up in corners and crevices. Just be careful of the used paper towels and let them dry completely before putting them in the bin. Dee Dee
-
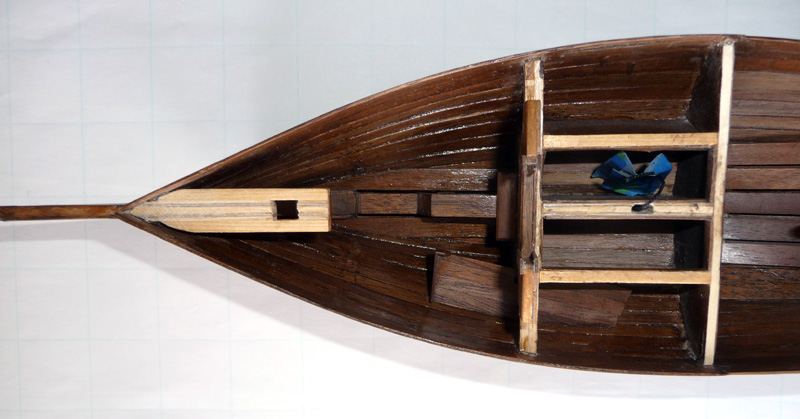
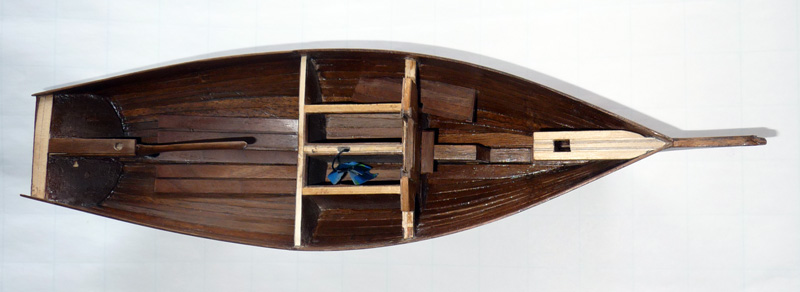
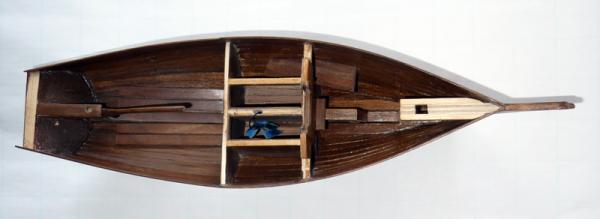
Keith, Thanks for all of the likes! Hope all is well with you. Looking forward to seeing more of your Swift! Craig, Thanks for stopping by and your vote of confidence! Eamonn, Thanks! The decking is basswood! After I glued on the basswood decking, it was sanded, scraped, then a couple of thin coats of poly were wiped on (with paper towel.) This was repeated a few times. What is really kewl is how the wood changes colors pending the angle of the light. There is one plank that will change from very dark to the extremely light. I really hope your timber arrives quickly! Thanks Popeye! Yep! The walnut can get a bit dark. These lids are closer to spec in size. I really liked the look of the lids on my first build and they were very 'stylish.' But they were way oversized and not in character with the build. This build is all about getting as close to what this work boat looked like back in the day. Bob, Thanks for stopping by. I was planning on adding false framing to the cockpit, but when I did some dry fitting, it didn't look good so I decided to skip it. I thought the ceil planking was only inside the cabin, but I just reread about the ceil planking and it was carried the full length of the hull. So, it is close to right. I don't have any specific dimensions per se for the fish wells, rather, I made an educated guess-t-mate based on the drawings in Chapelle's book. Here's the drawing I used: The outline of the fish wells are highlighted in red, the mast step is in green and the port side bunk is in blue. This is a low res photo, I'll send you a link to a high resolution copy that shows a lot more detail including the ceil planking. Also, note the 'open space' on the stern side of the fish wells. It looks like 'empty space', but I've been thinking that this was storage space that was accessible from the cockpit. The French Smacks have storage space in a similar location that is accessible from the cockpit. Also, I added a trim piece on the transom and it's really kewl. I shows the curve in the decking. I'll include this when I add more pictures this weekend. Thanks again for stopping by! Dee Dee
-
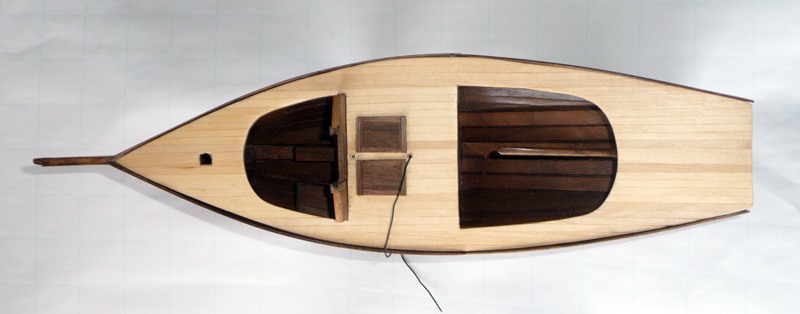
This build has been an adventure in learning. Funny, after I get done adding a part, I think, OK, that wasn't that hard! How quickly I forgot how much time I spent figuring out how was I going to add the decking!! I had made a big error when I started planking (started planking 1/8" too low) and that was compounded with these fish well openings / covers. But I took my time, thought it through, it looks good and I'm happy. These are the last two photos of the dark hull. Yep! The light color deck will provide much needed contrast to the dark walnut hull. In the cabin, the portside berth has been added. There's a lot of room for improvement, but this gives the essence of what it looked like. I'm happy with the single planking. To give the 'thin spots' in the planking some strength, I 'painted' the interior of the cabin with two coats of gap filling CA glue. The hatch opening has been completed and an improvement on the first build. The rudder is installed, is fully functional and sits on the keel. I'll add a photo this weekend. And here's the decking added. Finally! Some much needed contrast! These fish wells measure 24" x 15" x2" and weigh about 25 pounds each. (A cubic foot of dry oak weighs ~59 pounds.) The centerboard chain comes through a hole in the deck that is lined with a small piece of brass tubing. I'm thinking that I probably should have blackened it first. Oh well! The tiller is on the bit on the long side and will be cut down after I add the shortened benches. The excess hull planking has been removed and a trim piece at the top of the transom has been added. The mast will be square below deck, but will be rounded starting a couple of inches above the deck. I'll add a square mast combing and blocks for the mast rake. I'll add a couple of more photos this weekend. Next up is the hull trim, then the cockpit combings. It's finally starting to look like a boat! Thoughts and suggestions are welcome! And thanks for stopping by! (Edited 11/24/2014 to add photos that went missing.)


-
I've been (wrongly) blamed for worse things, so it's OK, you can blame me Your build is looking super and hoping you get your new wood today!
- 1,039 replies
-
- 1
-
-
- ballahoo
- caldercraft
- (and 2 more)
-
Hi Tim, You're off to a good start. In almost all Midwest sailboat kits, the cockpit floor is too small. On my first MBLS, I added a bit of with to the cockpit floor for a snug fit against the hull. There is a photo how I did this in my first post, use the below under 'Completed Build'. If you have any questions, please do not hesitate to ask! As Can'n'Bob said - Have fun
-
Congrats Jack! My Bluenose 1:100 will be out of dry dock soon and i will be using your build log for guidance. I like the way you did your rat lines and this will be a great help! Congrats and enjoy! Dee Dee
-
Hi timo1 Welcome to the world of Muscongus Bay Lobster Smacks! It would be great if you can start a build log and I'll do my best to help you.
-
Eamon, Abes Books UK has some Keith Julier books available at a much better price than Amazon. http://www.abebooks.co.uk/
-
Pat, Midwest kits are historically corrects and great for learning and bashing! IMHO, 'burnishing' the paint should result in a finish that reflects 'just enough light'. While sanding 'removes' the paint to get a smooth surface, burnishing 'compresses' the paint. Burnishing also makes the paint harder and more durable. There are no set rules or 'how to' burnish paint, you just need to find a process that works with the paint you are using. The timing to burnish a painted surface is somewhere between applying the paint and the paint setting up. That sounds ambiguous, but water content plays a big part. How the surface is burnished will determine the final surface. I've used paper towels, fabric rags, crushed news paper (on black paint only), hardwood blocks and even my shirt sleeve to burnish. I have the flattie on the shelf and I'm watching your build to see all the changes you make. Dee Dee
-
This first photo (courtesy of Apprentice Land and Sea) shows the full length of the MBLS keel, including the centerboard trunk, (note the extra boards at the base of the trunk and the opening for the centerboard. ) Note the area where the Land and Sea Apprentice in the foreground is working and how the keel is built up. The step is placed on the keelson so the weight of the mast is distributed. On our boat, the step was a tight fit port to starboard with 3" of adjustment for the rake. As for square or round mast, the MBLS has no shrouds and a square mast and step would be the only means to prevent the mast from spinning around. Here's a link with pictures: http://www.davidjonesclassics.com/sail/2309/wings-of-the-morning-1967-31-friendship-sloop-38500/ This photo is from my build log and shows how I built the mast step. After I cut away the excess false keel, I built the keel back up and made the step. Only the bottom two feet of my mast will be square. Looking forward to seeing more of your build!
- 86 replies
-
- 3
-
-
- muscongus bay lobster smack
- Midwest Products
- (and 1 more)
-
Bob, This looks fantastic! The camber only needs to be enough to drain off any water that has accumulated on the deck. The 2-3" drop would be from the centerline, so a 2" drop over 3.5 feet would be 5% and a 3" drop would be 7%. Apprenticing Land and Sea has a good article about building a MBLS, here's the link: http://apprenticinglandandsea.com/?p=207 This article has some photos, this link will take you to their Photo Bucket Album which has 52 photos (some are duplicates.) These photos provide a lot of detail and should provide you with a lot of information. http://s1302.photobucket.com/user/Arista81/media/Muscongus%20Bay%20Sloop/MBScharitycolor_zpsf77def26.jpg.html As for the fish wells, your shape, is fairly close to Chapelle's drawings. As for the location of the covers, it appears the location on the Midwest prints IS correct. It has to do with the way they fished. I'll add more info on that when I add my deck. As for the centerboard trunk, have you figured that out? If needed, I can send you a sketch on how it all fits together. We used to own a old wooden boat with a centerboard, and I based my build on how that centerboard trunk was constructed and others that I saw. In one of the photobucket photos shows the centerboard, it weighs 300 pounds (about right) and is only about an inch thick. Also, before you add more frames, take a look at the 'mast shoe' I made to secure the bottom of the mast. https://fbcdn-sphotos-a-a.akamaihd.net/hphotos-ak-prn1/t1/45623_10201348070725979_1000876754_n.jpg This is really a facinating build! Can't wait to see your next update!
- 86 replies
-
- 2
-
-
- muscongus bay lobster smack
- Midwest Products
- (and 1 more)
-
Bob I have been patiently waiting your next post and it was worth the wait! Excellent! I do have two thoughts: There appears to be too much 'curve' on the deck. I'm thinking just a 2 - 3" drop (at scale.) Where the transom and deck meet, there is no flat area. I'll send you a couple of photos and some links. I've done more research on the fish wells and their location. I post this info soon on my build log - and it will be a BIG surprise! Looking forward to seeing more of your build! Dee Dee
- 86 replies
-
- 2
-
-
- muscongus bay lobster smack
- Midwest Products
- (and 1 more)
-
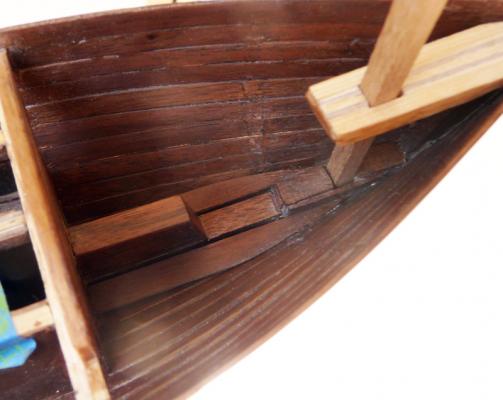
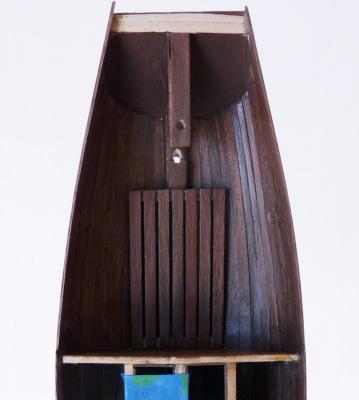
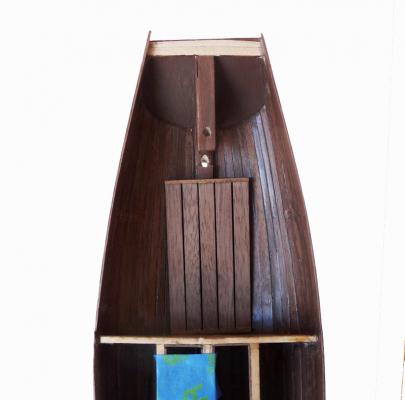
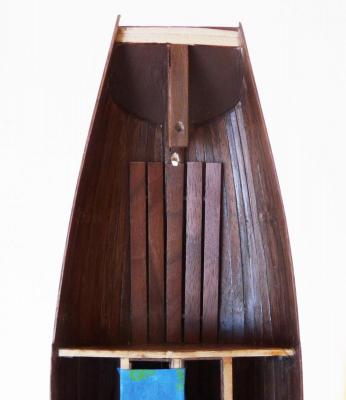
These cockpit floor boards have been a real puzzle, but after numerous attempts, I worked my way through the puzzle. Description of the floors from Chapelle's book: “Five floors were the most used, and many boats had none. The floors, if used, were of plank and were placed on top of the frames rather than beside them or were located clear of the frames and fastened to keel and planking.” After numerous tries , I put the cockpit flooring aside and started working on the cabin floor. This was easy, since there was only one plank on each side of the keel. I like the way it turned out and I'm doing the happy dance! Here are two of the better first try cockpit flooring. Close, but no cigar! After doing the cabin flooring, the proverbial 'light bulb' went on and I figured out the cockpit flooring! YEAH! The height of the keel was reduced and the 'five floors' were added. This looks so much better. Before I permanently add the five floors, I'm going to try adding some false frames. Whilst these will not be 'structural', they will provide some strength to the hull planking and add visual detail. The last major detail in the cabin is the port side berth. The angle of the fish well is not right and the berth is a bit on the narrow side. Even though the berth will only be ~15" in scale wide, I'll add it. When I started this build, I knew what I wanted this finished build to look like, I just have to figure out how to get there. I am learning a lot and having fun! Thanks for stopping by, your thoughts, comments and suggestions are welcome. Dee Dee Edited 11/24/2014 to add back photos that went missing
-
Wow! This sign is really nice! Thinking out loud, have you thought about adding the wrought iron hardware to hang the sign?
-
Hi Eamonn, The Ballahoo has become a very popular build and on my list for a future build! Your photos show you're off to a good start and I will be following! Cheers! Dee Dee
- 1,039 replies
-
- 1
-
-
- ballahoo
- caldercraft
- (and 2 more)
-
Popeye, Bug, Jesse, Craig, Thanks for stopping by! When I started this build, I knew what I wanted this finished build to look like, I just had to figure out how to get there. I am learning a lot and having fun! I am enjoying working with this walnut stock. It's a different species than what I used my prior build, it's less brittle and the color is more on the coffee side. There's a couple of planks where the grain reflects light like a hologram and it really kewl! As for the floor boards, in the cabin, there will just be one board on each side of the centerboard trunk. But I'm still wrestling with the floor boards in the cockpit. I've made a couple of samples, but nothing I really liked. Chapelle’s drawing show no floor. On page 272, there is discussion about the floor: “Five floors were the most used, and many boats had none. The floors, if used, were of plank and were placed on top of the frames rather than beside them or were located clear of the frames and fastened to keel and planking.” So I started working on the cutwater and veneer the external keel. The cutwater turned out to be an easy fit. Almost 1/4" was removed off the bow to seat the cutwater and no filler was required to get a tight fit. The keel was veneered with walnut 1/4" wide or 6" in scale and after it was stained, the stern part of the keel looks like it would have been build back in the day. The keel veneer was a different walnut species, so it took a few applications of stain to get an even color. The final color is like a dark, French Roast coffee with a nice warm finish. This update is all about the hull, so here are some photos. The reflection on the keel does not show the actual color of the keel. The actual color is very close to that of the hull (Looking for this photo to add back in...) This rudder is from a prior build. It's a good fit and I might use this one. The centerboard drops a bit more than shown. Thanks for looking. Any thoughts about the cockpit floorboards would be welcome. Dee Dee (Edited 11/26/2014 to add back photos....) HEY!! ALL OF THESE PHOTOS HAVE ALSO GONE MISSING!!!!! - AGAIN!!!
-
J, Your build log and photos provide volumes of information on the ECB. I have the ECB on the shelf and looking forward to building this historic boat. I will be following your build!
-
Bug - Researching the small details is half the fun! If you need more time to research, let me know and I'll write you a 'note'
- 274 replies
-
- 1
-
-
- Santa Maria
- Artesania Latina
- (and 2 more)
-
Jack, I've been following your Bluenose 1:100 build from the beginning with great interest. You're Bluenose looks great and your sails are looking super! I was just about to start working on the masts / rigging on my Bluenose 1:100 when a mini disaster struck. Currently, my Bluenose is in dry dock while I rework the windlass parts that were lost / broken. Looking forward to seeing your Bluenose under full sail! Your build log is a fabulous resource! Dee Dee