Dee_Dee
-
Posts
290 -
Joined
Content Type
Profiles
Forums
Gallery
Events
Everything posted by Dee_Dee
-
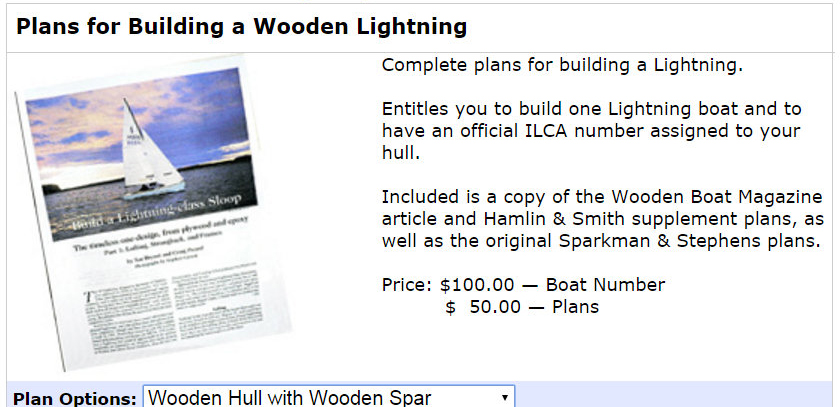
No, I'm referring to plans to build a new lightning.

-
Builders like Sparkman & Stephens charge a premium for their plans. You can buy the plans only (no hull number) directly from the ILCA for $50. FWIW, there's a lot of info and photos on the web to draw your own plans.
-
Many years ago we owned a lightning sailboat. While I don't remember the hull number, it was in the mid 5,000 and was built in the mid 1950's. We moved it up to Madison, WI in the mid 70's, then my sister took it out to the San Francisco Bay in 1979. She sold it in the mid 80's. A four digit hull number was extremely rare in the bay area and she sold it for 3-4 times more than what we originally paid for it. The entire deck was covered with a painted canvas like material and tacked down with a 1" half round even with the deck height and nailed on the sides of the hull. This canvas had to be replaced every few years. I don't remember ever seeing a Lightning with a natural deck. I'm thinking a natural finished deck would bee a bit to slick to stand on to set the spinnaker. Actually, the rigging on the Dumas model is very close to the real boat! -A wood mast was ~3" x 5" rectangle and tapered slightly and had a jumper strut and spreader -Almost all main sails have 'windows' in the mainsail. -There were turnbuckles located at the deck on the upper and lower shrouds -The back stay was fixed, there was a way to take up any slack with the jib stay -The mast rake was set using a series of 'T' shaped blocks- in the mast shoe / step in the bottom of the hull and on the deck -There were floorboards in the cockpit, these varied in designed by builder. -Seat designs varied, from one solid bench on each side, to u-shaped, full circular slats or grating benches, made from mahogany, cedar or teak. -The cockpit was completely open under the fore and aft decks -The main sail was attached with clips that slid on a track attached to the mast and boom. The part of the rigging that has changed significantly over the years is the main sheet and travelers. Our Lightning had a very simple main sheet that was fixed with a cam cleat off the centerboard trunk. The main sheet went through two small (1.5") fixed pulley blocks on the aft deck that acted as the traveler. These pulleys changed to thread through the deck with the pulleys on the underside and the newer fiberglass Lightning's have high tech rigging. Cam cleats were also used on the jib sheets. What I remember most about our Lightning was the rudder. It was solid mahogany with a high gloss varnish finish and needed to be refinished every winter. It was stored in a custom made quilted canvas bag. When you decide what year your Lightning was built, you can find hundreds of photos on the web showing how the main sheet / traveler were rigged.
-
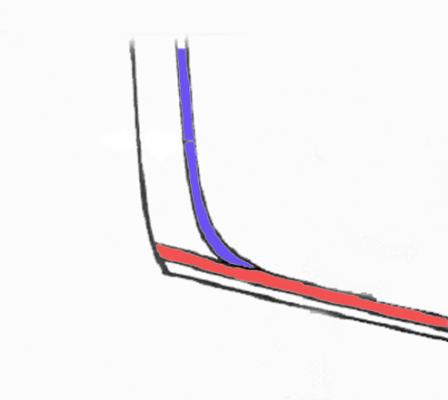
This turn is possible to do, but it's a pain. Suggested alternative to the print, gives the exact same results. The red runs the length of the hull. Add a separate piece to run across the transom. This is closer to how it actually would have been built.
- 52 replies
-
- 2
-

-
- muscongus bay lobster smack
- Midwest Products
- (and 2 more)
-
Greg, This discrepancy is due to the 'camber' in the deck. The deck is higher in the middle and lower on the sides, to allow splash water to drain off the sides. Midwest kits are tried and true, so there should be no need to adjust any of the precut parts. Dee Dee
- 52 replies
-
- 1
-
-
- muscongus bay lobster smack
- Midwest Products
- (and 2 more)
-
Dennis, I've been following your Andrea Gail build from the beginning and it's fabulous! I don't want this build to end! Patrick, Borges' Dragon build log is also one of my favorite build logs and I too hope he will finish it. I have the Corel Dragone kit on the shelf; it's half the size of the Billings kit and may be friendlier to your space constraints (14" long x 20" tall.) The wood is nice and comes with a lot of specialty brass hardware. PM me if you have questions about this kit. http://www.cornwallmodelboats.co.uk/acatalog/corel_dragon.html Dee Dee
- 956 replies
-
- 3
-
-
- andrea gail
- trawler
- (and 1 more)
-
Don't blame the kitty! It was the dogs, in the library with the candle sticks
-
If you glue the mast into the mast step, you have only one chance to get it perfectly straight. For that reason, many builders prefer not to glue the mast into the mast step, instead the mast is held in place by the rigging.
-
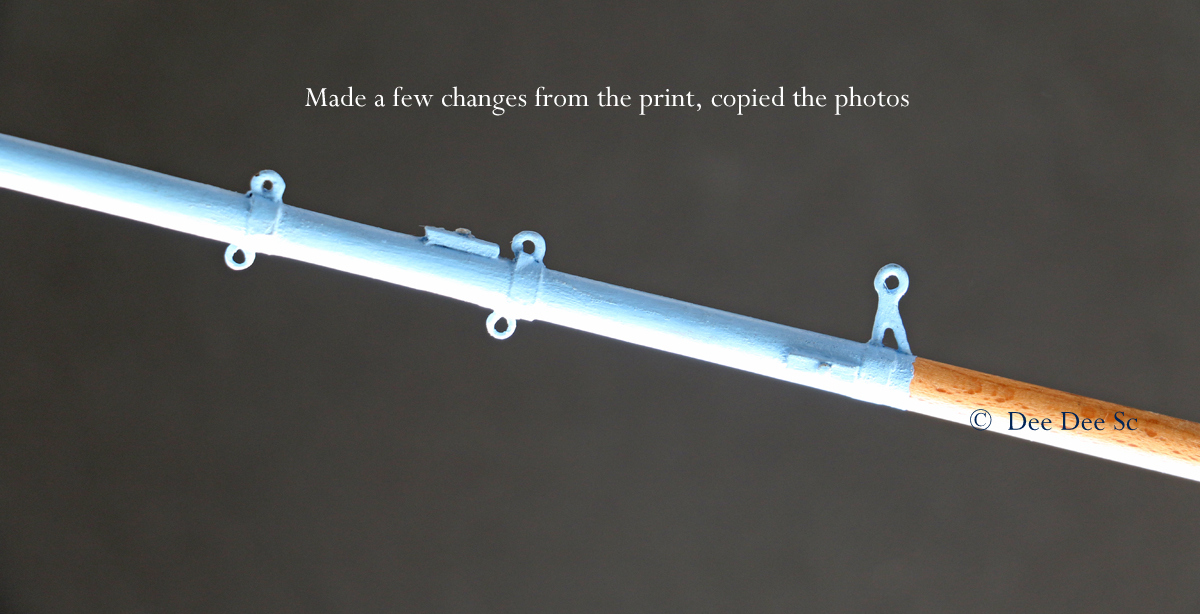
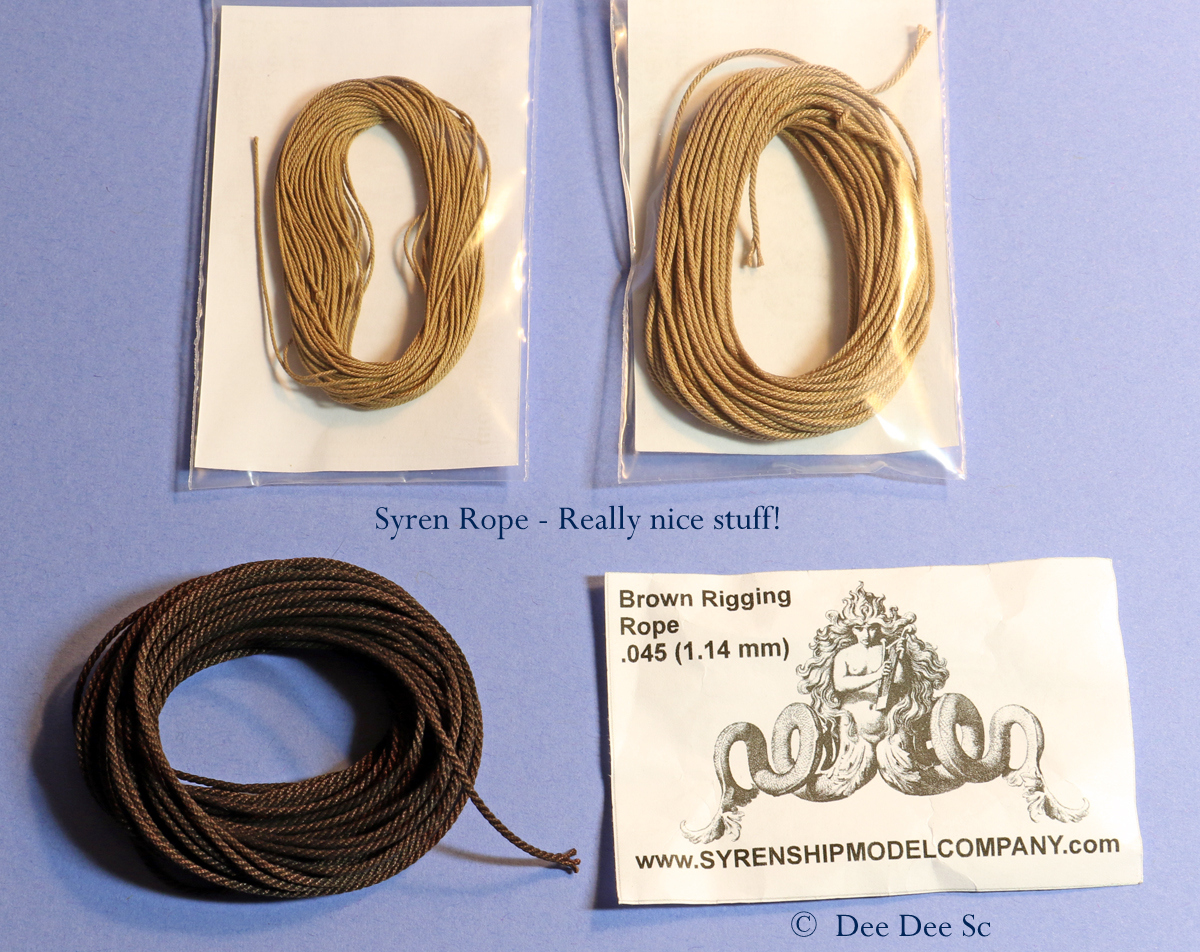
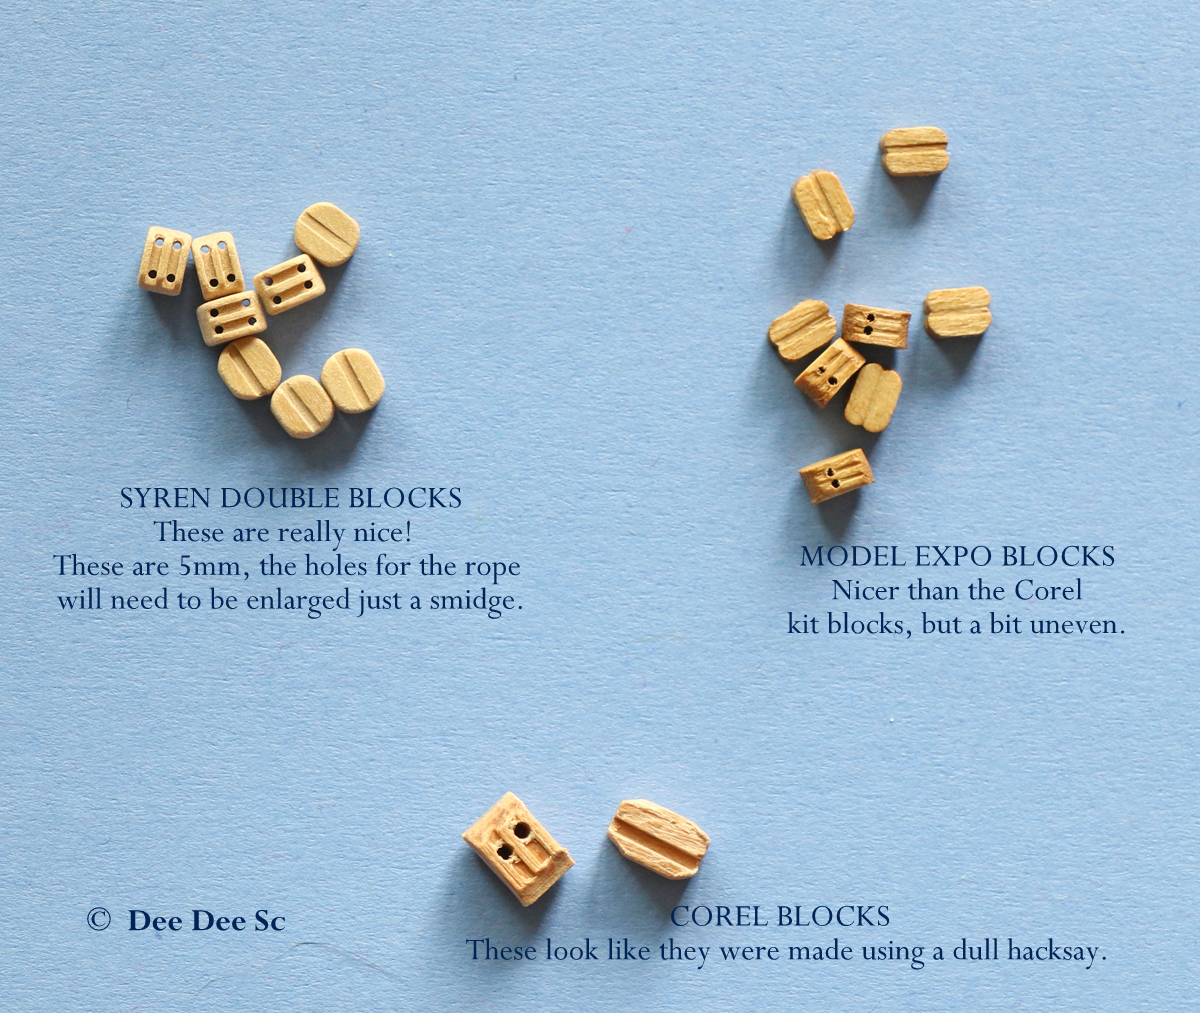
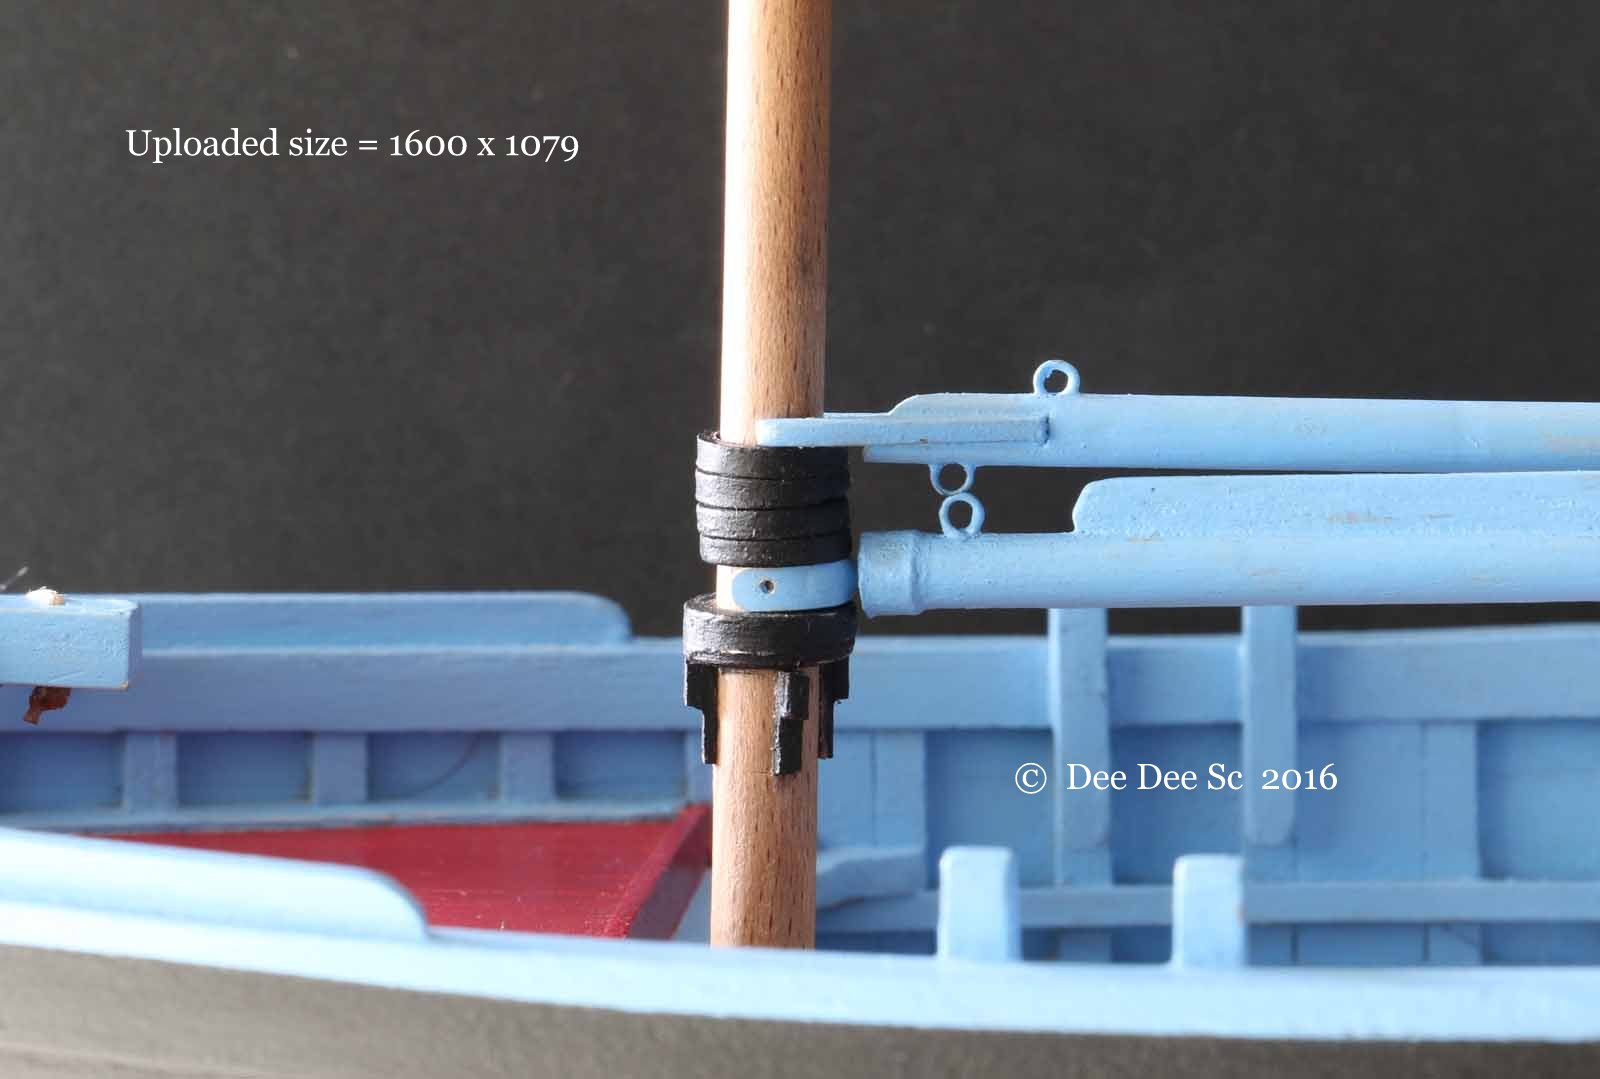
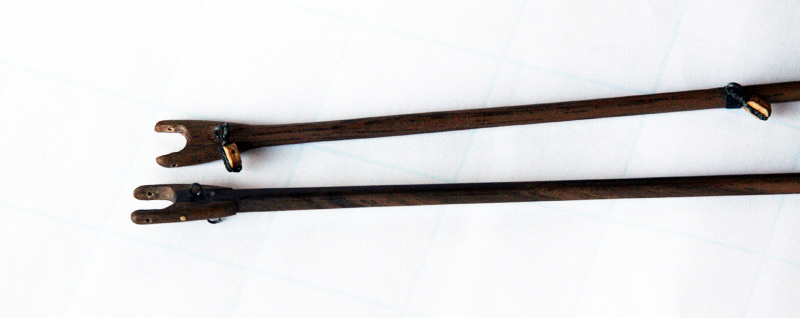
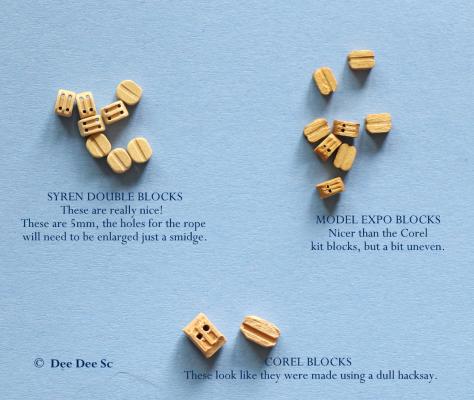
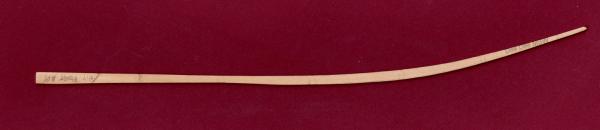
Things are moving along here at Glacial Boat Works. I've learned a lot building this small humble work boat. My method of planking is similar to how Chuck P is planking his Cutter Cheerfull. Chuck P posted a 'tutorial' on planking which I highly suggest checking it out. Also, read through all of the following questions, lots of good questions and answers there! http://modelshipworld.com/index.php/topic/8131-hm-cutter-cheerful-1806-148-scale-by-chuck/page-22#entry292745 New parts! I turned the mast from a square blank last October when it was still warm outside (this was really messy!) But it had lots of fittings that needed to be made and added, So I started at the bottom and worked my way up to the top! The blue prints are a bit vague on how the boom is connected to the mast. Instead, I followed the online photos and made an iron yoke and painted it light blue. I'm holding off drilling the holes for lacing the main sail, these holes need to line up perfectly with the seams on the sail. The gaff is close to print, but I omitted the pivoting block. I really need a drill press to get all the parts to align. I could 'fake it', but it would look fake. After investing this much time and effort, I wanted to rig using better quality rope and blocks and ordered replacement rope and blocks from Syren. The rope is great, I mean super fabulous great. However, based purely on economics, I need to seriously think about investing in a rope making machine, also a serving machine. Check out the difference in the blocks, the kit blocks, ME blocks and Syren blocks. Corel deadeyes are really nice and I will use those. Next up is making the sails. The kit sails, well, maybe they will make nice dust rags. (If anyone wants these, send me a pm.) I need to make a run to Vogue Fabric store in Evanston, one of the finest fabric stores in the country. I'll be looking for fabric for my sails. Along with the fine threads and other notions needed to finish off the seams and edges. These will be my first sails. I used to sew all of my own clothes, so I'm going to experiment with various techniques. I have some very fine thread, 0.06mm / 0.0025" which will be interesting to try sewing with. I'm also going to experiment with making sails from tissue paper, similar to how Wefalck made sails for his Zuiderzee botter. Wefalck's Zuiderzee botter build is one of my favorite builds. Check out Wefalck's sails here: http://modelshipworld.com/index.php/topic/68-zuiderzee-botter-by-wefalck-artitec-resin/page-2#entry47886 Maybe, just maybe I'll finish this model this month - or next month! Thanks for stopping by and taking the time to read my update. Dee Dee Edited to add second, close up photo of Syren blocks Edited to test photo upload compression. Shakes head.........


-
Chuck, I plank my hulls similar to how you described and have a couple of questions about the edge beveling: Do you bevel both edges or just one edge of the plank? How do you determine the angle of the beveling? Do you have a way to measure the angle and then bisect the angle? Or other? Thanks, Dee Dee

-
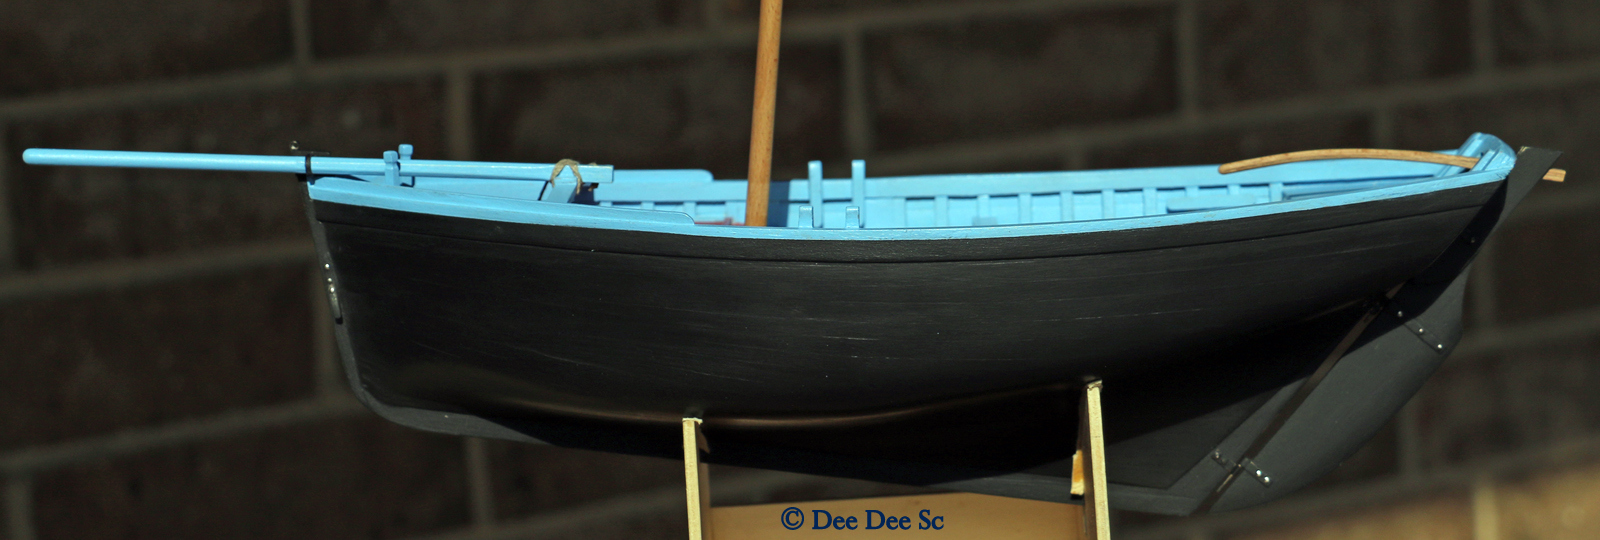
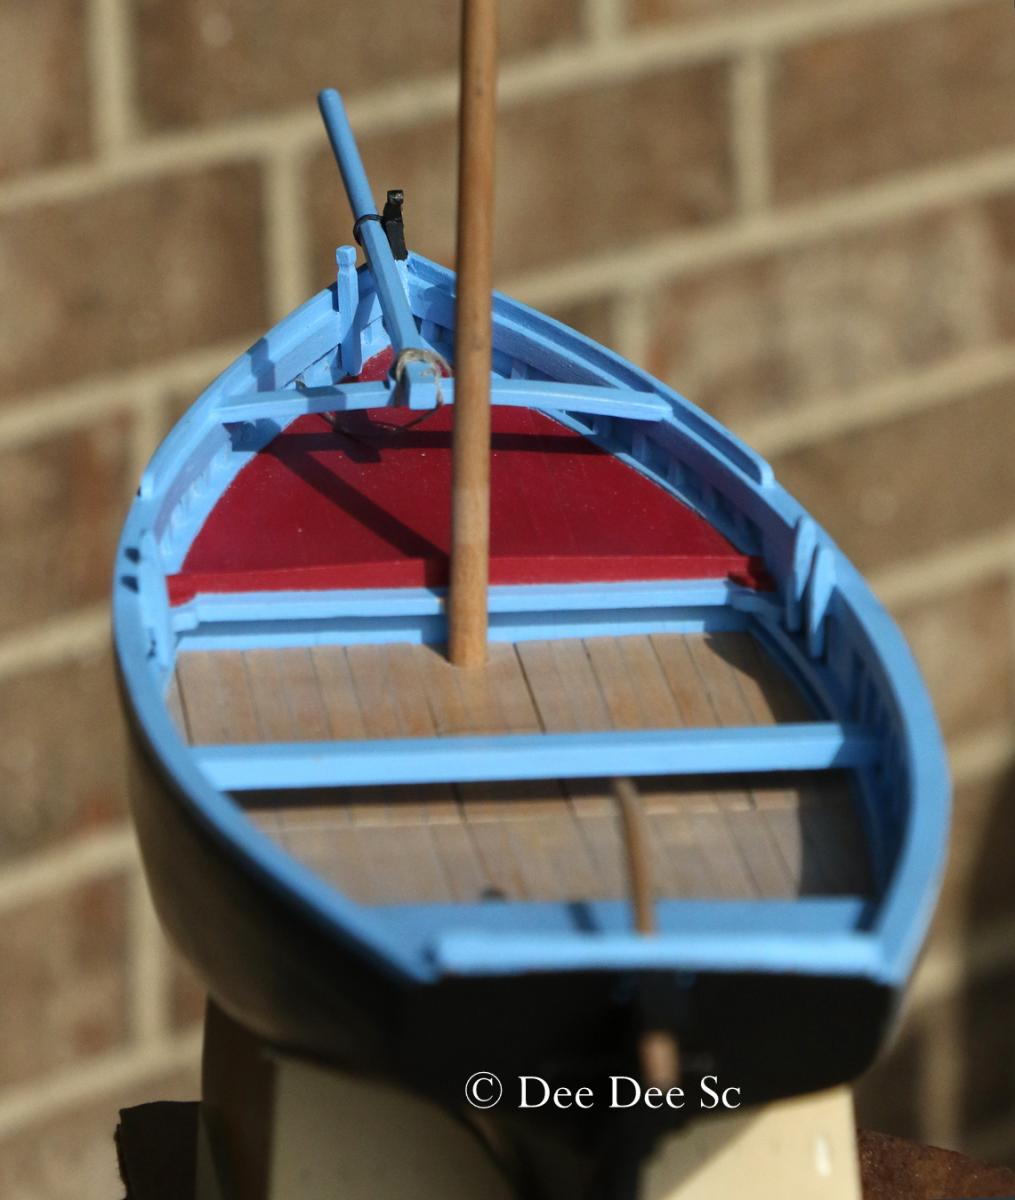
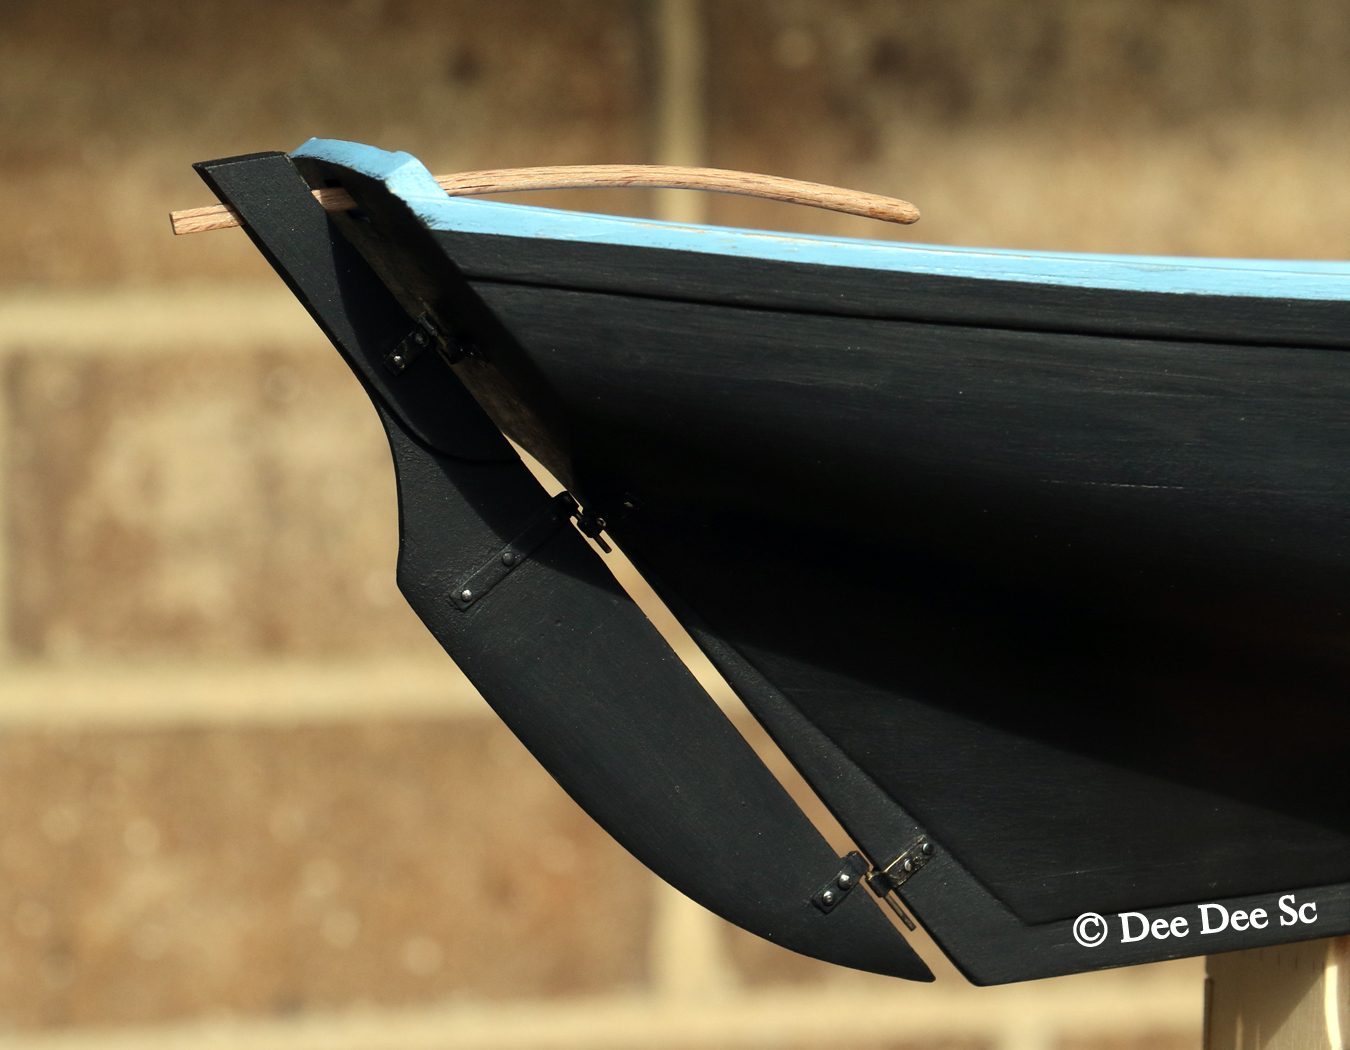
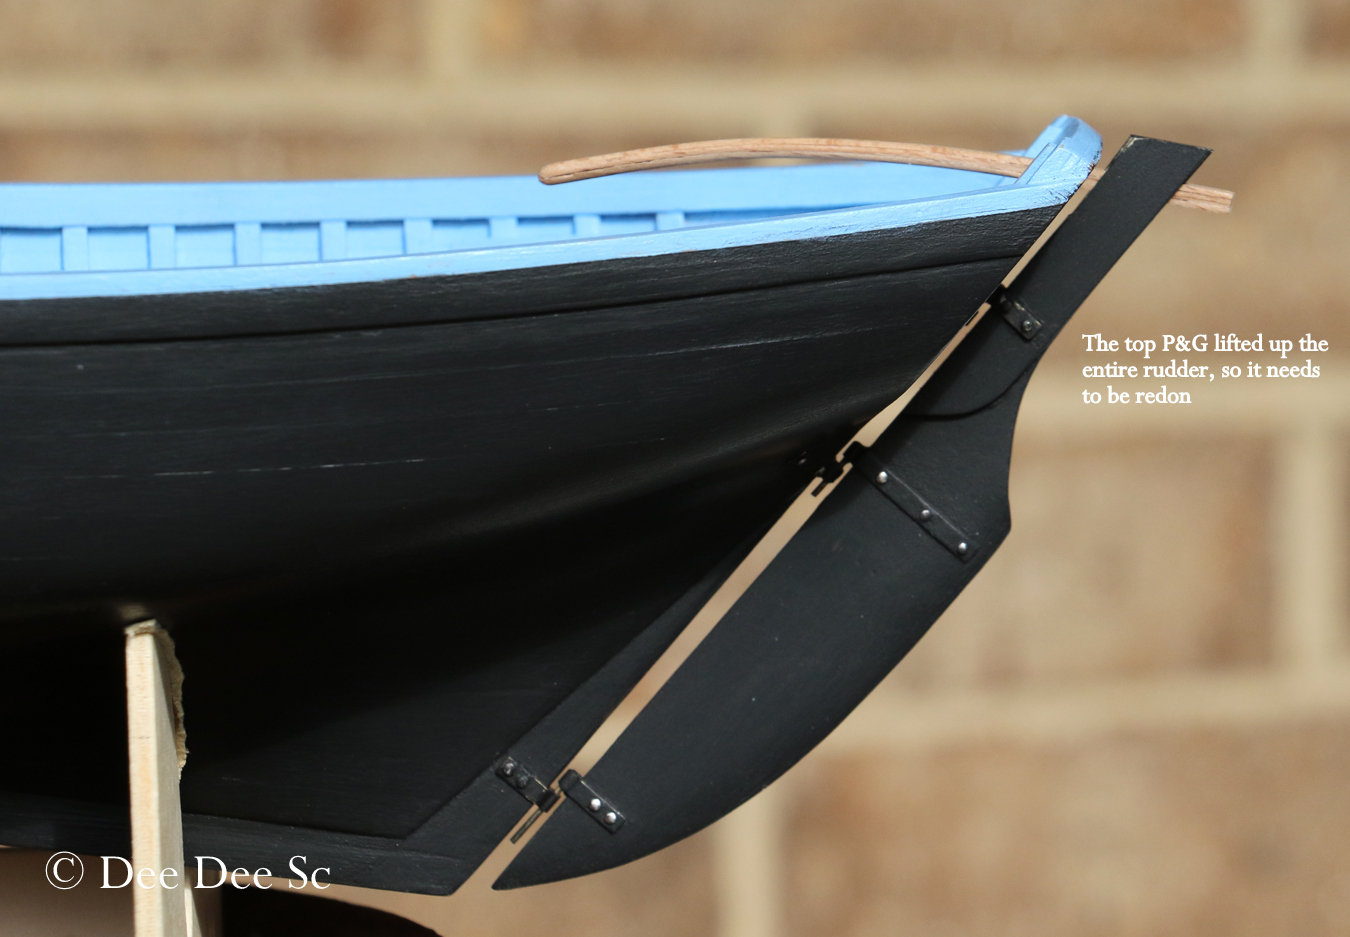
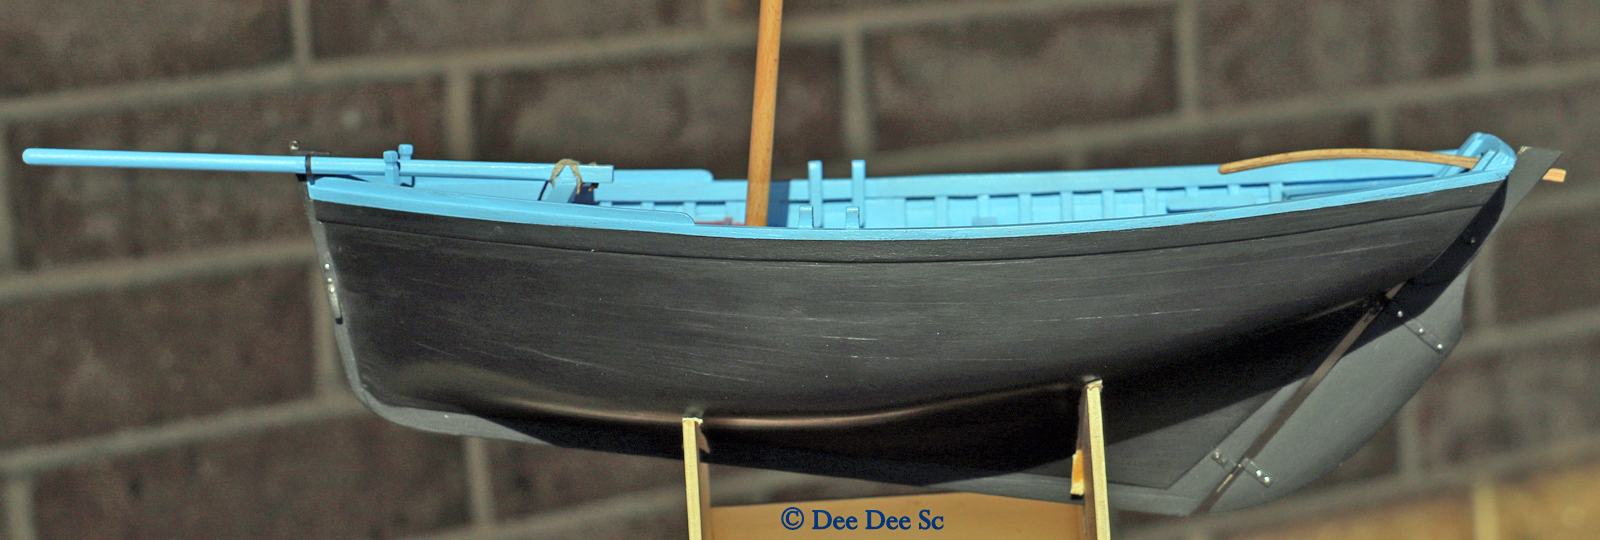
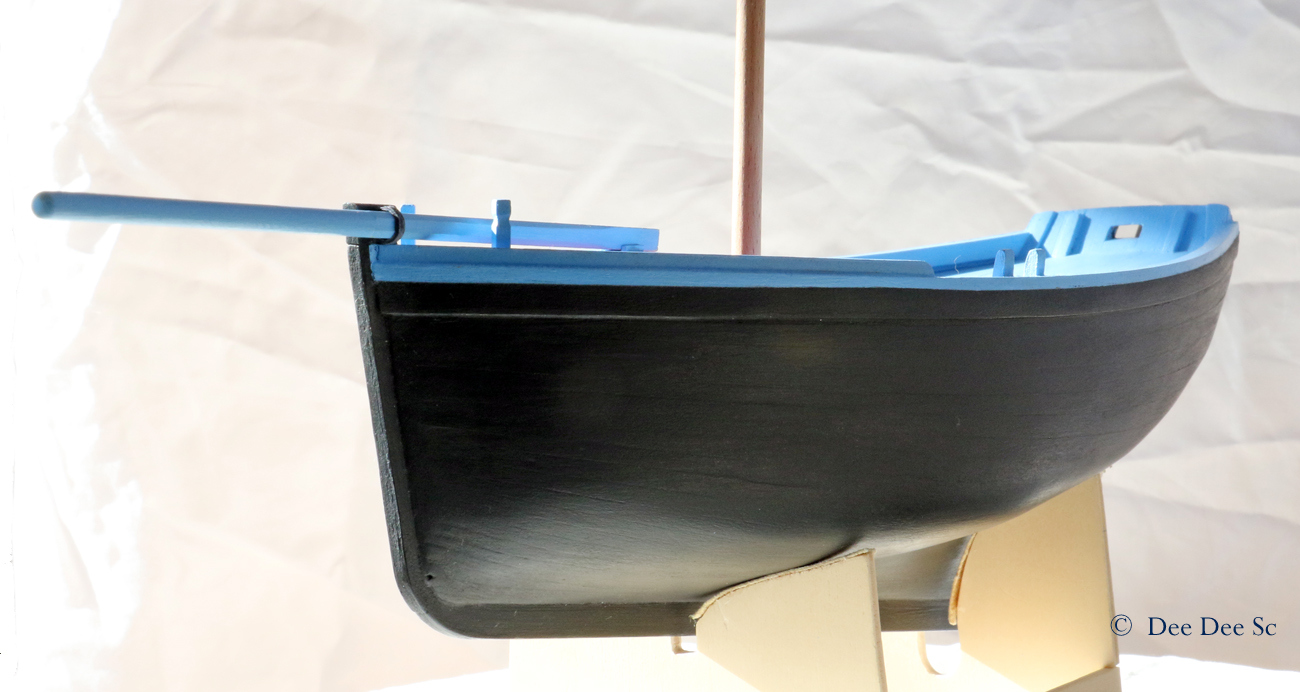
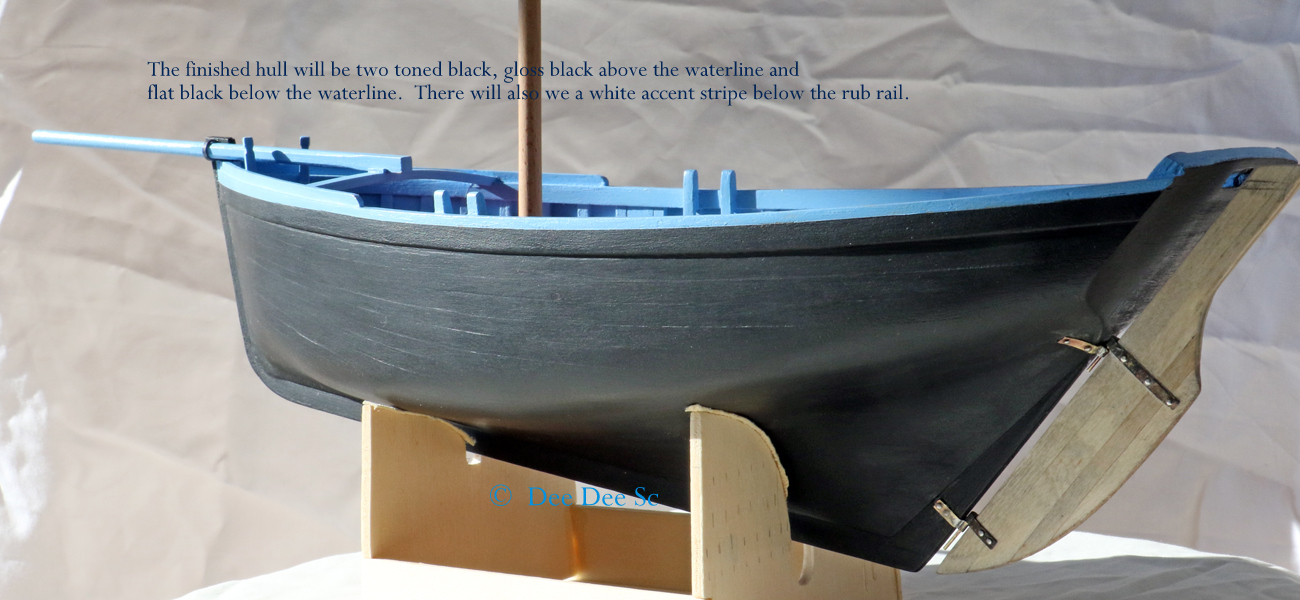
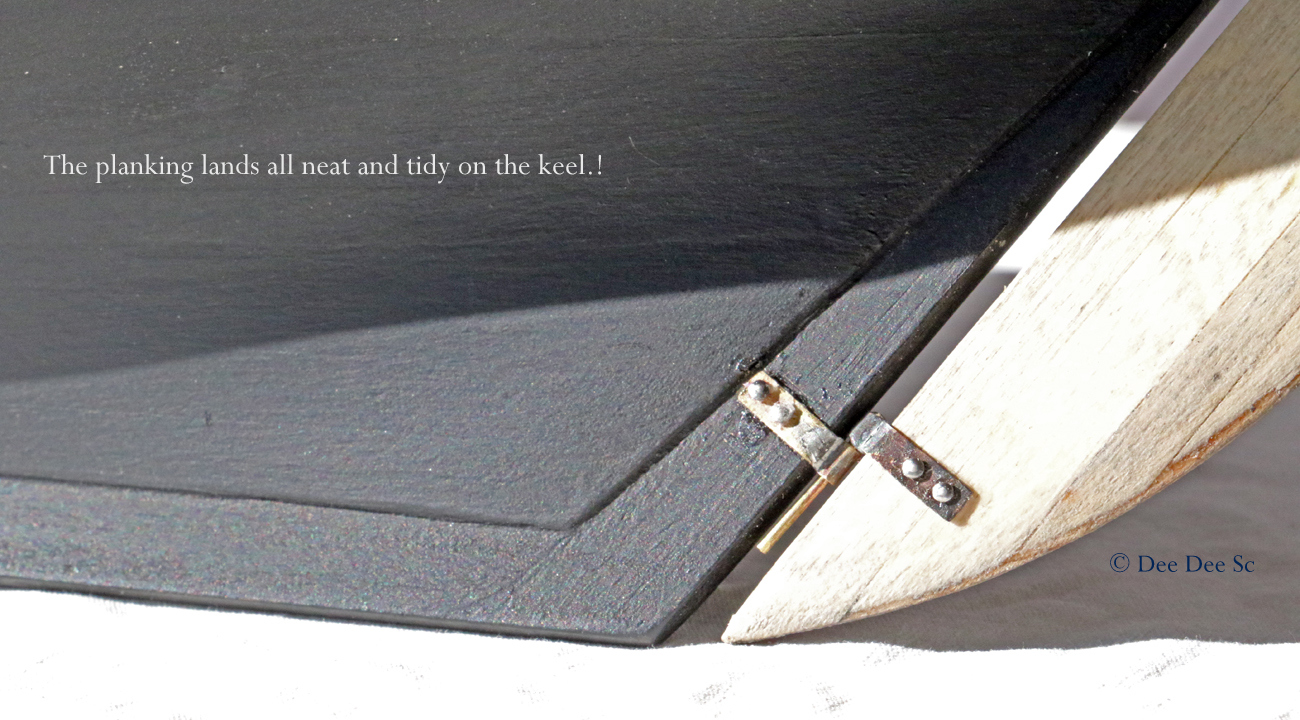
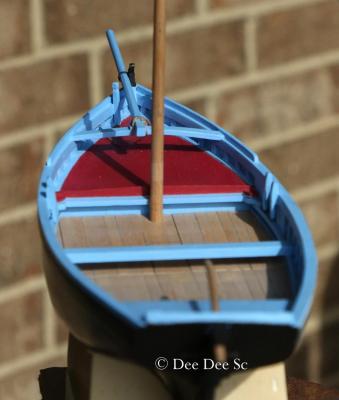
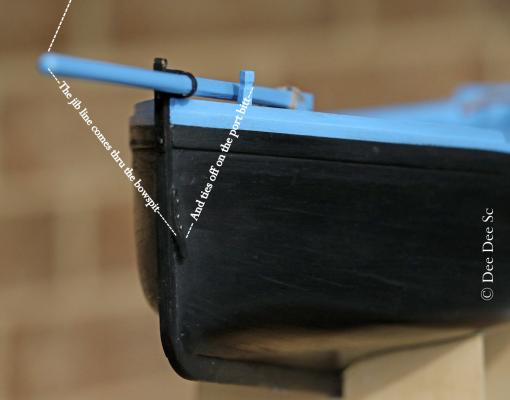
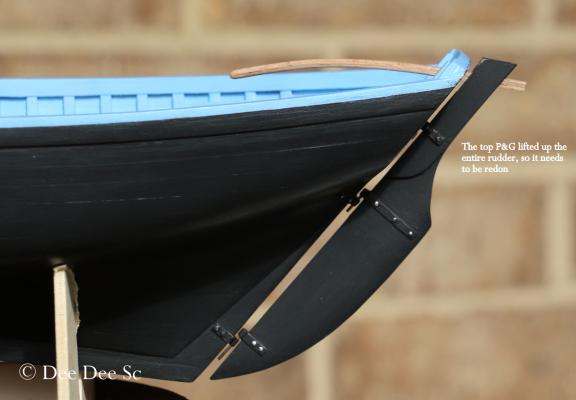
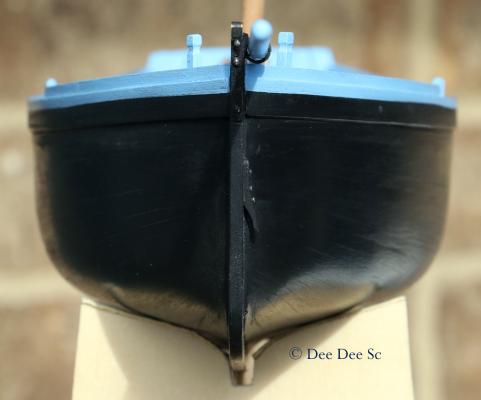
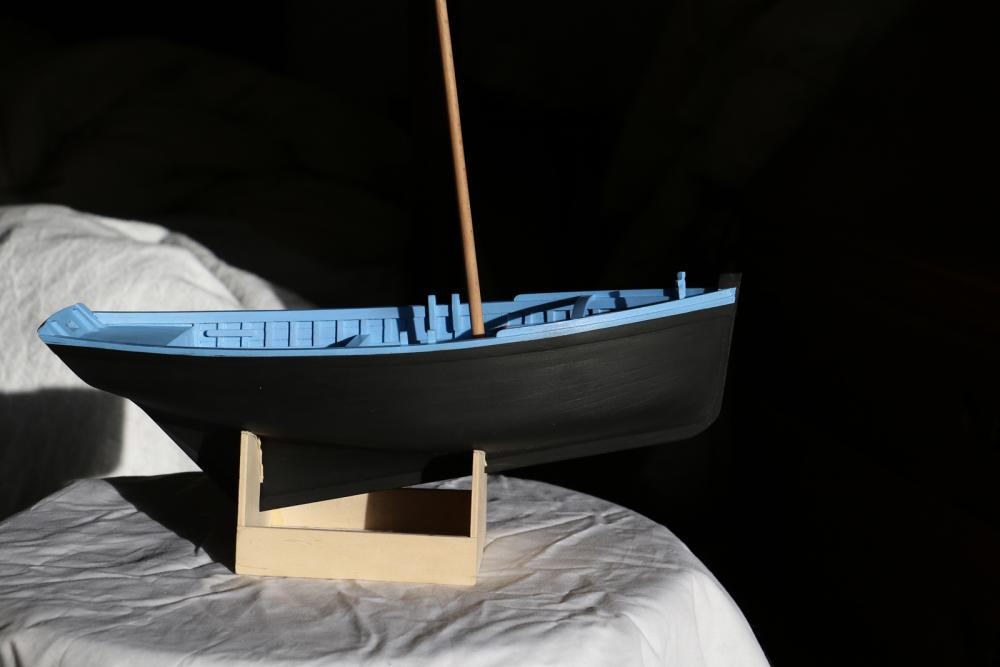
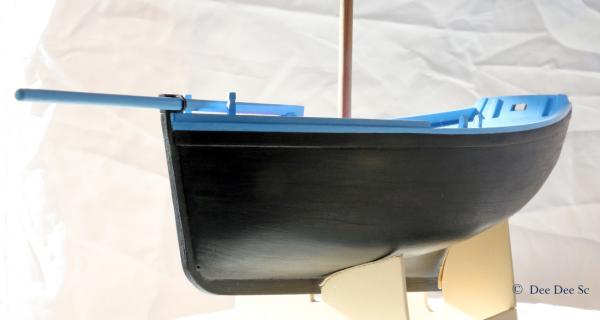
The hull is finished and I'm doing the happy dance! Well, almost done..... The gloss coat above the water line still needs to be added, but most likely the paint will get a bit nicked / scuffed up while working on the rigging, so I'll wait. In general, I like it! Yes, it could be better, but that's OK, I learned a lot of skills that will carry forward to my next build. Here you can see the bow stem and the cleat for the jib line. This cleat is a fixture on small and large coquilliers. Check out the photo in the October 20, 2014 post, (post #51) for more info about this cleat. Some of the paint has worn off of the stops on the bow thwart. I want the finished model to look like a real working boat, so I think I'll leave it as is. And finally, a couple of photo's of the rudder. When I put on the third / top set of P&G's, it's not aligned with the other two sets and is pulling the rudder up, as can be seen. I'm definitely not happy with this and I need to rework these. The tiller is not attached and will most likely be one of the last parts to be permanently added. Up next is adding all the fiddly bits and bobs for the rigging. The mast has already been turned from a square blank, but now I need to add all of the little bits to it. The Corel instructions are less than logical, so I came up with my game plan. It's supposed to get chilly this weekend, so maybe I'll make some progress. Thank you for taking the time to stop by and read my build log. Dee Dee


-
Congrats Jesse!! She looks fabulous! Dee Dee
- 607 replies
-
- 3
-
-
- scottish maid
- artesania latina
- (and 1 more)
-
Bob, I've steamed 1/32" x 3/16" walnut that needed edge bending in the microwave. Since these need to 'cook' a bit longer, the strips were wrapped in paper towels and then put into a 9" x 12" casserole dish with a quarter to half inch of additional water (to prevent 'cooking' the microwave.) Microwave on high for three minutes, let it sit in the microwave for five minutes, added more water if needed and cook on high for another three minutes. Handle with care. Dee Dee
-
Piet, The rigging looks great and I love how you displayed our flag......Your MBLS looks fabulous! Dee Dee
- 176 replies
-
- 1
-
-
- muscongus bay lobster smack
- Midwest Products
- (and 1 more)
-
Jack, Thank you for stopping by. I'm happy to see you back in your boat yard! Your Mother is a wise woman. I'm in no hurry to build, so I'll continue to build at my glacial pace. God grant me patience and I wanted it 20 minutes ago........ Eamonn, Your Ballahoo is lovely and should take pride of place! Let me know what you found for the brass. I updated my last post with a photo of the cleaned up P&G's and added link to EdT's Young America build log and how Ed made his P & G's. Nils, Thanks for stopping by! I enjoy reading your build logs and have learned a lot from them. Canute, Thanks for stopping by and following my build! My avatar is my cat "Tuxedo". 'Tux' has a white bib and stomach and four white spats. He has a white moustache, one side is ala 'Clark Gable / Rhett Butler' and the other side is ala Groucho Marks. Yep, Tuxedo is a romantic comedienne. Steve, Thank you for stopping by! This kit hull was supposed to be double planked, but I challenged myself to build it with only one layer of planking. It was a challenge, but I took my time to make sure every plank was sized to fit. I've been fortunate to find numerous photos online of the Shepherdess from Domremy to base my build on. It's a lot of fun making all the changes and having a 'model' for my model. Mike, Thanks for stopping by! YEAH!!!! Another Sloup build! I'm doing the happy dance! At 1:12.5, you will have lots of room to add detail! The sharp turn in the hull is what made this hull a challenge to single plank. If I were to redo the planking again, I would make two adjustments to my planking process: Bevel both the top and bottom of all planks Starting with the 4th or 5th plank, heat set the edge bending. Here's a photo of the 17th port side plank after I did the edge bending. This plank was a breeze to add. Mike, you'll do fine with the planking and I'm looking forward to following your Sloup build. ~~~~~~~ I'm continuing to work on all of the little fiddly parts, I have a list of 15 items to do before I can start working on the rigging. Hopefully I can get these done in a couple / few weeks and start working on the rigging. Thank You to all who stopped by and the likes. Dee Dee
-
Bob Your Friendship Sloop is looking great! For the vinyl covered mattress, I have a couple of ideas: Cut styrene to shape, carve a little surface texture, rolled contour and slightly rounded corners and then paint with the desired color. Detail on the styrene can also be added by adding a layer or two of fine cotton fabric in the desired color. Instead of gluing the fabric onto the styrene or wood mattress, saturate the fabric with polyurethane. When dry, sand the fabric to get the final texture desired. You may need to sand / poly / sand / poly a few times to get the desired texture. If you don't have styrene, brown paper bags cut to shape, layered up and also glued with polyurethane, and finished off painted in desired color. Or, use a blue and black Sharpie Marker on the brown paper bag before adding the polyurethane. If you want to stay with vinyl, stop by the local high end bicycle shop that carries road bicycles and ask them if they have any light weight butyl tubes that you can have a section of. The rubber on these lightweight tubes is less than 1mm thick and the tube is about 1" wide with some texture lines on it. . I checked the bicycle shops in your area and Ironclad Bicycles, 710 White Spar, Prescott appears to be the only shop that carries road bikes. Dee Dee
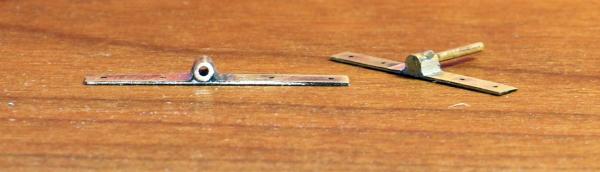
-
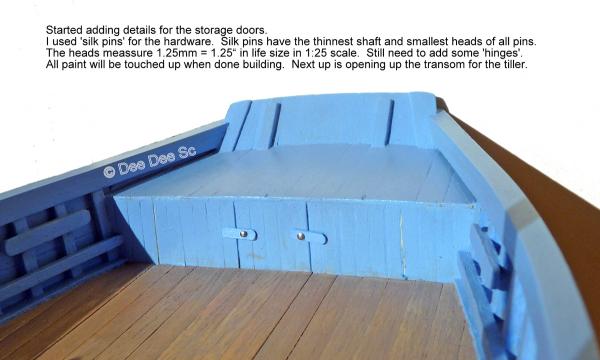
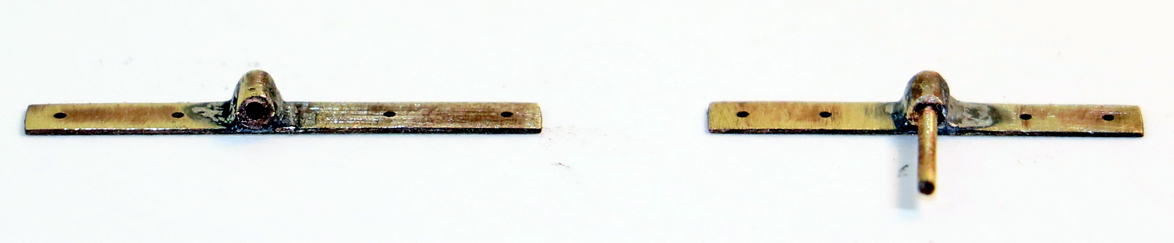
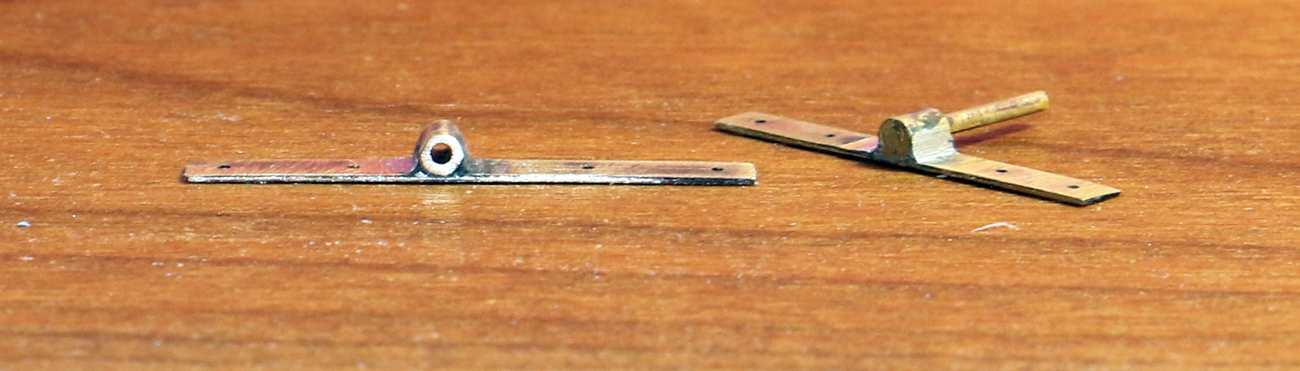
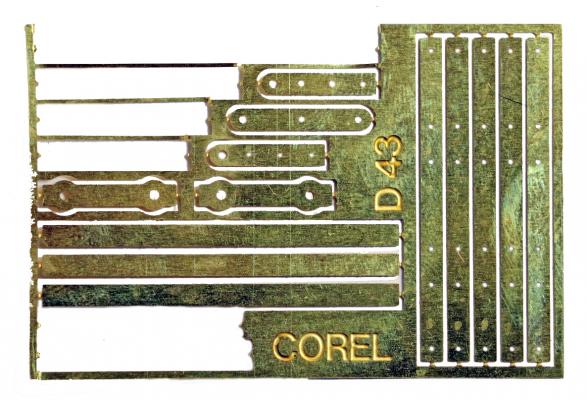
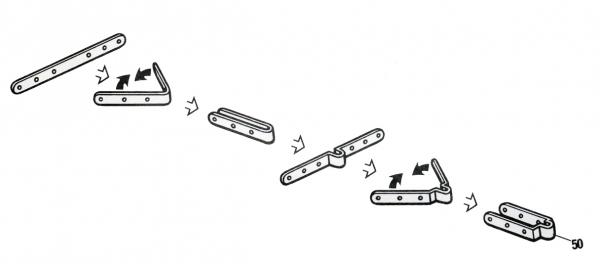
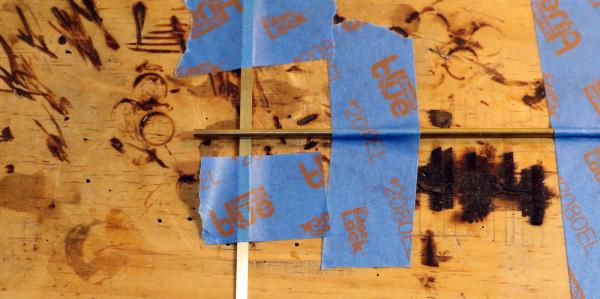
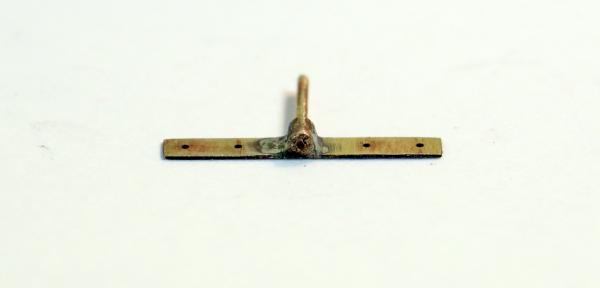
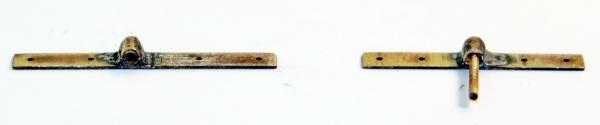
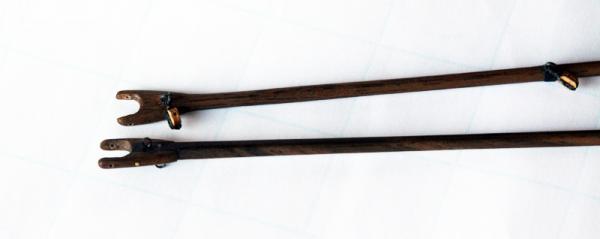
Bob, Thank you Bob. I spend a lot of time reading build logs, they contain a fountain of information. At times it's frustrating that I'm not progressing faster, but ah yes Grasshopper............. Eamon, I love your Ballahoo! So step away from the bin.......... These gudgeons and pintles were made different from the prints. The kit came with a sheet of photo etched parts. The sheet of brass is 0.32mm / 0.0130" thick. This is how the prints wants the P& G's made - NOT! going to happen I saw on another build log, where instead of making the 'loop' in the middle, the builder soldered on a piece of brass tubing. The key was to make sure the tubing was 90* to the strip, so I used a log piece of tubing and a lot of tape. This photo is a mock up (with oversized tubing / strip) on how I set up the soldering. The example I saw used silver / hard solder. I used an iron and put down a big GLOB of solder to make sure I had a good bond. I used brass tubing with an OD of 1.57mm / 0.620". After soldering, I cleaned up the excess with files and they turned out like this. (The one on the right needs a bit more filing / cleaning up.) EDIT: I did a bit more filing / clean up to the 3rd set of P & G's and I've added another photo to show how these cleaned up. One of my favorite build logs to follow is Ed's / Edt's 'Young America' scratch build. Ed's work is stunning. The day after I posted this info, Ed posted a similar way to make the P & G's. Check out Ed's post here: http://modelshipworld.com/index.php/topic/3453-young-america-by-edt-extreme-clipper-1853/page-79#entry281895 Here is the original photo of the 3rd set of P & G's Here are the P & G's after being cleaned up For the 'pin' I used brass rod that measured 0.80mm / 0.320", it's a perfect fit with the tubing and I glued it in with thick CA glue. The head on all of the nails I have are too big to use and look clunky. Instead, I use 'Silk pins', specialty pins made specifically for sewing with silk. The pin shaft and head are almost 20% smaller look much better. Brass Kit nails head size 1.60mm "Silk pins" head size 1.30mm I glued the g's onto the rudder / stern post first and then I added the nails. Most of the nails were very short and I lost a lot of them! Again, thanks for stopping by and the 'likes'. Dee Dee Edited 1/29/30 to change out and add photos, see info added in blue.
-
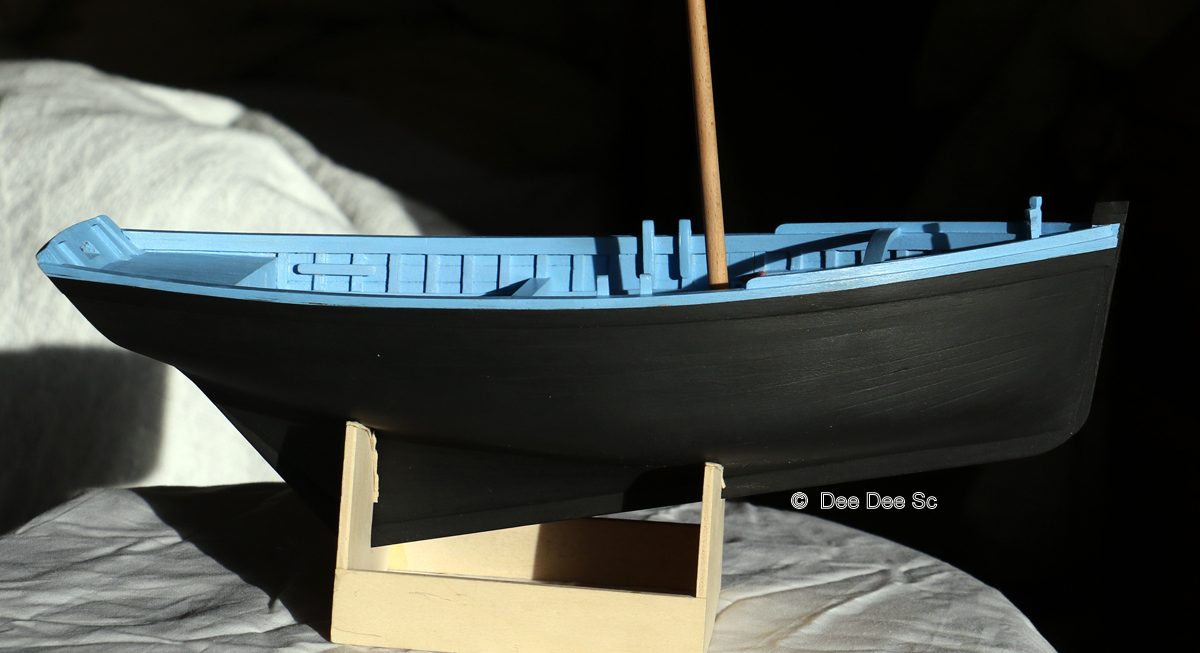
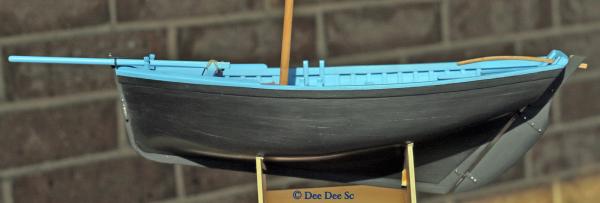
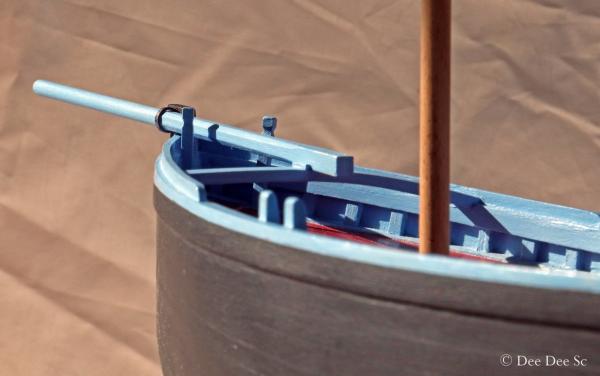
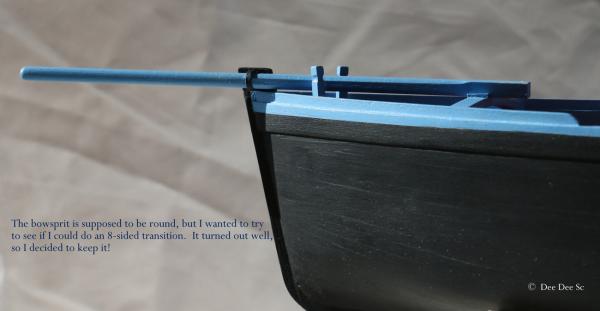
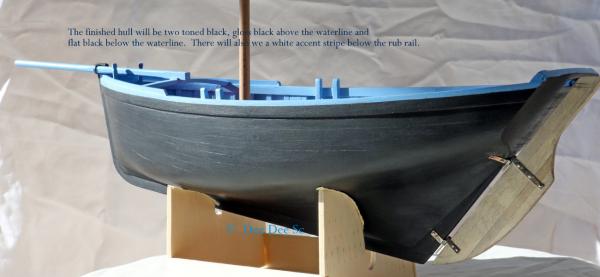
My build is moving along at a glacial pace. Primarily because I take my time to think things through and figure out how it's all going to fit together. As I gain experience, maybe my pace will approach the speed of grass growing. ~~~~~~~~~~~ The hull is painted! I really don't like painting, but it's a skill I need to learn. Paint will either showcase your planking or hide your planking. I like the way my planking turned out, so I want to be able to see planking through the paint. Back in post #52 I lopped off a bit of the hull / keel so I could add a stern post. It was a scary move, but I had thought it through and this is how it turned out! I like it. Figuring out how to build the rudder / tiller and when to add the hardware took some time. The tiller is removable so the rudder can be installed. Before I could add the bowsprit, I had to build up the bow stem. This is another item that should have been done on page one. I did my best and it's a bit off. But with the bowsprit, it's not as visible. I couldn't find the walnut square that I was planning to use for the bowsprit, so I glued up a blank from four pieces. The bowsprit is supposed to be unpainted, but decided to paint it to hide the glue seams. The aft most section is square and rests on the bow thwart between two stops. These two stops were a pain. The first wood I used didn't like to be glued and broke off AFTER I finished retouching the paint! I keep on finding more and more little detailed parts that need to be added. My rolling TO DO list has 25 items and none are related to the rigging! The kit rigging is overly simplified using only single blocks. On the Shepherdess from Domremy, half of the blocks are double blocks and I think there's one or two triple blocks. So, I need to draw / diagram the actual rigging plan and determine how many blocks and how much line I'll need and order from Syren. As always, thanks for stopping by. Dee Dee (Edited to fix photos)


-
Piet, Your MBLS is looking fantastic! I love the green color. Here's a photo and some info to help you with attaching the boom and gaff. Dee Dee
- 176 replies
-
- 5
-
-
- muscongus bay lobster smack
- Midwest Products
- (and 1 more)
-
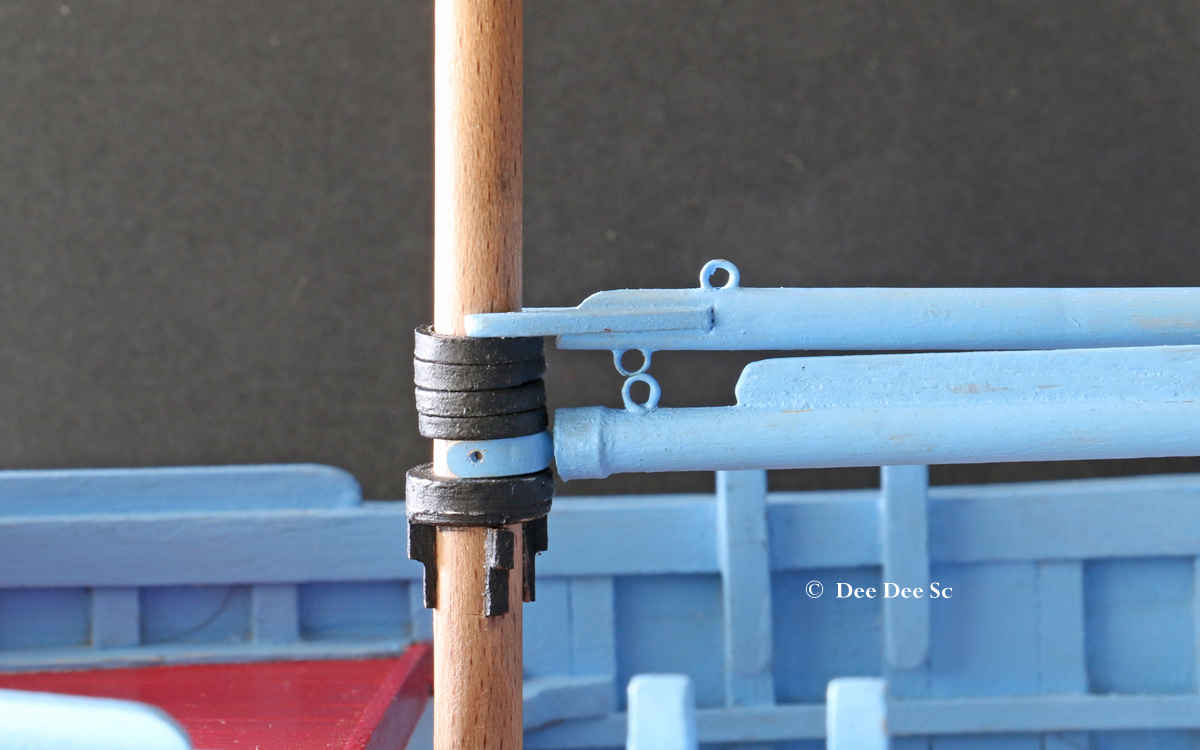
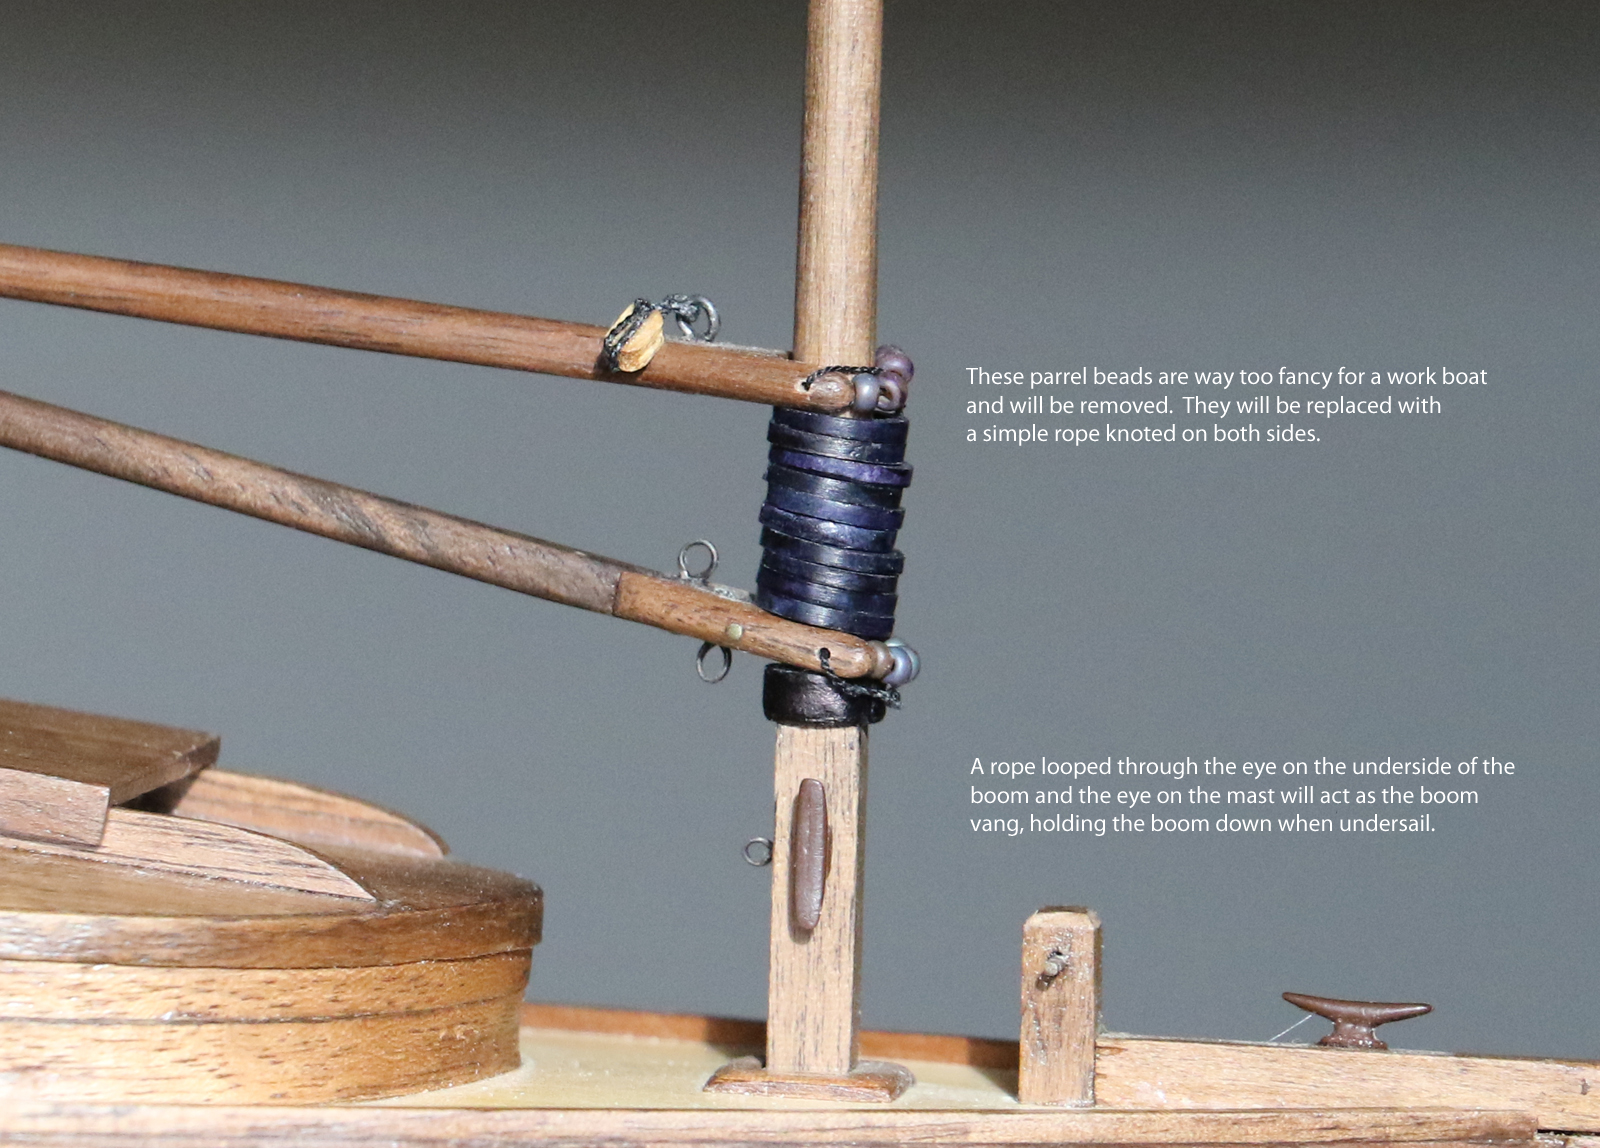
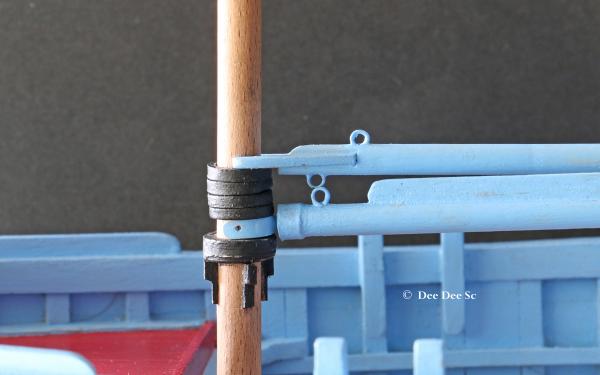
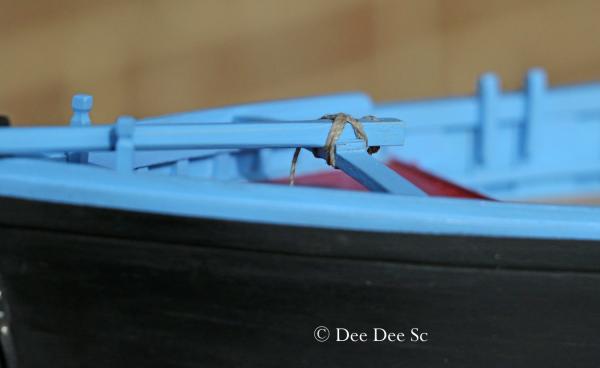
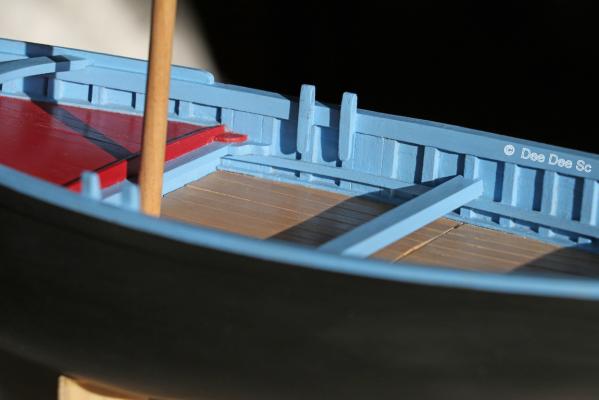
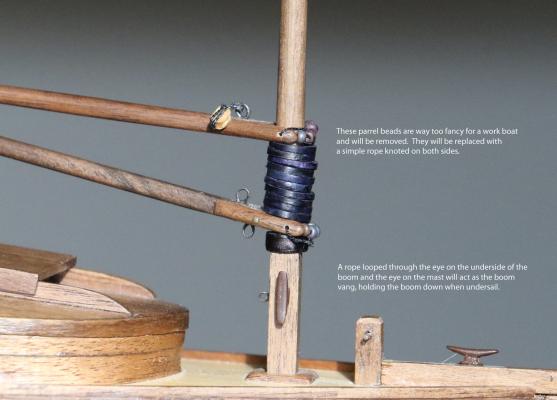
Piet, Your MBLS is coming along very nicely. The boom / mast connection as described by the Midwest plan is 'fiction'. In real life, it appears the boom was connected to the mast with a yoke, the same as the gaff. Below is a photo from my build log showing the yoke on the boom and gaff. Also, the boom was held down by a rope that ran between an eye bolt on the bottom side of the boom and a eye bolt that was added to the mast, about 12" below the boom. Dee Dee
- 176 replies
-
- 4
-
-
- muscongus bay lobster smack
- Midwest Products
- (and 1 more)
-
Matti, Hope you are doing well in the New Year! Your Wasa build is inspiring and Thank You for sharing! Dee Dee
-
Jim, At first it sounds like 'Great Stuff' would be an excellent option for filler blocks. However, I think it may cause more issues than it solves. When Great stuff cures, it expands to fill the space available. My main concern is the false frames and bulkheads might be 'pushed out of alignment' when 'Great Stuff' cures. Also, will glue bond to it? I've made filler blocks by filling in the space with smaller pieces of balsa wood and then sanding it down. Filler blocks don't need to be pretty, they just need to be functional. Dee Dee
-
Jesse, You did a great job building your peapod and it looks fabulous! Dee Dee
- 33 replies
-
- 1
-
-
- finished
- midwest products
- (and 1 more)
-
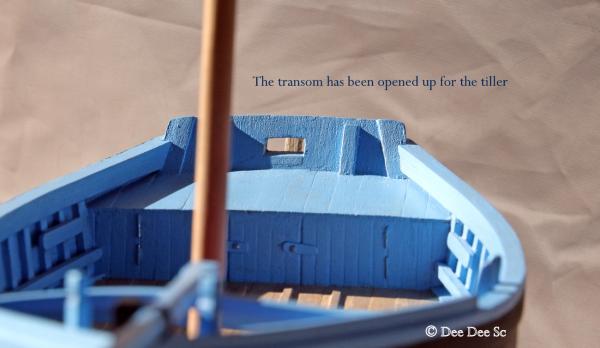
This update is a bit overdue. I've been waiting over two weeks for a sunny day to take photos. The last sunny day was three weeks ago, lasted about 30 minutes and I was on my way to a race. The next forecast for sun is next Sunday - SURPRISE! We had sun this morning! SURPRISE! My camera pooped out this morning while taking photos! The mirror got hung up while taking photos and I'm getting error message. I can't complain, I've been using this camera a lot for eight years, took well over 100,000 photos and never a problem. But I did get a few good pics before it pooped out and also took some with my little point and shoot to finally do this update! Bye - Bye Mr. Sun! Hope to see you again soon! ~~~~ Cap rail are done! After I added the last interior plank, I used an 8" hardwood sanding plank to get a smooth, even and level (glue) surface for the cap rails to sit on. To understand all the pieces of this puzzle, I made a 'mock up' cap rail with coffee stir sticks and figured out the angles at the transom and bow. I added the cap rail, starting at the transom and worked my way to the bow stem, five sections per side with butt joints and it's done! Phew! Only two of the eight butt joints are slightly visible. Going forward, I want / need to learn how to do scarph joints. The bow stem is a wee bit on the short side, as in 'non existing', so I need to add some height to it. I like these bow bitts, but I'm thinking they are a bit too tall. The good news is I'm thinking they're tall enough to lop off a few inches and they will still look right. There will be just enough room for the bowsprit and it will look good. Way back I added 4" to the height of the transom and thought I would need to remove 2". With the cap rail added, it's just barely enough. Still need to make the square opening for the tiller. In the last update I added the mast thwart and knees. The splash board was sanded down to height and added knees. All but one of the kit metal cleats have been replaced with wood cleats of various types or belaying pins. The hull is only 3mm thick, not enough for the deadeye strop nails to hold onto. Since I don't want the ends of the nails poking through, I'm thinking about going to order some scale hardware nuts and bolts for the strops and hull struts. Blackened / painted, these will blend in very nicely. Painting is a necessary evil and I'm learning. Preparation is key, I'm using gesso as a prep. I'm getting nice results. While making the rudder, do make sure it had an even bevel, I decided to give it a coat of the black paint. And while I was at it, add some paint to the lower part of the hull, to get an idea how it was going to look. I used the canned spray paint I've used twice before with excellent results. The next morning the paint was gummy, like a heavy coat of crayon. Ickky! So that all had to be scrapped off and then cleaned to remove residue. It was a mess! It seems like the more small parts I do, the more small parts there are to do! The rudder is almost done, need to install the rudder and open up the transom so I can get the right height on the rudder for the tiller. Then there's the belaying pins, hull struts, bow sprit and a few other parts. As always, thanks for stopping by. Your suggestions are always welcome. Dee Dee Wishing you and yours Happy Holidays. (Edited to change photos to smaller sized photos)