Dee_Dee
-
Posts
290 -
Joined
Content Type
Profiles
Forums
Gallery
Events
Everything posted by Dee_Dee
-
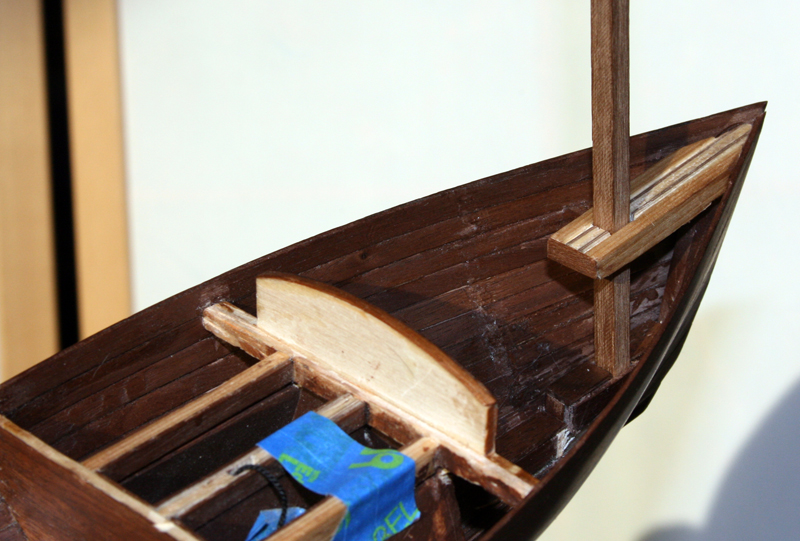
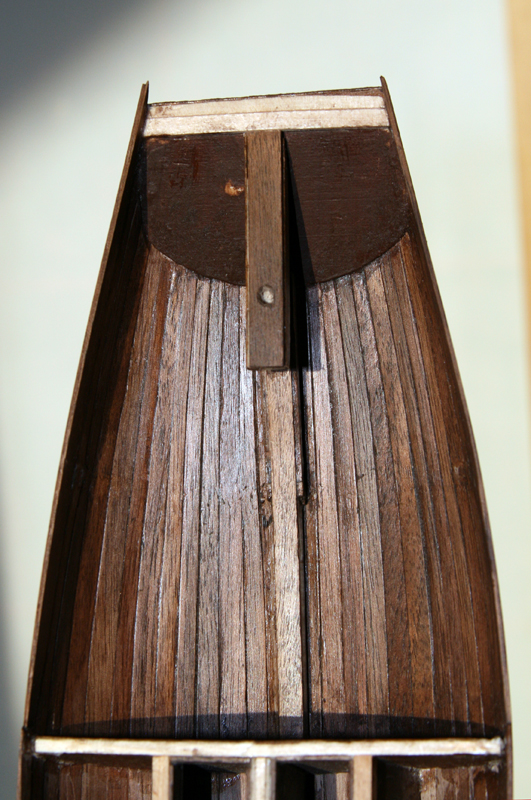
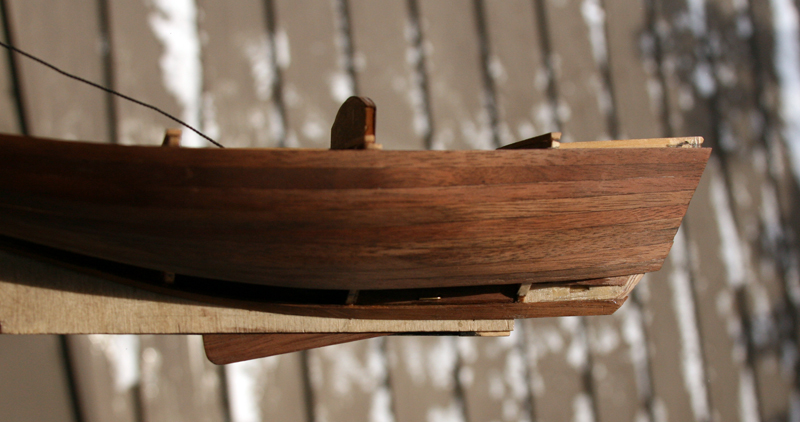
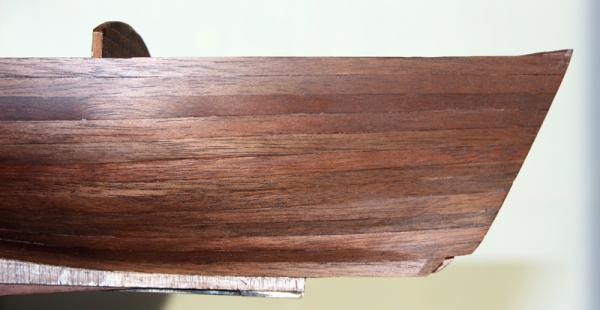
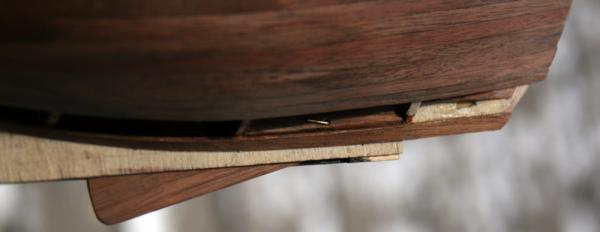
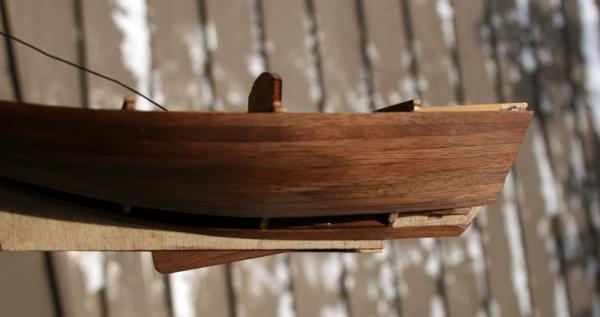
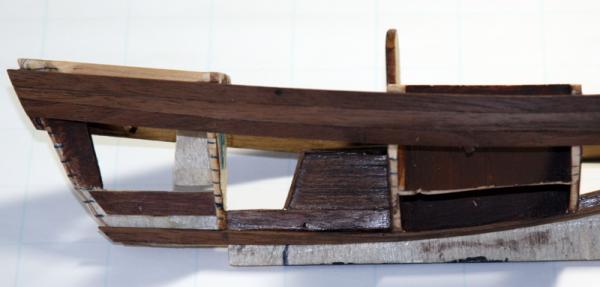
Popeye, thanks for putting 'moveable features' into perspective. The centerboard is done and I was only off by 1/128", but it works and I'm happy. The planking is done and all excess material has been removed. The third bulkhead and the transom are the only two kit parts that remain as the original kit part, everything else has been removed or changed per info found in Chapelle's book and other reliable sources on the web. These boats had a relatively long life due to numerous reasons, one being the sheer timbers and the keel structure were much stronger than necessary. In these photos, you will see how the keel has been built up and runs the full length of the hull. The first two photos show the mast shoe and the keel. I am making the assumption that the mast was square at the shoe due to the way the sails were set while fishing. It is a tight fit left to right, but there was room to adjust the rake. The mast rake is fixed with "T" shaped spacer blocks that drop into the shoe. When I install the fish well covers, I will go into more detail and sources. The first bulkhead was completely removed. I'll add a false frame to hide the glue residue and support the planking and a cross brace for the mast. HULL PLANKING I started planking with 3/32" x 1/4" planking, after prepping, the planks measured between 3/64" and 1/16". Mathematically, I only needed to use 11 planks total. But I went with 13 planks total. Reason being is the planking makes a hard turn around the fourth bulkhead and on the transom. With the additional planks, I narrowed the planks to make the turn and still have enough wood left to sand the hull smooth. The fourth bulkhead has been removed. This was easy since only the garboard plank and the first three planks were glued to this bulkhead. . I will replace this with a false frame and also to support the planking. Bow planking turned out good. I might have to add a wood splice onto the garboard plank when I add the cutwater, but that will be easy. The top plank was the final plank to be added and was tough due to the sheer. I did the right side three times and the left twice. I ended up doing it in two pieces, but it turns out the sheer plank was made in short lengths and joined with scarph joints. Next up is flooring in the cabin and cockpit and other small parts. Thoughts, suggestions and comments are welcome. Dee Dee Edited to change "Cockpit Planking" to "Hull Planking" Edited 11/24/2014 to add back photos that went missing

-
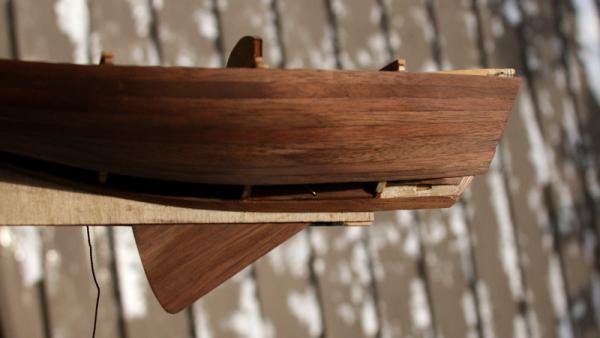
With just two planks to go on the planking, it was time to install the centerboard. Centerboards were made from solid white oak (or similar dense wood) with iron rods or wrought iron straps to weigh it down. But these would rot, swell, jamb and eventually cause catastrophic failure. Half inch boiler plate steel or black iron were also used, but prone to rusting. The best material was brass or bronze – but that was very expensive and these are work boats. My centerboard has less than 1/128" (0.007") clearance inside the centerboard trunk. I tried making the straps out of thin rag paper, 0.004" thick, but that was too thick. So adding black iron straps was not an option. The centerboard moves freely inside the trunk, but in the summer with humidity, it might swell up a bit and start to bind. In this photo, you can see the brass pin that goes through the oversized keel. This is is fully working centerboard, a wide view with the centerboard drawn up into the trunk. And a wide view of the centerboard dropped The centerboard is operated by pulling up on a short black iron handle (brass is incorrect, as its too soft and too expensive.) The black iron handle is attached to a short length of black chain and the chain is connected to the centerboard. The black iron handle acted as the stops for both the raised and dropped centerboard. After the hull planking is done, I'll start work on the cabin and cockpit and there will be lots of changes there! Thanks for stopping by, suggestions and comments are welcome Dee Dee Edited 11/24/2014 to add back photos that went missing
-
Pete, I've checked out your build log. IMHO, since your keel does not run the full length of the hull, your hull will have no strength, it will twist and be prone to leaking and it will sink like a rock. This photo from "Apprentice Land & Sea" shows the centerboard trunk is an extension of the over sized keel and the centerboard drops down from a thin slot in the keel. The keel / center board design in post #2, is based on this photo and the drawing from Chapelle's book. FWIW, when I posted the photo of the drawing (that you've been using) from Chapelle's book in my first build log, I deleted / added numerous lines. Popeye, YEP! They are contagious, but I got a shot before I started this one! Happy Holidays to you too! Bob and Bug, Thanks for stopping by. There are a lot more changes coming, the first one will be in the following build update. I'm learning a lot that will carry forward to future builds and I'm having fun!
-
Great detail and ideas! I like the way you made the windlass, I've used that same lathe to make some of the parts on my Bluenose.
-
The Dutch Boeier De Sperwer- The 'James Bond Yacht'
Dee_Dee replied to Salty Sea Dog's topic in Nautical/Naval History
I have 'Gretel' on the shelf and have been thinking about using guitar or violin binding as some of the trim. Would it be possible to use a purfling cutter to cut strips of wood from a sheet? Thanks, Dee Dee -
ROYAL CAROLINE 1749 by Doris - 1:40 - CARD
Dee_Dee replied to DORIS's topic in - Build logs for subjects built 1501 - 1750
Doris, The photos of your build make me feel like I am on the RC, in a beautiful cabin and living the life! Wishing you and your family a most wonderful New Year! Dee Dee- 883 replies
-
- 1
-

-
- royal caroline
- ship of the line
- (and 1 more)
-
Keith, That's a great question! For me, whilst it's a very pleasing hull shape, I'm using this build to learn some of the skills I'll need for the kits I have on the shelf. This is my second MBLS bash build and when it's done, the only part that will be sort of original to the kit is the third bulkhead. But I am also challenging myself to build a MBLS that looks close to like it did back in the day. I've done a lot of research, Chapelle's book is fantastic and there is a lot of information out there. Also, the kit is reasonably priced, so if I really mess it up, I can call it a learning experience and move on. Here are some of the skills I am learning on this build and where I will use them on kits I have on the shelf: The 18th Century Long Boat is single planked hull and uses 1/32" x 1/8". I'm learning about single planking, including measuring and shaping the planks, beveling the edges and gluing. The Corel Sloop is a great little model, but it's not very accurate and a lot of changes need to be made. Redesigning the bulkheads and keel to lower the cockpit floor and adding doors in the bulkheads to access storage under all three decks are just two of these changes. The Corel Dragon is double planked and the kit walnut is some of the nicest I've seen. The hull is supposed to be painted, but it would be a crime to paint this wood. Also, I will need to redesign the keel, so the hull can be completely planked. The walnut planking is 1/16" x 3/16" and no will filler will be allowed!
-
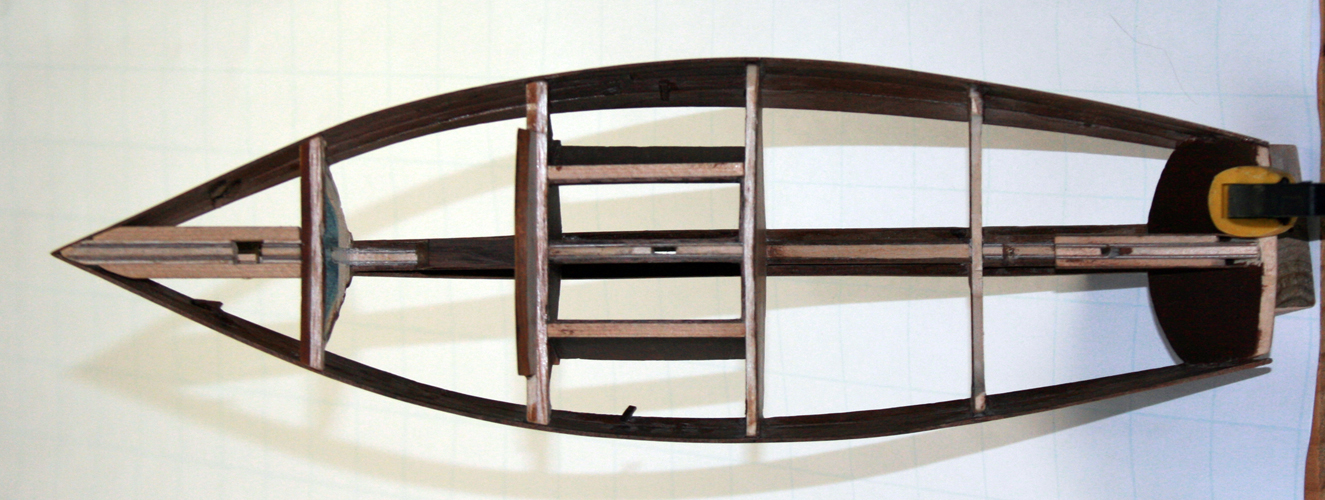
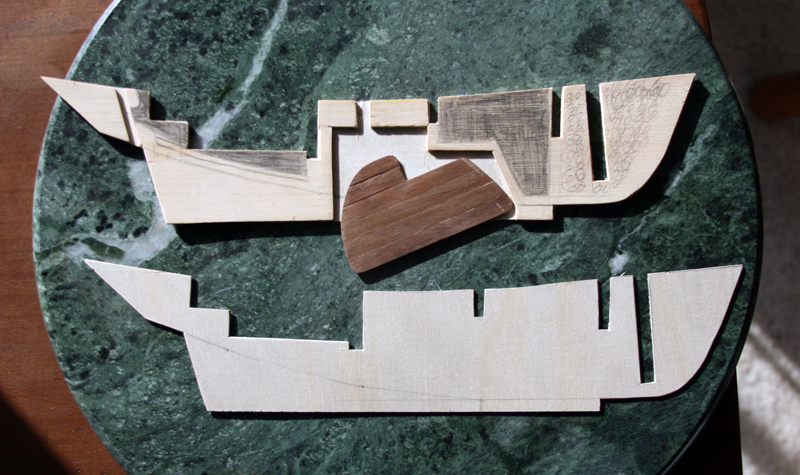
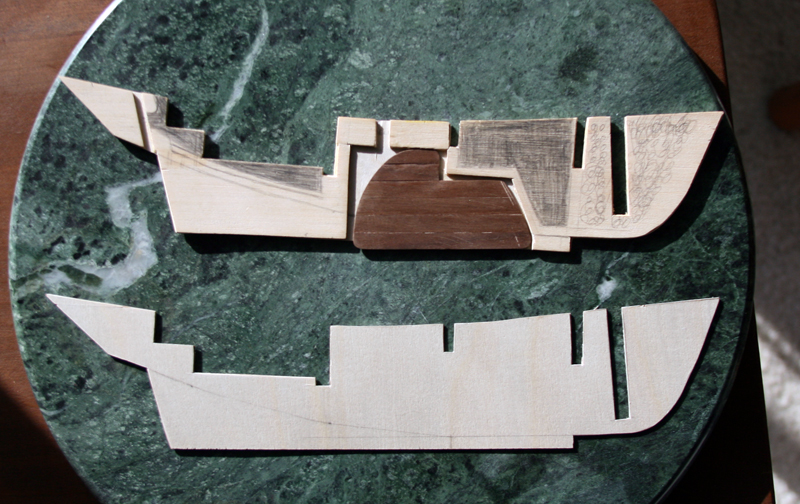
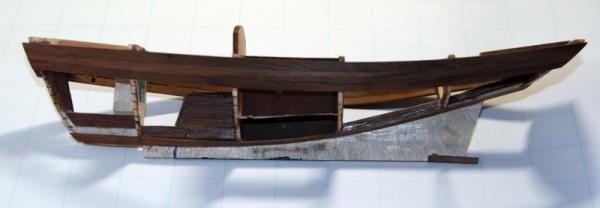
I prefer to build small boats, as these boats tell the history and life of the people that plied the waters in small towns and cities along the water ways. I went with Plan B and temporarily tacked on the deck to straighten out the keel. After I had three planks on each side, I removed the deck, temporary spacers and a lot more of the false keel. When I'm done planking, I'll remove most of the first bulkhead, part of the second bulkhead and the balance of the fourth bulkhead. This is the my fourth build I've planked. This build is a single planking, using 1/16" x 1/4" walnut. With four planks done on each side, I am happy with the results. It's been cloudy and snowing the past few days, the next sunny day I'll add a better photo. In the cabin, the centerboard trunk has been finished. After the bulkhead is removed, I'll plank the top of the keel and add one floor board on each side of the keel. Before I started planking, I used some Minwax gel stain to even up the color of the various walnut planks. Three days later, I had to scrape it off because it was still 'sticky' and 'gummy'. THAT was a mess and that can of stain is on it's way to the recycling center. The mast shoe is sized to use a 6mm square blank for the mast. I'm making the shoe similar to the one on a friends old "E" class sail boat that was built in the 1930's. It's was rectangle in shape and "T" shape blocks were used to get the desired mast rake. The excess false keel between the 1st and 2nd bulkheads has been removed. After the planking is complete, the remaining false keel and most of the first bulkhead will be removed. The center board trunk is finished. When the bulkhead is removed, I'll finish the keel, mast shoe and add one floor board on each side of the keel. The interior of the 2nd bulkhead has been planked with walnut veneer. When planking is completed, part of this bulkhead will be removed to make space for the port side berth and storage. The distance from cabin floor boards up to the top of the fish wells is close to four feet. Will add a 'step' on each side of the centerboard trunk and one more on the bulkhead along with a brass handle. I painted the inside of the fish wells and transom to match the walnut color. The bulk of the fourth bulkhead has been removed, after planking, I'll remove the balance and replace with something more in scale. The top of the keel will be finished and will add floor boards. I have the 18th Century Longboat on the shelf and I this planking has given me more confidence to start that build. Thanks for stopping by Dee Dee Edited 11/24/2014 to add back photos that went missing....

-
Popeye, That was the plan, but it is near impossible to get even one row of planking on due to the twist and turns. The F4 bulkhead is square, but the port side is 3mm lower and the transom is level, but it turns to the starboard side almost 5mm. There is so much torque on the glue joints that they kept on snapping off and I was still not able to get the frame straight. So, I'm going to PLAN B. I'll lightly glue on the deck to the bulkheads. This will help me to square up / straighten the bulkheads and get the planking started. Then, when I have a few rows of planking done, I'll snap off the deck and continue as planned.
-
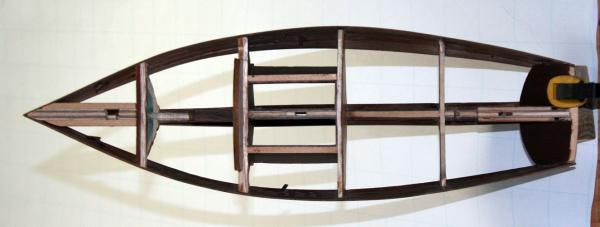
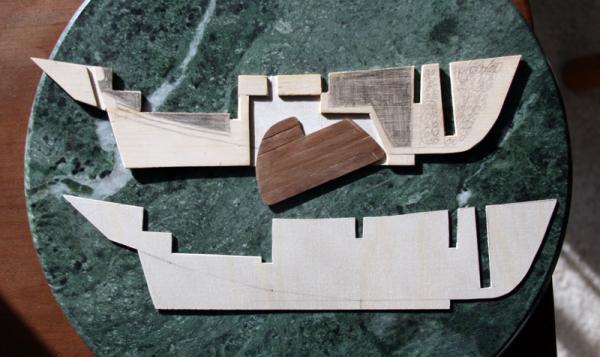
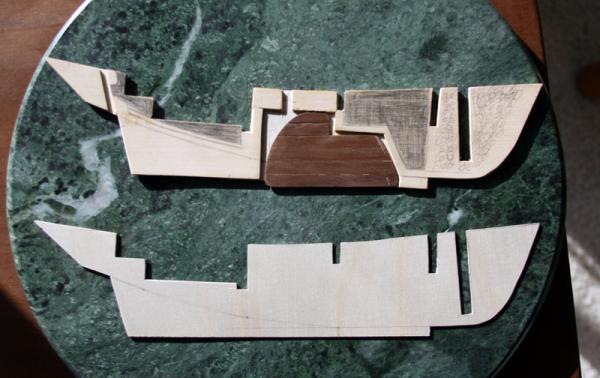
The three layers of the keel have been glued up and the keel is stiff and straight. I used wood blocks to keep the bulkheads square while gluing, however a bow and a twist developed in the keel. Spacers between the bulkheads fixed the bow, but the F4 bulkhead is still slightly twisted. I'll fix this by planking both sides simultaneously and the first plank will be 1/16" x 1/4". The spacer between F3 and F4 will be removed before planking and all spacers will be removed after planking. LOOKING FOR ALL PHOTOS...................................................................................... I have already removed a lot of the keel and added a lot of strength in the keel. After the first two planks are on, I'll remove the balance of the keel between the first and second bulkheads (and refine the shape of the centerboard trunk.) When the planking is completely done, I'll remove most of the first bulkhead and parts of the second bulkhead so I can add the port side berth. The centerboard pivot pin is in the false keel and is about 2" (scale) from the bottom planks of the hull. This is going to be a tight fit, so I will hold off adding the CB until most of the planking is done, then use some wax paper to keep it from getting glued. I also added a peg to hold the rudder and secured it with two pins. It's final length will be ~1/8" or 3" in scale. Planks will be laid on the frames and planks to make a 'floor' in the cockpit. At the lowest point, the cockpit will be 24" below the deck and ~27" below the combing. In the forward section of the cabin, I've added a shoe for the mast. The framing for the fish wells is from Chapelle's drawings and answers half of the question of "where" were they located. In this photo, I've added the kit fish well lid and it fits right on the edges of the framing. At scale, the lids measure 15" x 21". Next, I'll start the planking, remove more of the keel, add veneers and framing to the centerboard trunk, install centerboard, add the garboard, finish the planking. Comments, suggestions are welcome. Thanks for stopping by Dee Dee (Edited 11/26/2014 to add back photos......) PHOTOS HAVE GONE MISSING AGAIN, IF I ADD THEM BACK, THEY'LL JUST GO MISSING AGAIN!
-
Hi Jesse, thanks for stopping by. I'm really enjoying this build! Keith, The book I'm using is Chapelle's "American Small Sailing Craft, Their Design, Development and Construction." The MBLS is in the 'Sloops and Catboats' chapter, which also includes the Bermuda Sloop, the Newport boat, Providence River boat, the Noank Sloop (Emma C. Berry) and many other boats. It's heavy reading but extremely fascinating. I figured out the mast shoe after I saw one detailed in the drawing for the Providence boat. Throughout the chapter, I've penciled in lots of notes and underlined lots of tidbits of information. Also, Chapelle references other books and articles where he found information. My only complaint about this book is the drawings are very small. In my first build log, I scanned and posted one of the drawings of the MBLS so I could compare my build to the actual drawing. Many others have found this photo helpful as I have seen it posted on many other places. I'm also looking for information on pilot boats, so will be checking out other Chapelle books.
-
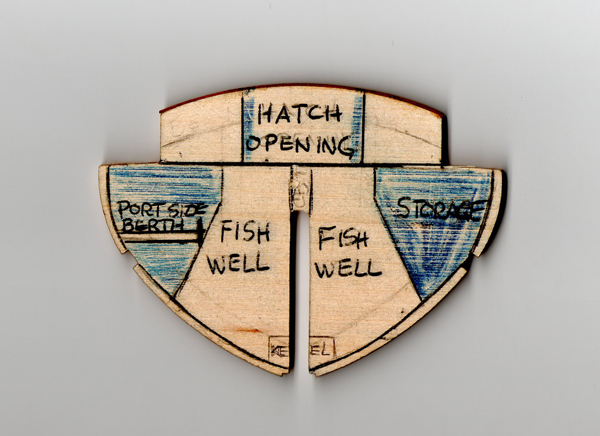
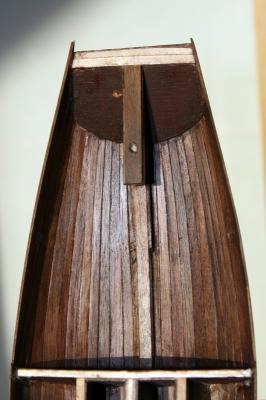
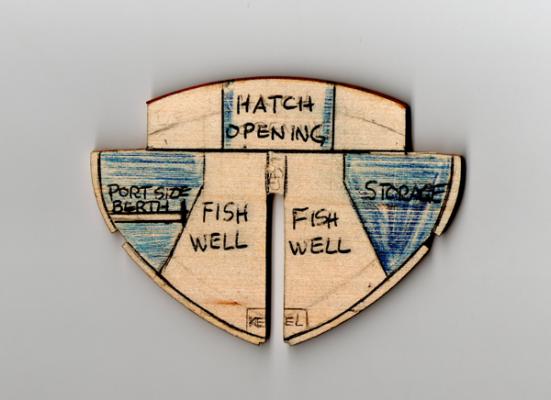
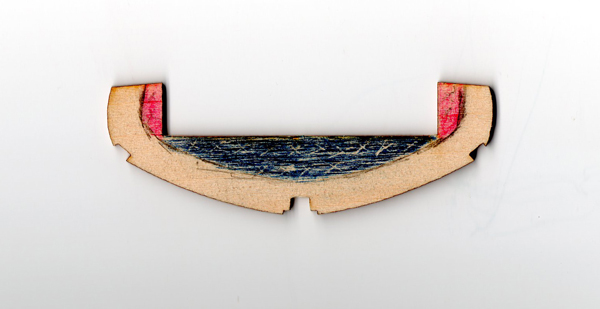
The kit keel is 1/8" or 3.2mm thick. After I glued the layers of the keel together, it ended up being 3.45mm thick. I sanded off the laser burn marks on the bulkheads and they fit nice and snug. On each bulkhead, I ID'd where I want to remove material and where I will have to add material. Removing material will be done after the planking is completed, but I need to add some of the material before planking. BULKHEAD #1 The area in blue will be removed. I've replaced the 3/4" x 3/32" kit bracing with two strips of 3/32" x 3/32". When I remove the excess keel I'll add one more strip on the other side of this bulkhead. BULKHEAD #2 Again, the area in blue will be removed and the kit supplied bracing was replaced with two strips of 3/32" on the other side. The fish wells are per Chapelle's print. I am also including the port side berth which is shown in the Friendship Sloop prints, but not shown on the prints for the MBLS. The top edge of this bulkhead was lined with a strip of walnut to prevent the basswood from 'wearing away' while planking the hull. I learned this in my first build, where the starboard side was almost 1/8" shorter than the port side. BULKHEAD #3 The only change on this one will be to omit the brace for the cockpit floor. BULKHEAD #4 If this is your first build, just before you add the cockpit combing, remove the bulkhead shaded in red. This will significantly improve the appearance of your finished model. The blue AND red area will be removed. Next up is install the bulkheads and transom, add the shoe for the mast, fair the bulkheads and start planking.
-
Keith, When I was painting the pieces of the windlass, I used clips to hold the pieces. They were sitting on my desk when I heard one of the clips go 'PING' and fall over and then I heard something hit the wall. YEP! It was the main piece for that blasted windlass. I looked everywhere for it. I figured it would just be my luck it fell into the printer. So I decided to humor myself and look inside the printer and guess what I found inside of the printer! (It landed on the paper and slid down.) I don't think this windlass likes me. Tuxedo is a sweetheart. He will jump up on my work table to inspect everything I am working on and he will not touch any of it. Instead, he looks for one of his toys that I keep on the table and he starts playing with that! Thanks for the info on Nigel's build. I'll check it out before I finish making my bulkheads. HI Popeye! Nice to have you stop by! I really like your Moe, Larry and Curly build. For a Christmas theme, I was thinking about building the Rouse Simmons, AKA the "Christmas Tree Ship."
-
Keith, Thanks for stopping by! For the planking, I have some 1/32" x 3/16" stock that would be close to scale, but since I am only doing one layer of planking, I will use 1/16" x 1/4" and will be doing a lot of trimming to get it down to scale. When gluing, I'll use PVA as often as possible, but occasionally I will use CA. On the bulkheads, I've figured out where I want to remove and where I will have to ADD. I'll show this in my next post later today. This build is a 'mega bash' of a kit and even though I am making a lot of the parts, it is still a kit build. And I am still looking for that part that went flying!
-
WOOD COFFEE STIR STICKS These come in 5.5" and 7.5" and are 1/16" thick. You can get some at your local coffee shop, or purchase a few thousand on eBay for less than $20. These are made of birch, very pliable and hold a corner very well. When I build my 18th century long boat, I will replace the basswood planking with coffee stir sticks.
- 396 replies
-
- 9
-
-
- Idea
- Bright Idea
- (and 1 more)
-
Wefalk, I have been following your build from the start (on MSW1 and your website) and your build it's one of my favorite. Your attention to detail, use of alternative materials, color and more.....
-
So, here I go! The kit keel was replaced with a three ply sandwich of two 1/32" birch plywood and one 1/16" basswood. These were hand cut slightly oversized and will be sanded to print when all three pieces are glued together. To build the center board trunk, some of the 1/16" basswood was removed. After the bulkheads are added, I will remove the shaded areas on the keel. Then, when the planking is completed, I'll remove the area with the 'squiggly' lines. The final keel will then look similar to the keel as shown in this photo on the Apprenticing Land and Sea website: http://i1302.photobucket.com/albums/ag122/Arista81/Muscongus%20Bay%20Sloop/38054afa-85ab-4c2b-9186-226e151813d1_zps2509a6bb.jpg The centerboard was made from 3/64" stock and has 1/64" clearance. At scale, this is 3/8" clearance, a little tight for a wood centerboard, but more than enough for an iron centerboard. I'm going to remake this centerboard, so the extended centerboard will be 6" longer. Then I'll paint the inside of the trunk brown, add the hinge pin and glue all three pieces of the keel together. Then, I'll keep my fingers crossed and hope I don't accidentally glue the centerboard while planking! You can see the opening for the rudder post. This will be reinforced with another layer of wood on both sides. Again, this build will be quicker than my first MBLS. Questions, comments, suggestions are welcome. Thanks! Edited 11/24/2014 to add photos that went missing....
-
To better describe this build, I've re-titled this build log and made some changes in my opening post. While the Bluenose is in drydock, this would be a good time to do my second build of the MBLS. The objective of this build is to get close to what the original MBLS looked like. I'm using the drawings in Chapelle's book and adding details as described in the text and other information I have found on the web. Also, I'm using these builds to develop my skills before I start the kits I have on the shelf. Bluenose update: The kit Bluenose build has been terminated. The kit scale was 1:100 - a really terrible scale! Everything is way too tiny --- 1mm in scale = 4" in life. These are some of the changes I will be doing in this build: March 8, 2014 update of changes made: DONE! Keel will have a working rudder and centerboard. DONE! Hull will be single planked in walnut DONE! Decking will be basswood and the only light color wood in the build DONE! In the cockpit, the kit floor will be replaced with planks that lay on the frames DONE! Bench will be smaller and closer to print. The cockpit bench has been eliminated DONE! Fish well covers will also be smaller and will fit flush DONE! Access opening for the centerboard line will also be smaller and a flush fit DONE! Cabin flooring will be one laid on each side of the centerboard trunk DONE! Fish wells will be redesigned so the post side berth can be added DONE! Windows will be rectangular in shape and will have sliding covers DONE! The cabin will be enlarged by removing the first bulkhead DONE! A shoe will be built for the mast. I always called it a 'shoe', more commonly known as a 'step' DONE! Hatch cover will be widened and the cover will be fully functional DONE! Bow sprit will pivot on the sampson post DONE! Mast, boom and gaff will be built with yokes and need to order some better quality blocks DONE! Mainsheet horse will be much wider TO DO! Rigging will be corrected by adding lazy jacks As for cost, in the 1890's, a 25 foot friendship sloop sold for $675 and a 28 foot complete for sea sold for $780, or $18,800 and $21,200 in today's dollar. The price was kept low by using low cost labor, local materials and short cuts in construction. I found this quote on the Apprentice Land and Sea website: "It ain’t a piana. Hurry up, a man wants his boat.” ~ John Gardner Questions, comments, suggestions are welcome. Thanks! (Edited to add update on changes to be made 4/22/2014)
-
Casey, Your build is looking really good! As for the rudder, when compared to pleasure sail boats, yes it is oversize. An oversize rudder is common on small work boats, as they have to be able to turn quickly and on a smaller radius. Russ' 'signature line' is one of my favorites: "T'aint a hobby if you hurry"
-
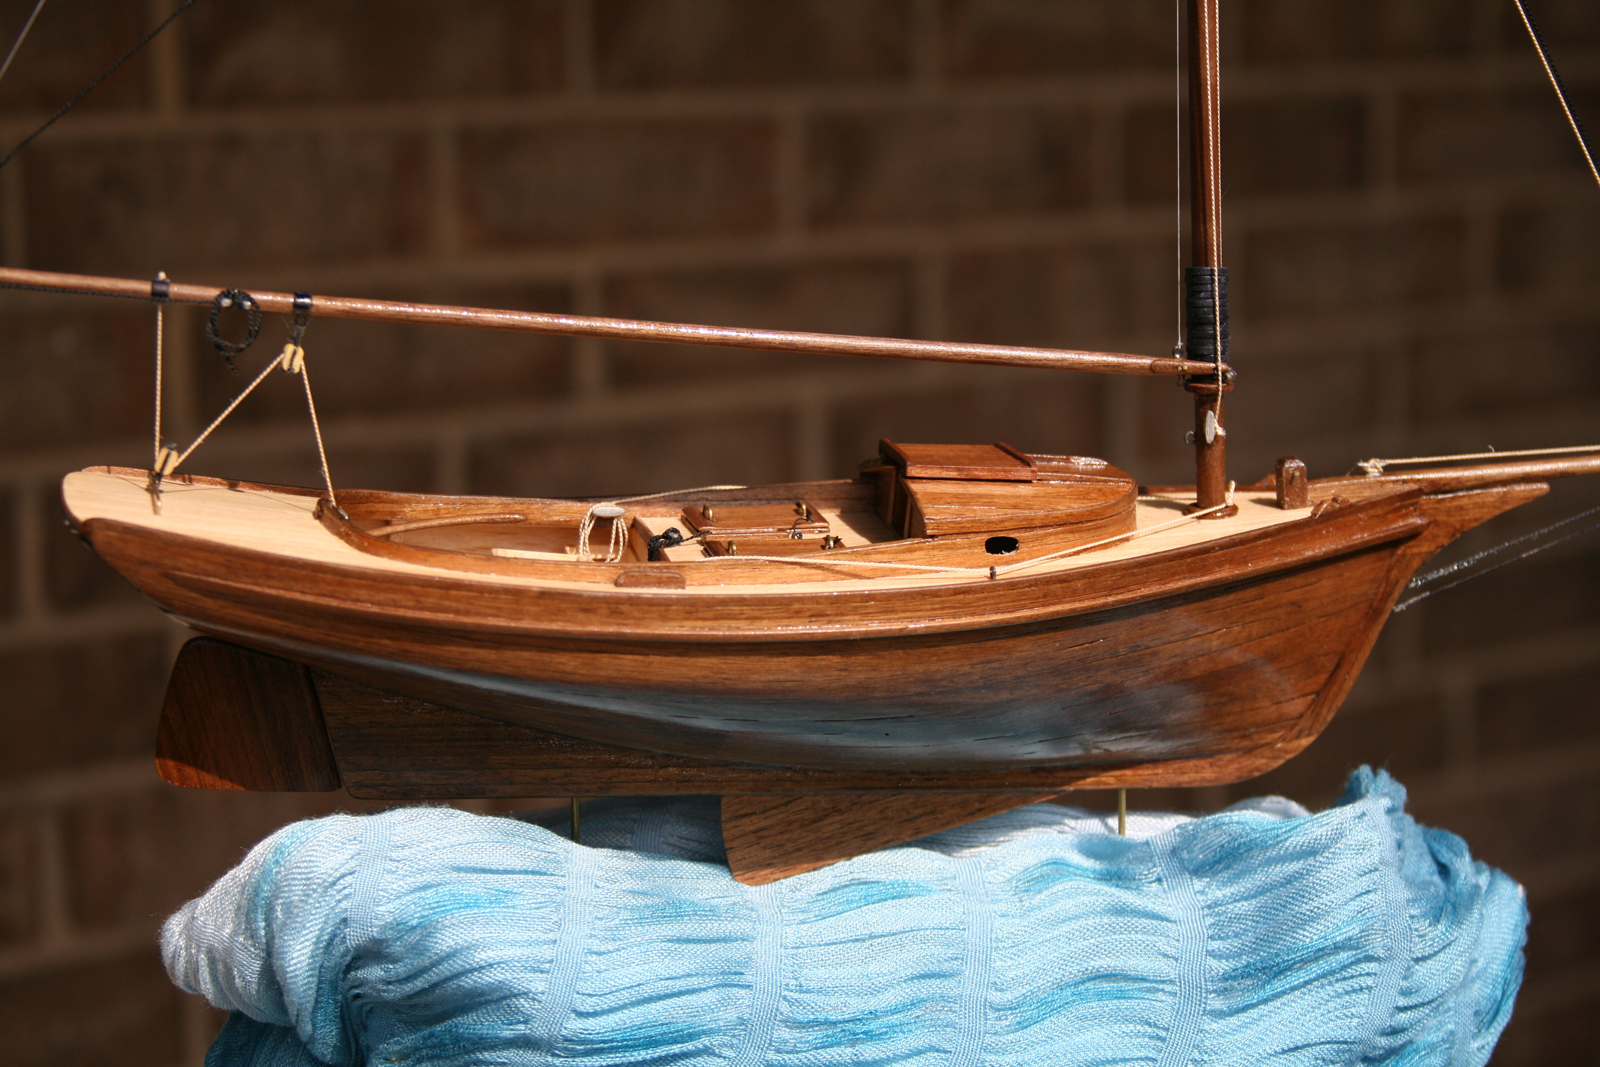
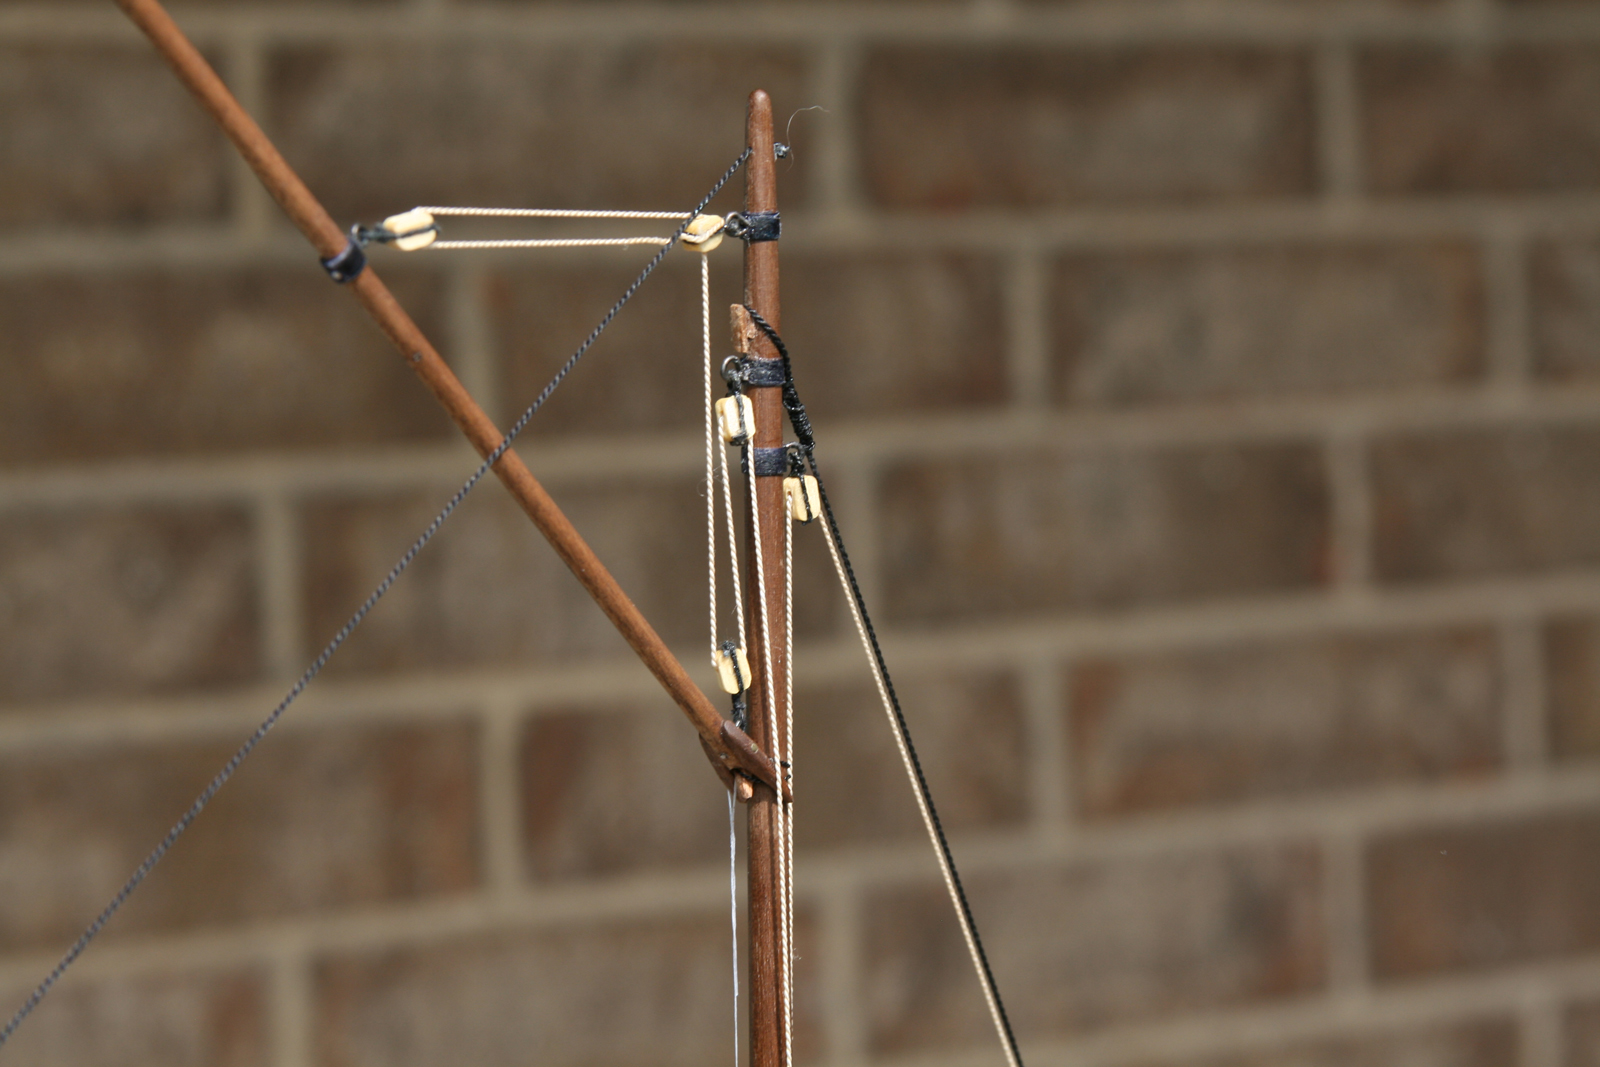
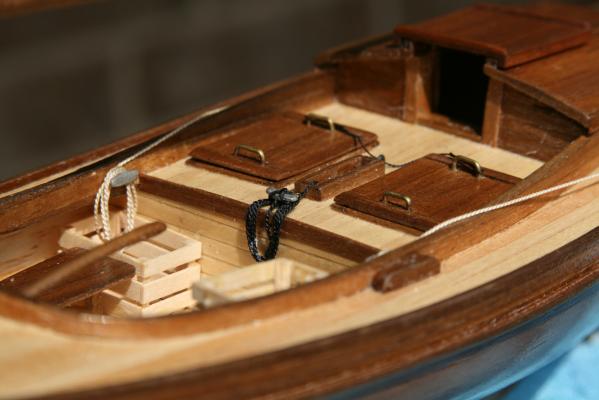
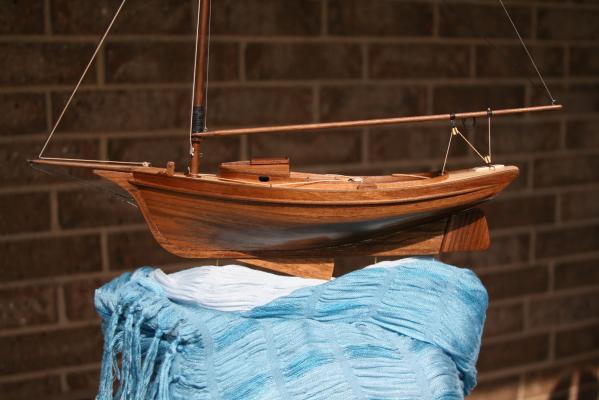
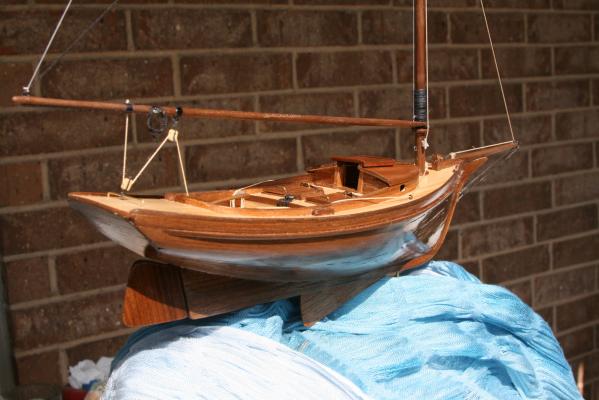
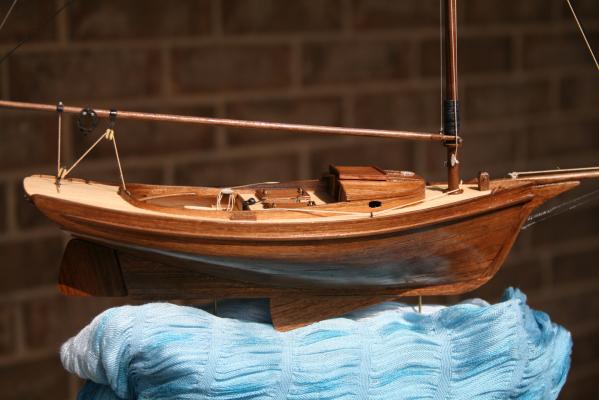
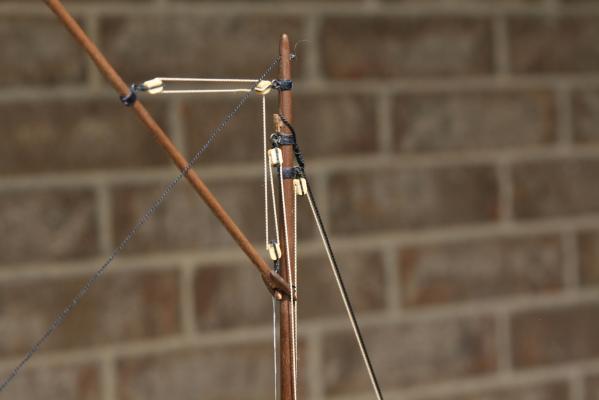
I’M FINALLY DONE! YIPPEE! DOING THE HAPPY DANCE!!! Well, almost done. I still need to add the trail boards – more on that later. I also still need to make the sails, but that will be in a separate post. I think this has to be one of the slowest builds ever! EIGHT (8) months to build a model that I could have finished sooner, but I decided to take my time, enjoy and learn. I took these photos a few days ago when we had good sunlight. It was clouds and rain today and the same is forecasted for the next 5+ days. These photos are missing three rope coils which were added today. When the weather gets better, I’ll add a few more photos with the rope coils and the cockpit floor boards. The following 'details' are to help other Newbies. GEORGE WASHINGTON FITTINGS I made numerous fittings with the help of George Washington, more commonly known as a one dollar bill. I cut thin strips from a one dollar bill to make the mast hoops and iron rings on the mast, boom and gaff. Through trial and error I found that a lightly worn dollar bill works best, as the CA glue is able to permeate the paper better. I used a permanent black marker on the paper BEFORE cutting and gluing. The ink / paint will quickly wear off if applied after gluing. So far, the mast hoops and iron bands cost about $0.68. MAST HOOPS I made the mast using a full width strip of George x 2.5 – 3.0mm high. After saturating the hoops in CA glue, I let them cure for a couple of days, and then sanded them down to a thickness between 1.47 and 1.59mm, or about 1.75” in life size. I started with 14 mast hoops and ended up with 13. I made the mast hoops for my Phantom this same way and sanded these down to an average thickness of 0.8mm (one mast hoop is 0.57mm.) MAST / BOOM IRON BANDS The paper for these bands needs to be cut to exact finished width since they cannot be sanded down to thickness. For this scale, two wraps did the job and left enough paper / iron to sand smooth the edge. After sanding, I touched up the raw edges of paper and then strengthened with a dab of CA glue. MAST I replaced the kit 7mm mast with a walnut mast and added lots of details. I added three iron bands under each block. These also work great to camouflage a wayward drilling. I also added a shoulder rest for the boom and a mast coat, both were made from layered walnut strips. The drilling for the cleats got really skewered, oh well! TRAVELER I added the traveler early on and that was an ‘oops’ waiting to happen and it got squished. I pulled that one out and made a new traveler from heavier brass rod. To keep it from getting squished again, I slid a 1/16” spacer under it. BOOM To improve how the boom was connected to the mast, I added a yoke to the boom that will rest on the shoulder I added to the mast. I also added two iron bands. GAFF I added an iron band for the block. The blue prints show one block placed at the base of the gaff, this should have been moved out approximately 1/8” to get a better ‘line’ with the rigging. PARRELL BEADS A vial of #11 seed beads will last you a lifetime of building and still have enough left over for a couple of friendship bracelets. Instead of using black beads, I chose a multicolor bead in a muted purple color. These beads have flecks of gray and tan that give them a weathered look. They blend in really well. BLOCKS After lots of experimenting, I came up with a simplified method. While not technically correct, they look great! All knots were secured with CA glue applied on the tip of a pin. RIGGING The kit supplied rope was replaced with Griffin Silk beading cord, in size 1, 3 and 6. This stuff is great and looks a thousand times better than the kit rope. I used a specialty thread in size 0 to secure the boom and gaff until I add the sails. This thread measures 0.07mm and is extremely strong! Here are some photos, when we are done with the rain, I’ll add a couple more photos that include all rope coils and the floor boards. Questions, thoughts, comments, suggestions are greatly appreciated, I've started my next build, Bluenose 1:100, but that is on hold until I clean out the boat yard from top to bottom. (Edited 11/29/2014 to add photos back) (Edited 4/9/15 to add photos back)
- 89 replies
-
- 4
-
-
- muscongus bay lobster smack
- midwest products
- (and 1 more)
-
Shawn, this has been a fun build and I have enjoyed it immensely. I’ve learned a lot that will carry forward. I just finished all the small details (except one and the sails) and will post an update later this evening. Marios build log was my inspiration, check out his build log here: http://modelshipworld.com/index.php?/topic/1221-muscongus-lobster-smack-by-teleman-midwest-124/?hl=muscongus Hope you enjoy your build.
-
Don, I would like to suggest researching the ships and boats built by the Moran Brothers Company. The Moran Brothers started building ships in the 1880's at their dry docks located on Elliot Bay, Seattle, now Safeco Field. In 1897 gold was discovered in Alaska and the Moran Brothers built the 'Yukon River Fleet' that supplied bulk goods to the miners along the Yukon River. It is an interesting story how these bulk carriers got from Roche Harbor to the Yukon River. The Yukon River Fleet included the SS Klondike that carried ore and passengers and a Klondike replica is now in dry dock in White Horse. On July 4, 1902, there was a big celebration in Seattle when the keel for the U.S.S. Nebraska was laid. The U.S.S. Nebraska, the last last battleship of the "Virginia Class" was launched on October 7, 1904. The U.S.S. Nebraska was sold for scrap in 1923. Hope this helps! Dee Dee Links to bulk carries of the era. http://www.explorenorth.com/library/ships/images/casca-pc1.html http://explorenorth.com/library/ships/images/prospector.html http://www.yukon-news.com/letters-opinions/ss-klondike-the-yukon-river-icon-part-1 http://www.riding-the-usa.com/2012/10/day-12-idle-day-in-whitehorse-yukon.html The SS Klondike was the largest sternwheeler in the White Pass fleet. Now a national historic site in Whitehorse, she was once capable of carrying heavy loads of ore and passengers.
-
Casey, Your smack is looking really good! From experience, one good thing about paint, is if you don’t like the color, you can always repaint! Lots of info about painting has been posted on MSW. My two cents: Invest in a good set of paint brushes and Tamiya tape. Paint is cheap, so experiment painting on some scrap wood first, especially masking! As for the gap between the cabin wall and deck. Did you ‘dry fit’ the deck before installing? The deck should have butted tight against the cabin bulkhead and cockpit bulkhead. As for the fix, you’re on the right track. The simplest fix is to use a filler piece of wood to fill the gap. Keep the filler as small as possible, same color and spaced evenly on both sides of the hatch door. Keep up the good work and enjoy! Dee Dee
- 60 replies
-
- 1
-
-
- muscongus bay lobster smack
- midwest products
- (and 1 more)
-
My Muscongus Bay Lobster Smack is entering what I call the 'Cinderella Phase'. The hull is 98% complete. I’m really happy with the planking and the look of the walnut wood, especially the black streak on the port side. It took a lot of scraping (and vacuuming) to get the smooth finish. I tried some mahogany stain on the hatch cover, I like the effect, but it’s too red, so I’ll get some walnut stain. The tiller / rudder and centerboard are done but they are fragile and will be permanently added after the rigging and sails are complete. I finally figured out the hatch cover: I wanted a ‘working’ hatch cover, but that is not going to happen on this build. So for now, the hatch cover will be held in place with rubber cement. The ‘kit supplied cleats’ are flat stamped and 'blah' so I used the cleats from my Phantom. These cleats measure 1/4” in length / or 6” in life size. I’ll darken these cleats with some paint. For the mast, I replaced the kit supplied 7mm basswood dowel with a 6mm square walnut blank. While the base is a bit undersized, it was possible to taper it down to 3mm. I burnished the walnut with a hardwood block to get the glossy smooth finish. To fill the gap in the deck, I made a mast coat and will use wedges to position the mast with a dab of glue since there are no shrouds. The ‘To Do List:’ The boom and gaff will also be made from walnut to match the mast. I need to purchase some walnut blocks to replace the squishy soft wood kit supplied blocks. I also need to get some brass for the goose neck. For the finish, I’ll use some walnut stain to even up the color, then another coat of tung oil. I have big plans for the trail boards…… The kit calls for brass / black iron mast hoops, but the kit supplied brass is a bit on the thin side, so will use some heavier wire. One of my other hobbies sewing, from haute couture, heirloom machine sewing, quilting, home décor and everything in between, so I will be making sails. I will also try making sails from tissue paper following welfalcks’ instructions from his zuiderzee botter. I'm done traveling for the summer, so hopefully I can finish this build soon. While I'm waiting for the parts I need, I might start either the Midwest Flattie or Bluenose 1:100 that are on the shelf. Thanks for stopping by, any suggestions are welcome. Dee Dee 07 05 2016 Looking for all of these photos....... A close up showing the grain of walnut, almost looks like it is 'woven' (Edited 11/29/2014 to add photos back)
- 89 replies
-
- 2
-
-
- muscongus bay lobster smack
- midwest products
- (and 1 more)
-
Hi Bill - Thanks for letting me know about this - I was cleaning out files and I obviously deleted the wrong photos! I'll get this fixed ASAP and let you know when done. I've been having fun building this kit and making all the changes. Please let me know if you have any questions. Thanks again Dee Dee