Dee_Dee
-
Posts
290 -
Joined
Content Type
Profiles
Forums
Gallery
Events
Everything posted by Dee_Dee
-
Eamon, Your Ballahoo is coming along nicely. Nice job on making the masts. In regards to walnut masts, I 'burnished' the walnut masts to dark and even finish. I used a 1" cherry wood craft block, the same blocks I use to square the bulkheads to the false keel. The burnishing gives a hard and smooth finish and no poly required. You can see the results in the third photo from this MBLS build log entry: http://modelshipworld.com/index.php/topic/4670-muscongus-bay-lobster-smack-by-dee-dee-from-midwest-to-chapelle-124-small/page-7#entry19102 Ha! You're writing "Pegs, Pins and Clamps" and I'm writing "As the Plank Cracks". If we collaborate on a book, we could call it "How to Crack a Plank and Clamp it Too"! You letter to Santa is similar to mine. Dee Dee
- 1,039 replies
-
- 2
-

-
- ballahoo
- caldercraft
- (and 2 more)
-
Alan The mast hoops look fabulous! All are the same size and seamless. FWIW, after sanding / cutting to size, I add another coat of stain to even out the color, but I like the variations in the color on your hoops - they look more realistic! Dee Dee
-
I'm not a lawyer (but I did stay at a Holiday Inn this past weekend), so technically speaking: Yes. Laws exist to prevent counterfeiters and swindlers from doing 'naughty deeds'. Essentially, it comes down to intent to render a bank bill unfit to be reissued. I've seen a $10 bill altered to look like a $100 - Definitely illegal. Here's a link that covers some of the basics and links to supporting docs: http://answers.google.com/answers/threadview?id=426715
-
Alan, Your co-workers father in law will have a very merry Christmas. I make mast hoops in a similar manner as described by Druxey. But instead of using wood shavings, I make them one at a time, using a US dollar bill, rag paper or under layers of silver birch bark. Birch bark can be stained just like wood. It's quick, easy, with good results and the finished mast hoops are incredibly strong. I completed 13 mast hoops in an afternoon (that includes the two hours needed for the glue to dry). I did a quick how to on my build log: http://modelshipworld.com/index.php/topic/4670-muscongus-bay-lobster-smack-by-dee-dee-from-midwest-to-chapelle-124-small/page-6#entry186900 A couple of photos of results. The black hoop is a dollar bill stained with a black Sharpie Marker, yellow is unstained birch bark and white is high % rag paper / stationary: Dee Dee
-
Popeye, Your builds are fun to read - you never know what you're going to learn! For some reason, whenever I hear this commercial on the tele, I think of you!!
-
Piet, My first MBLS was a minor bash - All of the photos from this build went 'missing', I'm working on adding these back. One photo is the drawing from Chapelle's book which should help. My second MBLS was a major bash - the final model contains only 6 parts from the kit and all of them were altered (2nd + 3rd bulkhead, transom, two cockpit combings and the cut water). This build has a working rudder, centerboard, fish wells, hatch opening, full cabin, floor boards in the cockpit and cabin, mast step, port side bunk and is single planked in walnut. I've added back most of these photos, should have all added back soon. The links to these builds are in my signature. Dee Dee
- 176 replies
-
- 2
-
-
- muscongus bay lobster smack
- Midwest Products
- (and 1 more)
-
Hey Piet! I've built the MBLS twice and it's a great kit for bashing, having fun, learning, creating...... and more! FWIW, Chapelle's book "American Small Sailing Craft" is the 'go to' soure for bashing this kit. I'll just take a seat at the coffee bar. Dee Dee
- 176 replies
-
- 1
-
-
- muscongus bay lobster smack
- Midwest Products
- (and 1 more)
-
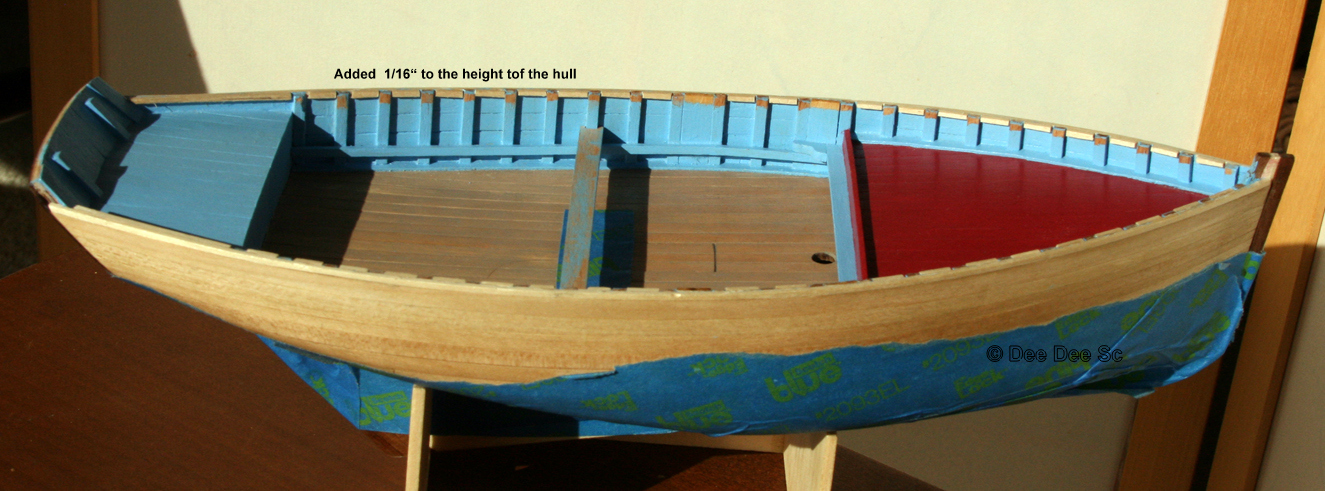
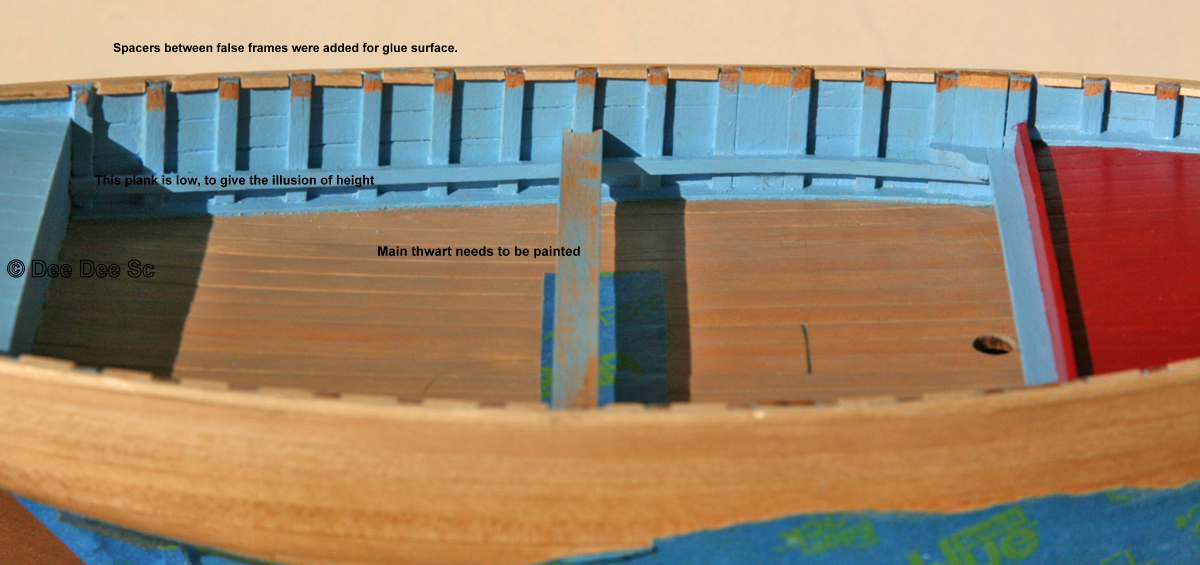
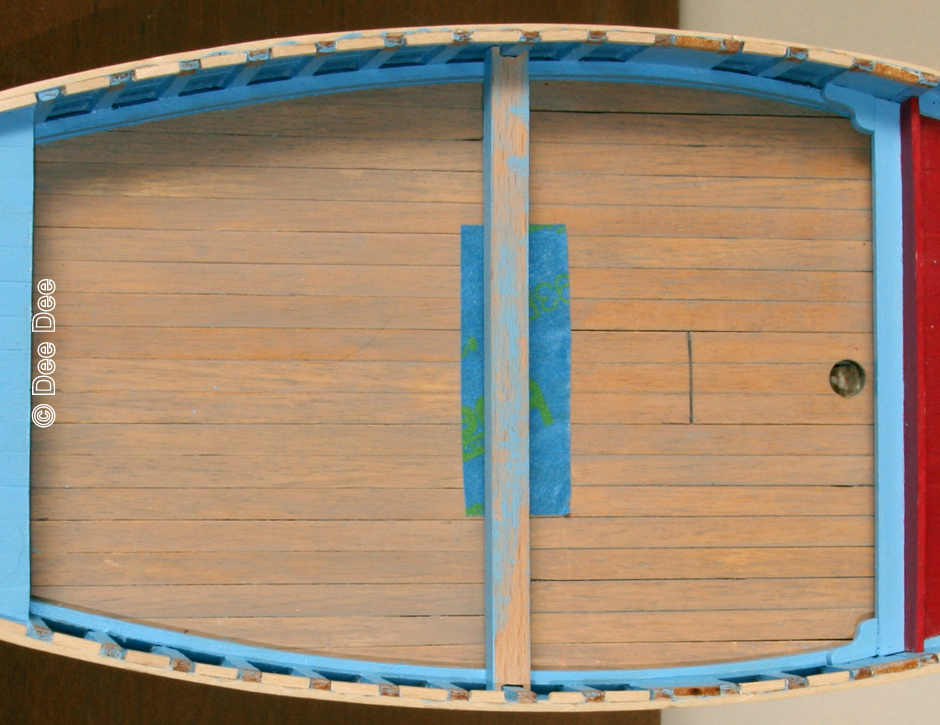
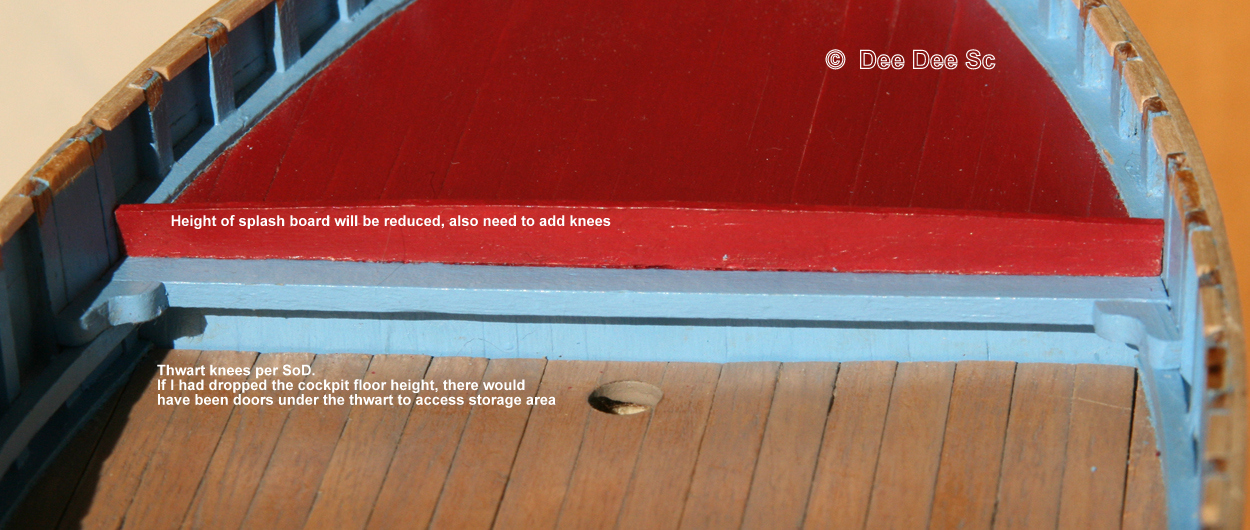
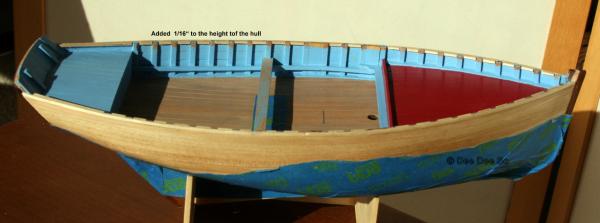
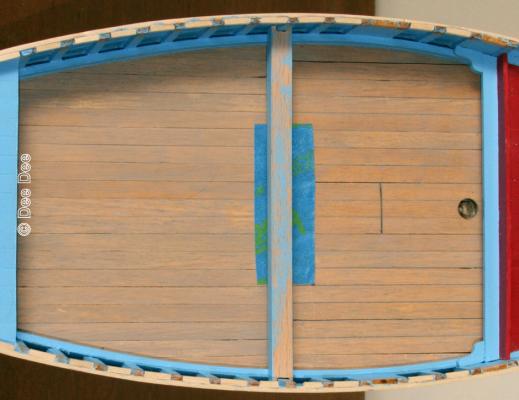
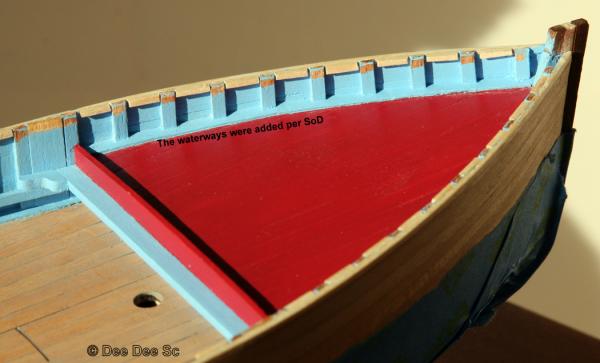
I've made some progress...... finally! In post #22, I made adjustments and increased the height of the hull, but it was not enough, so I increased the hull height by another 1/16". This interior planking is closer to the SoD than the kit. Since I didn't drop the height of the cockpit floor, I made a couple of adjustments, to give the hull the appearance of being higher. When I extended the length of the foredeck, I forgot to take into consideration the spacing of the false frames. But all is well as the spacing in the cockpit worked out almost perfectly. I was lucky this time! The main thwart covers the seam in the cockpit planking. The top of the thwart still needs to be painted. Waterways are not part of the kit, but they are a nice bit of detail. On the foredeck, the added height helped with the visibility of the false frames. Still need to add one more inner planking board, the cap rail and splash water. But with the added height, I now need to increase the height of the bow stem so I'll have room for the iron band for the bowsprit. The mast thwart, knees and splash board are courtesy of Starbucks coffee stir sticks. The port side knee turned out fabulous, the starboard side not so well and needs a drop of filler. I added the knees after the thwart was installed. In hindsight, I should have made the knees with the thwart and installed them as one unit. The splash board will be reduced in height. Frames on the transom are a bit uneven, but once I add more parts, it should be less noticeable Next up is adding the cap rail The cap rail will sit on a base of four layers of planking / framing that is 3/16" wide. I'll also start working on the rudder. Thanks for stopping by. Your thoughts, questions and comments are welcome. Have a great weekend! Dee Dee


-
Hey Eamonn! Thanks for stopping by! What I love most about this build is the abundance of photos of actual boats I've found online. As for notes, I'm a big fan of post-it notes, write it down and slap it on the wall! "Don't recommend 'Jay Walking' in Venice." Where's Monty Python when you need him..... John / Redbeard! Thanks for stopping by. Josh! The gray paint wash looks good, but it definitely needs more depth of color and texture. 'Weather It' is supposed to give the wood a deep silver gray look, which is what I was looking for! I definitely need to pick up a bottle of this stuff and experiment! Thanks for sharing! It's been almost a month since my last build update and I finally completed the interior planking. Just need a day with a little bit of sun so I can take some photos. And THANK YOU to all who hit the 'like' button! Dee Dee
-
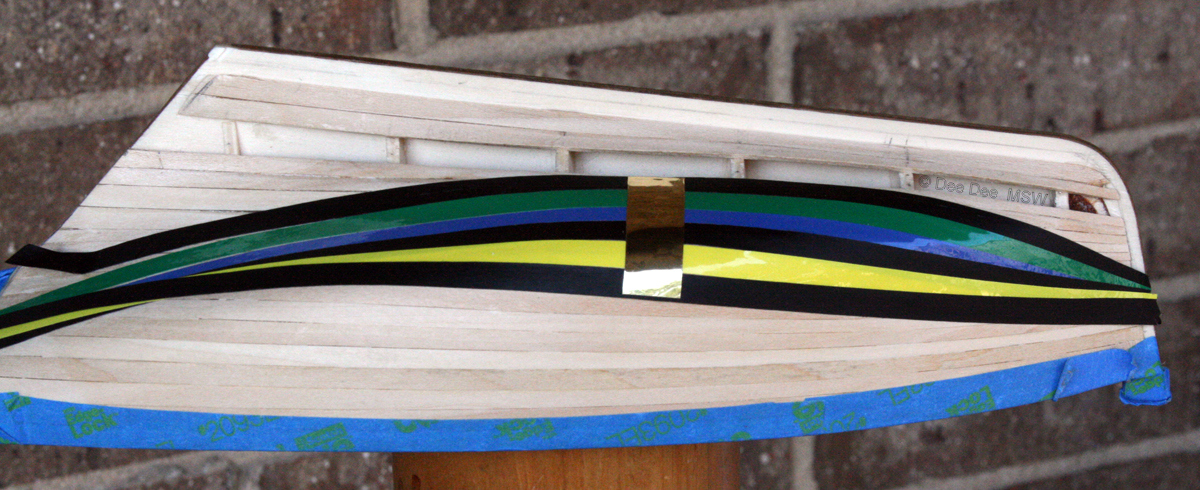
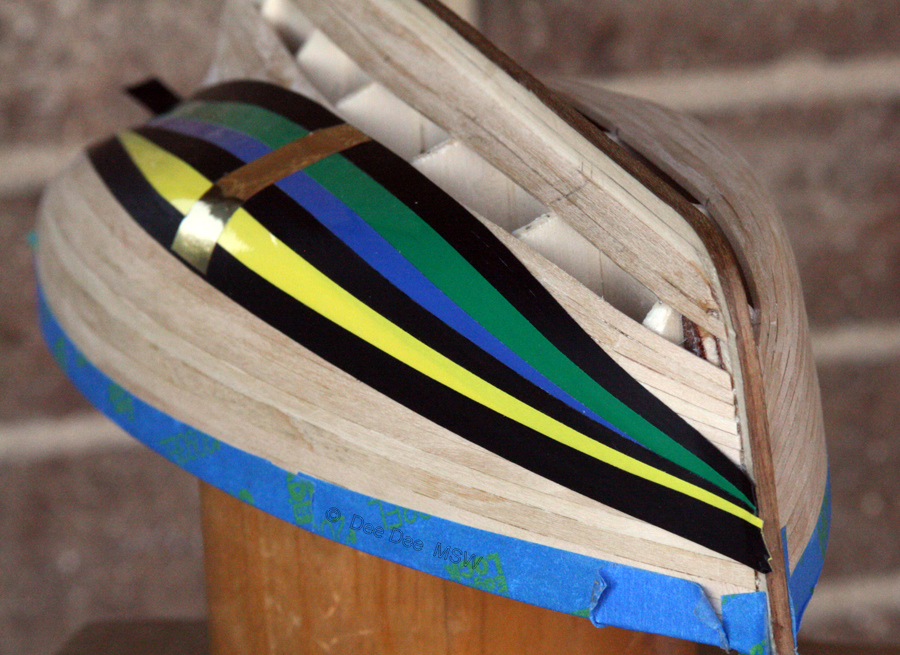
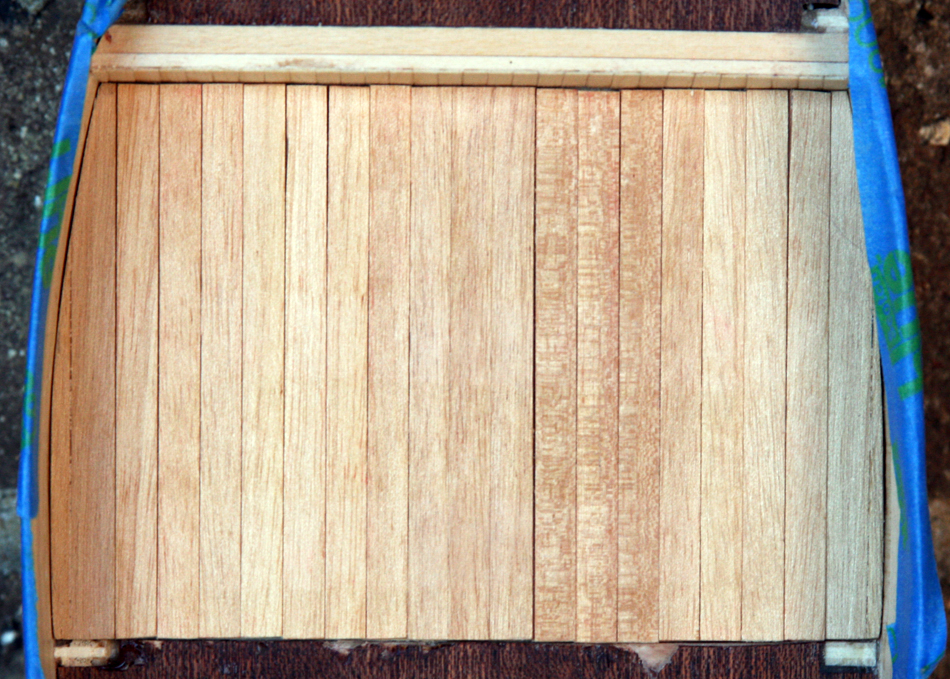
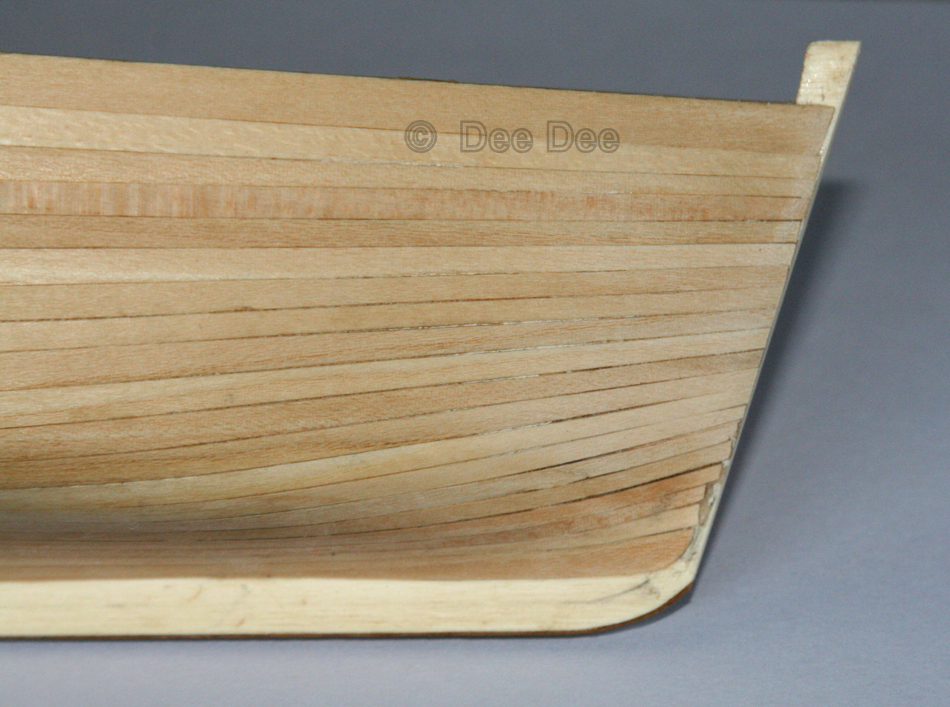
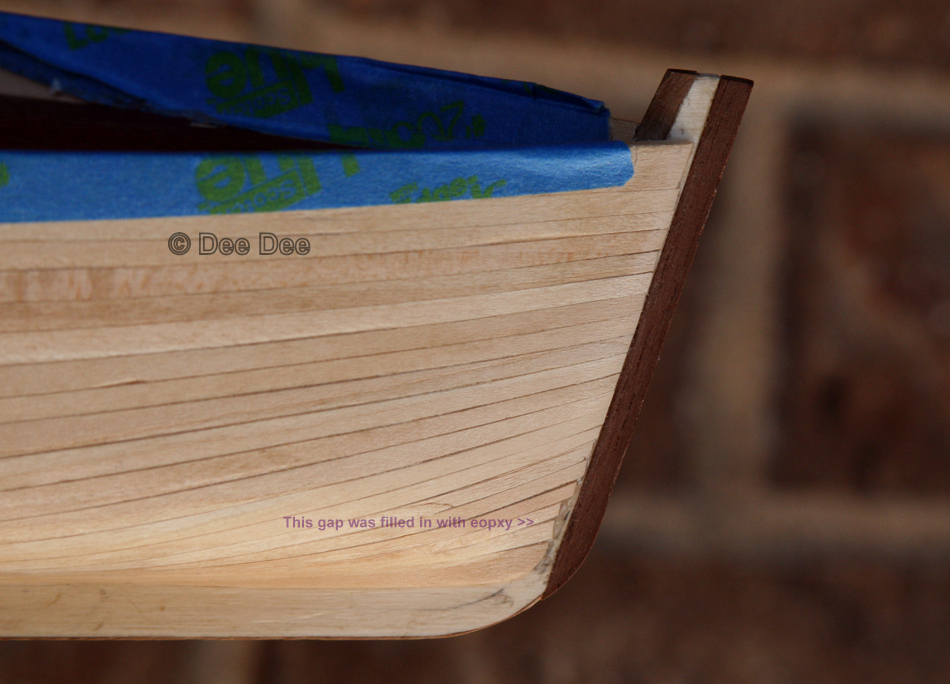
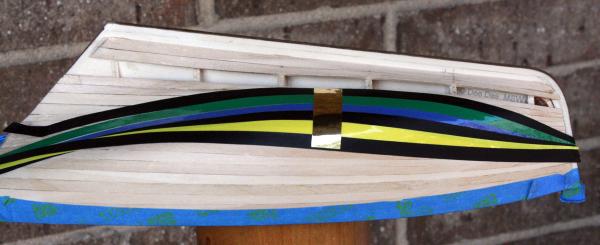
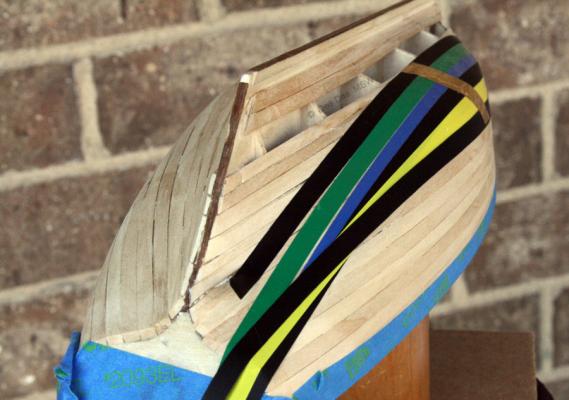
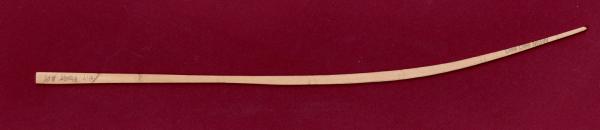
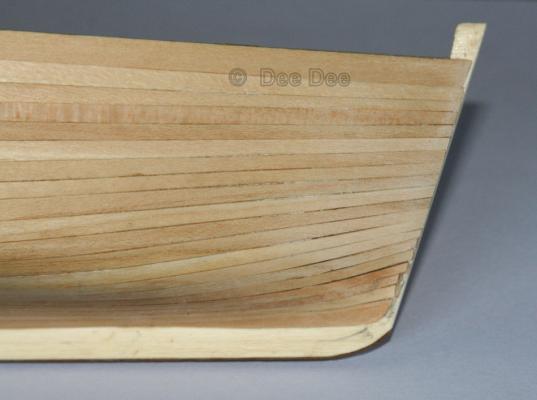
The problem with AL instructions is the same as with Corel - the translation was done by the editor / publisher who has minimal, if any knowledge about model ship building or naval architectural terms. Further, it sounds like the translator was Italian who learned near perfect English from a book, but lacks conversational English. I agree with Keith, AL made up the term 'master plank' and it should be a batten. (FWIW, Mamoli instructions are a bit better. Most interesting, is Mamoli instructions were translated into The Queens English.) Having some fun with Google translate: If you translate 'batten' into Italian, one of the noun results is 'la assicella di legno'. When you translate 'la assicella di legno' back to English, the result is 'wood lath' (the literal translation) or 'clapboard'. Having some more fun with the paragraph hircsailor referenced from the AL Swift instructions. (At times, these instructions sound like they were written by a politician.......) AL instructions are in black, my comments are in red Note: Planking should be done one at a time alternatively for Port & Starboard, to avoid possible distortion. Good advice! In addition to avoiding distortion, make sure both the port and starboard planks are even / same height. After the second hull plank has been fitted to both sides of the ship, the third hull plank should now be glued and nailed at the most convenient point and approximately half-way down. Repeat the third planking operation on the other side of the ship in the same way. This third plank is called the Master Plank and is most important because all other planks to be fitted will have to be shaped so that they will fit flush side by side with each other. My first question is: What is a 'most convenient point? What AL calls the 'Master Plank' is actually a 'batten'. If you decide to add a batten, the critical bit of info that is missing here is the batten needs to lay flat, no shaping / edge bending and follow the natural curve of the hull. Additional information on adding battens can be found in build logs. However, as Keith mentioned, this is a small hull and can be easily planked using the 'fan' 'tic' method, with excellent results. Also, skip the nails, just use lots of clamps. This is due to the curvature of the hull and when near finished, some planks may have to be cut to shape before gluing and nailing. Please note that planking should never be forced to take up an un-natural position against its own shape and for that it is much better to cut and shape where necessary and also before gluing and nailing. In reality, with the exception of the first / top plank, ALL planks should be cut to size and shaped before gluing. Here's a couple of fun photos from my current build. I laid out 6 strips of art tape, (same width as the planks) on a piece of glass and fixed them with the strip of gold tape. The tapes were transferred to the hull (parallel to the keel) and each strip of tape was then laid flat following the contour of the hull. The views from the bow and stern show the curvature of the hull the best. It is frequently found that most cutting takes place nearer the stern part of the hull and that most shaping work of the gull planks takes place nearer to the bow of the hull. I pulled out my kit and added the bulkheads to the keel, it appears there will be cutting (reducing the width of the plank) the entire length of the plank. Shaping is more commonly known as edge bending and there will be some edge bending on most of the planks. For a visual, here's a photo from my current build. This plank started off as a straight strip of lumber, 5mm wide the entire length. It was sized / cut to width using the fan / tic method. It has also been shaped / edge bending to follow the contour of the hull, the bow end is angled to follow the stem and parts of the top edge is beveled, so it fits snug against the prior plank. I will spend up to two hours shaping,fitting and beveling just one plank. Where cutting and shaping has to take place it is often a good idea to draw the shape and cut it on cardboard first to make sure you have the right size and shape. Now THIS is FUNNY!! The very last sentence suggests that for best results, the planks should be splied. A boat load of info on splied planking can be found in build logs and here: http://modelshipworldforum.com/ship-model-framing-and-planking-articles.php But again, this is a small hull and it can be planked with excellent results using the fan and tic method. END....................................... If your kit came with the 'Oregon Pine' for the first planking: Pine does not like to bend, regardless of how long you soak it. Save yourself a lot of frustration, use these strips to light your fireplace this winter and replace them with basswood strips of the same size. Keith, it's funny you mentioned learning from different directions. There's also learning from using different words. For example, many years ago I used to show horses and I had a terrible habit of dropping my right shoulder. When I dropped my shoulder, my horse would drop his leg and hit the fence. My trainer kept on saying "get your shoulders back!" One day, I decided to take a lesson with another trainer and after two fences, we had a quick chat and I never dropped my shoulder again. The difference was words, she told me to 'touch your shoulder blades together.' Dee Dee Edited 11-5-2014 to change photos. When you click on these photos, you will now see a much larger photo. In the photo of the plank, you can now see just how much this planked was shaped.


- 153 replies
-
- 4
-
-
- swift
- Artesania Latina
- (and 1 more)
-
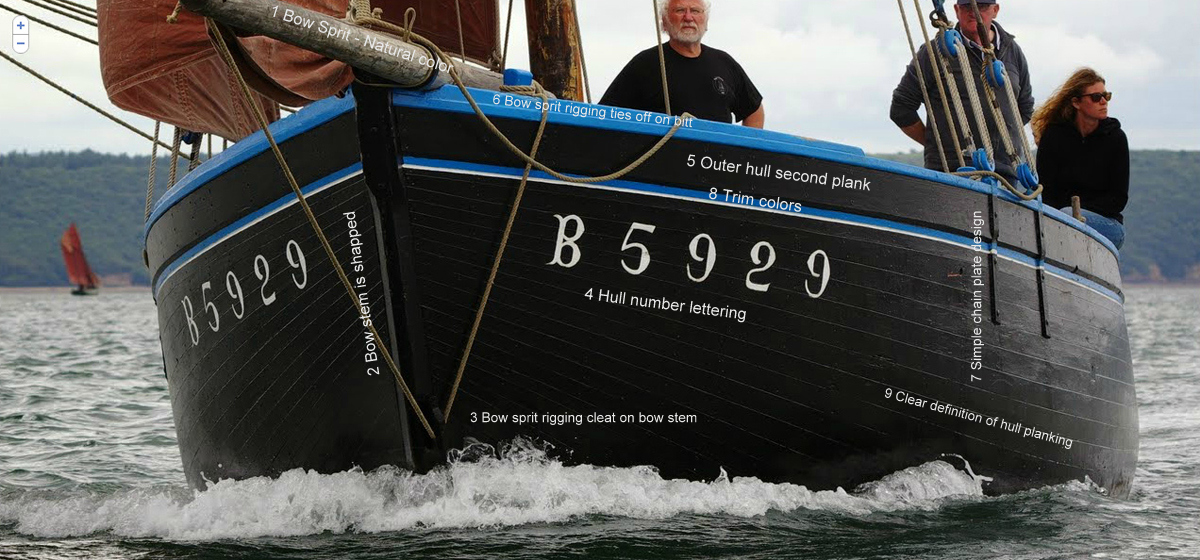
Bob, thanks for stopping by! Painting still scares me, so I've been doing lots of sample planks. The photo below shows the hull planking details and that is one of my goals. Eamonn! Thanks for stopping by! I'm looking forward to reading about your holiday to Venice! Keith, Thanks for stopping by! In the close up photo of the aft deck you can see some faint hazy gray spots down near the cockpit floor and near the transom. The foredeck red paint in the photo is a bit misleading; the paint is actually a bit uneven in coverage. Some weathering will be added to the fore and aft deck (and maybe even the cockpit decking) using dark and light gray. Funny you mentioned details. I spent Friday looking for photos with details. That's what I love about this build!! I've found lots of photos with details, details and more details! Did I mention I found lots of photos with lots of details!?! This one photo has nine (9) details that I'm planning to add to the build - and this is just ONE of many photos! I'm working on the detailed 'to do list' for all of the interior planking and making changes based on the photos I've found. What really makes this fun, is my build is based on a living, working boat! Thanks for stopping by! Dee Dee

-
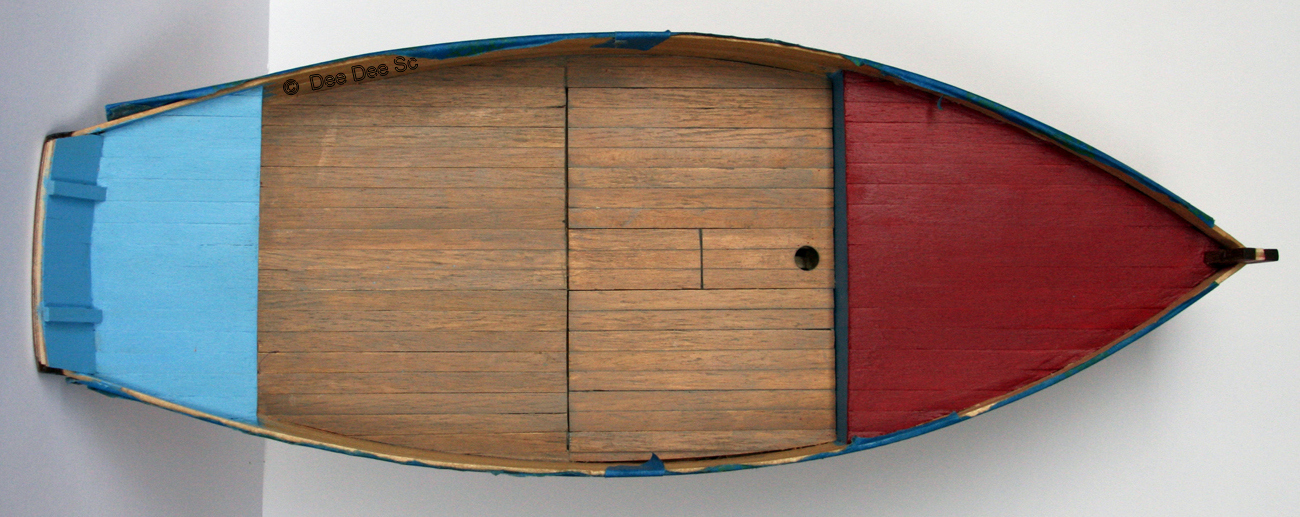
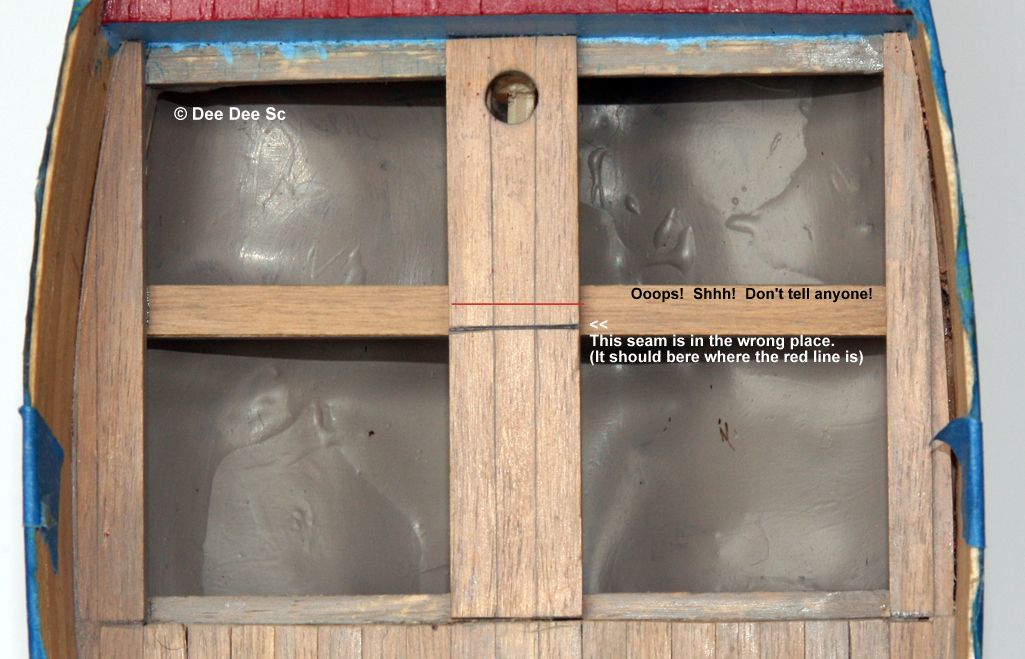
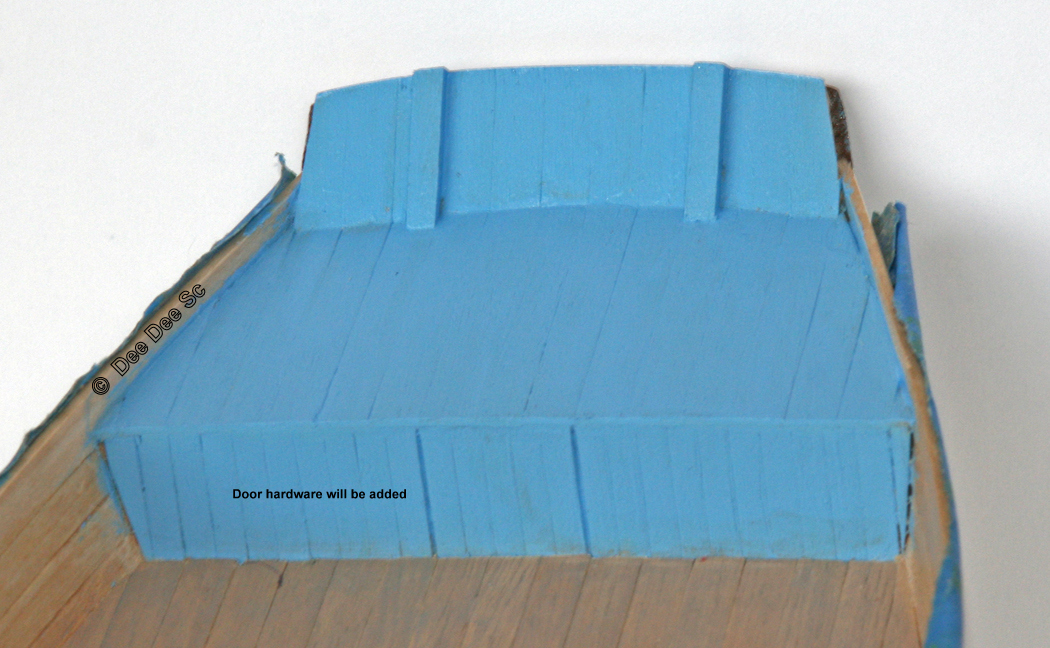
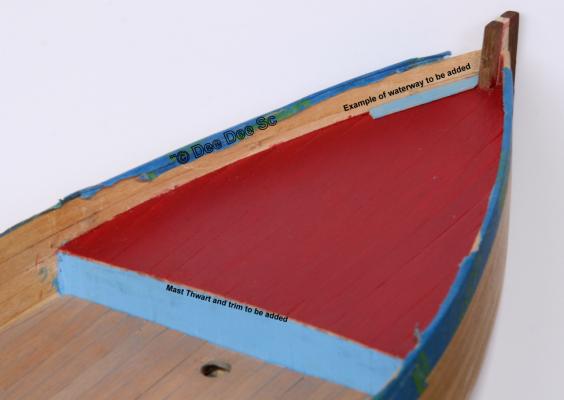
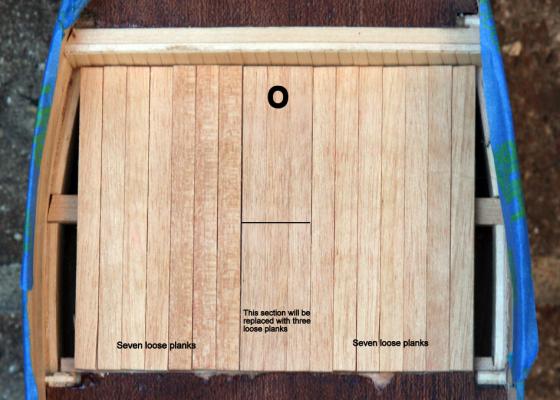
Finally! I reached the next target point in my coquillier build - All decking installed. To get here, I made a list of every little detail for the deck / floor planking, face planking and more. It was sort of anal with 38 line items, but once I started working on the list, the work flowed smoothly. In the end, I got the effect I was looking for and I'm happy! It would have been easier to 'fake' the fish well planking details. But it was worth the time and effort to add detail. Now, when someone asks me about the couquillier, I can do a 'show and tell' about the story of the couquillier. Plus, I learned a lot of little build details that will carry forward to future builds. It was worth the time spent! An 8" / 8mm thwart above the seam will partially hide the gap. The cockpit floor boards were finished with a gray paint wash. It only took a few days to loose one of the plank, specifically, the starboard side curved plank! That was way too easy to loose, so I made a few changes: The curved planks are glued to the bulkheads. The 7 loose planks on each side are now glued together. Instead of the 3 short loose planks aft of the mast, I scored a line to give the impression of the 3 loose planks. Don't tell anyone that this (false) seam is in the wrong place. When all of the boards are in place, no one will know! The height of the transom was increased by 4". This might be a bit too high, I'll decide after I add the cap rail. I left the excess width on the transom to protect the planking from eroding away. It will be removed when the cap rail is added. The opening for the tiller will be added when I install the rudder. Most couquilliers have storage under the fore and aft deck accessible through doors. I'll add cleats and hinges to define the two aft deck doors. I scraped down the foredeck planking a bit too much and lost some planking definition - lesson learned. The red paint is intentionally uneven - it's a work boat! Since the foredeck was extended, a few adjustments are needed for the mast thwart and trim. That little blue strip near the bow stem is an example of the waterway, it will be painted before installing. Next up is all of the interior planking, waterway, false frames, thwart knee, mast thwart and a few more parts that are shown in the photos of the Shepherdess of Domrémy As always, I appreciate the time you have taken to stop by to read my build log. Your feedback or suggestions are welcome. Dee Dee


-
Jesse, Thanks for stopping by. The design of the hull itself is very strong, but that 'puddle of epoxy' makes it lethal weapon! Your Scottish Maid is looking fine! I like your clothes pin solution for serving the lines, hope you don't mind if I borrow it! Eamonn It's always nice to have you stop by. Ha Ha! I stocked up on epoxy and I still ran out! Go figure! Looking forward to seeing your mast. I do a little bit of sanding in the house, but making a mast gets a bit messy, to I'm thinking I should start thinking about making my mast in the next few weeks, before it gets cold outside. Jack! Thanks for stopping by! Shortly after I started building my coquillier, I read an article that inspired me to add the well feature. So, this really isn't rework, rather, insufficient research before I started the build. Maybe I should start researching info on my next build - if only I could decide what I want to build next..... Cap'n'Bob Thanks for stopping by! Our Drafters who worked on the large commercial units used electric erasers. I've been working on the plan for the next few parts and I'm on my 3rd or 4th edition..... Brian, I started planking with the tick method, but found it easier and quicker if I knew how wide each plank needed to be at each bulkhead, bow/transom. With 18 planks on each side, if each plank was just a mere 0.25mm too wide, that totals up to 4.5mm or one plank. In post #39, you can see the measurements. The bow started off at 2.36mm, the last couple of planks were 2.10mm. I remeasured with 8 planks, 4 planks and 2 plans to go. Here's a photo of plank #17, just needs to be beveled and it's ready to be installed. Thanks to all who stopped by and all that hit the like button. Off on another business trip, be back sometime next week. As always, thanks for stopping by, your comments and suggestions are always appreciated Dee Dee
-
Welding a broken bandsaw blade. Bad idea?
Dee_Dee replied to qwerty2008's topic in Modeling tools and Workshop Equipment
Sorry Dave, I never said I ran a band saw, I was referring to ASME welding specs. What ever. -
Hi Matti, It's been a while since I posted, but I've been stopping by frequently to catch up on your Vasa. I love it! Dee Dee
-
Bob, Thanks for posting the photo of your template for the cockpit seats. I need to make a similar part on my current build and finally!!!! I know how to do it! I have the 18th century longboat kit on the shelf and your build log is a fountain of information! Thanks for sharing your build! Dee Dee
- 277 replies
-
- 1
-
-
- model shipways
- 18th century longboat
- (and 1 more)
-
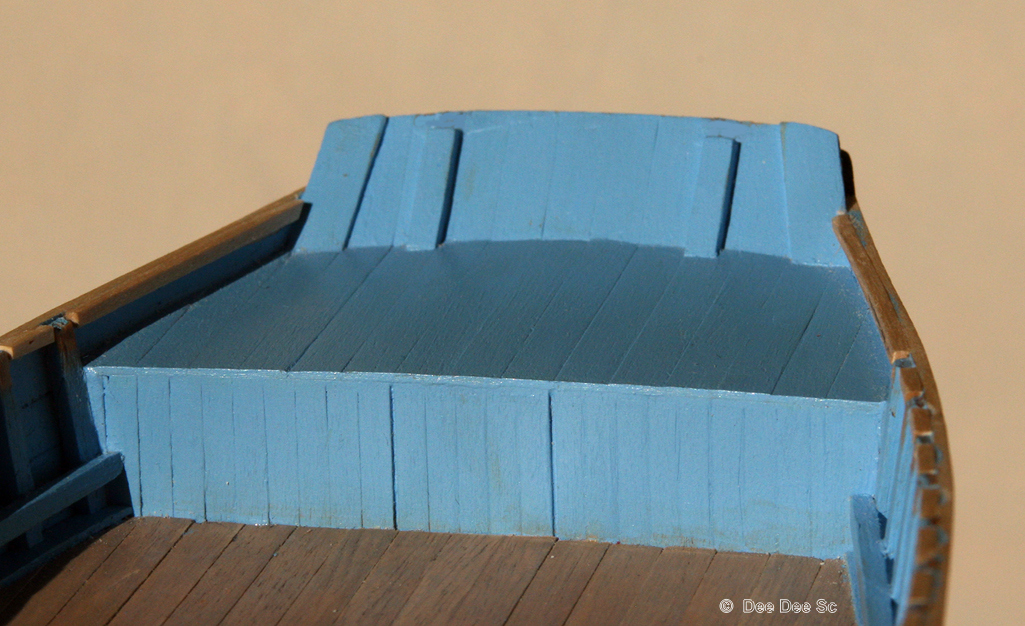
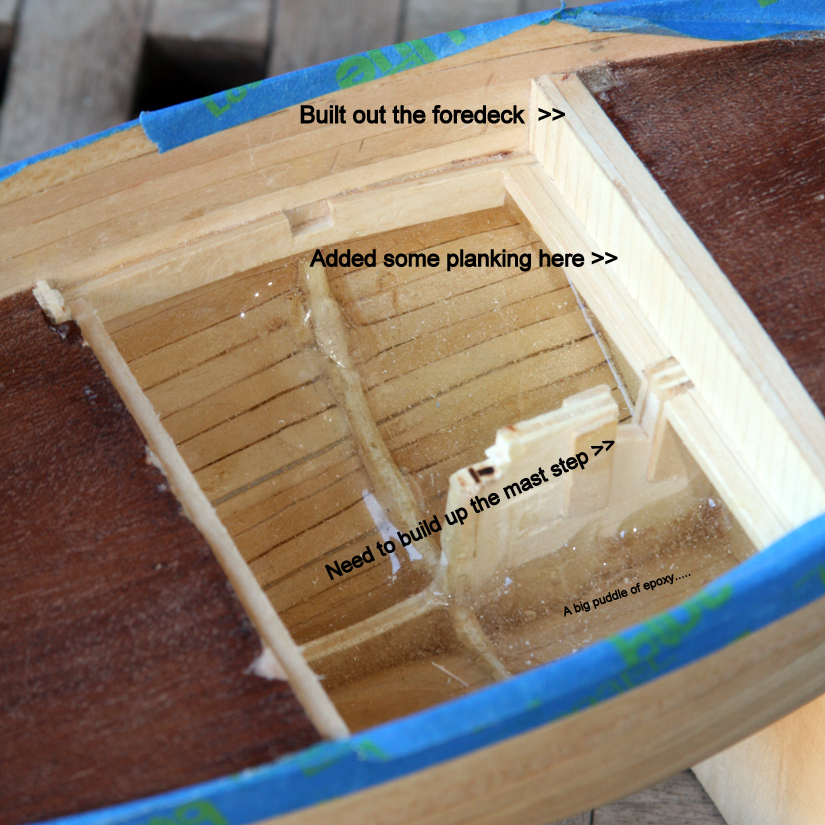
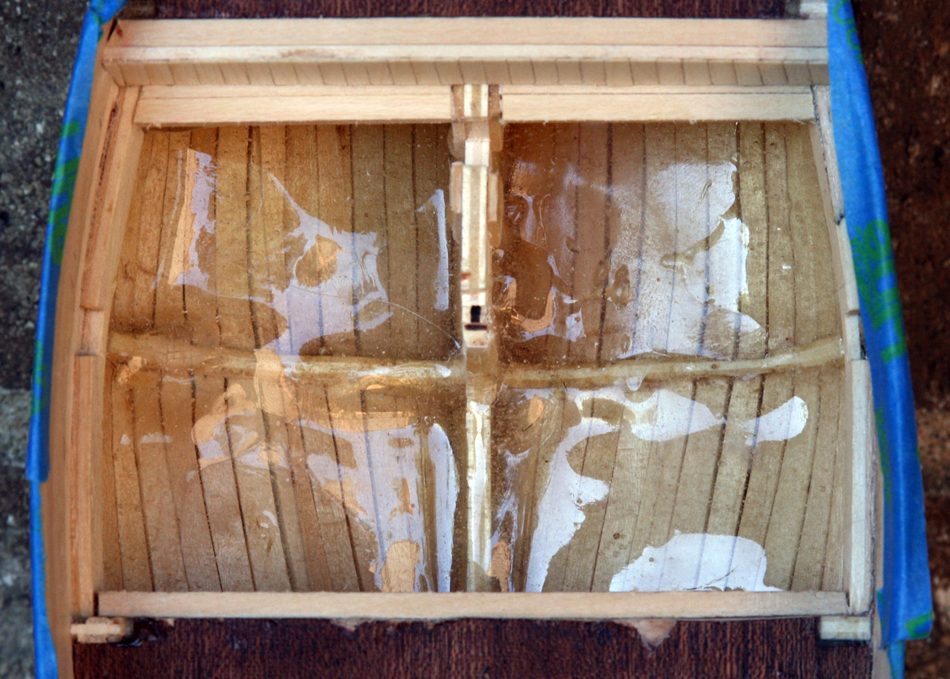
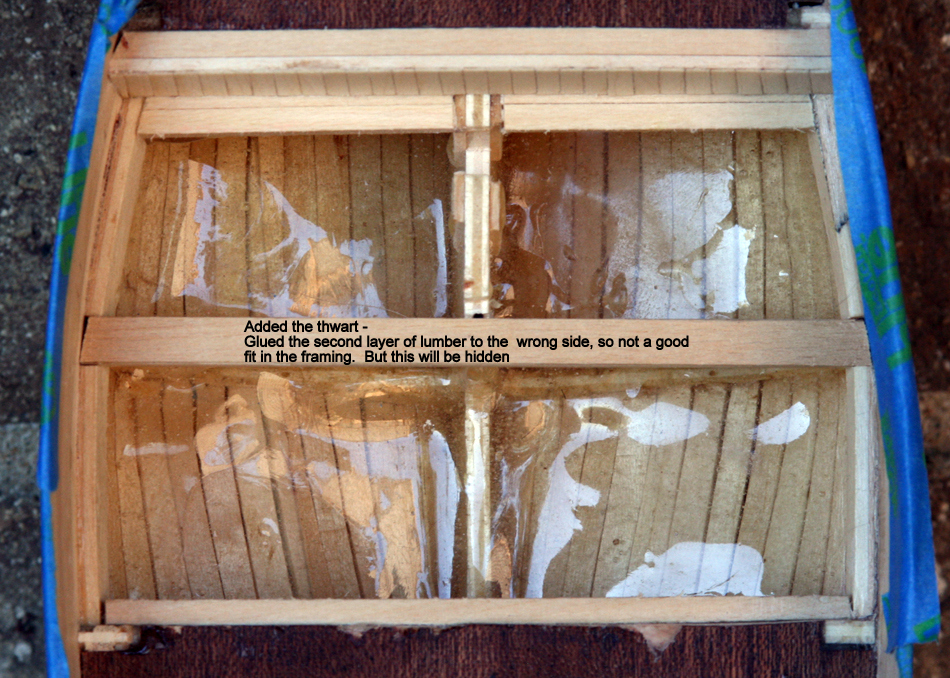
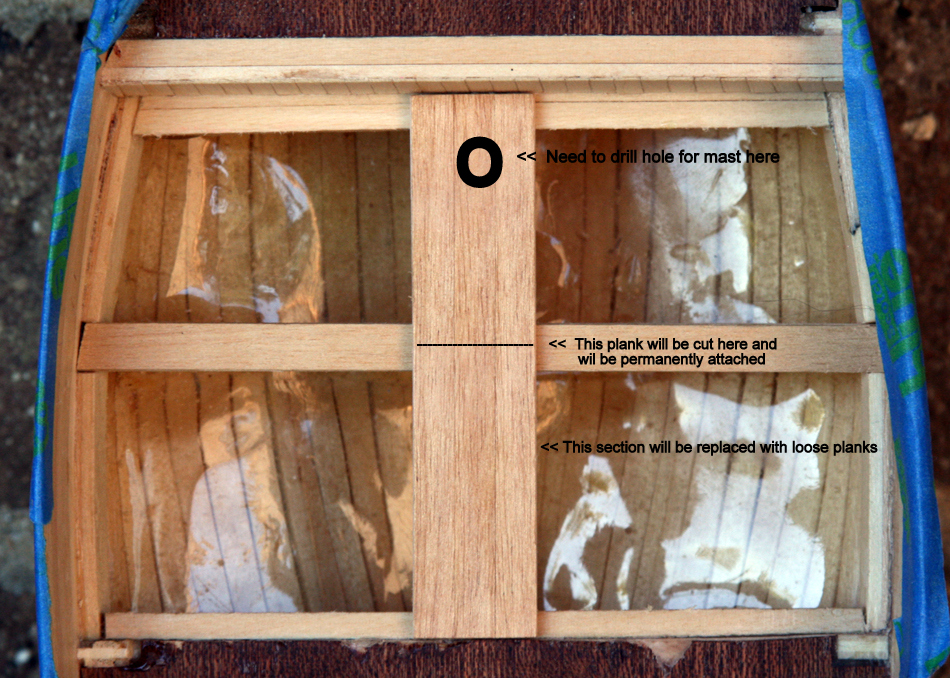
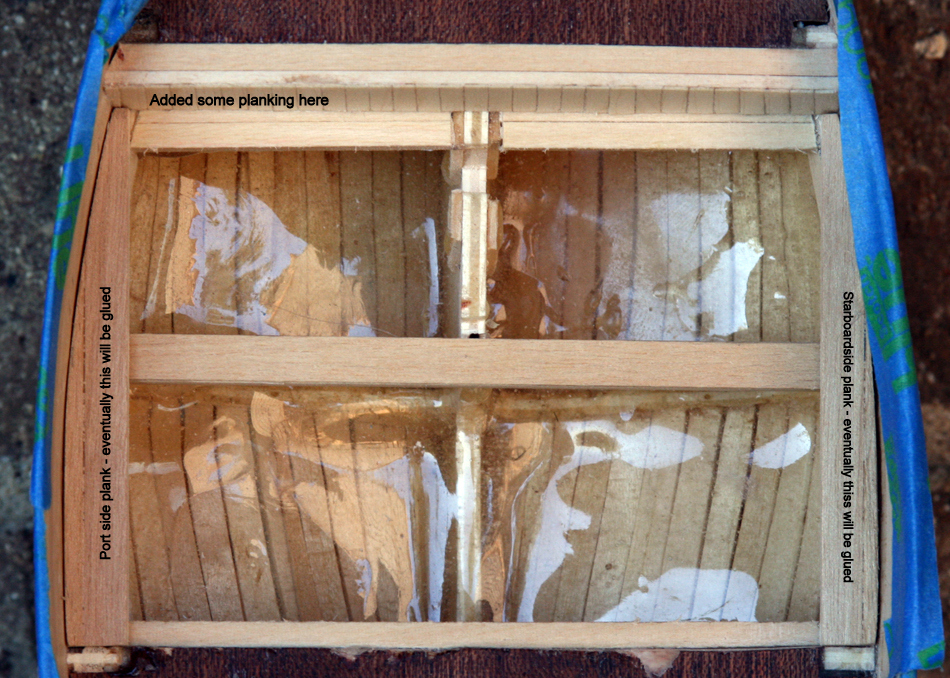
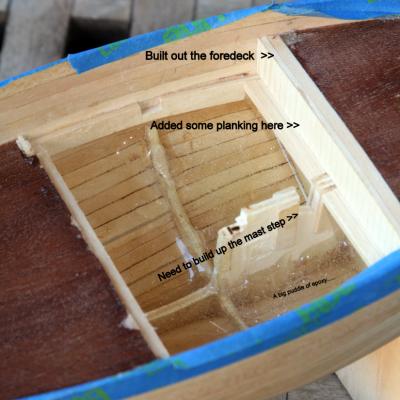
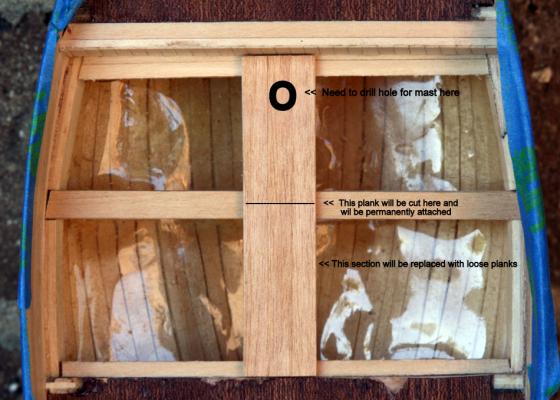
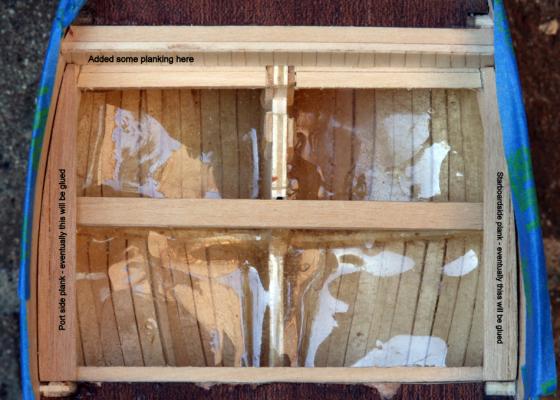
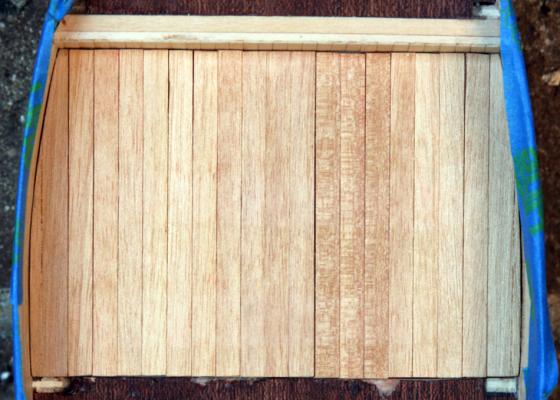
Again, the obvious is I should have done more prep work back on page one: Drop the cockpit floor height, build up the mast step, the bow stem, framing for the wells and more. Oh well, but I'm learning and having fun. It was a puzzle, trying to figure out what to do first, but slowly I figured it out. After removing the balance of the false deck, I removed most of the 6th bulkhead and the keel between the 6th and 7th bulkhead. Added outer framing on all four sides. The mast thwart is 12" wide, that's too wide, so I added an extra 6" of framing and built out the foredeck. Since the hull is single planked and a few spots are a bit thin, I add some epoxy for strength (OK, I added A LOT of epoxy.....) Before the side framing was glued, I cut a notch for the thwart. This first section of planks will be cut in half, at the thwart and permanently glued, still need to drill a hole for the mast. Three short planks will be cut and fitted. In post #2, in the 6th photo, you can see these short planks. Next up, i made 20 floor planks, only needed 14. I'll use 3 planks when I cut down the center plank and the other 3 will be for 'just in case', as in just in case if I / when I loose one or two............. Next, need to make the planks that will fit on each side. These side pieces were an adventure to make! These will be permanently glued, which isn't quite right, but that's the way it is......... Finally, all of the floor boards in place! It's a real tight fit and they easily pop out, so will need to reduce each very, very slightly. Before I glue in the end pieces or do anything else, I first need to decide if I should do some painting first. This took a month to figure out and make all the pieces, but I'm happy with it and again, I learned a lot! As always, thanks for stopping by, I appreciate your interest in my build. Dee Dee


-
Jpett, Thanks for stopping by Thanks for stopping by Adam. I do like the walnut, but the hull will be painted. What I really like about the walnut are the nice sharp edges. Thanks Cap'n'Bob. I really appreciate your taking an interest in my build. John, I use the fan method, but take it a step farther. After I mark off the frame, I calculate the with of each plank at each bulkhead, bow and transom. In post #39 I posted a copy of my measurement plan. This way, I could custom fit each plank to make sure I stay on target with the tick marks. With 18 planks, if each plank was a quarter millimeter (0.25mm) too wide, that adds up to 4.5mm's or one plank. In post #45, is a photo of plank #17, shaped and edge bending. And THANK YOU to all who hit the like button Dee Dee Edited to correct 'Adam' to 'John'
-
John, Your planking is looking good! I calculated the number of planks the same way, then added two more planks. Since my hull is going to be single planked, the sides of each plank had to be beveled to get a tight fit. If I had just used 16 planks, there would be no room left at the bow, but there would be numerous gap towards the stern and I would need to add at least two stealers. Keep up the good work and go slowly! Dee Dee
-
Hans, Thanks for stopping by and the kind words. I really like your Batavia! FWIW, Batavia is also the name of a suburb, west of Chicago in the Fox River Valley. Now I know where the name Batavia came from! Bob, This hull was a challenge to plank, but I learned a lot! Umm, as for those oysters..... Bob, I like your idea of sesame seeds, sunflower seeds also look good. But not sure if seeds will be stable over the years, so possibly bits of Fimo clay. What ever I use, I'll add a layer of glue and roll it in crushed shells for texture and color. But first, I need to make those crates. As for the bow! I liked the way the stern stem turned out and decided to do the same with the bow stem. To get the planks to line up neat and tidy, the bow stem was removed And then I added a new walnut bow stem. It looks good! But the lines on the bow stem are not parallel and it's a bit curved, so I need to make some corrections. It's an easy fix, but the obvious is this should have been done on page one. I've spent weeks trying to figure out how I'm going to do the cockpit decking and it's looking good. Have a few more pieces to add and shape and then I'll add some photos. As always, thanks for stopping by. Dee Dee

-
Todd, Josh recently visited Annapolis and documented his visit here: http://modelshipworld.com/index.php/topic/6561-naval-academy-museum-visit-annapolis-md/ You two need to chat! Dee Dee
-
Todd, When you install the bulkheads, push F4 back so it fits tight against the false keel. Getting the bulkheads square is fairly simple. Some use square wooden blocks, lego blocks, the one I like is alu angle. The Mad Chemist AKA Keith, did a great tutorial on squaring up the bulkheads in his Swift build log. Check it out here, starting with post #5: http://modelshipworld.com/index.php?/topic/997-swift-by-themadchemist-al-150-the-dock-side-of-the-moon-pink-floyd-tribute-build/page-1 Dee Dee
-
Todd, The Chesapeake Bay is filled with history and stories of the people that worked the waters and in the surrounding towns. College in Annapolis!!! No wonder the Flattie spoke to you! For research, I would like to suggest Howard Chapelle's book "American Small Sailing Craft." http://www.amazon.com/American-Small-Sailing-Craft-Construction/dp/0393031438/ref=sr_sp-atf_title_1_1?ie=UTF8&qid=1409451129&sr=8-1&keywords=American+Small+Sailing+Craft%2C#cm_cr_dpwidget I would also like to suggest Mario's Chesapeake Flattie Intarsia build log. http://www.modelshipbuilder.com/e107_plugins/forum/forum_viewtopic.php?5435 Take your time and enjoy the journey! Dee Dee
-
Hi John, I have the Swift on the shelf and it might be my next build. BobF did a great tutorial on planking on his 18th century longboat, very informative and lots of photos on how he did it. He goes into using the fan, marking the hull, shaping the garboard strake, using the fan, shaping each plank and edge bending. This helped me a lot. http://modelshipworld.com/index.php/topic/1465-18th-century-longboat-by-bobf-ms-148-tri-club/page-2 Dee Dee
- 159 replies
-
- 1
-
-
- swift
- artesania latina
- (and 1 more)
-
Josh! Thanks for stopping by. Remember the crates? Yep! THOSE crates! I need to make some of those crates, fill them with oysters and put them in the well. Adam! Welcome aboard and Thank You! I'm sort of new to this hobby. I have a few kits on the shelf that exceed my skills, so I've challenged myself to learn how to research, add details, use alternative materials and learn other skills I'll need for those kits. It can get a bit scary, but it only wood and I'm having too much fun! Cap'n'Bob Thanks for stopping by. Yes, the walnut gives the crisp corners that are difficult to get with basswood. Eamon Good question. Short answer: Nay! I just sawed it off, slapped on some glue, did a bit of sanding and called it done! Long answer: Eek gads! I had been thinking about this for a while. When it finally came time to do it, I kept on putting it off until I had the courage to execute the plan. I scored the cut line to keep the saw from floating off, and just sawed very, very slowly. The biggest challenges were making sure the cut was at 90* and getting a straight line from the now planked transom and all the way down the keel. Wait till you see what I did with the bow...........