Dee_Dee
-
Posts
290 -
Joined
Content Type
Profiles
Forums
Gallery
Events
Everything posted by Dee_Dee
-
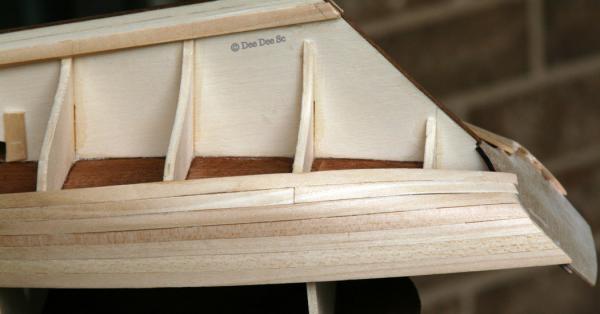
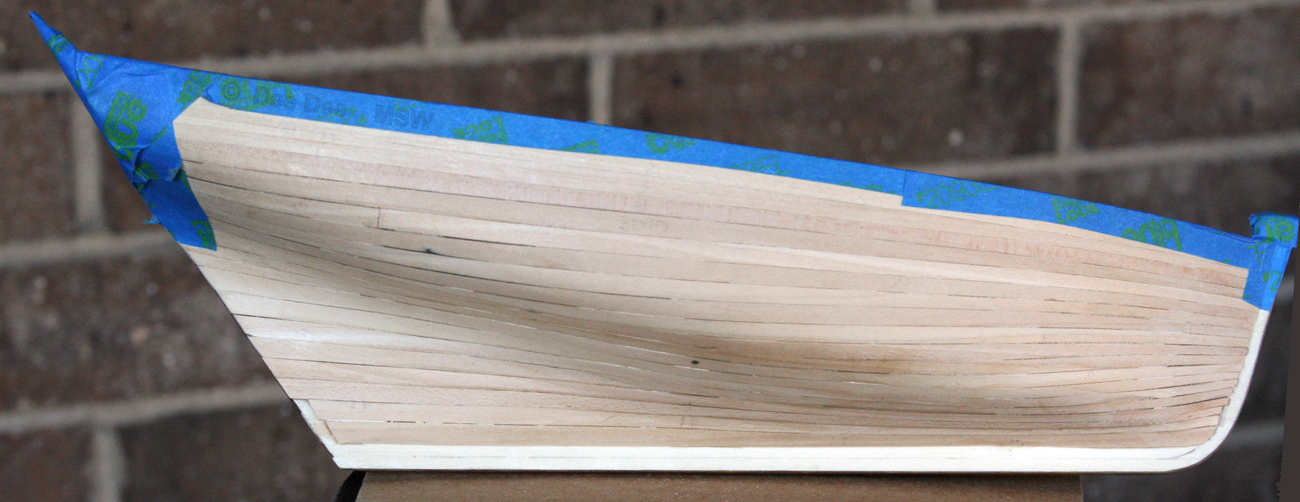
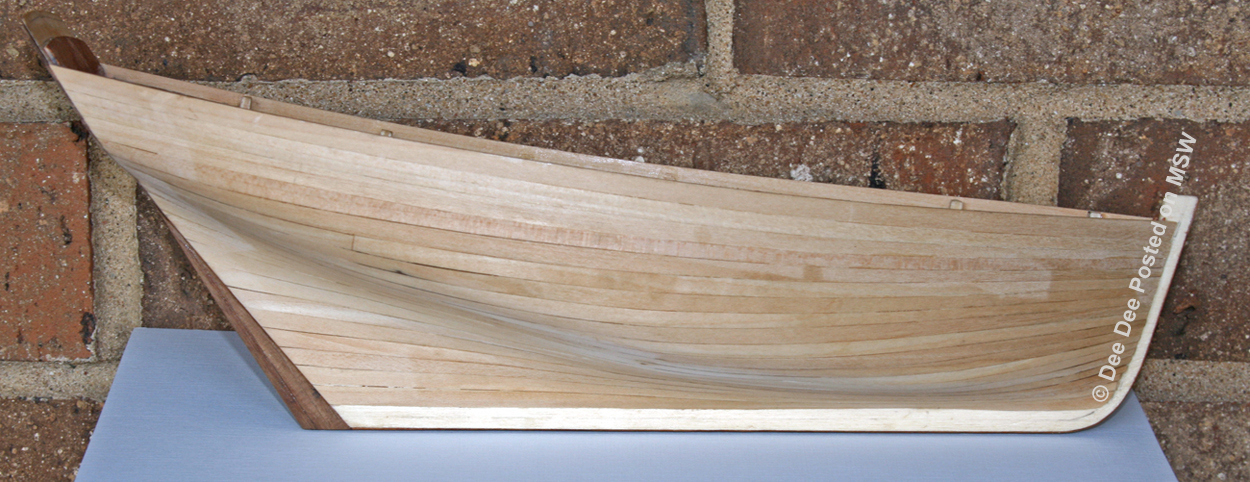
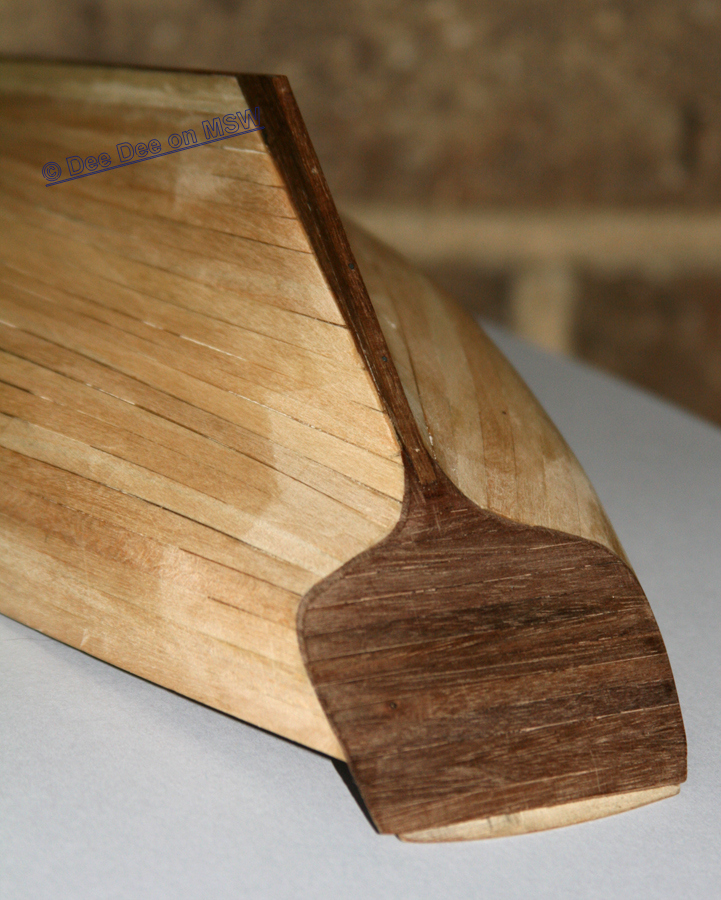
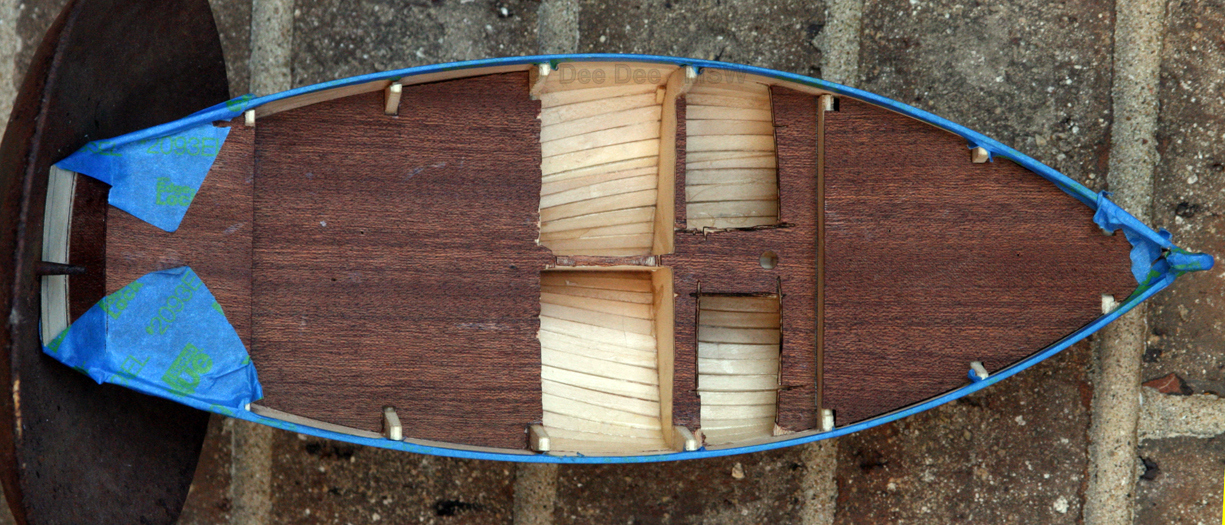
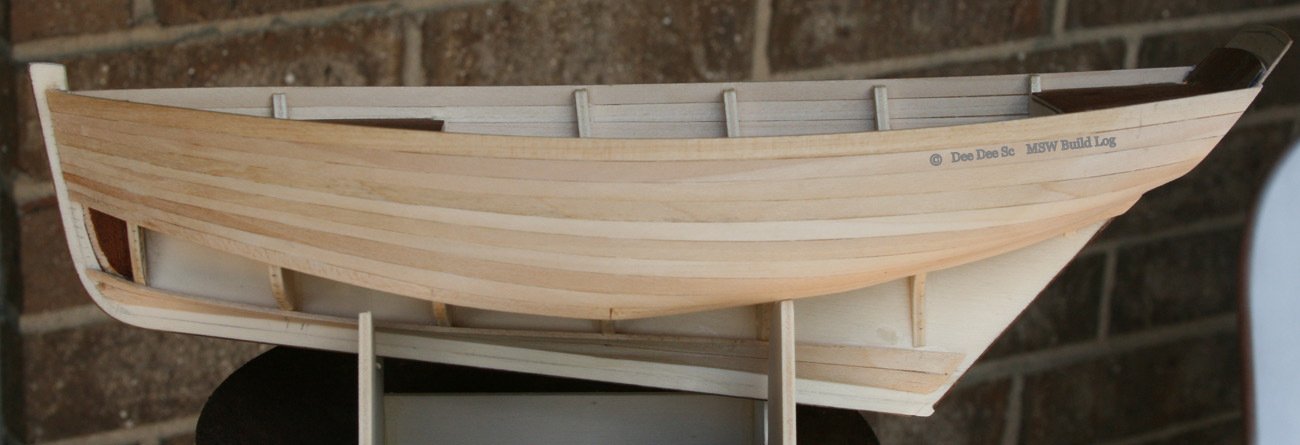
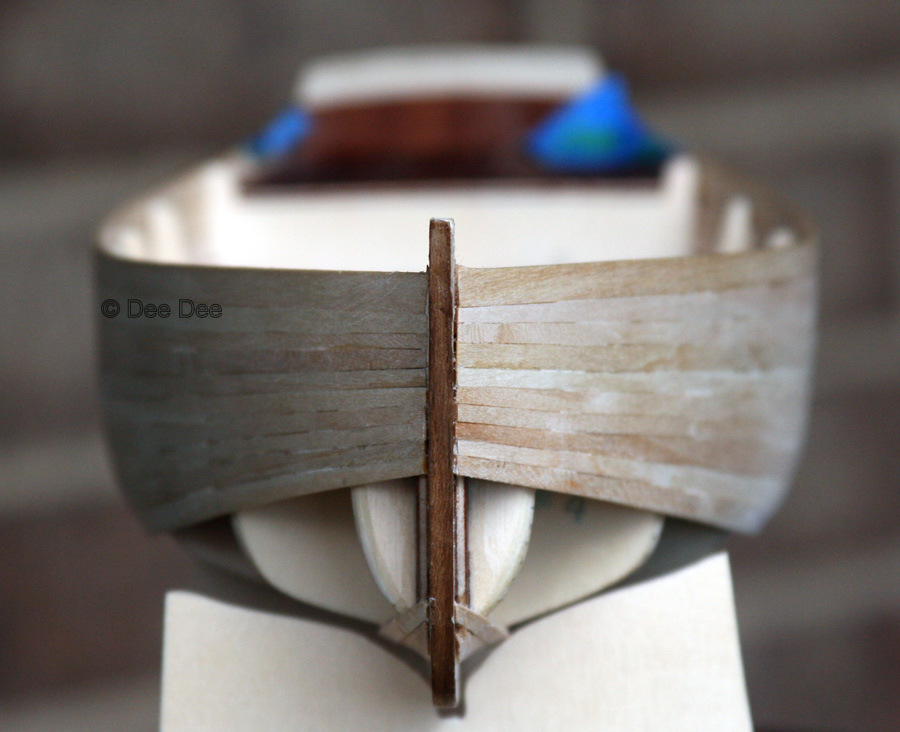
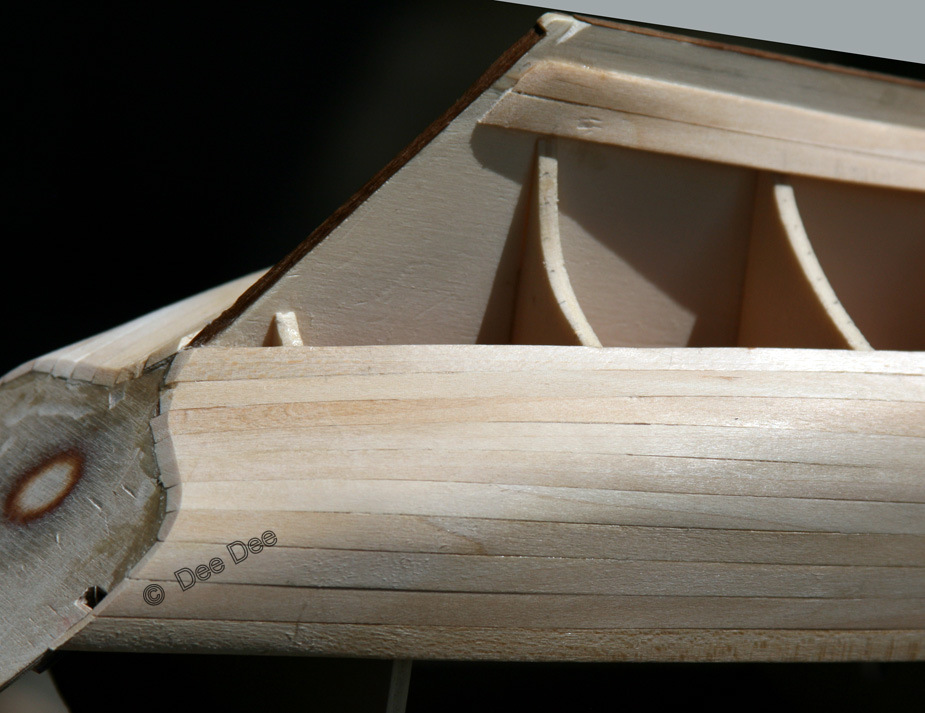
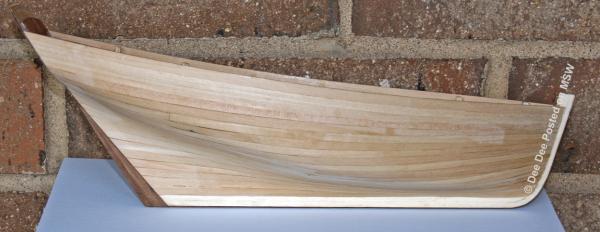
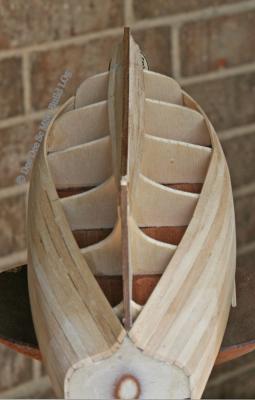
My problem in post #41, was how am I going to get the planks to land all straight, neat and tidy on the keel as shown on the drawing (the purple section.) This is how the stern looked after I finished planking last week. Not very promising. So, I took a deep breath and cut off a section of the planked keel and added a walnut stern stem. And the planks line up straight, neat and tidy!! The transom was planked before adding the stern stem Working on the framing around the fish wells, have a few more parts to figure out, but it's looking good. Thanks for stopping by! Dee Dee


-
Jack! Oh no! Please tell me I didn't jinx you! But all looks well! I love the stained oak color! I need to experiment with stains to get a similar color for the floor planks on my build. In regards to nails for the shield ornamentation, after seeing Von Kossa's photo, I would like to suggest "Nifty Notions appliqué pins". They're made from nickel plated steel, the head measures 1.20mm with a slightly domed shape and the shaft is 0.50mm. The 1/2" long pins are hard to find, but the 3/4" long pins are available. You can find these at specialty quilting stores and I've seen on ebay, a box of 200 pins cost ~$8. Your drilling 30 holes and then adding 720 nails, gave me the courage to cut off a section of my planked keel and replace it with a stern stem! Dee Dee
-
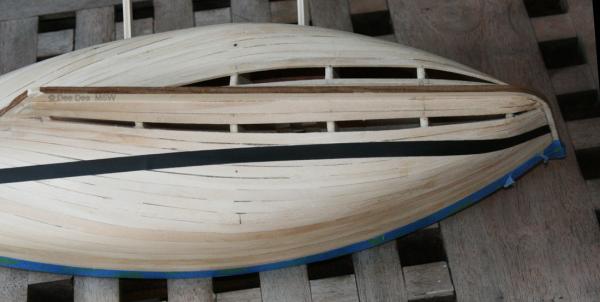
And then there were two planks..... then one plank and (almost) done with planking! The 2nd to last plank was made same as the others with updated measurements. The last plank was made almost the same. The major difference is the final plank was beveled on both edges so it could 'press fit' for a snug fit. Added some glue and called the planking almost done! Before I sand the bump and lumps, I'll add a layer of epoxy on the inside of the hull. The ends of the planks will be trimmed up to a nice straight line. The garboard strake, in addition to needing a bit of filler, is a bit too wide at the front. The starboard bow needs a bit of clean up. The planking got a bit snug at the bow, but ALL planks run the full length of the hull with no add / dropped planks. And then I did THIS to the deck! I got carried away when opening up some of the false deck to add the epoxy. I decided to add the wells, framing, mast shoe / step. Good idea, until I figured out, that to do it right, I should have done some of the prep work on the false keel for the mast shoe / step and individual bulkheads for framing (back on page 1). Oh well, I'll figure it out! It won't be right, but it will be close. In this photo of the Shepherdess from Domrémy, you can see the cockpit floor boards are in two sections. From the thwart forward, the floor boards are loose to access the fish wells below, and aft of the thwart, the floor boards are fixed. The oyster would be stored in the (wet?) well below the floor boards. At the end of the day, the boards would be put back and head for home. While I'm trying to figure this out, I'll add a layer of epoxy to the inside of the hull and try to get rid of THAT bump on 14 & 15 and work on the stern post. As always, thanks for stopping by. Dee Dee


-
Bob, The black tape was (visually) aligned with the keel and yes, a slight shift would be a completely different pattern. Edge bending is definitely wonderful. A major lesson I've learned while planking this hull: It's not 'good enough' to do the same general edge bend on all the planks, rather, each plank needs to be custom shaped to get a tight fit. Thanks for stopping by! Dee Dee's
-
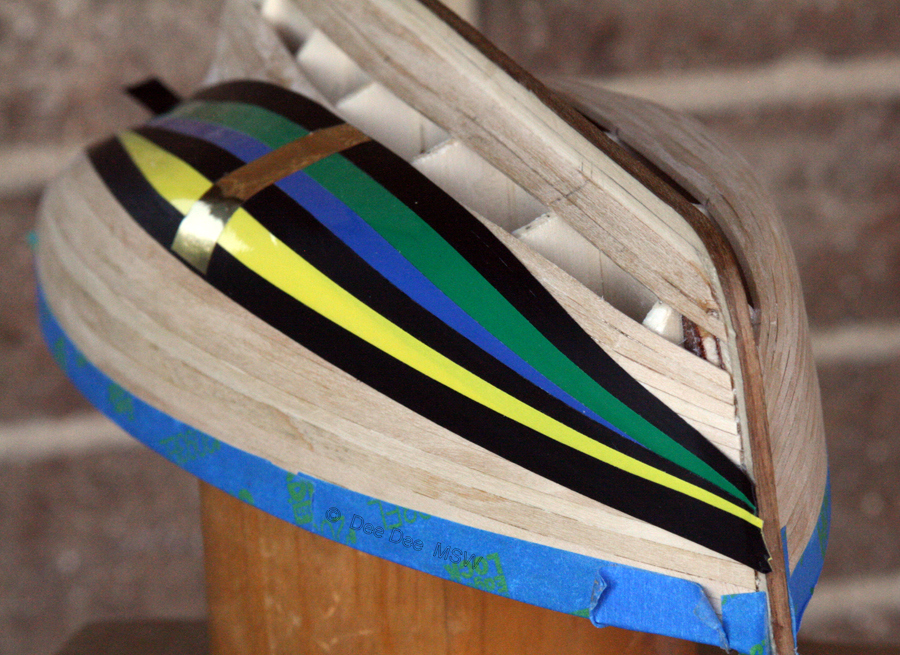
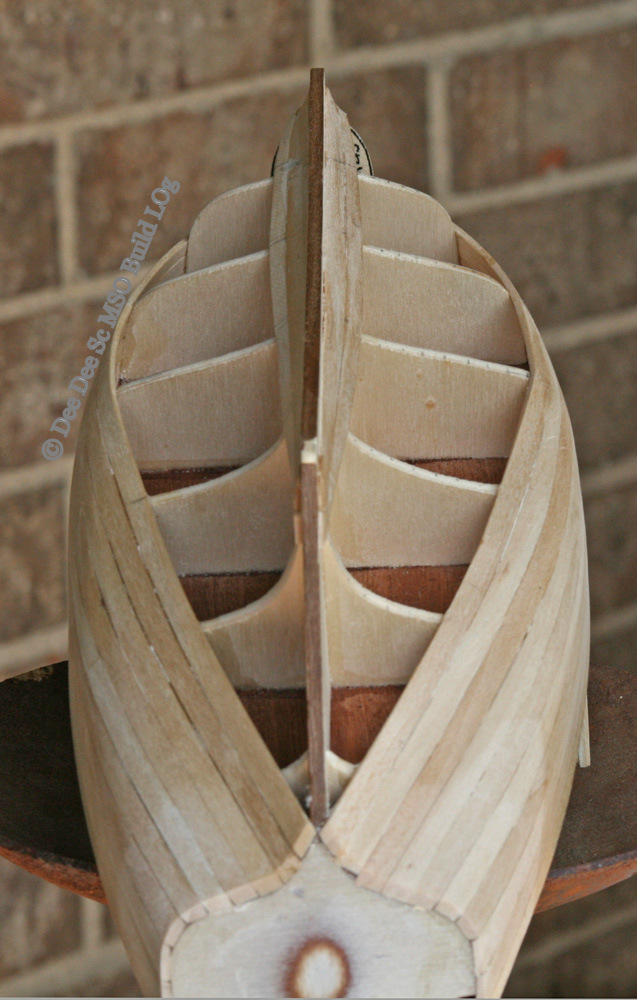
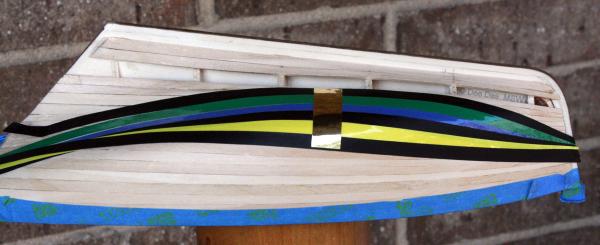
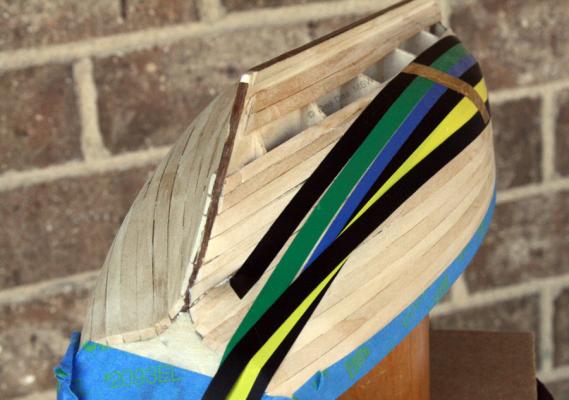
Bob, I'm a 'puzzle person' and planking any hull is a puzzle! Too much fun! I tried my best with single planking and I learned a lot about planking! Keith, Scary kewl, but I understand most of what you wrote! Sort of! A puzzle with thinner tape would definitely be interesting! I'm thinking the results will either bring total order or some really kewl '60's Pop Art'. Here's the fun part of this puzzle. By feel, I know there's a ridge on the port side due to the 14th and 15th planks aft of the 6th bulkhead. In the tape puzzle, theoretically, there should be no gaps between the strips of tape. However, the stern view photo shows a gap between the blue / green tapes and the green / black tapes and the gaps start when the tapes cross planks 14 & 15.

-
ROYAL CAROLINE 1749 by Doris - 1:40 - CARD
Dee_Dee replied to DORIS's topic in - Build logs for subjects built 1501 - 1750
Doris, Your Caroline is inspiring. I want to linger, just a little while longer with your beautiful Caroline....... Dee Dee- 883 replies
-
- 1
-

-
- royal caroline
- ship of the line
- (and 1 more)
-
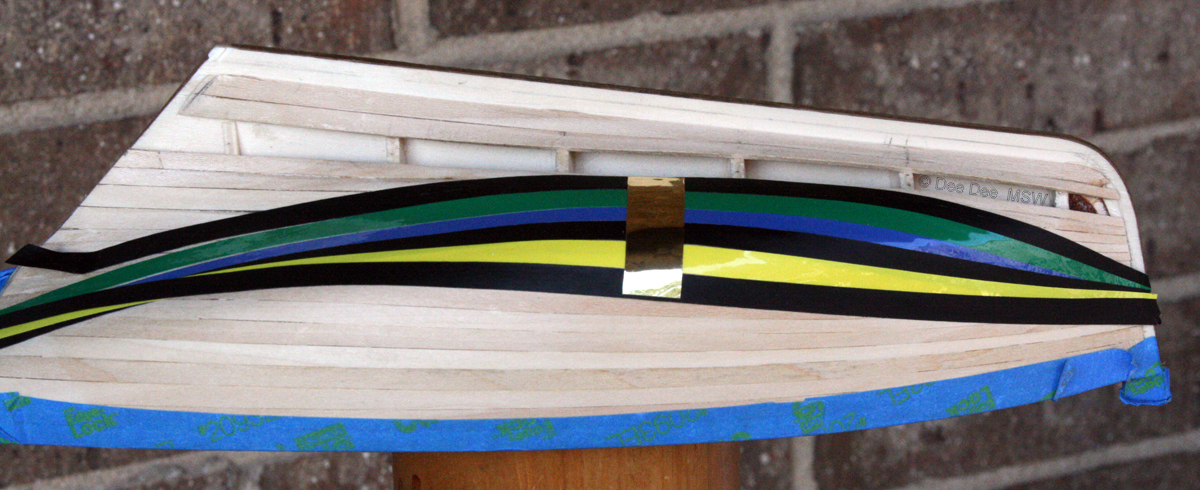
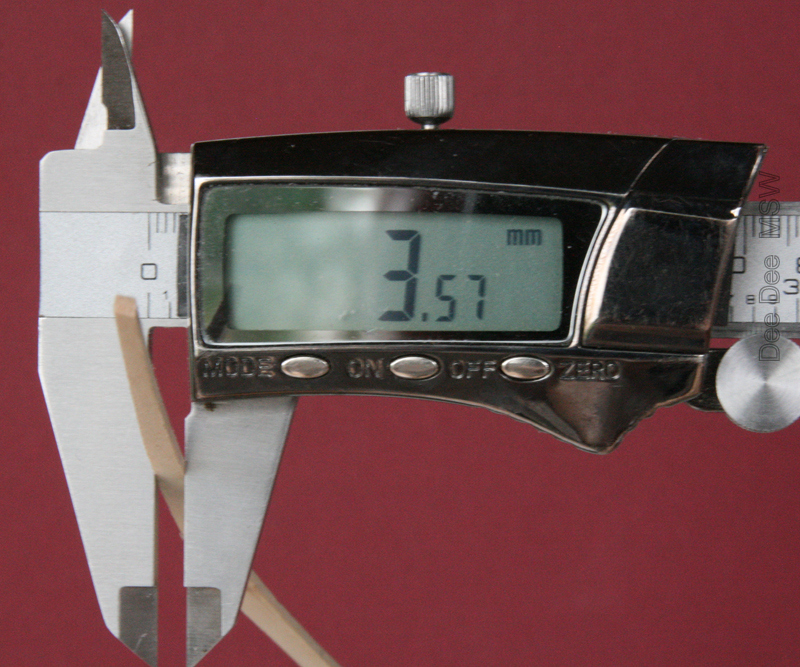
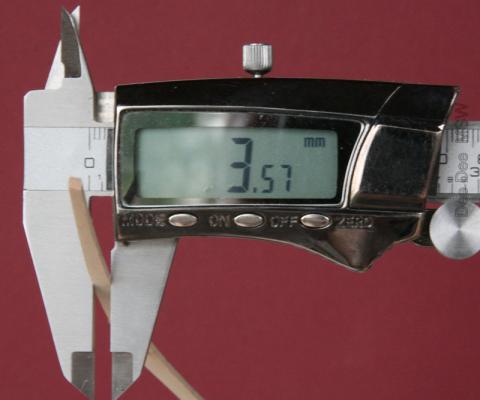
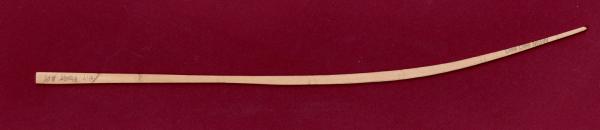
I enjoy planking, it's sort of like a jigsaw puzzle with all rectangular pieces and there's no picture. Here's the puzzle: I laid out 6 strips of art tape, (same width as the planks) on a piece of glass and fixed them with the strip of gold tape. The tapes were transferred to the hull (parallel to the keel) and each strip of tape was then laid flat following the contour of the hull. The views from the bow and stern show the puzzle the best. Just a few more planks to go. Here's a quick review on how I made each plank: Each plank was steamed, edge bent, then shaped to size. The measurements at each bulkhead was taken, then divided by the number of planks to go. My goal was +/-0.03mm at each bulkhead, bow and transom. I averaged 45 - 60 minutes shaping each plank, it's a process that just cannot be rushed. This target measurement here was 3.58, I got 3.57. The amount of pressure applied on the calipers will change the reading, so I just tried to be consistent with my process of measuring. This is the port side #17 plank, it just needs to have the top edge beveled and it will be ready to glue. Port plank #17 glued and partially sanded. Three more planks to go! There's a slight ridge on the port side, on planks 14 and 15. It's not visible on the bare wood, but I'm thinking it might become visible after the hull is painted. So I'm going to follow Cap'n'Bob's suggestion, add some two part epoxy on the inside of the hull, just in case the wood gets a bit thin while sanding that ridge. The kit wood for the cockpit flooring is about 12" wide, way out of scale. So I'm thinking of going with some maple, 3" wide and staining it to the gray weathered color. But before that, the mast thwart is too wide, so I need to extend the foredeck a few inches. It's really kewl to have an actual boat to refer to. Thanks for stopping by, suggestions are always welcomed! Dee Dee

-
Josh, "I'm planking the sucker." Now THAT's funny!! Cap'n'Bob, Thanks! Gread info! I added the PVA to support the glue joints. One of my goals in this build is to single plank the hull and it's going well. I will need to sand down a slight ridge, so I'm going to follow your suggestion and add some epoxy before I start sanding. Dee Dee
-
I like the OttLite. I have the basic / original flip up light, purchased over 20 years ago when I was doing a lot of art quilting. They have a proprietary light bulb that shows true colors, day or night. Check out the color shown here: http://www.ott-lite.com/t-why-ottlite.aspx Mine is older and is similar to this one: http://www.ottlite.com/p-342-13w-folding-task-lamp.aspx They have many styles available, including clamp on desk version of this lamp with a 3x magnifier: http://www.ottlite.com/p-59-easy-view-floor-lamp.aspx Ott lights are like ink jet printers, they're reasonably priced but they get you with the dedicated replacement bulbs. My Ott light cost $40, but a replacement bulb is $18. However, I've been using the same light bulb for 20 years. They have numerous styles available that can be purchased at local retailers or on-line.
-
Steve, The bitts look great. How did you get all four sides shaped evenly? Did you make / use a jig? Thanks Dee Dee
-
Your nail pattern works, it's a blend of symmetry and a touch of chaos! (That's good!) 720 holes on the port side --- and I was worried about drilling one hole in the transom. Fantastic and dramatic photos against the black background. Dee Dee
-
Steve, The details on your companionway are fabulous. I really like the mix of stain and paint colors and materials you're using. As for camber on the cabin roof - If your deck has a camber, then the cabin roof should also have a camber. Just enough so water will roll off, but not so much that everything slides off. Dee Dee
- 569 replies
-
- 1
-
-
- shenandoah
- corel
- (and 1 more)
-
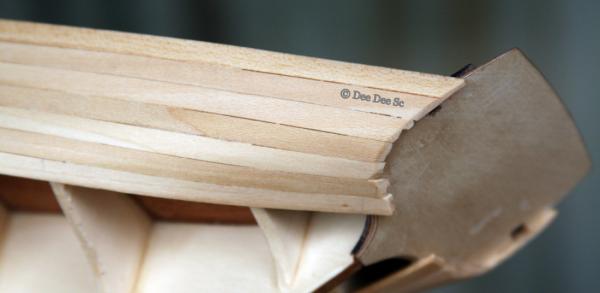
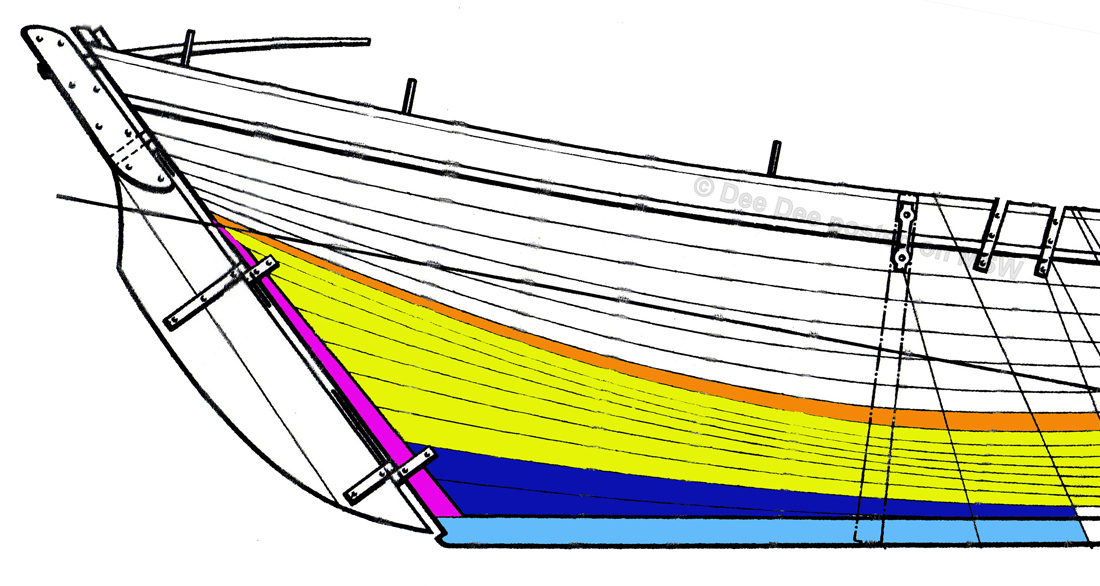
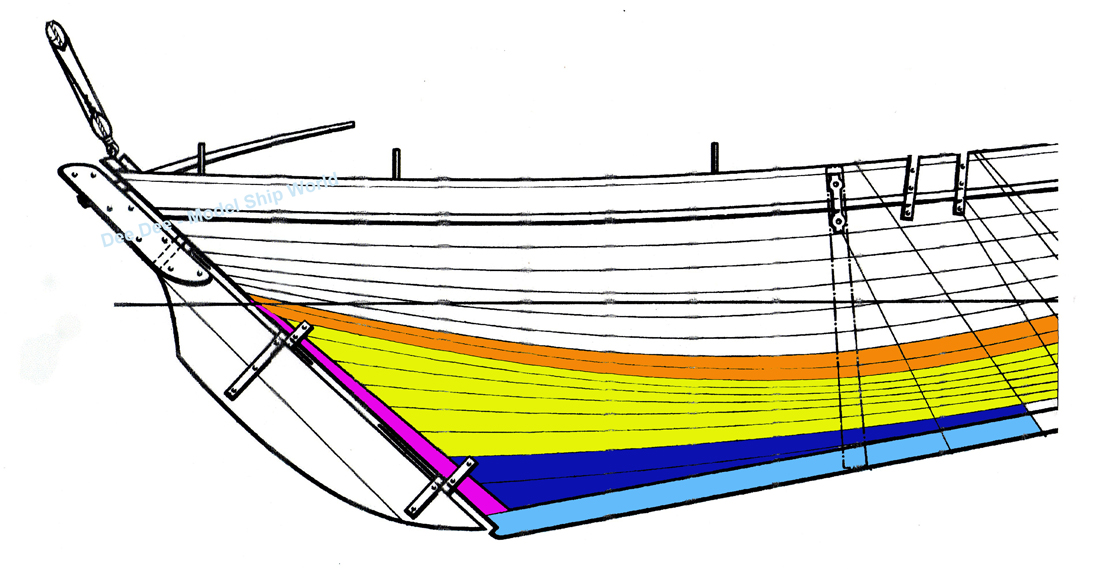
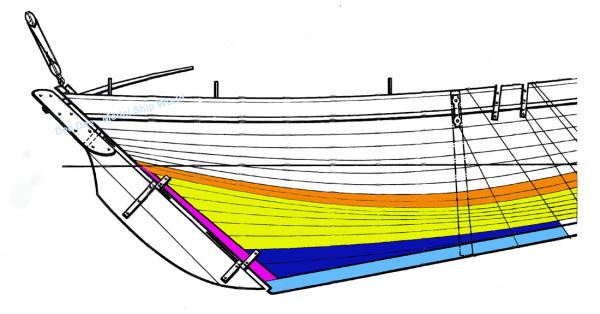
Below is the line drawing of the hull with extraneous lines removed. (The garboard strake highlighted in dark blue is oversized / out of scale in this drawing.) The remaining 8 planks (highlighted in yellow and orange) need to land neat and tidy on the keel, with a straight edge and taper smoothly to the keel. (Where's that magic wand?) It took a while, reread numerous build logs and then had a light bulb moment! I pulled out two kits on the shelf, AL Swift and Emma C. Berry, reviewed the drawings, parts instructions and came up with a plan to add a stern post. The two planks in orange, are the two that were tapered aft of the 6th bulkhead. The remaining 7 planks, highlighted in yellow, will land on the keel at full thickness. Next, a wedge shape section will be removed from the keel, similar in size to what is highlighted in purple on the line drawing. The planks will be sanded and tapered to a smooth transition. Then, I'll make and add a stern post out of walnut. The stern post will have the tab to prevent lines and nets from getting snagged on the rudder. But first, I need to redo the measurements. Thanks for stopping by. Your thoughts, comments and suggestions are welcome!!
-
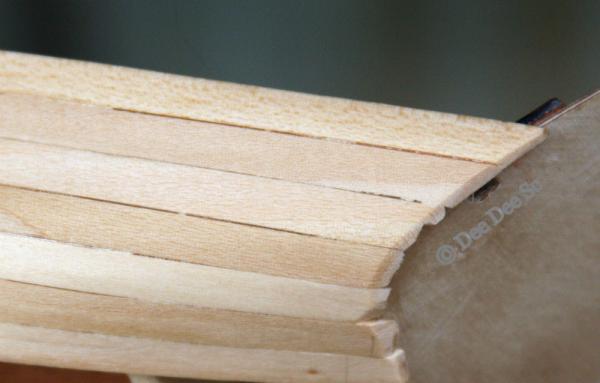
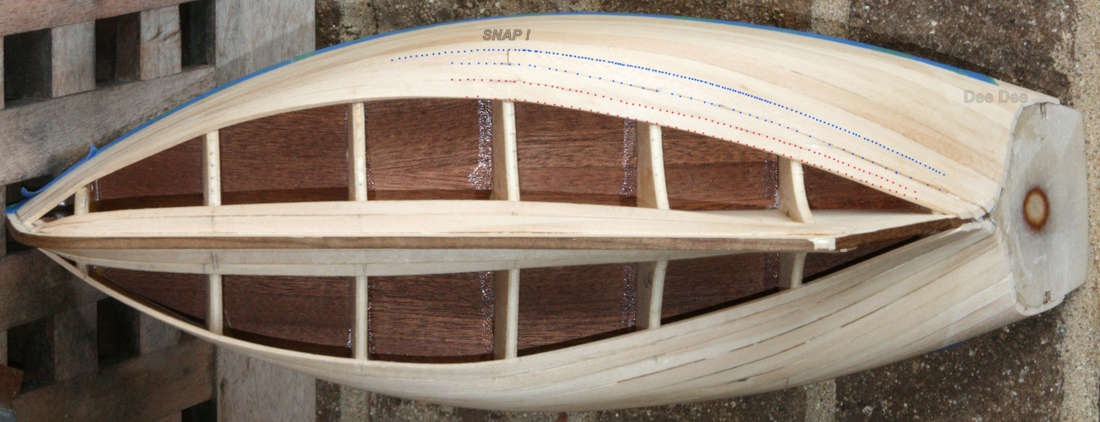
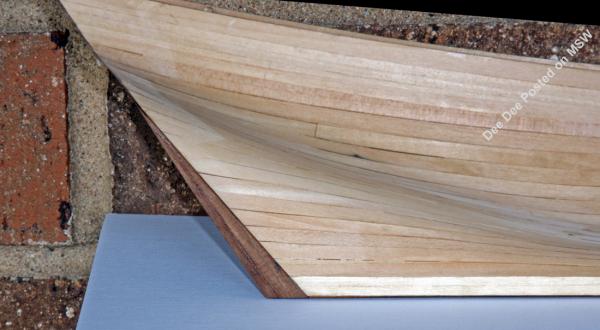
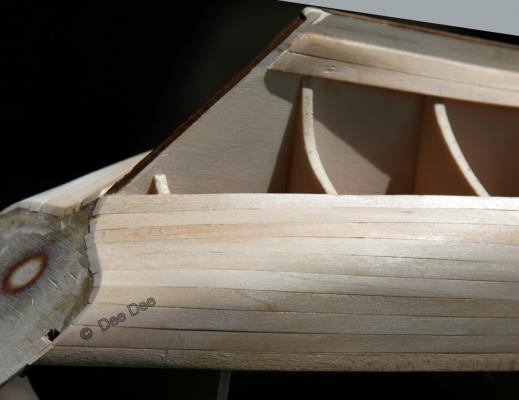
Due to the hull shape, a few planks had sever edge bending. I was doing well, until 'SNAP!' and I broke another plank. It wasn't going to get better and didn't want to chance breaking any more. To relieve the edge bending for the remaining planks, the next two planks were undersized from the 6th bulkhead to the transom. So instead of 4.42mm, the planks tapered down to 3.0mm. This photo sort of shows how the last two planks were undersized aft of the 6th bulkhead (in the middle with the cracked plank) to ease the edge bending.

-
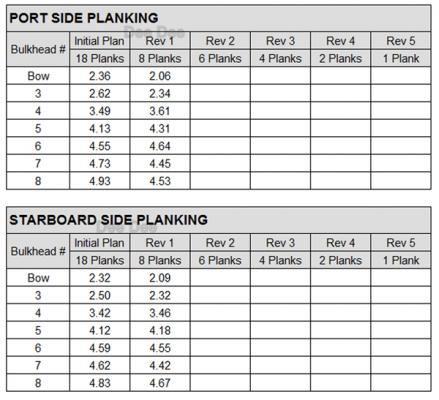
I've been traveling for work again and have got a bit behind in posting updates on my progress. So I'll a couple of updates to keep things straight. In hindsight, I'm thinking I should have added balsa fillers on the bow and stern to increase gluing surface. I dripped in a few layers of PVA glue inside of the bow and transom. In Floyd's J-Boat Endeavor build log, Cap'n'Bob suggested epoxy the inside of the hull to stiffen the planks, I think this might be a better plan. I'm using the 'tic / fan' method to plank my coquillier. I was a bit lax on the first three planks and I paid the price on the eighth plank. Edge bending was an issue at the 6th bulkhead and the plank snapped on the port side. To ease the edge bending, the next two planks were undersized aft of the 6th bulkhead. Here's my fan / tic planking plan. Need to redo measurements for the remaining 6 planks. Then, a new plan with 4, 2 and 1 plank. Again, I was a bit lax with measuring on the first three planks, but after that my goal was <0.05mm variance. (A sheet of paper = 0.1mm).
-
Cap'n'Bob, Thanks for stopping by! I wish I had a magic wand that could grant you unlimited time in your shipyard! In Floyd's J Boat Endeavor build, you commented: "If the deck is not on yet, epoxy the inside to stiffen the planks." I had a similar concern and added a few layers of PVA glue. In this situation, is epoxy better? Thanks again. Eamon, This kit hull is double planked, but I'm challenging myself to single plank the hull. You've set the bar high. Hope you're having a good day and spending time outside enjoying that bright shinning thing in the sky. Tyler, Thank you. I'm with you, can't wait to see how this build turns out. Your Swift is looking really good! I have the Swift on the shelf and will be checking your build for ideas. Thanks for stopping by.
-
Jack, I enjoy reading how you work through each problem. '....about to drill 30 holes into my ship......' And I was sweating drilling one hole into the transom. What did you do with all the decking pieces? Is each piece numbered? Dee Dee
-
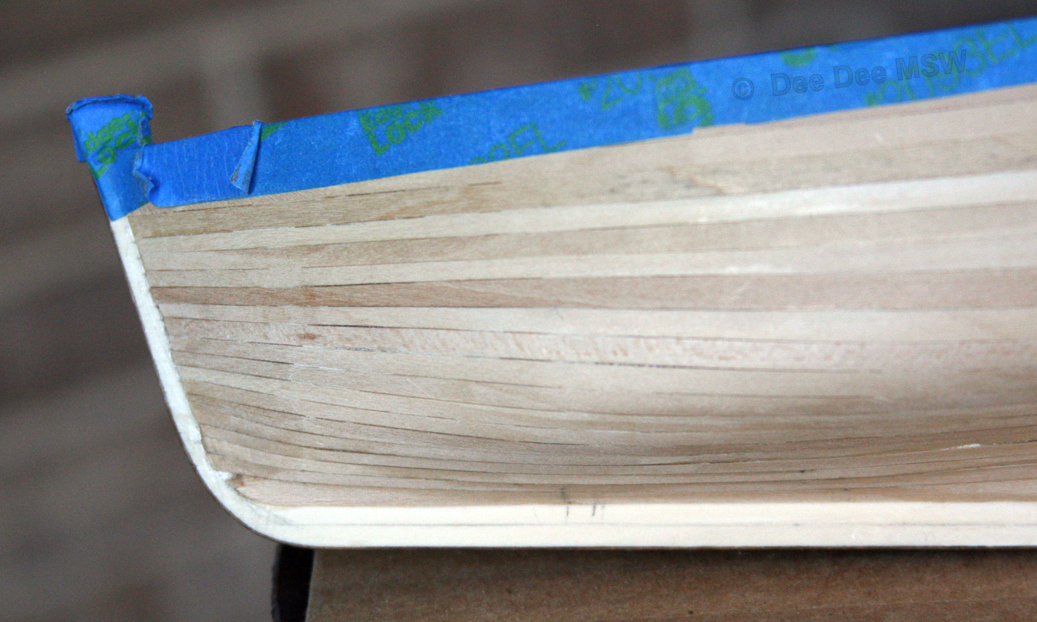
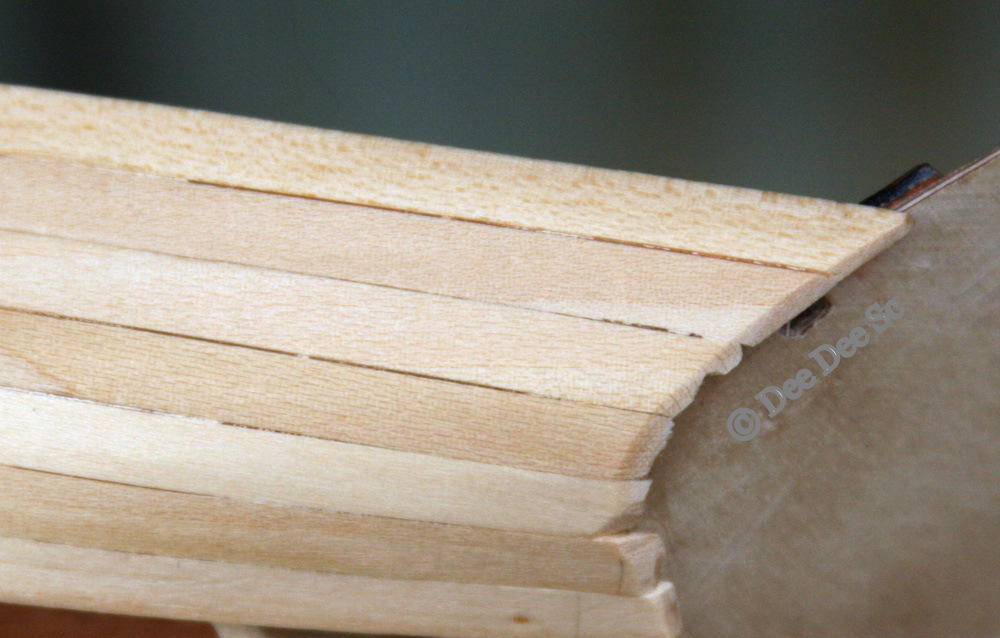
After I get this posted, I'm going for an easy short 35 mile ride today up to Old School and back. The winds are favorable, so I'll have a light tailwind home. SO! I added that last plank and that brings me to my next planned build update. Original planking plan was 18 planks + Sheer + garboard = 20 total. 12 planks done, 8 more to go. I picked this point for a planned update, because this is where I will re-measure the remaining distance to be plank on each bulkhead and make any adjustments. The planking has been going well. It takes well over an hour to completely shape each plank, (the planks are only 12" long and I have 8 measuring points.) So far, the planking on the port and starboard sides have a 1.0mm or less variance. At the bow stem, the variance is only 0.50mm, 27.04 and 26.54. Most of that is from the first plank on the port side, which is a bit too high. I'll sand it down so it's level with the starboard side and the variance should be close to zero. Somehow, this garboard strake was chipped, I'll fill that in with a little bit of filler. I keep the bow stem wrapped in layers of tape to keep it from being eroded away. The tail ends of each plank still need to be sanded even with the transom. I've kept the stern covered with tape to keep a crisp corner. You can also see the edges of the keel have been lined with a strip of walnut, to prevent the wood from eroding away. Next up, redo all the measurements and plan out the final 8 planks! Thanks for stopping by! Dee Dee Edited to add length of measure Edited to change 'final 8 planks' to 'final 9 planks' Edited to change 'final 9 planks' back to 'final 8 planks' oops!


-
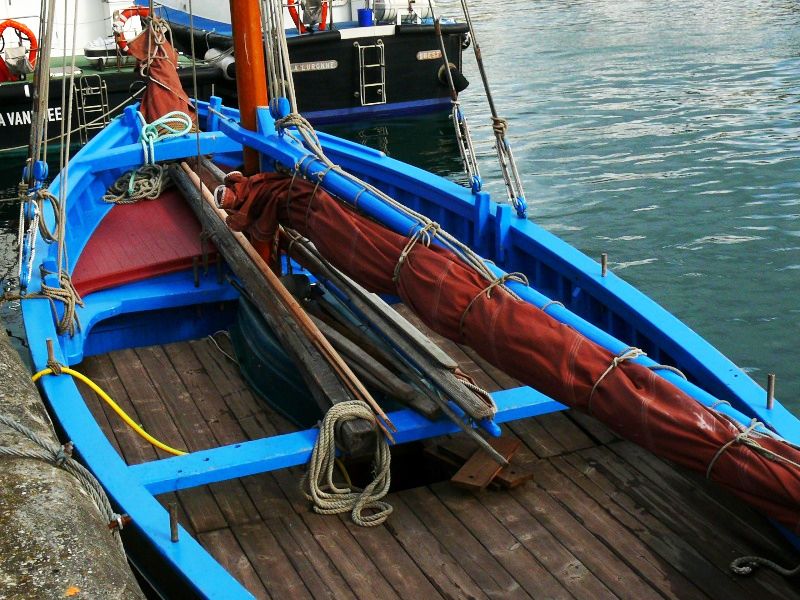
Markku, Thanks for stopping by! You did a great job on your Flattie, especially all the little details. Agree, it's interesting to see how work boats change to work the local waters. Eamonn, JesseLee, It's always nice to have you stop by. Yep! I managed to add another 'character' mark! You'll get to see it in my next update. And Thanks to all that hit the 'like' button. ~~~~ I'm finally home after a couple of weeks on the road and plan to get back to the boat yard this week. But that may be delayed by some nice long rides on my bicycle. I need to add one more plank to get to my next planned build update. So far, I'm happy with how the planking is going. But the last five planks added on each side have been a real challenge! Each plank bends, twists 90* and has significant edge bending in the middle of the plank and also add some edge beveling! It takes a few hours to make and glue each plank. I'm taking my time to make sure each plank fits snug, I don't want to use any filler and single plank the hull. As I progress in my build, I'll be posting a few more photos of the Bergère de Domrémy. These photos are not being added for 'fluff,' 'log filler' or 'eye candy', rather they are a reference when I make a change (or where I wish I had made a change, such as dropping the height of the cockpit floor 10-12".) I'd like to share with you more about the boat I'm using as my model guide, the Bergère de Domrémy, (Shepherdess from Domrémy, referring to Joan d'Arc). (See post #2 for more photos.) The Bergère de Domrémy, hull #B5929, is a coquillier, shellfish sloop, built in 1936 at the shipyard M. Auguste Tertu in Le Fret, France, length 37'5", beam 13'. Of the more than 200 boats built, only a few still exist and are used for recreation purposes or as museum boats today. Since 1982, the Association An Test has owned, maintained and operates the Bergère de Domrémy, which is considered a French National Treasure. The boat was overhaulled / rebuilt 1989 - 2002 at the museum shipyard Chantier du Guip in Brest. The Bergère de Domrémy hull is cleaned frequently, always on a king tide day. The boat is laid over on one side (here port side) and some weights are hung from the mast to stabilize it. Below the water line is cleaned with high pressure water and scrapers. Any wet spots on the hull are dried with a flame so it can be painted. Weird to see a flame on a wooden boat, but they only have the tide duration to do the job. On the other side, the paint is touched up above the water line. The next day, the boat is laid on its starboard side and cleaning process repeated. These boats were built to last and were very heavy. Careening (leaning) these boats over was done frequently, to strengthen the hull, the plank that it lays on is ~2" thicker. I'm thinking about adding this detail, it can be done by adding a layer when I'm done planking. These next three photos show this plank. Ringed Plovers are enjoying some of the mussels that have been scraped from the hull. I was starved for info and photos on my MBLS, but for this build, there is a lot of information available! I'll add a build update as soon as I get that plank added. Thanks for stopping by! Dee Dee
-
Joe, Looking nice! This was my first built and whilst it was not my best, I learned a lot and plan to build it again. Whilst I don't have any info / ideas on the 'hardware' for the Sakonnet, I would like to suggest researching information for Lightning sailboats. The first Lightning Sailboat was build in 1938 in a small upstate New York village, based on history and detail going back to just after the Revolutionary war. Another classic for 'details' is the Snipe. As for the decking, based on photos I've seen of Sakonnet's, the decking was constructed of a layer of plywood that was covered in canvas. The canvas was then sealed / waterproofed using a concoctions of marine grade paints. It was a high maintenance deck that had to be replaced every few years. But it is a true classic . I've been traveling the past two weeks for work and plan to get home sometime next week. When I get home, I'll look for photos of the Sakonnet.
-
Jesse, those belay pins look fabulous. I'm planning on changing out some of the oversized cleats with brass pins, but after seeing yours, I'm now thinking about making these out of bamboo skewers instead. Thanks for the great idea! Hope your wrists are feeling better. Dee Dee
- 607 replies
-
- 1
-
-
- scottish maid
- artesania latina
- (and 1 more)
-
SHELL CASINGS The photos below are shell casing from my .22 starters pistol. Main OD: 0.22" 7/32" 5.7mm Length: 0.41" 13/32" 10.4mm On my current build, there is a 'cap' on the end of the boom, the length needs to be cut down and it's a snug fit. Thinking these could also be used for vent stacks, a little bit of shaping, make it into a capstans and who knows what else! PM me if you want some of these. (I also have a .32 starters pistol, but I rarely use it.) Before and after cleaning up.
- 396 replies
-
- 1
-
-
- Idea
- Bright Idea
- (and 1 more)
-
Jesse Good catch and fix on the mast! Do take care of your hands / wrist and give them time to heal! Dee Dee
- 607 replies
-
- 1
-
-
- scottish maid
- artesania latina
- (and 1 more)
-
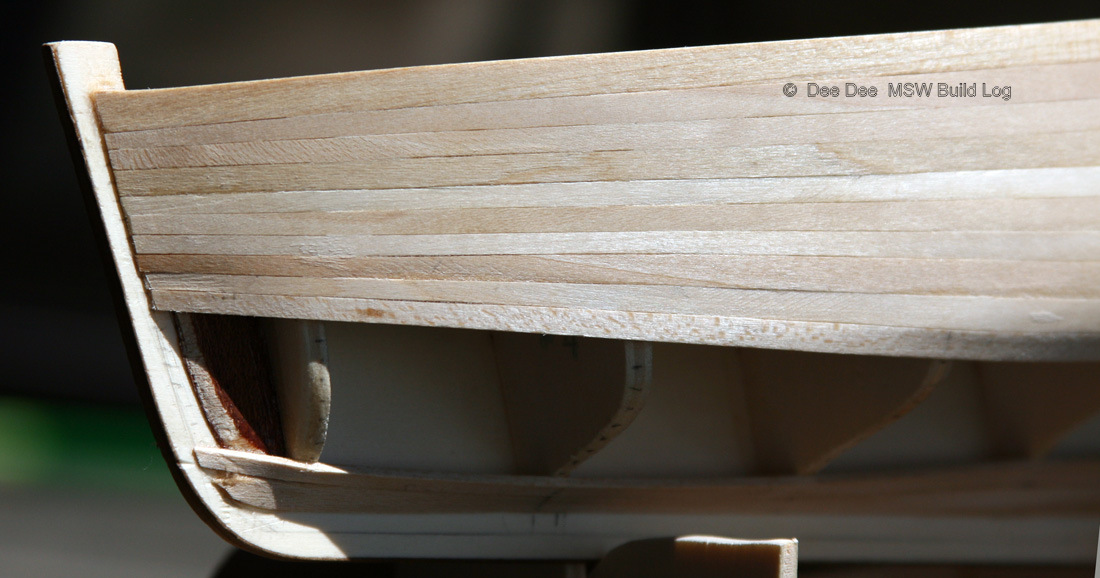
Eamonn, Thanks for stopping by! Good catch sighting Andy trying to slink thru Montreal during the F1. I just finished the thriller called "As the Plank Snaps!" In the stillness of the evening the next plank is being added. The quiet was broken with a loud and distinctive "SNAP!". Yep! the starboard plank #5 snapped off aft of the 8th bulkhead, right where it makes a twist and edge bend. Oh fiddle stixs! But, there was a happy ending! It's fixed and it adds a little character to the hull! Now I'm trying to figure where / why these black lines are appearing on the edges of the planks. It looks like a gap between the planks, but the planks fit very tight. In the second photo, you can see the snug fit on the ends of the planks. It's not causing any problems, just curious. After I add three more planks, I'll start planking up from the garboad strake. Back to the ship yard! Dee Dee