


donrobinson
-
Posts
1,909 -
Joined
-
Last visited
Content Type
Profiles
Forums
Gallery
Events
Posts posted by donrobinson
-
-
-
Looks good, I replaced almost all the kit wood on mine so far some of it for lack of quality but mostly for looks. Great Job
-
Great work Dimitris, I just love all the details on this boat
- Dimitris71 and Omega1234
-
 2
2
-
Very nice work, you should be proud of her, she is beautiful
-
Hi Zoran,
Yes that is what I seen in your plans and I think they look real good, they should be easier to attach than cleats.
The information you have provided on your kits has been a great help, especially on the Cog and the Trabaccollo. I have looked at several of your kits on-line and they all look well designed. I have ordered the Trabaccollo and am really looking forward to receiving it. I will most certainly be starting a build log here on MSW, I hope you stop in and visit there and help me out with any problems I may encounter.
You have done an outstanding job in introducing yourself and your product, I know I have appreciated this opportunity and I hope all goes well for you.
Thanks
- MarisStella.hr and Canute
-
2
-
-
You are doing great, nice work
-
-
Hey Frank,
I also have to say the furled sails are really something, That's something I want to try someday but not too sure how it's done as nice as yours.
- mattsayers148, Dimitris71, mtaylor and 1 other
-
4
-

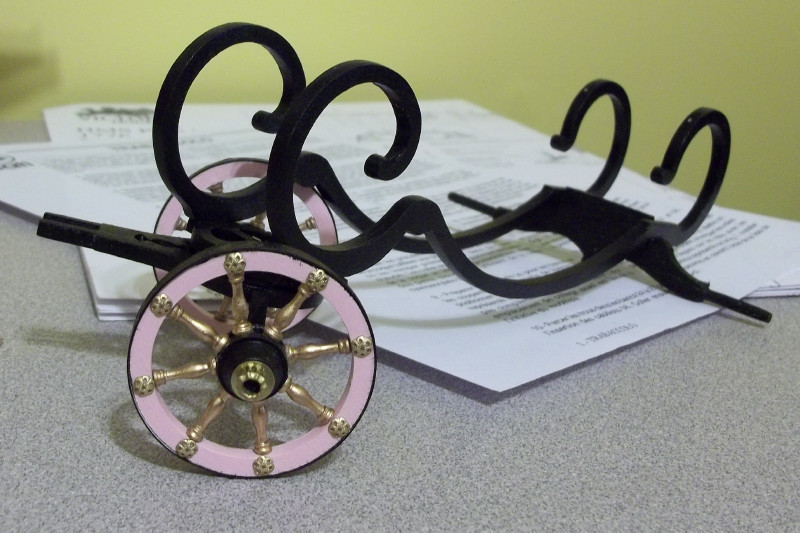
First picture is the carriage I'm making for granddaughter, this picture is for Rick showing the placement of the spokes and some of the decorations involved(hope you enjoy Rick)

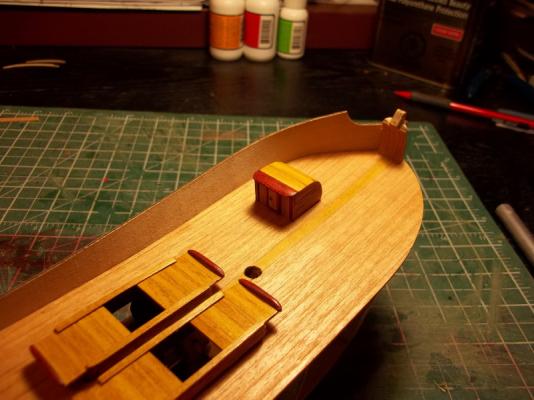
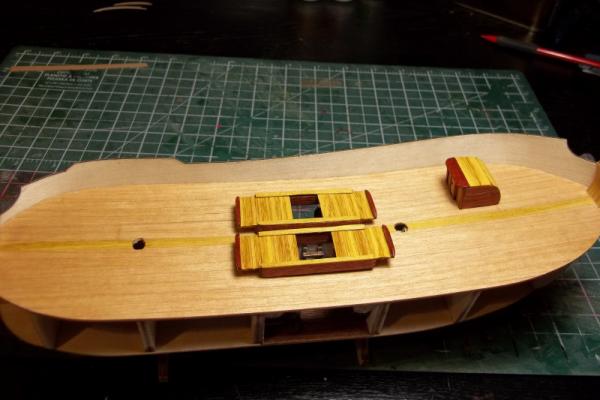
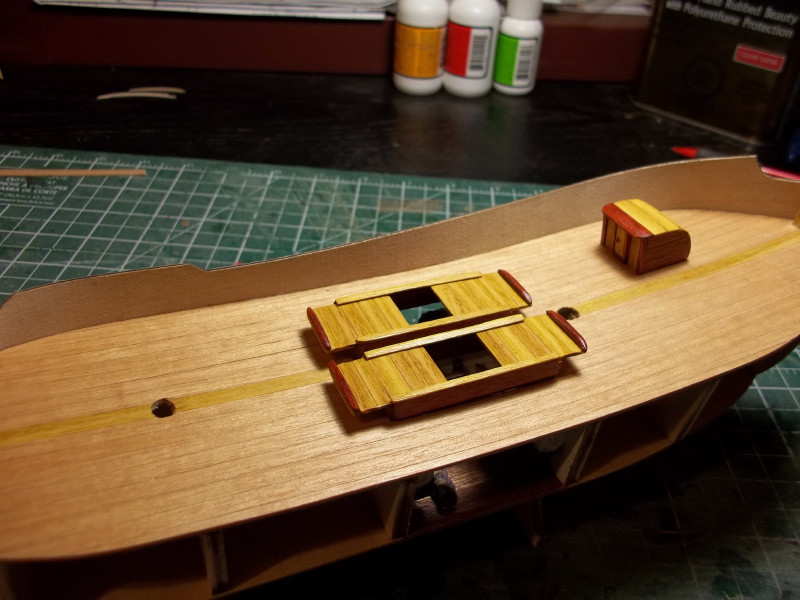
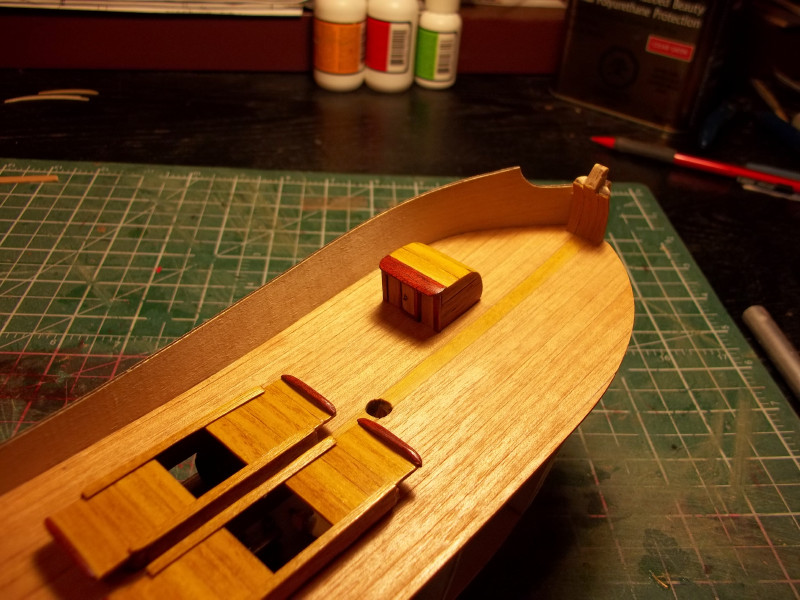
The next pictures are of my progress on the Trabaccolo, I have finished the decking with little changes, the only change here is the middle plank (king plank?). I replaced that with a strip of Osage Orange.
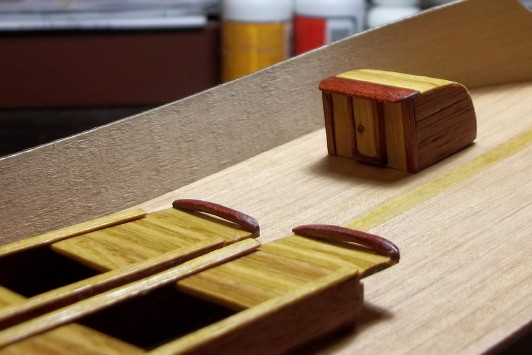
The hatch covers are completely changed both in shape and wood. The original covers had large planks covering the hatches, which I thought would eventually get lost. I re-designed them so they now have sliding covers which still allow viewing of the interior. These and the cabin cover are made from Osage Orange and Blood wood.
The cover for the cabin is just something I added just for aesthetics as the door does not open, although, I think it looks cool and hopefully grandson does too.
As you can see I have started the hull planking and will show more pictures later. I have decided not plank over any of the three lower holds which will allow better viewing, I'm hoping it will look ok.
That's it for now, today is carriage day so no updates on the Trabaccollo for a day or two.
Have a Good One
- mtaylor, Dimitris71, riverboat and 3 others
-
6
-
Thanks Zoran for the pictures and your explanation, it has been very helpful. I have to say that this is such an opportunity to be able to talk to a manufacturer about his product, one that we don't get very often.
I noticed, while looking at some of your kits, that some of them have pin rails mounted in the shrouds is this something common to boats of that era? I have seen cleats attached to shrouds but never this. I like the looks of this method.
I have also seen that it looks as though most of your kits come with stands is this correct?
-
Man, Dimitris that is looking sooo good. The details are incredible
- Dimitris71 and Omega1234
-
2
-
Thanks Rick,
Actually I am not past the sail painting yet
 , I still have to paint the other side yet. I have been busy with the carriage the last couple days and having lots of fun with that so far. There so many fittings to be attached, I was really surprised, all are very detailed and will make for a beautiful build. Amati has done a beautiful job on this kit and I know my granddaughter is going to be real happy. This is such a wonderful Christmas gift and one that I will have no problem completing in time. I will post a picture when it is done.
 -
-
-
-
-
Thanks Zoran for all the information this really helps. I am finding your kits really interesting and I'm thinking they would be a real fun challenge to build.
I am particularly interested in the Trabaccolo as I am currently building the Amati version of this and I like how you have designed yours and the scale of 1:32 is really appealing.
I will contact you on your site for further information.
I have noticed on some of your kits there are holes in the frames(bulkheads) that dowels are inserted into, is the purpose of these to help align and strengthen the hull?
Have a Good day
-
-

I just had to show this.
A short time ago I talked to Rick @ The Modeller's Workshop and was complaining about the empty shelf space I had and the dusting involved trying to keep them clean.

Well this is the solution we arrived at and I must say they fit the shelves perfectly and the dusting is down quite a bit now.
If anyone finds themselves in the same situation contact Rick, he is a great help and has awesome service.
Thanks Again Rick
-
-
-
-
Thanks David, I'm hoping my Grandson has the same reaction
- Canute and Dimitris71
-
2

Royal William by marktiedens - FINISHED - Euromodel - scale 1:72
in - Kit build logs for subjects built from 1501 - 1750
Posted
nice start, will be watching for more updates