CDW
-
Posts
7,742 -
Joined
-
Last visited
Content Type
Profiles
Forums
Gallery
Events
Everything posted by CDW
-

McLaren M8B by CDW - Accurate Miniatures - 1:24 Scale
CDW replied to CDW's topic in Non-ship/categorised builds
I'll be painting some orange before you know it. -
McLaren M8B by CDW - Accurate Miniatures - 1:24 Scale
CDW replied to CDW's topic in Non-ship/categorised builds
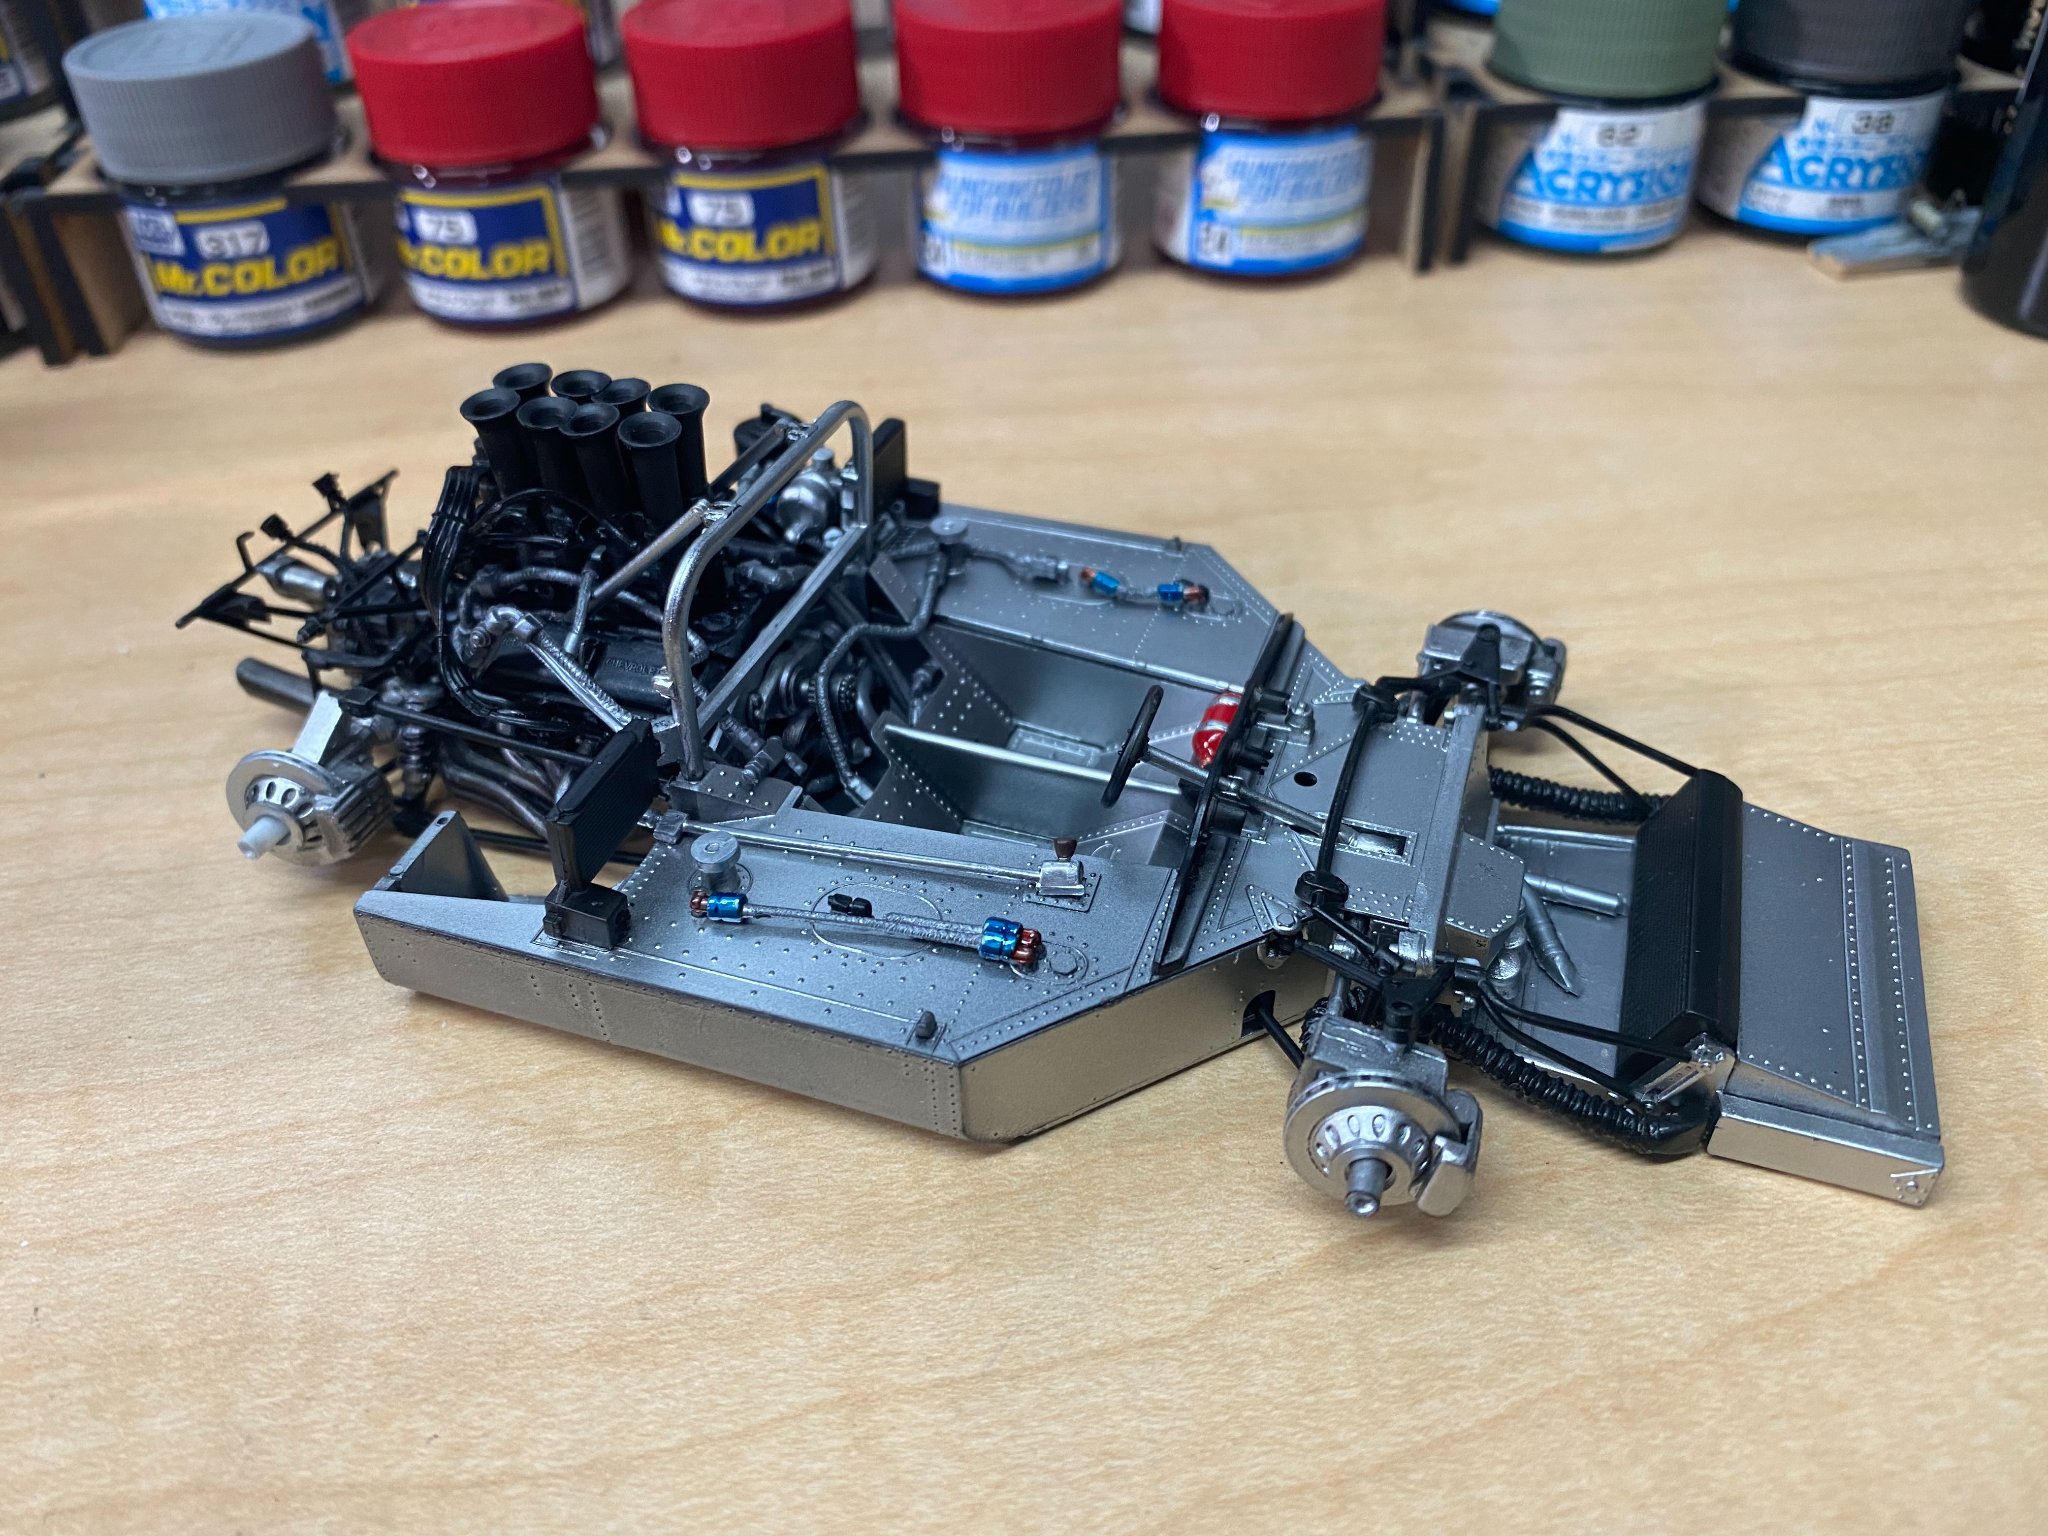
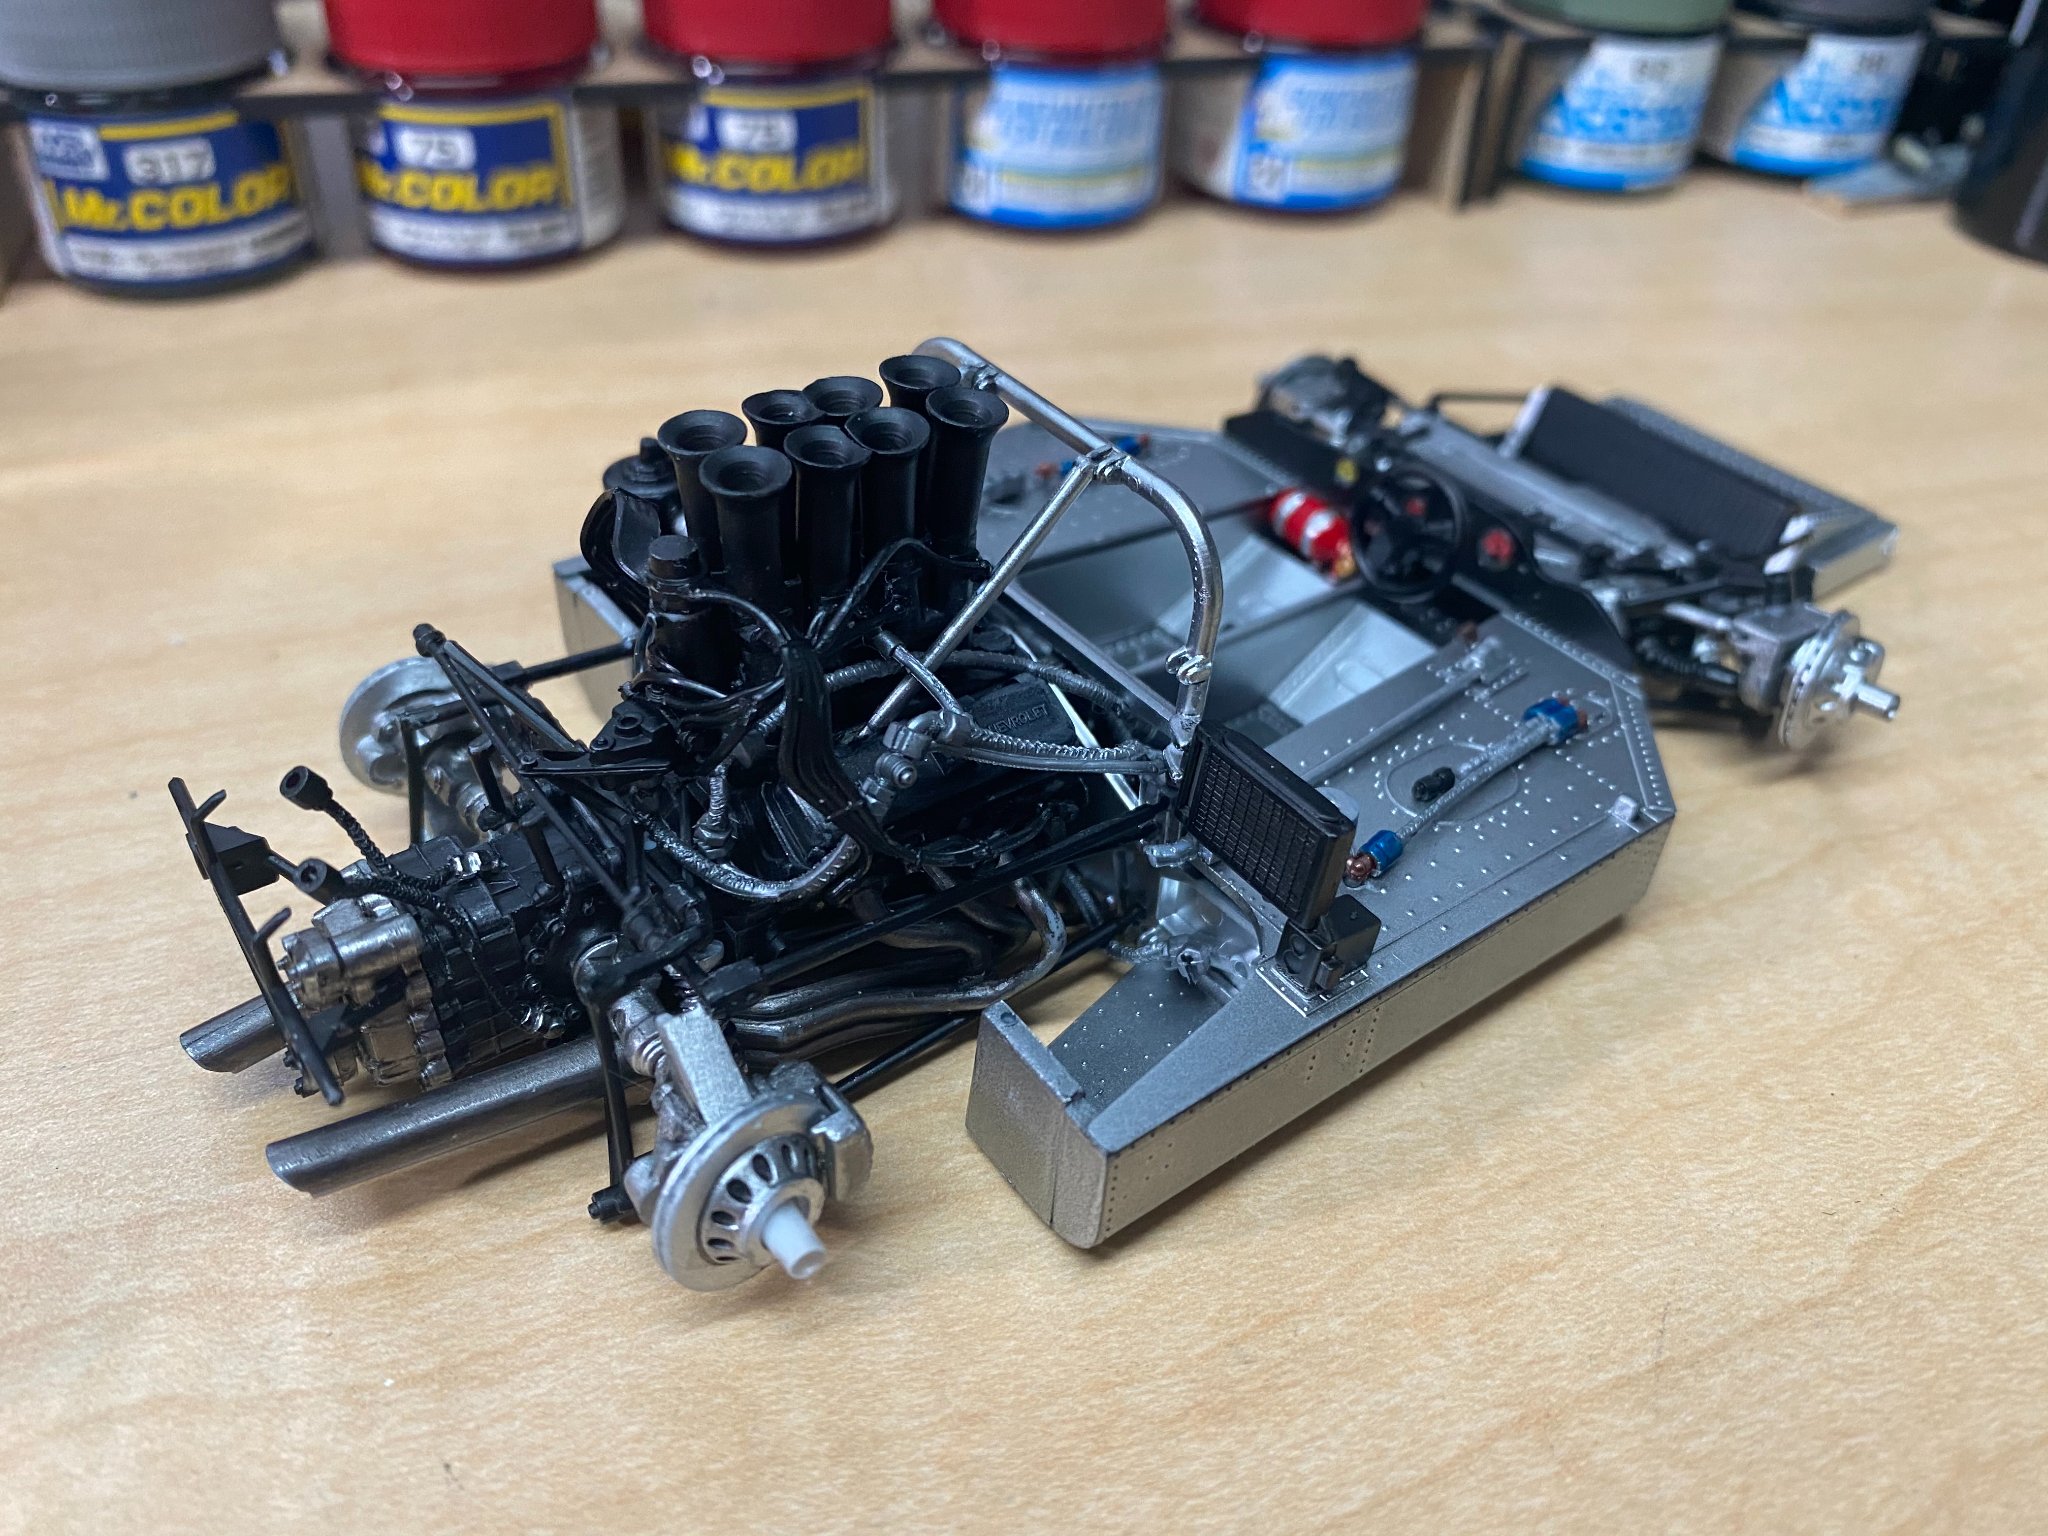
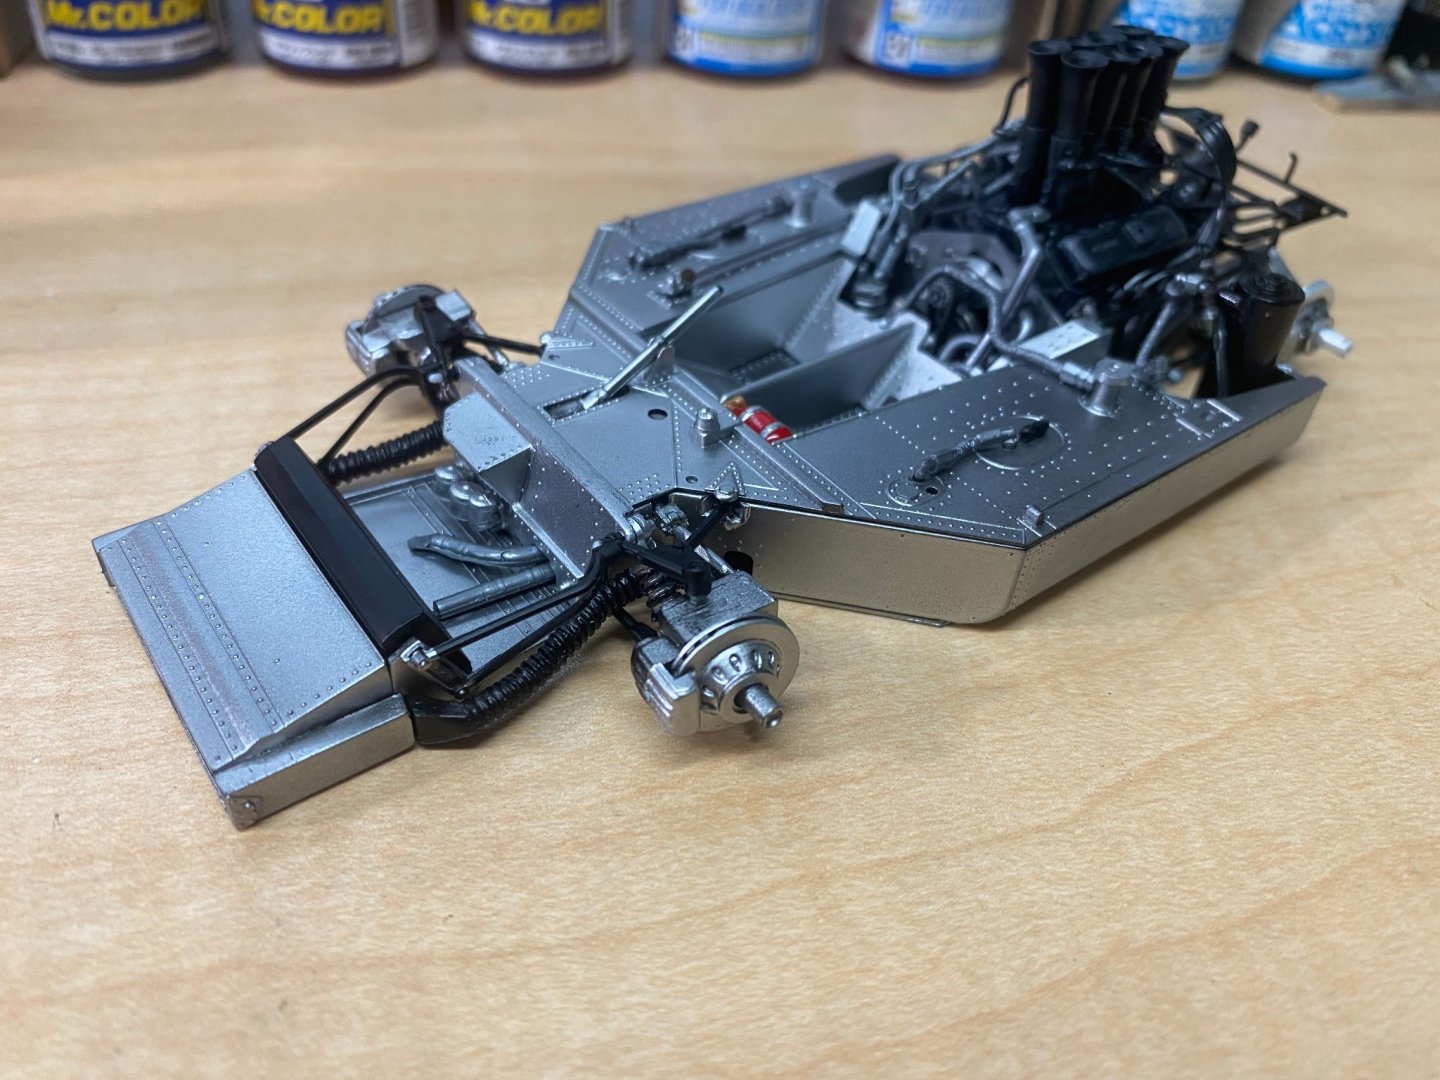
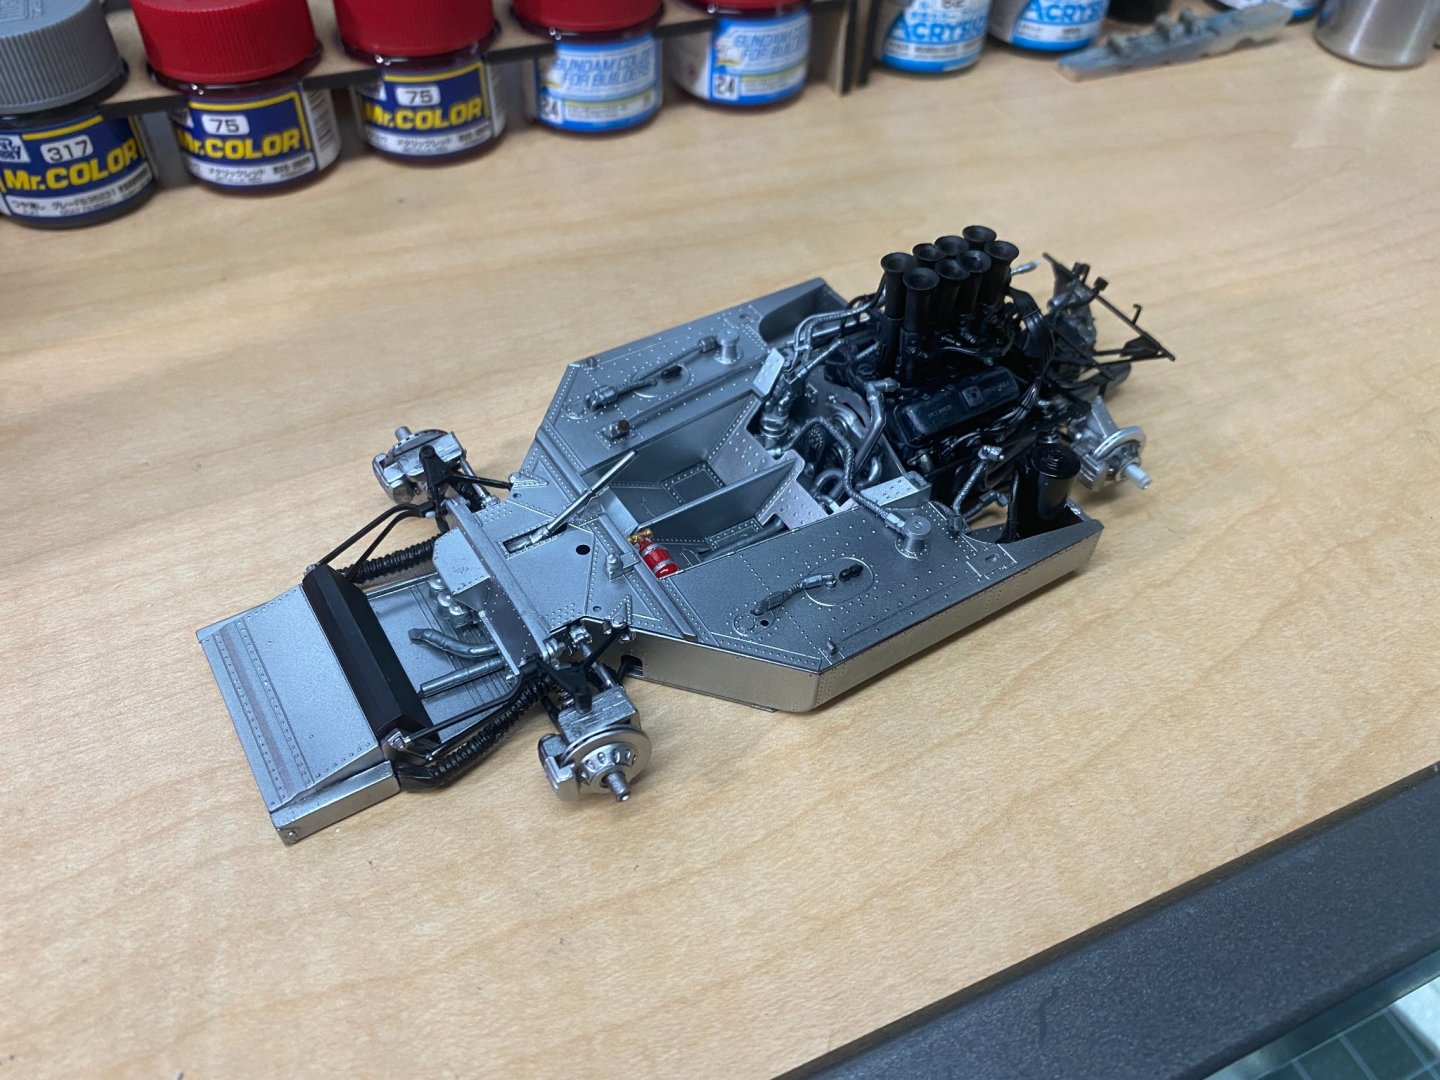
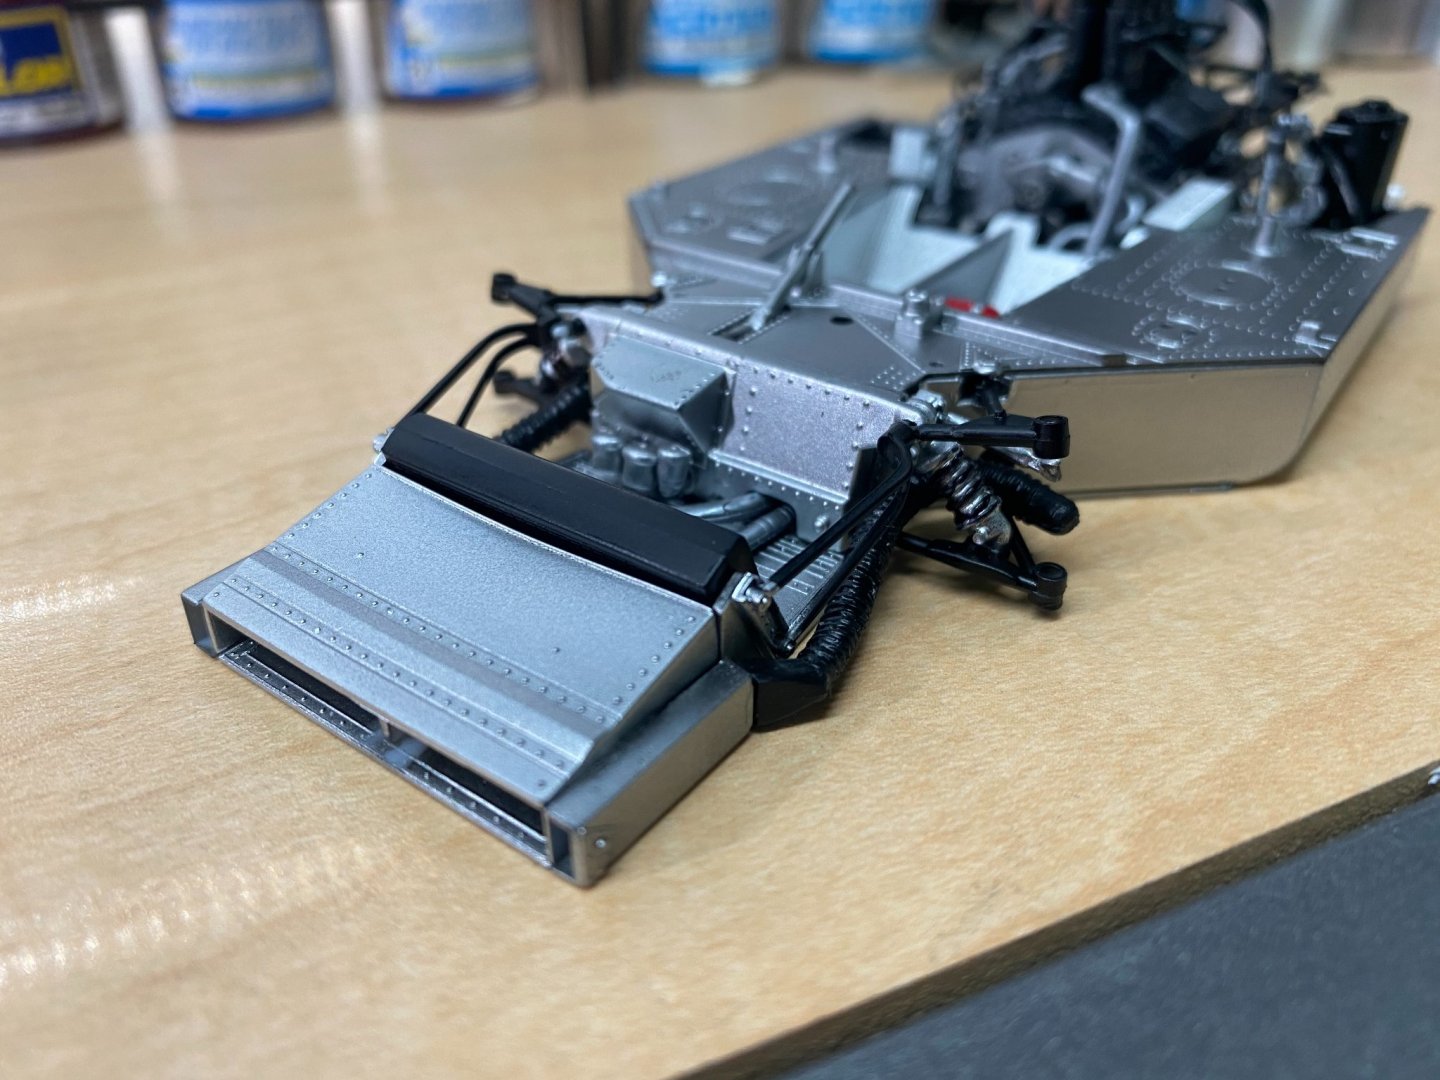
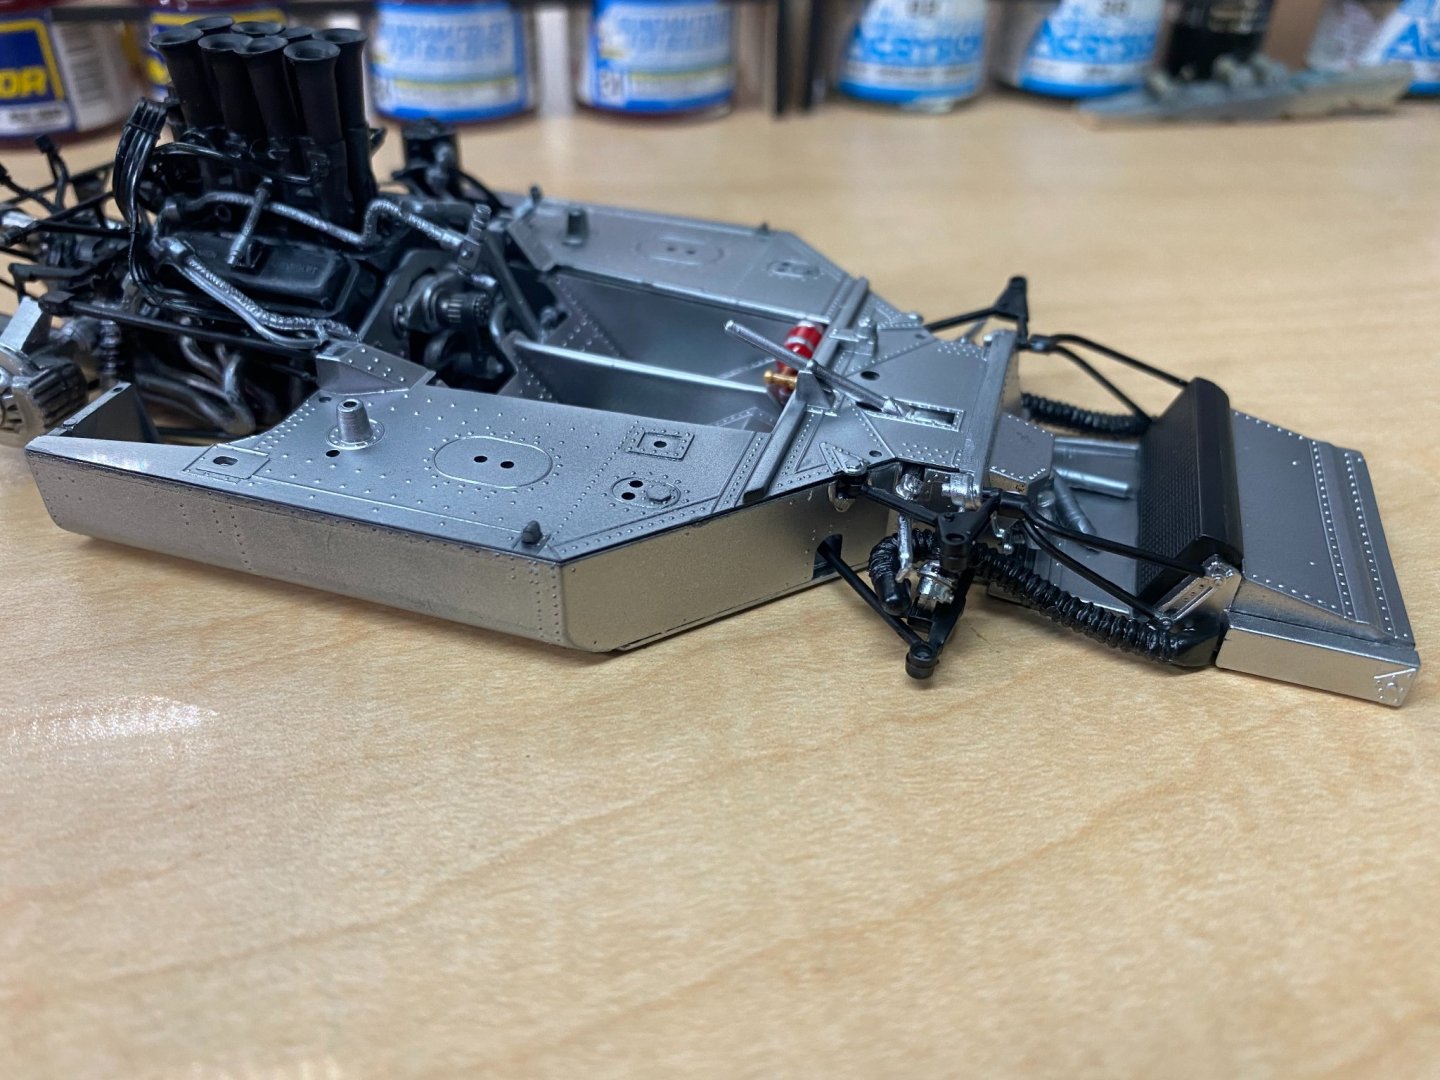
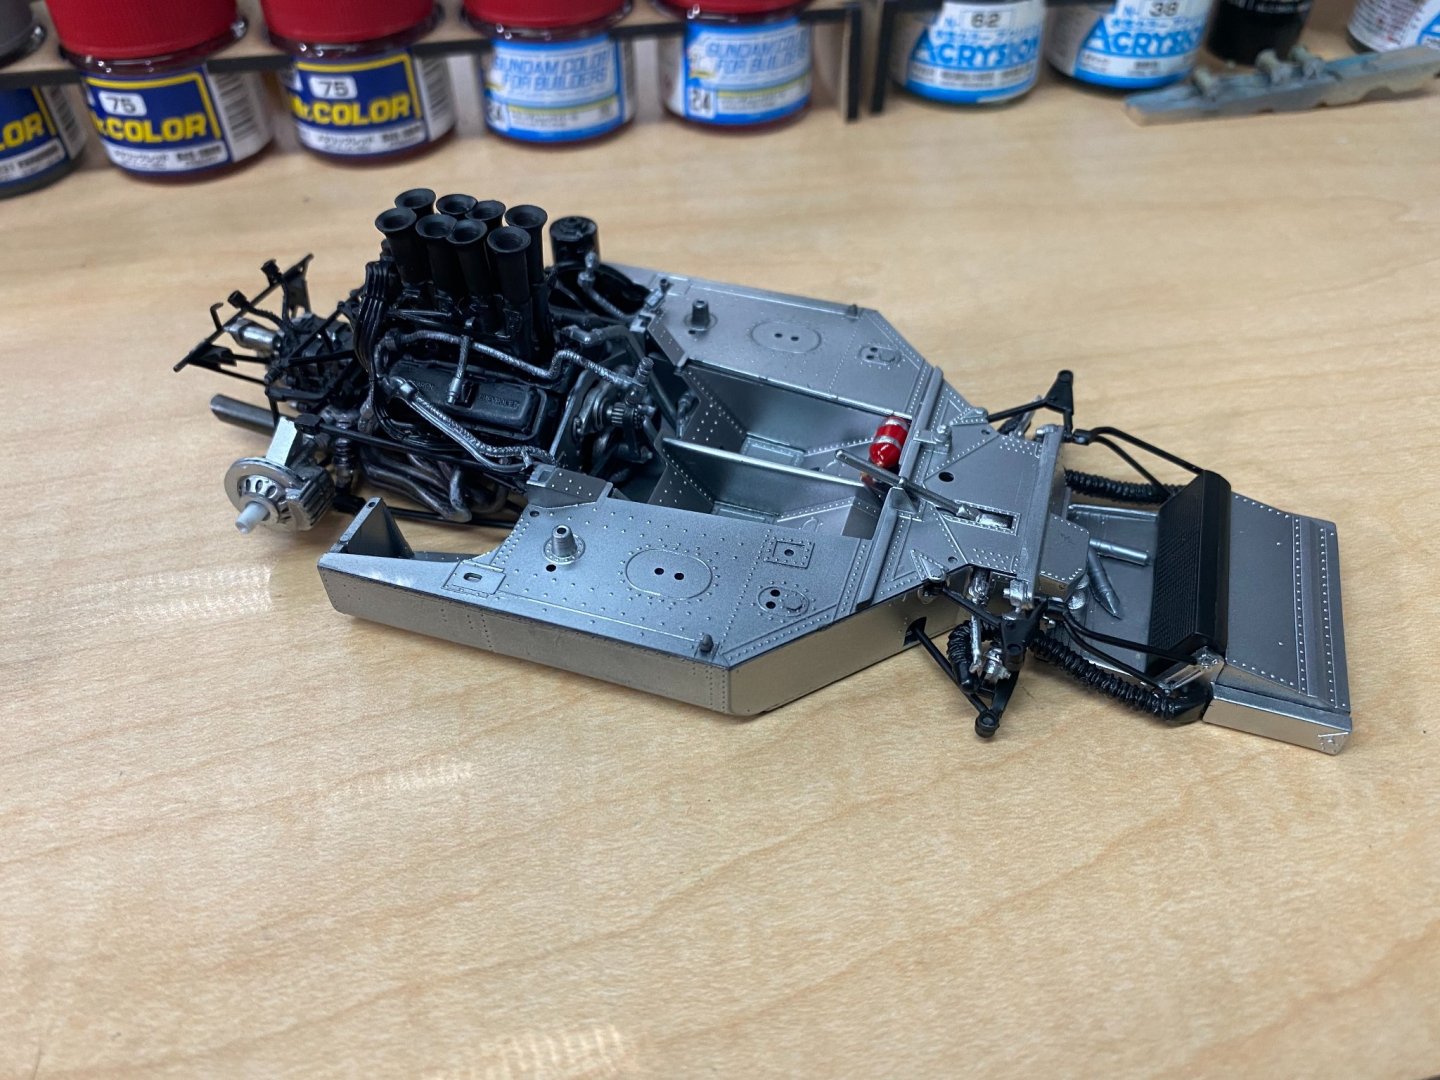
It's been a fun kit to build so far. There are a few fit issues where it seems the engineers maybe didn't thoroughly vet the prototype construction and make adjustments before production, but nothing that is too glaring. The instructions actually warn the builder that there are a few areas where certain parts you might want to leave out of the construction sequence for ease of assembly. Particularly the area of the engine compartment where the headers take up a lot of space. Just to see how bad it was, I opted to attempt it all but had to abort a couple of small things. An onlooker would never spot it most likely, but it's there (or not there as the case may be). -
McLaren M8B by CDW - Accurate Miniatures - 1:24 Scale
CDW replied to CDW's topic in Non-ship/categorised builds
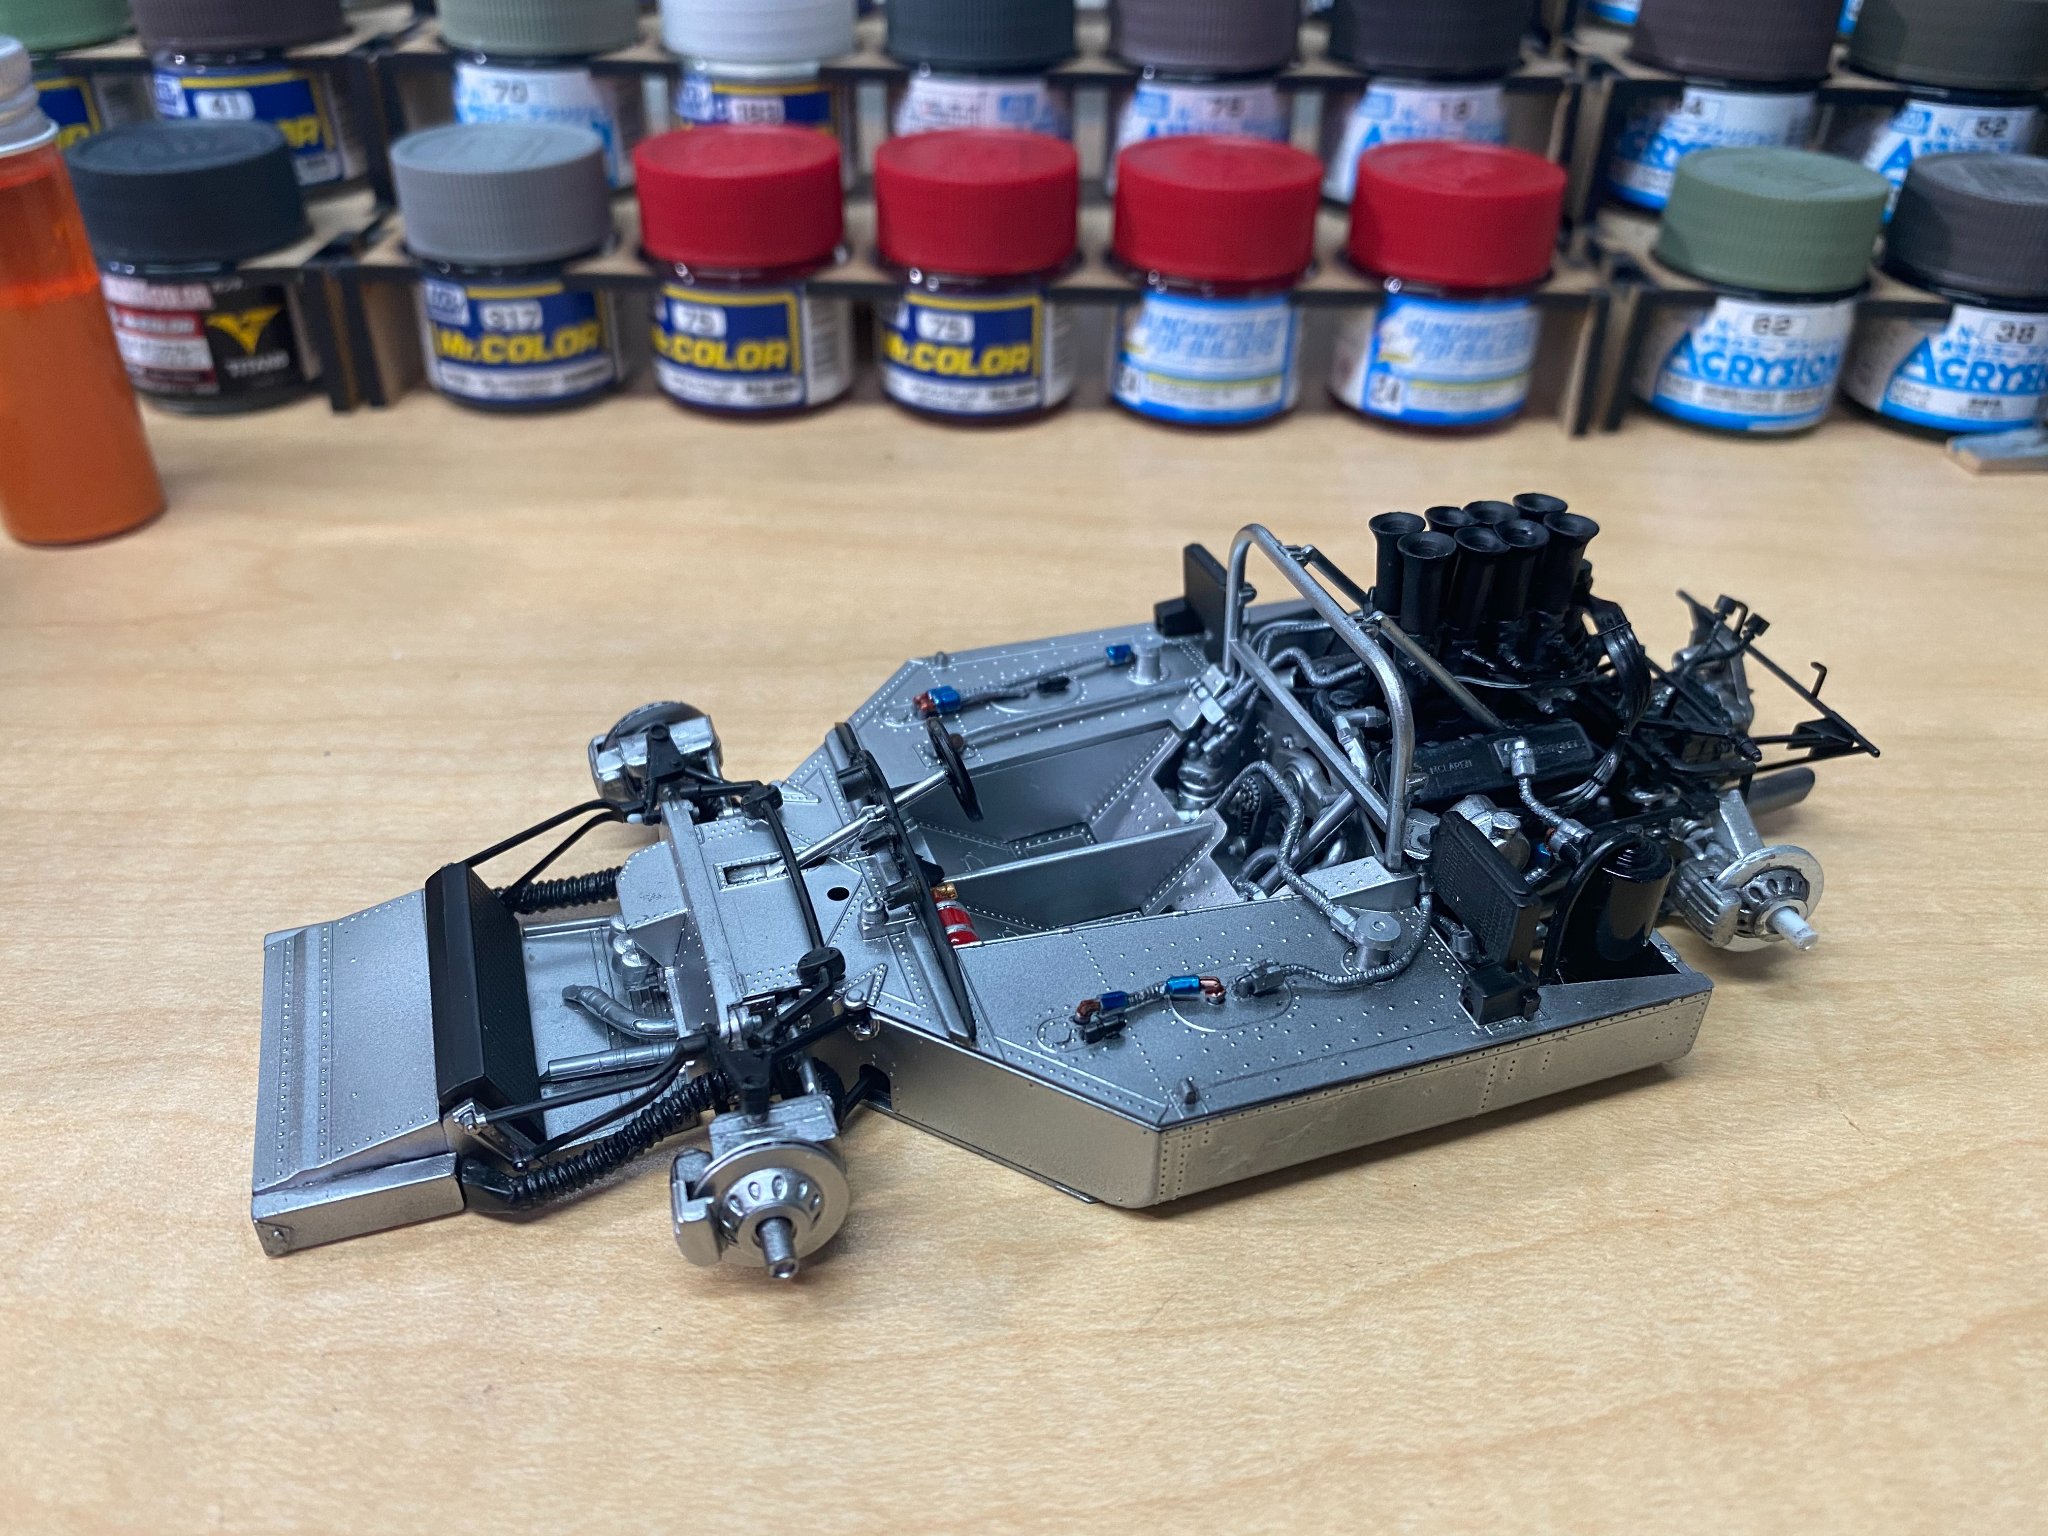
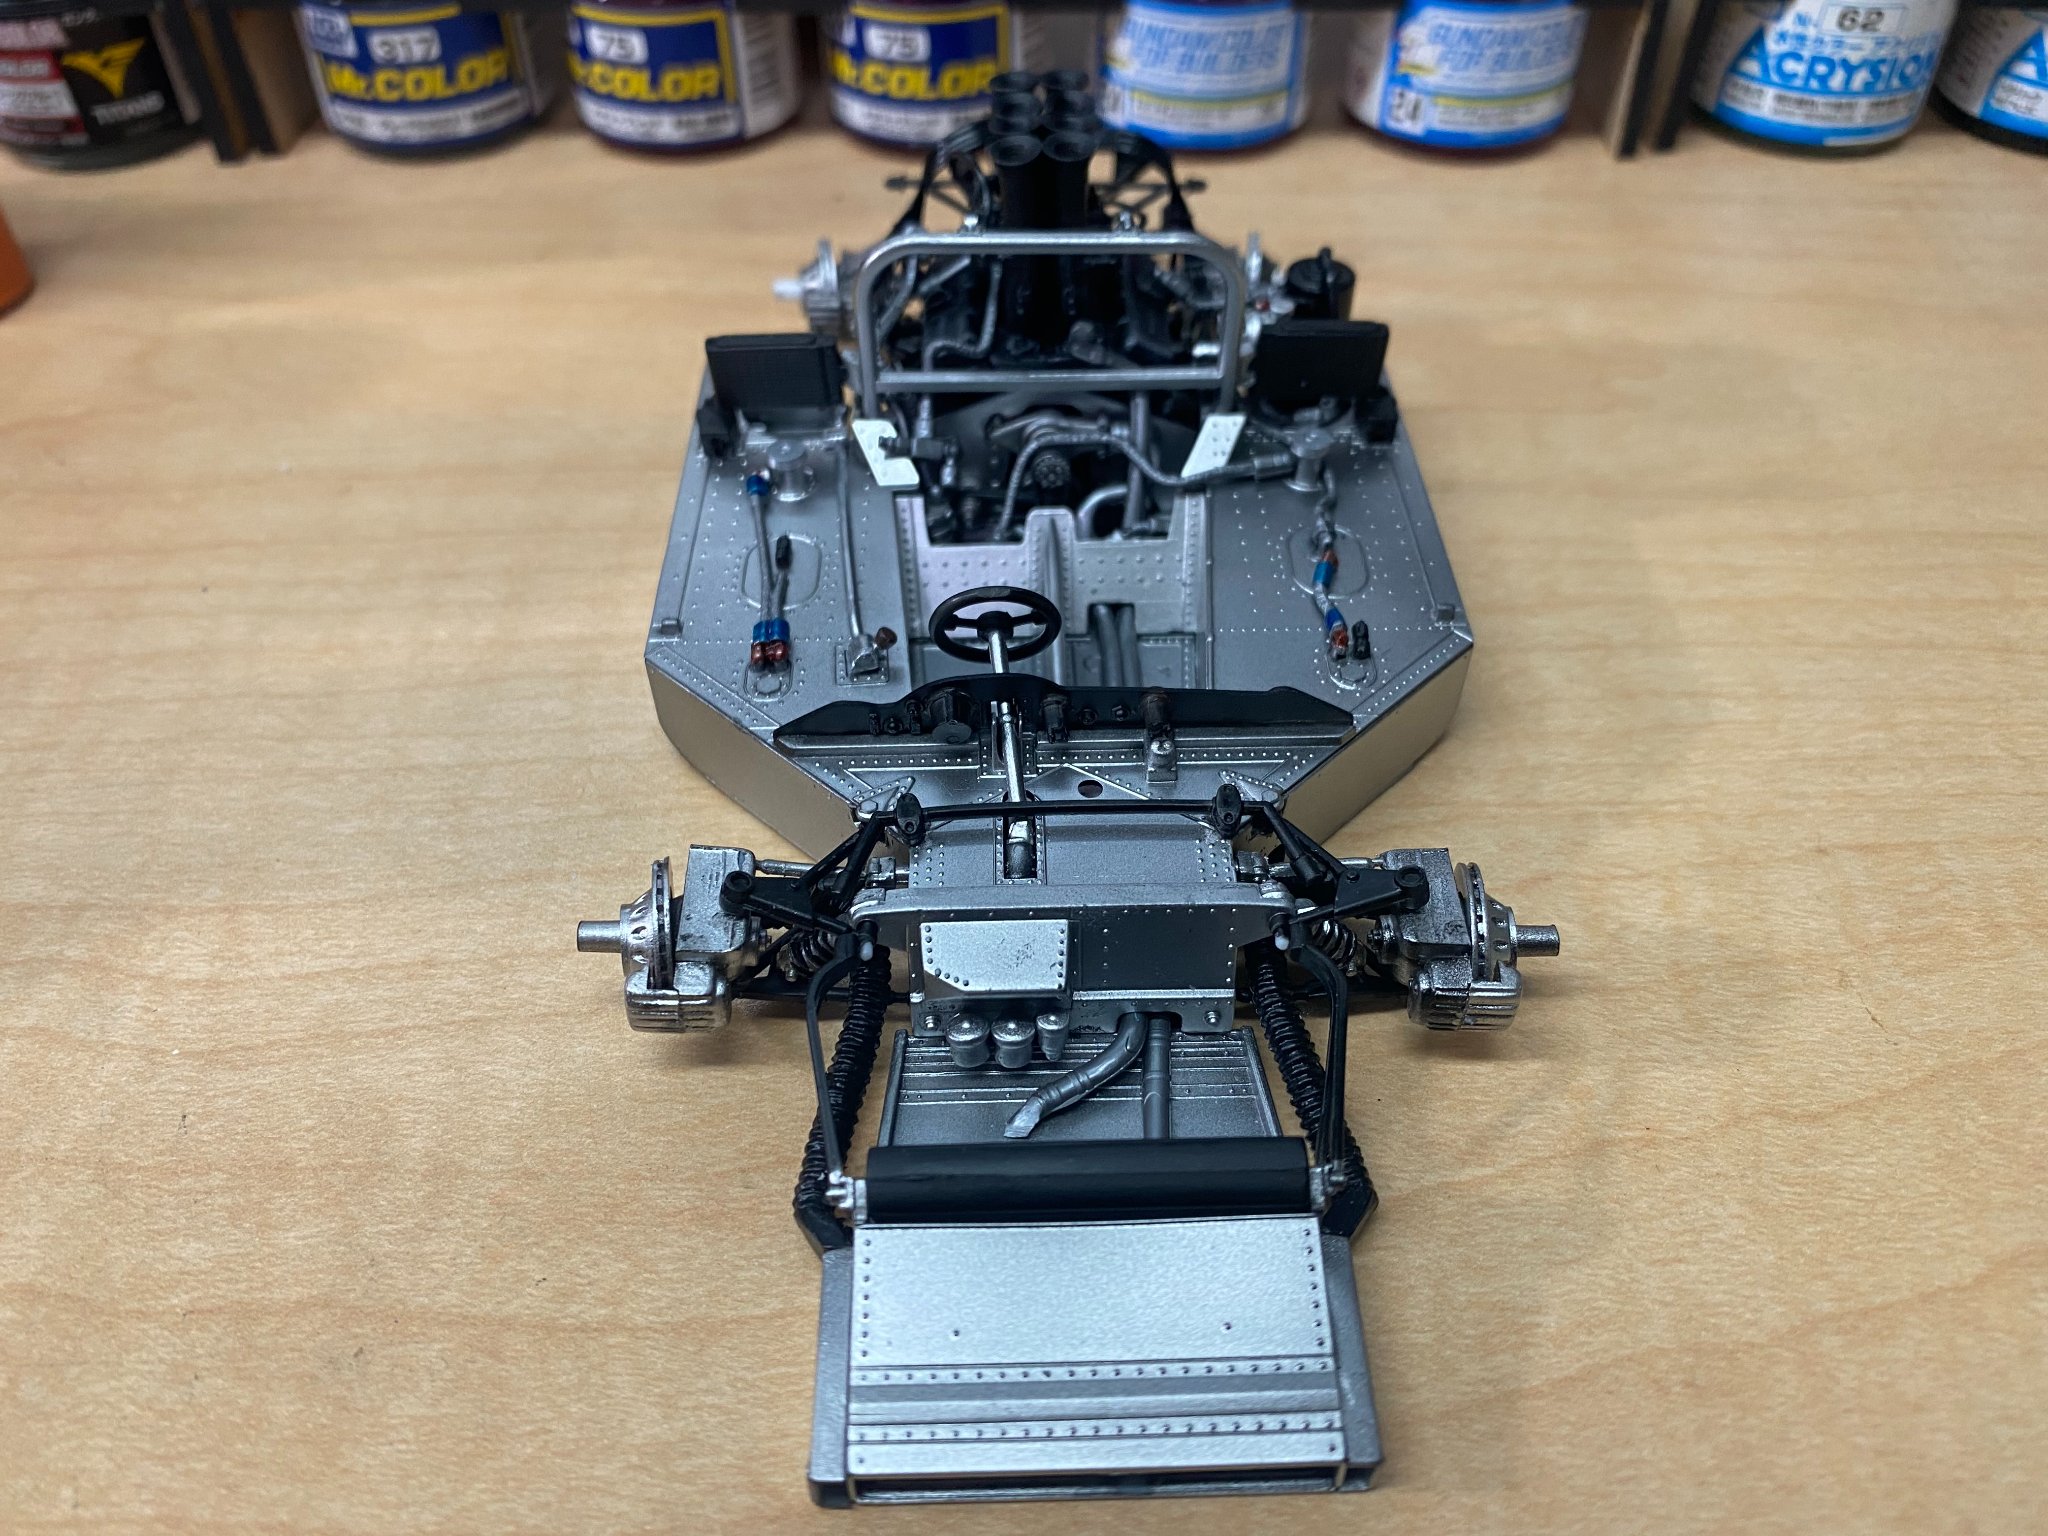
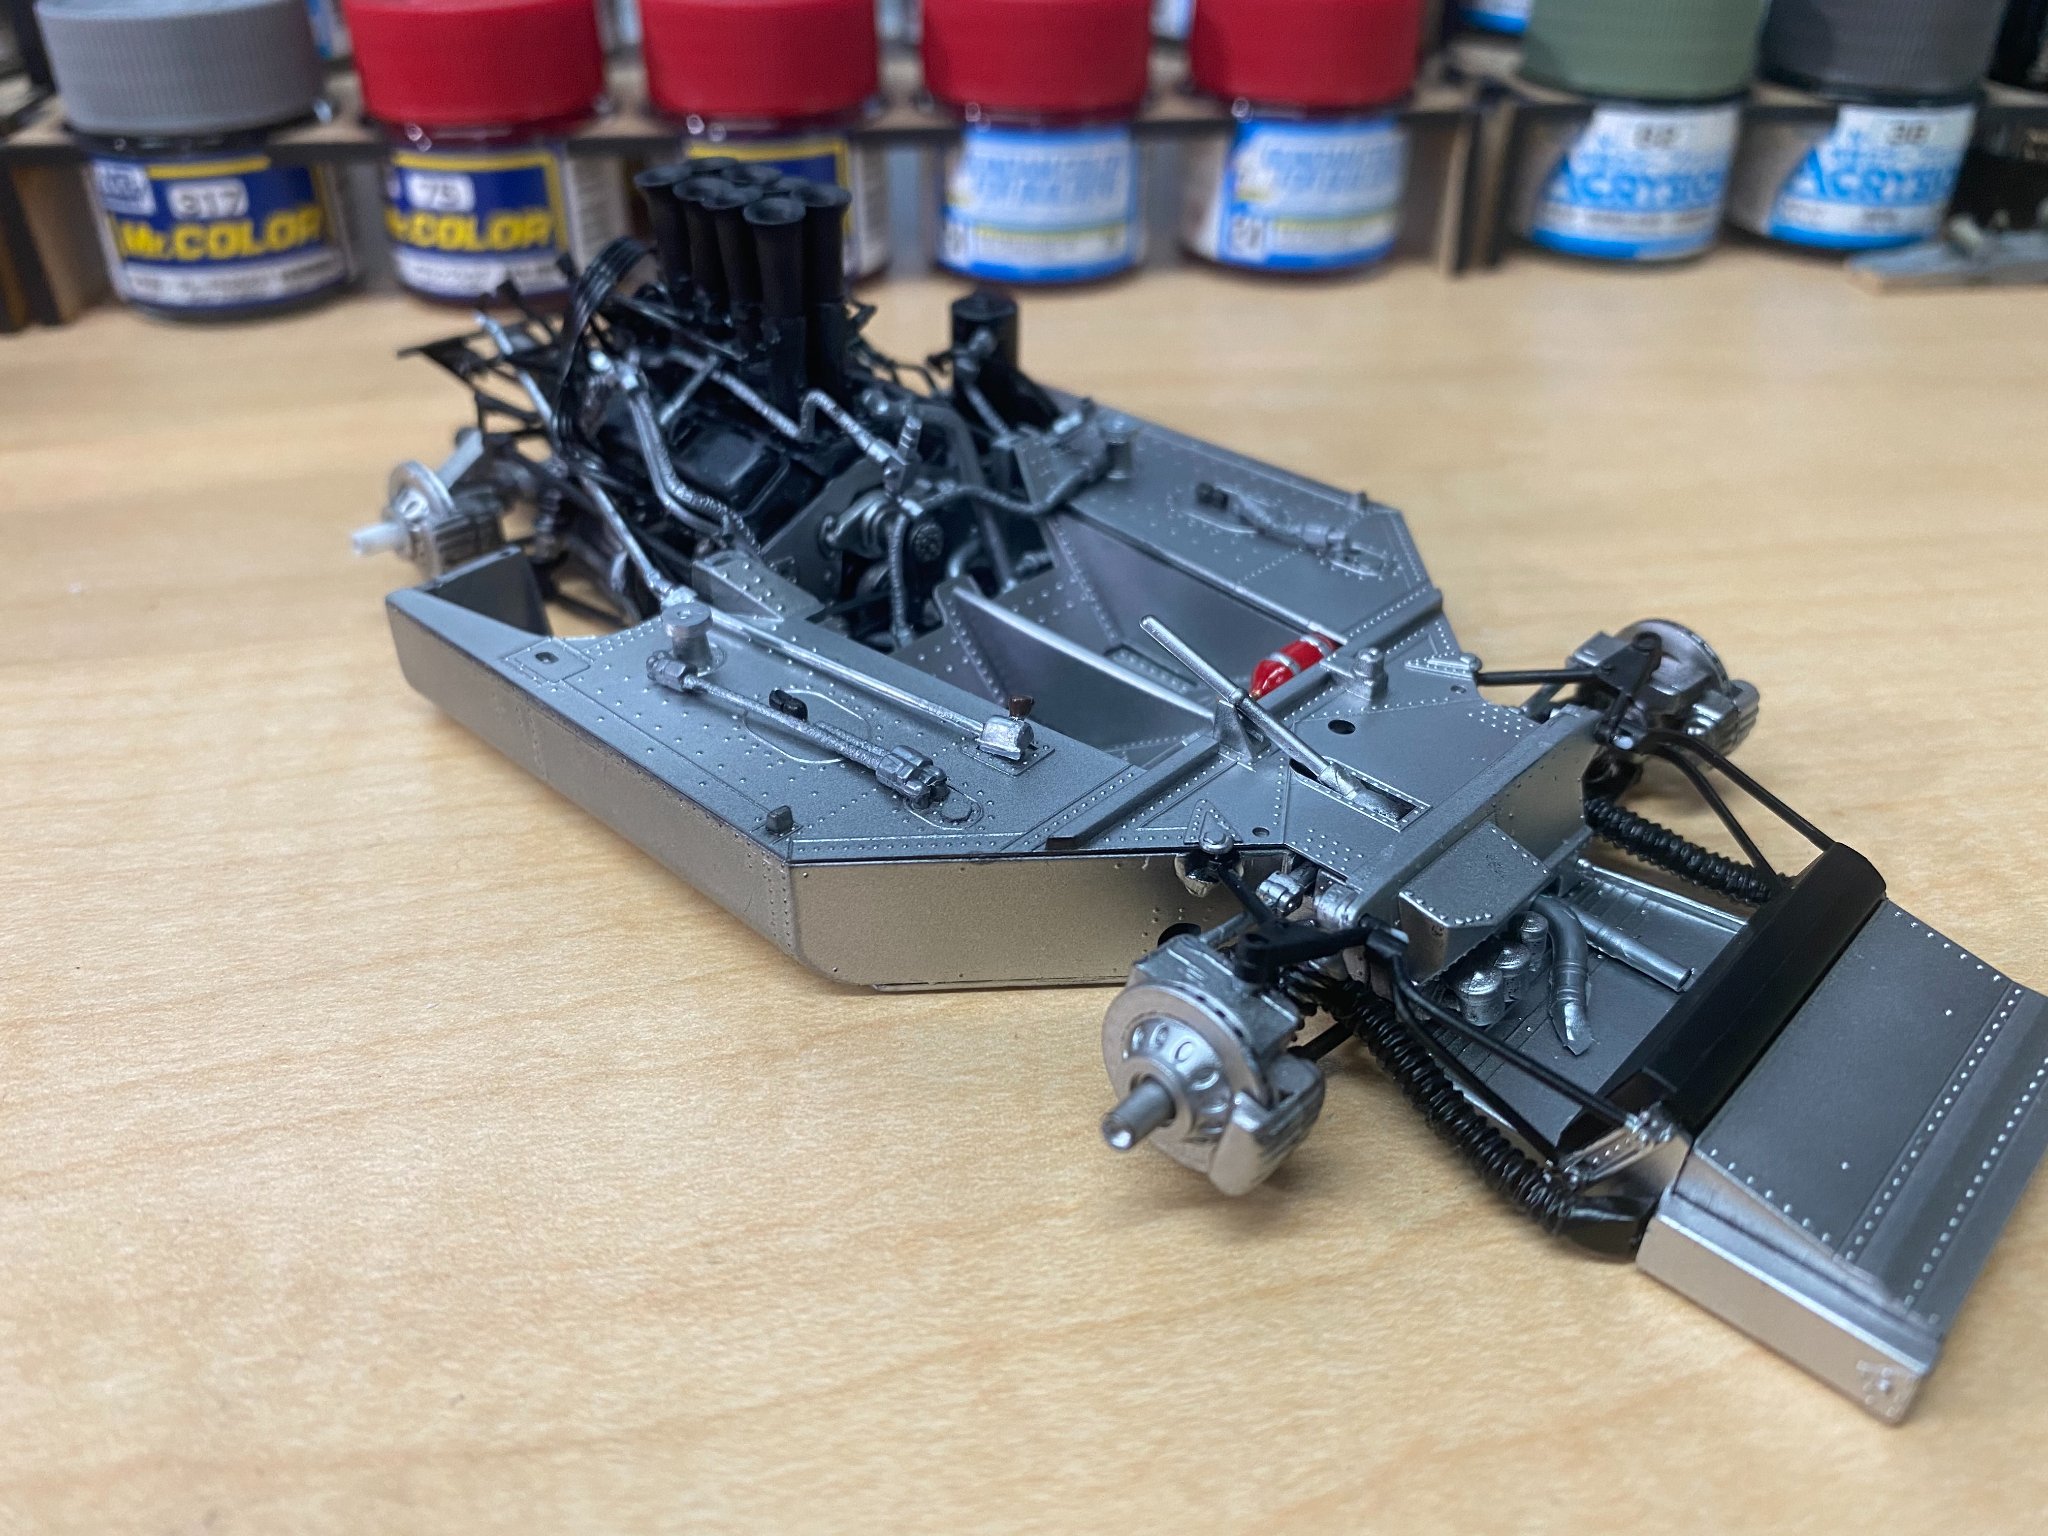
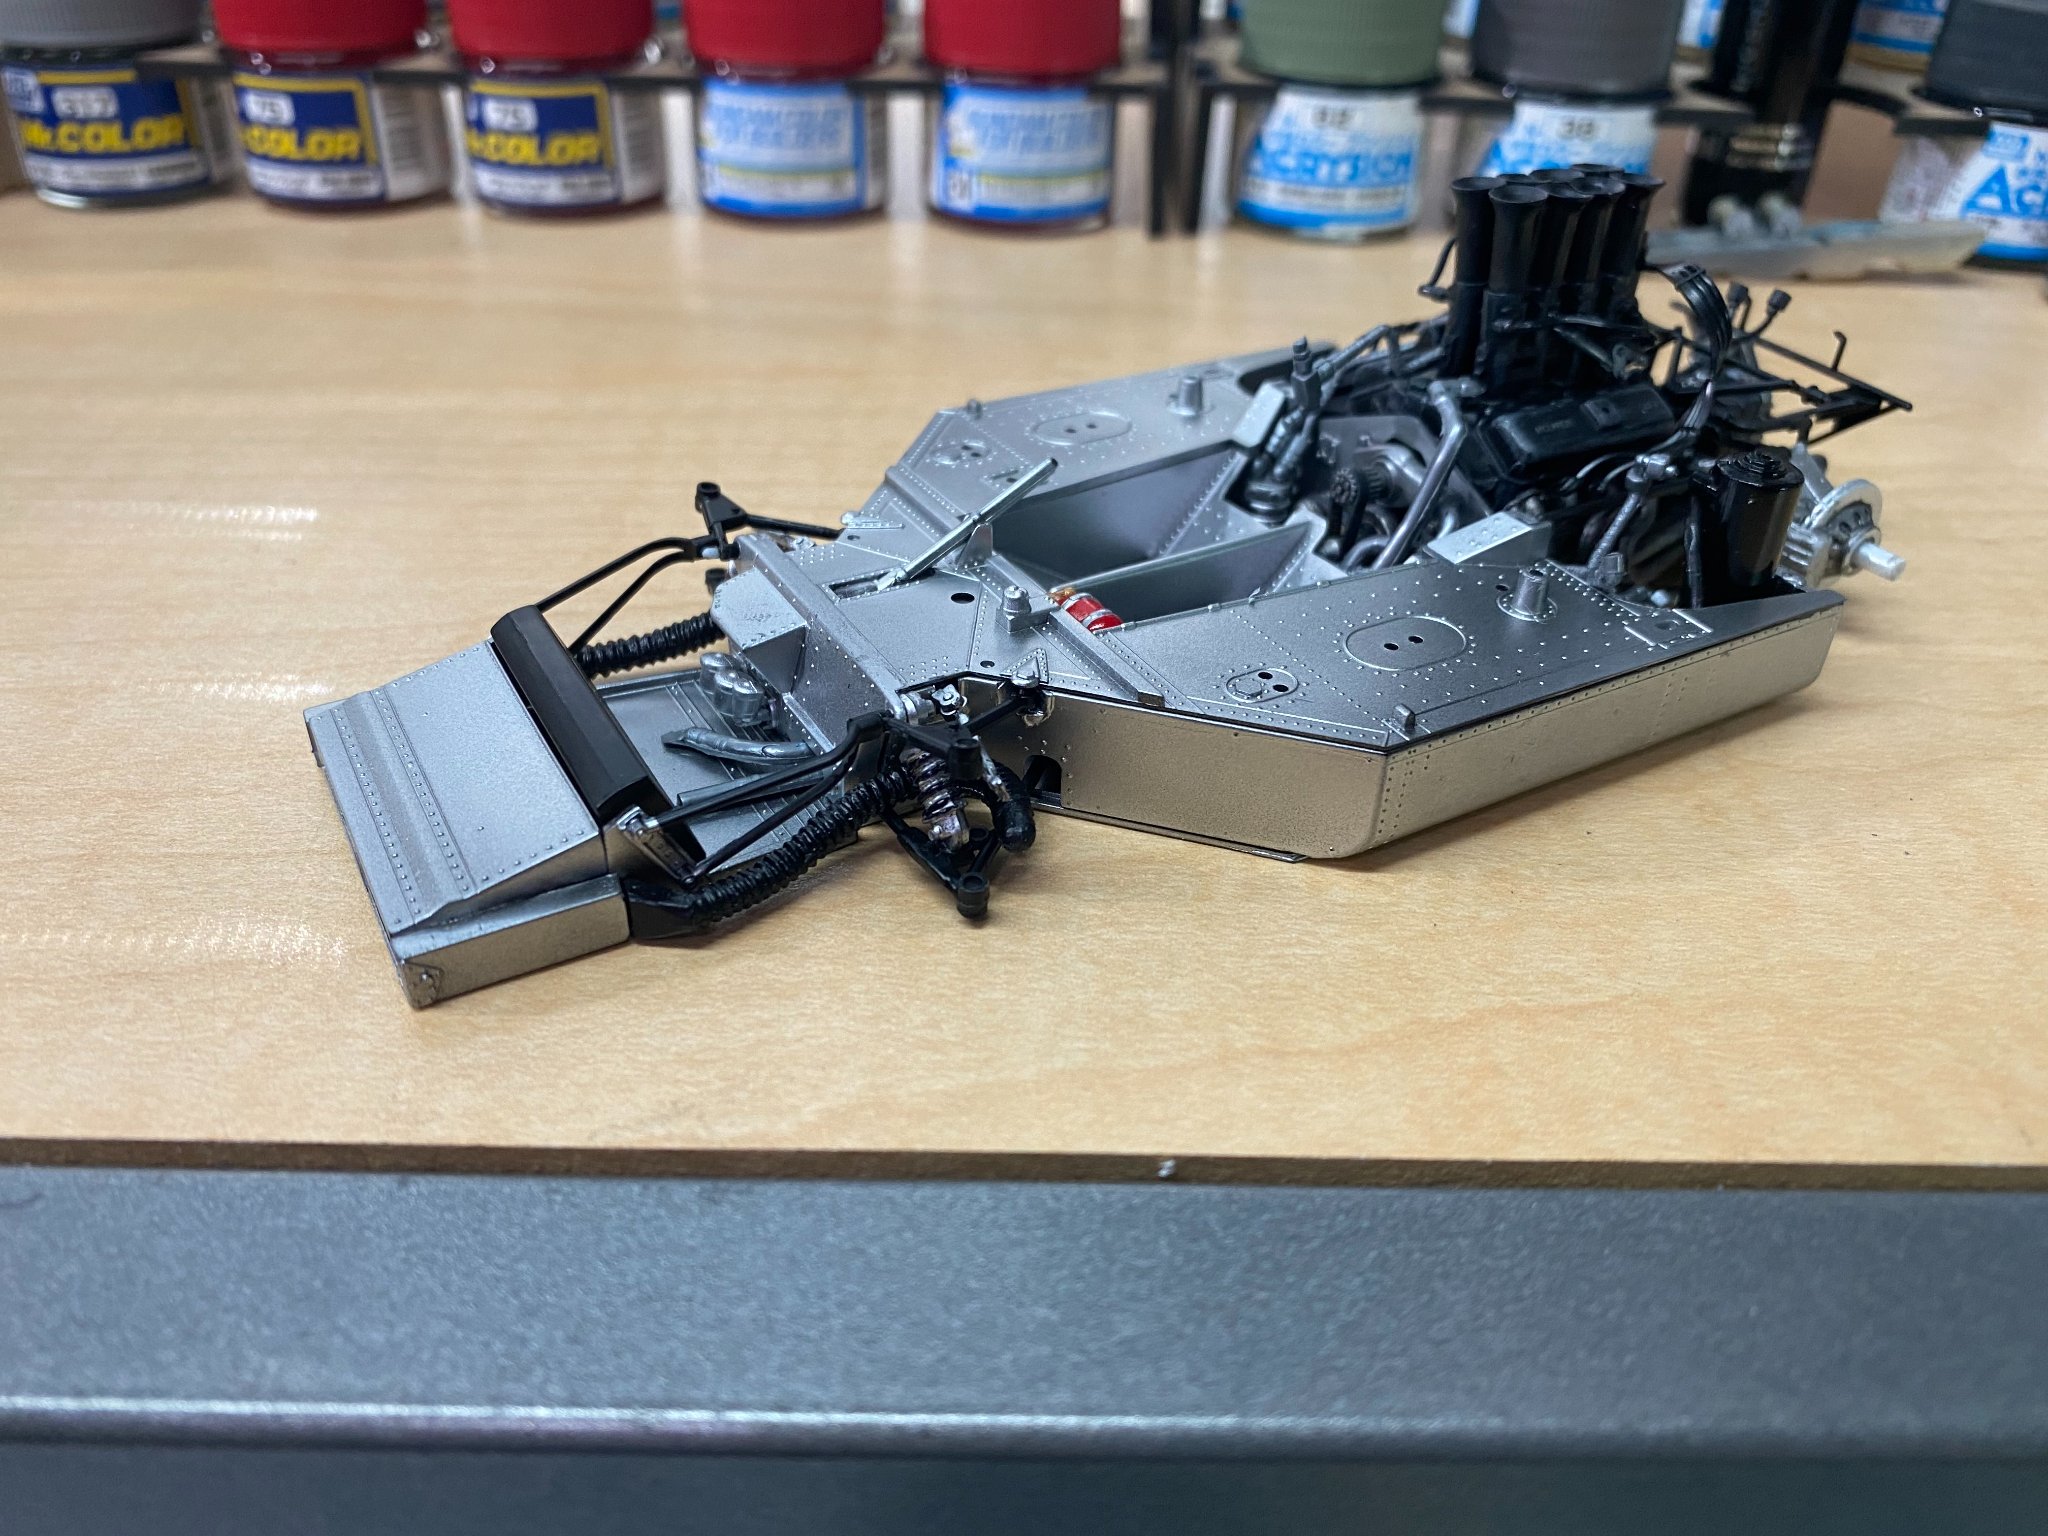
Added roll bar, oil coolers, front suspension, and dash/steering wheel components. Started painting the various red/blue anodized connections to various fuel and oil lines.


- 137 replies
-
- 12
-

-
McLaren M8B by CDW - Accurate Miniatures - 1:24 Scale
CDW replied to CDW's topic in Non-ship/categorised builds
I'll have to do some more experimenting to give you a definitive answer to that question. I have read others say three hours thoroughly cures acrylics but I have to believe it will depend somewhat on what you have used to reduce the paint. I like to use lacquer thinner with Tamiya paint and that's going to behave a whole lot different than an acrylic thinned with a water based thinner. -
McLaren M8B by CDW - Accurate Miniatures - 1:24 Scale
CDW replied to CDW's topic in Non-ship/categorised builds
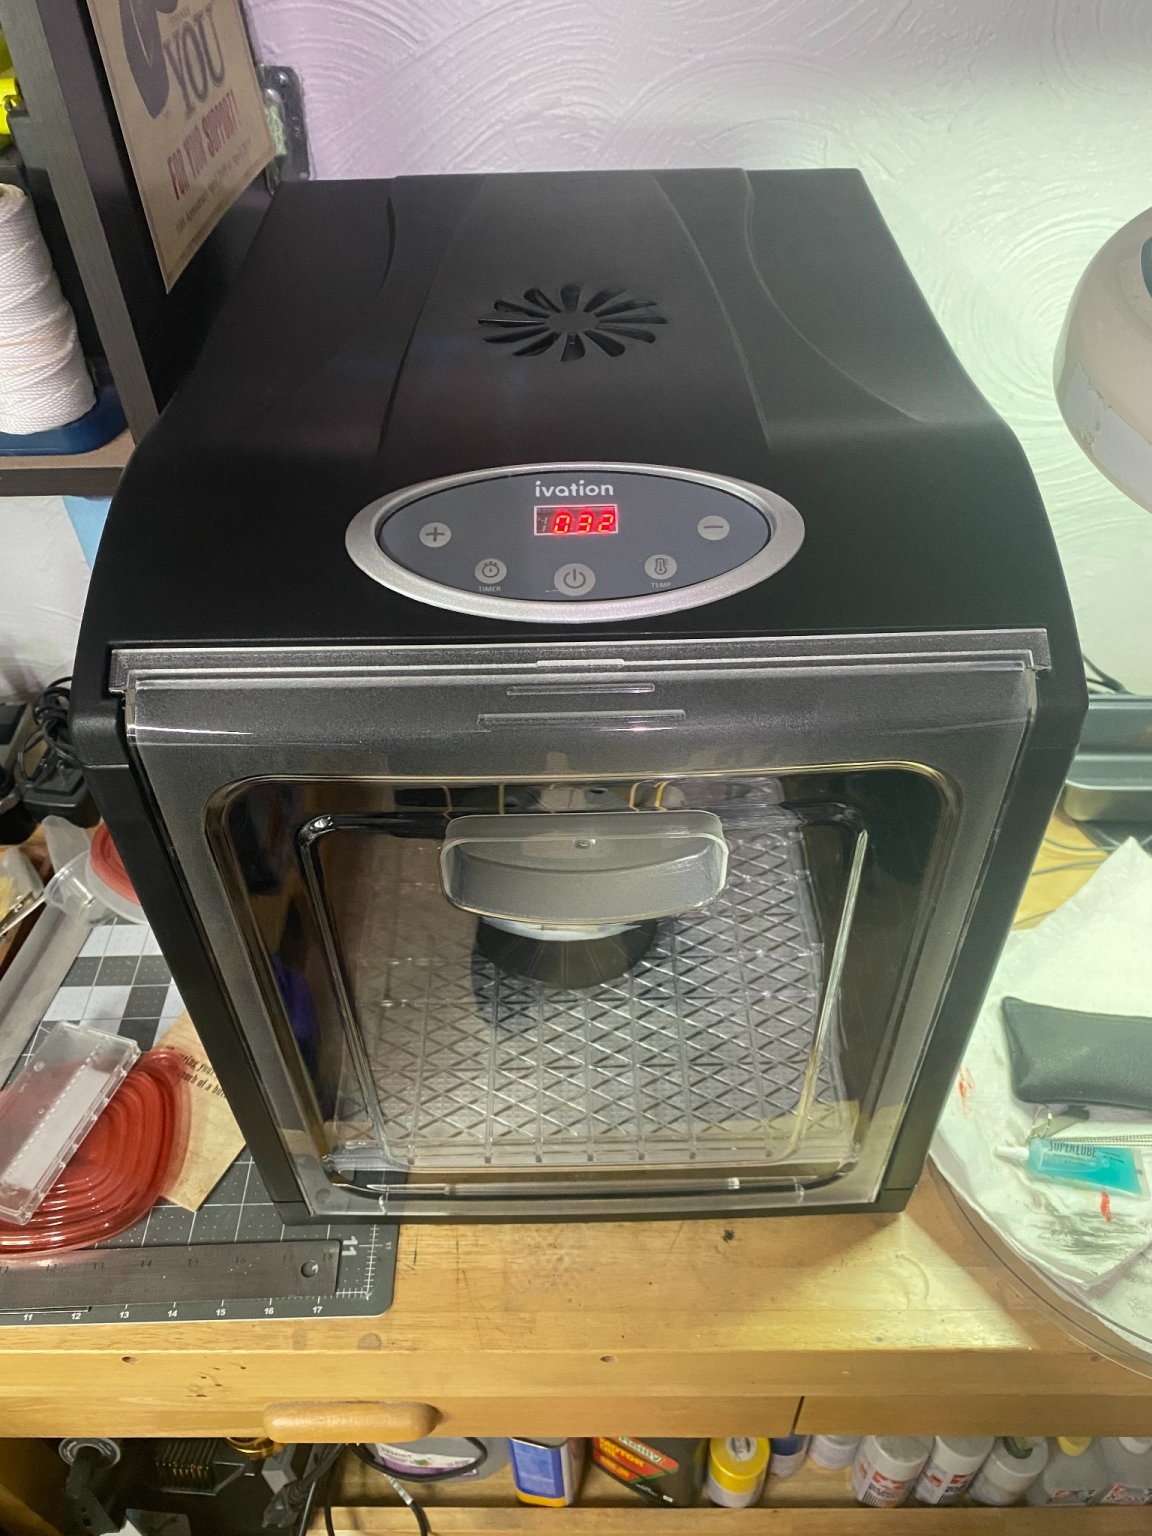
Yes! But hands-free and much better controlled temperature and air all around the parts. It's like a miniature convection oven, low temperature and will not harm plastic unless you set the temperature too high. -
McLaren M8B by CDW - Accurate Miniatures - 1:24 Scale
CDW replied to CDW's topic in Non-ship/categorised builds
I should note, this unit is particularly well suited for model cars and other similar sized models, but large ship hulls would not fit inside, obviously. -
McLaren M8B by CDW - Accurate Miniatures - 1:24 Scale
CDW replied to CDW's topic in Non-ship/categorised builds
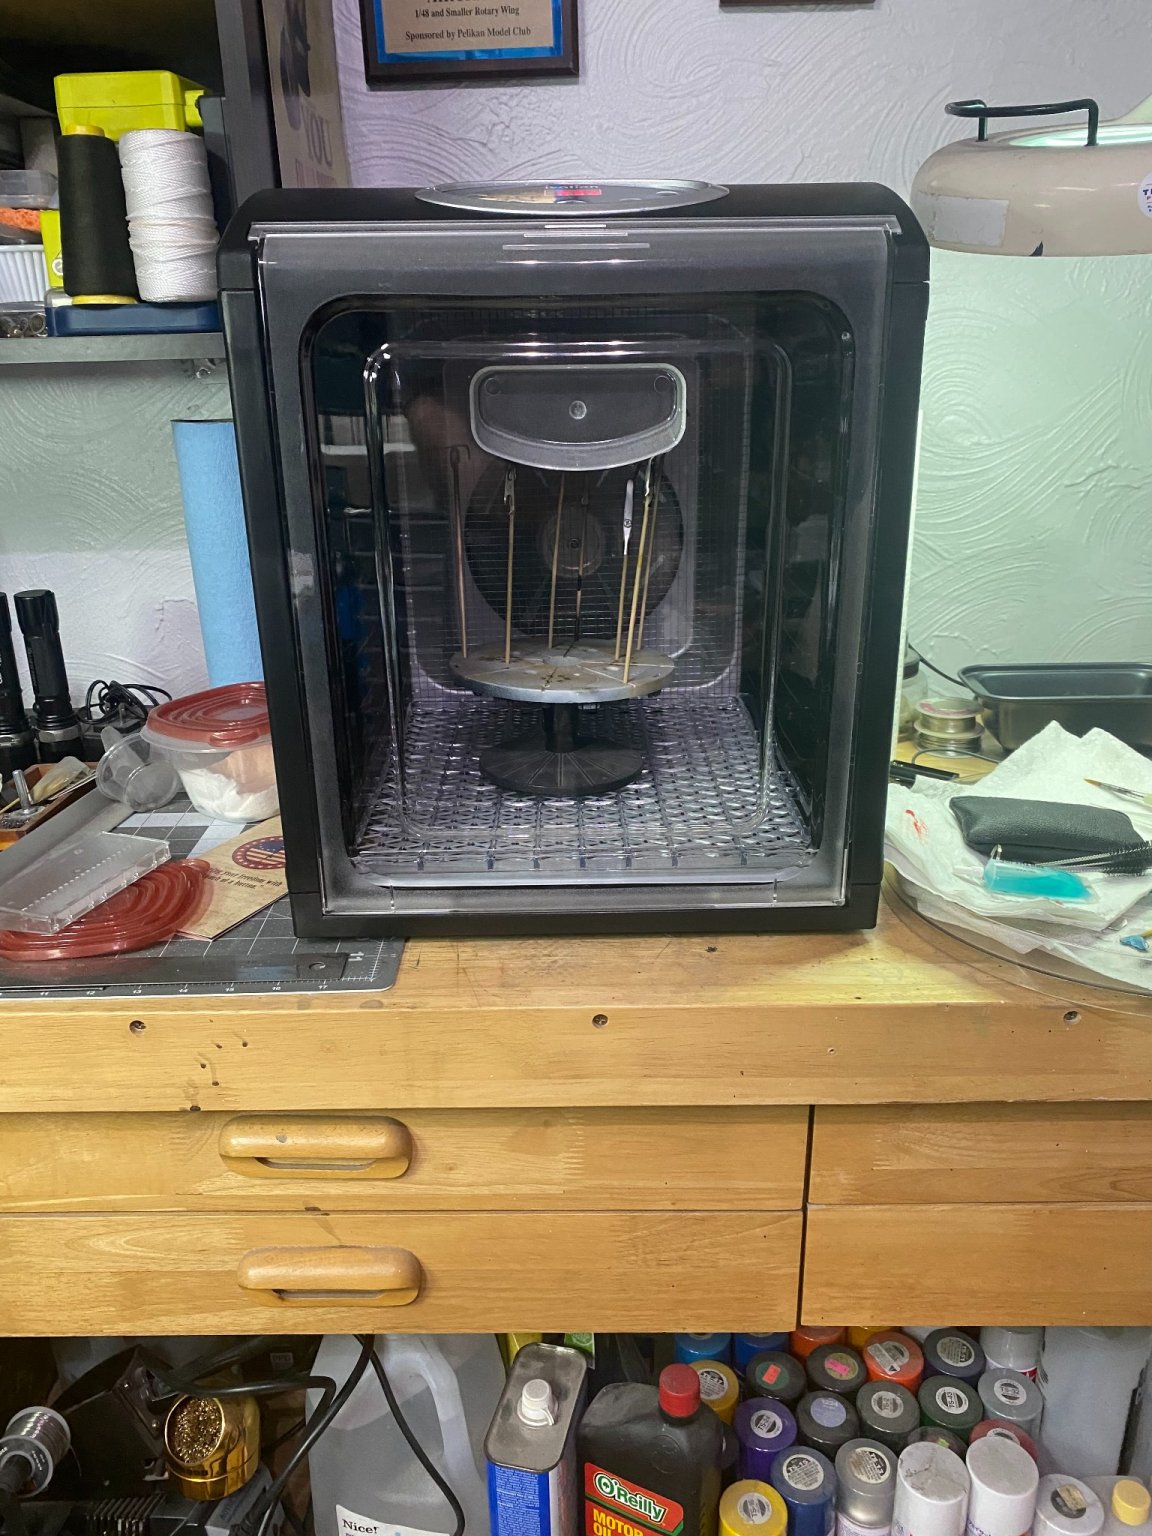
After doing some research, I learned about using a food dehydrator to help reduce the drying time of painted model parts...drastically reduce the time. As I am sure most of you know, various paints can take quite a long time to dry, certain enamels taking two weeks or more to cure. Acrylics can take quite a while. Well, the food dehydrator can cut that complete cure time on enamels from 2 weeks to over night. Acrylics down from a full day or more to 3 hours, fully cured. The dehydrator I bought is a 9 shelf unit with a front opening sliding door, from Amazon. The shelves are removable so you have plenty of space for parts. It has a thermostat control for heat as well as a timer. As pictured, I have some acrylic painted parts drying now that I set on 105 degrees F. With this unit, I will return to using enamels from time to time. I avoided them in the past because of the extreme drying times. By the way, the painted parts now in the dehydrator are for the McLaren. 🙂

- 137 replies
-
- 10
-
-

-
McLaren M8B by CDW - Accurate Miniatures - 1:24 Scale
CDW replied to CDW's topic in Non-ship/categorised builds
While she's not quite 16 yet, a few more months to go (this summer), she's already taking college courses and will graduate high school at 16. She's in all high honors classes and has her heart set on becoming a mechanic. Go figure. I was so proud of her today, she changed the oil in her newly acquired Miata, flushed the radiator and put in new coolant, put in a new set of spark plugs, changed the air filter, and completely detailed the engine compartment. She's a smart girl and not afraid to get her hands dirty. -
McLaren M8B by CDW - Accurate Miniatures - 1:24 Scale
CDW replied to CDW's topic in Non-ship/categorised builds
No, this is a CMC Model, from a company in Germany. Completely pre assembled by them. -
McLaren M8B by CDW - Accurate Miniatures - 1:24 Scale
CDW replied to CDW's topic in Non-ship/categorised builds
Took my grand daughter, turning 16, to pick up her first car yesterday evening. Mazda Miata.
-
Generally speaking, I have had very good service when ordering items from Japan, but less than stellar service from Korea. Not sure why, but it seems to take a lot longer period of time to receive goods from Korea. I often receive items from Japan in less than two weeks time, Korea sometimes two months! An a separate note, each the several photo etch frets/sets contained in that one detail set are available separately. Try to find a close up photo of the set box top. It shows the photo etch fret numbers contained in the set. Maybe Mike will take a look at the box his set came in and list the items numbers of the frets contained in the set for you.
-
McLaren M8B by CDW - Accurate Miniatures - 1:24 Scale
CDW replied to CDW's topic in Non-ship/categorised builds
I thought about the same thing....surrounded by fuel. Yikes! -
McLaren M8B by CDW - Accurate Miniatures - 1:24 Scale
CDW replied to CDW's topic in Non-ship/categorised builds
Spindles, brake disks, calipers, shift linkage, and various fuel lines have been added.
- 137 replies
-
- 12
-
-
McLaren M8B by CDW - Accurate Miniatures - 1:24 Scale
CDW replied to CDW's topic in Non-ship/categorised builds
There's ductwork for the rear brakes as well. To be installed in a later step. -
McLaren M8B by CDW - Accurate Miniatures - 1:24 Scale
CDW replied to CDW's topic in Non-ship/categorised builds
Here, the upper control arms and disk brake cooling systems have been painted and installed. Pretty neat how they include the brake cooling systems with ductwork and everything in this kit.
- 137 replies
-
- 12
-
-
McLaren M8B by CDW - Accurate Miniatures - 1:24 Scale
CDW replied to CDW's topic in Non-ship/categorised builds
A life long friend in the hobby business routinely bought entire inventories (models and related items of all descriptions) from bankrupt businesses and estates for exactly what you said, 10 cents on the dollar. That was the going rate and probably still is in a distress sale. It was nothing short of amazing to walk into his hobby shop and spend half the day just looking at everything he had, and then you only saw a tenth of it because he owned warehouses full out of sight. Today I regret so much that I did not have the foresight to take photos of his business both inside and out to save for posterity. It's all gone now and I can't find photos of it anywhere. Sigh...the good old days. I used to bring thousands of dollars worth of hobby items to him and he would trade with me. Got some mighty fine models from the man. -
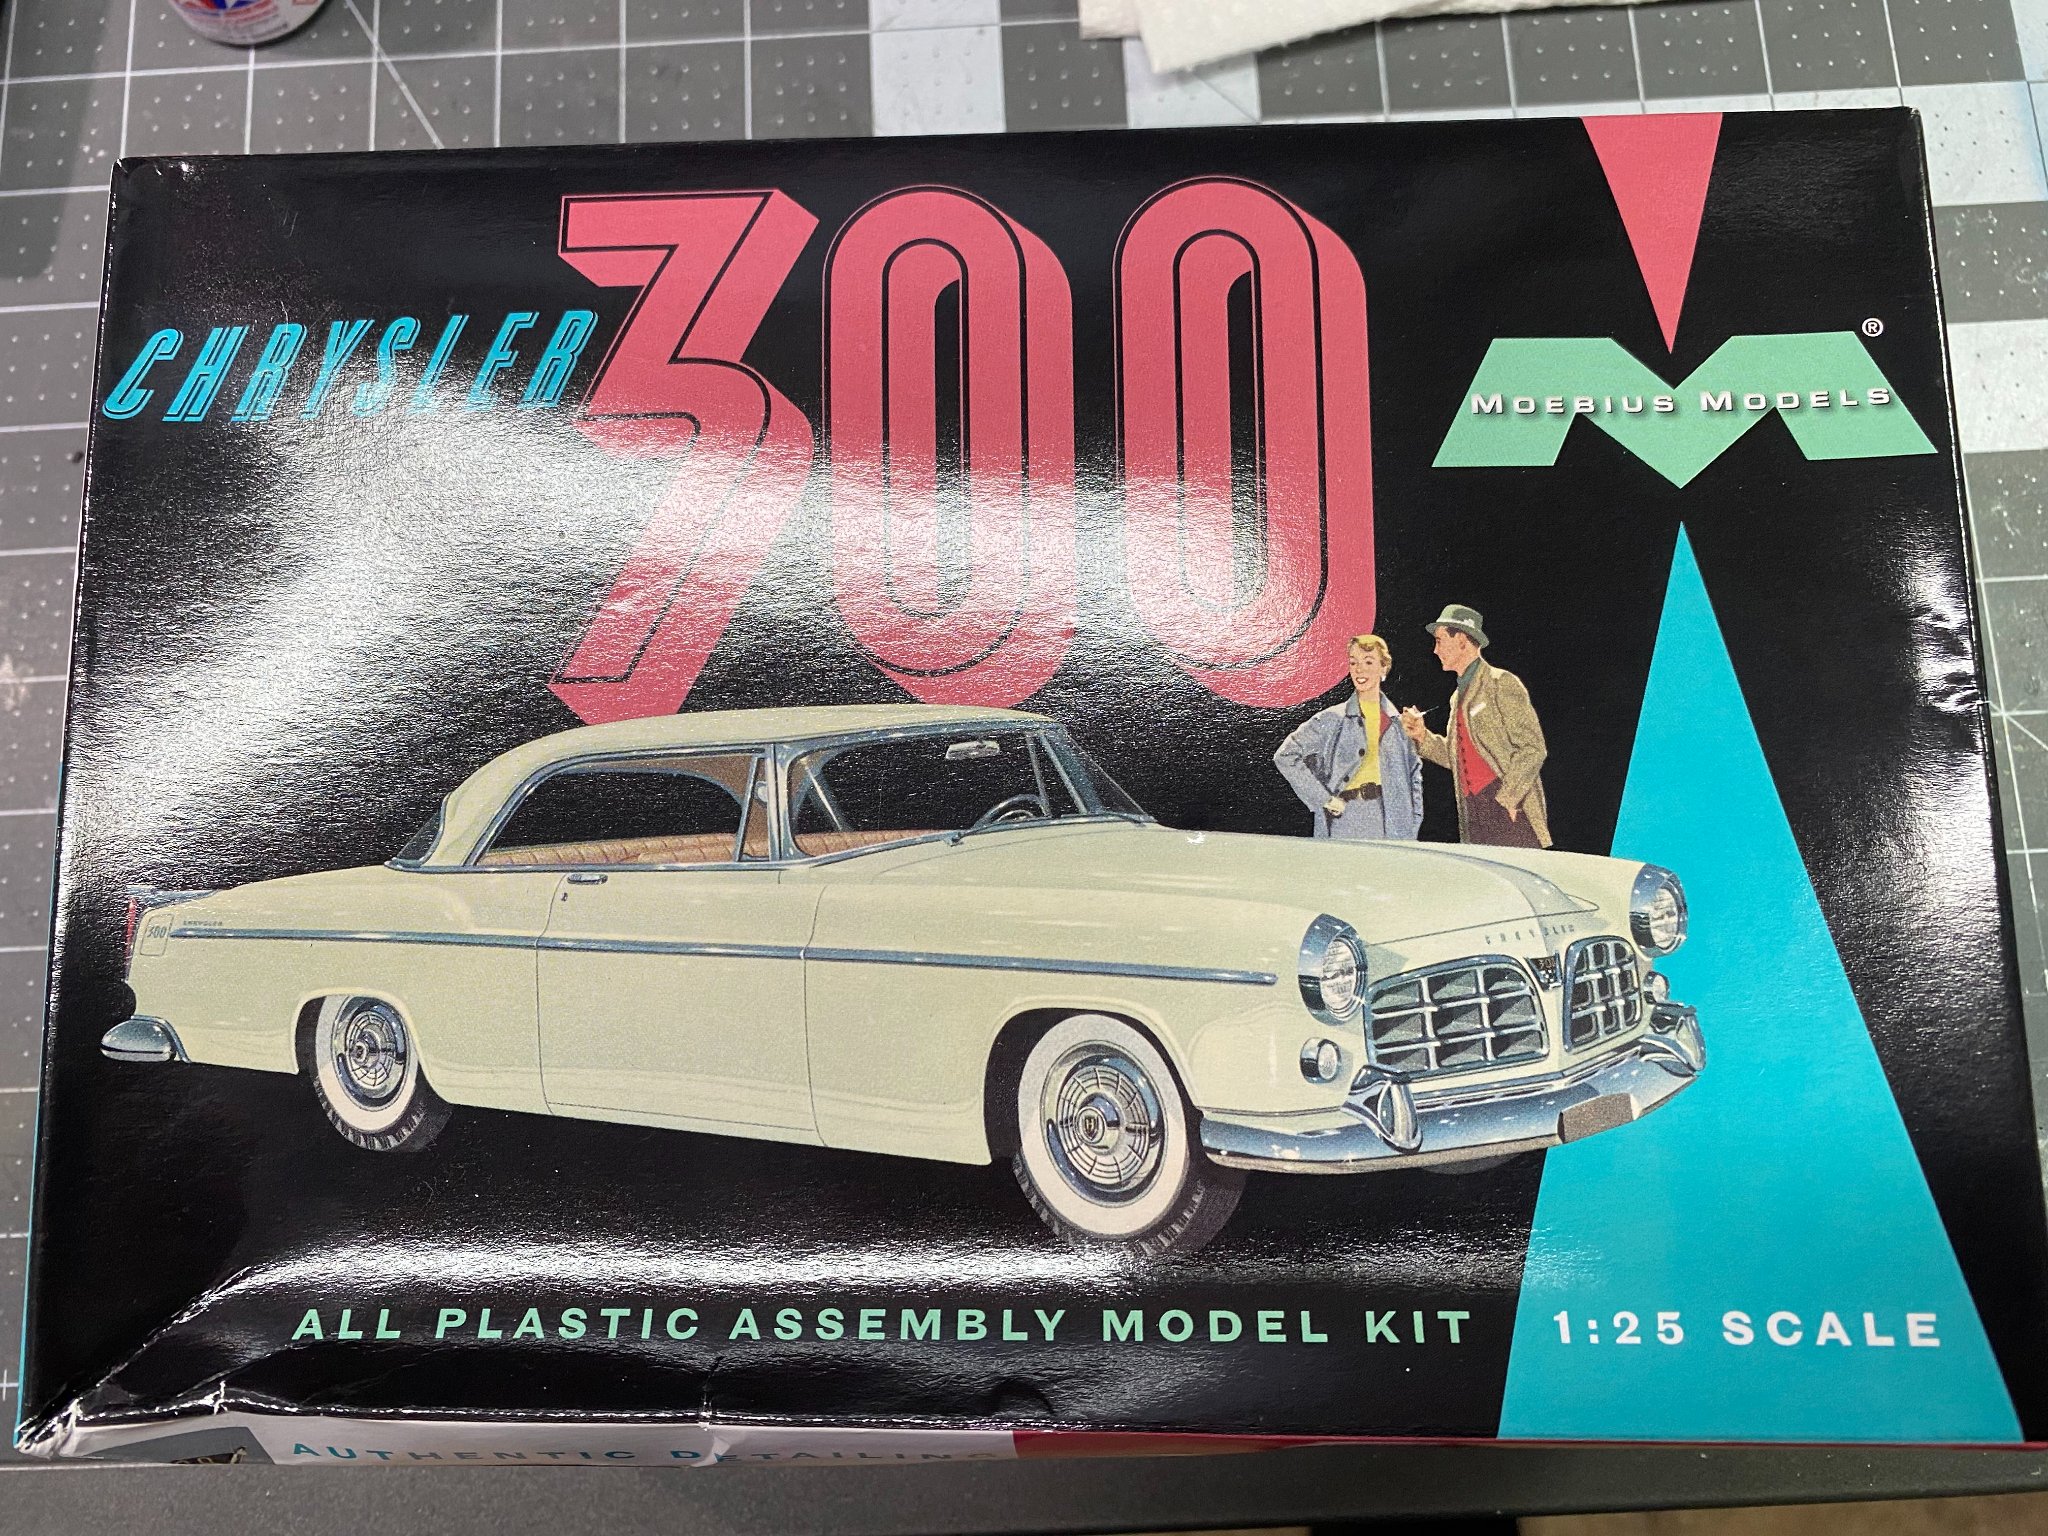
1955 Chrysler 300 by CDW - Moebius - 1:25 Scale - PLASTIC
CDW replied to CDW's topic in Non-ship/categorised builds
Mr Color Metallic Gold -
I had two detail up sets but sold them about a year ago. Have you checked for vendors in Japan? It should turn up on Ebay eventually.
-
McLaren M8B by CDW - Accurate Miniatures - 1:24 Scale
CDW replied to CDW's topic in Non-ship/categorised builds
I would tell you if I could find it, but for the time being, I have misplaced the kit decals and the material they included for the seat belts. The seat belt material came sandwiched between to pieces of sticky backed paper and I never got around to opening it, but it felt like a lump of something rather than being thin like ribbon. I'll locate the MIA decal sheet and seat belt material eventually but for now it's gone. -
McLaren M8B by CDW - Accurate Miniatures - 1:24 Scale
CDW replied to CDW's topic in Non-ship/categorised builds
Looking ahead just a bit, this M8B kit comes with a nice set of molded styrene seat belt buckles. Recently, I searched for and bought some different colors of 1/8 inch ribbon at a fabric store. The ribbon should work perfect with the buckles to make a great set of seat belts for the model. -
McLaren M8B by CDW - Accurate Miniatures - 1:24 Scale
CDW replied to CDW's topic in Non-ship/categorised builds
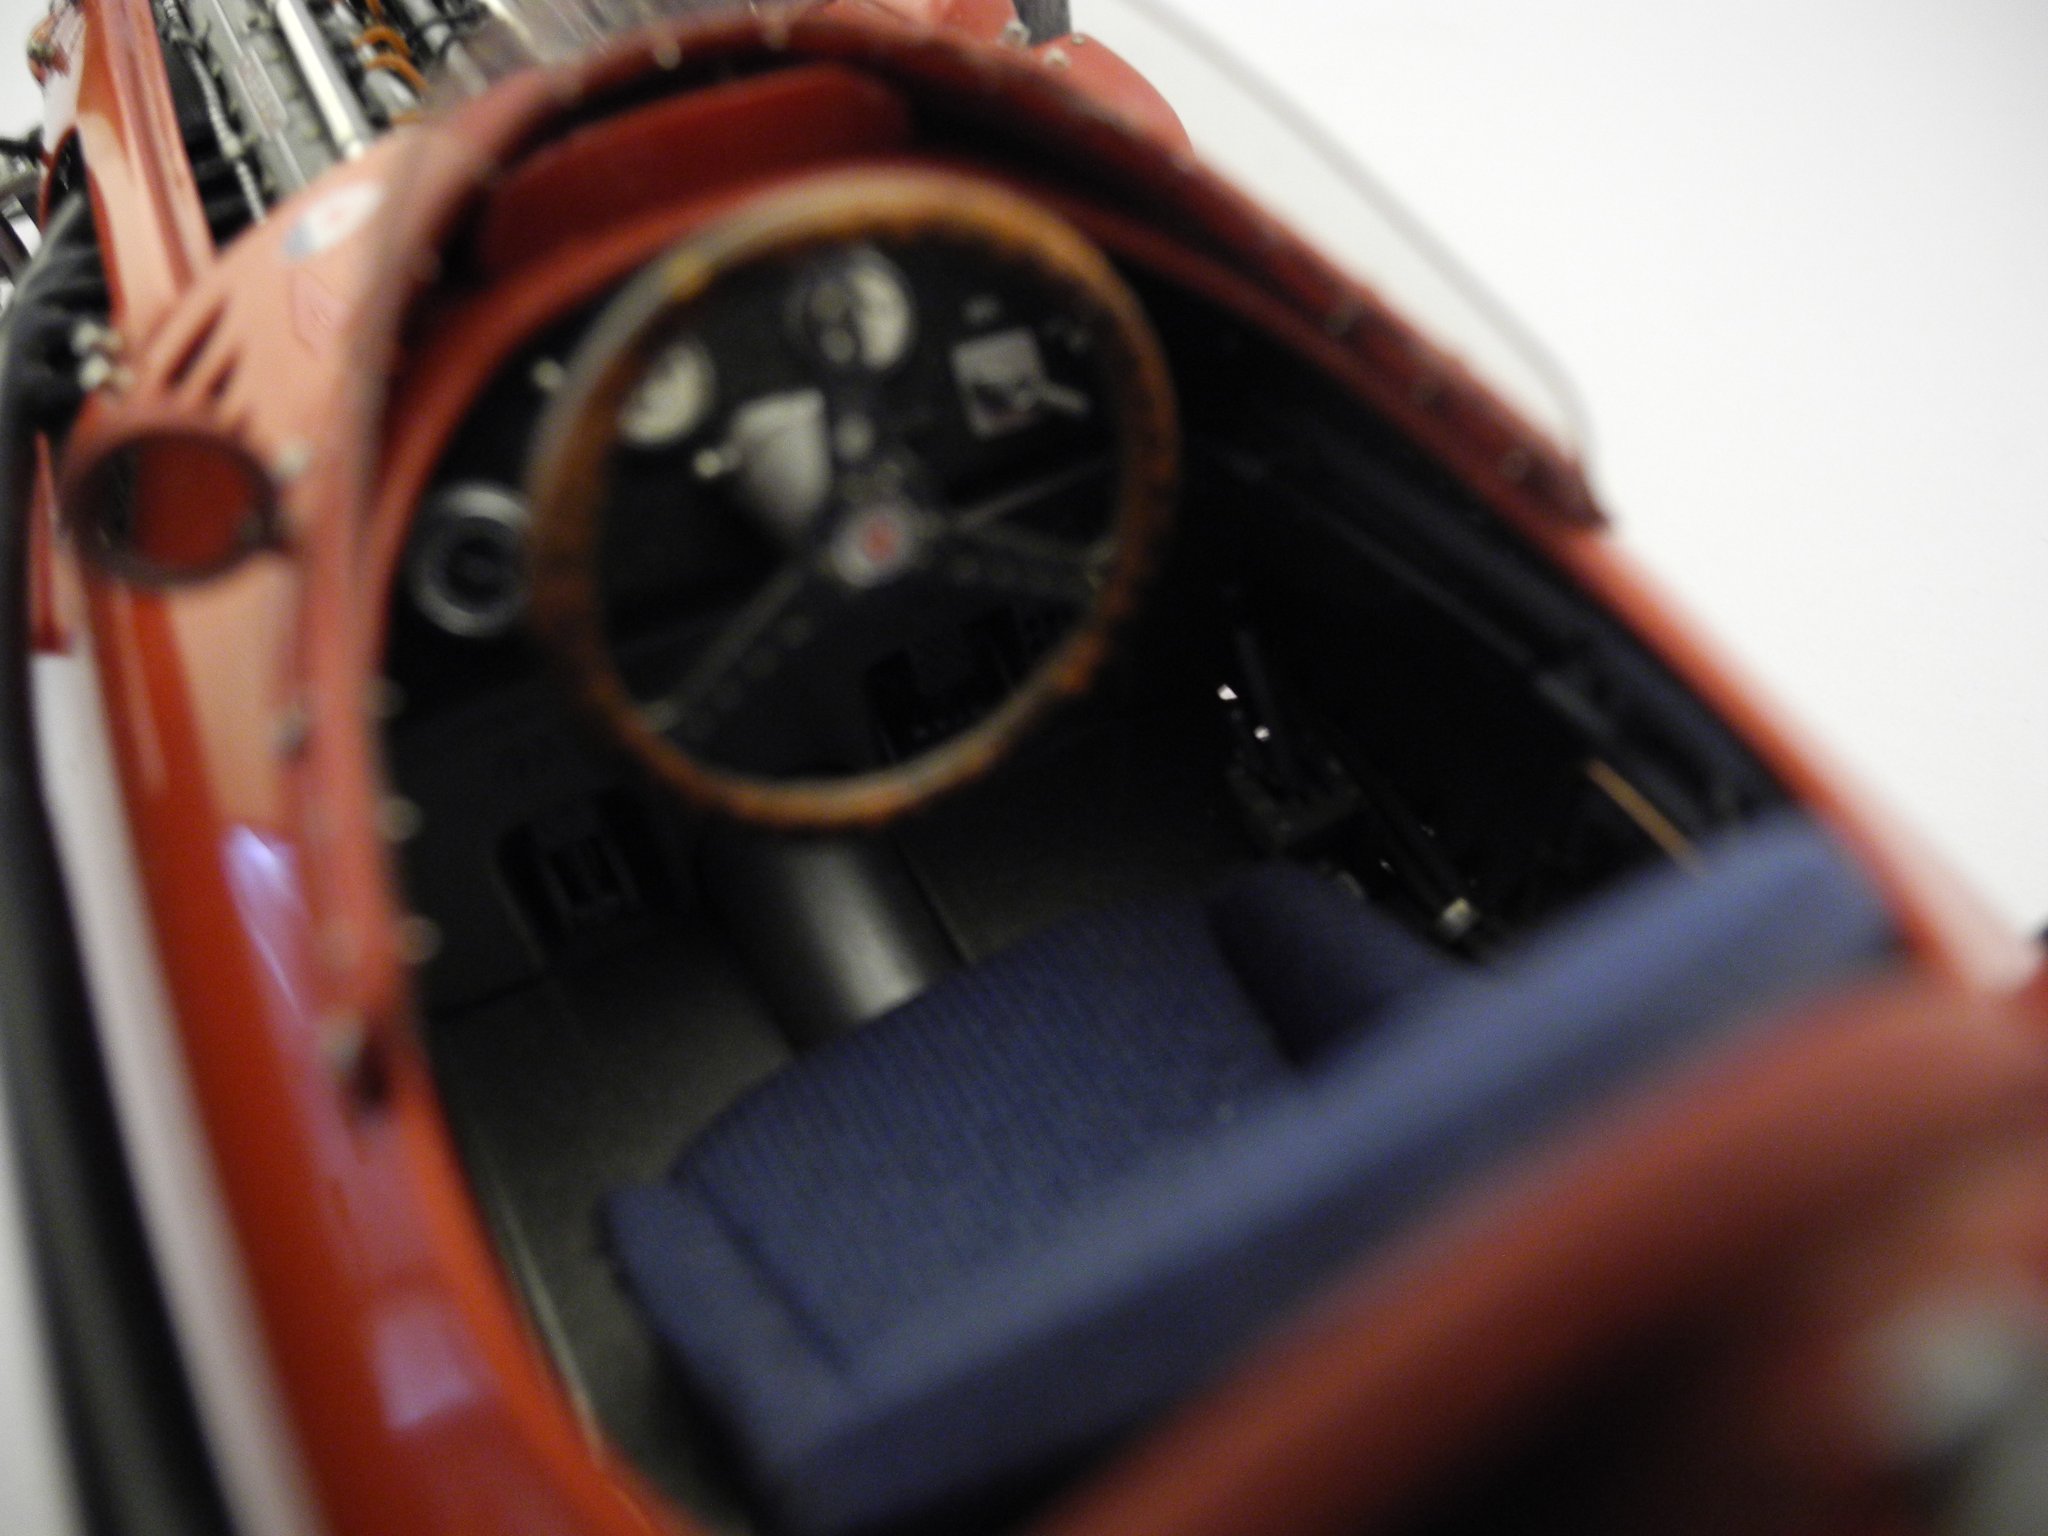
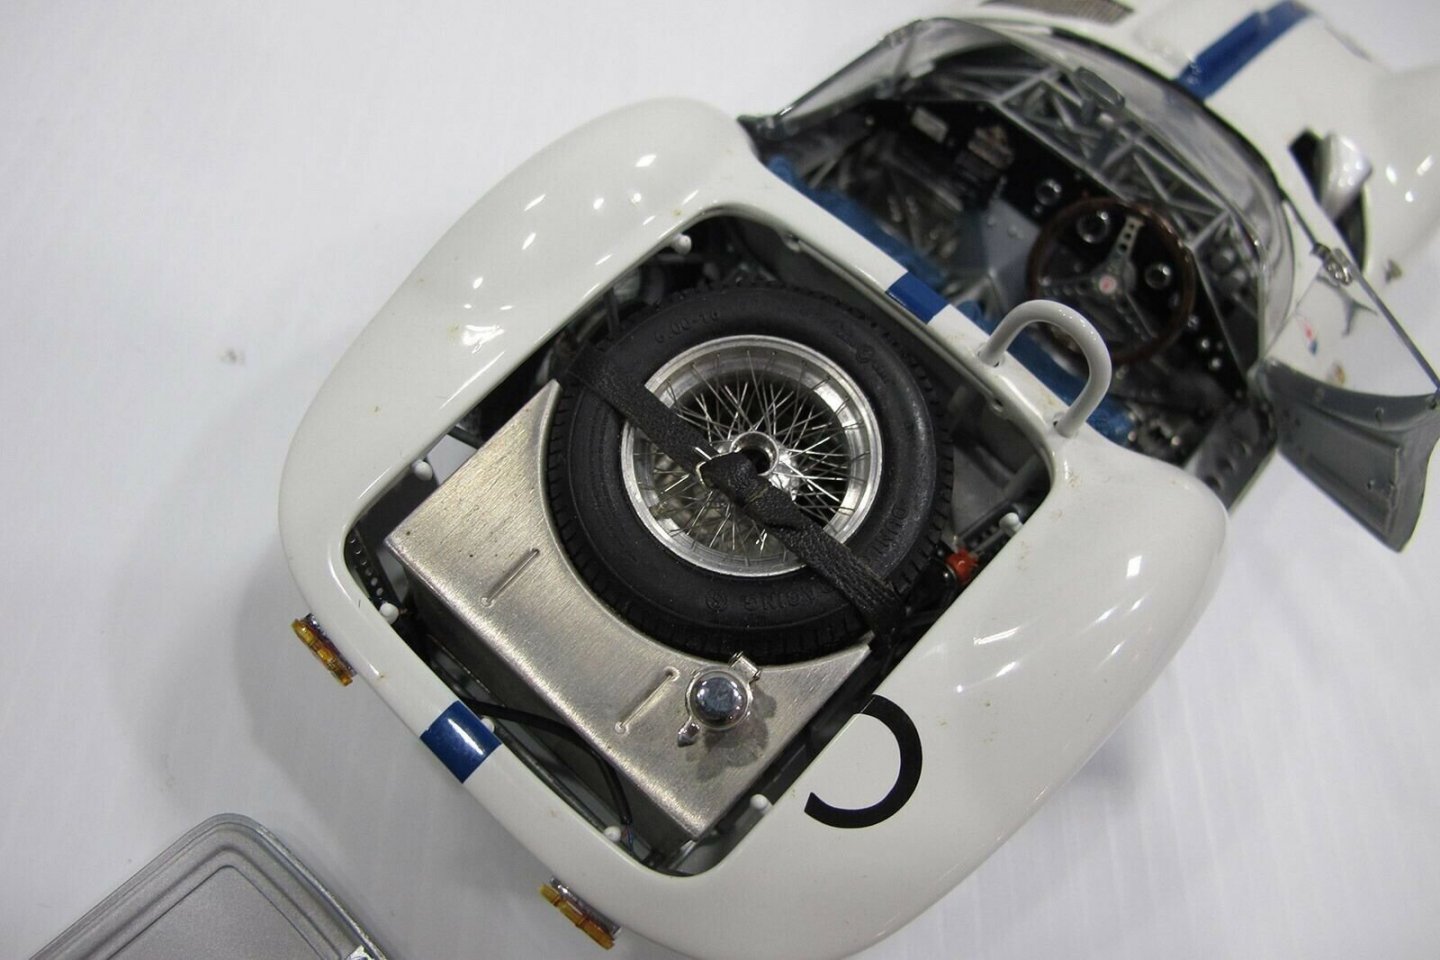
Check out this CMC 1960 Maserati Birdcage. I don't own this one. They command a very high price now. I could have bought one about twenty years ago for a few hundred. Now they are 1,000 and higher.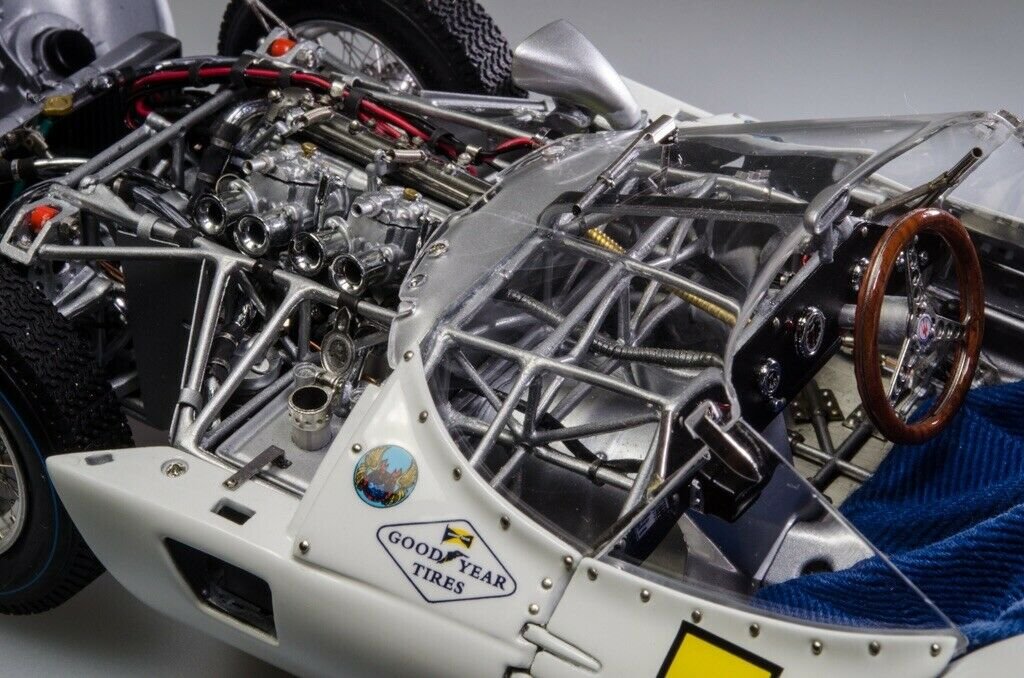
- 137 replies
-
- 13
-
-
McLaren M8B by CDW - Accurate Miniatures - 1:24 Scale
CDW replied to CDW's topic in Non-ship/categorised builds
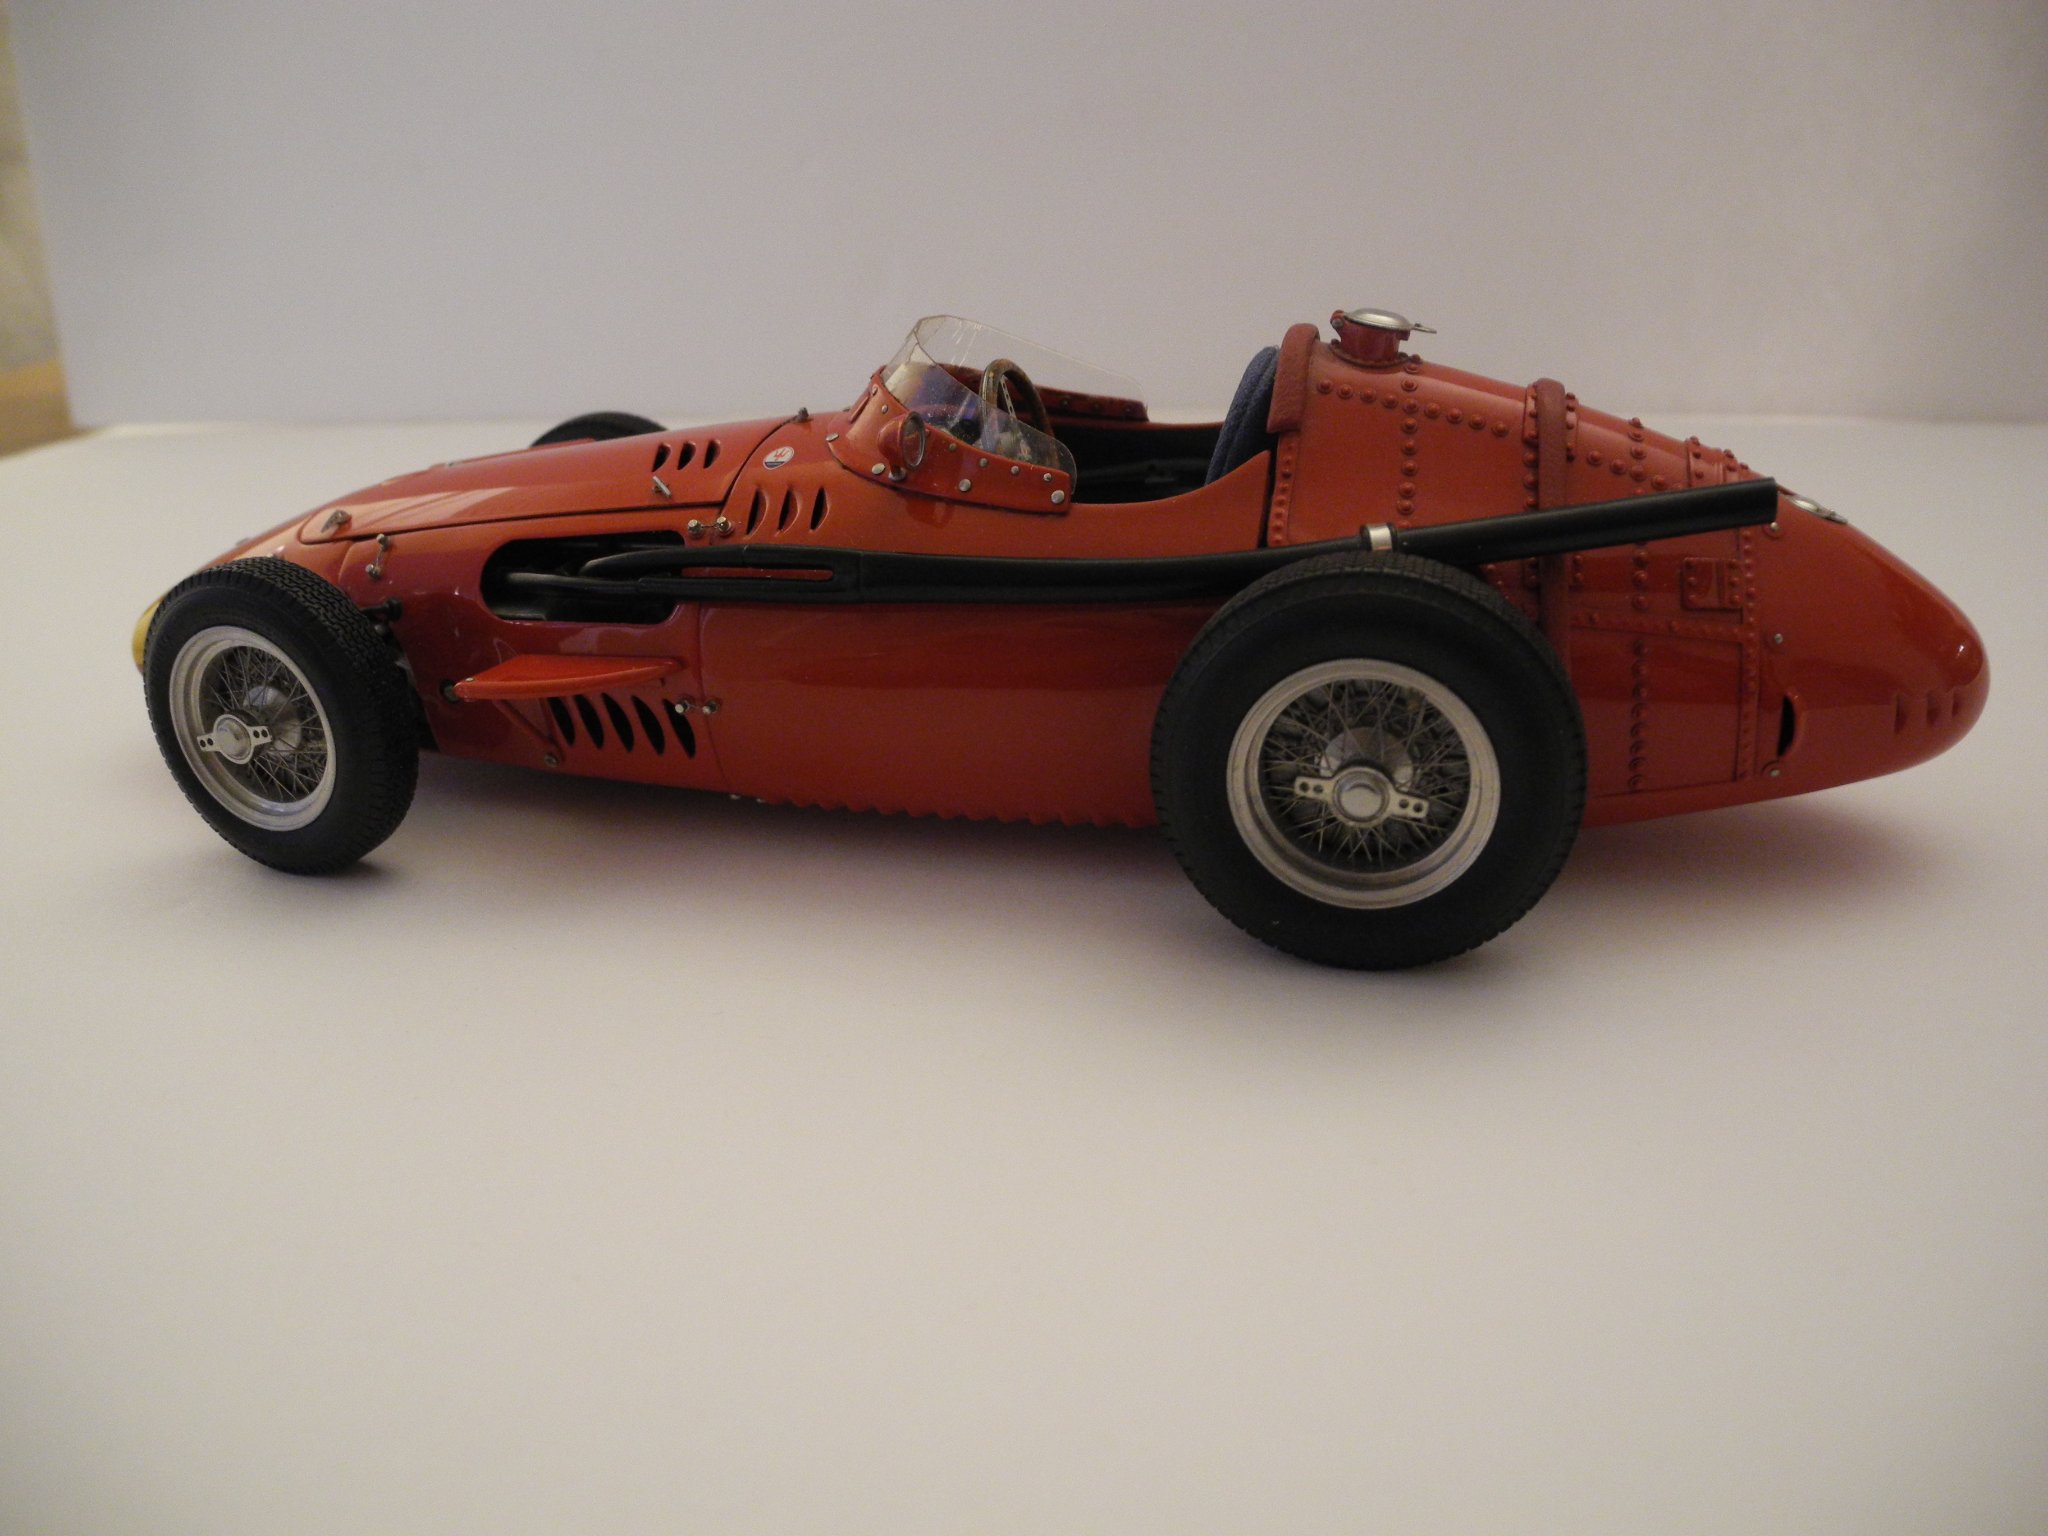
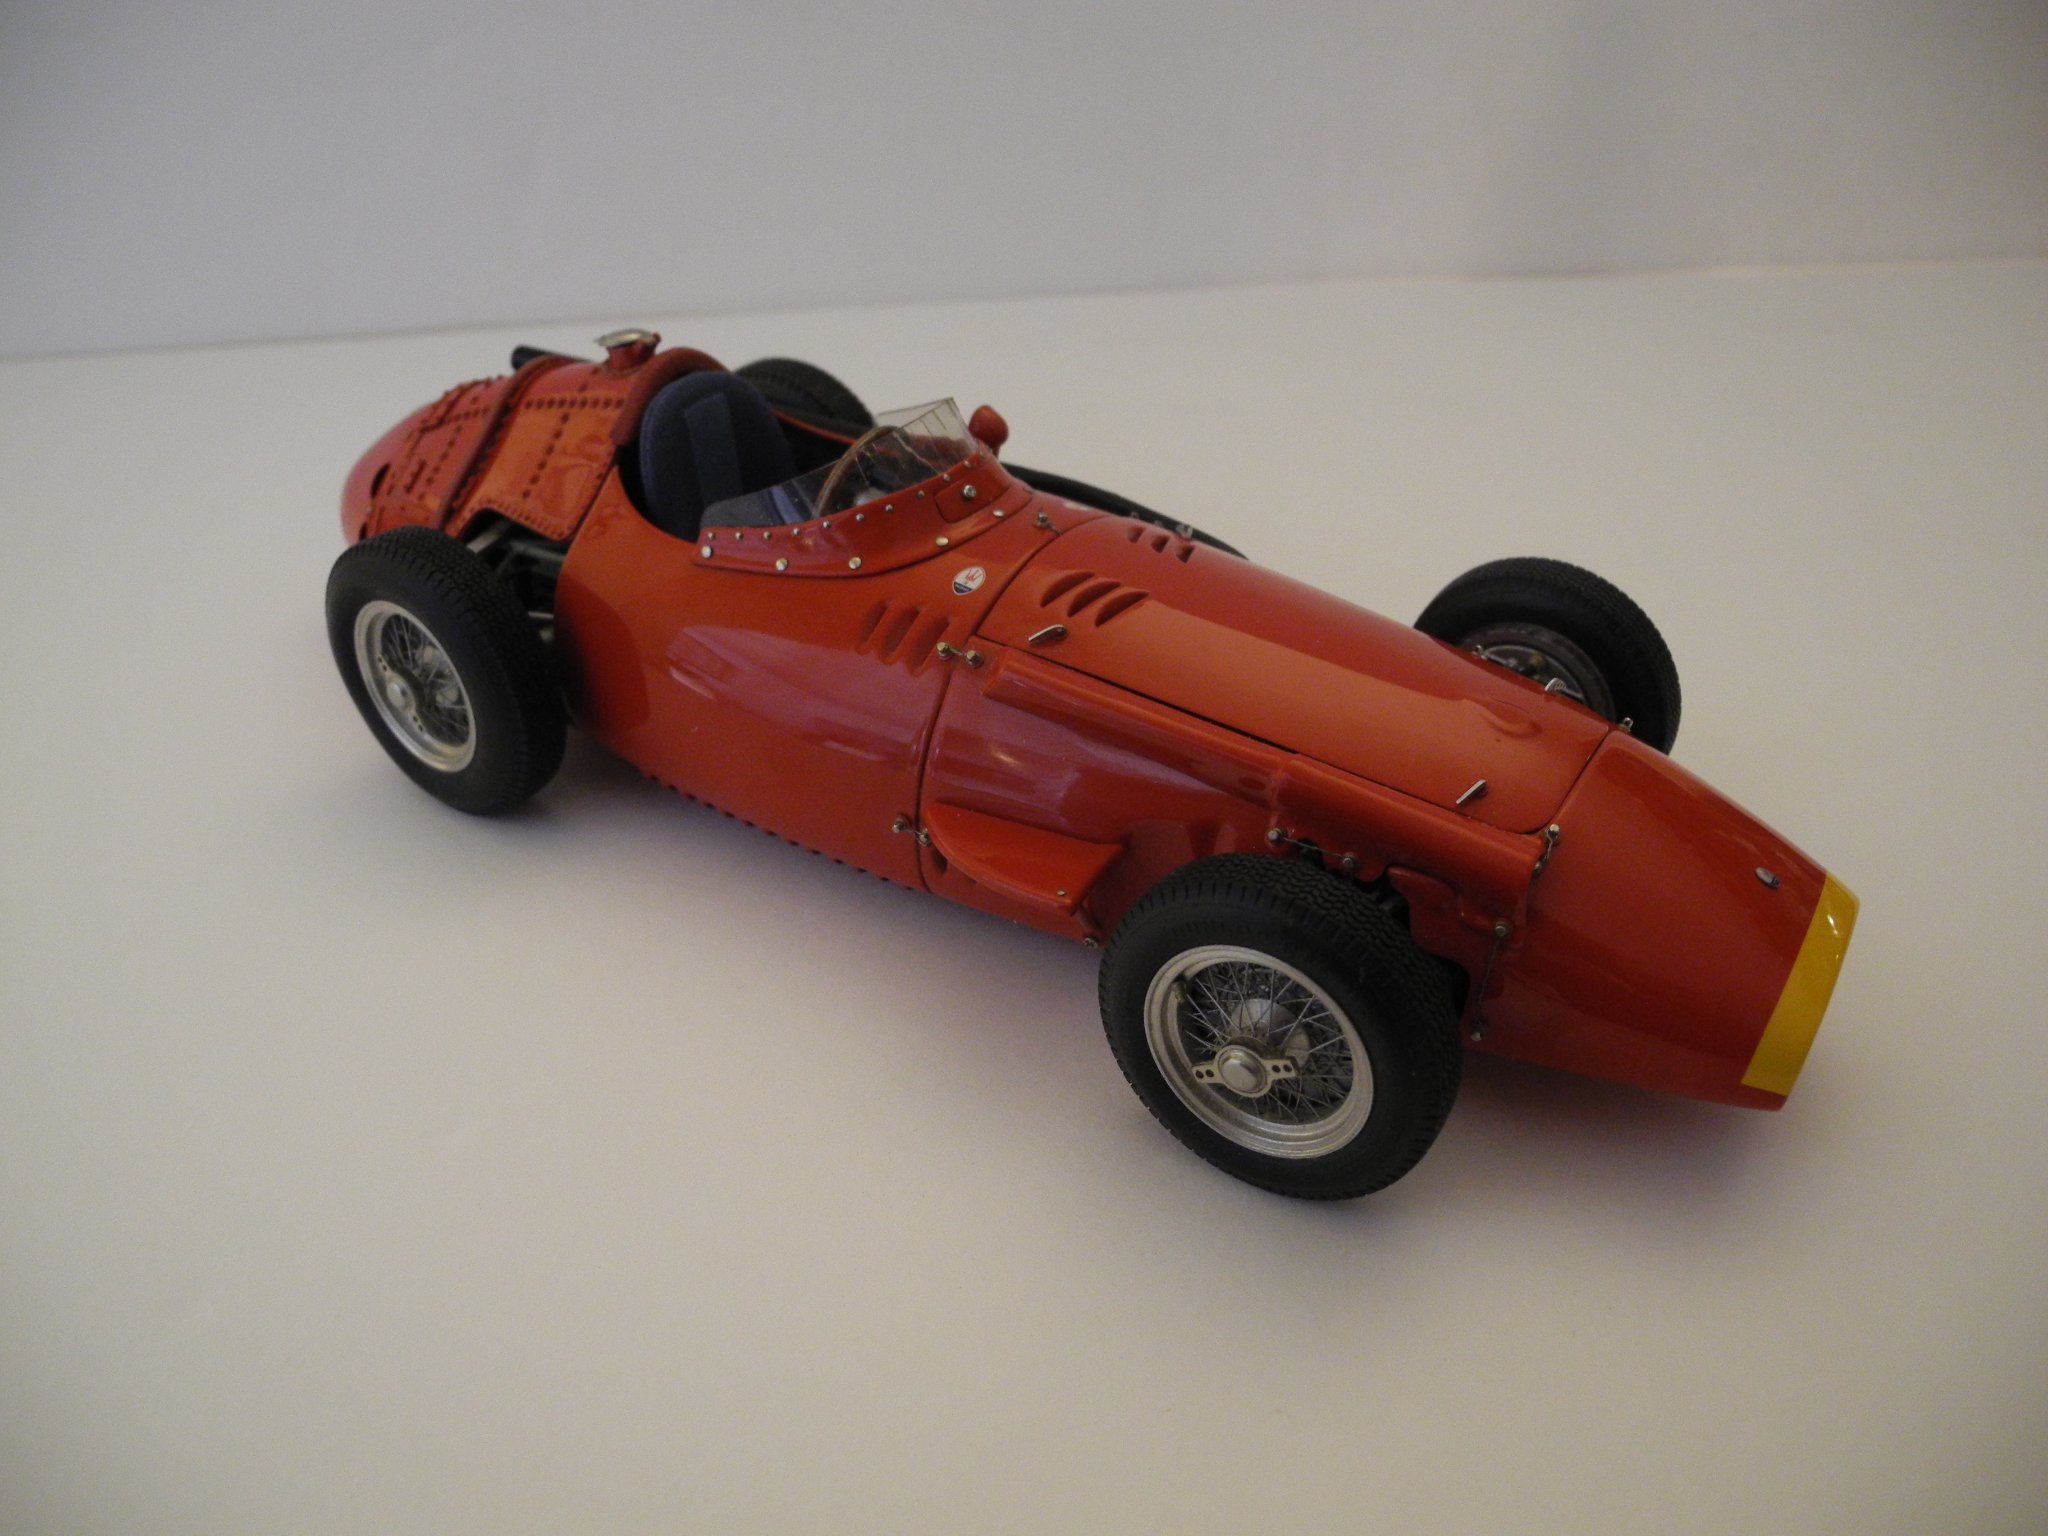
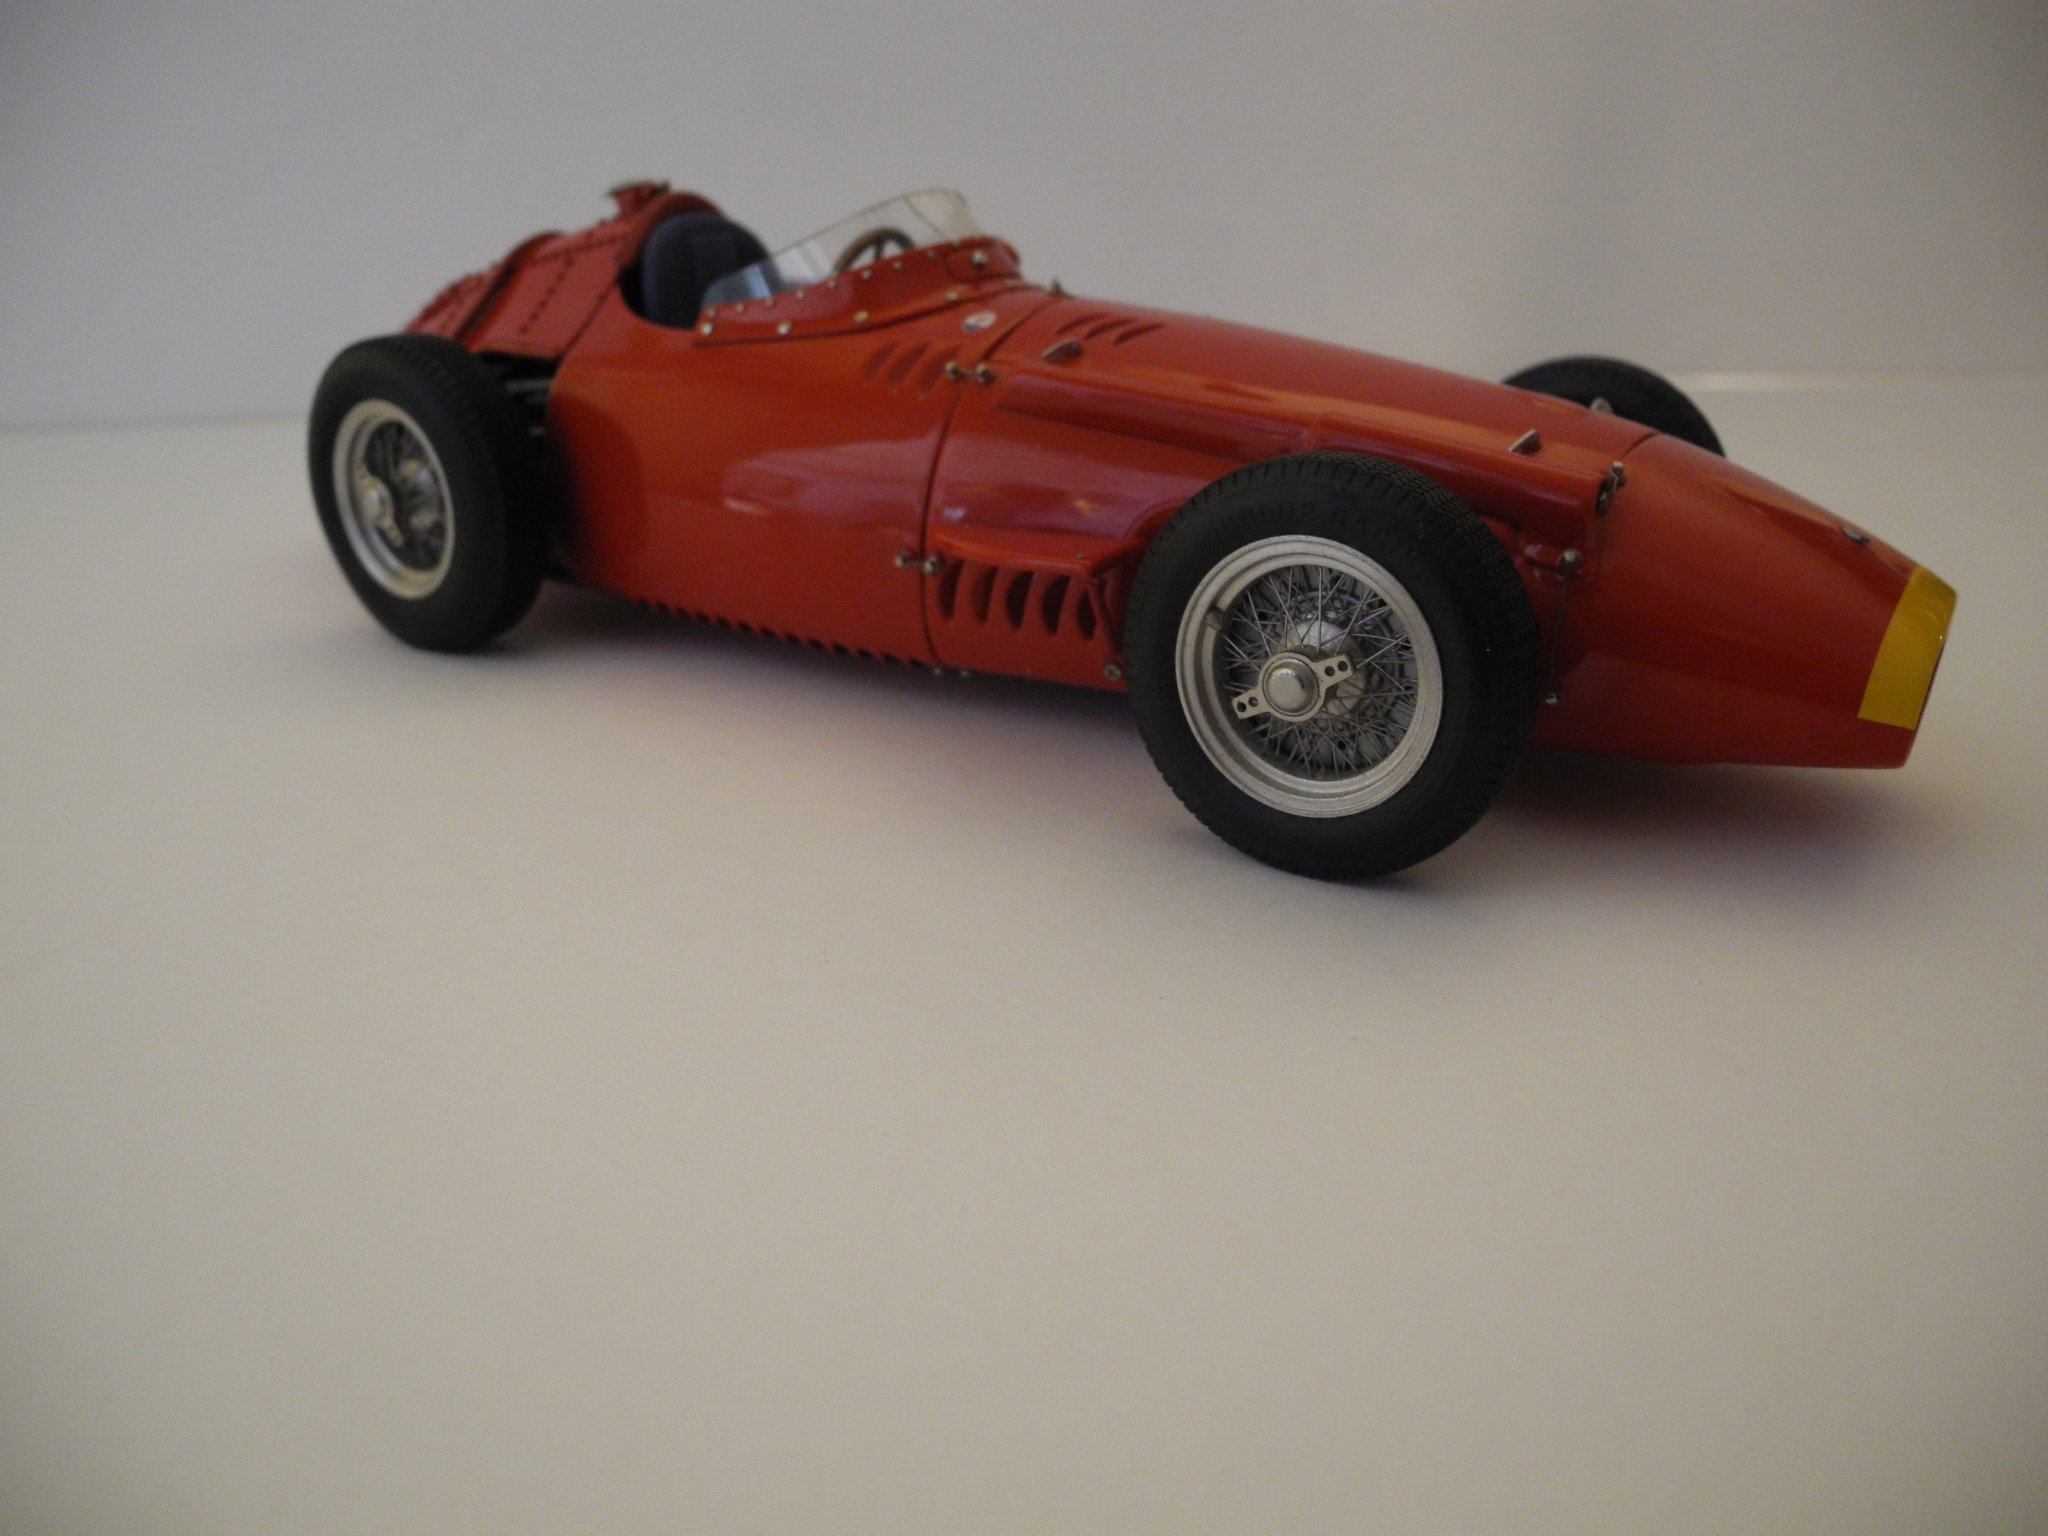
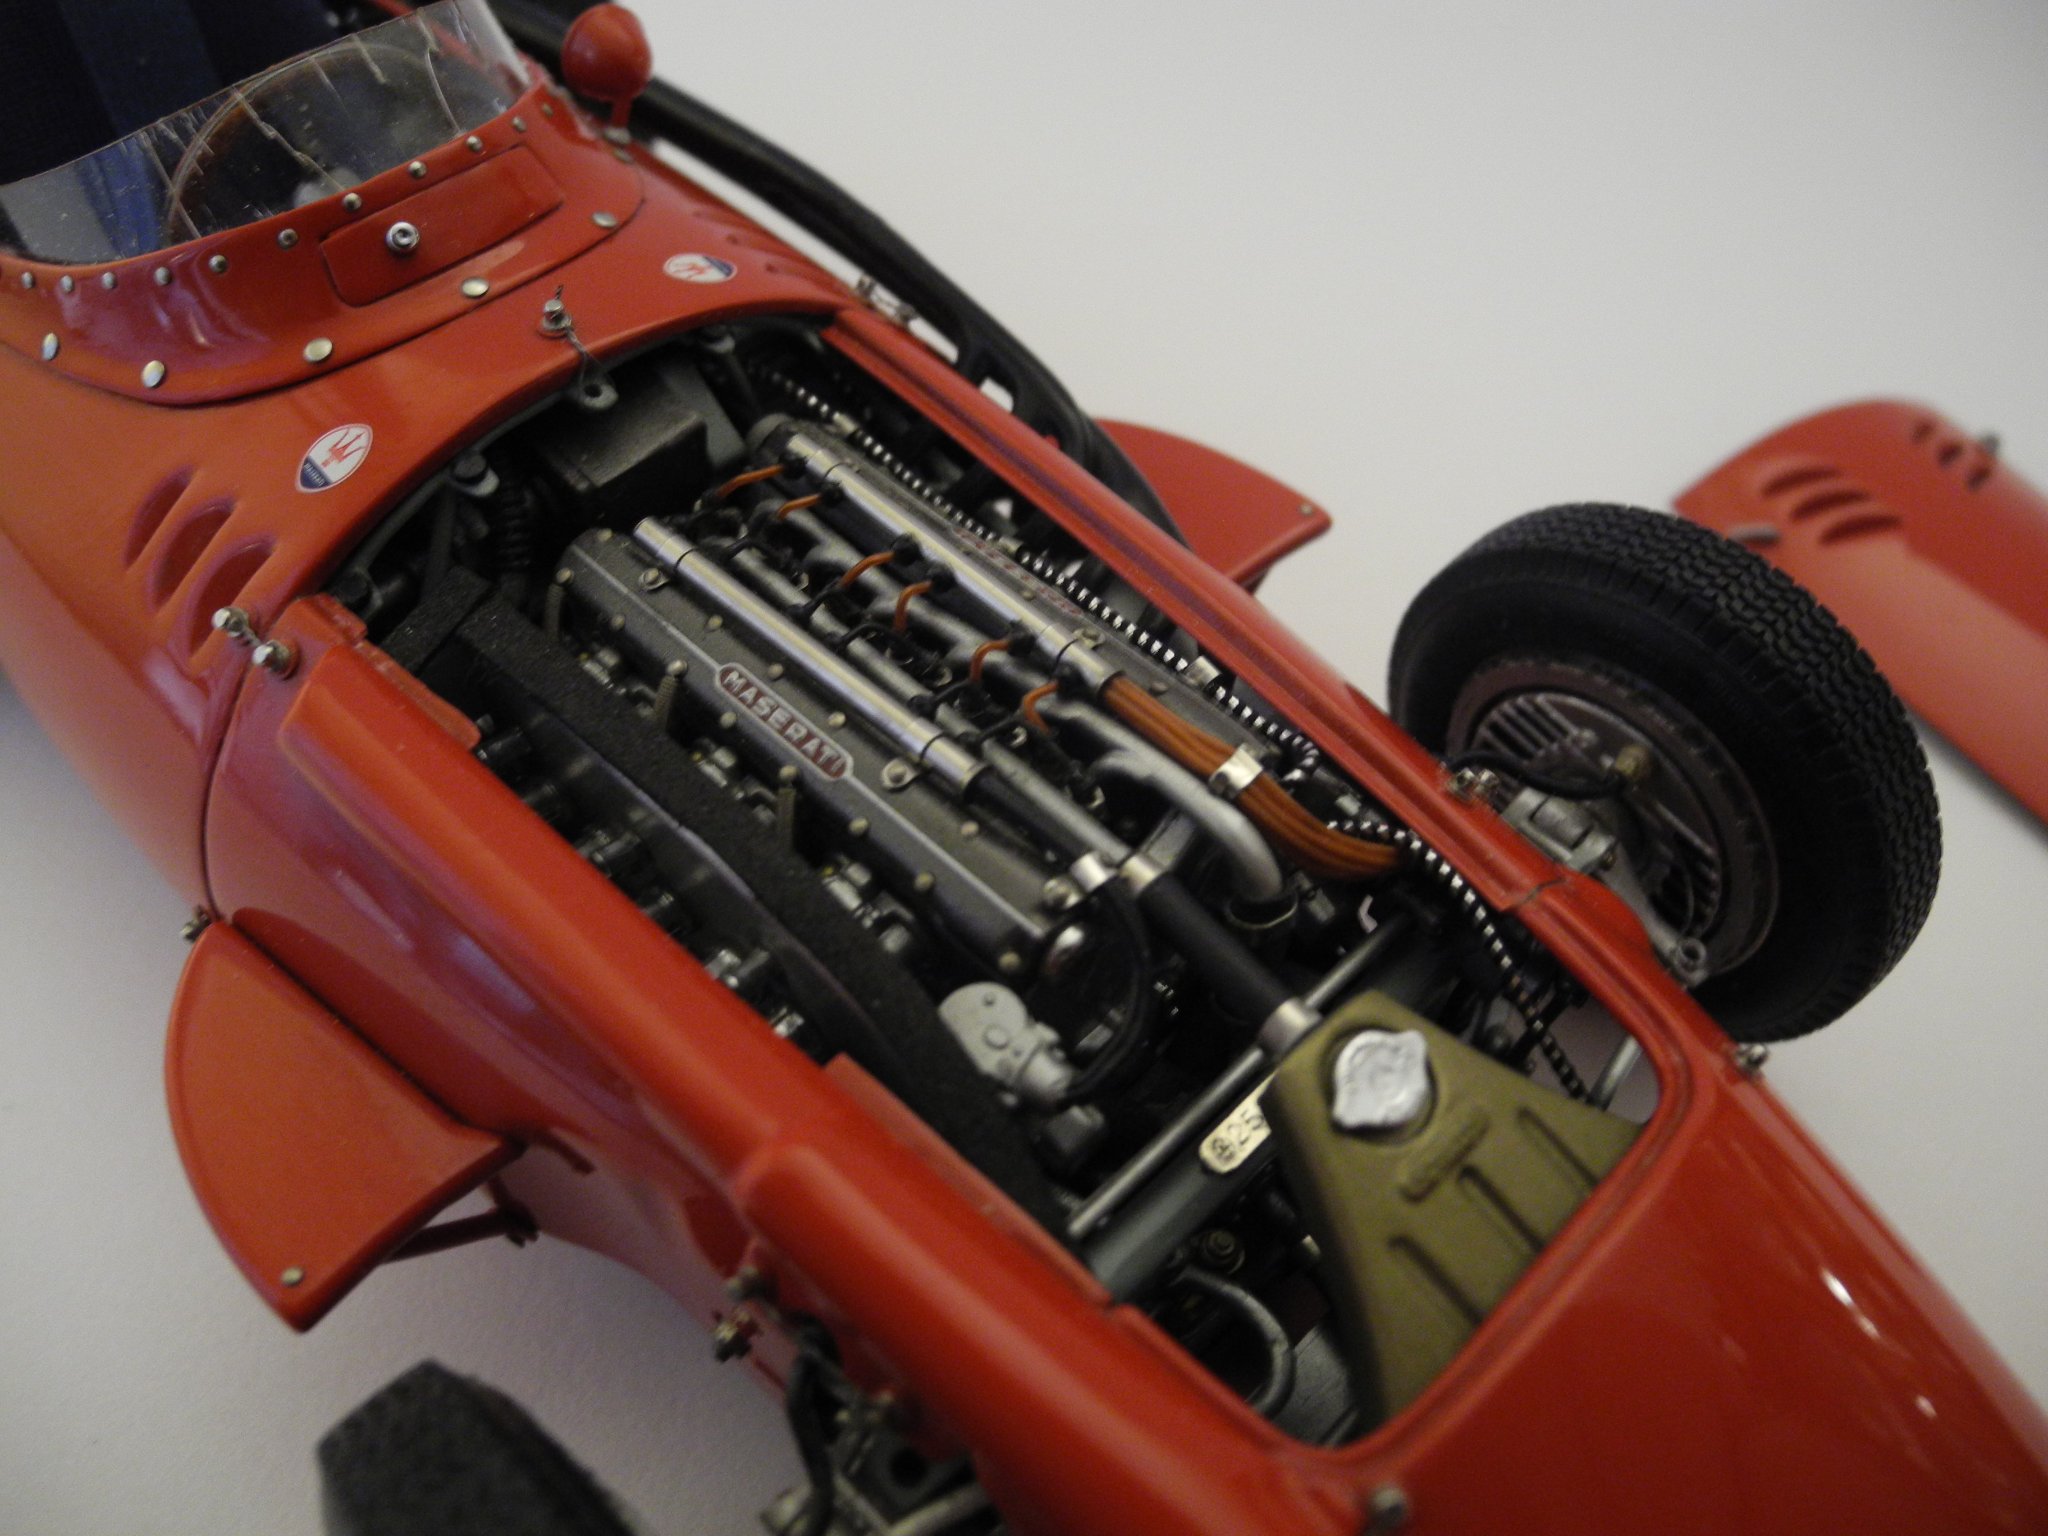
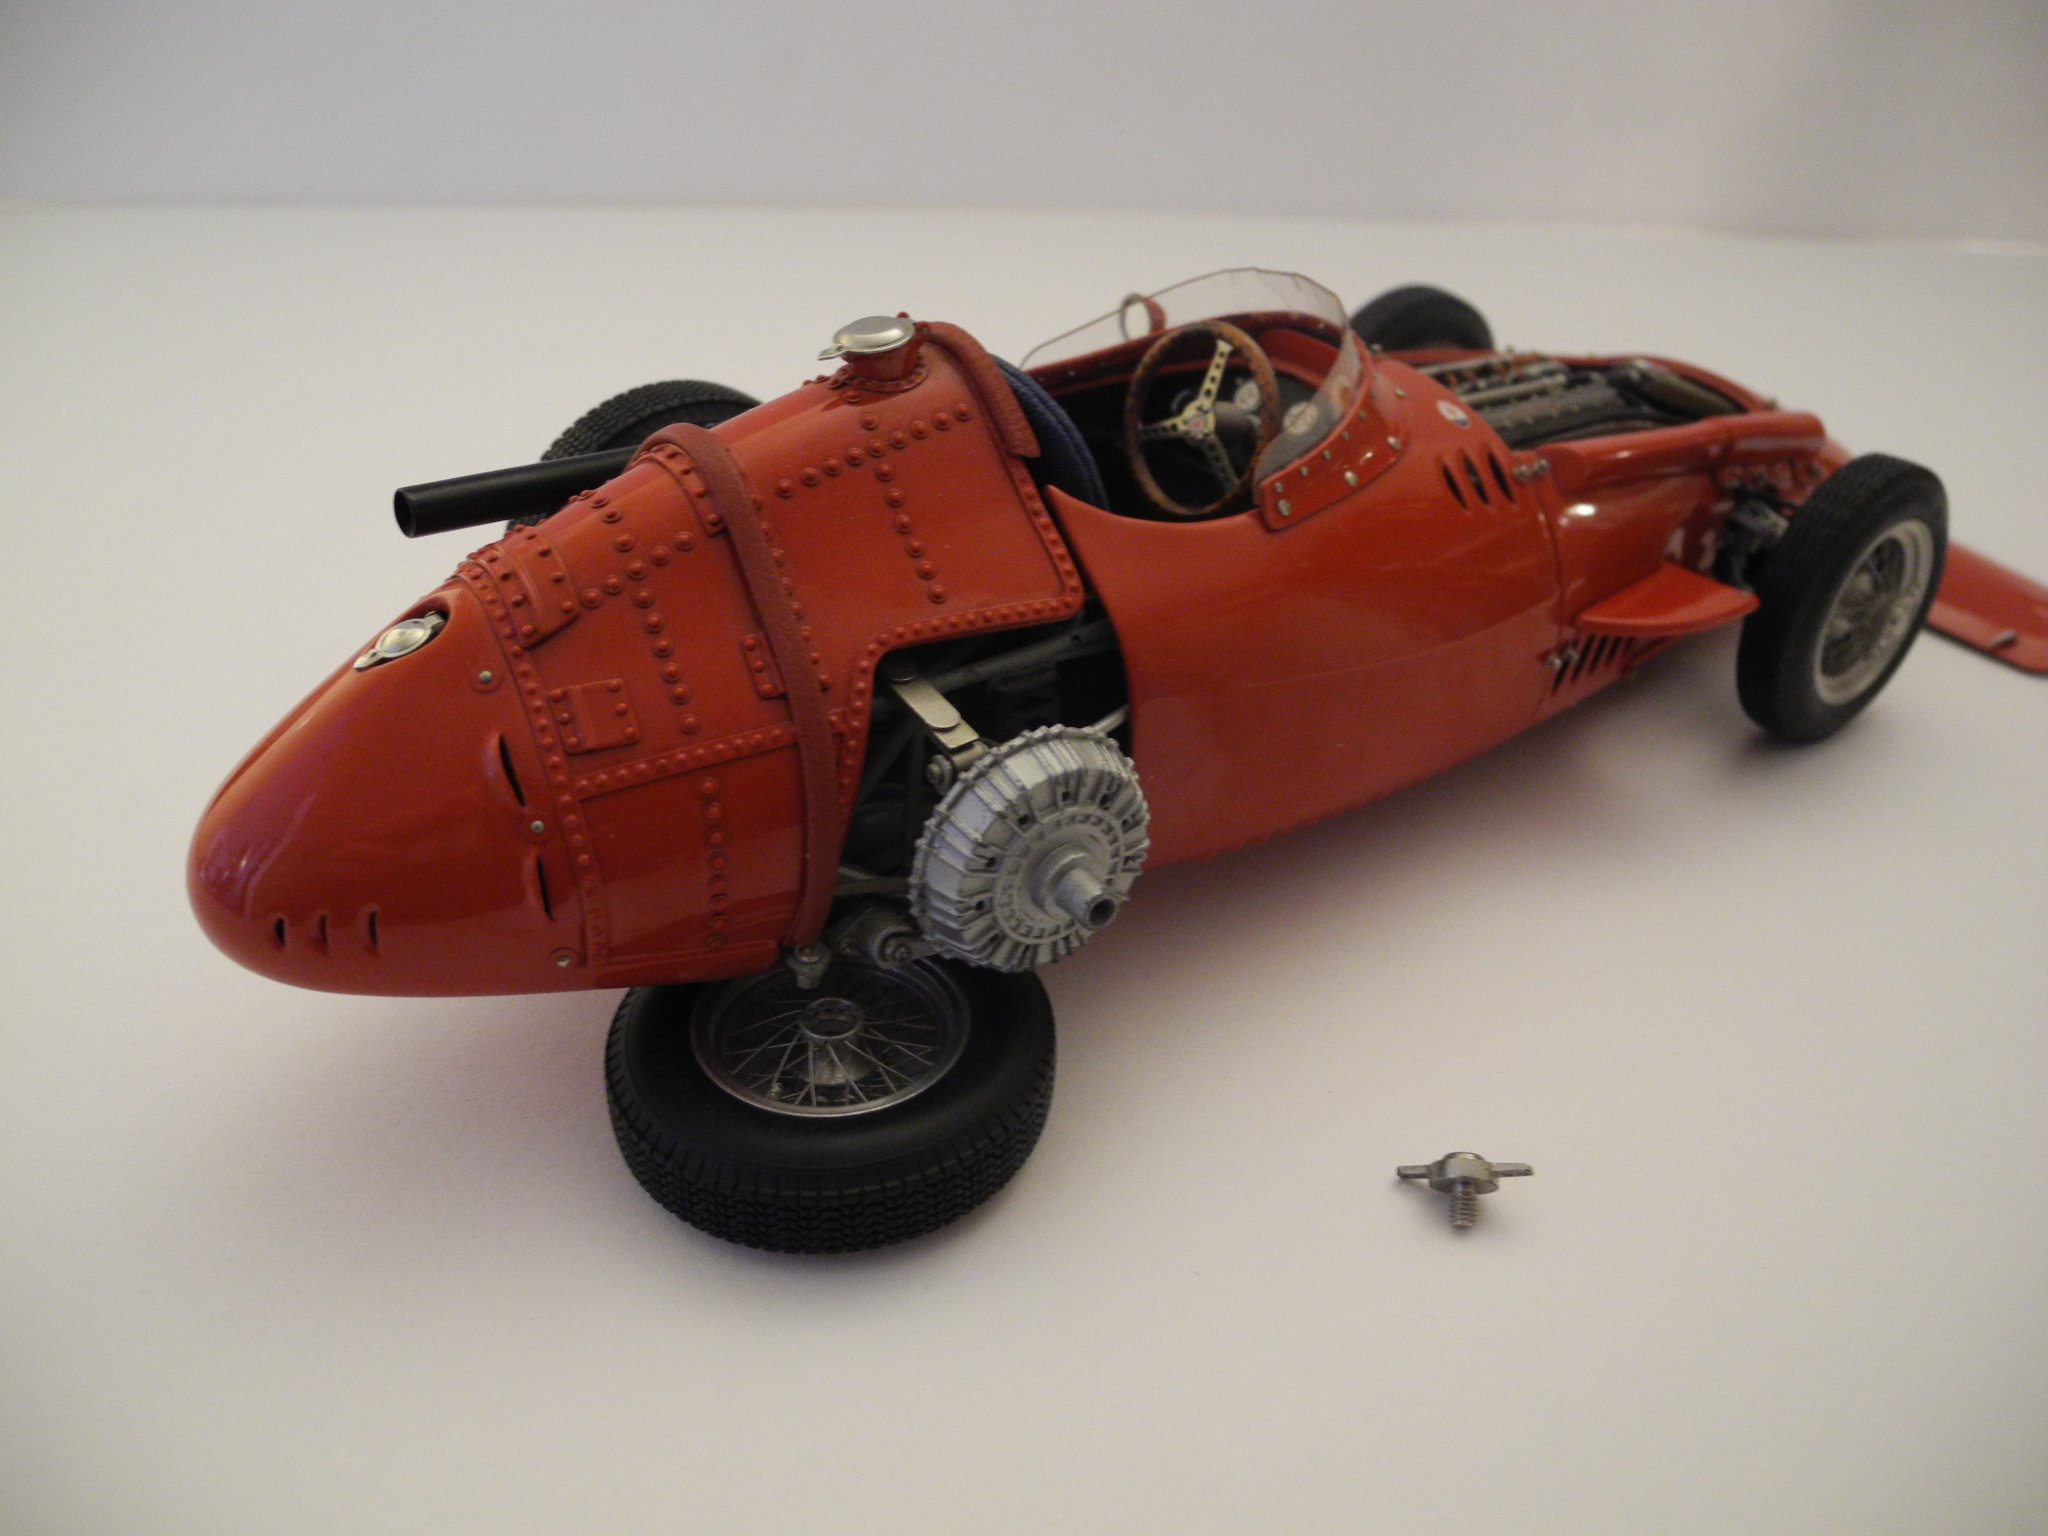
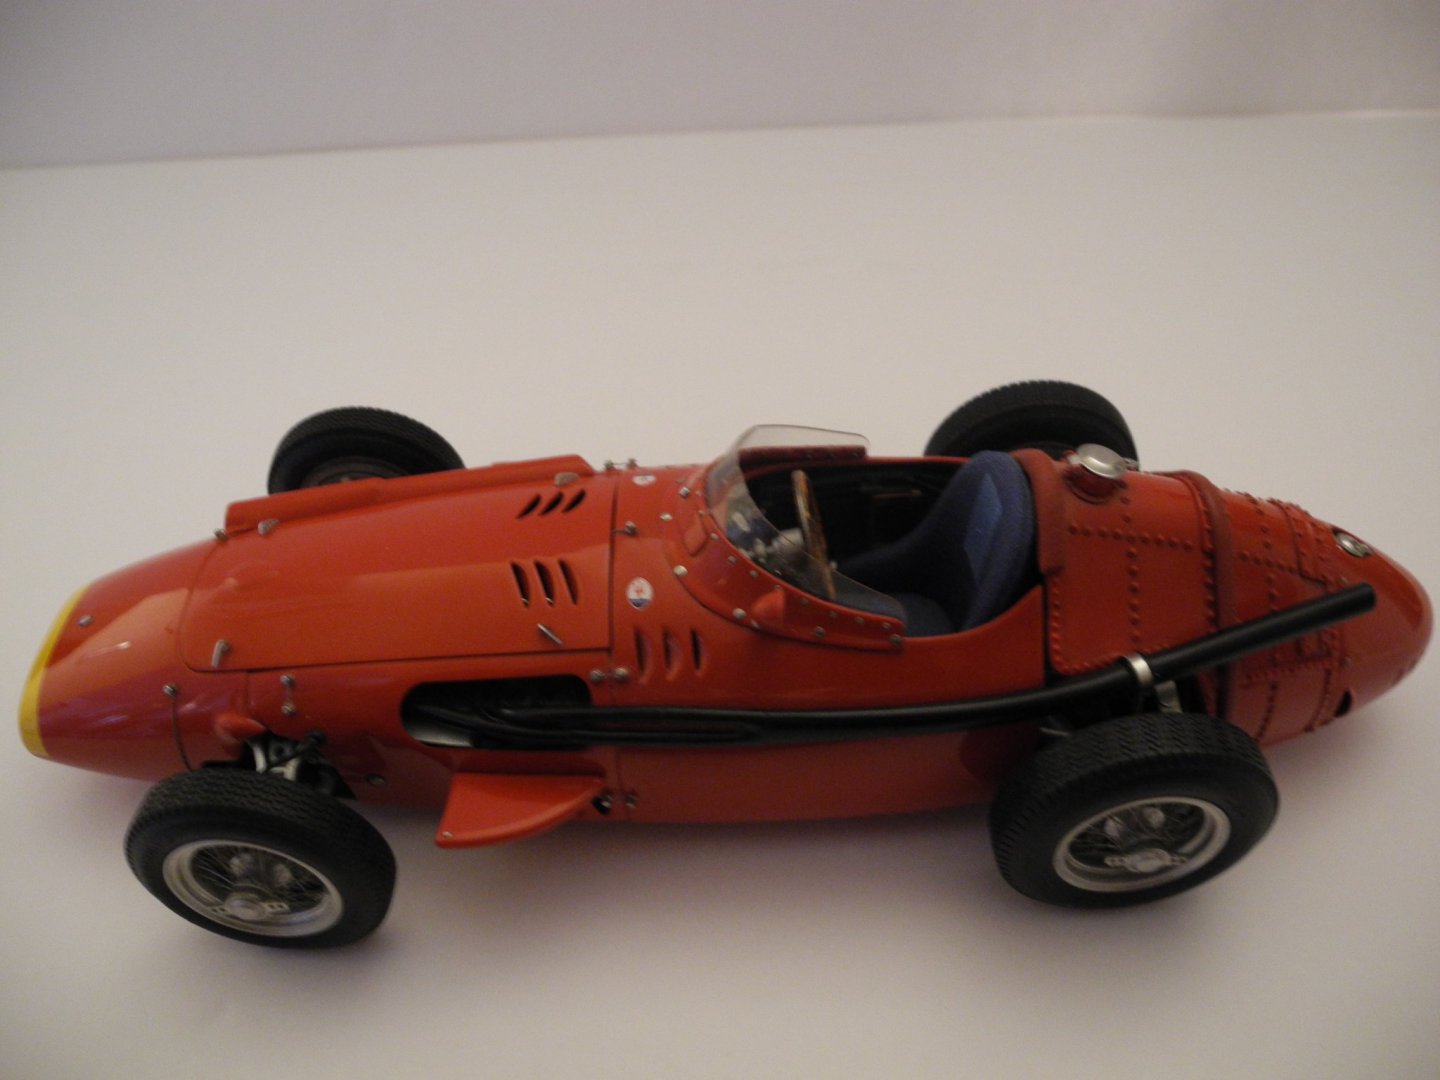
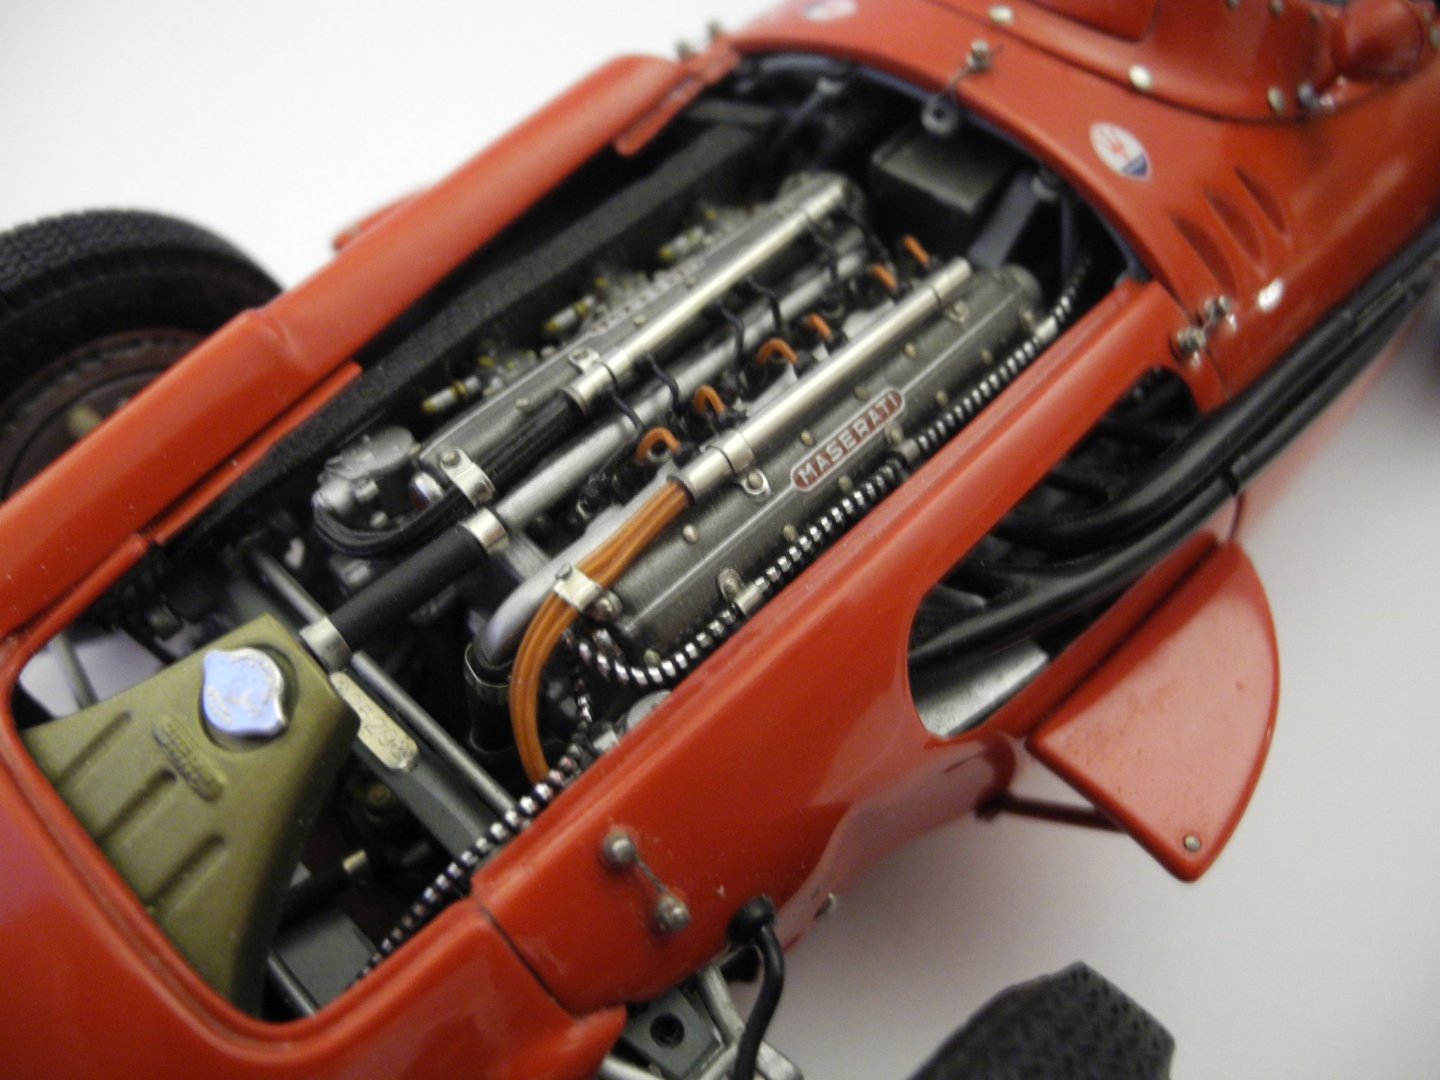
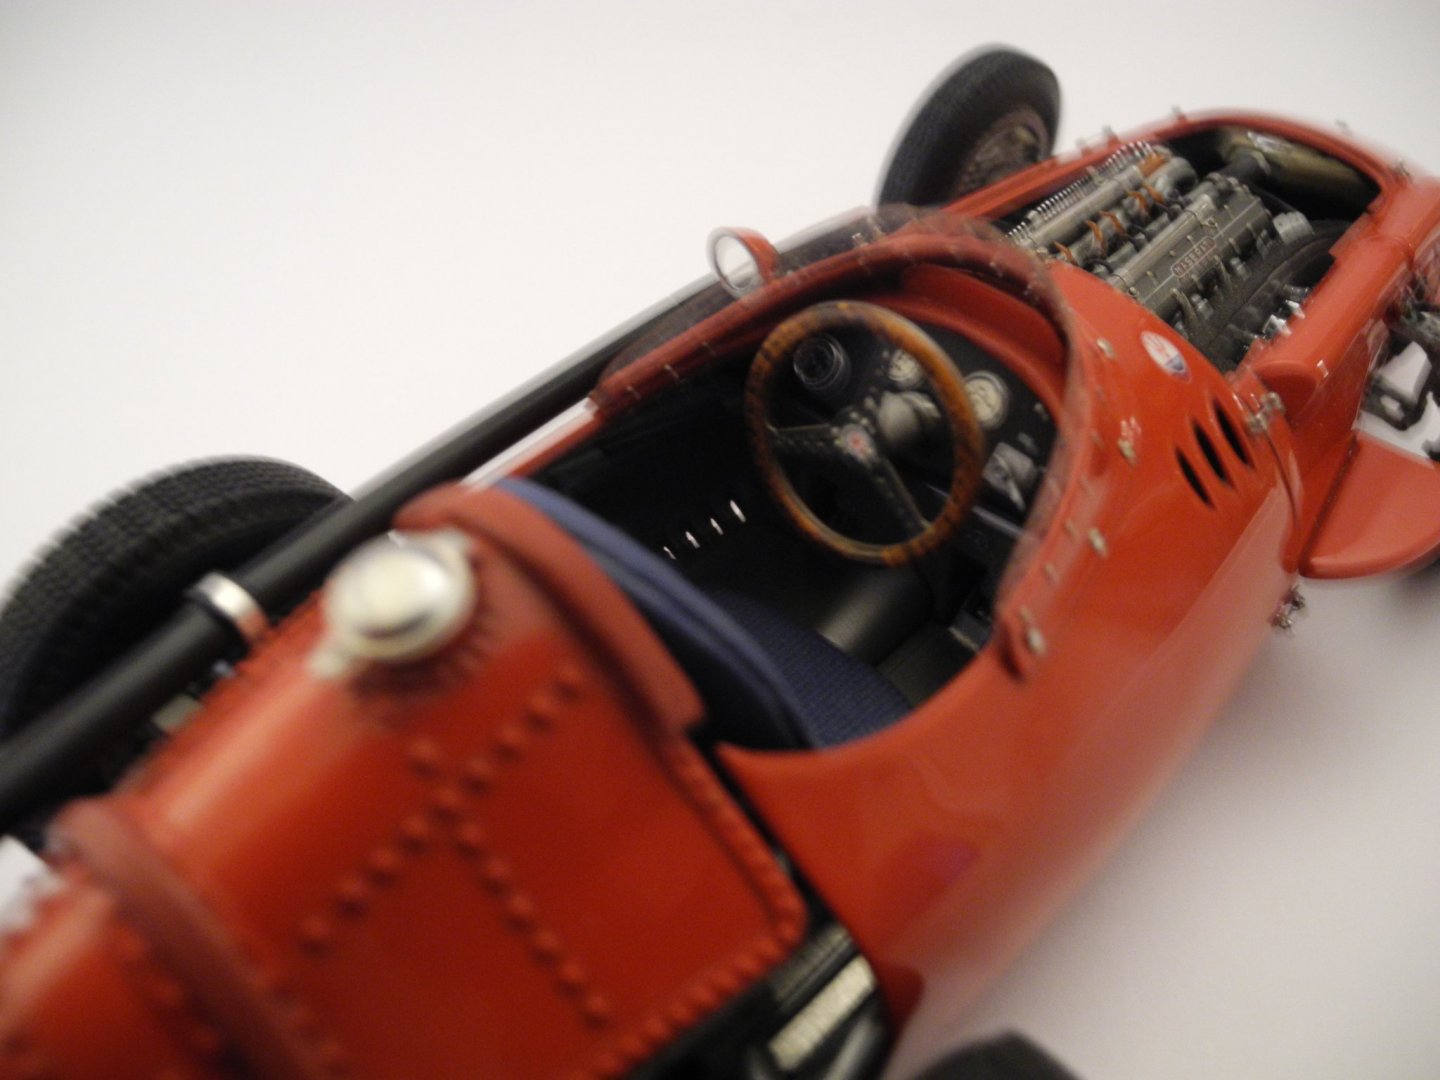
Really nice die casts cost 100's of dollars each. The body work is more like sheet metal rather than die cast. Here's my 1957 Maserati 250F. Notice how thin the body sheet metal is. No doors. 😄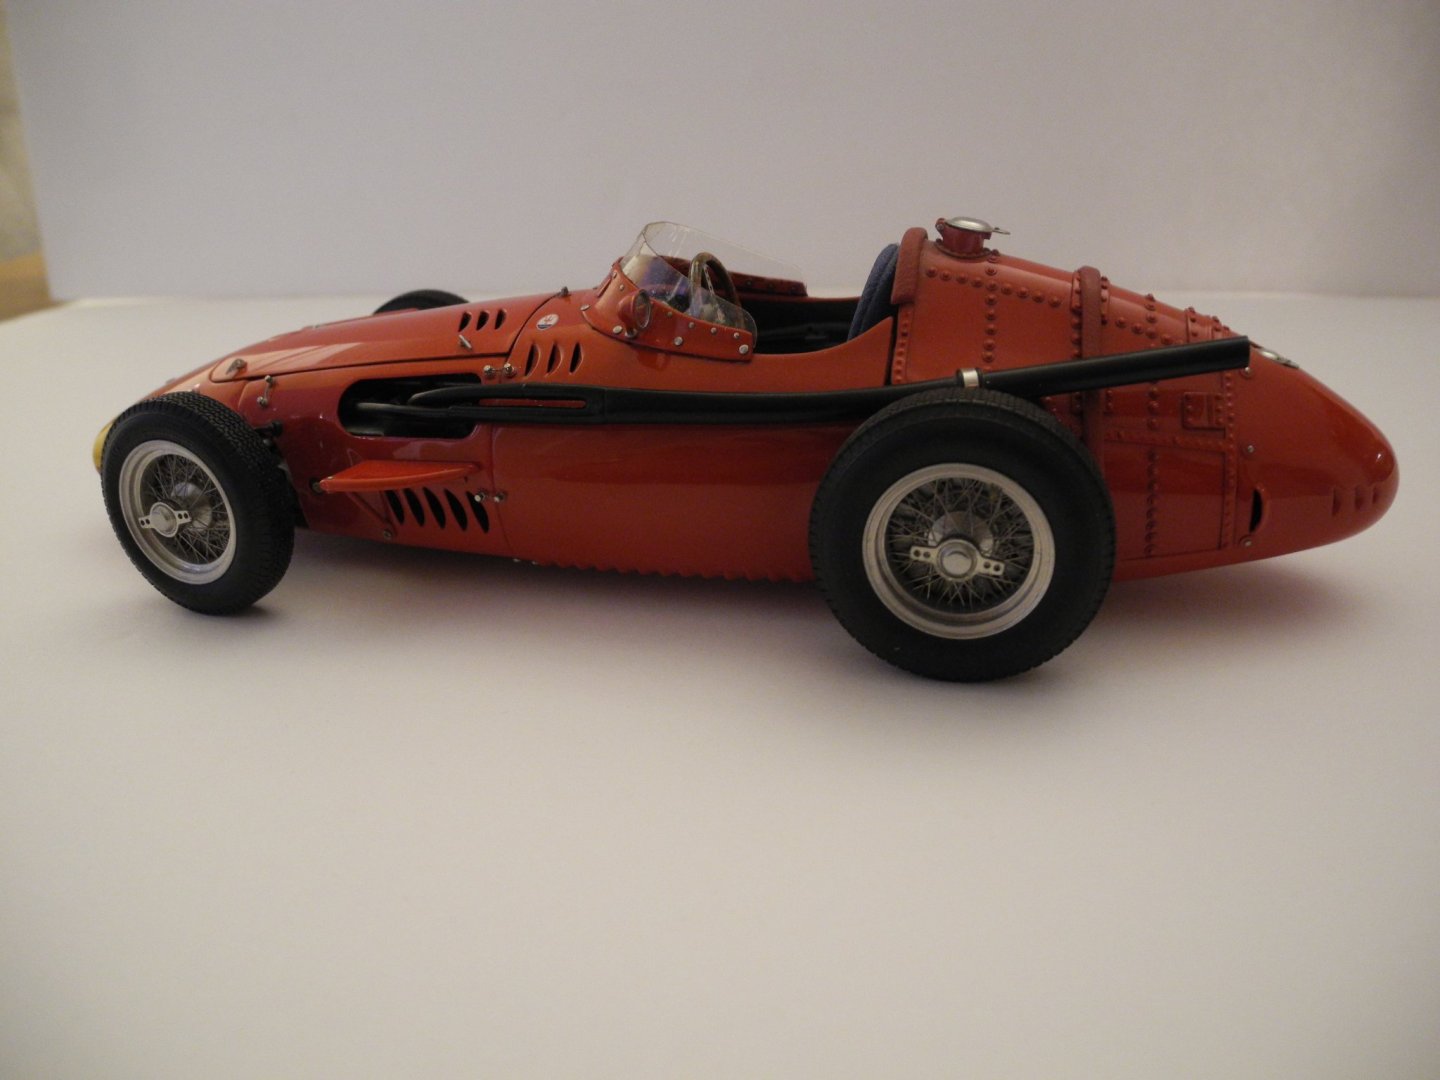


- 137 replies
-
- 13
-
-
1955 Chrysler 300 by CDW - Moebius - 1:25 Scale - PLASTIC
CDW replied to CDW's topic in Non-ship/categorised builds
They were very heavy engines for sure. Like the Caddy's and Lincoln's. Used to be, the route to a real fast, cheap to build drag car, was to drop a used Caddy engine and tranny into a Chevy Vega. There were hot rod Lincoln's, too. But I don't ever recall seeing one of these '55 Chrysler 300's. Don't think there were too many of them sold, probably kinda expensive. I read they didn't come with air conditioning as an option in '55, and that would hurt sales potential in southern states competing with Lincoln's and Caddy's which did offer AC.- 11 replies
-
- 10
-
-
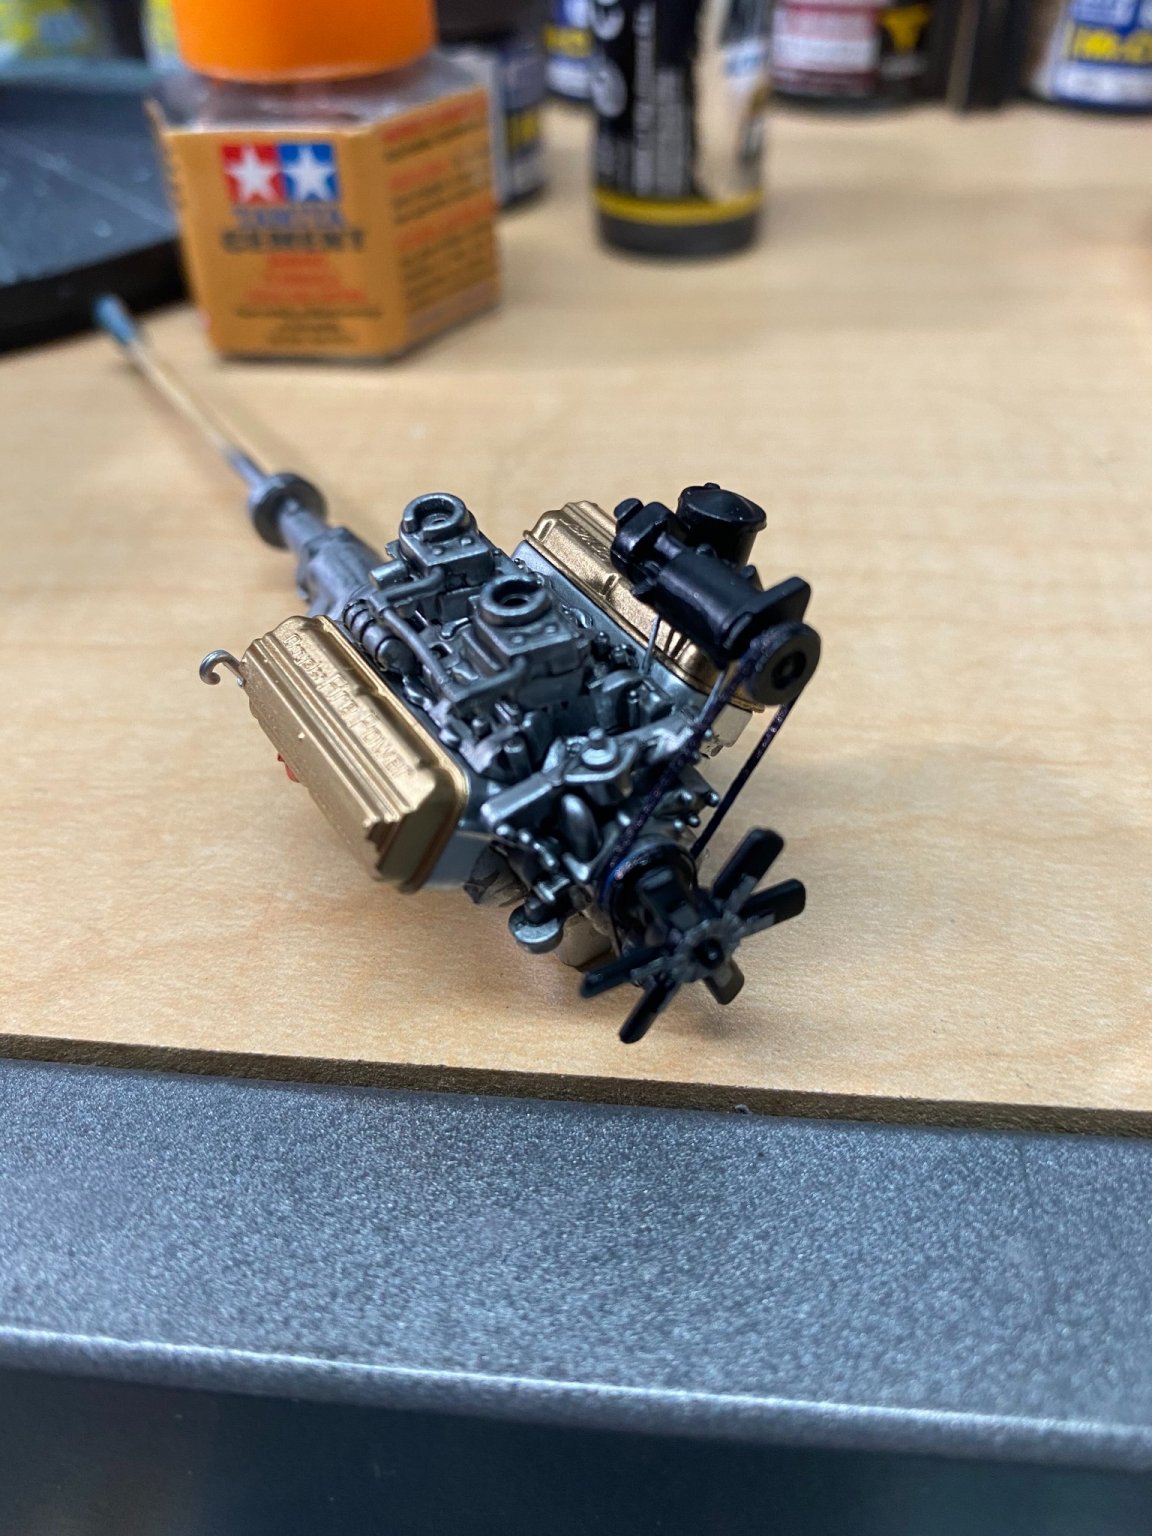
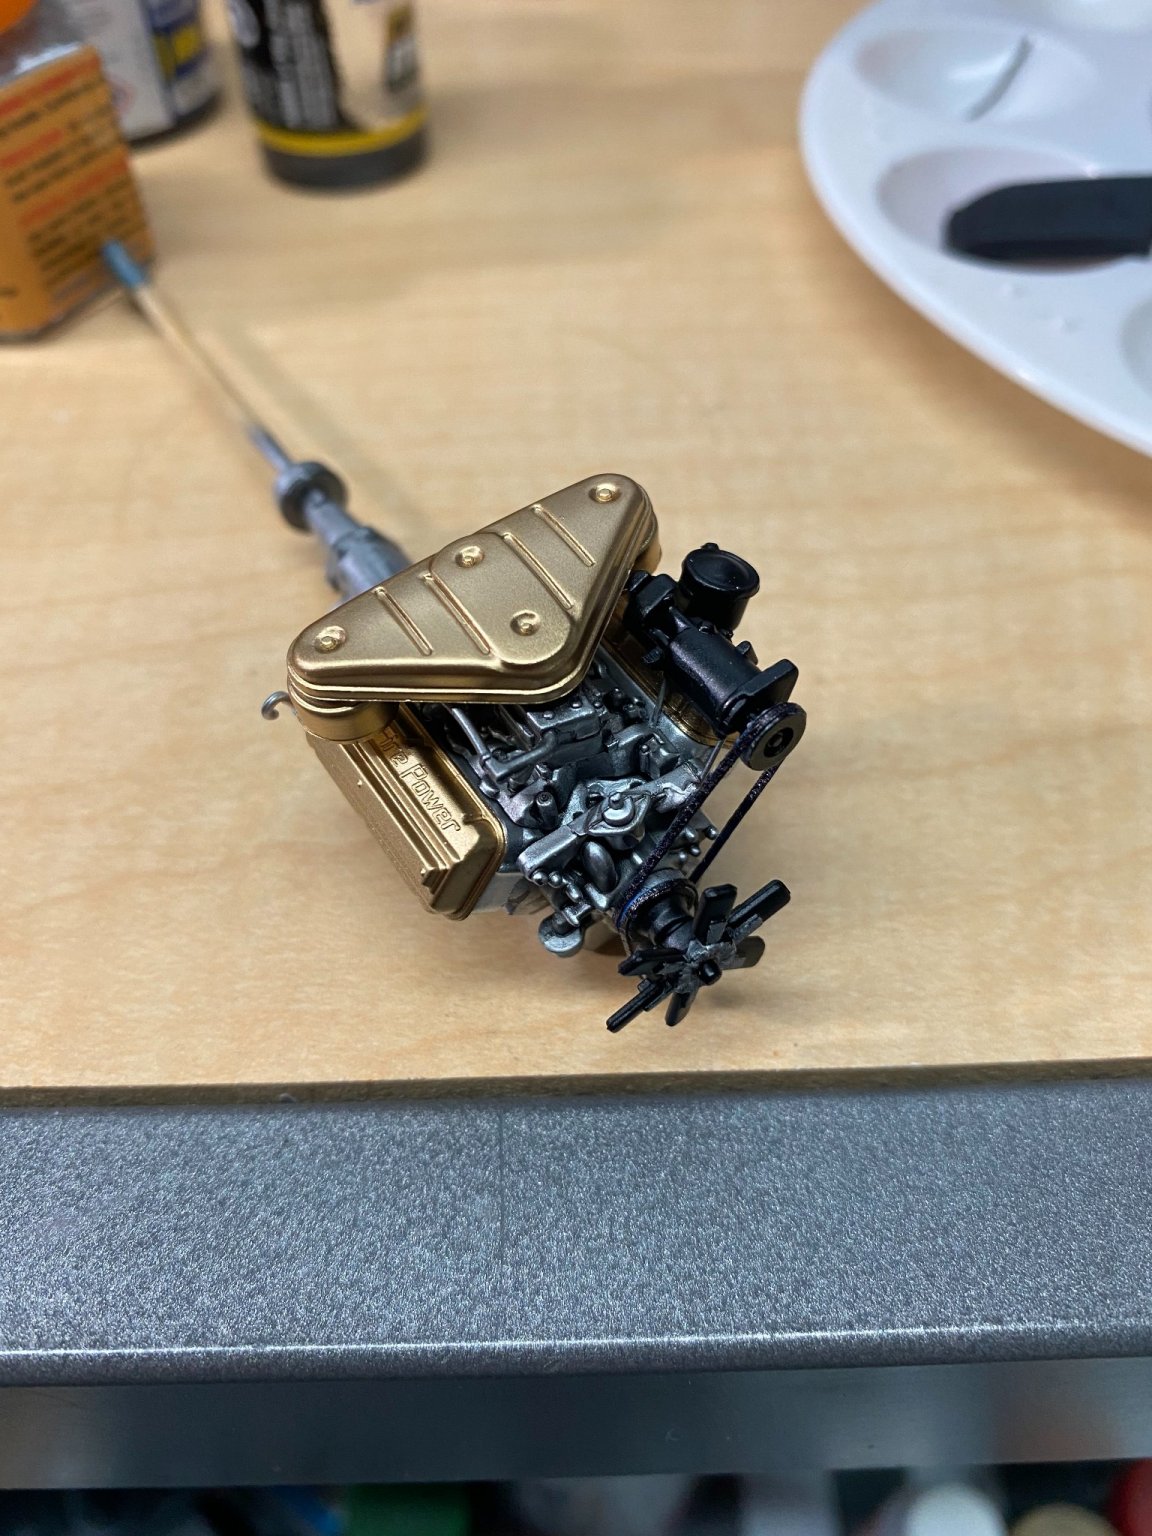
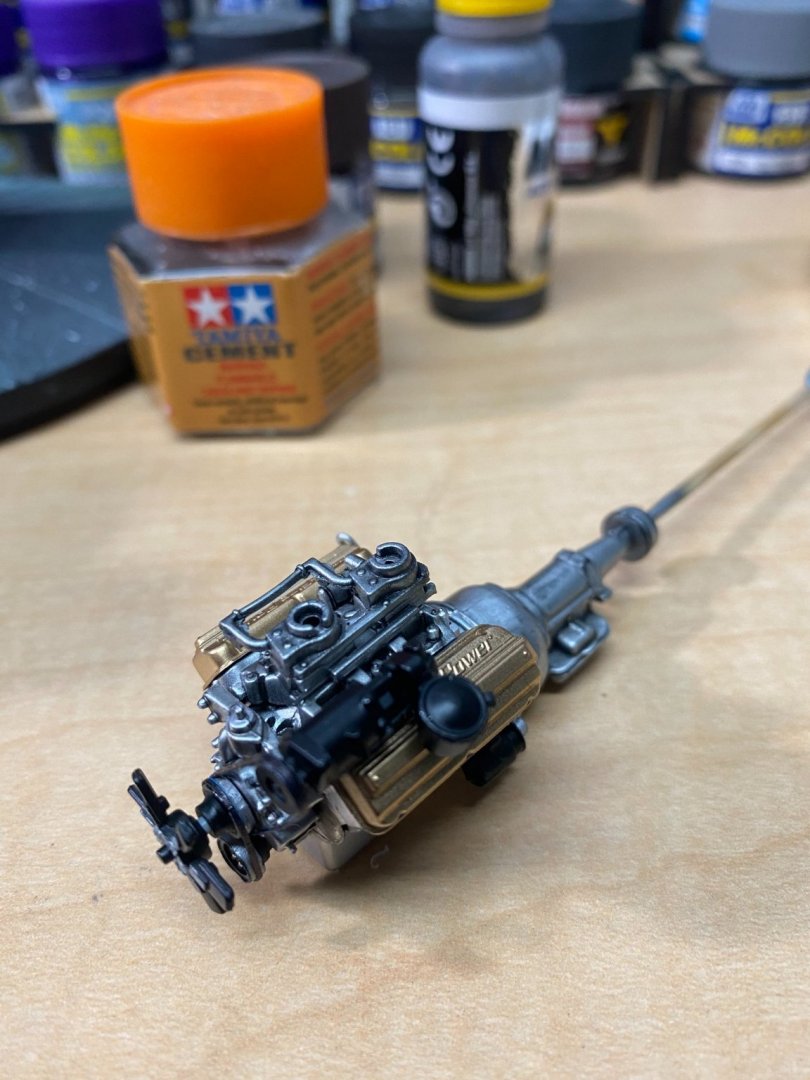
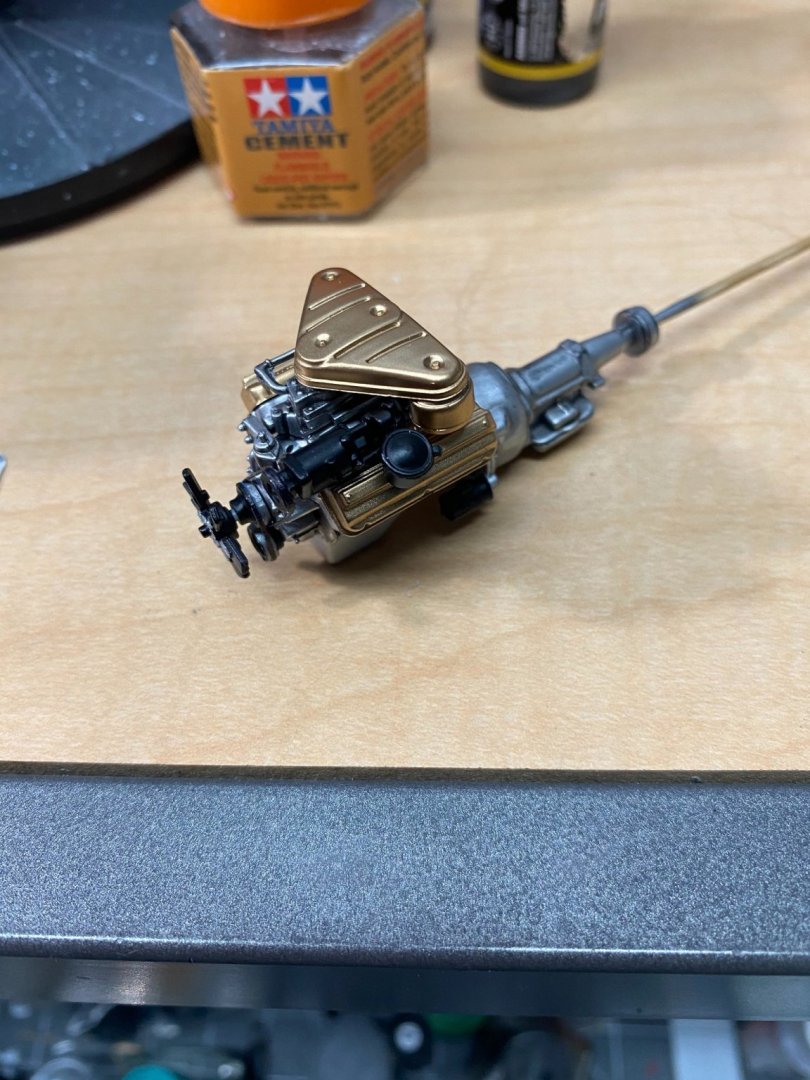
A couple of weekends ago, had the pleasure of attending a scale model swap meet at a local hobby shop. Modelers from all over the state brought dozens of models for sale or trade. I ended up buying quite a few model car and truck kits including this one, the 1:25 Moebius 1955 Chrysler 300. In 1955, this Chrysler was equipped with a 330 cubic inch Hemi V-8 engine with a factory installed dual four barrel carb intake manifold. While it was a heavy car, the powerplant made it quite a good performer and it was sought after by drivers on the big race track circuit. I've decided to add extra scratch built details to this build and have started by doing my own custom made fan belt, power steering, and water pump pulley's. Also, the fan belts are custom made along with a scratch made bracket for the power steering pump. The engine colors are stock. Have not decided yet on the interior/exterior colors I will use. Will be working this one slowly and will not be in a rush to finish it. Moebius packs a lot of detail into their scale model car and truck kits.


- 11 replies
-
- 16
-
-
McLaren M8B by CDW - Accurate Miniatures - 1:24 Scale
CDW replied to CDW's topic in Non-ship/categorised builds
Thanks for the kind words Lou. The only times I've had good luck with opening doors and such is when I have cut the doors open myself and custom built the closure hinges and door jambs. I'll be doing that in a future build thread along with the hood and trunk as well. Will use some micro size magnets to make a realistic catch for the doors and bonnets.