HOLIDAY DONATION DRIVE - SUPPORT MSW - DO YOUR PART TO KEEP THIS GREAT FORUM GOING!
×


mikiek
-
Posts
2,276 -
Joined
-
Last visited
Content Type
Profiles
Forums
Gallery
Events
Everything posted by mikiek
-
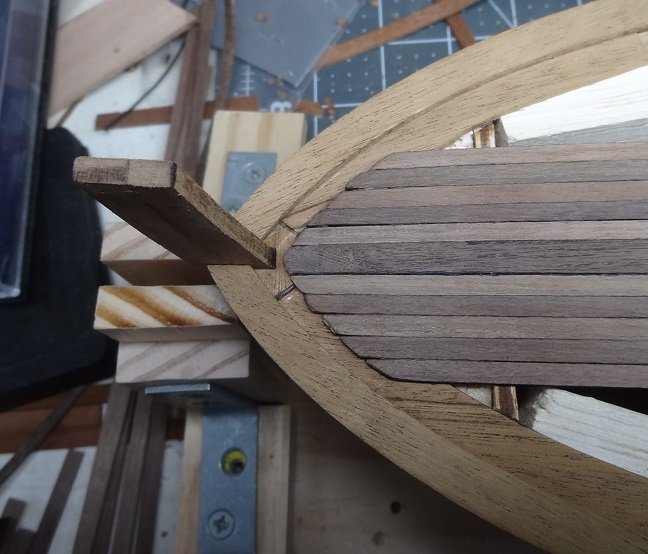
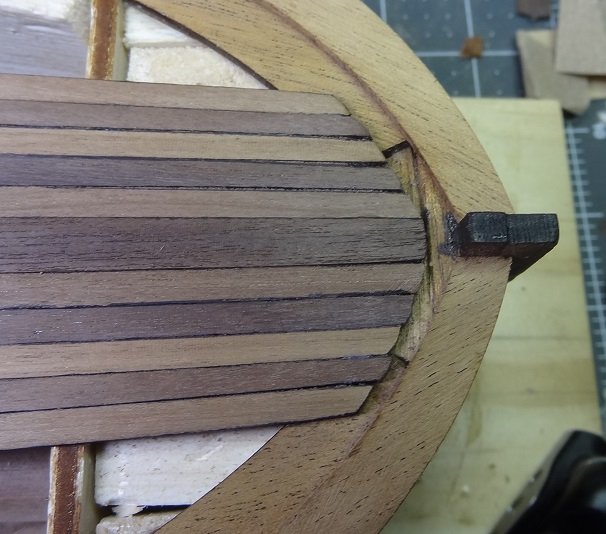
 You are right about that Zoran. Although somehow I did miss the first time. The groove did make it easy to center the step, even using hemostats. Sometimes I wonder where my head is.... Hey, I'm curious - where does the taper for the deck planks start? I started it about 1" in from one end and continued to the other end.
- 204 replies
-
- 1
-

-
- trajta
- marisstella
- (and 1 more)
-
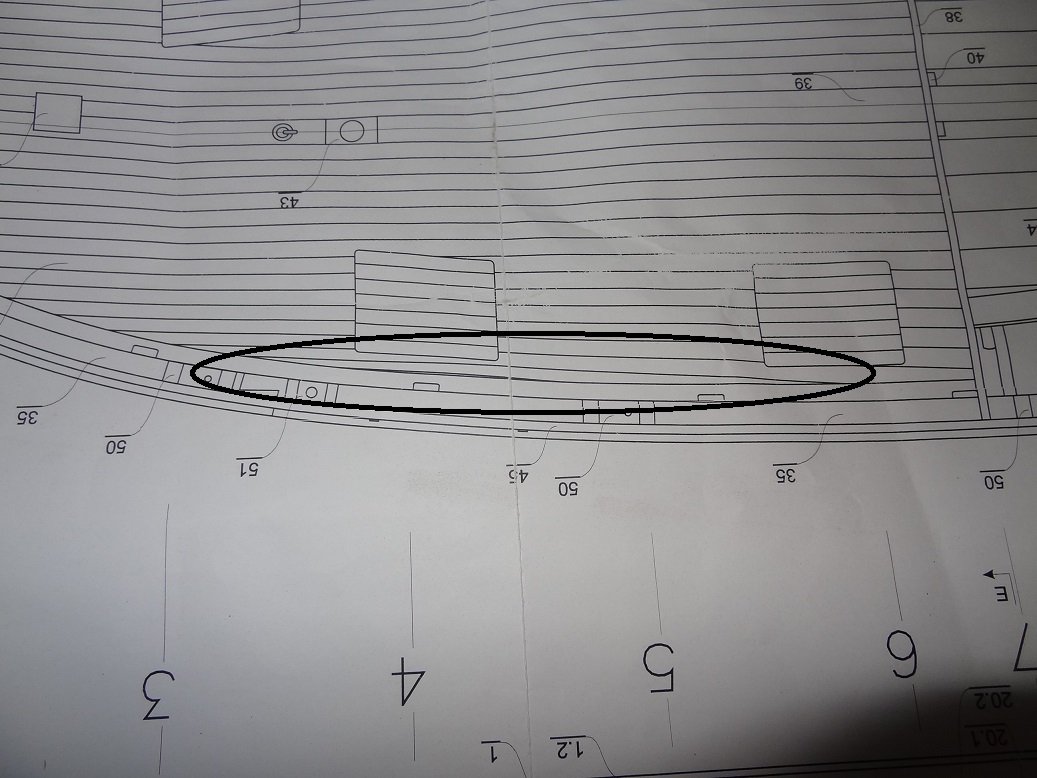
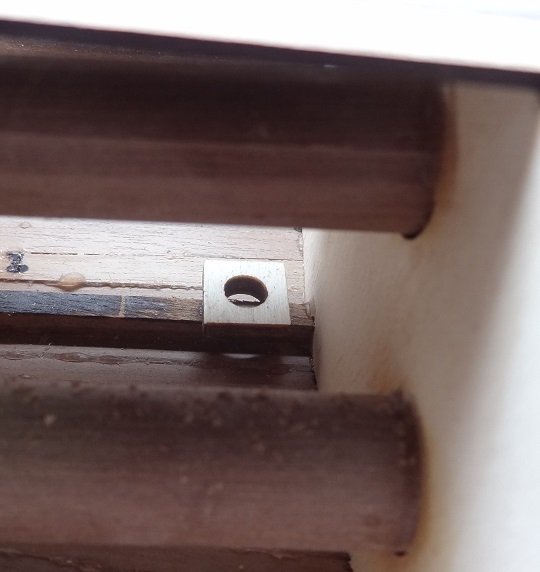
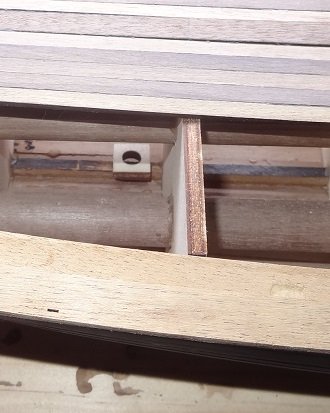
Lucky Break!!! Was almost ready to drill a hole in the deck for the mast. Went to the plans to see if there was some measurement I could transfer. The plan had no hole where I had intended to drill. It was forward a full frame meaning the step glued to the keel was in the wrong place. So that had to be moved. I could still reach under the deck still but those big dowels used to hold the frames together kept me from getting fingers all the way to the step. I did get the step up with some hemo's . Used them to reposition the step also. Sure enough on the keel where the step is supposed to sit there was a notch so placing it was pretty easy. Hate to think what might have happened if I had completely planked the deck before drilling that hole. As best I can tell this mast is set straight up & down. No angle.
- 204 replies
-
- 3
-
-
- trajta
- marisstella
- (and 1 more)
-
Have not progressed as far as I would have hoped so far. Had some other things that HAD to be done. Then someone told me there was a football game on this afternoon. Bahh. One of those Who Cares Bowls. Planking is coming along pretty much as expected. The tapered pattern is beginning to show. It's not as much of a curve as I would have expected, but the sticks are turning in. I was wondering where to start the taper on the fat end. I ended up starting about 1" in from the fat end. That little thumb planer is really turning out to be the perfect tool for this job. I decided I better stop and figure out the hole for the mast while I can still access the step glued to the keel. So that's the next step.
- 204 replies
-
- 4
-
-
- trajta
- marisstella
- (and 1 more)
-
I've never seen this kit before. It's gorgeous. Beautiful lines. And you're doing a great job with the build.
-
Ross - I don't know if this is what Marisstella had in mind but with my approach I think the curves will almost take care of themselves as long as I get the taper right. Think about it - with the sticks laid out and all the fat ends edged up to each other there will be gaps between the sticks at the skinny ends. So, say I glue the leftmost stick. The one that butts to the big center plank. When I glue the adjacent stick I'll have to push the skinny end to the left so the edge can butt up to the stick to its left. There's the start of a curve right there. Not much of one, but a little bit. Doing the third stick just like the second there will be slightly more of the curve. Each successive stick will make the curve a little more obvious. And the curve is slight. Maybe more just angled toward the center. Keep in mind when I get to the last few outer sticks, the curve there is NOT supposed to match the curve in the waterway. It will be less. There is a filler piece that will cover the remaining opening. I'll know if I did the job right if my filler piece goes in about the same place as the one on the plans.
-
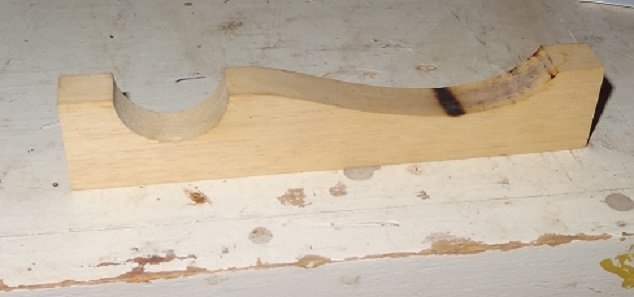
Tom - I thought I had a photo of my trash pile of fashion pieces but didn't find one. It took many tries to find one that worked. And I imagine each one is unique because everyone does that area of the boat differently. If I gave you duplicates of mine, they probably would not fit. Think out of the box. It doesn't necessarily have to be one piece. You might consider dividing those corners of the boat into areas and make a part for each. When you glue it all together, fill it and paint it, it will look like one piece. Looking at it from the side, you know the general shape so start there. Maybe start with a 1/4"x1/4" square stick and do some carving. The trick is getting it to lay flat on the side planks whose surface typically has some curve to it. Typically we bend pieces around a curve. You might have to carve the curve into your piece this time.
-
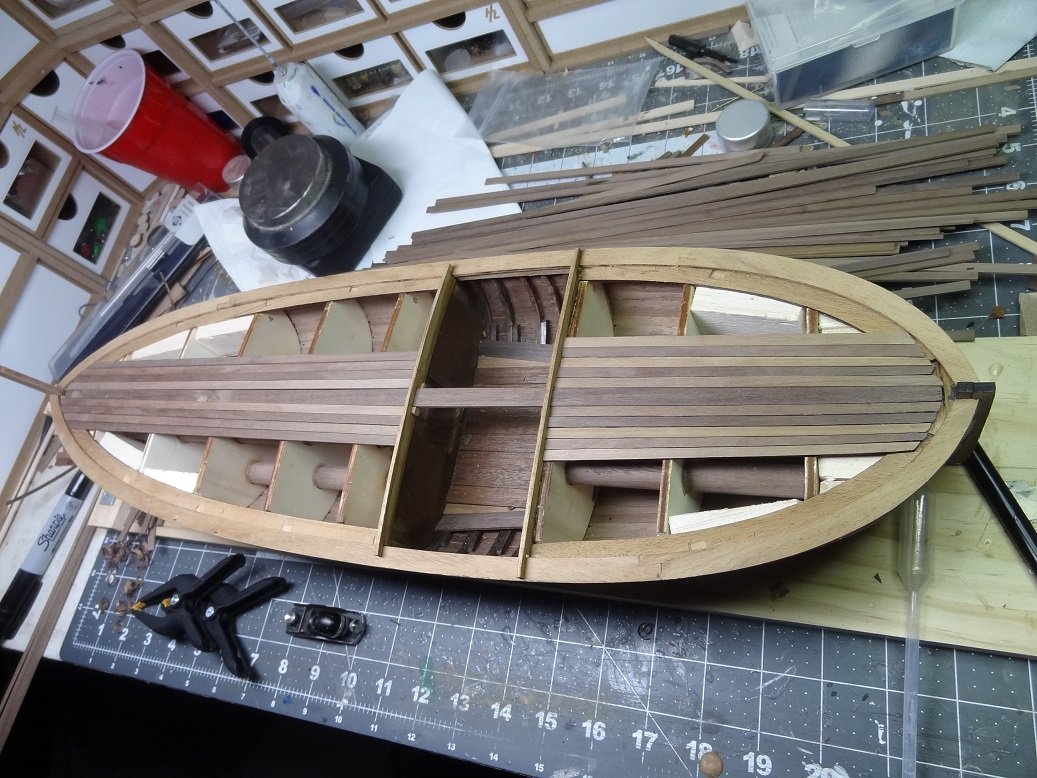
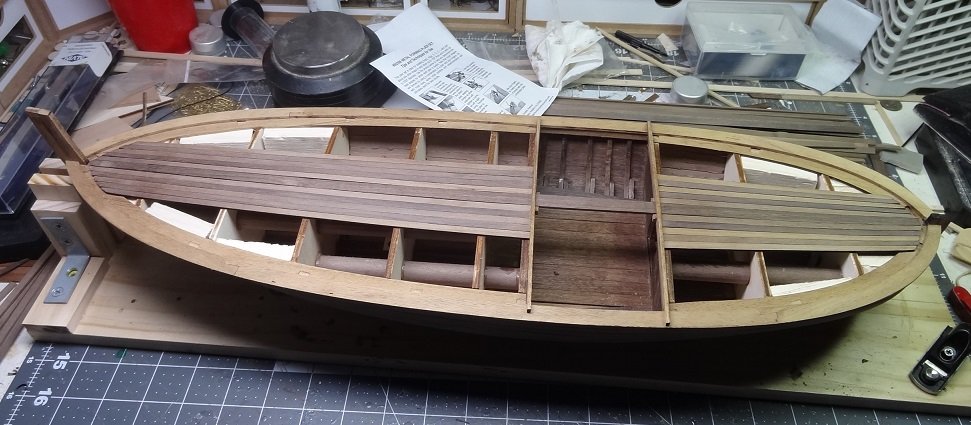
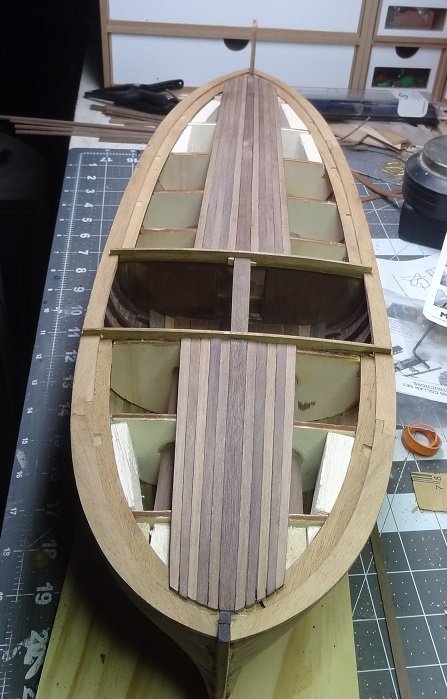
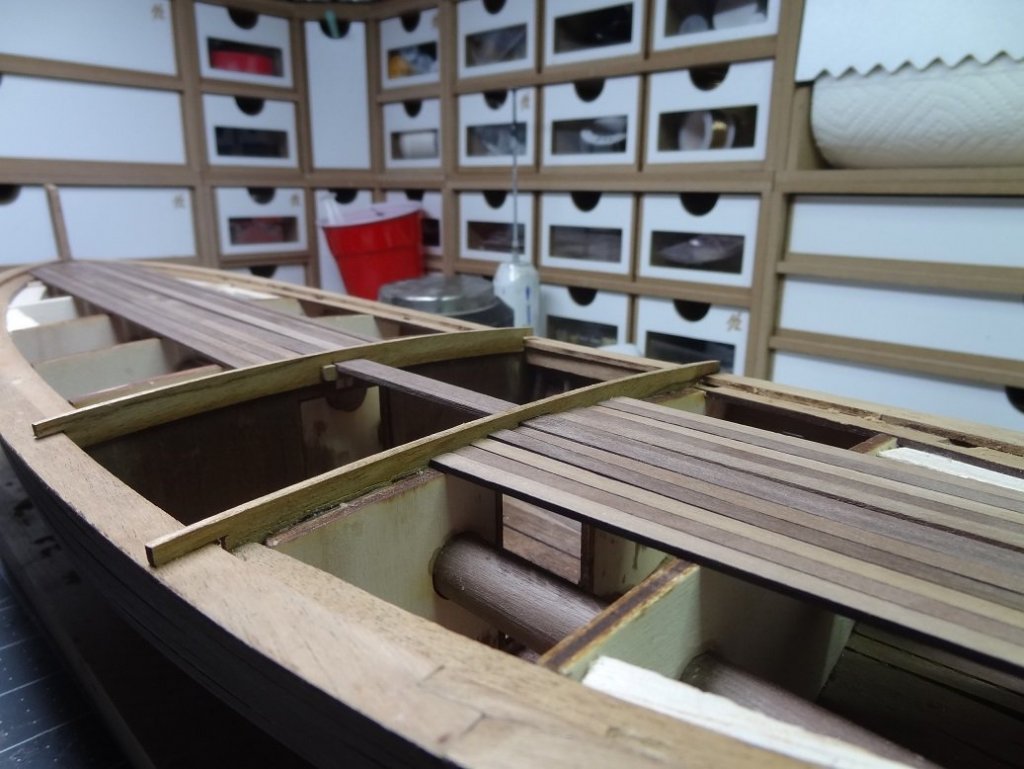
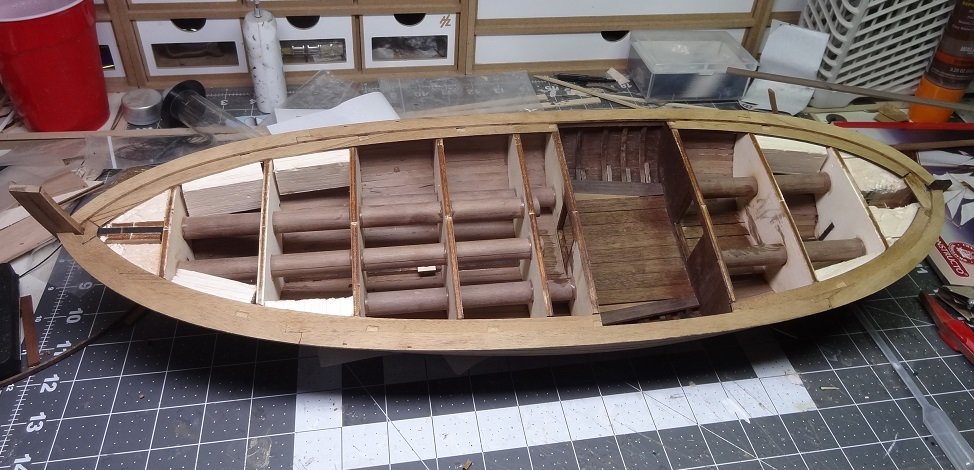
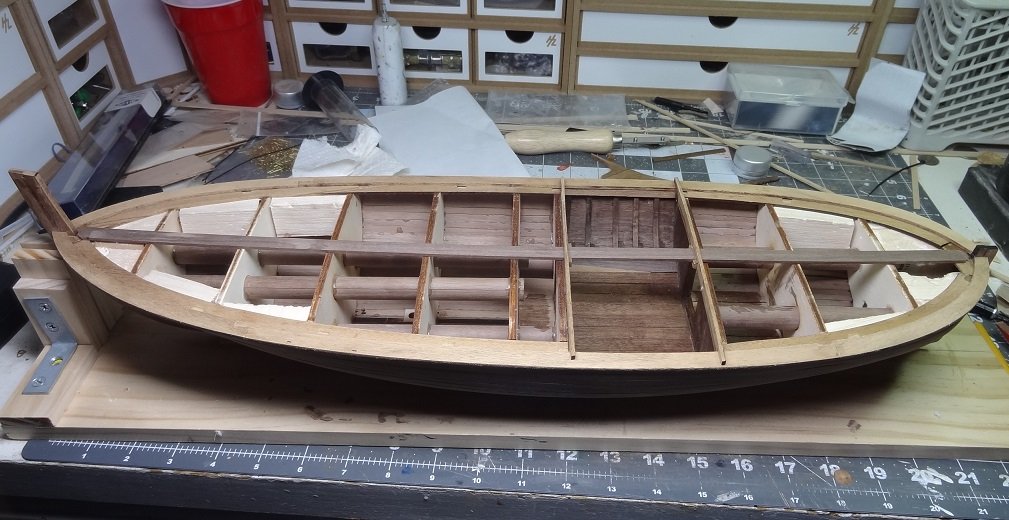
Hello Ross - welcome aboard. It's never too late to pull up a chair. I have cut a few of the stern planks - starting at the middle up against the big center plank. I think I am going to try to get all the pieces cut before gluing. I have been able to select a few of the walnut sticks with a subtle color difference so I am planning on a look somewhat like the pix in the manual. Alternating lite/dark. Also, I am not planning on staining any of the parts above the hull. Actually I will use the Natural stain but that doesn't add any color. The some matte varnish on top. As I mentioned previously the deck does not extend all the way to the waterway. There's about a 1/8" gap all the way around so as my pieces begin to get closer to the edge I'll have to shape them to fit. With the open cargo area there are really 2 decks to plank. You have the bow deck then the open area, then the stern deck. Per the plans, I am using a full stick rather than cutting smaller planks. This means I do not have to worry about a a butt pattern. Both sides of the cargo area have a coaming that extends starboard to port and is raised up slightly so they sit a little higher than the deck and rails. These coamings are what you butt one end of the deck planks up against. The planks are full width at the coamings, then get narrower as they run towards the bow or stern. Thus far, shaping the middle planks has been fairly easy. I think it is going to get a little hairy as I cut the outer ones. This is because the planks are full width where they contact the coaming but as they run out to the bow or stern they get narrower. And as Zoran has commented, the tapering should be done only on 1 edge of the plank. So as you lay them down edge to edge the narrower end is going to need some force to squeeze the edges together. This will add a little bit of curve to the planks at the narrow end. Getting the right amount or curve will be the challenge. Planks shown here are still loose.

- 204 replies
-
- 3
-
-
- trajta
- marisstella
- (and 1 more)
-
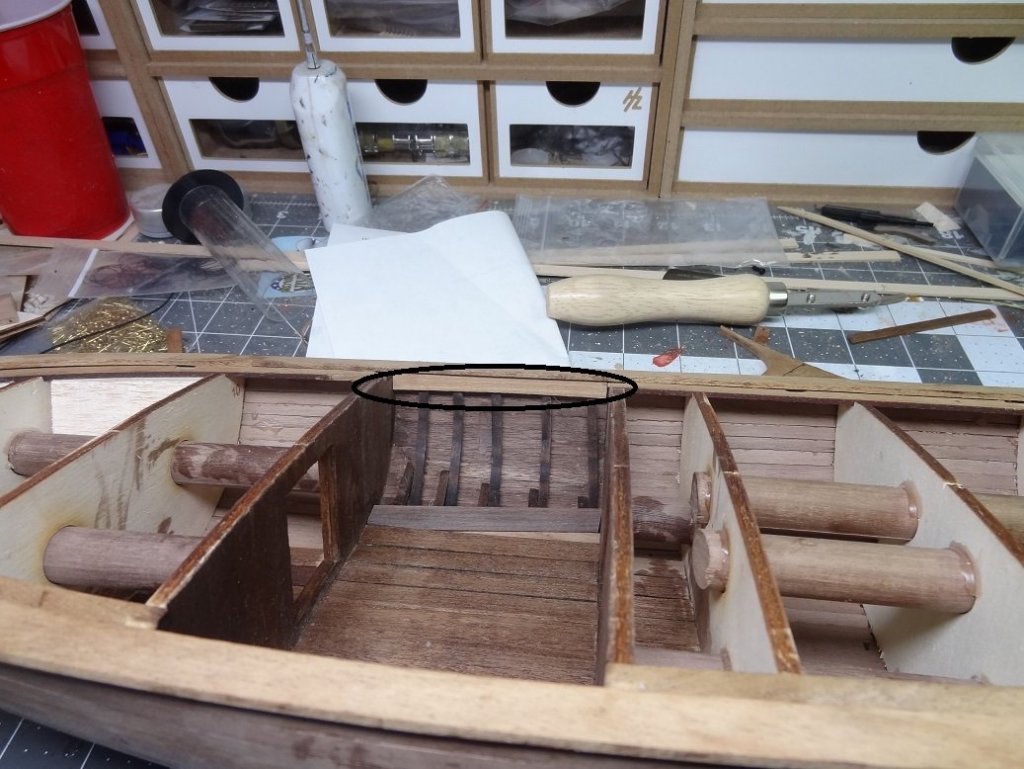
Out of one frying pan and into another. I've been yacking about the deck planks needing tapering. Well the first stick is already down - the big wide one in the middle - and it needs shaping as well. So it was torn out worked down to size and reinstalled. I used a thumb planer for this. It worked pretty well. Shaving off little by little. Some sanding at the end. It's under clamps now or else I would have a photo to show. I'm going to stick with the planer until something better comes along. It's a little slow (or maybe the user is slow) but it worked. I used it exclusively to shape the hull planks. If I had that angle fence attachment, I suppose the Byrnes saw might work too. I am wondering one thing. As I work out from the center, should I shape by scraping both edges of the plank or just one side. The plank pattern seems to bend inwards toward the center stick. Will probably just have to try both and see what looks best.
- 204 replies
-
- 1
-
-
- trajta
- marisstella
- (and 1 more)
-
Nothing revolutionary here but it worked. Lay the wet plank flat on top of the curve. I ran the shaft of a soldering iron back & forth on the top surface while pressing down. A couple of swipes and the stick will bottom out in the curve. It just helps keep you from pushing too hard and snapping the stick. From what I remember you have almost a U shaped bend? Some scrap 2x4 would work. You might even have to crank up the mill.
-
Home now and had a chance to review the plans. I think I'm all right. Guess I've been going more by the pictures in the manual than the plans. It's a little confusing as the stick in question is in some of the plan insets but not in others. I can see where you were coming from Don. P12 shows what you were describing, P11 shows how I did it. Didn't sleep last nite so I was pretty tanked up on coffee myself this morning. Death Wish brand. Need to work on a process for shaping those deck planks. Fortunately there is a deck plan and it's 1:1 so anything I make I can test first.
- 204 replies
-
- 2
-
-
- trajta
- marisstella
- (and 1 more)
-
Don - the electric plank bender I had (really just a soldering iron with a special tip) came with a thick strip of wood that had various curves carved into one edge. It's what I eventually used (minus the iron) to bend those ribs. Having something on the back side of the stick while I applied heat & pressure to the other side kept the sticks from breaking. You could easily make something with the curve you are looking for. You probably know what I'm talking about but if not I'll post a pic when I get home. Good luck!
-
Zoran - just curious do some of the real boats do the alternating color thing? The walnut deck strips are pretty uniform in color. If I was to do a pattern I would need to alter the color of some or use some strips of a different wood. Either one is OK. I will experiment this weekend.
- 204 replies
-
- 1
-
-
- trajta
- marisstella
- (and 1 more)
-
Don - I'll take a look when I get home. Horizontal is easy enough. I'm not sure if it sits on top of the ribs or not. I do remember a photo where the ribs went all the way up to the top edge of the wale. At least that's what it looked like. Then the rail sits on that. Either way I would probably glue the support piece to the underside of the rail. You can't really see up under there anyway. The planks remind me of Niagara. The Niagara plans call for planks to be tapered at the stern. That was a bear - those suckers were maybe 1/16" wide at that point. The taper for Trajta is not as severe. I like the idea of marking or scribing a border around the waterway. I need to decide if I want some sort of color pattern with the deck sticks. If so, I'll have to stain some darker or rip some boxwood to go lighter.
- 204 replies
-
- 1
-
-
- trajta
- marisstella
- (and 1 more)
-
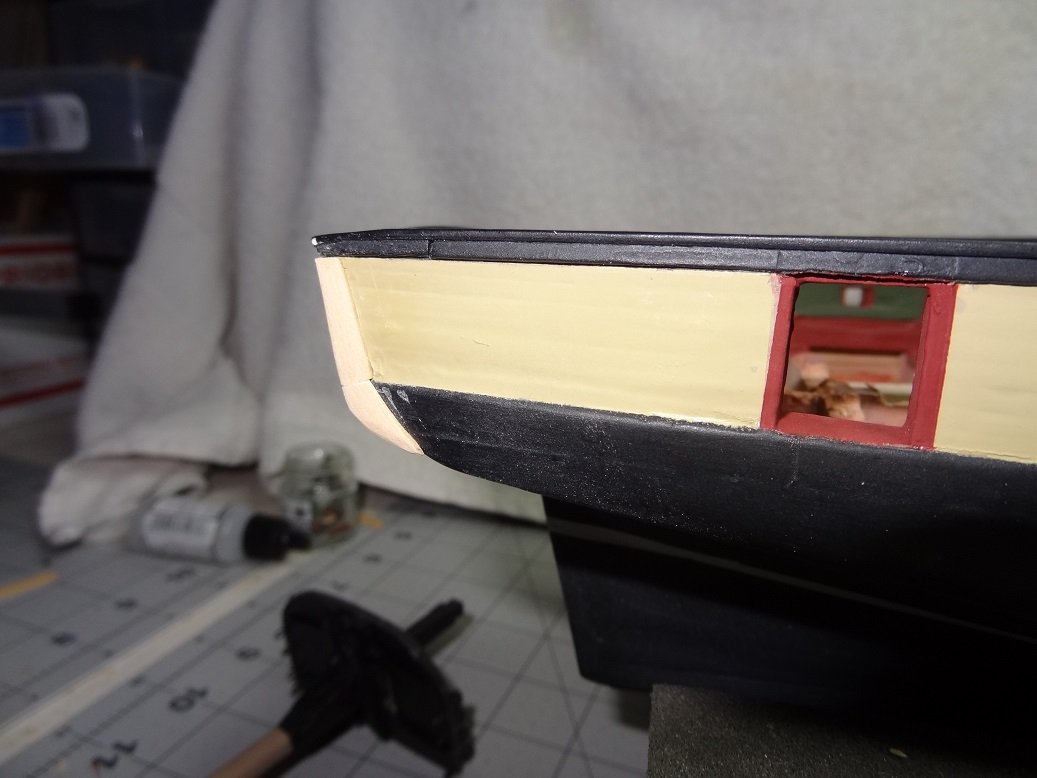
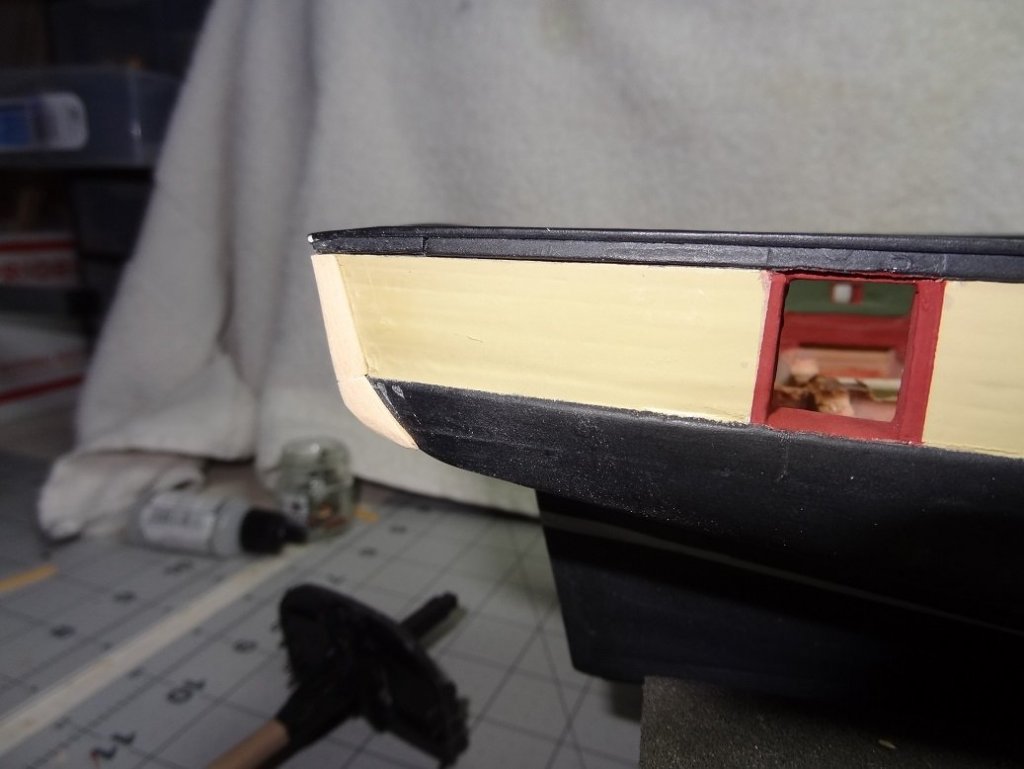
Tom - 2 observations 1. The transom ports in the plans sit a little bit cockeyed. They slant outside in a little. Not a big deal. No one but another Niagara builder would know. 2. I think the outer transom planking should overlap the bulwark planking rather than bulwark over transom. Part of the purpose of your fashion piece(s) is to cover that joint. You will be putting those at the rear edge of the bulwarks - on the side. The end of the transom planks should butt into the fashion piece(s) and the end of the bulwark planks should be completely covered by the fashion piece(s). It will look a lot cleaner when all is said & done. Keep in mind the fashion piece can be made up of more than one part. Those parts can be 3D instead of just flat. Kinda like the piece on the left. Here's what I did on mine. Don't forget when you order blocks for the tackles you need a double and a single for each one.
-
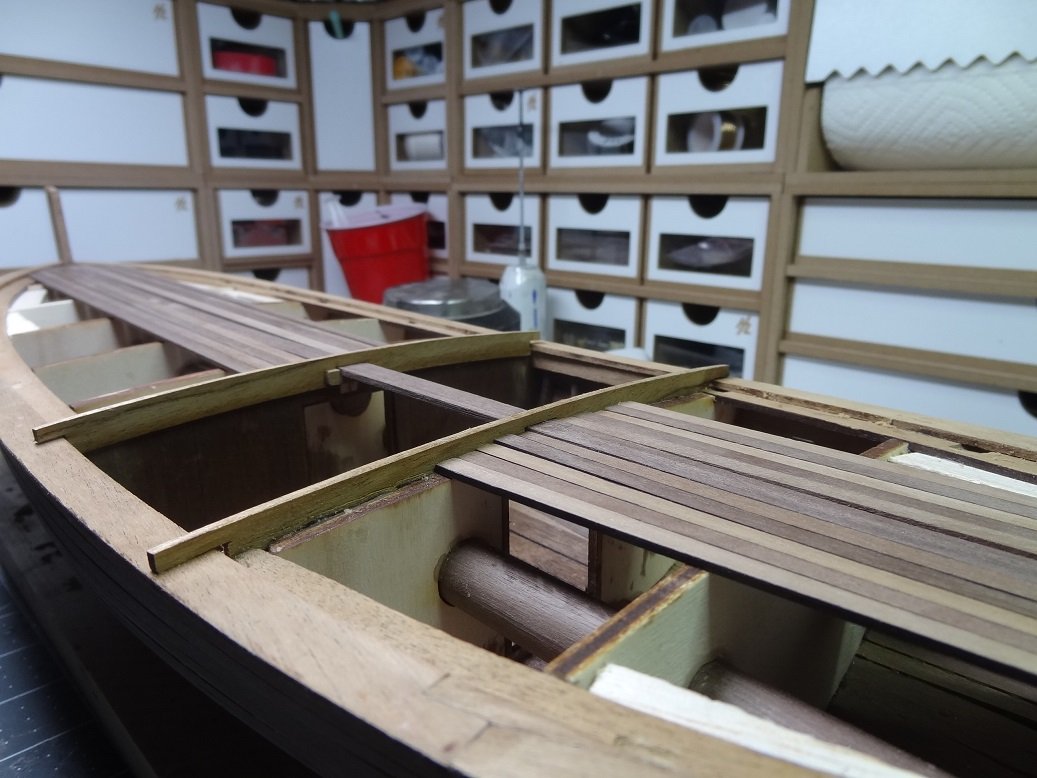
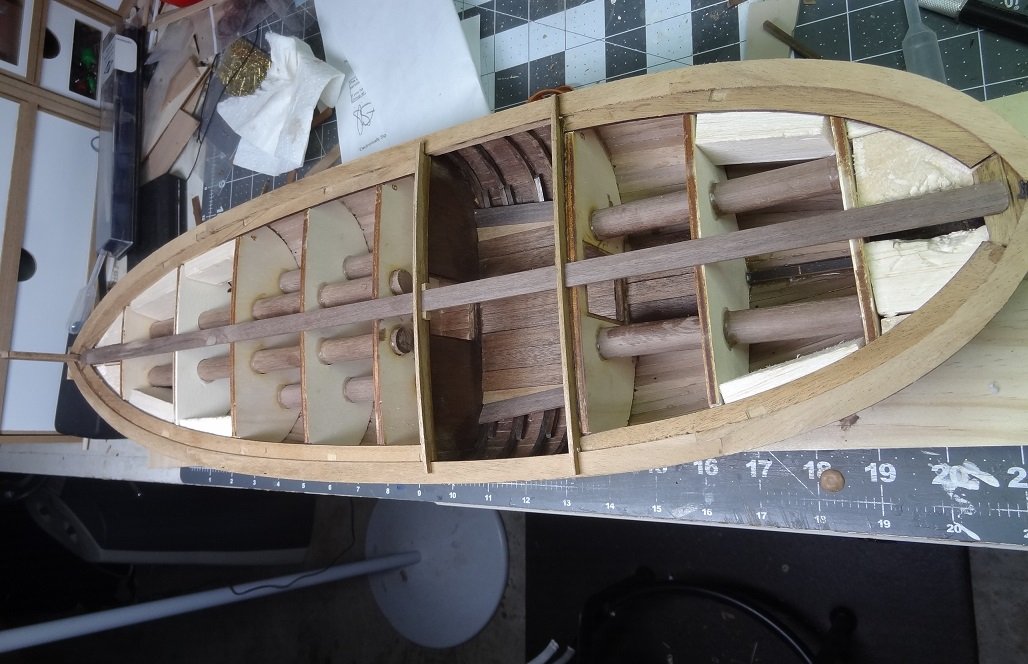
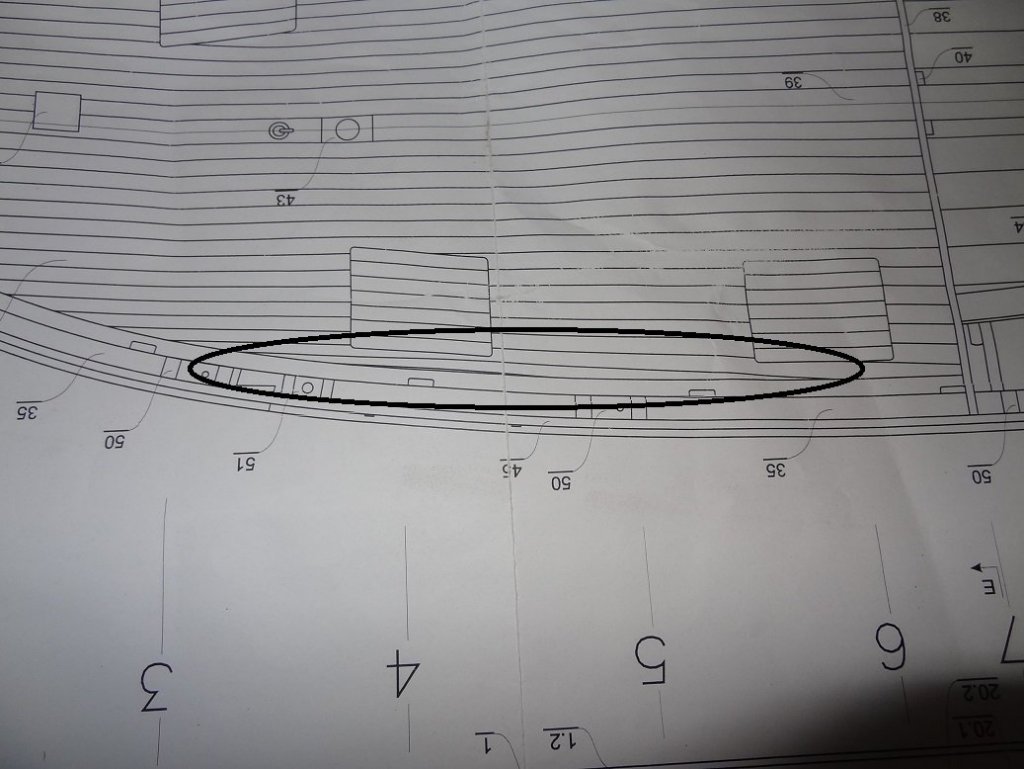
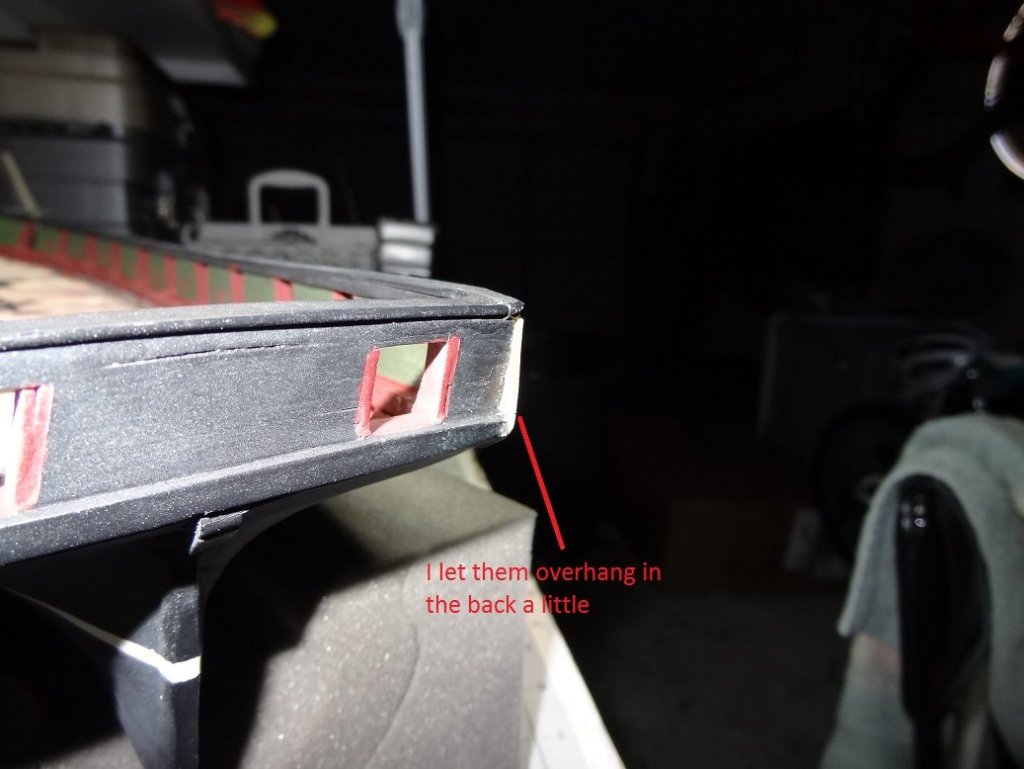
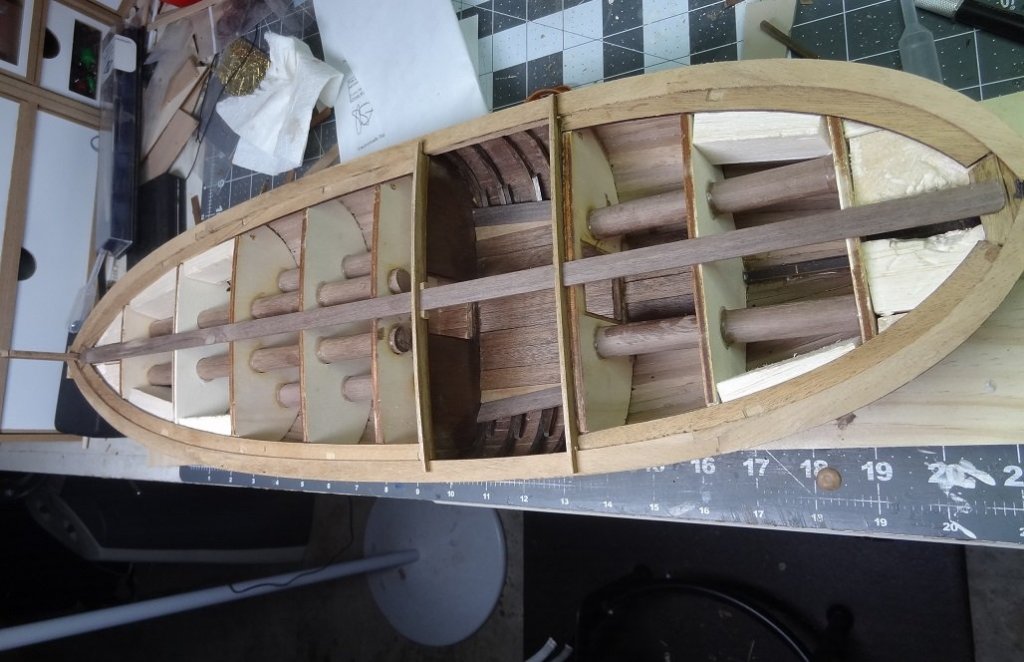
Rework is finished All that so I could lay 1 stick. I know it is considered a support, but in the model it is practically useless. As a matter of fact it went in after the rail it is supposed to support See photo below. Staying with the program. As mentioned another rail is installed. I'm still learning the terminology differences. To me it would be considered more of a waterway than a rail as it is at deck level. Each side was 3 laser cut pieces and they fit together well. A couple of coamings and a wide center plank went in next. I guess that means I am officially in deck planking mode. One observation/question on that - the pix in the manual show the deck laid with alternating strips of 2 different colors. It appears that only the darker colored sticks are supplied with the kit. Instructions don't mention the alternating color scheme. Maybe that's the Deluxe kit? I suppose I could cut some boxwood if I wanted. Not sure at this point. Deck planking will be interesting. The sticks do not lay all the way out to the lower support rail. There is a gap all the way around. A quick look at the plans earlier, I believe showed the deck planks tapered as they near the bow & stern. At least there is a deck plank plan to go by.
- 204 replies
-
- 3
-
-
- trajta
- marisstella
- (and 1 more)
-
Hey Don - while I see what you are talking about with the deck plank edges, I still think it's a winner. I can pick up the grain running in different directions in different planks. Almost a herringbone look in places. I know you usually use the wipe on finish but I got to wonder whether a liquid applied thick might seep down between the joints and darken a little. I know when I paint the stuff over a small gap it fills up and will be a tad darker than the plank when it dries. Of course with the smooth/tight fit you've made there may not be much of a gap to fill The price of a job well done. Ditto on the Sherline products. If I just knew what to do with them Take a break and enjoy what you've done. I want a front row seat at the plank bending station!
-
General rule - Do not size up your rope over what is called for. I bucked that on the guns in a couple of places. But then I also went against tradition on the tackles and frapped the excess rope instead of making coils on the deck. Just a personal preference. The mock up gun station I built was solely for the purpose of trying different combinations of ropes/blocks/eyebolts/rings etc. IMO some of the rope sizes called for looked too small for my taste - kinda wimpy. I played around with that for several weeks before moving on. Page 11 of my log is where all that madness started. The photo at the very bottom of 11 was the look I was trying to copy. The adventure continues for several more pages. I will suggest you consider making the mock up. It took maybe 15-20 minutes. Even if you don't go thru all the part sizes, it will give you an idea about placement of the eyebolts plus you have some extra room to work in. And your deck doesn't have to be finished before you start experimenting. As far as storage, that's your call. My take is rope will not be affected by time or weather. The blocks are boxwood, a much denser wood than basswood. They come in mini zip lock bags and that's how I store them. Again, I don't believe they will be bothered by the elements. After all, we are expecting all that to hold up for years and years on our completed builds. I joked about being a hoarder but it's true. My biggest pet peeve in this hobby is running out of parts. When you're on a roll with something like the gun tackles, the last thing you need is to run out of rope or blocks. Then you log in to order and see what you need is out of stock.
-
Well my guardian angel was watching today. Turns out I have placed those upper frame pieces incorrectly. They need to terminate at the wale edge, not 2 or 3 planks down. There is a support that I am about to add and it needs them higher up. It's all there in the instructions - I just skipped right over it. The pieces did come up and since they extended under the flooring pretty far, I will be able to slide them up as needed. But I'm going to do some sanding first. There is a lot of excess glue on the inner hull and since that is in plain sight I think it needs to go. Actually the inner hull will be a lot easier to sand with the frames gone. Thanks to Don for pointing this out! I owe ya a cold one.
- 204 replies
-
- 2
-
-
- trajta
- marisstella
- (and 1 more)
-
I don't think you will be disappointed Tom. 2 packs of hooks should do you. I didn't use them for anything else. Hang on to the kit rope. There were several places that I did scrimp and use it. Mostly for inside runs near the masts. You'll find you have quite a few runs that start by going up a mast thru a block or something and then down to the deck. A lot of those could be kit rope. Jim is right about having to wait sometimes. I've always tried to buy some extra when I could so I would have it for that next build. I've probably got 2 or 3 builds worth of rope & blocks. Of course I'm kind of a hoarder
-
Right on Steve - I could dribble on about Syren products all day, but I do my best to keep my comments objective and not sound like a commercial.
-
Zoran - I would love to see a video or some photos of this process. Feel free to post them in this thread if you like.
-
Well if it were horizontal would there be room for a square sail? I can't really see but is it fastened to the mast in the middle of the yard or closer to an end? My first thought is just a yard being stowed. They did that a lot. Often they would lower the yard to the deck but just as often leave it stowed like that in case it's needed quickly. There's a term for that but I don't recall what it is.
-
I would seriously consider them. Mainly for the consistency. I can make pretty good hooks. Sometimes even hooks as small as you will need to stay in scale. But 200 identical hooks? Not a chance. Of course there are people here that can make their own. Usually on larger scale builds. At 1:64 a lifelike hook is pretty small. I used 3mm for the guns. The first time I ordered them Chuck had the brass ones but also some made out of what seemed like plastic. The plastic ones were awesome - a little bit of relief gave them more of a 3D look and they were black so no painting required. He lost that manufacturer and apparently nobody wants to make them as the plastic gives off noxious fumes during the etching process. The brass ones are OK but not like the others. And I agree with Jim, they will need some manipulating. I didn't find threading them too bad but hooking them into rings and eyebolts proved difficult sometimes. Two things that I ended up doing 1. Spreading the hook open a little extra. Of course you'll probably tear a few doing that. 2. Use rings on all your eyebolts, both on the carriages and the bulwark. Trying to hook into that smaller size eyebolt will drive you mad. If I recall I ended up ordering rings that were the next size up from those tiny ones that come with the kit. And rings are typically used with eyebolts in the real world. One other thing I'll just put out there (and watch out for Syren fever) the Syren blocks look a heck of a lot better than the MS blocks. Same story with Syren's ropes. I'm bringing that up here because you probably want to go one way or the other and not mix them. You're about to the point where you will begin rigging (yes making all those tackles is rigging) and you will need rope & blocks to make them. So there's a few more decisions on your plate. I went with all Syren ropes and blocks. Hearts & deadeyes too. I have no regrets with those decisions. If you are not familiar with Chuck's products, check around. A lot of people use them, particularly the rope. And I have absolutely no affiliation with Syren or Chuck. They're just dang good products that will add to the look of your boat.
-
Thank you Zoran - patience is a virtue I have very little of. A bad thing for a model ship builder. Don is good at spreading his patience around. The lesson learned here was not so much about bending sticks. It was about slowing down. Every task is different. Even the same task on a different build.
- 204 replies
-
- 4
-
-
- trajta
- marisstella
- (and 1 more)