Supplies of the Ship Modeler's Handbook are running out. Get your copy NOW before they are gone! Click on photo to order.
×


mikiek
-
Posts
2,276 -
Joined
-
Last visited
Content Type
Profiles
Forums
Gallery
Events
Everything posted by mikiek
-
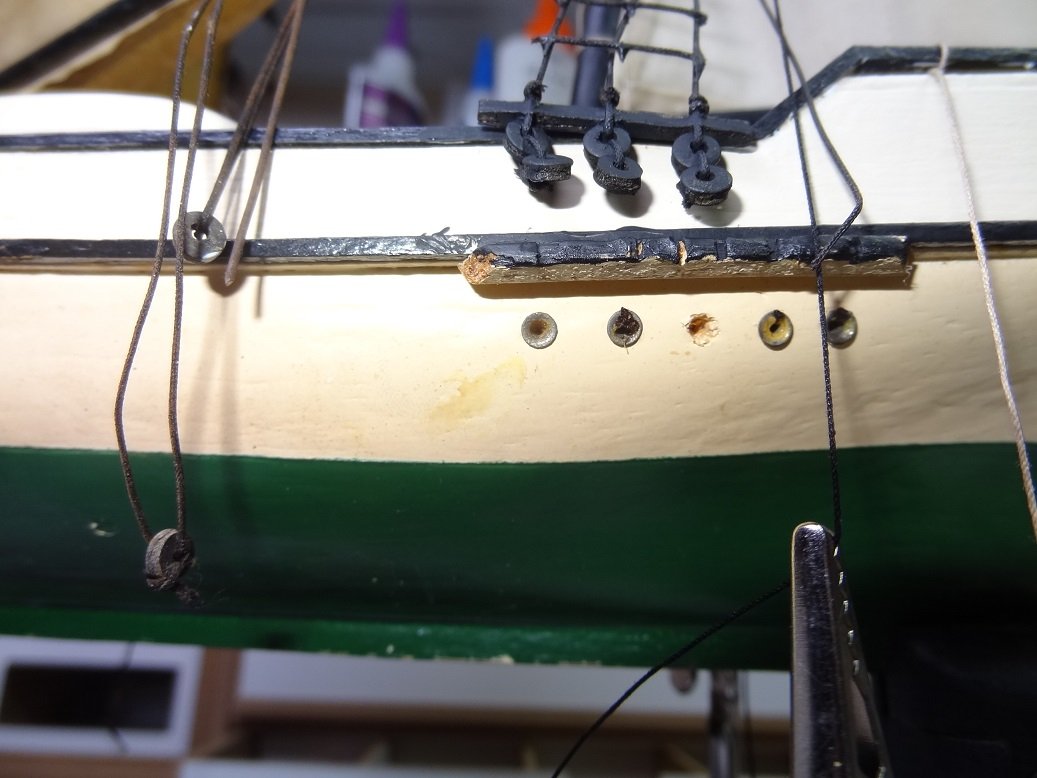
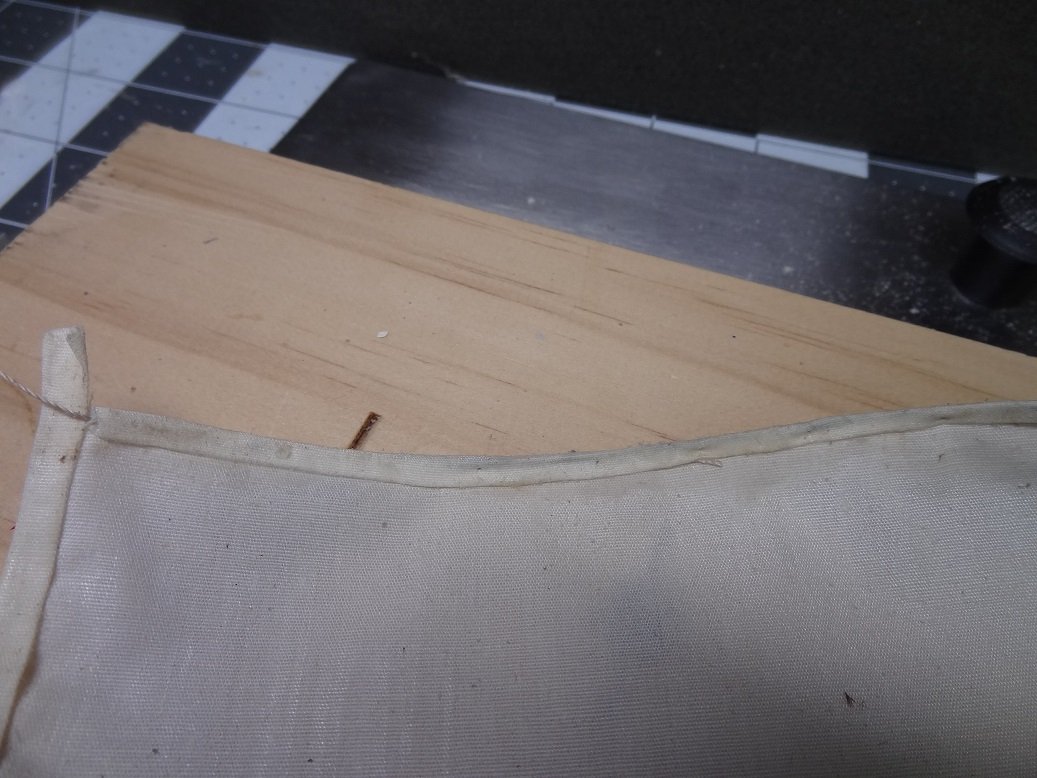
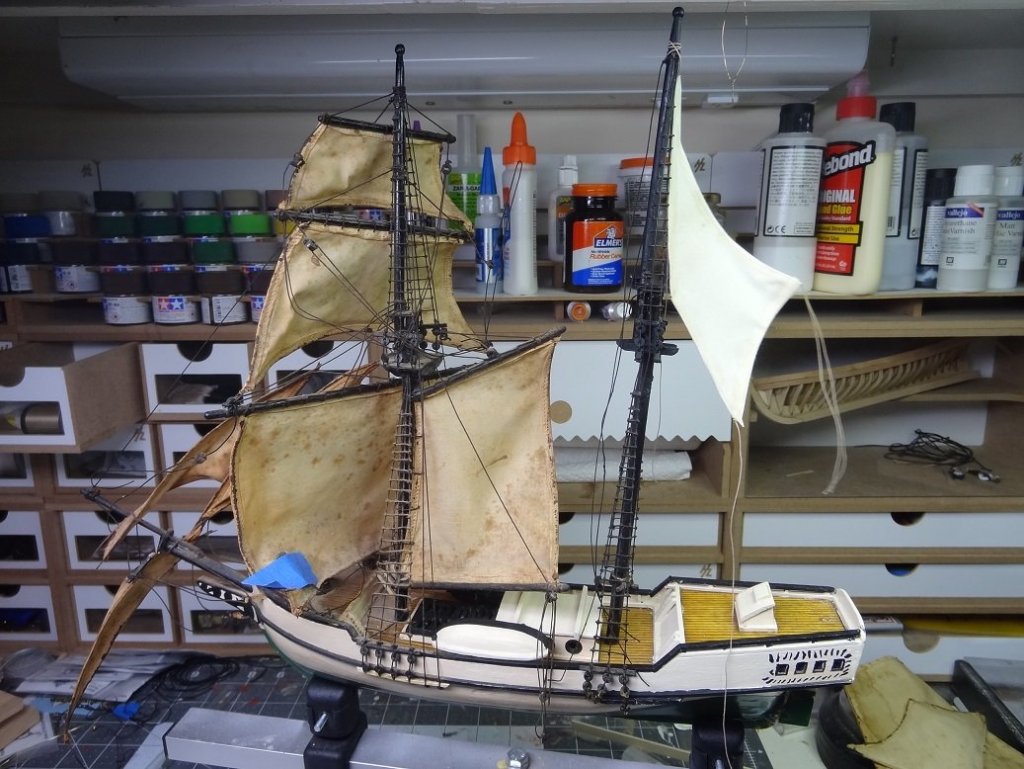
 Visible progress! Almost have the rear mast back in place - with sails and a clean deck underneath. A big improvement however a little sterile for my taste. Got one problem and I knew this was coming when I snipped the shrouds. This pic pretty much shows it all. There used to be a line from the lower 'deadeye' that went over the channel and into the small holes below. I assume they were fastened with a big granny knot on the backside, while there was still access to the inside of the hull. Now there is no access, but I need to do something similar. Tie a rope to the bottom of the 2 deadeyes. Run the rope into the hole. Tie the rope off somehow and keep good tension the whole time. Ideas?

-
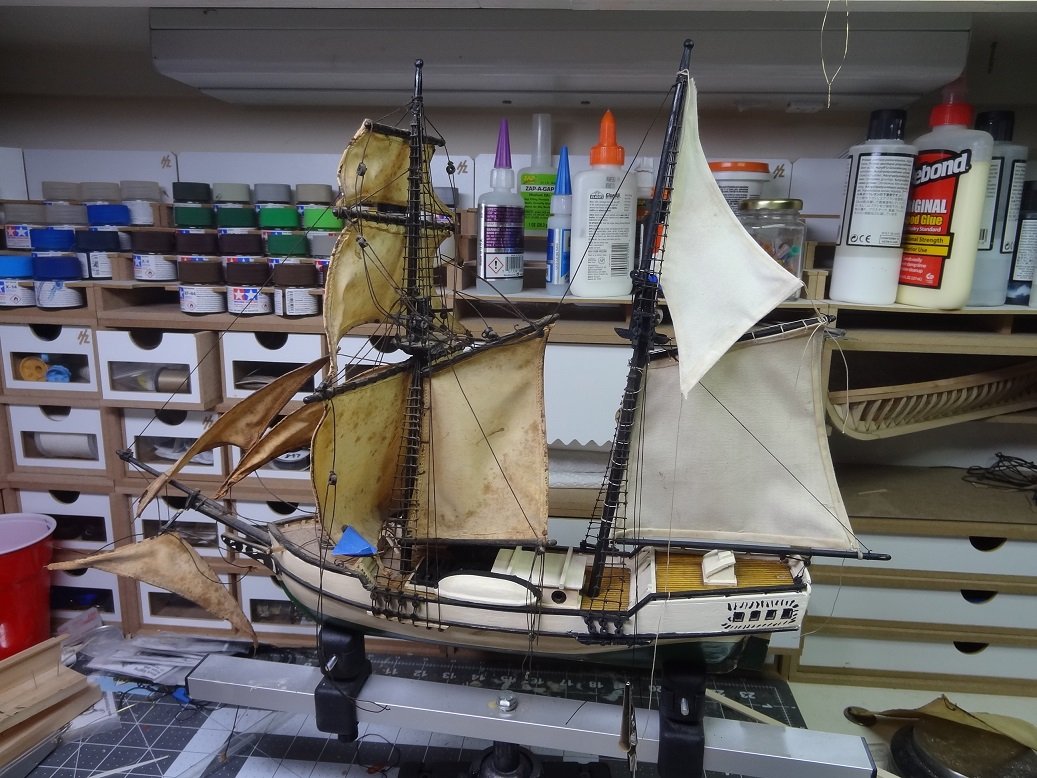
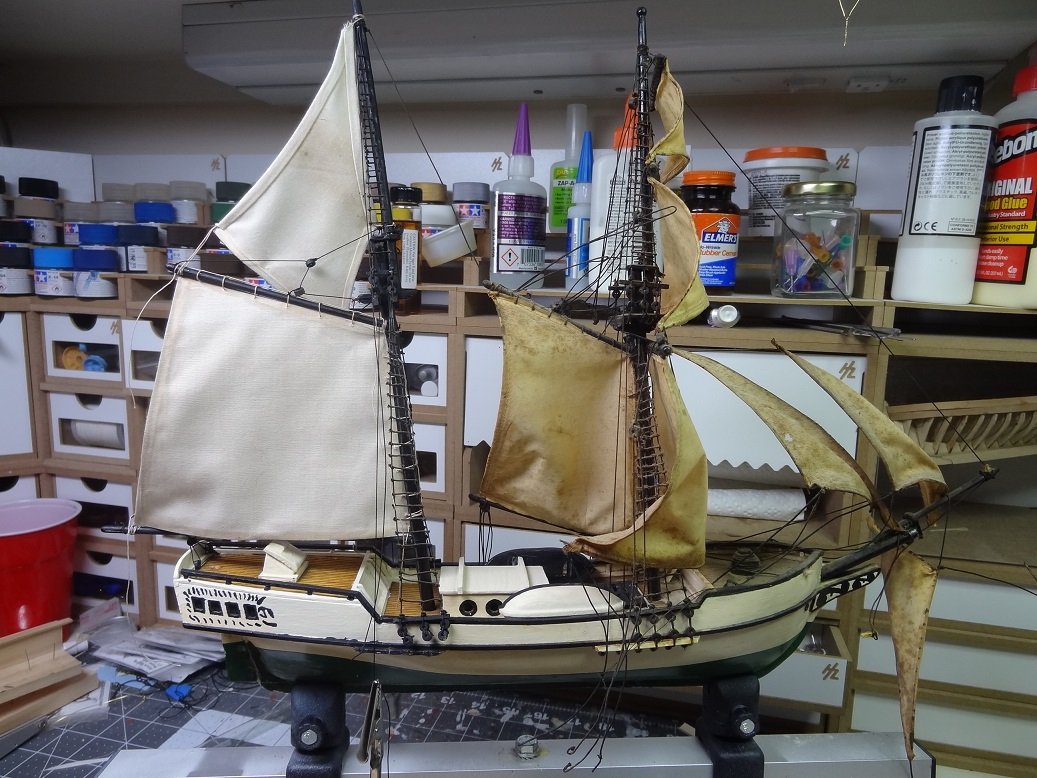
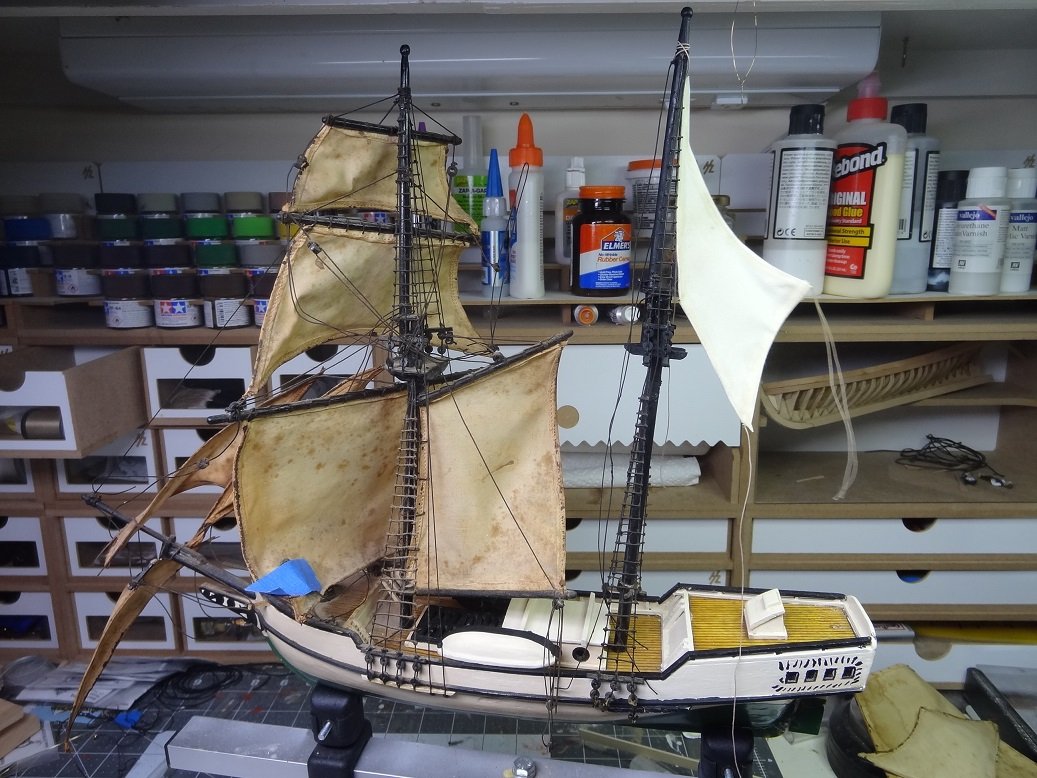
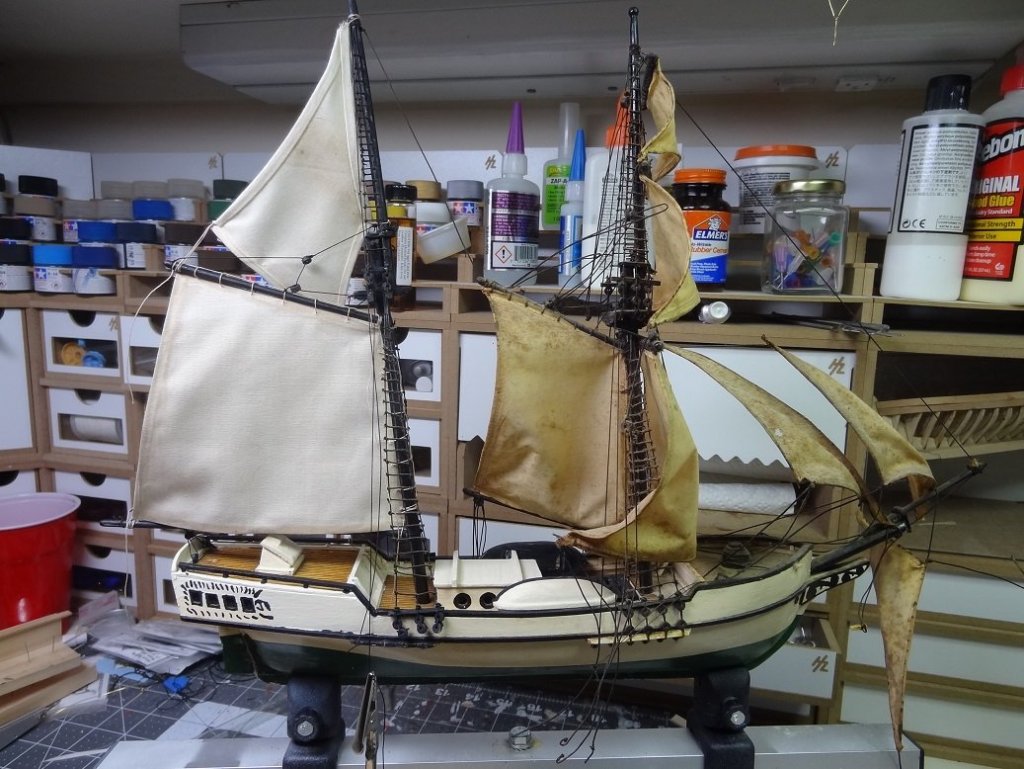
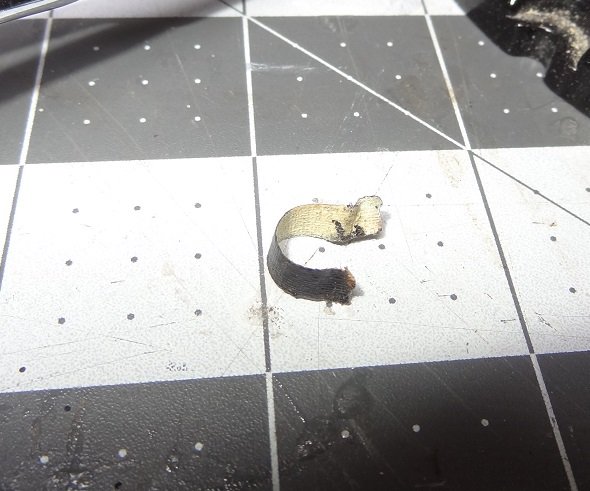
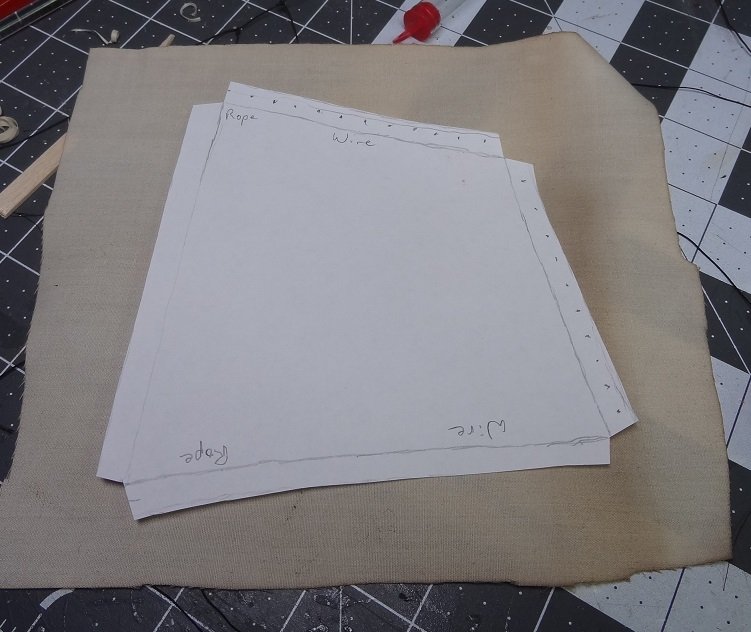
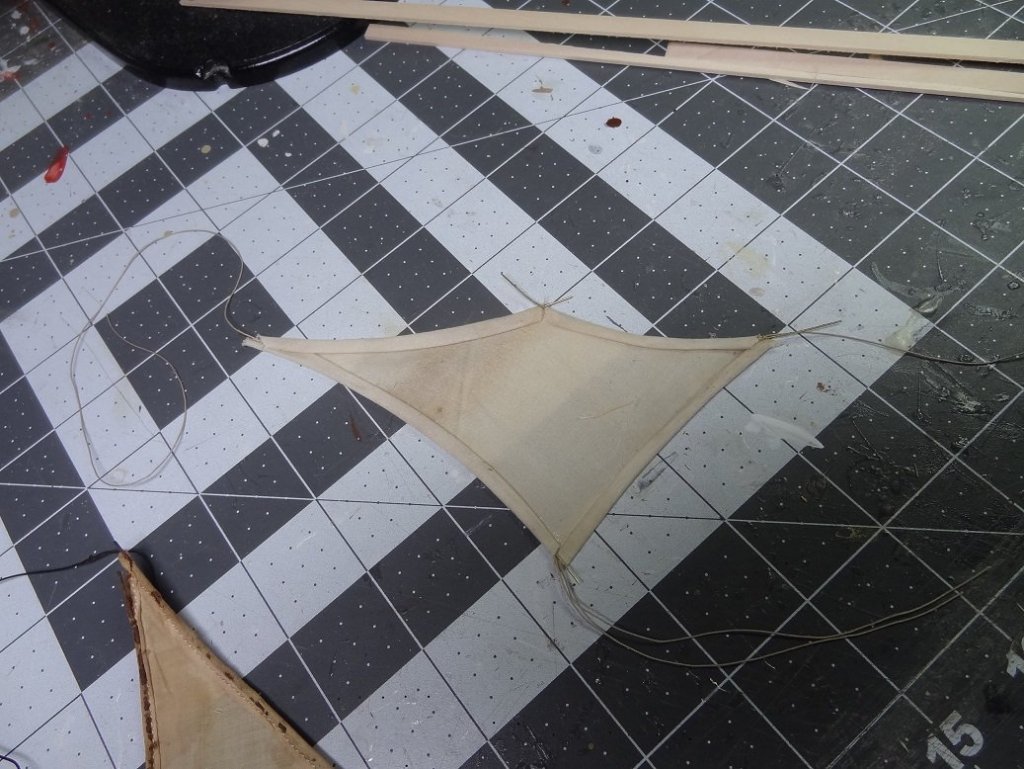
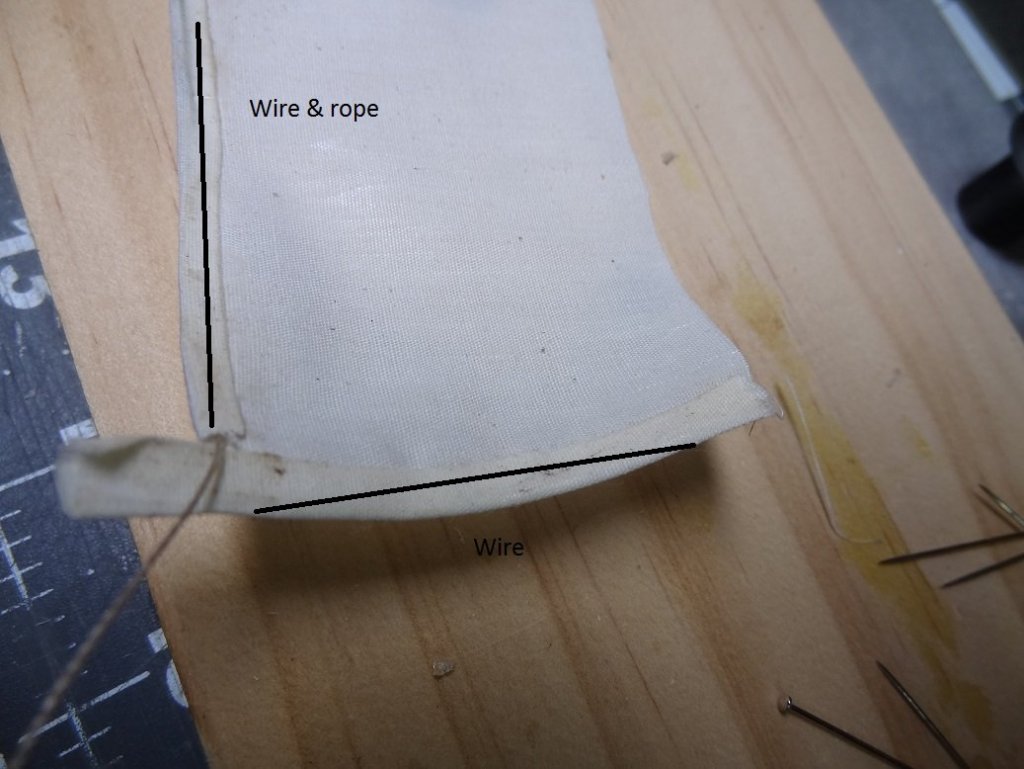
I think I am going to try out this method for sails. I'm trying to not strip down the entire mast in one shot. Even with pix, I'll never get it put back together the same way. So I have this upper sail - sorry, I don't know the names of the fore/aft sails - ready to put back on. But it will require an attachment to the end of the gaff on the lower sail (spanker?), so I really need to remove the lower sail. This one is laced on to the gaff and mast so the replacement will need holes in the hem in addition to wire & rope. Speaking of wire, having that in the hem is a very cool idea. It can be bent around to really give the sail some shape. No droopy sails. The boom and gaff were fastened to the mast by something that almost looks like tape. Maybe a touchup later in life. Don't know if they even had tape 70 years ago and if they did would it still be holding today? At any rate I'm going to have to do something different to hold the boom & gaff to the mast. I think the scale is too small to try a parral so I guess it'll just be a loop of rope around the mast. Tape? So the spanker is off and I've made a pattern so I can cut a new one. Compare old sails vs replacement. I feel like I need to take the new one and rub it around in the dirt.
-
Forgot Don is in CA. Probably a marketing difference between there and the US. Go to a store here and you're likely to find 5-6 Pledge products on the shelf and it's possible none of them are Future. Read the labels & fine print. Good link Ken.
- 653 replies
-
- 4
-

-
- trabakul
- marisstella
- (and 1 more)
-
Gotta jump in here. Be careful with dusting sprays. Many have wax and other ingredients in them which you may or may not want on your model. Wax is actually slightly sticky and will collect dust over time. The Future product Don refers to is a good one and has been used to finish models for years. That was the intent of the product. But Pledge has a whole line of products, so be careful what you get.
- 653 replies
-
- 3
-
-
- trabakul
- marisstella
- (and 1 more)
-
I think keeping the symmetry is the hardest part of this build. So many 90 degree angles that even a 89 degree mishap stands out. You've done well on that aspect Steve.
- 190 replies
-
- 1
-
-
- pinnace
- model shipways
- (and 1 more)
-
You are right about that Per. The case - just brought it in from the truck - is 44"x28"x16". It probably could have been 1" smaller all around and still looked OK. I have often commented/joked about admiralty builds and doing something like that for future builds. It does 2 things. Number 1, you don't have to rig much. Number 2 your case will be half the size of a fully built out boat. Personally, I think all the ropes detract from the deck details. Niagara is kinda bare bones there compared to others. I couldn't imagine doing one of the 17th century boats - gilded, ornately carved, rounded stair cases, etc. and then covering it all up. But that's just a personal preference. (Step down from soap box) I have to pull all the protective paper of the case and clean it up and then I'll post some pix.
- 843 replies
-
- 3
-
-
- niagara
- model shipways
- (and 2 more)
-
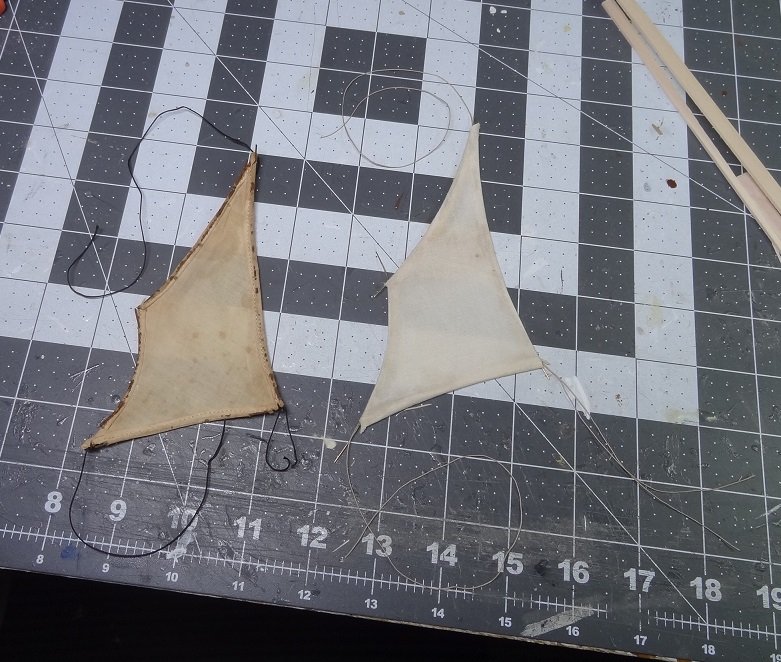
Not quite finished with my first attempt at a sail but I couldn't resist a few pix. The hems just need a lot more ironing. This is a double fold hem (by hand) and it's a tad over 1/8" wide. A bit wider than the original. Have not done any stitching yet - maybe I won't. As is my custom I ended up doing the most difficult sail first. Most of the others are square. My first deviation from the original - I changed the running rigging to tan. Do I keep at it or try another way?
-
Plan B it is. The case is rather overwhelming on his mantle. I'm getting some of those hairpin metal legs and will attach those to some 1"x4"s to make a frame that sits under the pedestal. Not many places in the house with a big "hole in the wall" for something like this. I wonder if I should start making smaller boats
- 843 replies
-
- 3
-
-
- niagara
- model shipways
- (and 2 more)
-
Hi Per - I'll bring it home and find a spot. I may need to construct some legs to raise it up. It might fit on a table where I have a small case now. It might look cool on a wall shelf. I don't remember the outer dimensions or else I'd be measuring right now.
- 843 replies
-
- 3
-
-
- niagara
- model shipways
- (and 2 more)
-
Case is ready! Went to go pick it up - too big for the car It's gi-normous. From the tip of the bowsprit to the end of the spanker boom, you don't realize how big these things are. Will have to go back with the truck tomorrow. May also need a Plan B in case my dad decides it's all too big for his mantle. Then I'll have to make him something else
- 843 replies
-
- 4
-
-
- niagara
- model shipways
- (and 2 more)
-
Wow Dee Dee - we should make a sticky from this. A great description. I wish I had your talent.
-
From what I've seen the biggest thing with the Euro kits is the instructions. Understandably, they are all done with English as a second language. Some much better than others. One of my current builds is Amati and the instructions are pretty good. Occre are fairly understandable as is Constructo. Unfortunately quality could vary from kit to kit. Those same 3 vendors are usually reliable. I have (but have not built) several kits from Victory. Their stuff looks pretty good. A lot of times if you want more detail you can look for 3rd party parts. For instance I use rope from Syren Models rather than from the kit. I also use Syren's blocks. Those 2 small changes can really dress up your build. A lot of times you can find better guns and other hardware. That's a little of my experience. Others might suggest otherwise. And I couldn't honestly say who makes the best Bluenose if that is the path you are headed down.
- 50 replies
-
- 1
-
-
- artesania latina
- Virginia
- (and 2 more)
-
Don I realized the timing for dyeing as I was putting this together. Material does need coloring first. In some hems I have rope and that would have taken the color also if I wait until afterwards. I'm not set on this whole method, I just had a few minutes and wanted to try ANYTHING and the admiral is being real slow about getting the sewing machine out. She claims that 1/8" double fold hem will be a breeze. I have my doubts.
-
I'll get a few started Ron. If I can get that straight I think what I'm trying might be doable. It was a real bear trying to keep the wire in the hem when it had a little twist. I didn't have enough hands to keep the wire in, hold the hem down and stick some pins in it.
-
Just a note - this thread hasn't died. I've got another related post here regarding sails and how to do hems. I need to get that worked out before I can put the mast back in. Will be back in action soon.
-
They blow me away how quickly orders arrive. If I order on a Saturday or Sunday it's on my doorstep Wednesday. That's worth the extra $$ for freight in my mind. If I ever go over there I WILL make it a point to stop in.
- 50 replies
-
- 1
-
-
- artesania latina
- Virginia
- (and 2 more)
-
Congratulations Matt. It's a great build! Ten months is not bad at all. I like how you did your rope coils. Loosely coiled and "tossed" onto the deck. Looks a lot more lifelike than the flat pinwheels that get done on most builds. Much of your running rigging (and standing rigging) can be done on the side. So when you finally put it on the boat most of what you'll be doing is seizing the loose ends to the boat or another mast. Unless your stuck on Model Shipways I believe there is one or two European versions of Bluenose. I'm in the States and buy all my European kits from Cornwall Models in England. I've never paid duties, freight is not all that bad, EU made kits can be almost half the price of the same kit bought in the US, and the dollar buys a lot over there right now. Might be worth a look. See you around......
- 50 replies
-
- 3
-
-
- artesania latina
- Virginia
- (and 2 more)
-
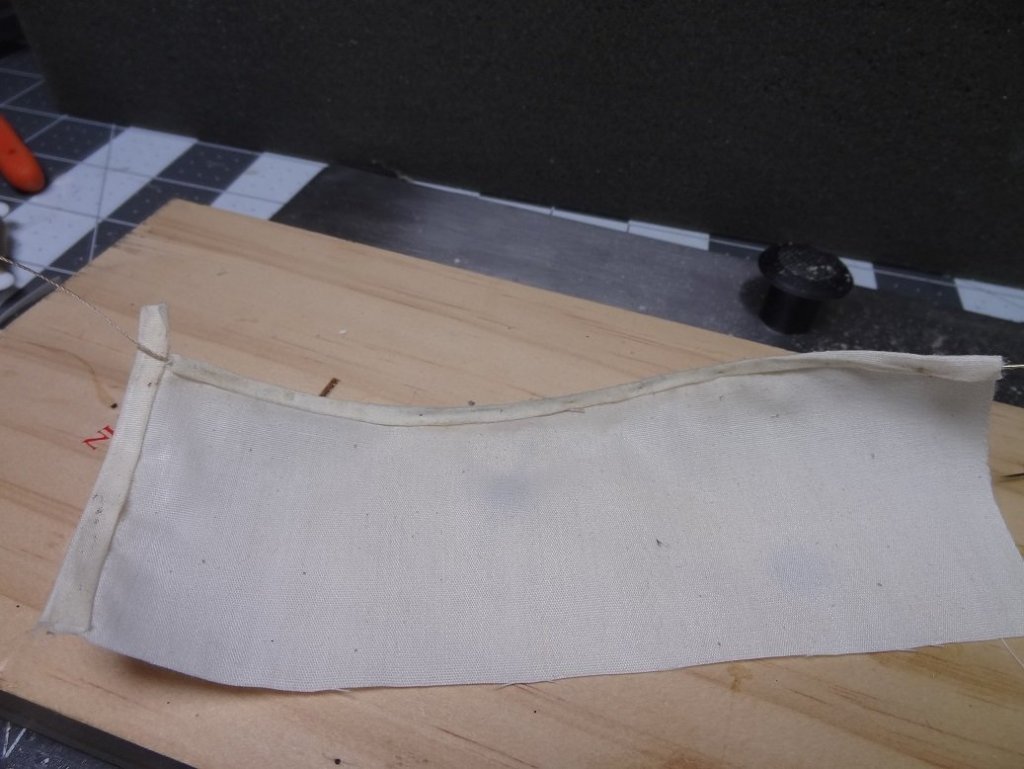
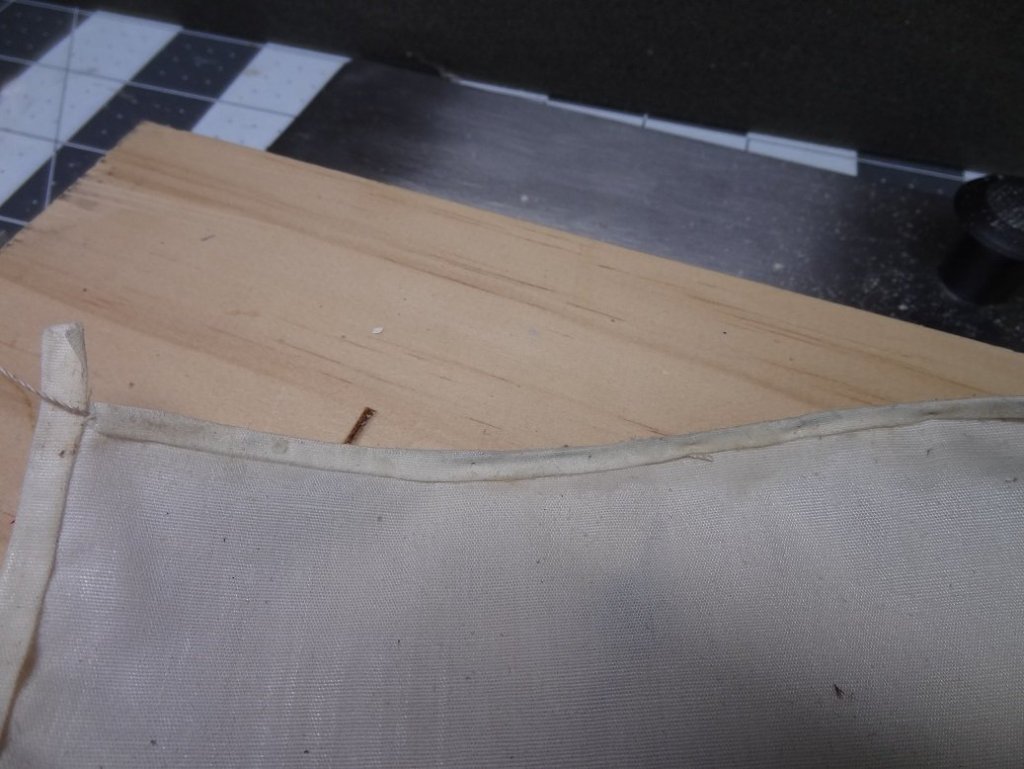
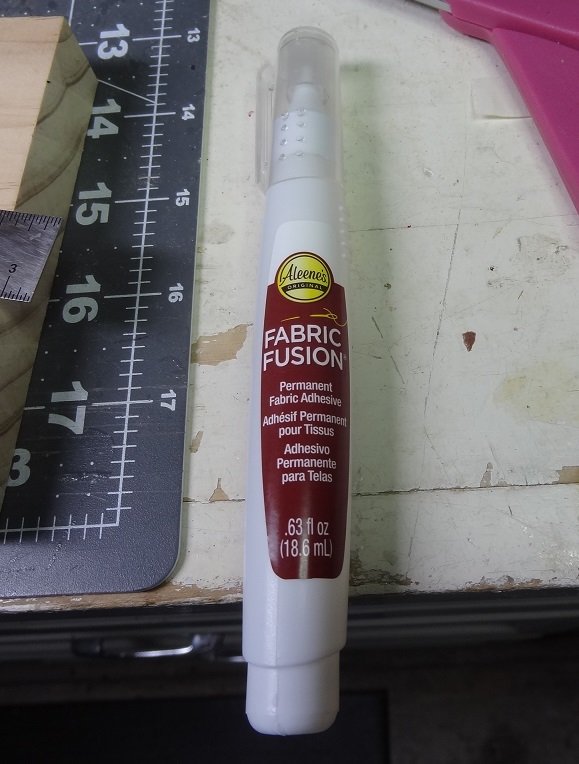
While accumulating enough guts to get out the sewing machine and make a complete fool of myself I tried this prototype with no sewing. I did a double fold at the edge - fold once, iron, fold again, iron. The hem measures about 1/8", about as small as I could easily do without some sort of edge to help with the fold. I figured messing with a full size iron would be problematic so I used the plank bender instead. Not as much control over heat, steam, etc. but who cares. The sails I am replacing have rope and/or wire in the hem so I tried to duplicate that. I guess I need to find a way to straighten the wire. It was a little curved from being on a roll and did not want to stay under the hem. I have some very thin brass rod I might try if I can't get the wire straight. So I started the first fold at one end of the material, ironed that, folded a little more, ironed that and worked my way to the other end. Sprayed a little starch on it then ironed again. Did the second fold and followed the same process. Then I took my rope and wire and stuffed that into the hem and did my best to push it all the way into the fold at the back. I used a bead of fabric adhesive in the hem and held that for a count of 60. Then took some straight pins and stuck those thru the hem just to keep the wire from coming out while it dried. This particular adhesive dries like glue. Others are activated by heat so you would need to iron everything while it's all still loose. Doable but easier with an extra set of hands. There's room for improvement but this method does have some potential. From the pix I can see that the hem will need a lot more ironing. On the light colored fabric the adhesive stained a little but I will be dyeing the sails light brown with some walnut crystals so I don't think this is a problem. I'll have to wait until tomorrow to bend the sails around and see how well it all holds up.
-
Thank you Steve. I'm afraid I went the other way. Building when I should have been doing other things. I let a lot of things slide. As far as builds, I'm in the middle of a RC version of Amati Riva Aquarama. Getting things laid out for a 50" RC trimaran. A restoration of a 70 year old build for a family friend. And considering Constructo La Camaret just for something fun & easy. Stay with your Niagara. If I can be of help please let me know.
- 843 replies
-
- 2
-
-
- niagara
- model shipways
- (and 2 more)
-
Maybe clear nail polish? I feel like I need to give sewing a try. This post (method # 2) looks like it wouldn't be too difficult. Sort of looks like something us ship builders would come up with. Pretty smart. I have to give the sewers out there some credit I'll get the hem adhesive ready though.
-
Nice saw Per.
-
Jack - do you do a single fold or double fold for the hem? Just asking because it appears the double will give the hem a nice inside edge that won't fray. Of course that means you have to do the tiny fold over twice but it looks a lot better and there's no trimming required after sewing.
-
I'm in double trouble here. First off, I don't know how to use a sewing machine, although I do own one. I'll have to work that one out on my own. That's what Google is for right? Secondly, for the restoration project I am working on I have decided it needs new sails. Looking at the current sails, they have a a very thin hem <1/8" all the way around and inside most of the hems is either a rope or piece of wire. So I am looking for suggestions for sewing this tiny hem. Google has a few options but I thought I ask here since I know I can't be the only person that has had to do this.
-
Still unable to find my sail material so I picked some up at a fabric store today. Got a broadcloth which is closer to the original material. The broadcloth is a very tight weave, very smooth vs the courser weave I had before. I took a sail into the store and of course all the ladies in line to get fabric cut are asking what I'm up to. From their feedback it sounds like the tiny hems are going to give me fits. I've Googled a few ways to do it but it ain't going to be easy. Even after I learn how to use a sewing machine If anyone has any suggestions, I'm all ears.
-
Heck Tom - for that matter you could cut the rail off the top of the timberheads. A jewelers or fret saw would work. Even if you break a few timberheads trying. I know I broke every one on my build. Some more than once. Some I glued back, some I made new ones and glued back. It's totally your call, but if it was me I'd take the rail off, one way or the other.