HOLIDAY DONATION DRIVE - SUPPORT MSW - DO YOUR PART TO KEEP THIS GREAT FORUM GOING! (Only 24 donations so far out of 49,000 members - C'mon guys!)
×


mikiek
-
Posts
2,276 -
Joined
-
Last visited
Content Type
Profiles
Forums
Gallery
Events
Everything posted by mikiek
-
 I did finish up the first band and began on the second. Then decided I better lay some planks on the other side. Very strange, for some reason the CA wasn't setting. I literally held down on one frame for 5 minutes. Lifted my thumb up and the stick popped right up. Reapplied the CA held it down for a while let go and it popped again. Arrow just about went airborne at that point so I'm calling it a night.
 -
I'll give it a shot. Tamiya tape has always been the best IMO. You may already know about this - one solution for seepage is to paint the tape edge with Tamiya clear paint. It seals up that "joint". This has been a great help for me.
- 129 replies
-
- 3
-

-
- finished
- model shipways
- (and 1 more)
-
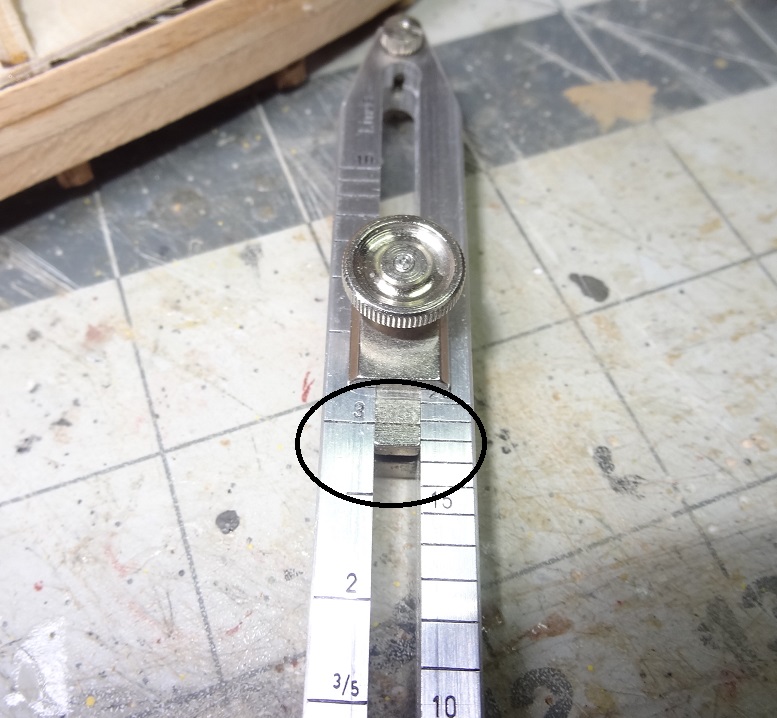
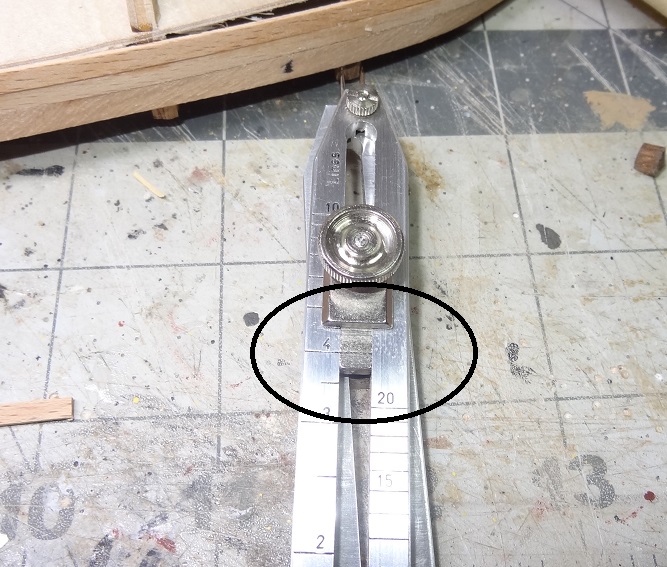
Mark - everyone has their own process for planking, this is just one more. I'm sure there are situations where the dividers may not be helpful but so far they have been a real blessing for me. Right on Per! Many of the cheaper dividers are plastic with no real points on the ends. Mine are made by Alvin and are machined aluminum. When I bought them they were $65 now they are $125. But I would still pay that for them. Dividers can also be useful for transferring measurements from plans to wood. They are also used to scale things up or down.
-
Looking good Mike. What is new about the Tamiya tape, other than the color? I've used it for quite a while and it used to be yellowish.
- 129 replies
-
- 2
-
-
- finished
- model shipways
- (and 1 more)
-
Per - thanks for the feedback. I'm glad it made sense. One thing I forgot to say, the kit supplied planks for the first layer are too short. They don't reach from stern to bow. I had to start/stop them at the first frame piece on each end. I don't think that will matter. The second layer planks are longer.
-
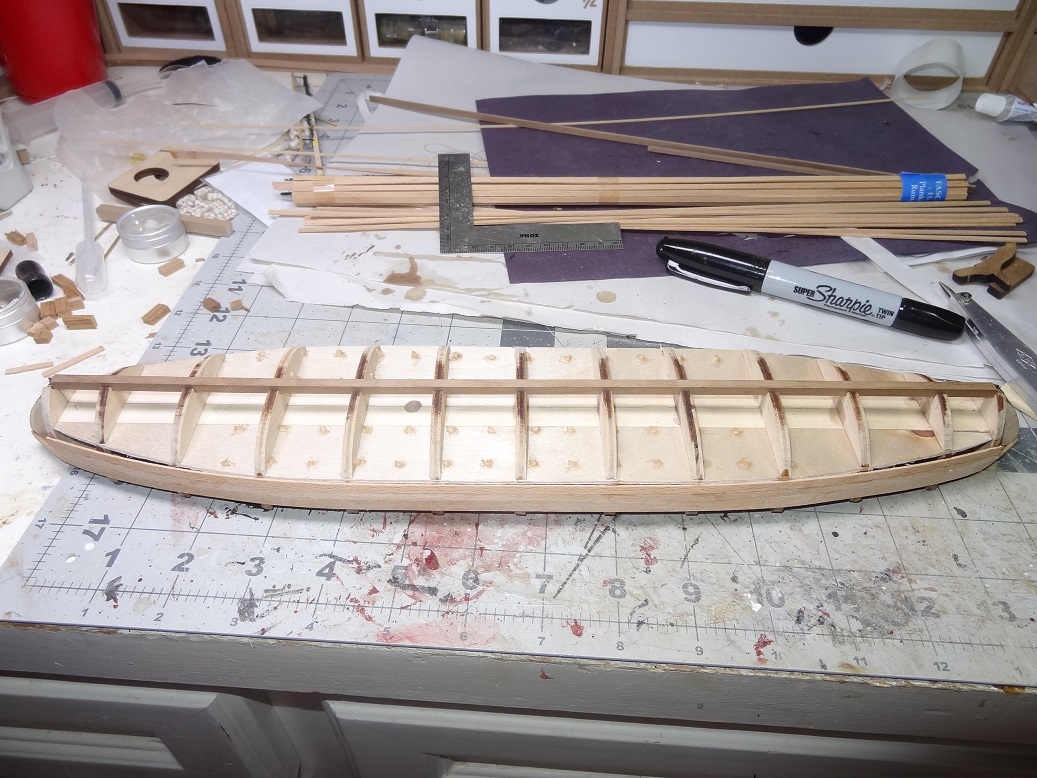
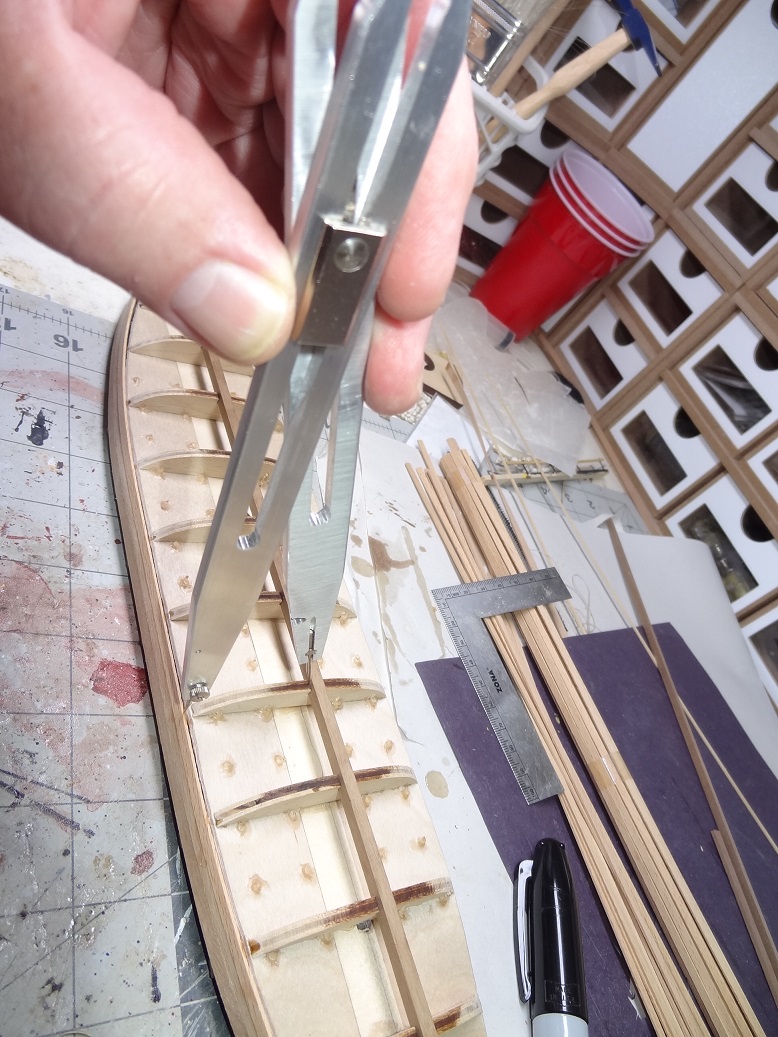
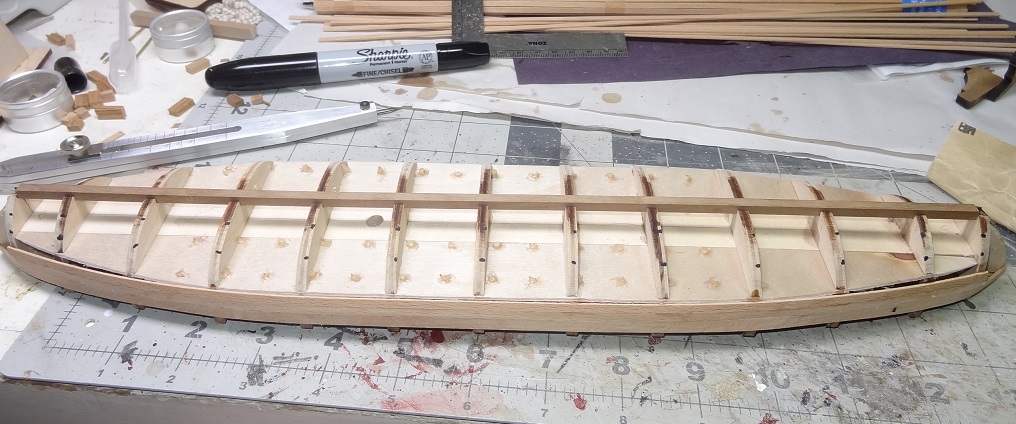
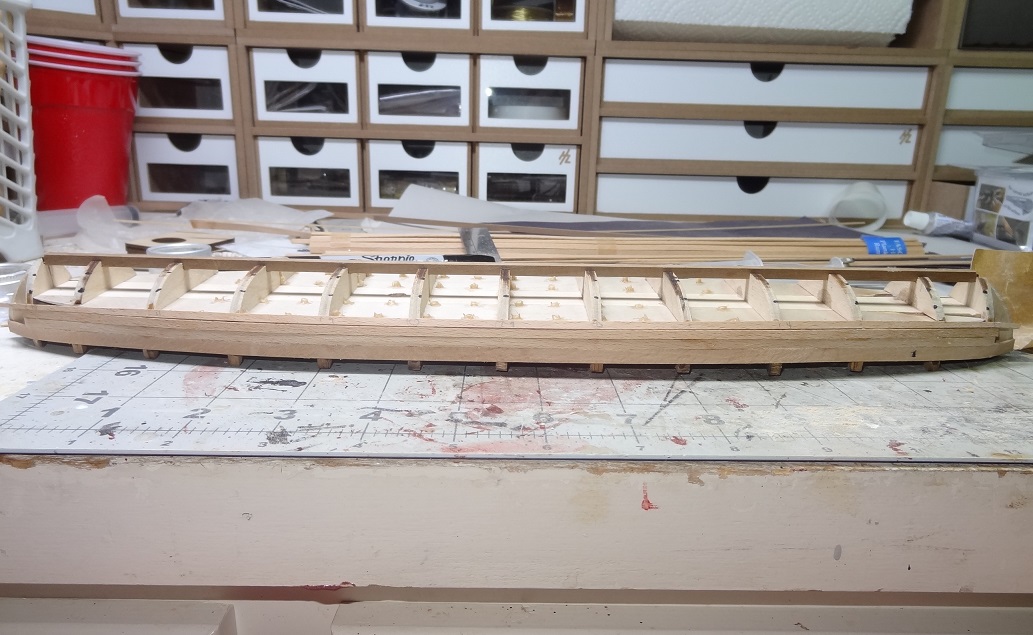
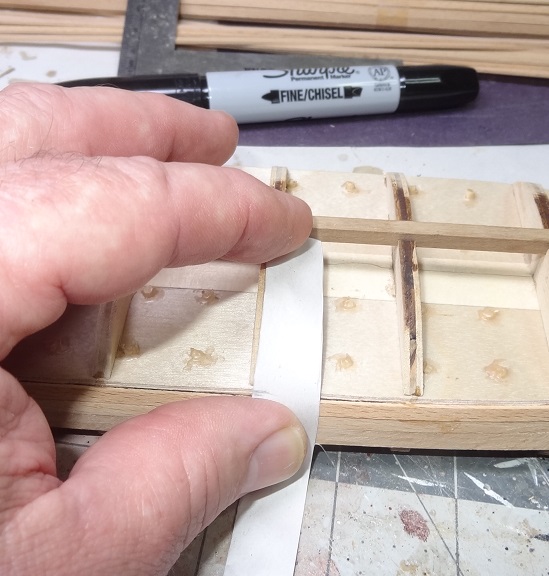
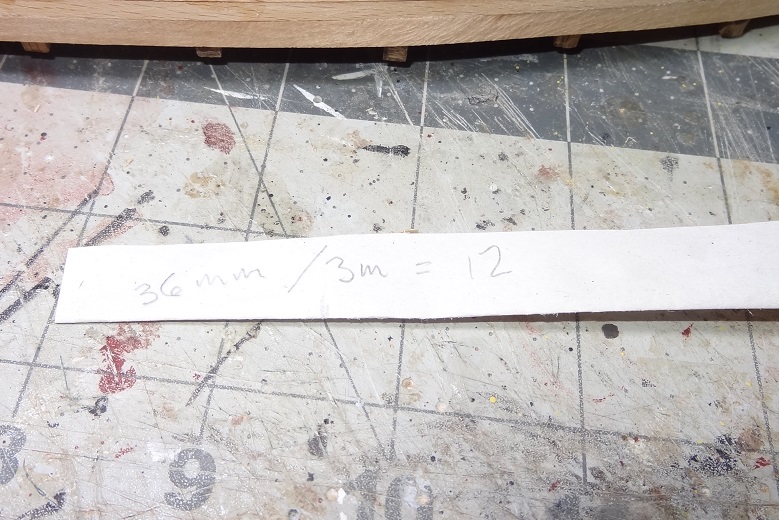
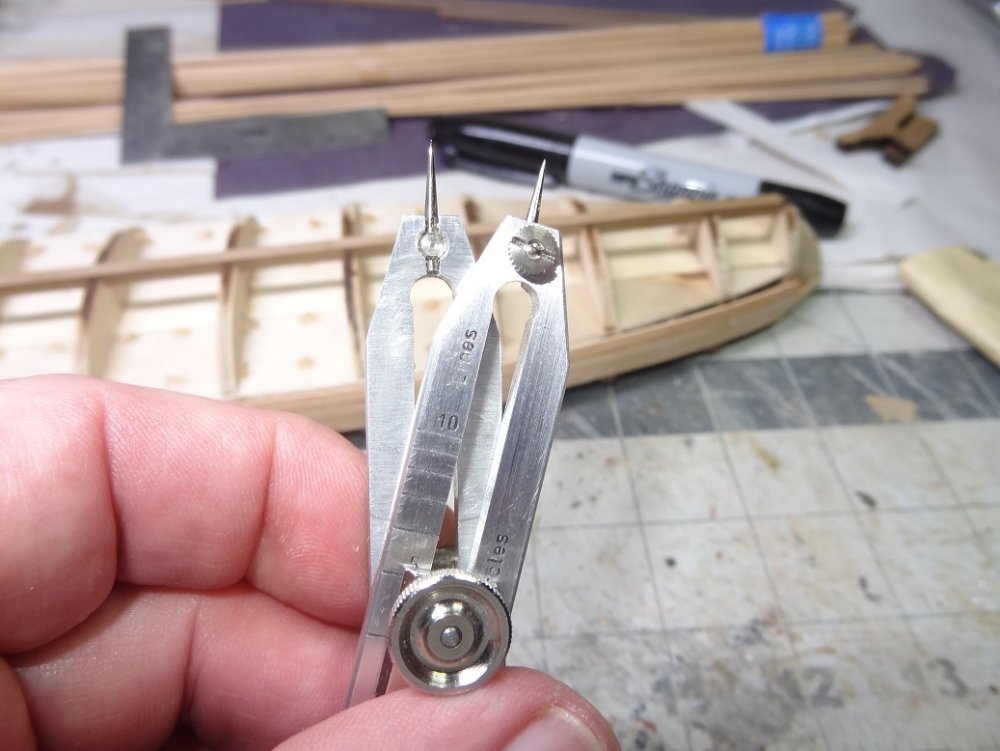
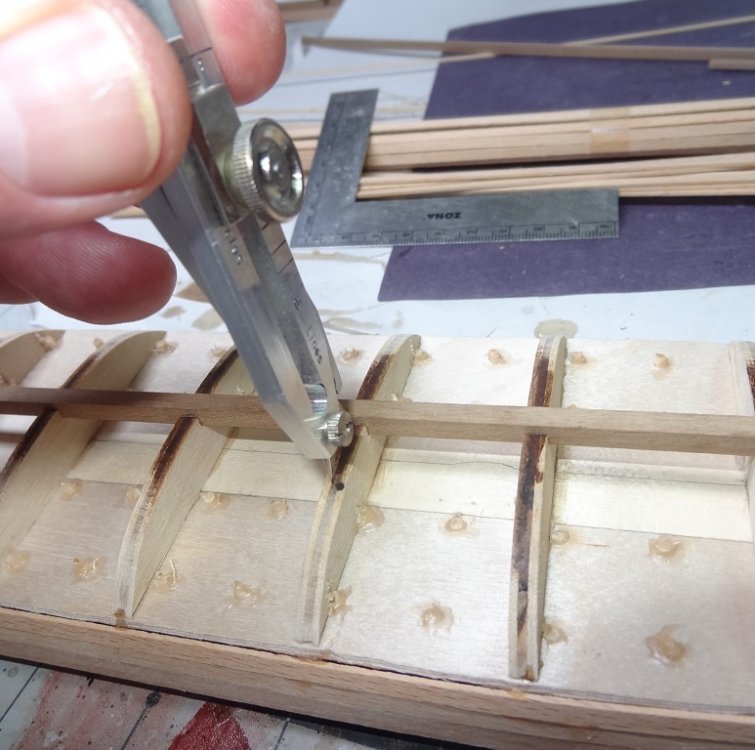
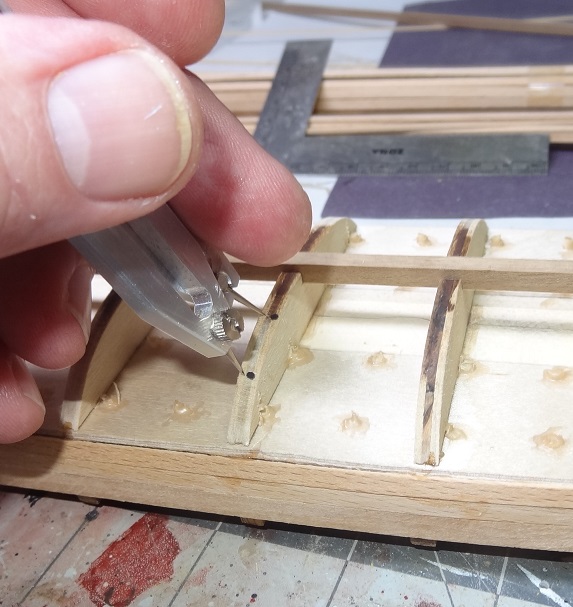
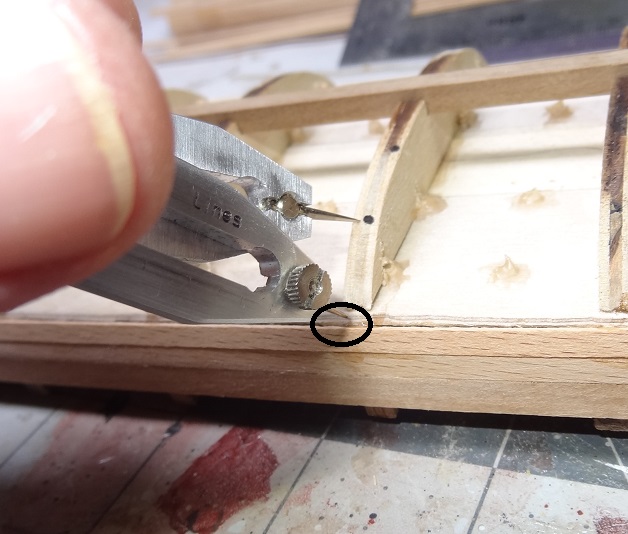
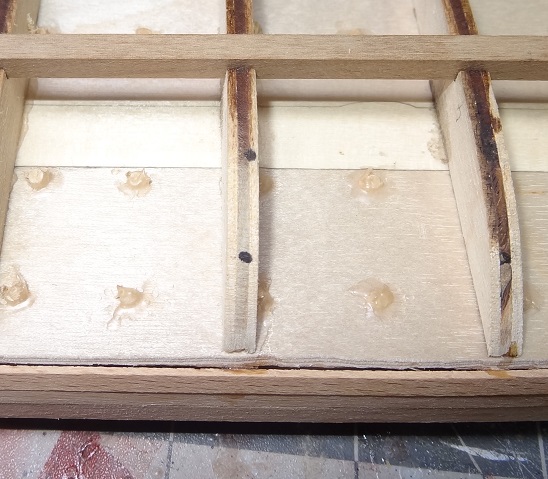
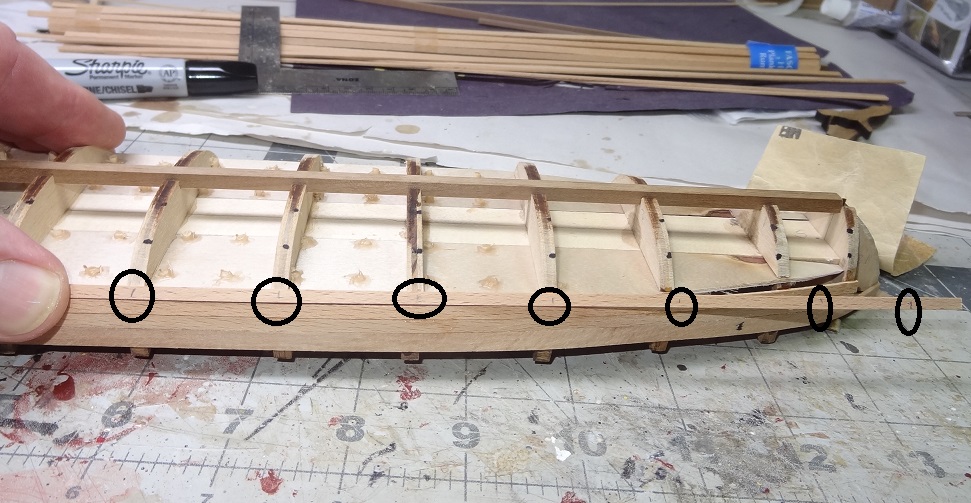
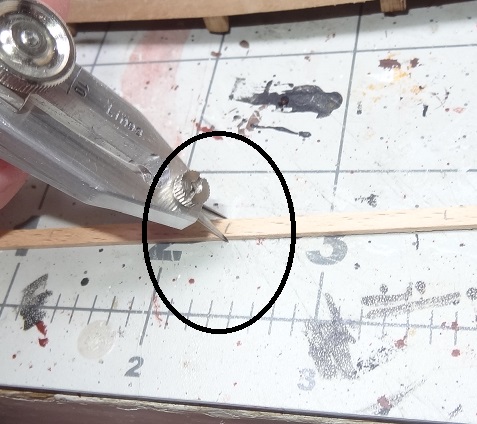
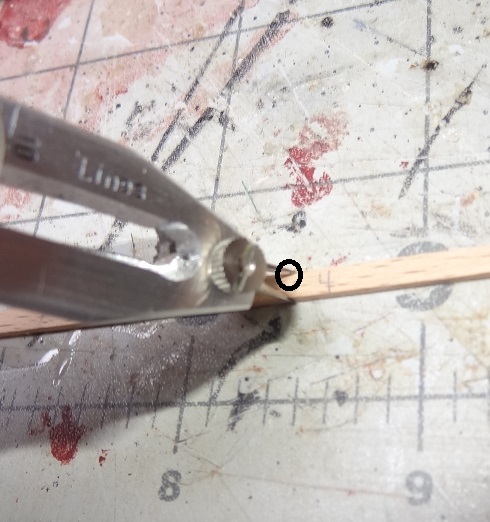
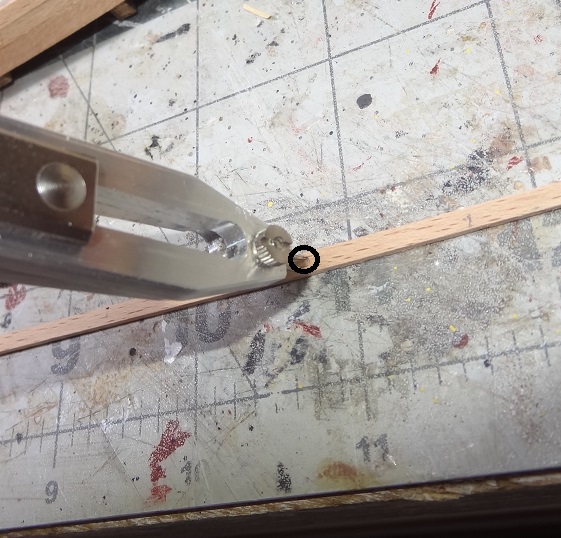
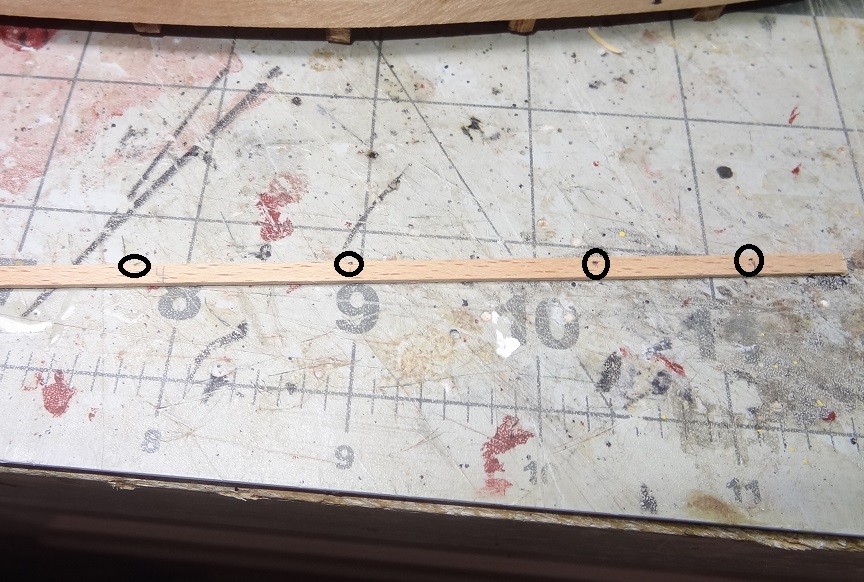
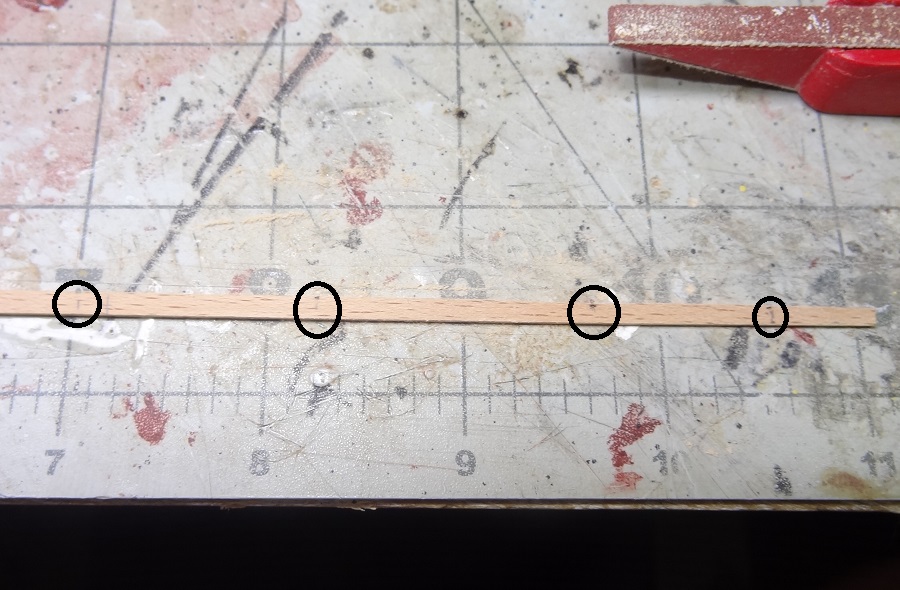
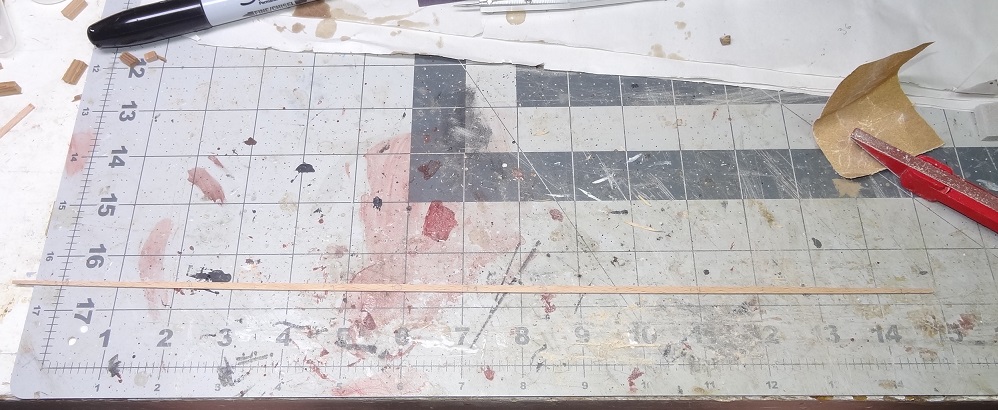
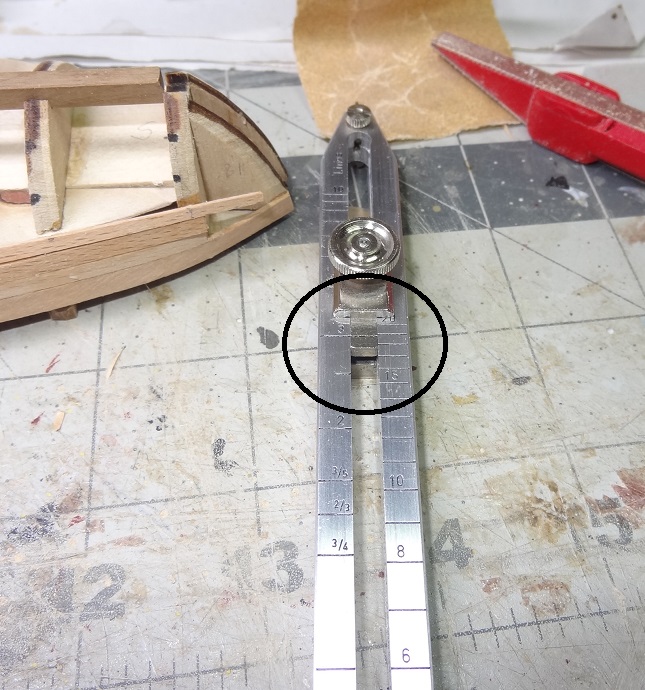
Trying to spread my efforts across all my projects - so it's time for Arrow. I decided it was safe to begin hull planking. The kit has wood for 2 plankings. As Niagara was a single planking this is my first build with 2. Honestly, I still don't see the need - just do it right the first time . To each his own. I will do the 2 layers just for the experience this time. So hull planking - time to break out the proportional dividers! There's an ongoing thread about these in one of the forums. Some like them. Some don't. I wouldn't plank without them. I decided to do another how-to so this post will be rather long. Hope it helps (or converts) someone. Arrow is a very easy hull, almost flat bottomed with a simple bow & stern. I had already glued the wider wale plank at deck level and done 2 strakes below that when I realized (or woke up) I would need to thin down the ends of the strakes. There is no real planking plan with this kit, so I had to calculate the bands on my own. At the frame piece with the longest distance between the keel and the last hull strake, I laid a strip of paper to determine that distance. As luck would have it, that distance was 36mm and the planking sticks are 3mm wide - perfect! That's 12 planks to complete the side. I decided to break up the distance into 3 bands. Here's where it gets cool. Not sure what the part on the dividers is called but I set it to 3 (for 3 bands). Then with the long end of the dividers span the distance between the keel edge and the strake edge. The short end of the dividers is 1/3 of that span. Using the short end, you walk the dividers over that same span and make a mark at each step. Yes there is a slight space after the last step. Nothing done wrong, it's just the fact that I am doing a linear measurement on a curved surface. This is not a big enough discrepancy to worry about. You'll see why in a minute. So here are the band marks for this frame. From here it's just repetition. Move to next frame, measure the full distance, then make the marks for the bands. Lather, rinse, repeat. Usually you will find that the frames in the middle have the same span. As you move to the bow or stern the measurement will get smaller. Don't skip any frames - do them all. Now get your plank, lay it where you will be gluing it and mark where it contacts each frame. Now it's time to focus on a band. I'll do the one next to the existing strakes. If you remember the original calculation was 12 strakes / 3 bands = 4 strakes per band. So set the dividers to 4. With the long end, measure the span between the band mark and the edge of the last strake. This is the total width of the band. The short end of the dividers is that span divided by 4 (4 strakes in the band). I started on one of the middle frame pieces - the widest overall span. On this frame the strake should be full width (3mm) and by golly that's what the dividers tell me. So there is no width adjustment needed on the strake where it crosses this frame. Continue this pattern, measure the band width on the frame, put the short end of the dividers across the plank and eventually you will hit the point where the distance on the short end is less than the width of the plank. I just stab the divider pin into the plank to make a mark. NOTE: some of the cheaper dividers don't have pins on the ends. I would recommend getting some with pins if you can. Here's the plank afterwards. From the holes upwards will need to be removed. You can cut with a knife or just file/sand. I'm almost done here. I've sanded the plank edge down to the holes. I left the holes just for demonstration. The trick is to sand the edge until the holes just disappear. Your plank will be the correct width at that point. The finished strake. At this point if you were doing short planks to make up a strake you could cut them now. Since this is a first planking I will not. I glue the strake 2 or more frames at a time. PVA along the long edge of the plank with CA at the frames. Be careful not to get them mixed - they don't play well together. Of course you can glue them any way you want. So much for that strake. 3 strakes left in the band. For the next strake you go thru the same process except this time (and subsequent times) the span to measure will be the from the edge of the strake you just laid to the band mark AND before you start set the dividers to 3 since you have 3 strakes left. When done with this strake repeat again after setting the dividers to 2. The beauty of this is that it doesn't matter if you screw up a strake - maybe a little too wide or narrow. Since you remeasure the remaining span after laying a strake the dividers will correct any errors. I hope this makes sense. Once you do a few repetitions, hopefully you will see the pattern and understand the process. Essentially you are measuring some distance and letting the dividers divide that measurement into however many portions they are set to. The nice thing is you don't really care what that span measurement is. You just let the dividers do their thing. Whew - good night all.....


- 138 replies
-
- 15
-
-
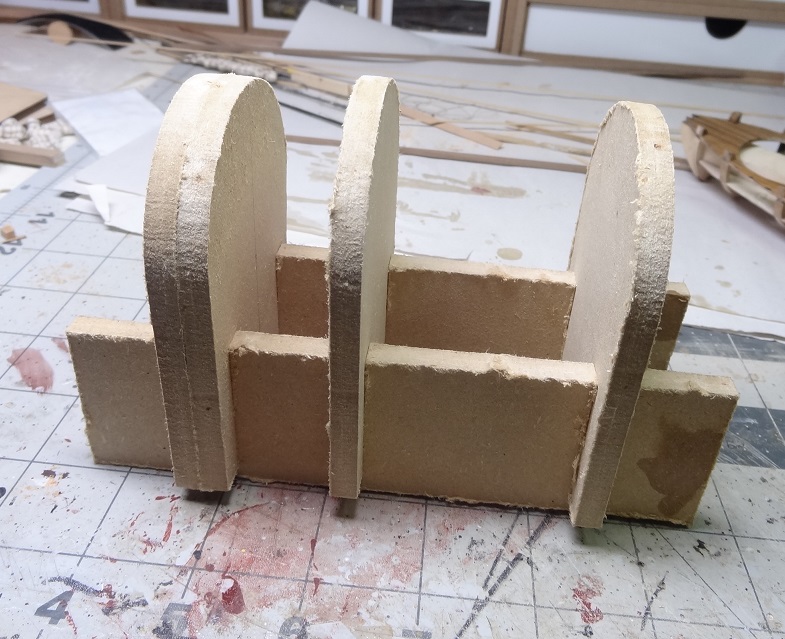
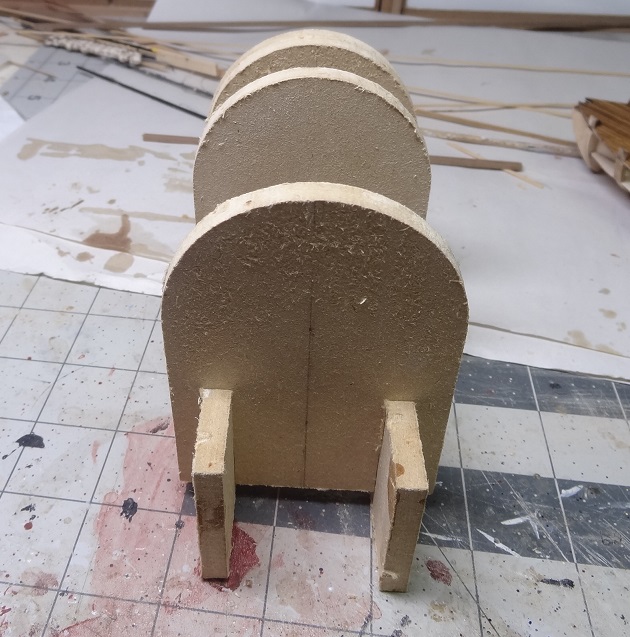
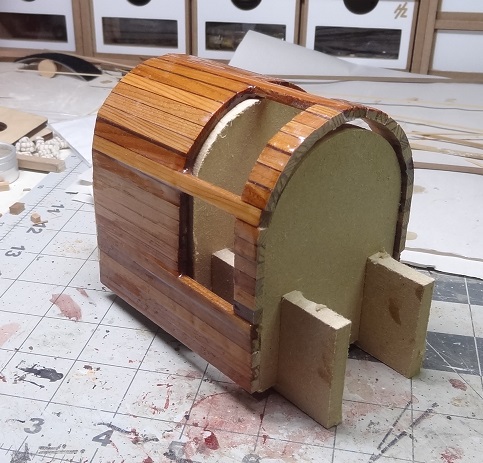
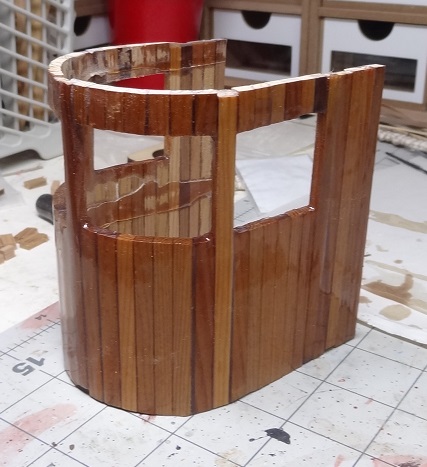
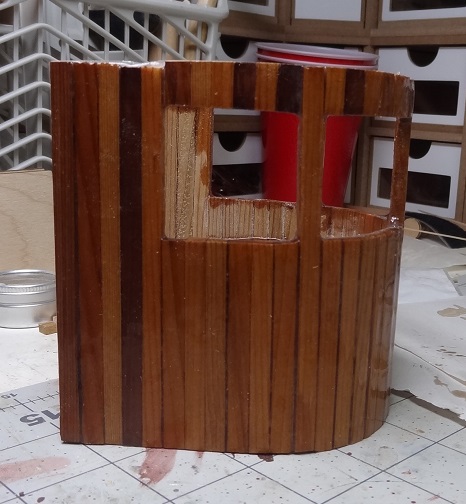
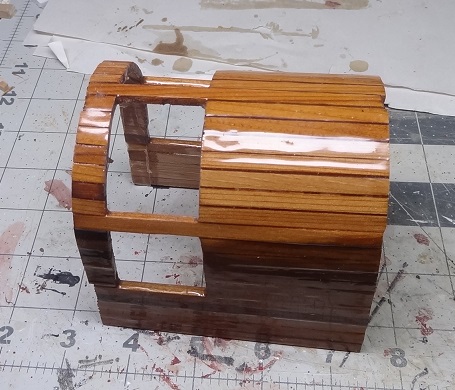
This was an interesting bit of work. The tug is my second kit from Tippiecanoe. Both have been top quality materials, so I was a little surprised to find some pressboard parts in this kit. Turns out they were kind of a mold for some cedar strakes that make up the wheel house. An interesting process. I apologize for not having pix from each step - it got a little frustrating and I forgot. What you see here is a "re-enactment" The idea here is to lay the 3/16"x1/8" strips on the edges of the mold, then clear coat the exterior with epoxy. First some packing tape is placed on the edges of the 3 rounded pieces. Epoxy doesn't stick to this (a nice trick). On top of that some double sided tape is applied. Next the cedar strakes are cut and laid onto the tape which holds them in place - sort of. There are some small 1/2" strakes that didn't stick very well and kept falling off. It took a while to get everything into place. Next some epoxy is mixed up. No thickener this time, just raw epoxy - what I have been calling clear coat and you will see why in the pix. Of course laying square sticks side by side on a rounded surface leaves gaps. So the epoxy is applied thick - without the thickener this epoxy is about the consistency of honey so it wicks into the gaps and is also self leveling. When it dries it is quite strong and hard as a rock With a little bit of wiggling the pieces of the mold came out. You can see here that some epoxy did get all the way to the mold. Sure enough they did not get glued to the strakes. I am amazed with the tricks that Will (Tippiecanoe owner & designer) comes up with. There's another cool one in the next set of steps. How bout that shine? Looks as good as varnish. All the gaps filled and the surface is as slick as can be. Wanna guess where it's going to go?
- 96 replies
-
- 5
-
-
- tugboat
- Tippecanoe Boats
- (and 2 more)
-
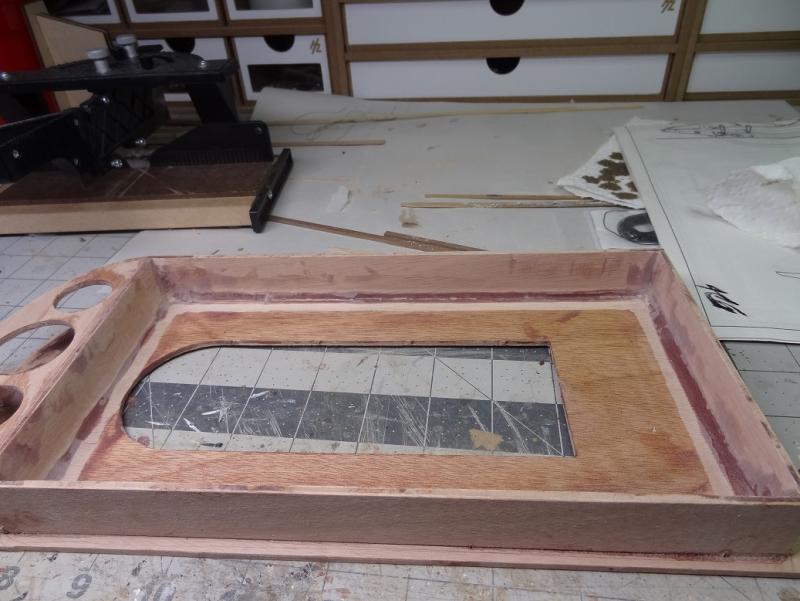
Bob - I'm hoping the hull rides high enough that it won't take too water onto the deck. That structure on top of the coaming is all that keeps water out. Per - that was the one thing I could not figure out from the instructions. I tried a sheet of plastic (trimmed to hatch size) with electrical tape - that didn't work very well. Then I got some of their 2" Hatch Tape. One piece covers the rudder hatch. Two pieces cover the main hatch - one edge over the other. No plastic. It worked pretty well last weekend.
- 96 replies
-
- 2
-
-
- tugboat
- Tippecanoe Boats
- (and 2 more)
-
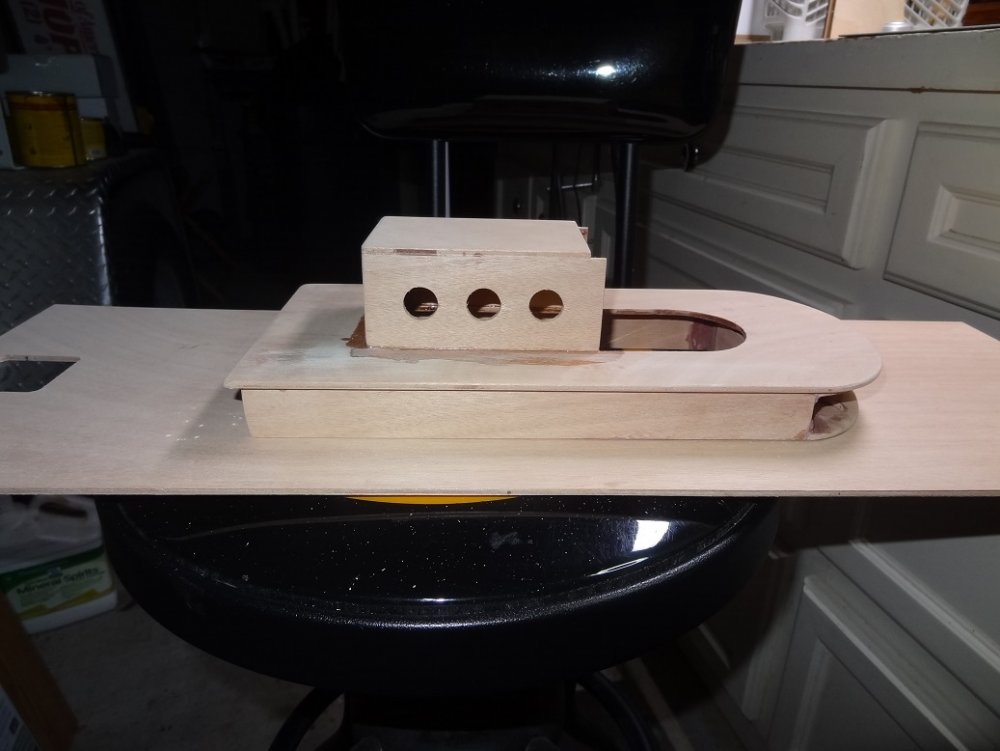
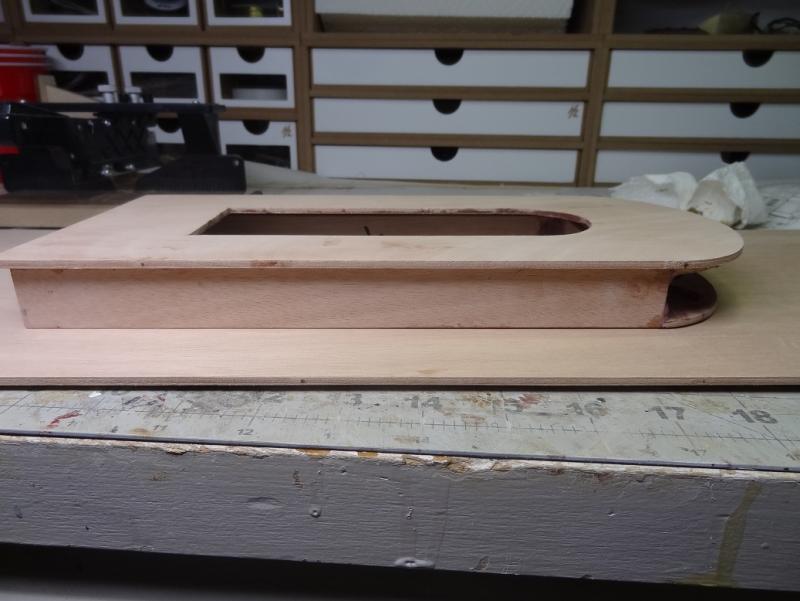
The belt sander strikes again! Gluing the upper deck to the lower cabin structure. Needed a small fillet on the inside. The catch? Too much epoxy at the joint will keep the cabin from sliding down completely over the coaming. As usual I ended up with too much residual on my surfaces. The sander made short work of it - probably would have taken 30 minutes by hand. Cabin and coaming Cabin over coaming

- 96 replies
-
- 6
-
-
- tugboat
- Tippecanoe Boats
- (and 2 more)
-
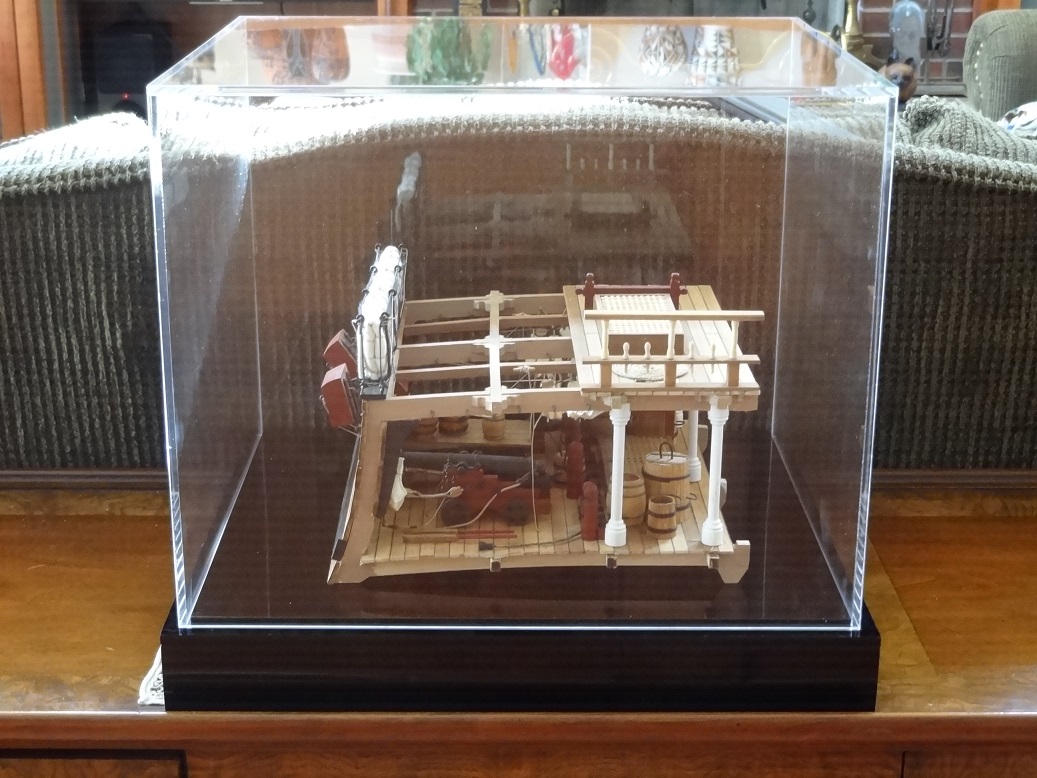
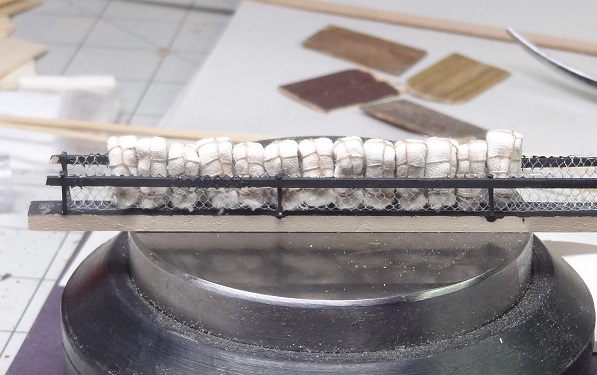
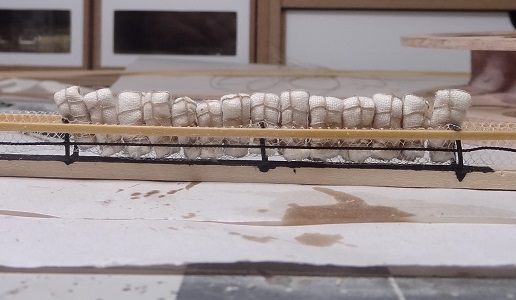
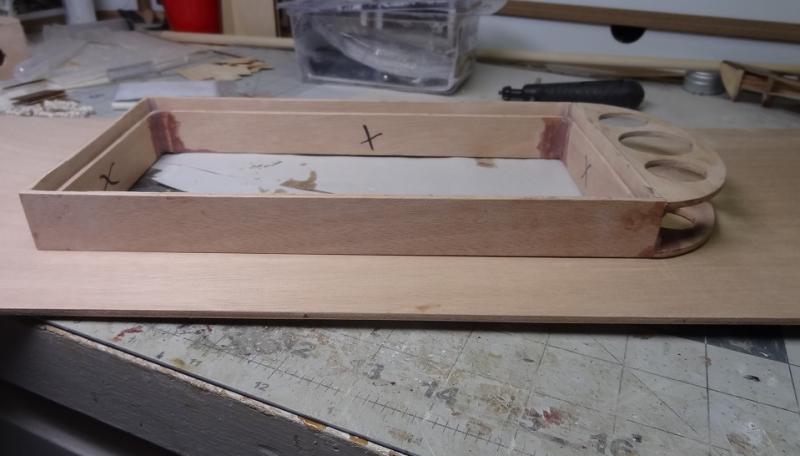
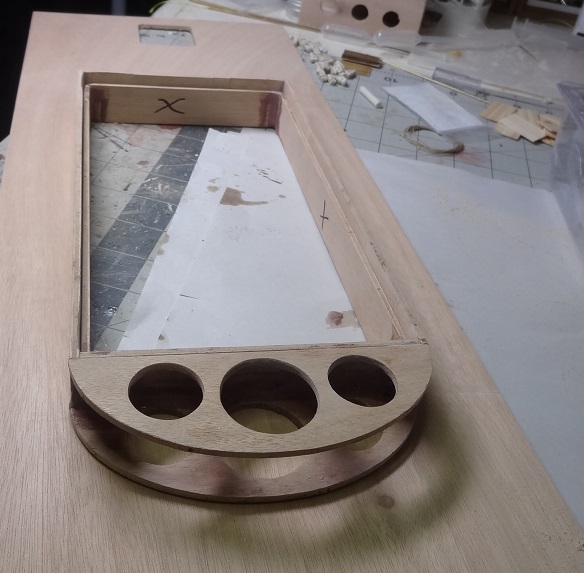
A few hammock prototypes, mostly just differences in the color of things. Would appreciate comments on the netting. OK? Too thin? I'm leaning towards this The hammocks will be more in line for the final product. I'll be aligning them and gluing them in place.
- 843 replies
-
- 4
-
-
- niagara
- model shipways
- (and 2 more)
-
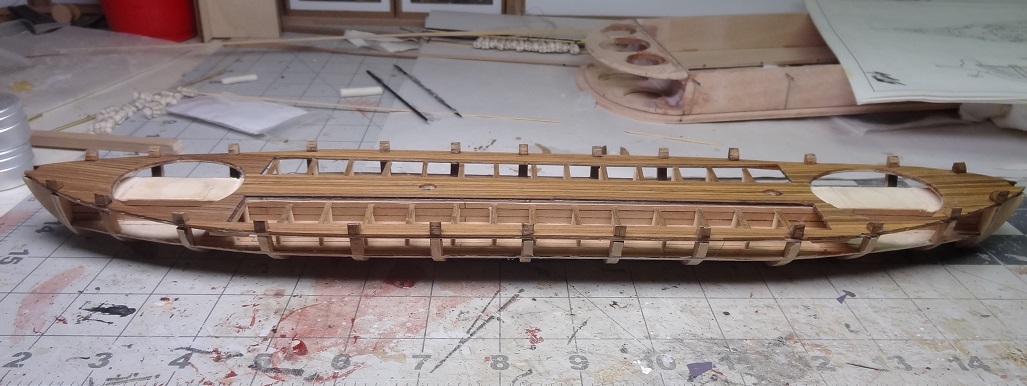
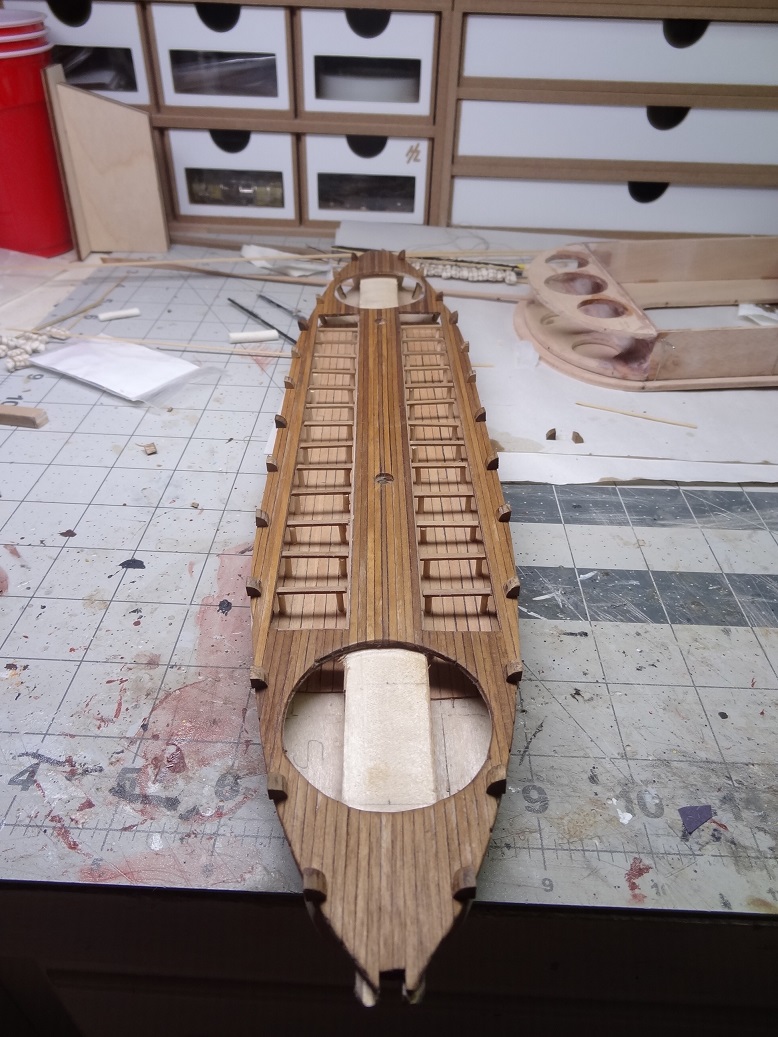
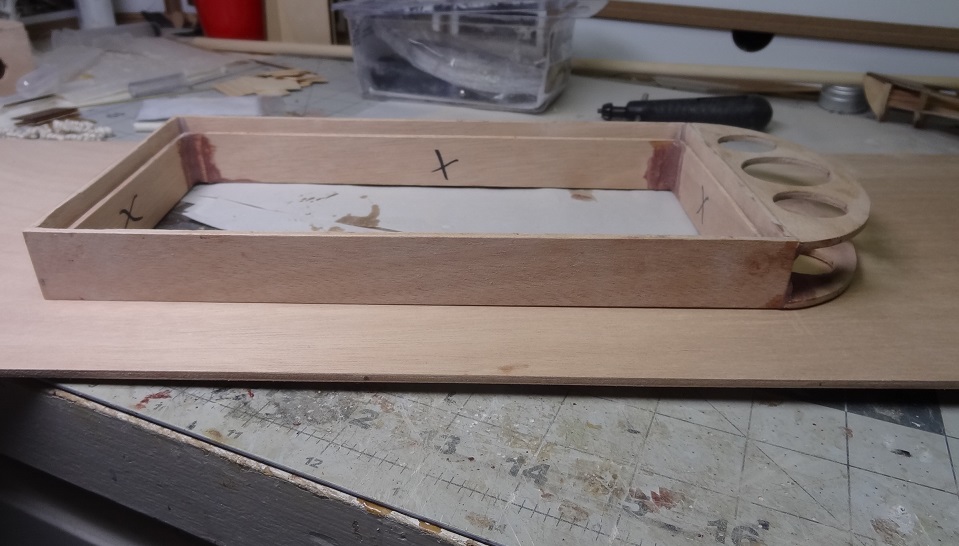
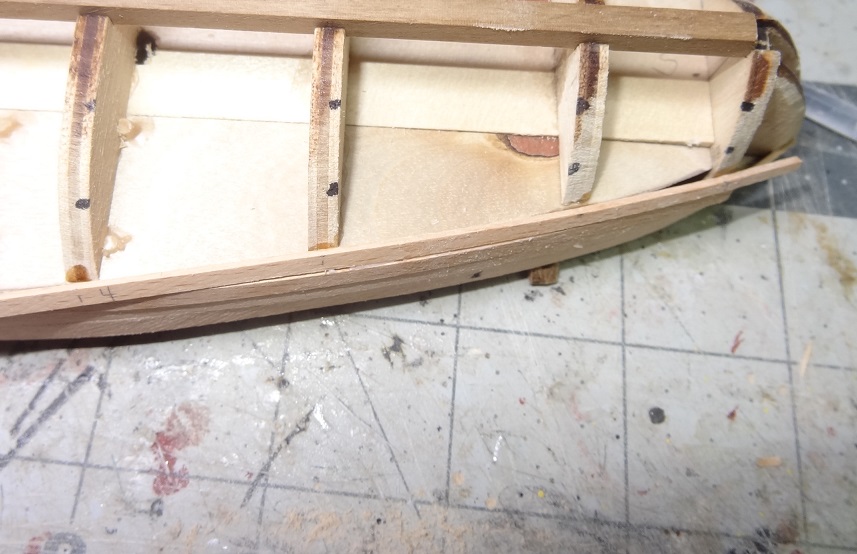
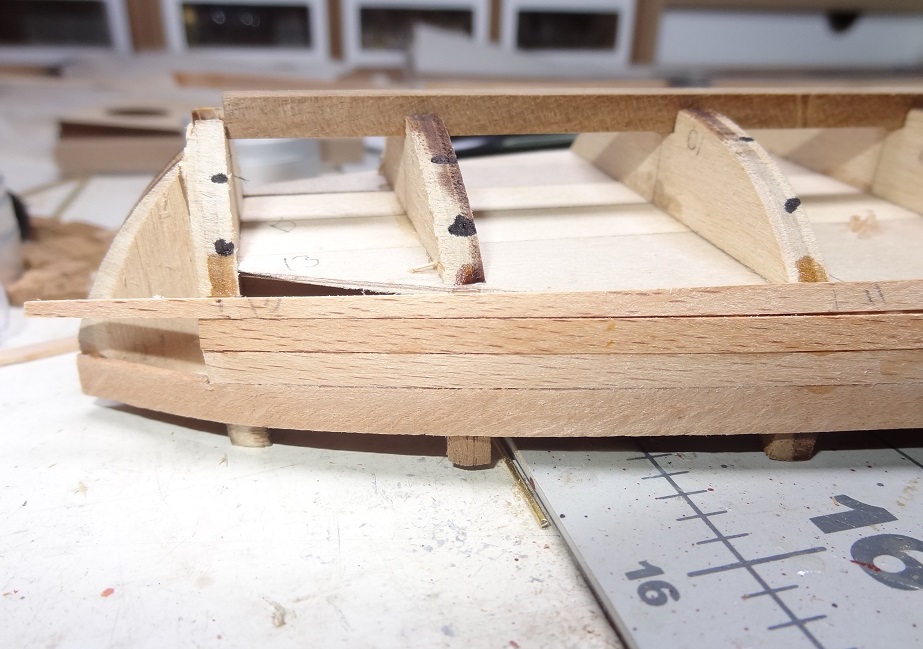
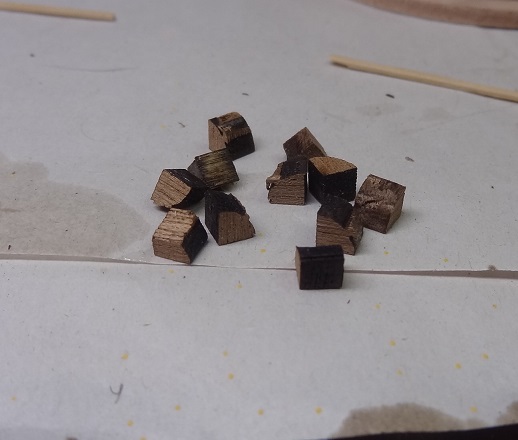
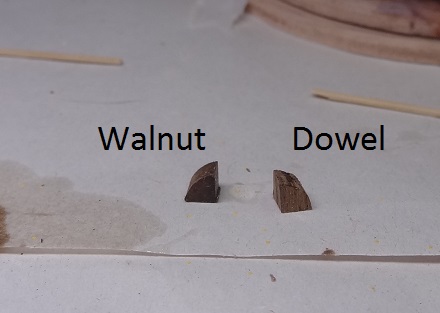
I got after the frame tips this weekend. I destroyed several of them while trying to get them out of the laser cut sheet. They're too small and the sheet is too thick.. My plan for replacement was to use a dowel the same diameter as the parts when they are in the sheet. Then on the table saw, rip a piece of the dowel in half, rotate 90 degrees and rip again giving quarters. Then take those and slice to the proper thickness. They pieces came out OK. Given that I had the saw out anyway I used it to cut the remaining laser cut pieces out. As you may notice - a lot of char around the edge. Sanding that off was not easy. Seems like walnut is always harder to get the char off. My replacement pieces were too light colored (not sure what wood it was) so I stained them. When I had enough pieces I glued them to the upper deck - doing a better job of lining them up this time. Note to future builders - do this as late as possible! I started in on my next task, the bench seats, and have already knocked off quite a few of the frame parts.


-
Looks like there was a little celebration? Besides the nail at the bottom, is there any other fastener? That's a good pic of the trim at the wale. You did a good job of fixing that paper trim to the boat.
- 335 replies
-
- 3
-
-
- 18th century longboat
- Finished
- (and 1 more)
-
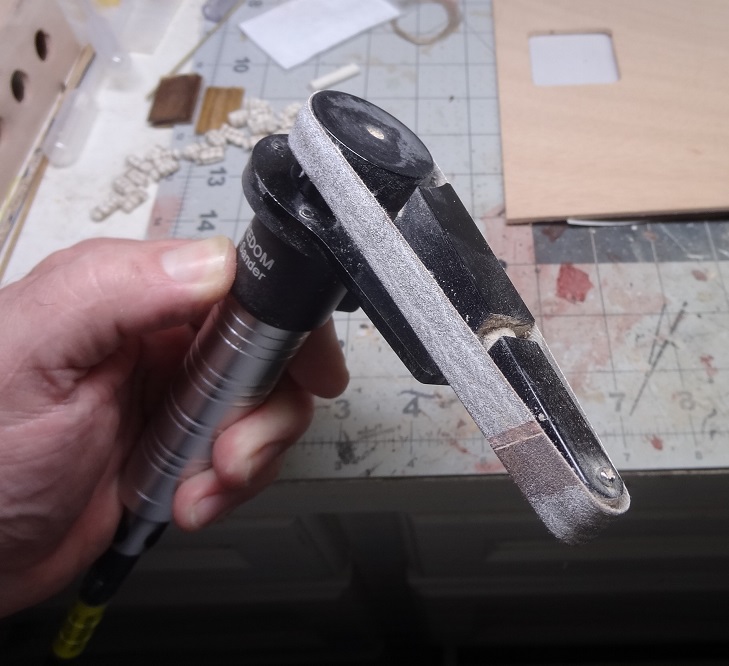
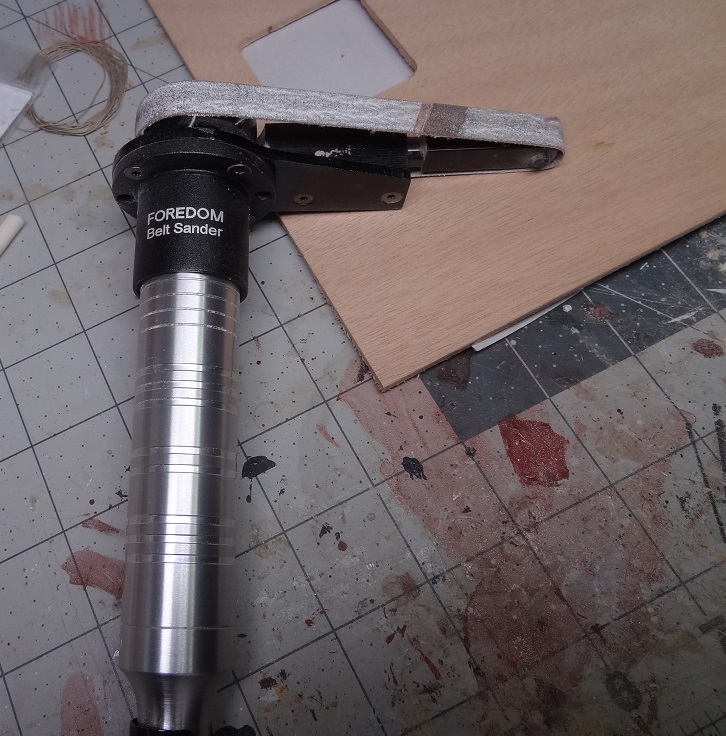
I posted a few pix of this in my tugboat build log but I thought it might get a few more eyes over here. The Foredom belt sander is an attachment for a flex shaft tool. I have a Foredom but it may fit on others as well. I tried it out on the tug - I had some epoxy I needed to remove from a frame. Took it off in a matter of seconds. This frame fits (or is supposed to fit) around a coaming in the deck. I'd been hand sanding these parts trying to get them to fit. Between the epoxy and a poor glue job (my fault) it needed a lot of work. Again, the sander thinned up the frame in seconds. Problem solved. The long narrow shape would be great for getting into places a regular (or even miniature) belt sander just wouldn't go. And of course with the foot switch for speed, you've got a lot of options. I was afraid the belts would get used up quickly, but even after the rock hard epoxy it is still ready for more. In my book, this one is a winner.

-
- 8
-
-
Wow Per, didn't know you were building this. Looks like you are nearing completion. This is a great kit. A lot more to it than meets the eye at first glance.
- 335 replies
-
- 1
-
-
- 18th century longboat
- Finished
- (and 1 more)
-
You're right about that Per. It would have gone right through that wood in a few more seconds. I probably should have used a practice piece first. On the bright side, the coaming won't be seen so a little bit of uneveness shouldn't matter. I had never seen the attachment either. I found it on a woodworking site. It kinda looked like one of those tools that would either be incredibly useful or absolutely useless. Given that it had the Foredom name on it, I was willing to take the chance.
- 96 replies
-
- 3
-
-
- tugboat
- Tippecanoe Boats
- (and 2 more)
-
Common blocks & the like for 1:64 scale ships
mikiek replied to FlounderFillet5's topic in Masting, rigging and sails
Max - try going to the Model Expo site. Most of their kits are 1:64. If you drill down to the kit pages you can actually download the materials list for some of the models. That would give you sizes and counts. -
Seems like I have been sanding that coaming down forever. Tonight I broke out the big guns. Enough is enough. Fitting the coaming is complete! I picked up this attachment for my flexshaft a few weeks ago. Was wanting to get a small belt sander. MM had one but it was out of stock. I kept searching and came across this. I like the idea much better. Very comfortable to use with good control. Of course with the flexshaft the speed is infinitely adjustable with the foot control. It took off the last of that epoxy fillet in seconds. Just a few seconds more to thin down the coaming strips. Pretty neat! It would take some practice to get good with it. I had to even out some spots with a block sander. But the small tip of the sander could get in some places that a regular belt sander (even a minature one) could never reach. That was a big step tonight. Work on the tug had come to a halt until I could fit the cabin over the coaming.

- 96 replies
-
- 4
-
-
- tugboat
- Tippecanoe Boats
- (and 2 more)
-
I'm with ya Joel - there is an answer but no one knows it. I like the look of the individual hammocks uncovered on the rail. So that's where I'm going. Only 129 more to make. Brian - it might be worth seeing what the captain knows regarding hammocks on the original boat.
- 843 replies
-
- 2
-
-
- niagara
- model shipways
- (and 2 more)
-
Hey Brian. The problem is (at least with the model) that where the shrouds run over the handrail there's only about 1/4" between the rail and the shroud and Darrell says there's even less on the foremast. So even these little guys are pushing it. The stanchions can't be any taller than that.
- 843 replies
-
- 2
-
-
- niagara
- model shipways
- (and 2 more)
-
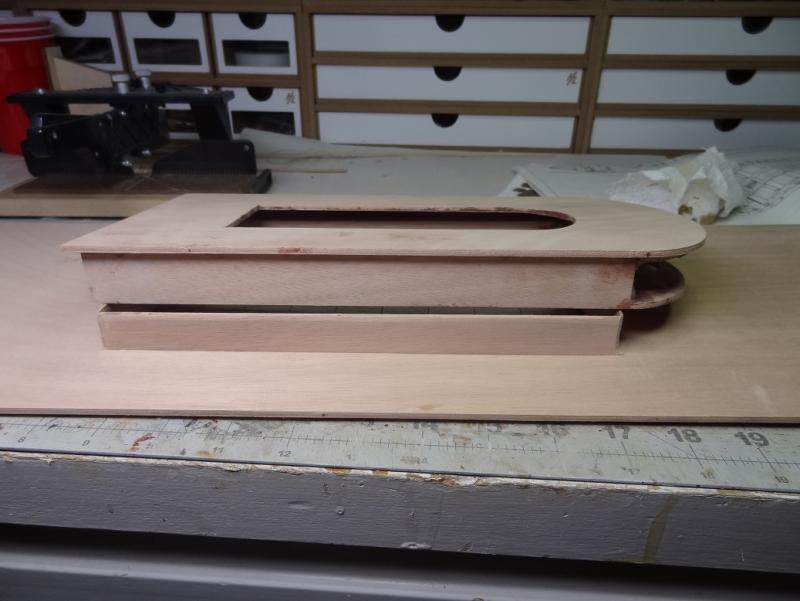
My coaming came out OK - well almost. It sits well in the deck but the lower cabin structure doesn't fit over it. There's still some epoxy from those corner fillets that I wasn't supposed to do. It's sanded down to a thin layer but it looks like I will have to get every bit of it off. Not sure if it will fit even then. It's gonna be close. If it doesn't I guess I either sand down the inside of the cabin structure or the outside of the coaming. I need to lose some material somewhere. I will say that epoxy is impressive as an adhesive. I really stretched that cabin structure to try and fit it over the coaming. I don't think PVA or CA would have held up. With the epoxy it looks like the wood around the joint would break before the joint did. Very strong stuff!
- 96 replies
-
- 3
-
-
- tugboat
- Tippecanoe Boats
- (and 2 more)
-
Bob - it will be interesting not having to depend on a sail.
- 96 replies
-
- 3
-
-
- tugboat
- Tippecanoe Boats
- (and 2 more)
-
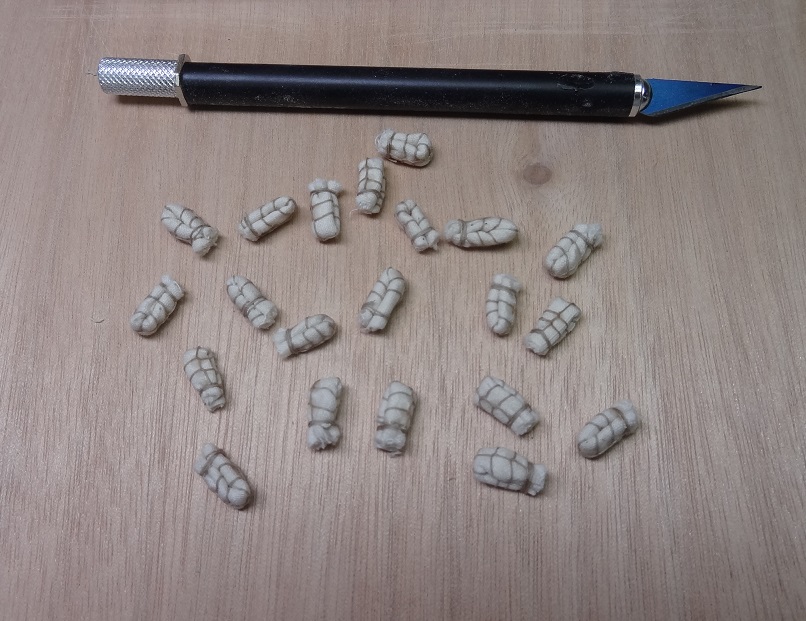
While working on several other builds and sailing a few of them I have been thinking about hammocks. There are several Niagara logs showing nice setups but they just aren't what I'm looking for. In fact if you think about them they may not even make sense. First off, there is no right or wrong because no one knows how they were done on the Great Lakes fleet. Given the short nature of the missions and the fact that there were only 2 decks with the below deck being used for all sorts of storage - maybe they didn't even use hammocks. Assuming they did and they got as dirty and smelly as some describe, I don't think they would be all covered up in a little cocoon unless the weather was bad or waters rough. I think they would leave them uncovered and in the sun whenever possible. I know all that is debatable but it is also plausible particularly in the arena they sailed and fought. I would likely think differently for an ocean going ship. I started rolling hammocks tonight. I'm going to do what I think would be the coolest look. 150 hammocks with real netting in the stanchions. Man, I have really gotten anal about this! Almost as bad as the frapping with the guns. Time to chill and keep rolling hammocks
- 843 replies
-
- 2
-
-
- niagara
- model shipways
- (and 2 more)