HOLIDAY DONATION DRIVE - SUPPORT MSW - DO YOUR PART TO KEEP THIS GREAT FORUM GOING! (Only 13 donations so far - C'mon guys!)
×

Bob Fraser
-
Posts
291 -
Joined
-
Last visited
Content Type
Profiles
Forums
Gallery
Events
Everything posted by Bob Fraser
-
 Hi Bob. Yep, I found the positioning out too, having done the same as yourself with the spacing. I guess it comes down to a half mm here and there, positioning slots being a half mm too wide so the cabin moves a bit. Looks good though. The other thing I found was that each upright was very slightly different and had to be measured with calipers before cutting, and cut slightly over to allow for the slant to be sanded. (I planked the underside of the roof so that's probably why 😀 , also being manufactured more than 16 years ago I guess tolereances weren't so exact and I noticed a slight warp in the deck pieces 😞 ) As everyone here will say, each model is built slightly different, and each builder will make the model their own - you're the captain so have fun building it and most of all don't worry! BTW I like the nails in the stable rail slots - gives them the appearance of strength, something I didn't think of, I've only just noticed them.
 -
Those pesky spiral stairs! 🙂 They've come out well. Mine broke, stair angles wrong, poles not vertical - it just wouldn't go right, so I chucked in the towel and did a straight staircase thats given me a few problems to iron out later on in the build. The deck supports - I had the same misgivings, are they vertical or slanted? Looking at the plans and various photos in the booklet, and as you've pointed out, the distance on deck to the houses, slanted came out the option to go with. One of the full size end on plans shows a slant, at least to my old eyes 🙂 It's all looking good from here!
-
Much better than mine!
-
So sorry to hear about Lucy - we know all too well the feeling of such a loss. The paddles are looking good, good catch with the boards.
- 109 replies
-
- 2
-

-
- Finished
- Artesania Latina
- (and 1 more)
-
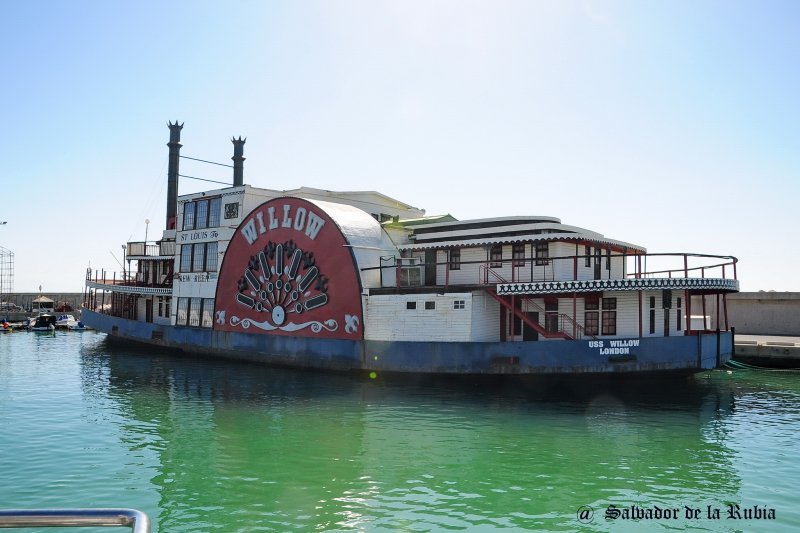
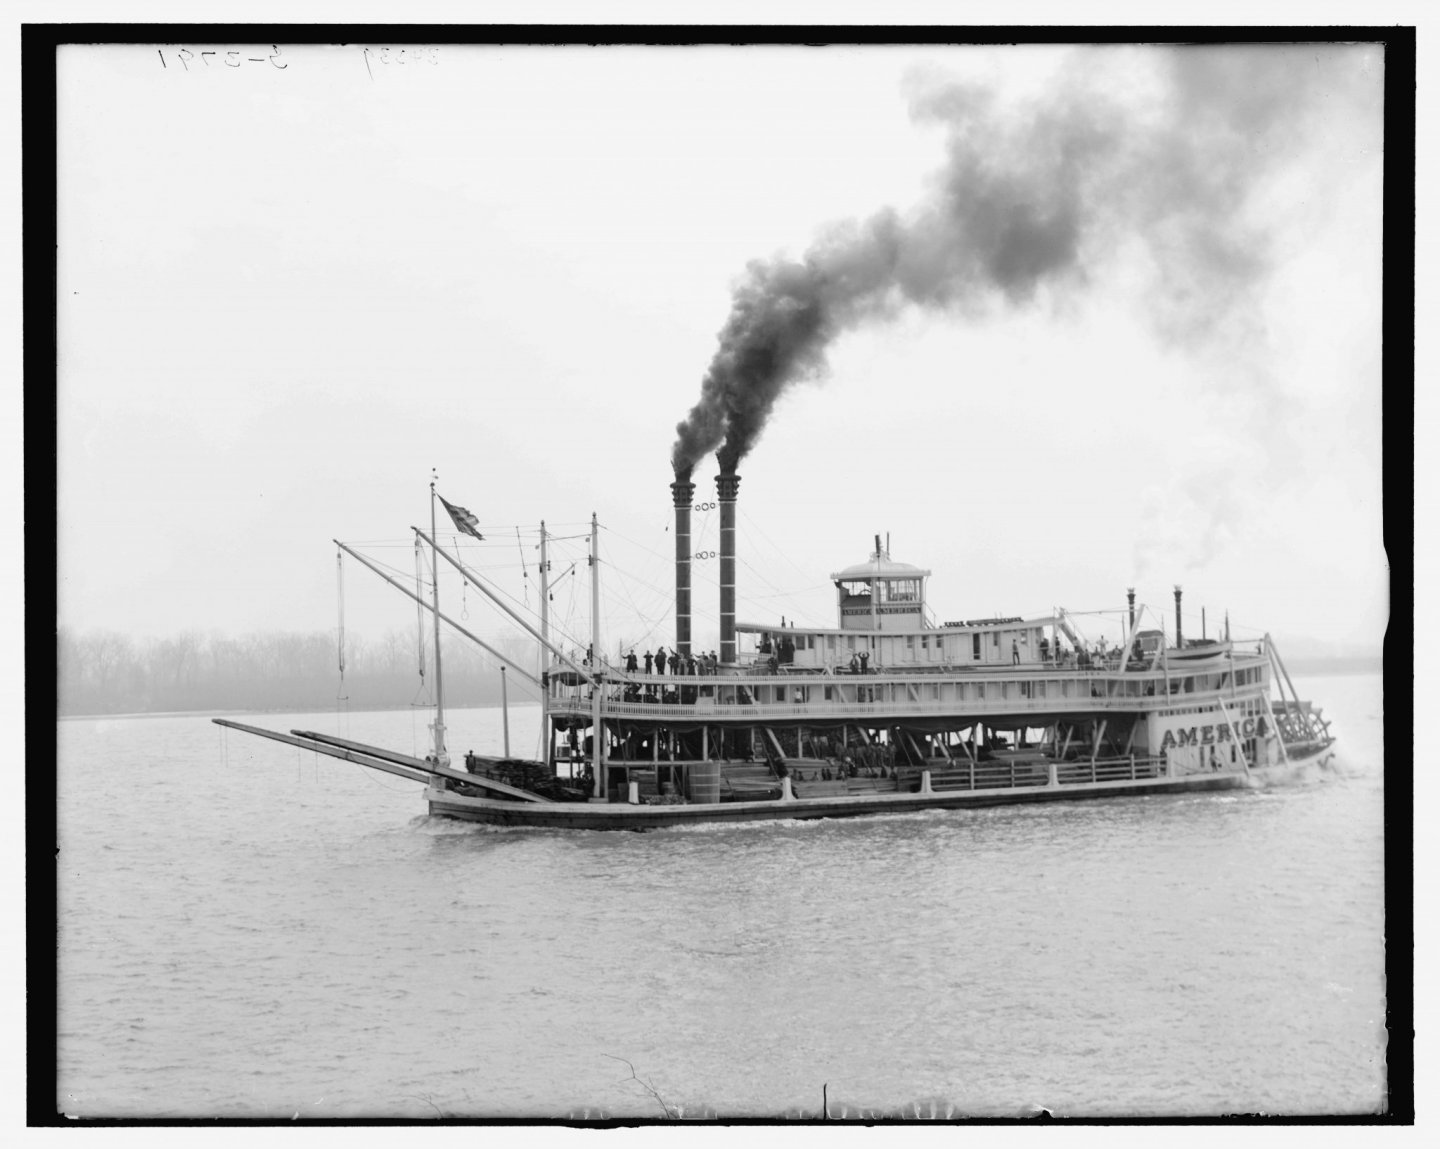
🙂 🙂. Ah yes, the Mersey Ferry used to be my preferred method of going to work for many years. Many a time the decks were awash with the waves on a stormy day, and getting off one when it was high winds was an adventure - you had to wait for the deck and landing stage gangway to be level and then run for it before a 3 foot gap appeared again! A few times I did jump the gap between stage a ferry just as it was pulling away from the Liverpool stage (much younger and fitter then!). Thinking about it I've never lived further than a 10 - 15 minute drive, and at one point a 2 minute walk, from the river. One of my schoolmates actually became a captain on them. this link will take you to a webcam site of cameras overlooking the river River Mersey To keep back on topic this steamer, USS Willow was moored in the docks a 10 minute walk from where I lived at the time. she's now sunk at her moorings in spain.
- 109 replies
-
- 2
-
-
- Finished
- Artesania Latina
- (and 1 more)
-
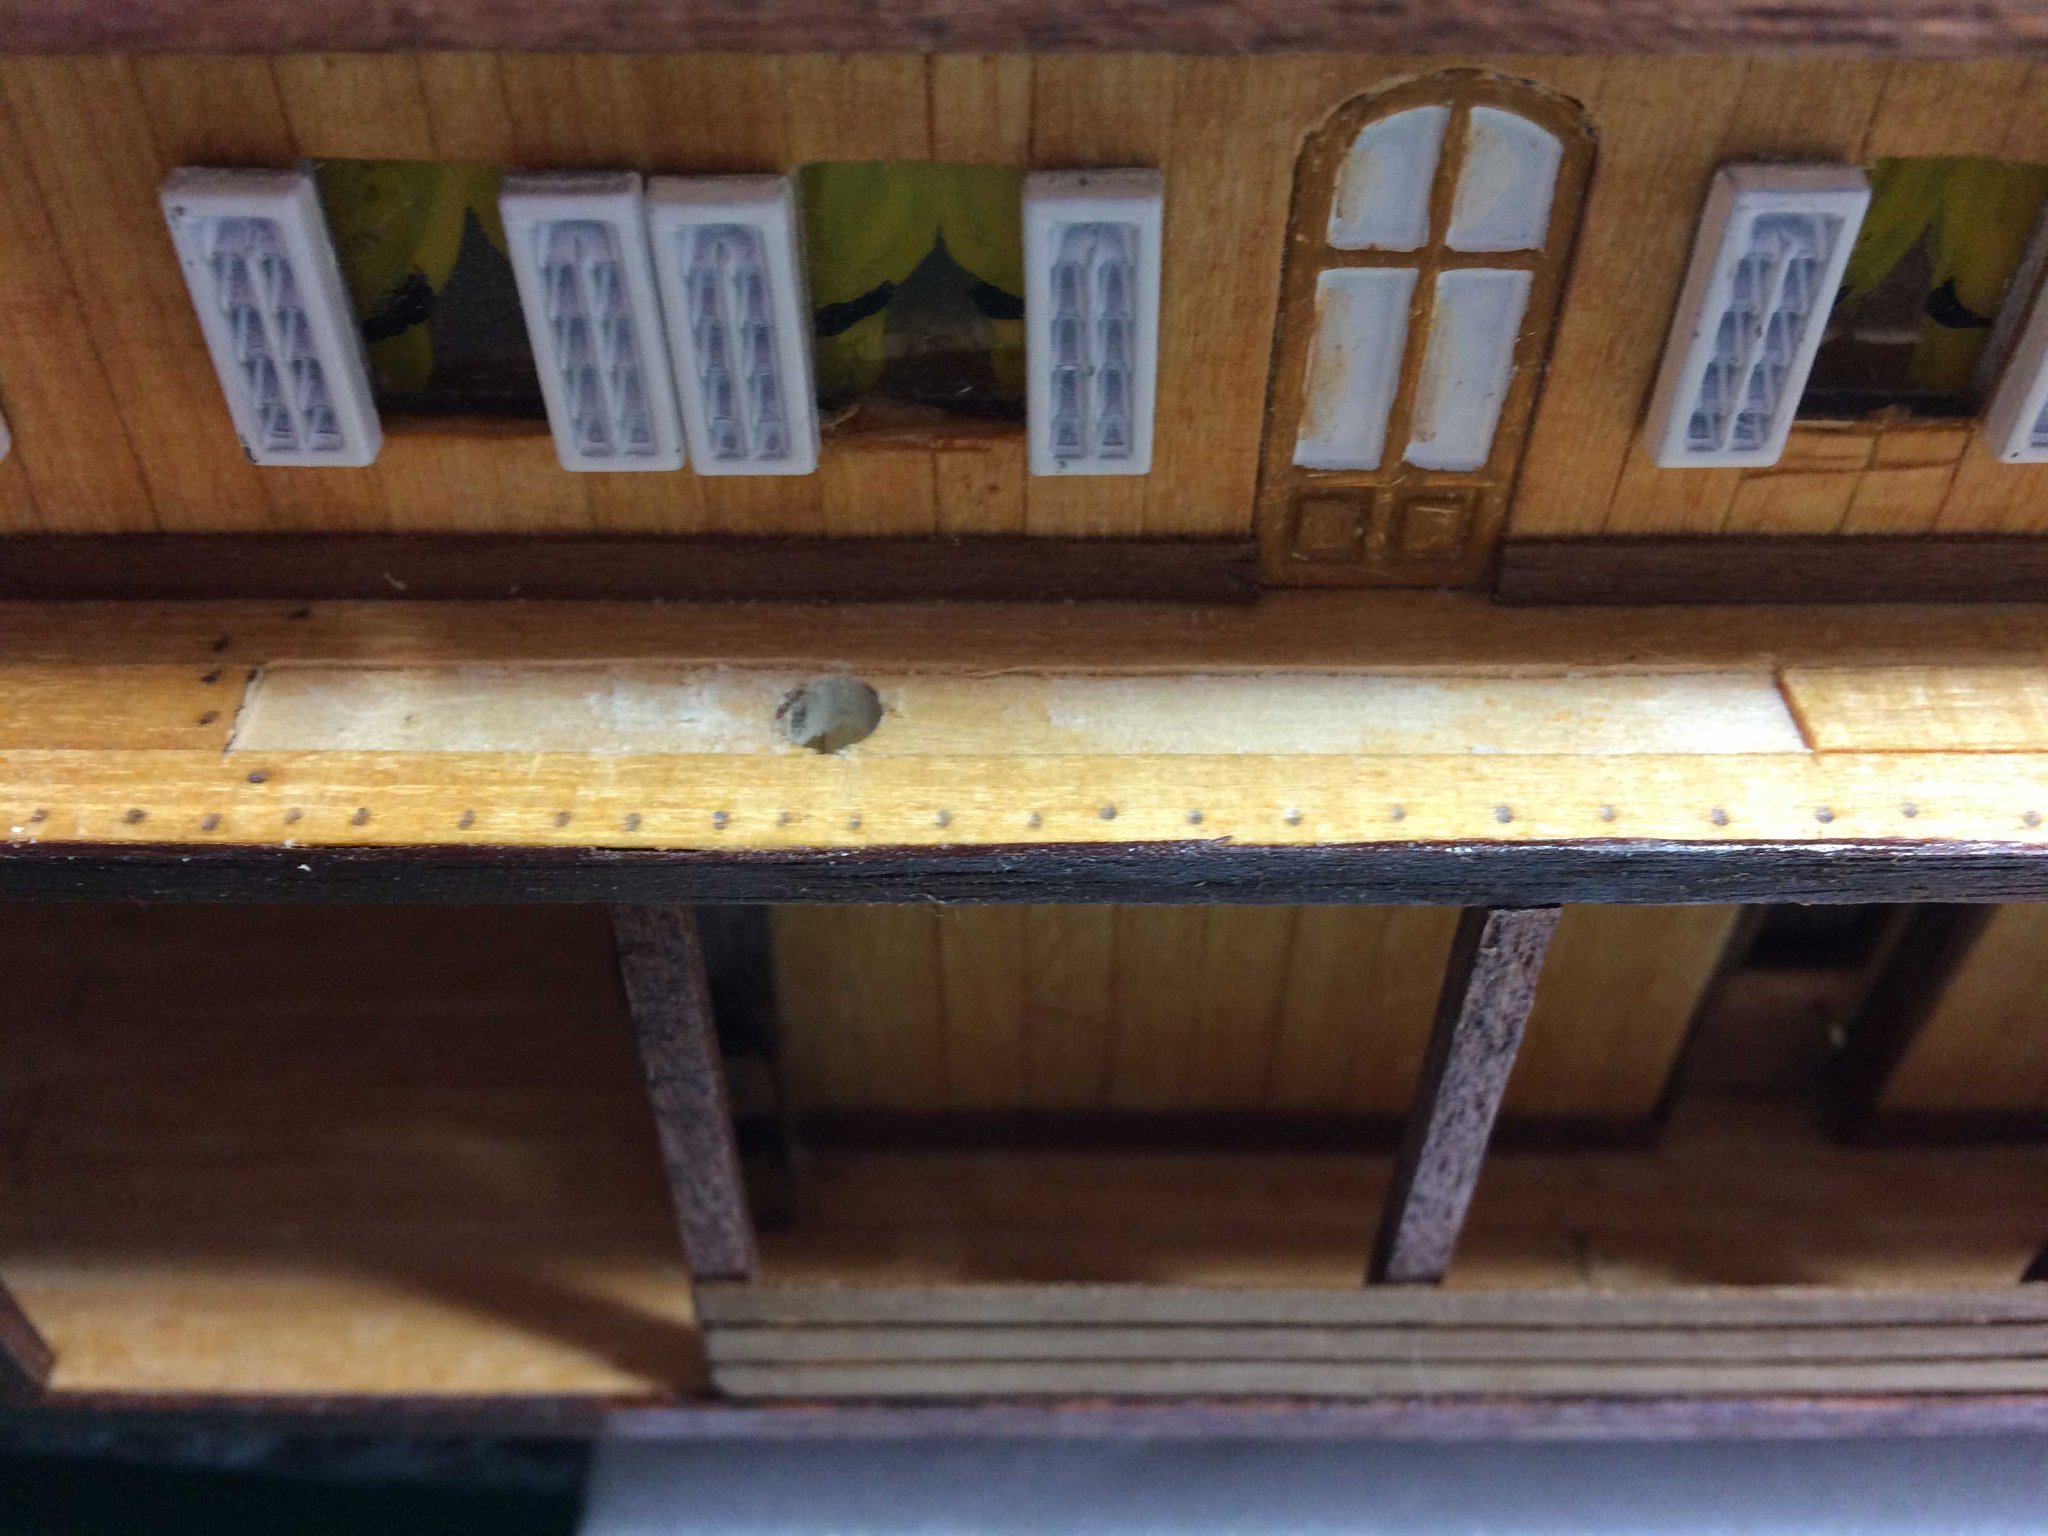
You know what, you've just pointed out yet another mistake of mine! Doh... don't I feel a right dummy now. I think that list just gets longer each time I look - never mind, I'll just call it yet another adjustment 🙂 I must have forgotten those holes were there and put the next deck on with the plates on that one - don't know how I missed it! Now the chimneys are higher than they should be. Oops. I totally get the misalignment issue now. Well caught. Please accept my apologies. Thanks for the compliment about my build though 😀. The wife, who it's being built for, loves it and OKs all the changes made.
-
Bob, the chimneys don't go to through to the second deck, I don't think the dowel is long enough to allow that! Those holes have a square of ply fixed to the roof beneath to close it off. Unless your model has been updated, mine has to be at least 12 years old. This is what I mean. No need to correct the holes. As far as mindless goes, wait till you get to cutting the railing posts for the top decks! 🤯
- 109 replies
-
- 1
-
-
- Finished
- Artesania Latina
- (and 1 more)
-
Slow going, just some more railings added, so no more pics. I've found that 6 out of 8 of the oddly curved precut stern rails are missing 😱 🤬 so I'm going to have to make them myself. They're marked up ready to cut and shape - wish me luck! Cheers, Bob
- 86 replies
-
- 2
-
-
- king of the mississippi
- artesania latina
- (and 2 more)
-
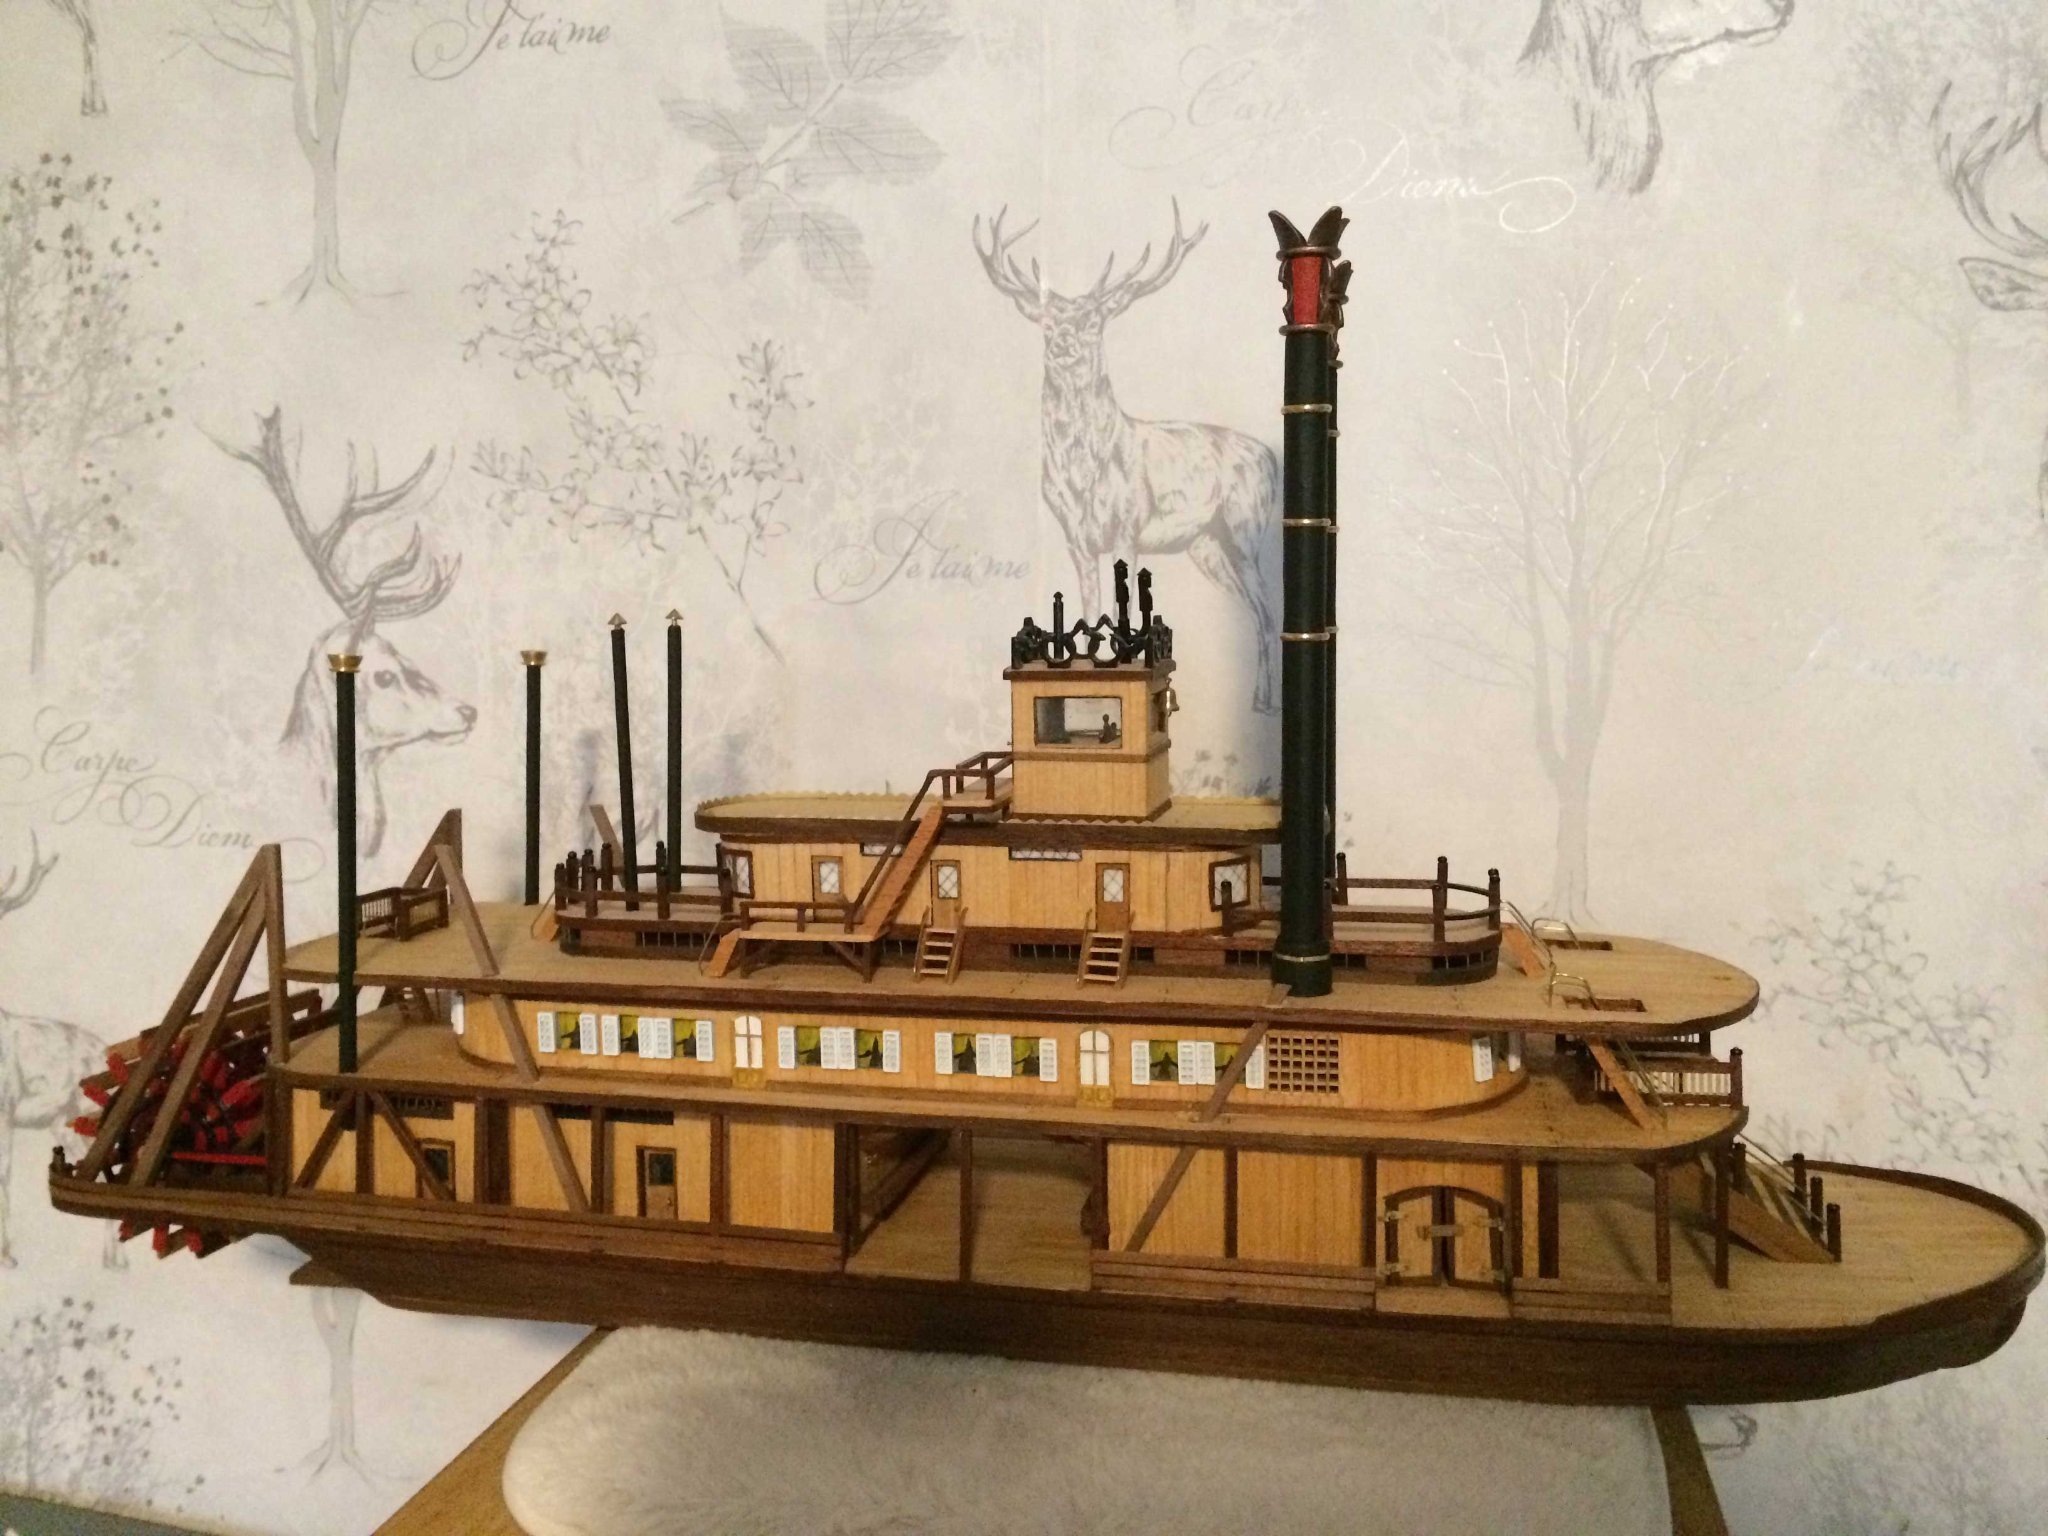
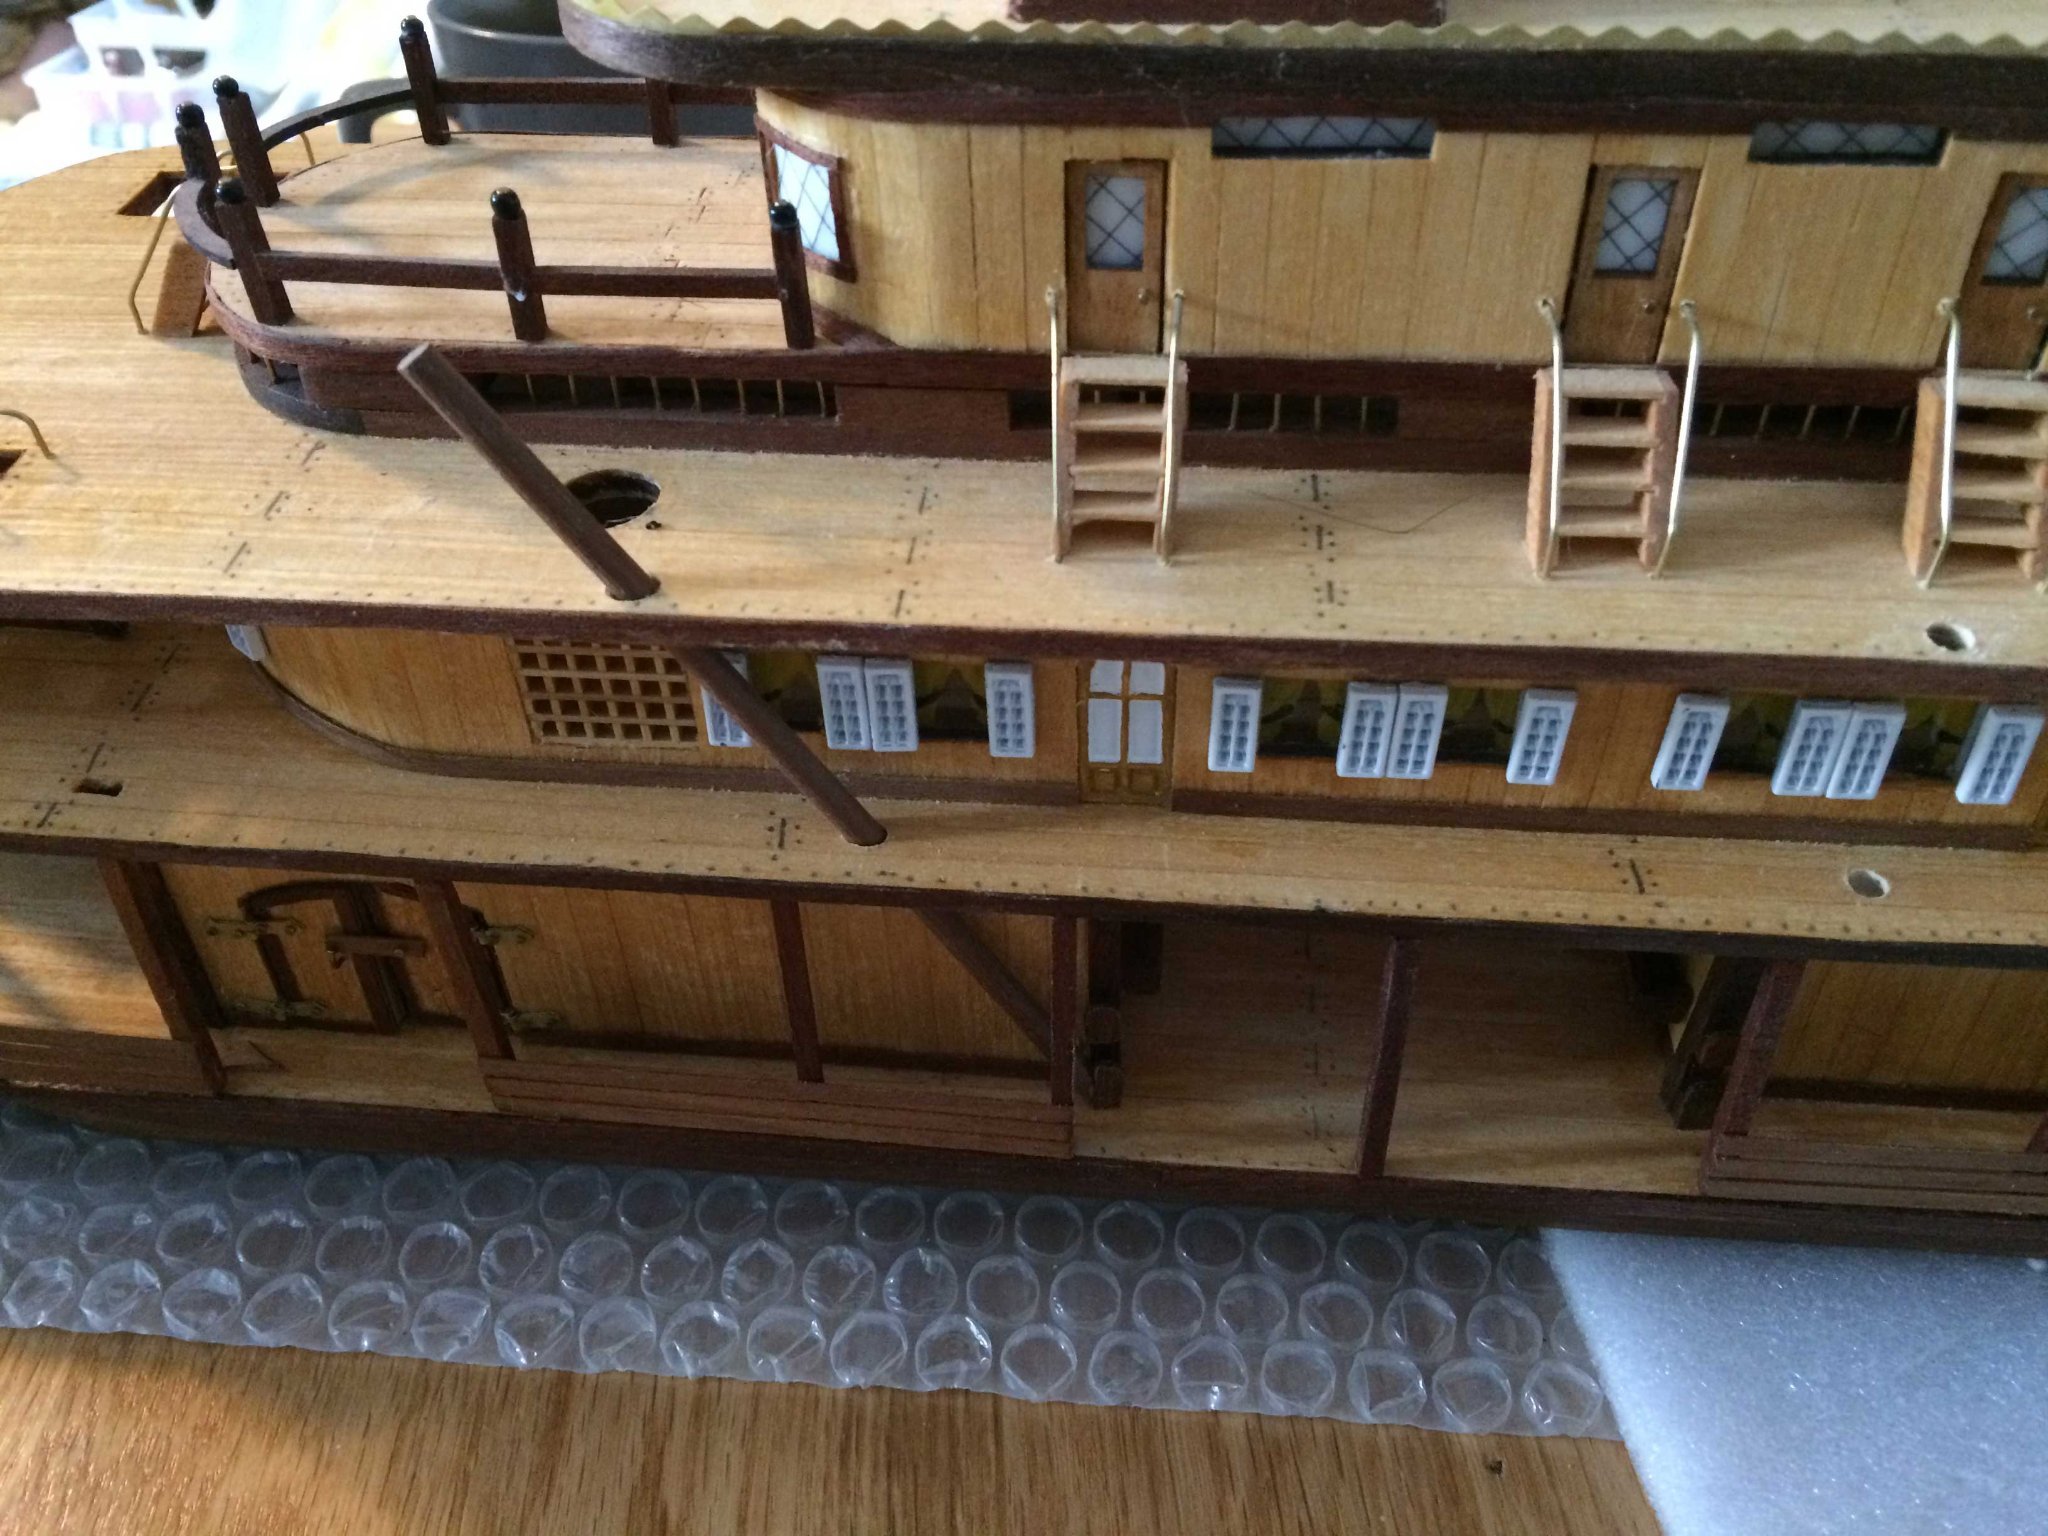
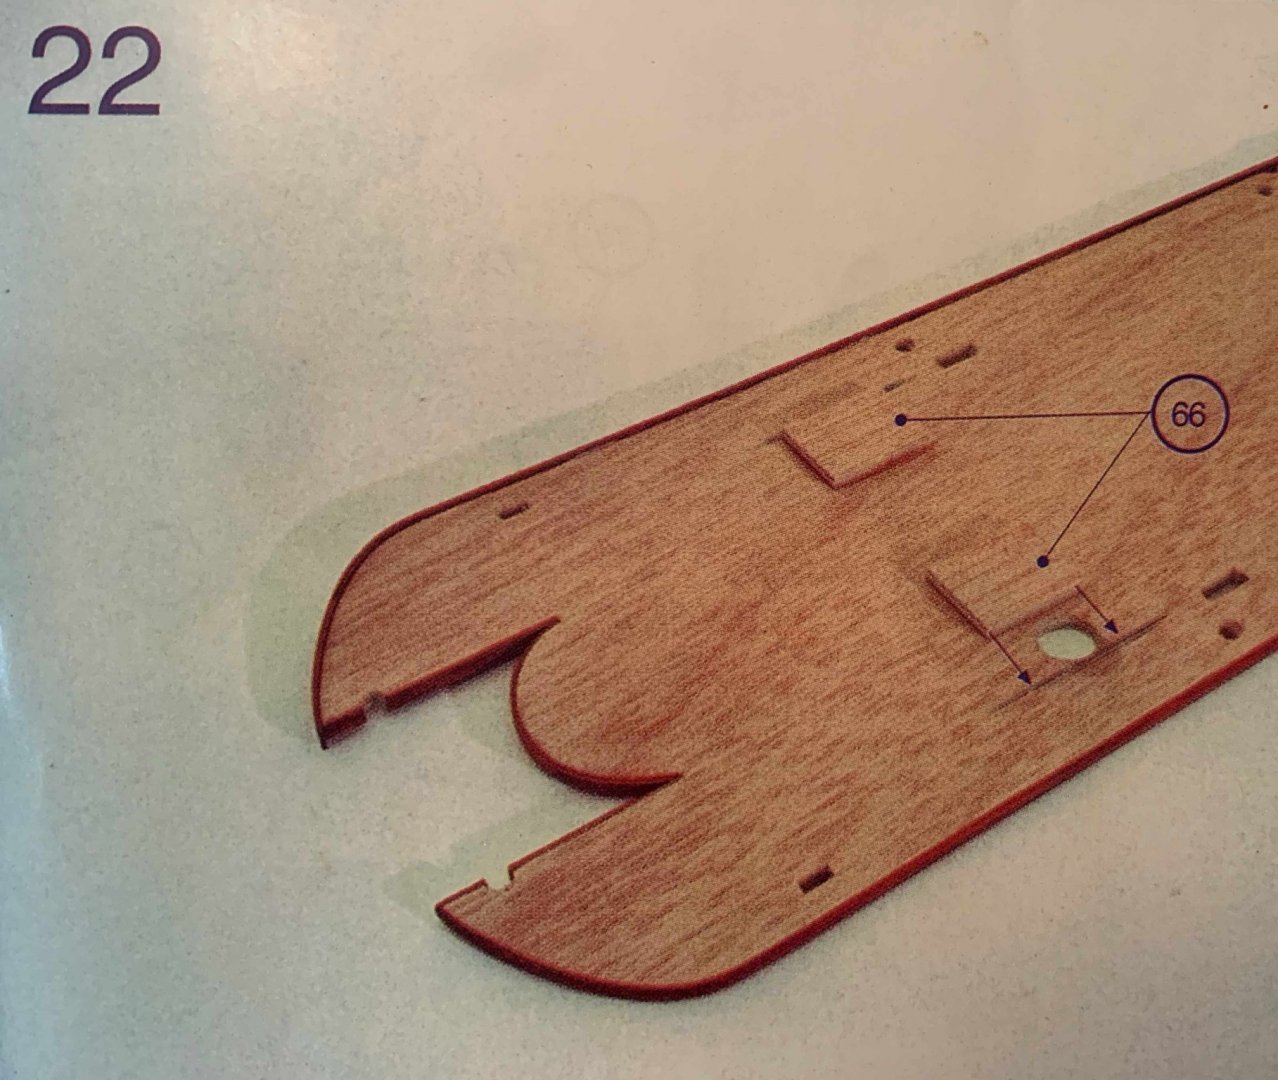
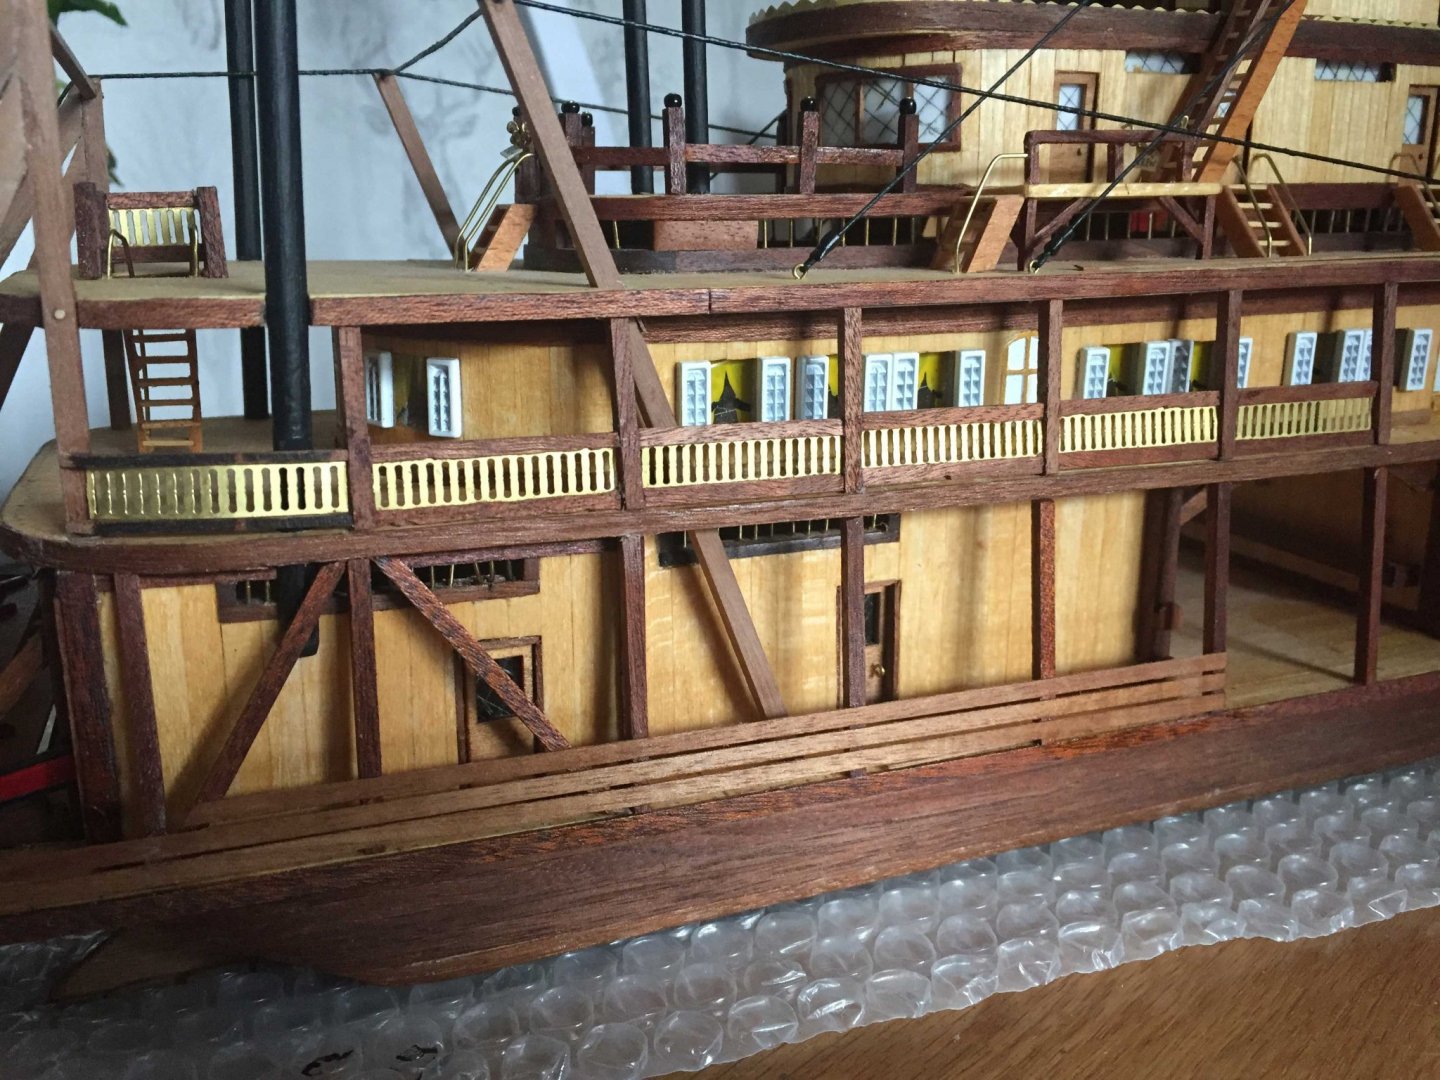
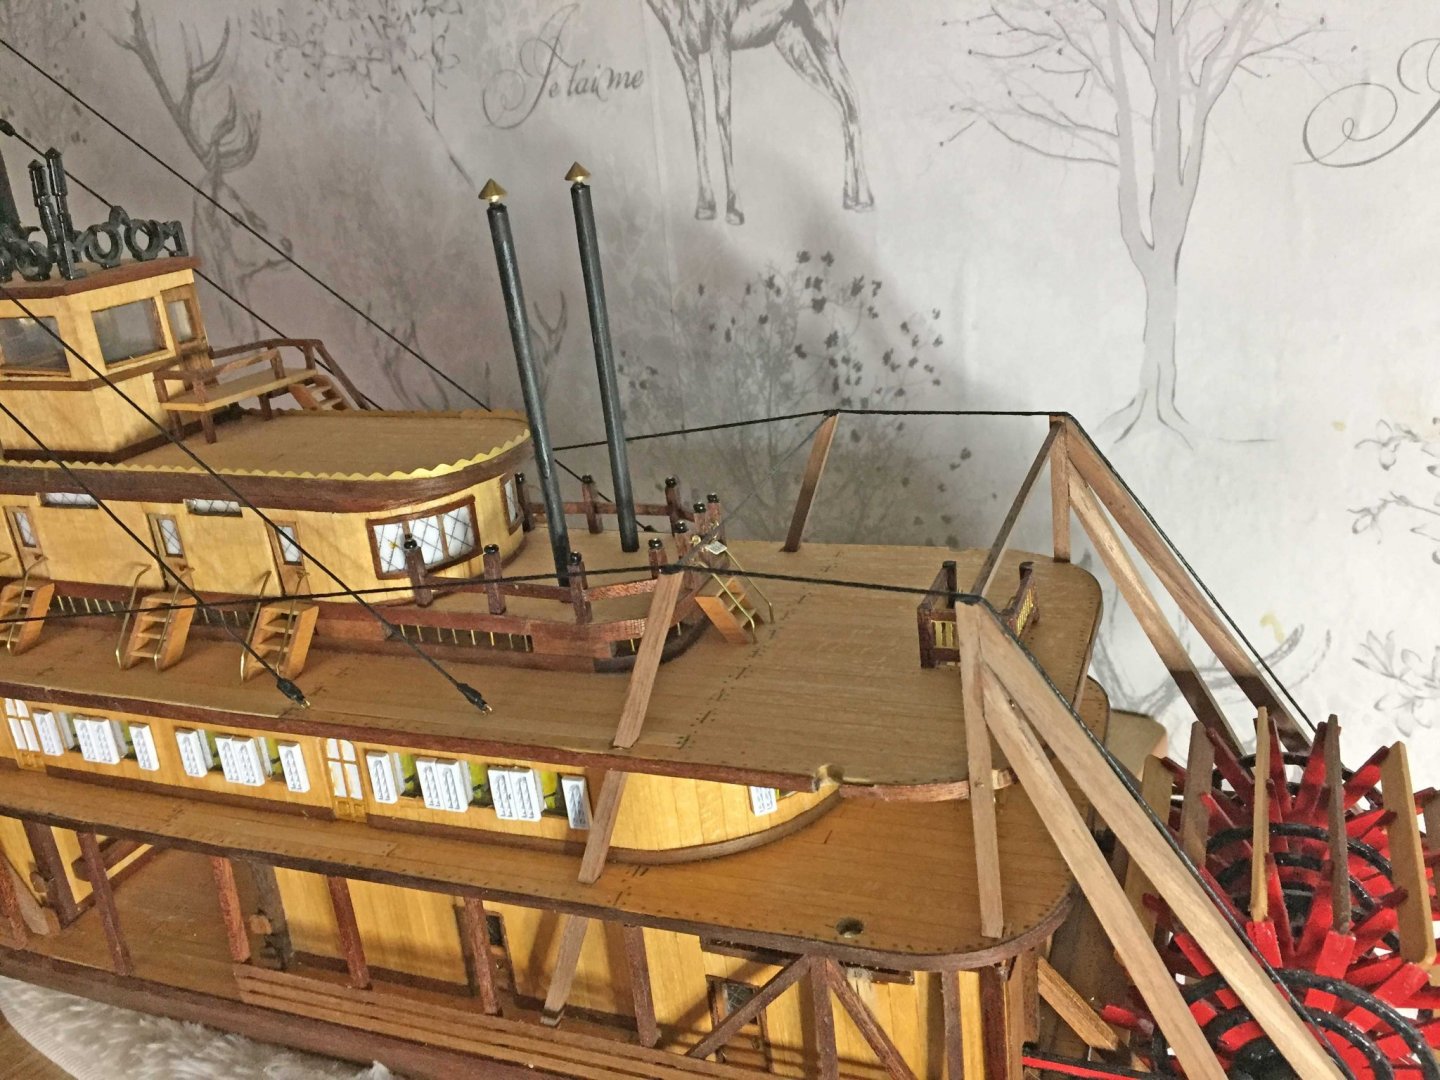
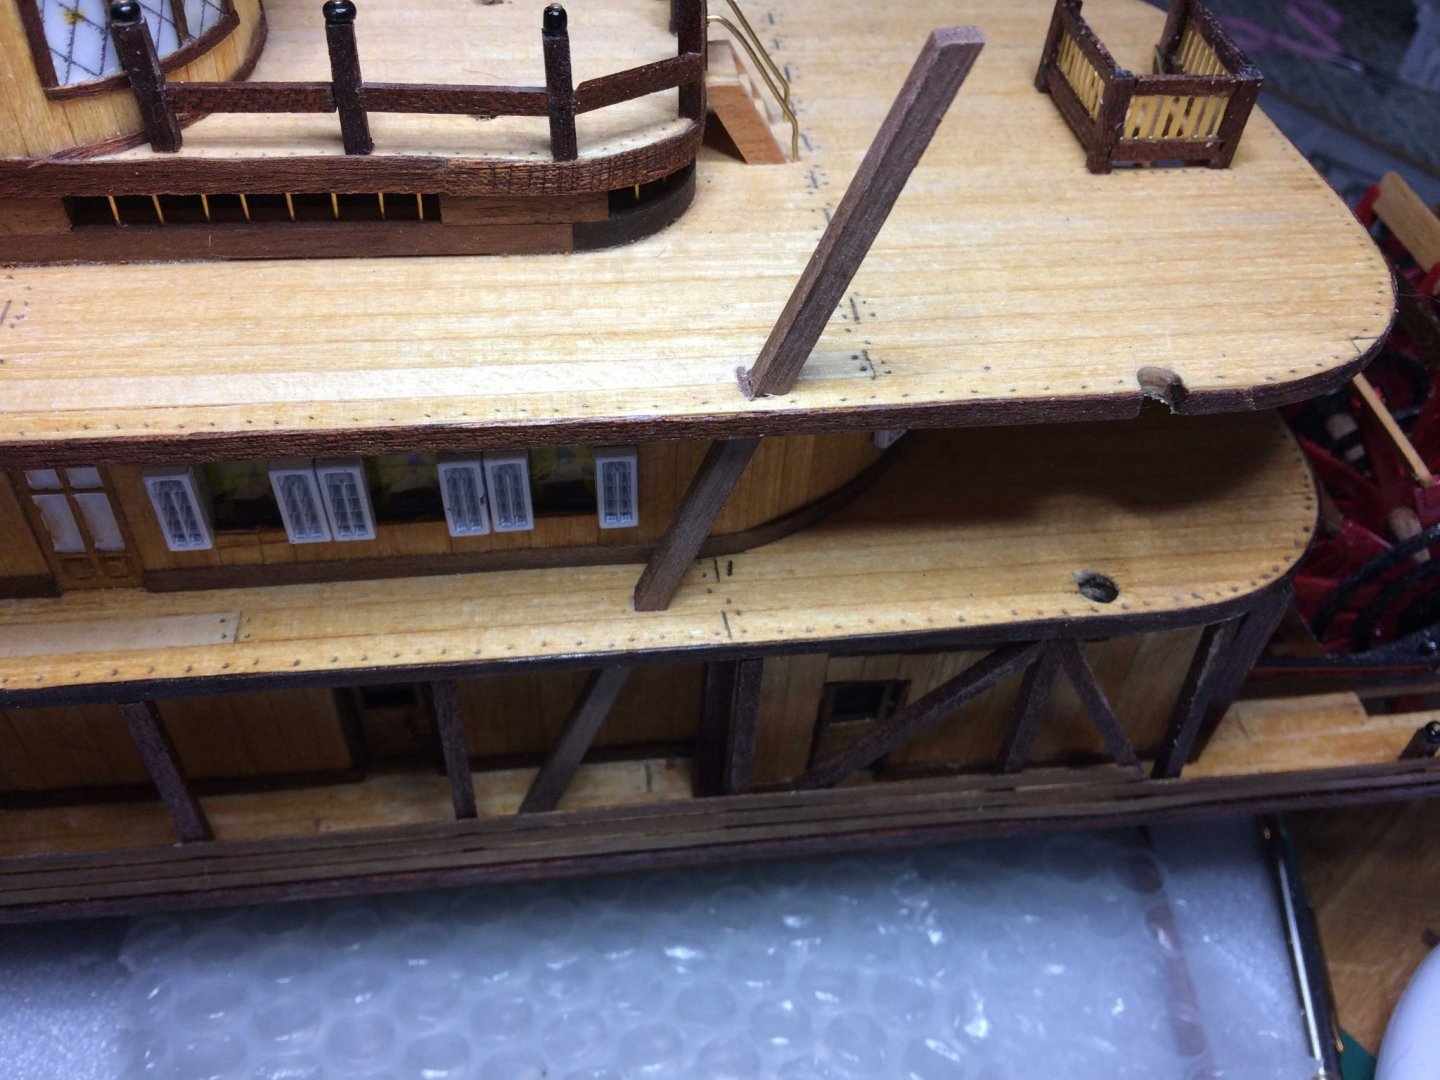
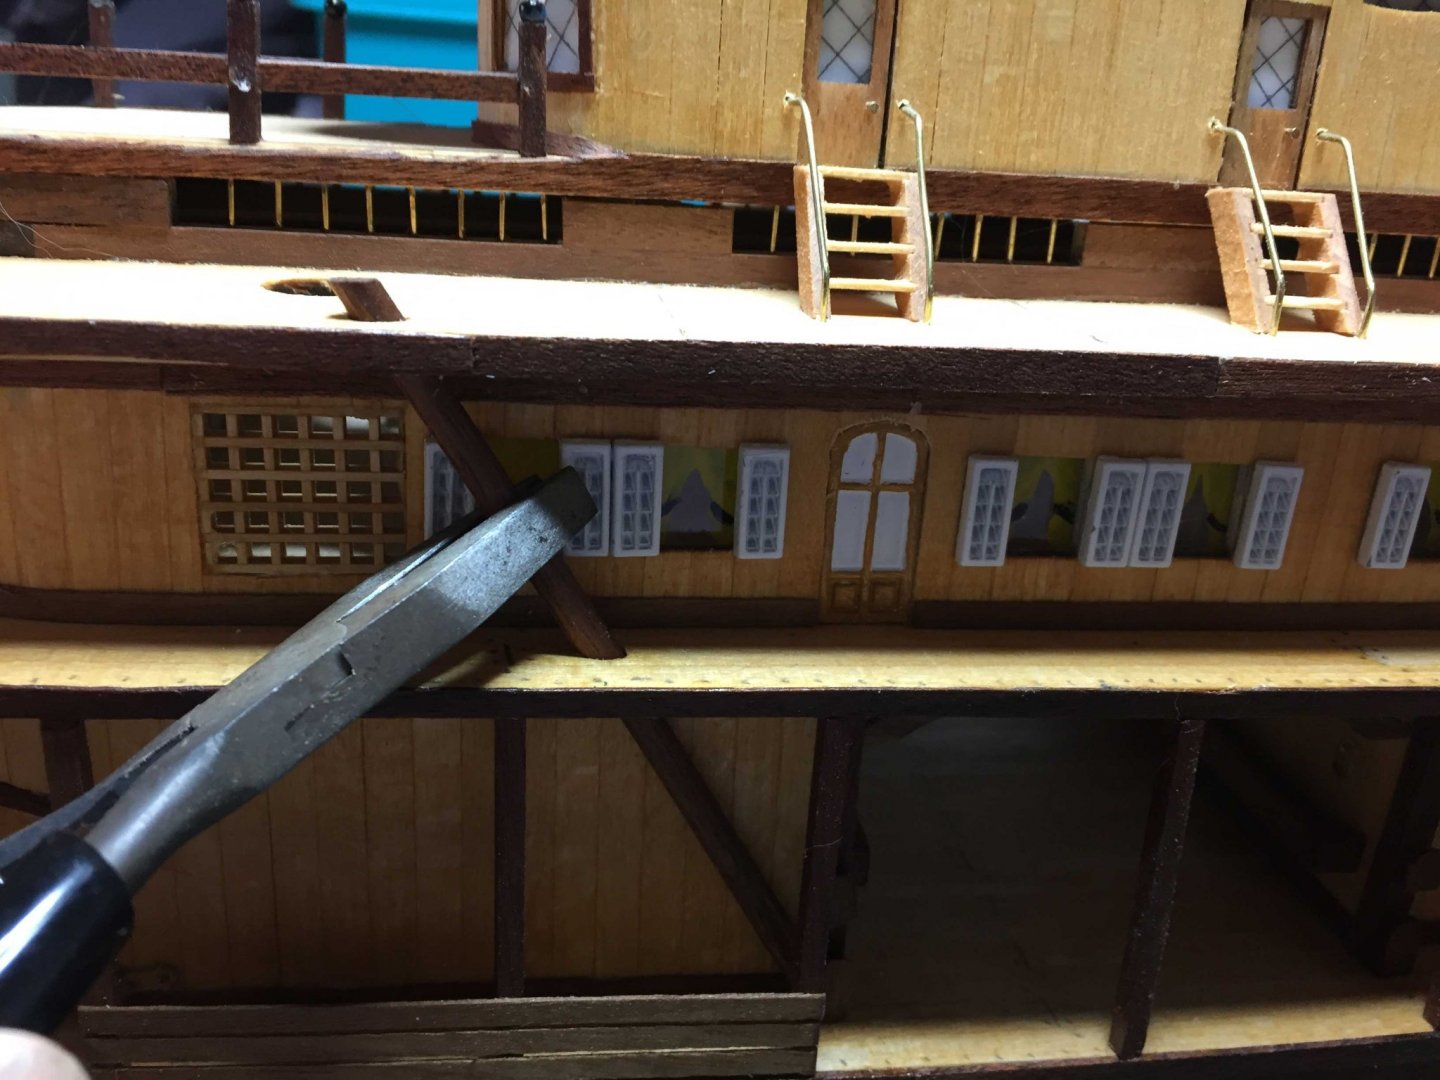
I look at it this way, any fixes or alterations done make this your own unique build, (my excuse for my own mistakes and fixes!) rather than the AL version. No two real ships appear to be the same anyway! Checking mine again, there's a catalogue of mistakes on this deck, which were all realised after the planking had been done. Having had to rip up a deck of planking previously, I went the easy route for fixes. I've probably used the deck notch to locate the cabins, with the door facing the bow, (it needs to be because of the flagpole placement - photo 55), and done away with the roof tabs to fit the roof longer forward. This gives a slightly shorter back deck, no biggie there as it's access to the flagpole. The forward part needed to have a little scrap planking added, as I hadn't planked far enough under the cabins. Because of the door mistake the pilot house and access stairs, booklet photos 54, 55 and 56, needed to go slightly further back than shown so the stairs didn't cover the centre cabin door. If you look closely at the pics in my build you can see these when compared to the booklet. From what I've read these cabins were usually crew quarters, and even with the mistakes and adjustments everything still seems to fit. I take it from your pic above the door is facing the stern? If so, it looks from your pic as if you've possibly done the same as me - the long 3 panel wrap around window end should be at the cabin end with the biggest gap between the doors. The chimneys - not sure what you mean about the slant. From your pic the holes appear to be correctly aligned with the air vent grilles below. They sit in the holes, with a square of wood, photo 22 part 66 in the booklet, as yet missing in your pic, fitted beneath to stop them going all the way in. They have a protective sleeve, photo 60 part 175, at deck level to help set them vertical and cover the hole. More skew is sorted by the metal fixing between the two, so they should be held vertical in both planes when all parts are fixed in place. Hope this helps a little. Airbrushing looks good, as does the brushwork. Embarrasingly I've had one for a couple of years, but it's still in the box. Be careful when fitting the wood paddles, as the notches for them are quite fragile and can snap. The planks aren't exactly the same thickness over their entire length, and the notches reduce in size due to paint layers and casting differences, not much but just enough to snap if forced as I found out 😞 Cheers for now, Bob
- 109 replies
-
- 1
-
-
- Finished
- Artesania Latina
- (and 1 more)
-
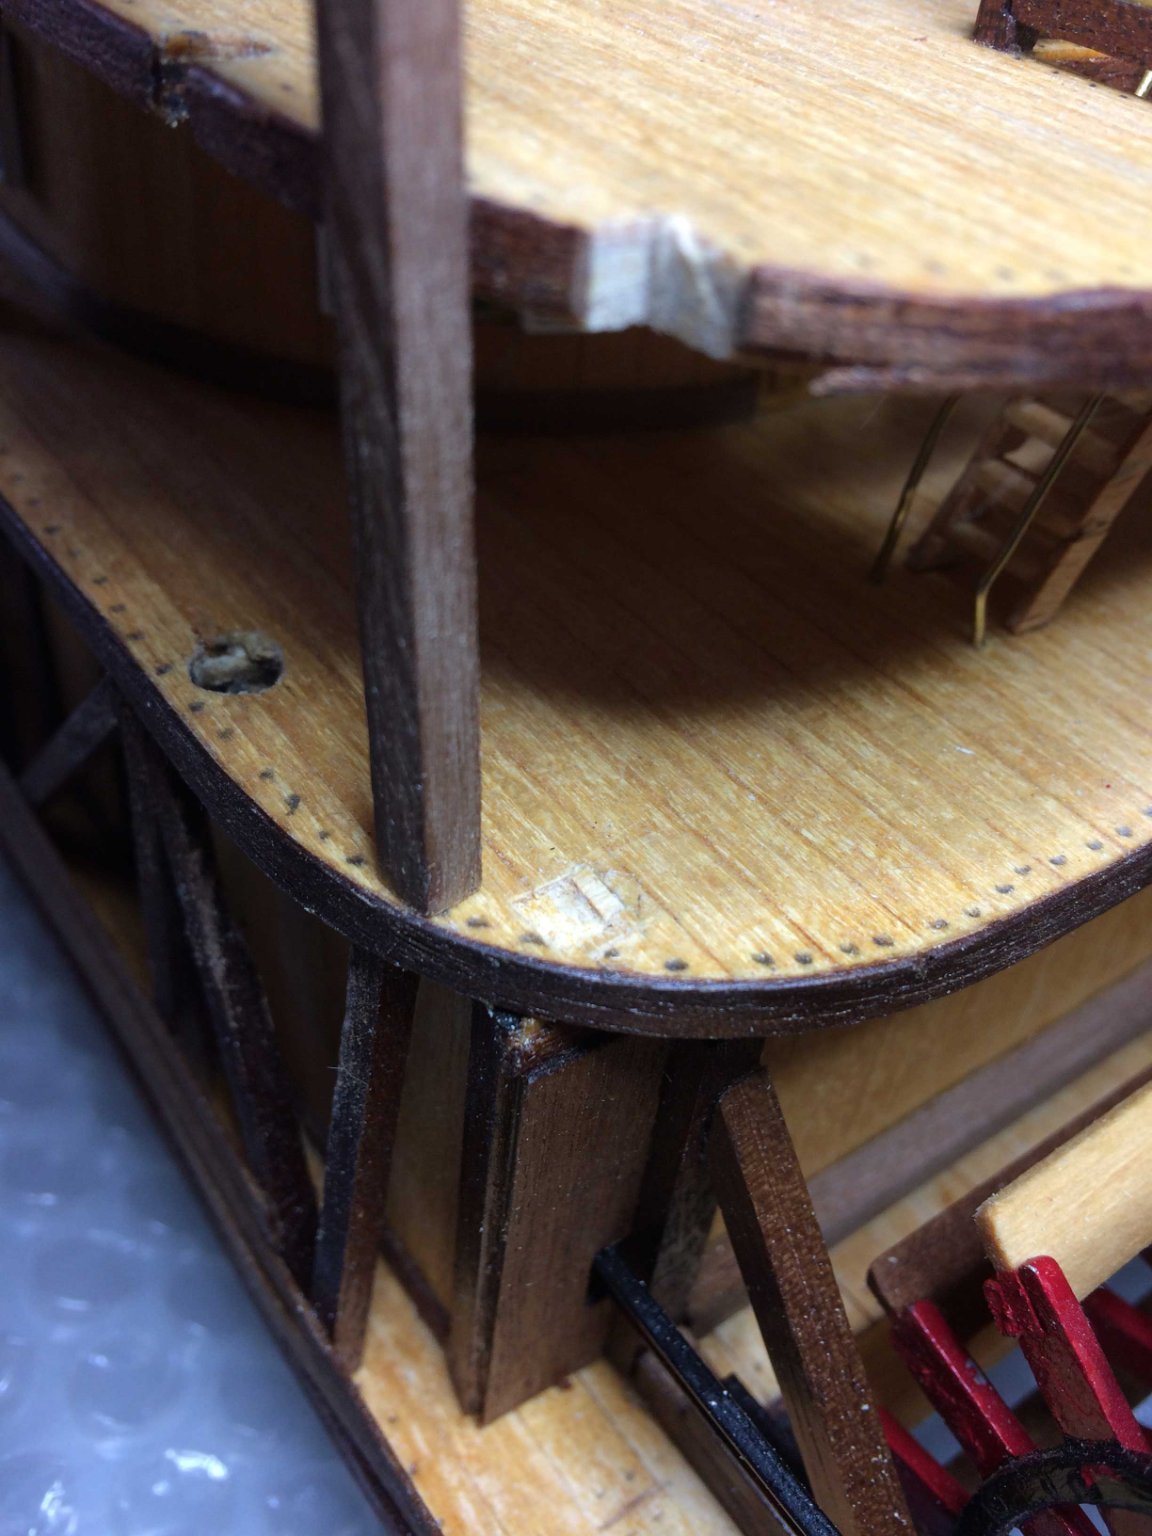
I think most, if not all, of us who have done this model have found the notches out of place, and aligned the deck manually. For the structure beneath the pilot house, check pictures 43 and 44 in the photo booklet for the positioning of the two deck pieces. The longer length of the roof goes forward, and the ventilation deck has the longer end to the back. The door end of the cabins goes forward. Embarrasingly, looking at my build again I can see I've got the door / no door ends at the wrong ends of the cabins, the door end should be at the end where the two cabin doors are closest. I got this and deck 2 the wrong way round at one point before I started the log, or just didn't note it, I forget now. Fortunately it doesn't affect the build as long as the doors face forward. Look ahead to photo 61. The stern steam pipes are misaligned in both planes, even when the decks are aligned. I found I had to trim the thickness on the inside once they went through deck 2 to get them to fit. The holes also need widening slightly. Look ahead to photo 66. The hog chain bracing beams are also misaligned between deck 2 and 3. They should be in a straight line and vertical, not slanted outwards. Before doing any planking on 2 and 3 look at the angles for the fore and aft ones, parts 203 and 204 in photo 66, and angle cut the holes to fit, so that the planking works, and part 202. The holes also need widening slightly. Oh, and you need to drill out the hog chain holes at angles too, easier done at this stage than when all is glued and the railings installed. The written instructions for photos 59 onwards just say follow the photos, and the fitting of these parts is well after planking has been done, so a good planking job could well be upset. (Hindsight is great - I've had to redo planking because of these things.) Hope this helps. Take care, and hopefully the fire won't affect you and yours. Bob
- 109 replies
-
- 2
-
-
- Finished
- Artesania Latina
- (and 1 more)
-
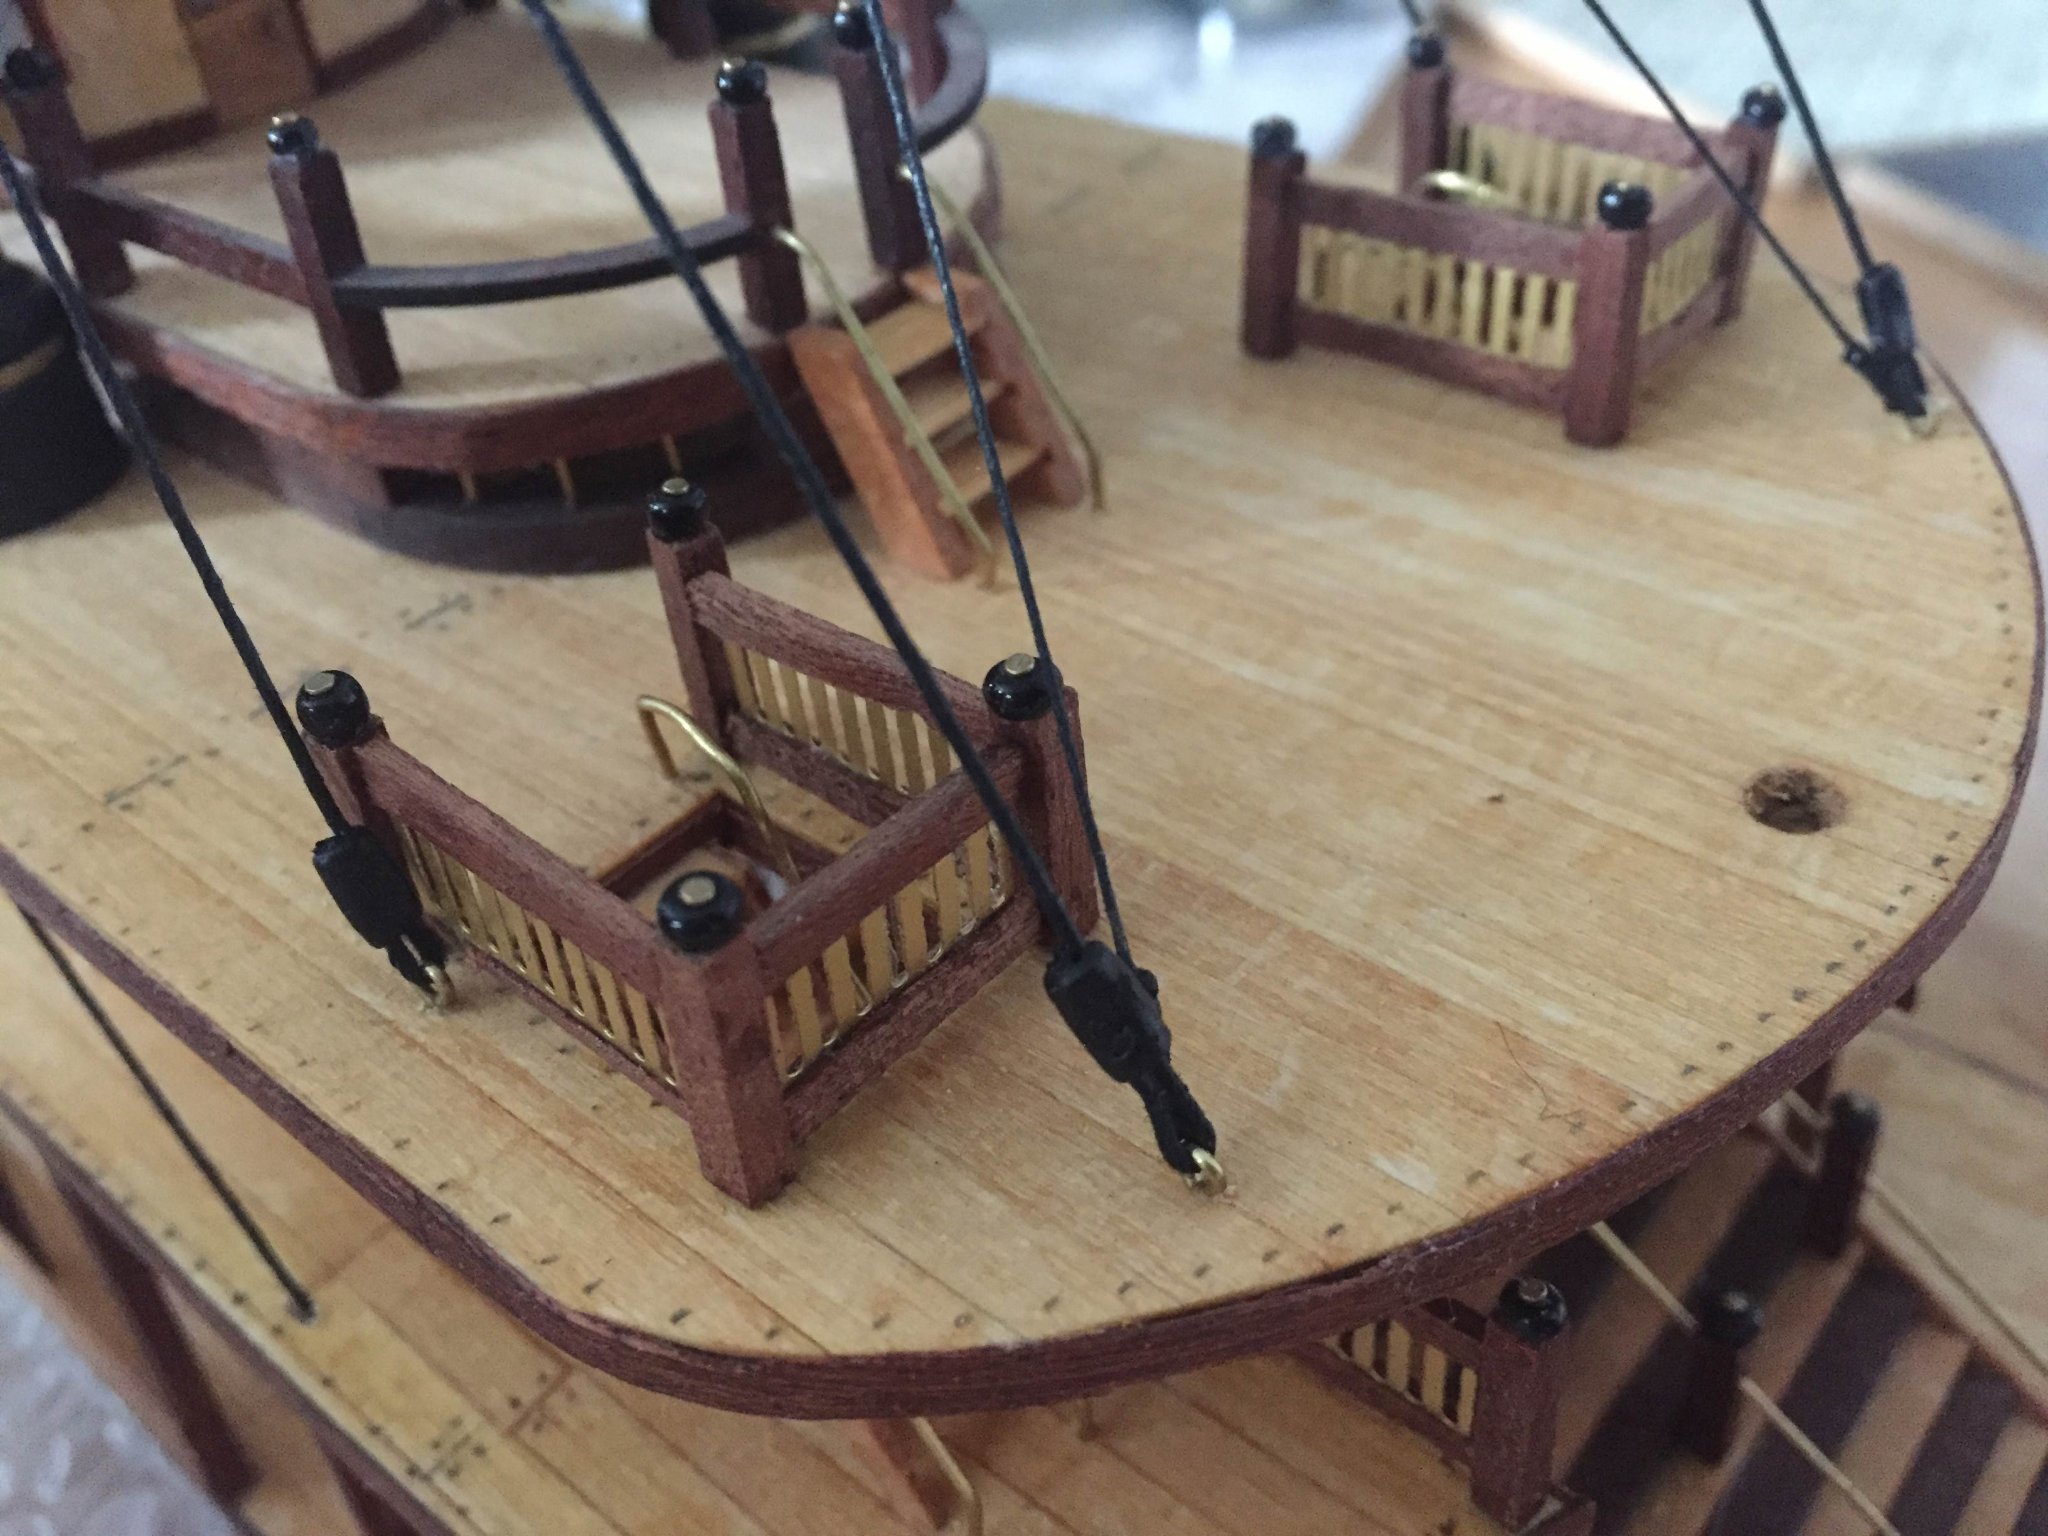
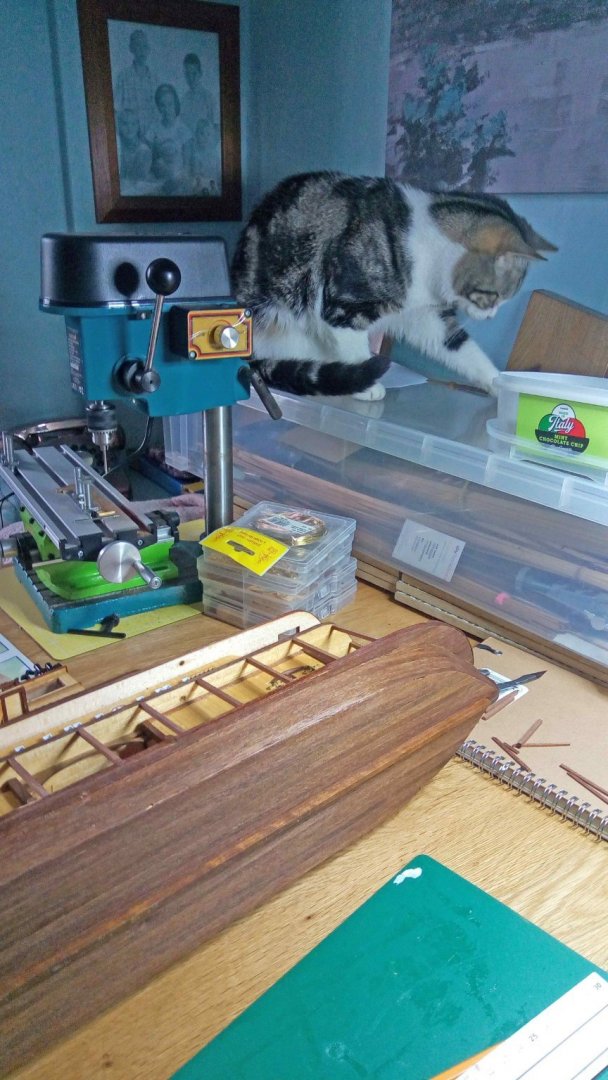
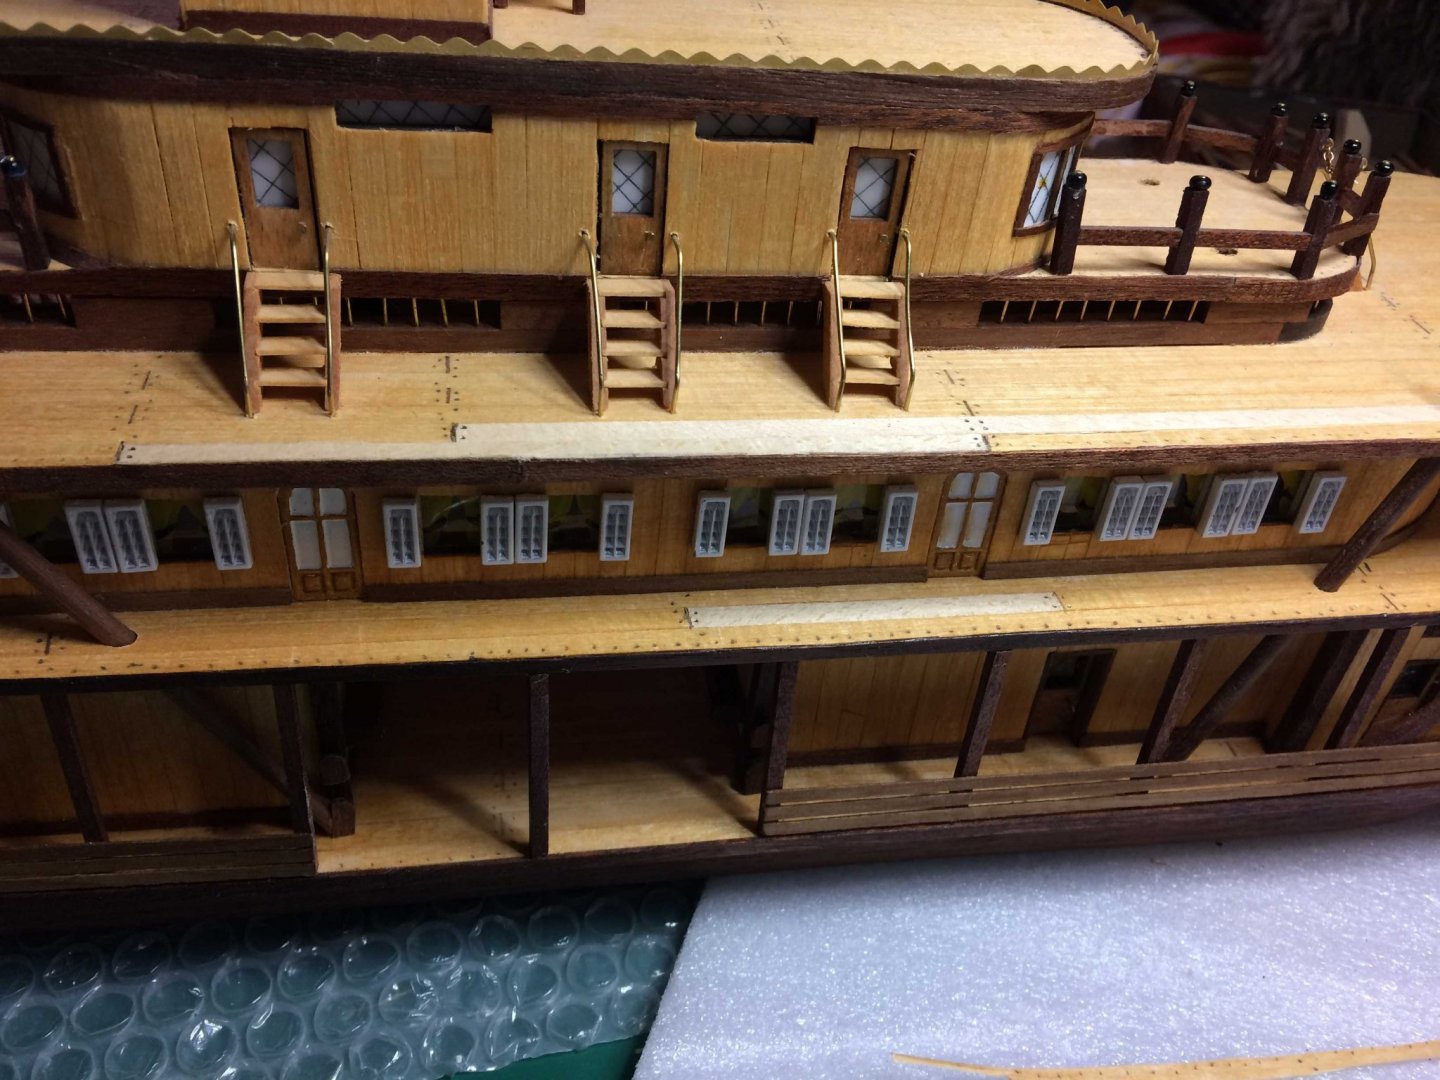
So some progress, but sloooow! Added the two fore stairwell surround railings And started on the railings Here's where it gets slow. Each and every one of the uprights is a different height 😞 Measure, cut and micro sand to a tight fit. Note to future self - maybe cut out the aligned holes on all decks and use one full height piece, measuring on the upper deck to get the post height right as I'm sure they'll still be all different 😱 The lower and upper handrails are slitted to take the P.E. railings and hold them steady. The wood not being the best and not exact along it's full length it does damage the edge slightly. Drillhead dropped to the correct height so no deed for lowering, the brass calipers as a fence aligned at the right depth and straight, the wood can just be slid through. Just realised this was done a year ago! Time flies. And of course Cooper the cat had to help. Given his name maybe I should get him making some barrels 🙂 Cheers for now. Bob

- 86 replies
-
- 5
-
-
- king of the mississippi
- artesania latina
- (and 2 more)
-
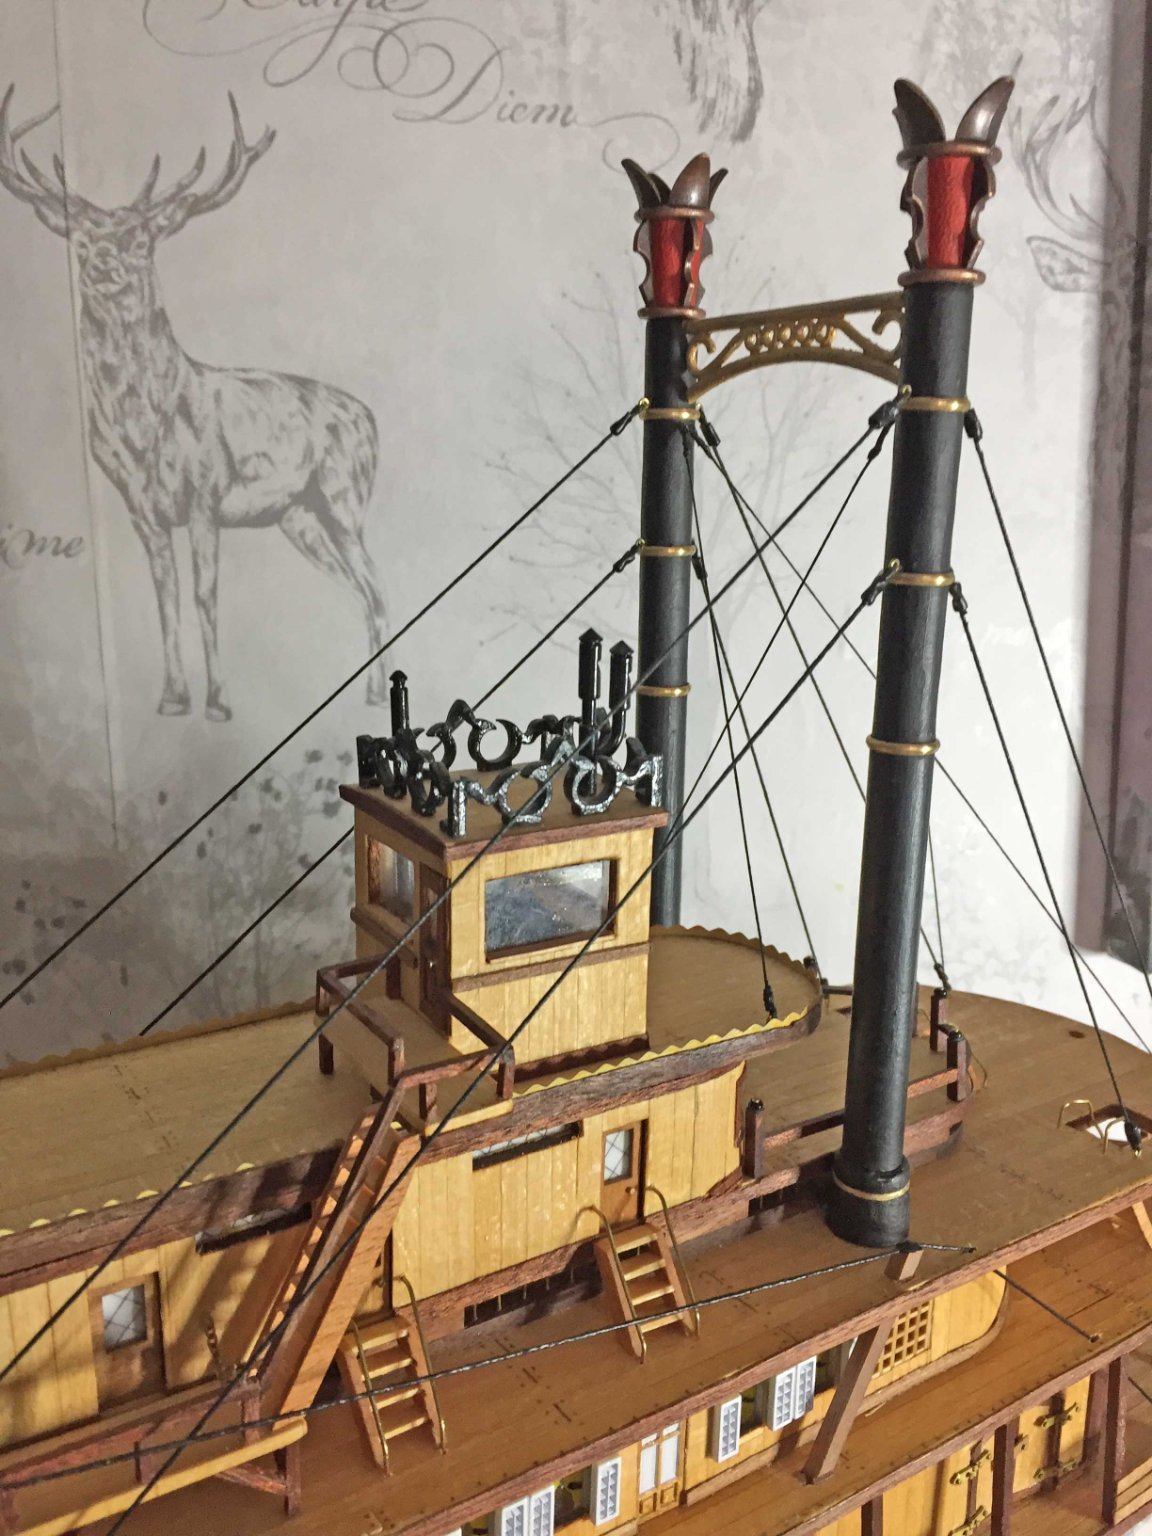
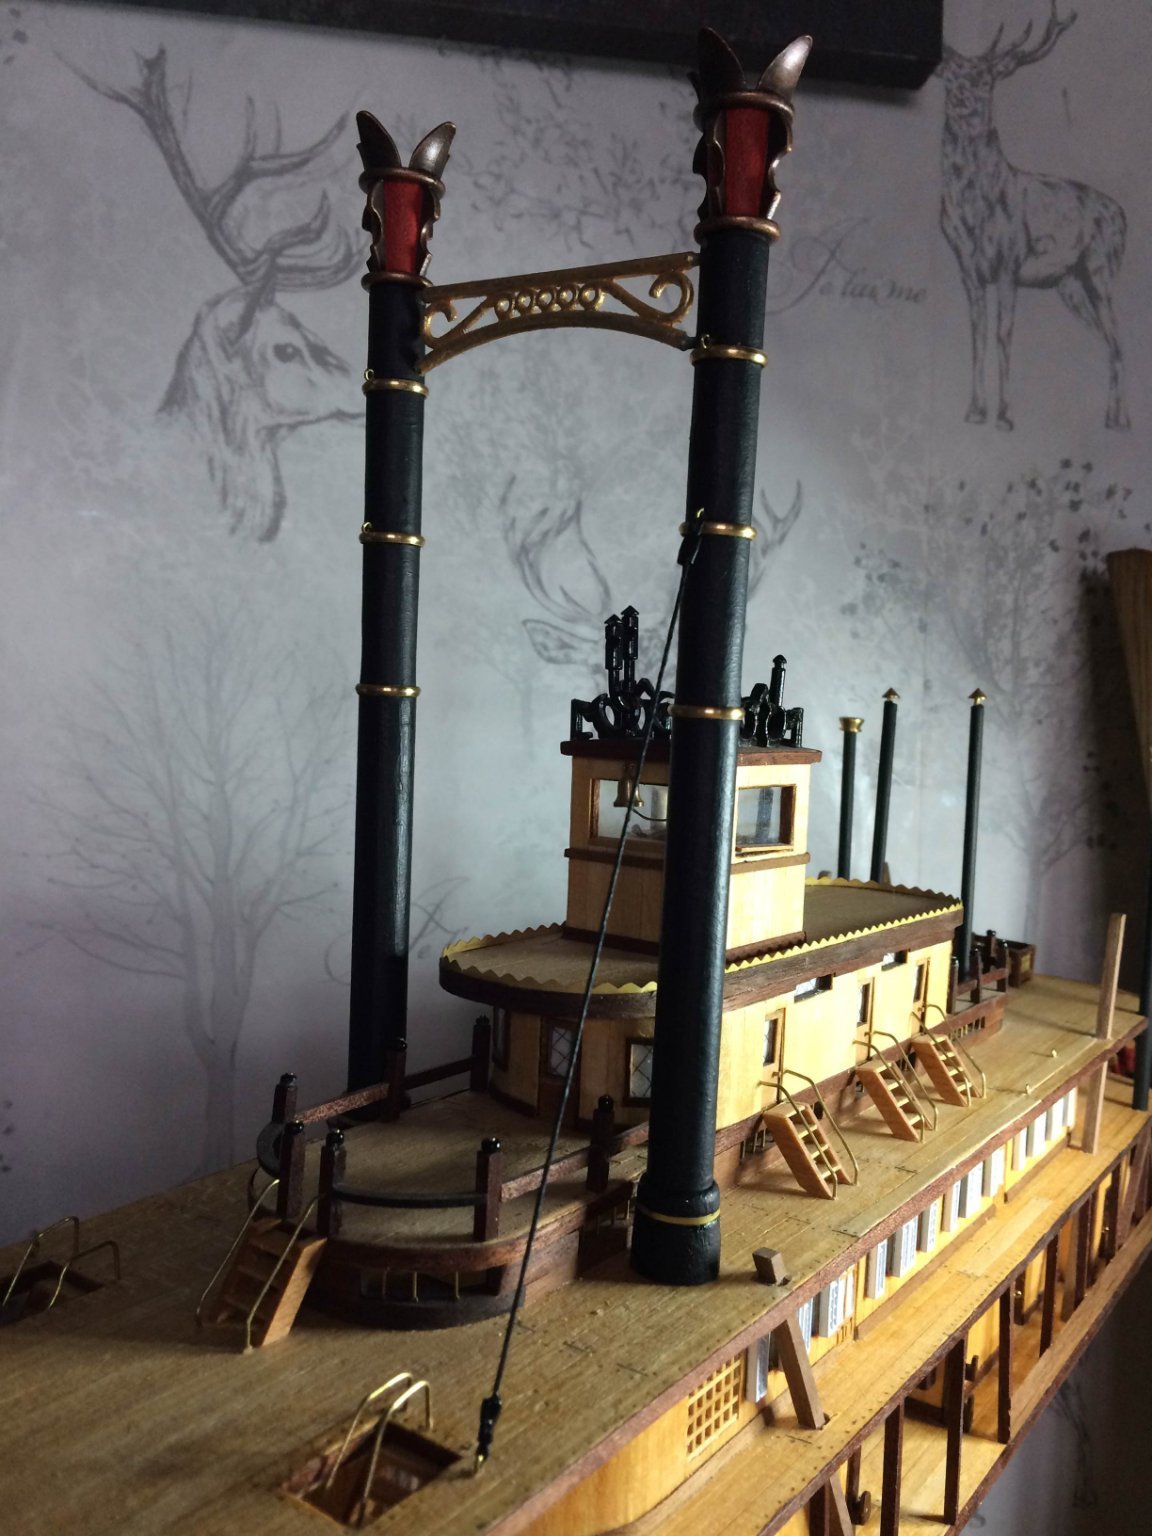
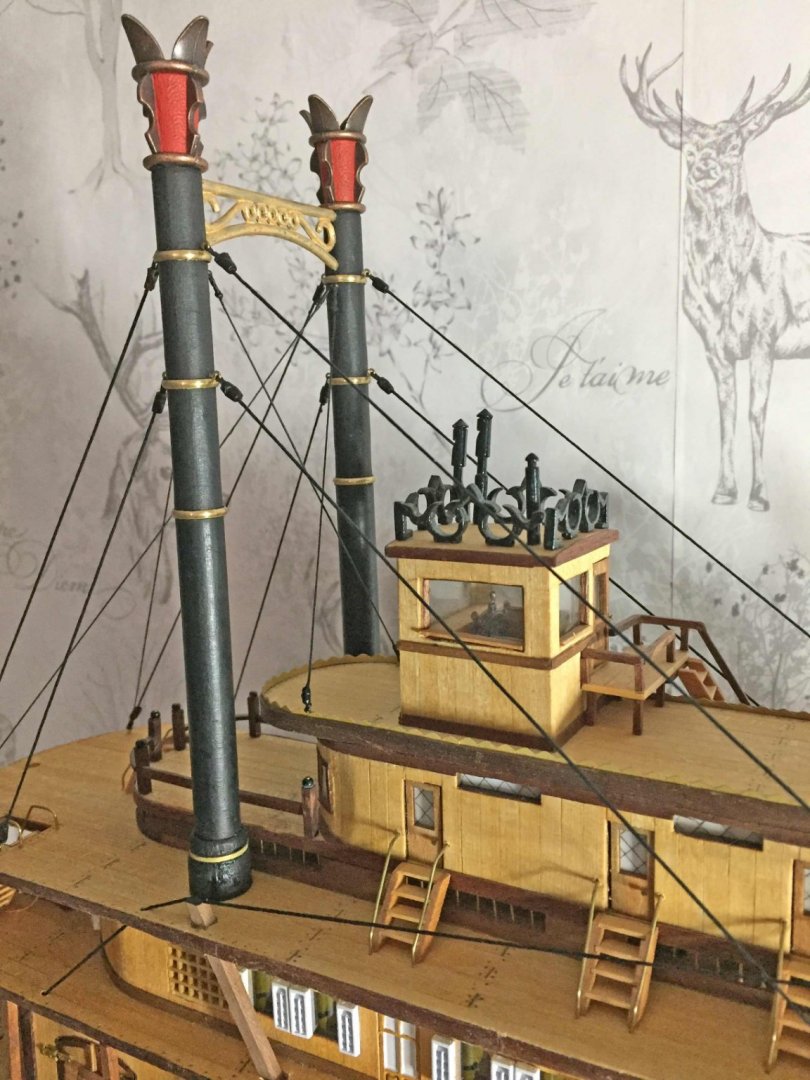
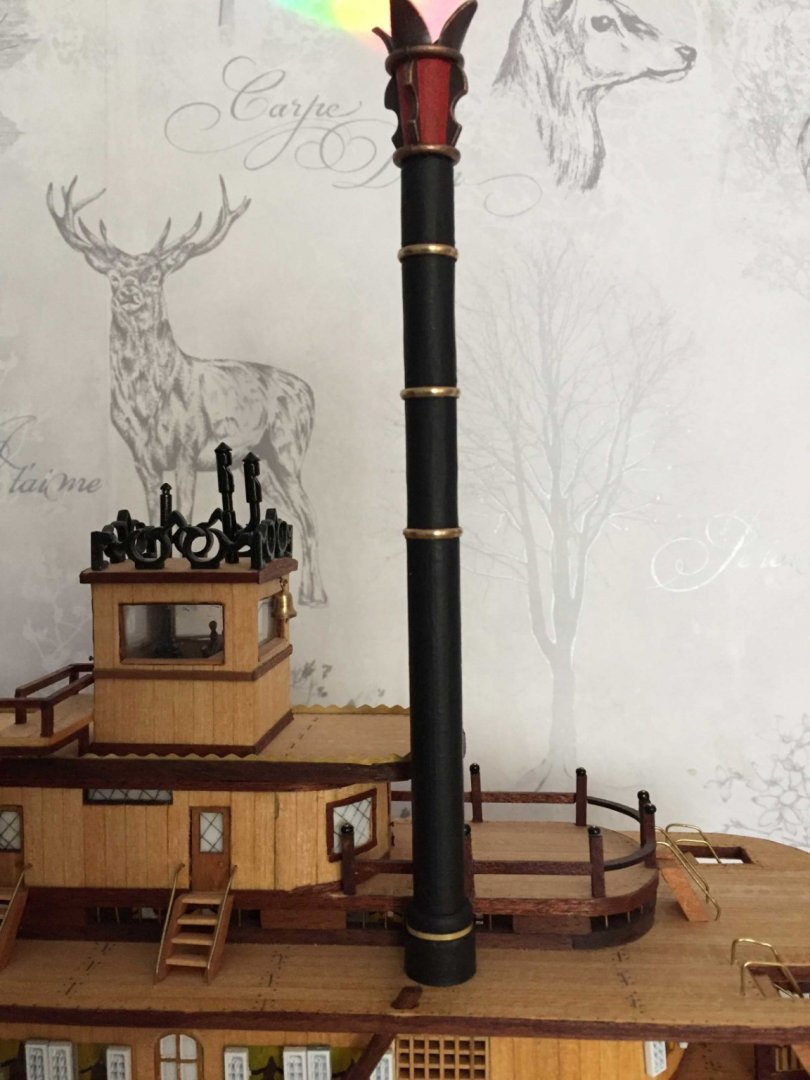
Chimney rigging done, and added lateral tensioners. Hog chains done. Added a lateral chain at the aftmost diagonal, and a crossbeam on the sternposts. The rope was painted matt black to remove the turns, to look like iron rods, an idea stolen from @Cathead - Thanks! These were set into grooves to take them over the diagonals as on many steamers photos show they were bent to shape. Many of them had a criss-cross of rods overhead open decks giving much more lateral and fore-aft strengthening, but I've decided not to show that as it tended to be on the smaller more open ones. Next steps, the fencing and then tackle the foredeck. Cheers for now, Bob


- 86 replies
-
- 4
-
-
- king of the mississippi
- artesania latina
- (and 2 more)
-
Jumping in to follow - as I've this kit in line to be done. Looking good so far. Have you looked at the other completed builds on here yet? Recommended if not. (most of the builders haven't visited this site in a long time). The carronade supplied are way out of the date range given for this model, so even it's being described as representative isn't entirely correct, something acknowledged in most builds. Some have used them, some have replaced them. The earliest mention of carronade is (Wikipedia ) 1759, and it's inventor joined Carron in 1765. Production started in 1778, and the first fully carronade Royal Navy ship was around 1781-2. Before then it was marketed to merchantmen. Other than that it's a nice model, and as it's been said many a time in many builds, it's your model and you build it to your wishes, with only helpful advise given. Cheers, Bob
-
Well done with that. At least one of mine de-laminated 😞 and there were other fitting issues too. Unfortunately this was done before I started a build log so there's no photos. Keep up with the good work!
- 109 replies
-
- 1
-
-
- Finished
- Artesania Latina
- (and 1 more)
-
Thanks Cathead. I've raided the wifes bead store for small tubes which are crimped and painted black.
- 86 replies
-
- 2
-
-
- king of the mississippi
- artesania latina
- (and 2 more)
-
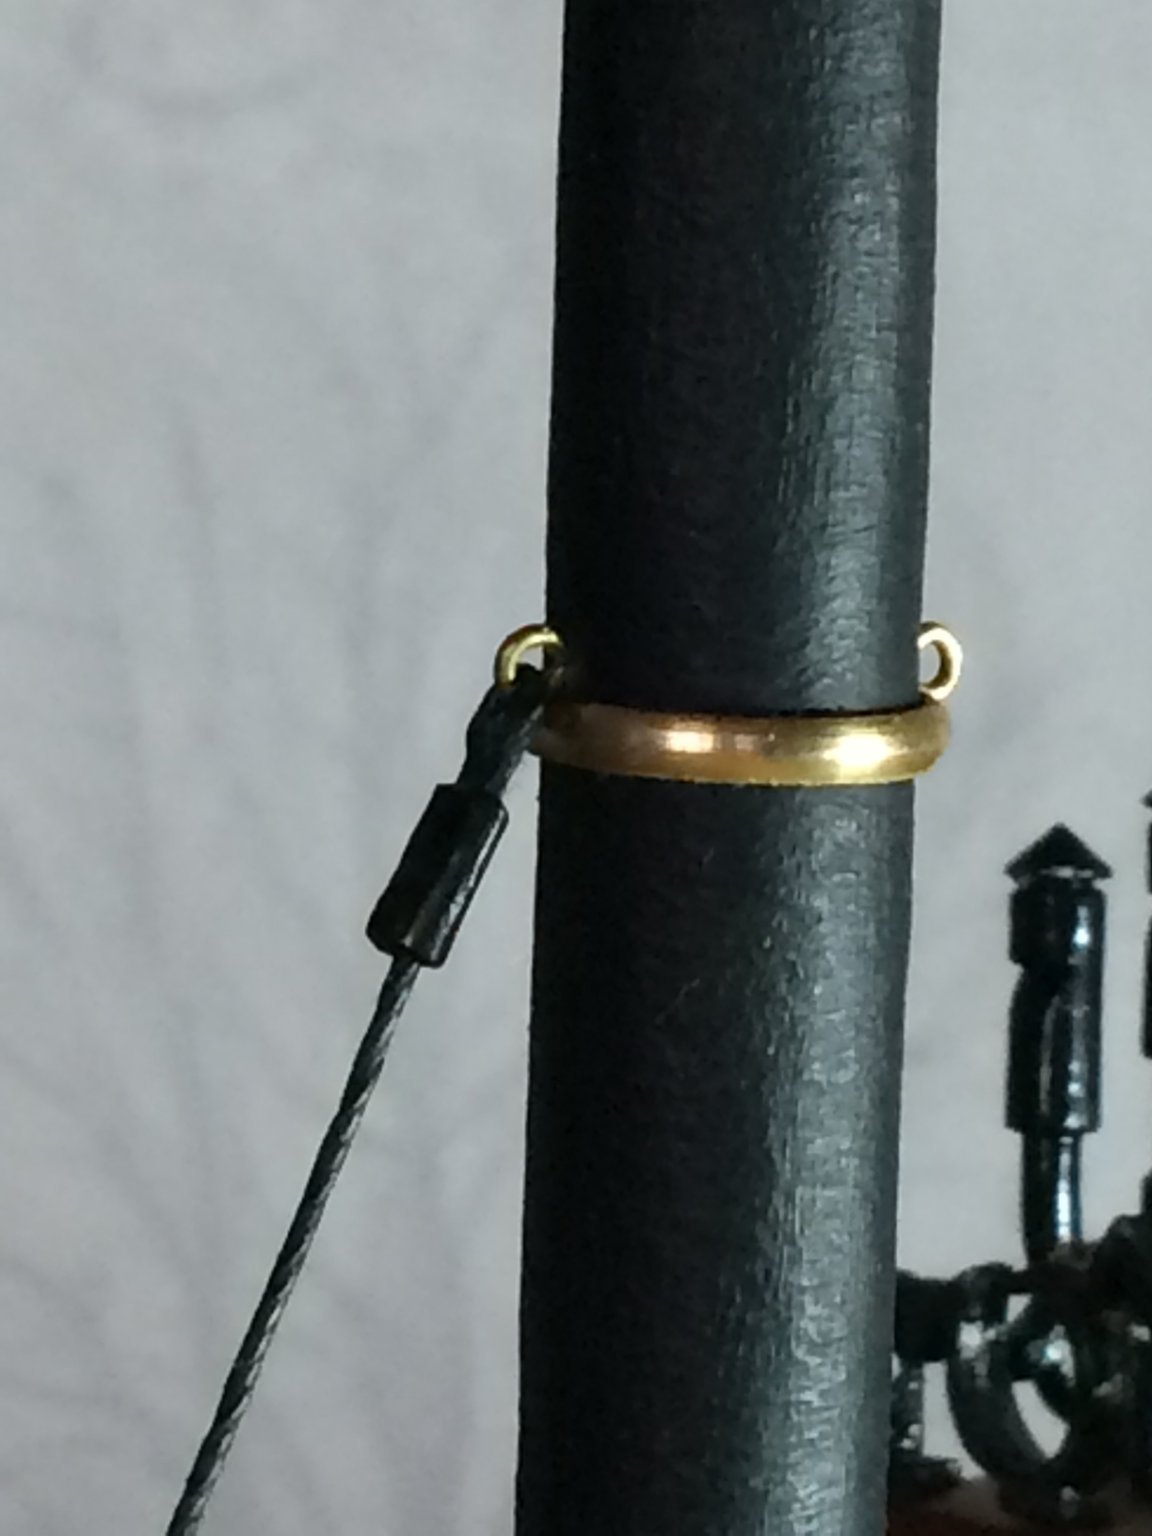
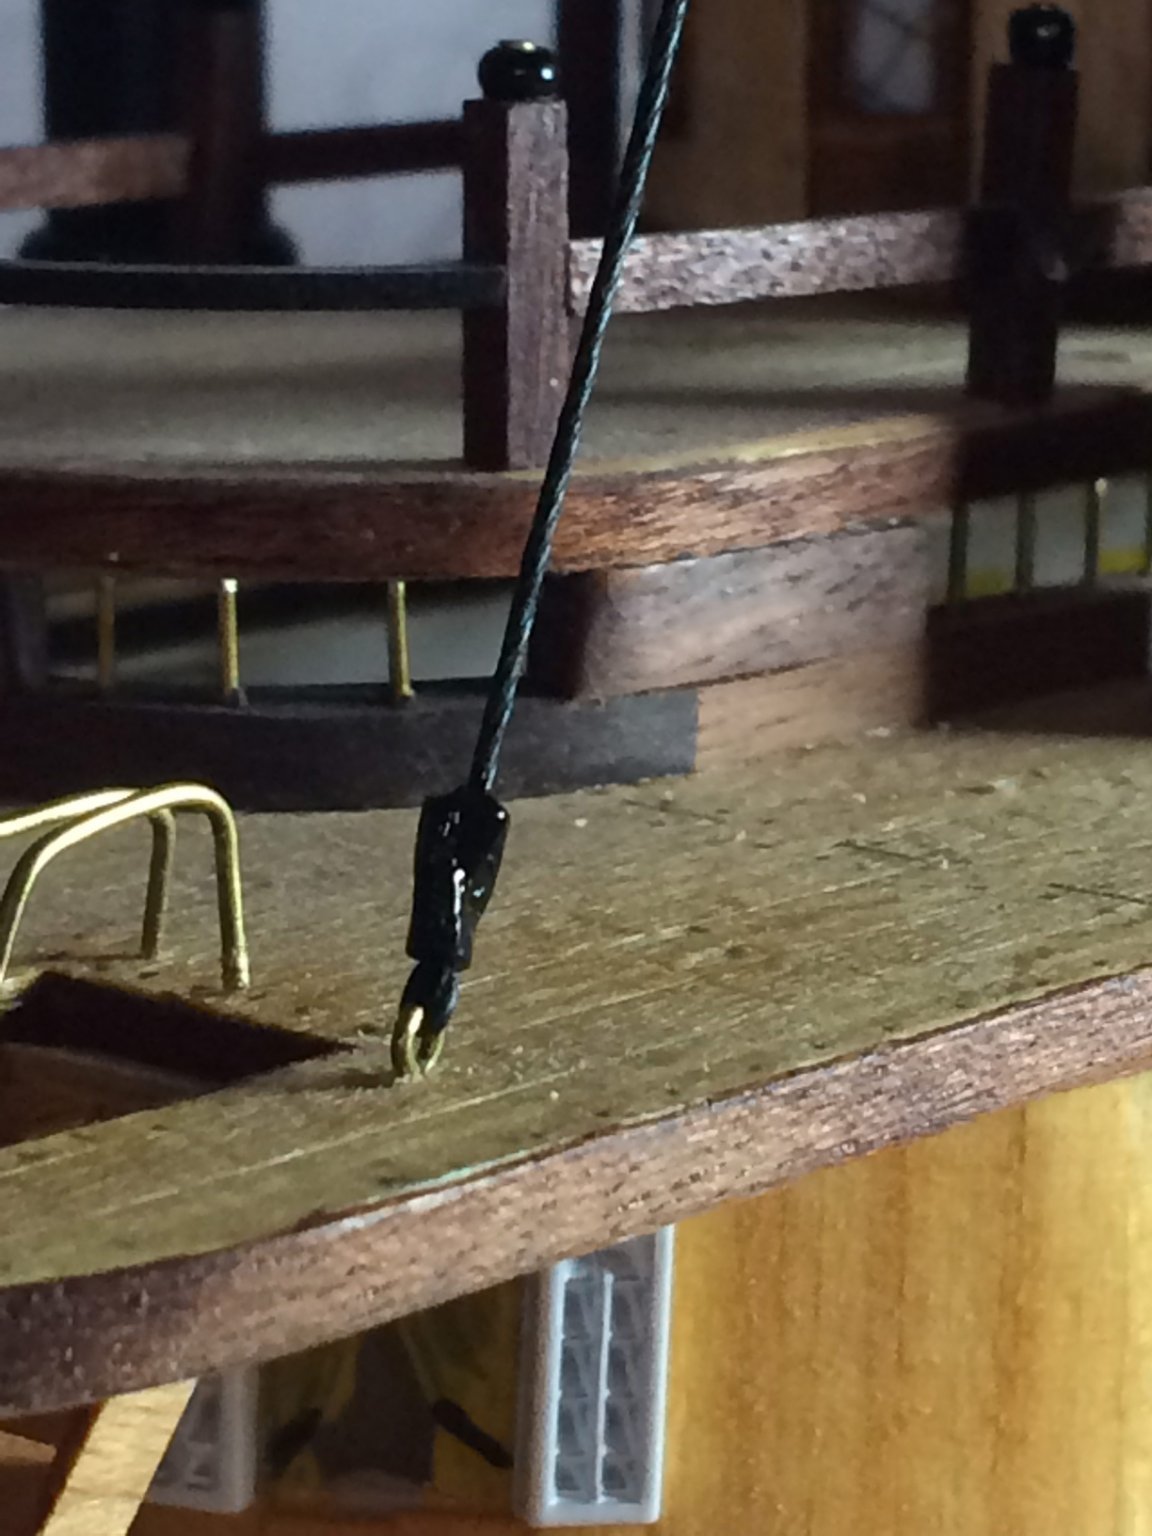
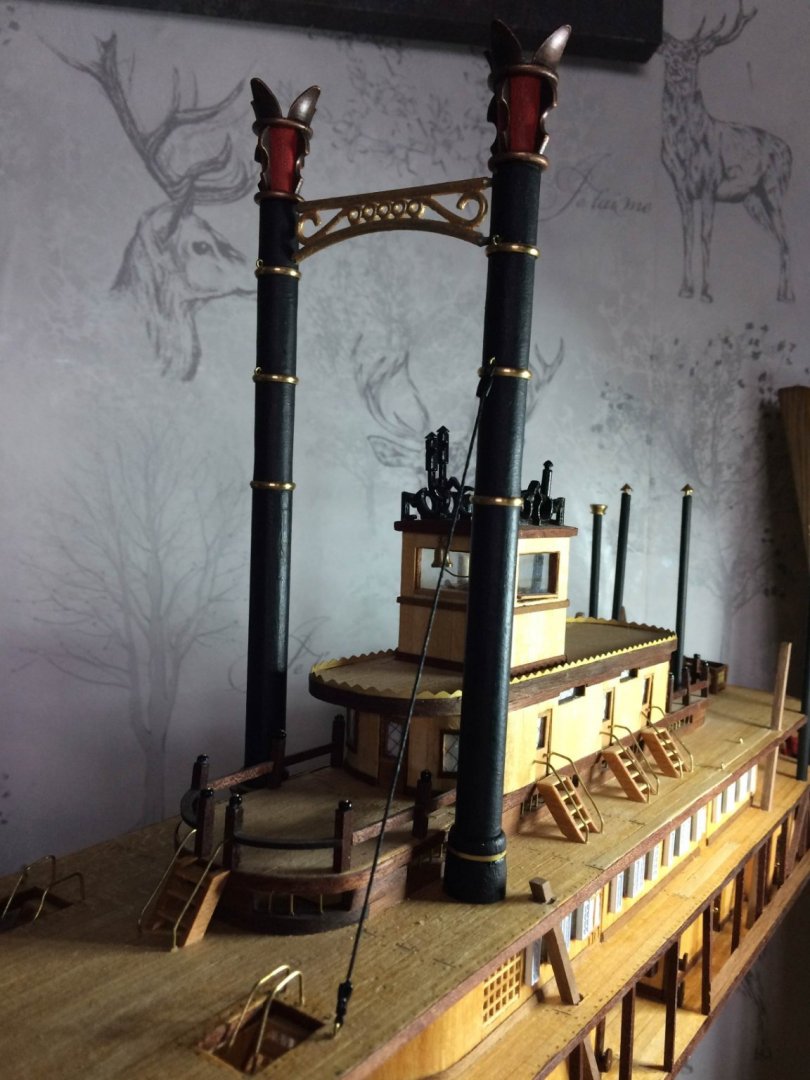
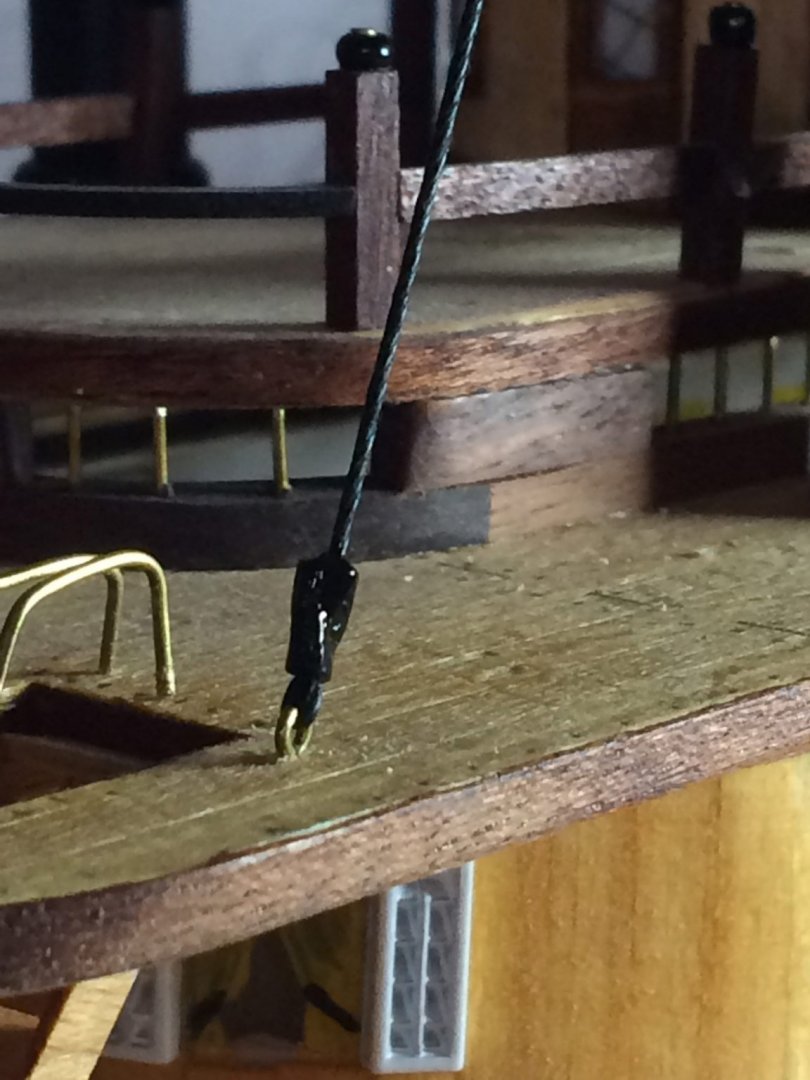
Thanks for looking in and the likes. Nothing done yesterday, but some thought about the next move. After some consideration I've decided to leave the railings to as close to last as possible to give me some manoevering room without snapping stuff off. So, first up today was fitting the eyes to the chimneys and decking for their tensioning lines. Then fitting the crossmember - the upper arm ends need shortening as the crown has a spike the goes centrally getting in the way. I've installed only one line just now. I've tried to simulate wire crimps at each end. What do you think - a little large close up, or ok at the viewing distance? Cheers, Bob

- 86 replies
-
- 4
-
-
- king of the mississippi
- artesania latina
- (and 2 more)
-
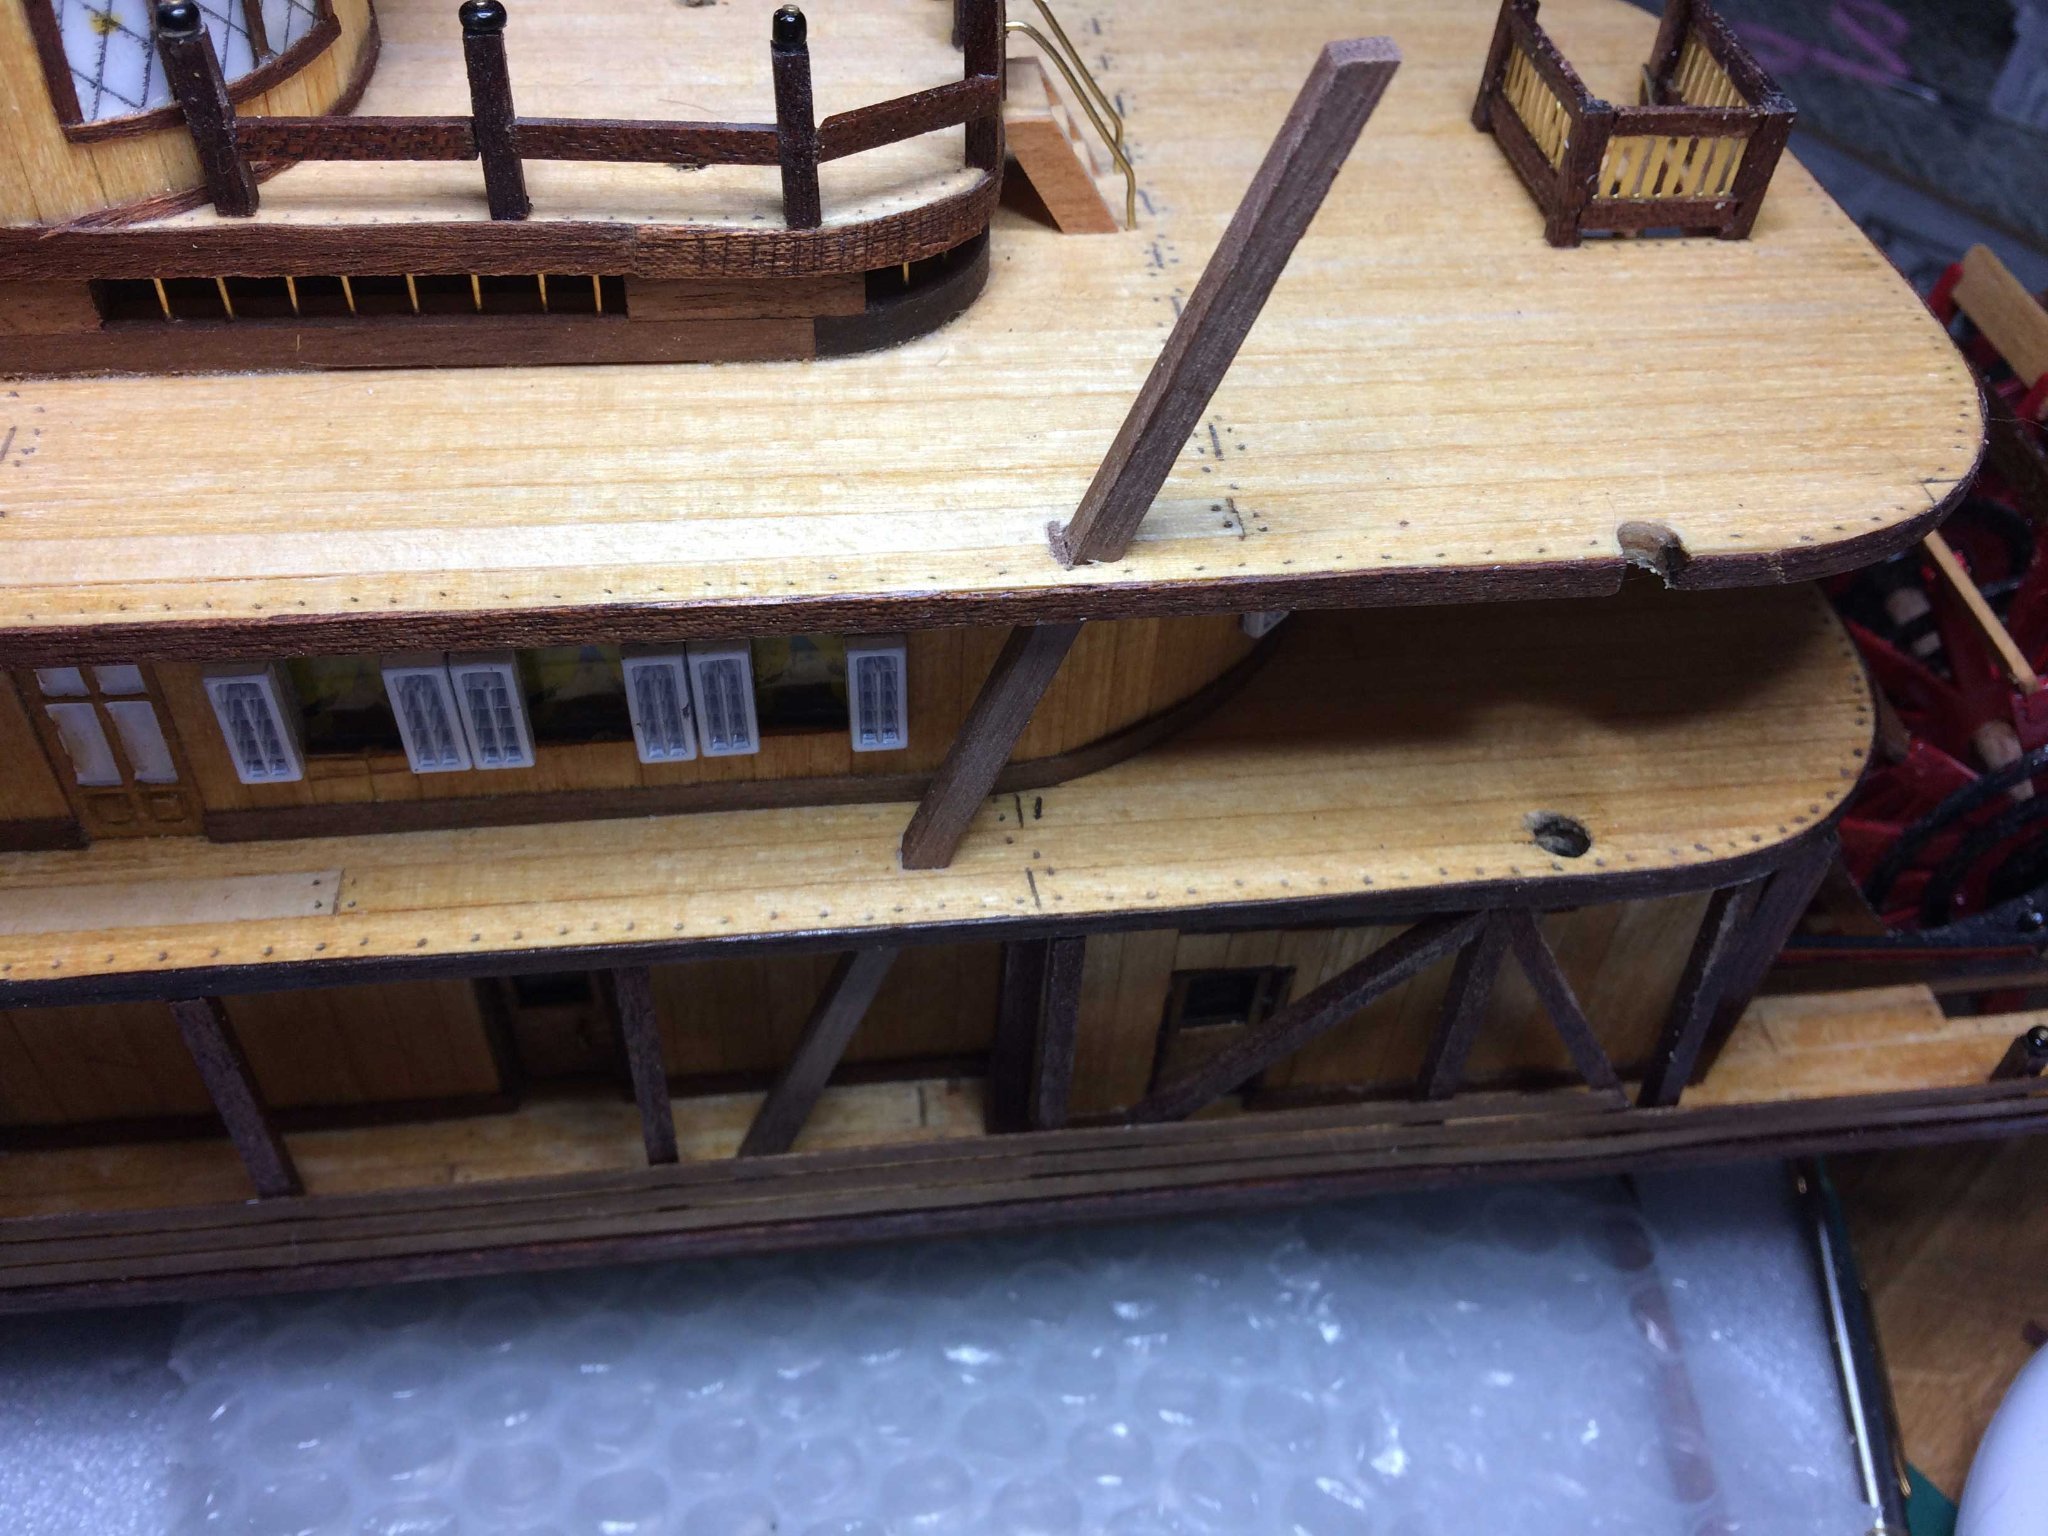
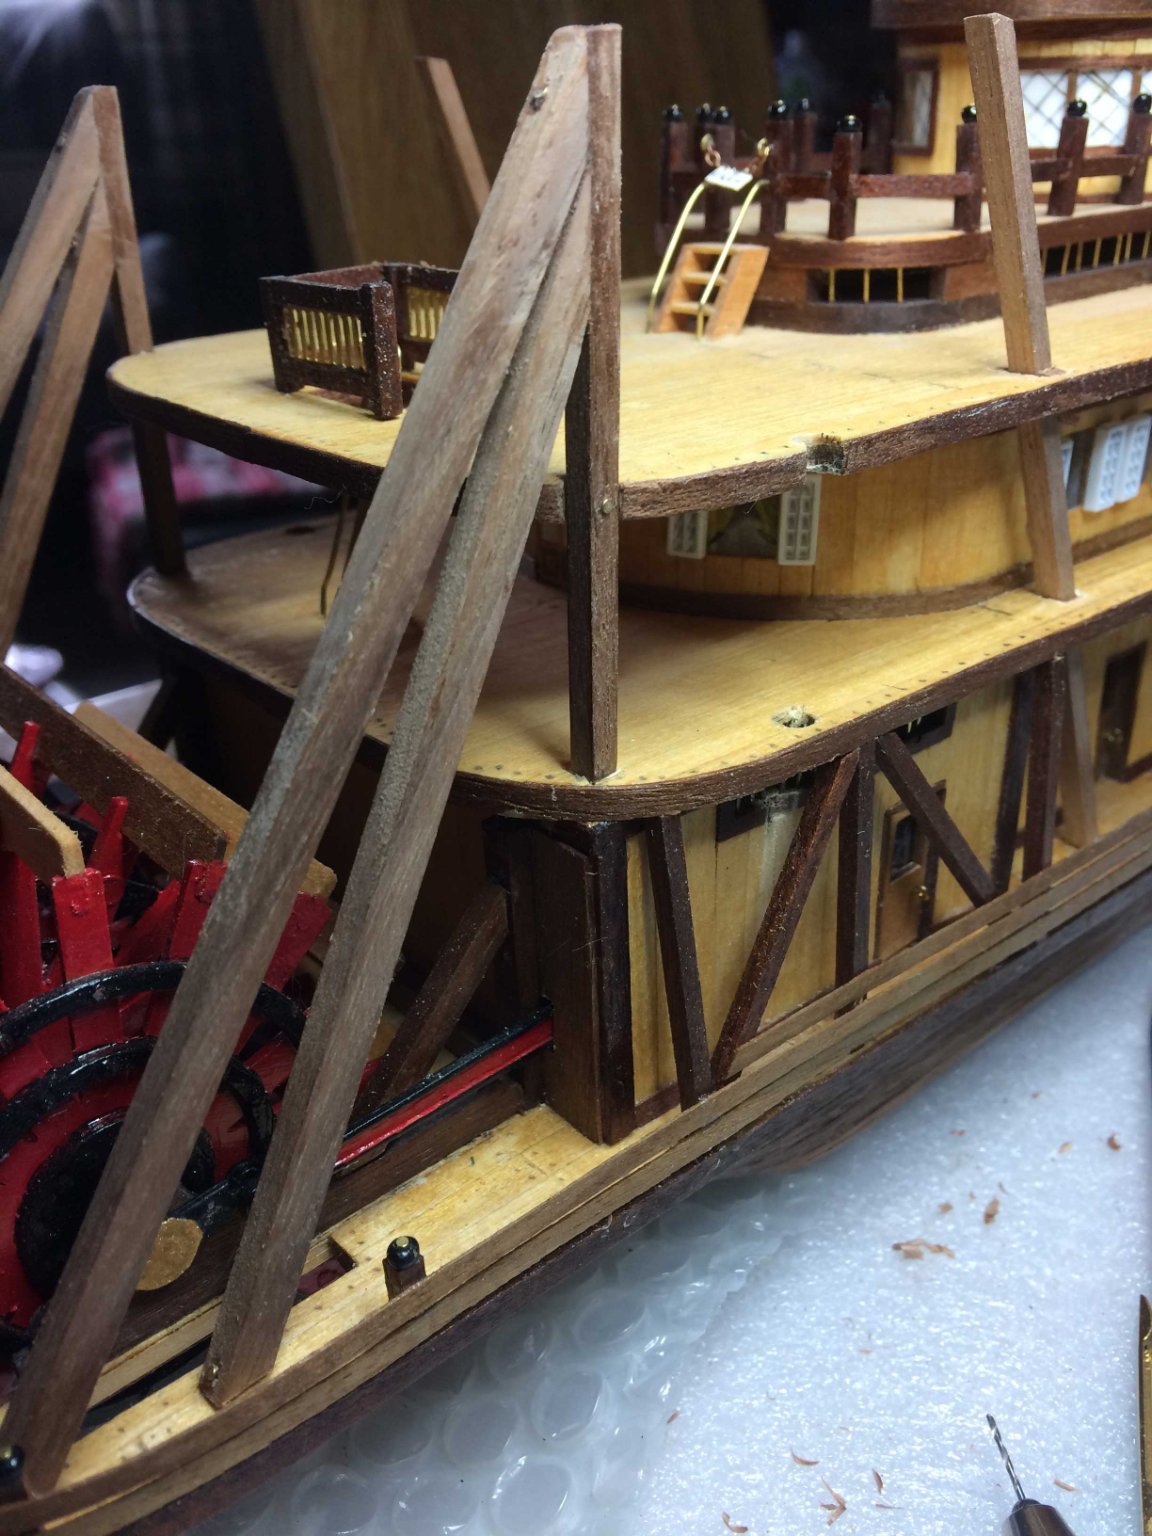
Thanks @Cathead I've copied this into my riverboat resources thread with full credit 😀 Yesterday was a productive one. After looking through innumerable photos of the hog posts (see above!) I realised that they were mostly square, with dimensions dependant on ship size. So, back to the tooth pulling. And out they came. Squared off the holes to give a better for-aft alignment and put new posts in. You may notice the triangular mark at the deck edge. This is for the new sternpost to suport the new stern trusses. Cut out and New stern post supplied reaching to the same height as the aft hog post with the post recessed into the deck to simulate going through to the hull framing. Putting it all together with two new stern trusses to the tailboard it looks like this. I used drilled holes and cut brass pins to simulate bolting of these pieces to each other and the deck. This is how she looks now with chimney and steam escapes placed. Having done this my advice to anyone watching and thinking of doing the same - hindsight is great! Start this job early, after the main hull and cabins are finished. 1) Don't yet plank the upper decks! 2) Build and place the passenger cabins 3) Have the hurricane deck, passenger cabins and Texas deck placed but not glued 4) Decide the size of the wood to use for the hog posts. To create mine I used 2 x 62cm lengths of 4mm x 4mm for the diagonals and stern upright, 1 x 62cm length of 5mm x 4mm for the stern trusses from my store box. What you need will depend on how long you decide to cut the pieces, and the angle of the holes. Mine came out at (2x) 10.2cm for the fore, 13.3cm for the aft, 11.7cm for the sternpost, 11.7cm for the lower truss and 14.2cm for the upper truss. Yours will pobably be different. 5) Square off the holes. I found that to get a good horizontal alignment (all hog posts and sternpost need to be in a straight line) and to pass the steam pipes I had to square them inboard of the original holes, but also check alignment with the tailboard, as the trusses have to be clear of the paddle arms. Start your cutting on the Texas deck, and angle / shape to meet the hurricane deck hole. Place the post through to the hurricane deck and mark around the hole where it meets. Remove the Texas deck and repeat the cutting to size, eventually place the Texas deck back to check for alignment and angle. Because you haven't planked the deck yet you don't have to be too neat! 6) Repeat 3 more times for the other fore and aft holes. Some larger ships had the central post, and some even doubled up on the fore / aft posts, but the central post is a personal choice now. I chose not to put one on. 7) DO NOT CUT your posts or trusses to size yet. The stern post size and truss lengths depend on the height you cut your aft hog post, as the sternpost is the same height as the hog post. This is best done once the build is much further on and before the main deck bracing and fencing is done. Remember to account for cutting angles! The hog chain (iron rod) runs from the sternboard over the truss to the forepost meeting the main deck at the base of the foremost fencepost. Drilling the holes may be easier if done before glueing the upper decks in place. Caveat - you do this at your own risk! I did find a couple of photos, pages 3 and 4 at steamboat.com that show a very similar layout as AL give.


- 86 replies
-
- 6
-
-
- king of the mississippi
- artesania latina
- (and 2 more)
-
Looking around to find out what size turnbuckles, their placement and connections to decks for the hog chains I found this website Steamboats.com to have lots (and lots!) of extremely useful photos of "at the time". The photos are in high res, so using ctrl and + together you can zoom in to see some incredible detail. The turnbuckles are, in almost all cases on large boats, where the cage is screwed on the actual hog chain, fitted at head height at the fore, centrally fore and aft, and about 3 feet up on the upper deck paddle truss.
- 86 replies
-
- 2
-
-
- king of the mississippi
- artesania latina
- (and 2 more)
-
I have this kit to one side at the moment, partially completed hull. Some of the parts you have are much better than the original one I got 9 years ago. An etched deck and laser cut parts, colour build manual - such luxury! The original had the diagram sheets and a couple of typed pages saying "do this" make that" with a parts dimension list. Only one of the reasons I put it aside to gain more experience and do some research to turn her into a reasonable model of a snow rigged sloop a distant cousin was 3rd lieutenant on. Looking good. Does it come with cannon, or only the carronade as I, and many others who built this, got? You may want to consider doing a seperate build log to your SF, as it can be found much easier Cheers Bob
-
BTW, keep all, or as much as possible, of your planking offcuts - they will come in useful! (You can always get rid later) AL don't give much, if any, slack in the amount of wood they supply, also look at the dowels for warp / curvature / ovalness.
- 109 replies
-
- 2
-
-
- Finished
- Artesania Latina
- (and 1 more)
-
Yesterday afternoon. OK, here we go - Deep breath and let's start ripping things out! 😱 First job, removal of the centre posts. As these aren't set into the lower deck, but just glued, so a tight grip with a pair of flat pliers, quick twist and - Gone! Just like pulling a tooth - Ouch! Next, using a scalpel to cut new plank ends and to slice and lift the old planking - Centre upper deck planks and deck plank gone 😨 Planking replaced! 😂 and new fake treenails applied. I didn't do the underside of the decks like this as access, and the ability to see, is very limited, so the holes were filled with offcuts of dowel. After a sanding down, off to the the outside workspace for oiling to match colours as the smell affects the wifes asthma. This morning - end result - Not too bad a match a little time, and hidden mostly by new railings, and you won't know! 😇 This also shows the new cut sizes of the hog chains, fore and aft. Aftermost is 2 people high. Painted the smokestack, hereafter called the Chimney as I've learned thanks to @Cathead and his goldmine of info, but have been requested to leave the fancy parts of the chimney crown the original bronze colour. Also added is the extra brass band around the base into the slot on the deck cowling for decoration. The upper bands on the chimney itself - decoration, to help stop chimney expansion and rupture by heat, points for rigging eyes, joint bands to extend the chimney height, or a multiple of these uses? 🤯 Now to amend the stern with the extra strengthening braces for the hog chain rods Cheers for now, Bob


- 86 replies
-
- 4
-
-
- king of the mississippi
- artesania latina
- (and 2 more)
-
Late 2012 Mac running Mojave 10.14.6 Using Wine/Winebottler I have Delftship v5 working, but can't get v10 or 13 to work. v5 is 32bit as is Freeship v3.4 which I also have working. The new Delftship v13 is 64bit, as is Freeship V5 which I can't get working either. There are problems getting some 64bit programs to work as Wine is a 32 bit program. There is no 64bit Wine version for Mac, so it will only work properly in Mjoave (10.14) or lower, as Catalina is pure 64bit and won't even run OSX 32bit apps. Also it appears OSX deprecated OpenGL3 in Mojave and above for Metal. If you want to try either on a Mac you really need an older 32bit version. It looks like either dual booting or a virtual Windows environment (Virtualbox, Crossover - who say they've got it running, Parallels) is the only viable solution for some programs. Hope this helps a little. Bob A small update. Using Virtualbox and Win7 64bit installing delftship 1330_334 on a Mac Mojave 14.6 it won't run. However, putting the file opengl32.dll into the same directory as delftship.exe it starts and runs. Tweaking the Vm settings for RAM and Video RAM will get it to work at least usable.
-
Thanks Cathead. I just needed some confirmation before going on with the upgrade! Not sure about putting in the second set, but will look at the viability of putting them in (forward of the existing ones) and also putting in some lateral ones. Going to remove the central post for definate though. Updates in a couple of days!
- 86 replies
-
- 1
-
-
- king of the mississippi
- artesania latina
- (and 2 more)
-
No shame in self promotion! Great explain and great video. More views of the hog chains on the Bertrand from approx 1:36. Did you use crimps to simulate the turnbuckles? I'm not trying to make an historically accurate model of any particular ship, but one that at least is reasonable, and where adjustments or additions can be made (without ripping the whole thing apart!), I'm prepared to at least try and do them. Great learning curve! Looking at the "America" which seems to be quite representative of a lower Mississippi river boat about 1900, it looks like - 1) at the highest the aft post should be cut to about 10 - 12 feet high, with the rod running down through the lower deck at about 60 degrees 2) an extra stern bracing beam needs to be added each side in line with the wheel arms extending aft to the deck end from about 8 feet above the upper deck, (which the rod will run down extending from the aft post) 3) maybe remove the central post altogether, which seems to be more representative the more photos you look at of this type of boat, or 4) the central and fore posts cut to give a rod angle of approx 15 degrees, the rod extending through the decks to level with the foremost railing newel. 5) There's also a cross truss between the aft posts and also the bracing beams. I'm using the figures in the photo give a size representation for heights. Looking closely at the high res version of this photo there are also the cross braces visible, presumably because there appears to be no structure except for the engine room under the next deck. Thanks again, Bob
- 86 replies
-
- 3
-
-
- king of the mississippi
- artesania latina
- (and 2 more)
-
Congratulations to you and your wife! Life will get very busy from now on - I know! Those stairs - well, I just did something different, even AL have now given up on them and have straight ones on the new release model. All the best, Bob