
Supplies of the Ship Modeler's Handbook are running out. Get your copy NOW before they are gone! Click on photo to order.
×

dgbot
-
Posts
3,993 -
Joined
-
Last visited
Reputation Activity
-

 dgbot reacted to Siggi52 in HMS Dragon 1760 by Siggi52 - FINISHED - Scale 1:48 - English 74-Gun ship
Thank you Robin.
Here now some pictures with the ship at his final place and with lights on
In reality the light is not so bright, that comes at the pictures because I had the shutter of the camera open from 1-4 sec. But it's bright enough that you could see most parts inside (also the rest of the dust )
Regards,
Siggi
-
dgbot reacted to Siggi52 in HMS Dragon 1760 by Siggi52 - FINISHED - Scale 1:48 - English 74-Gun ship
Hello,
now it is done, the ship is in his case.
The only thing that is left, is to connect the LED's in front of the ship with the switch and the battery.
Regards,
Siggi
-
dgbot reacted to druxey in Greenwich Hospital barge of 1832 by druxey - FINISHED - 1:48 scale
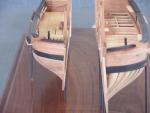
Further progress. The garboard is in on the port side and the forward plank on the starboard. The interesting thing is that, at any point in planking, provided one has spiled and shaped the plank to lie without stress, one can remove the model from the plug and it will retain its shape.
-
dgbot reacted to pete48 in Haven 12 1/2' by pete48 - 1" = 1' Scale - Joel White version
Today, I started by installing the rear bulkhead, Next I finished the floor framing in the rear section, up to the rear bulkhead. I then ( before I got to carried away ) Made and installed the Mast Step. Next I made and installed all the door jambs, Followed by a coat of Titebond 3 in the bilge area. This will seal it up. Next will be to paint the bilge ( grey like I used on the Buzzards Bay 14 ) Here are the results
-
dgbot reacted to EdT in Young America 1853 by EdT - FINISHED - extreme clipper
Young America - extreme clipper 1853
Part 141 – Skid Beams
Young America’s four boats were stored on skid beams that extended across the breadth of the ship over the main deck cabin. These were supported by stanchions off the bulwarks and by the cabin structure. The first picture shows the completed installation of these beams.
The beams have the same round up as the decks. The supports at the bulwarks are iron. I made these as flanged cylindrical posts. The next picture shows the stanchions after blackening.
These were made from brass tube and flanges cut from the next larger size of tube. The next picture shows the method used to cut the flanges.
To size the thickness of the flanges a steel cutting gauge was used. This has a number of milled holes to fit two sizes of tube. The holes were bored to depths of 1”, 1.5”, 2” and 3” for different uses. In the picture the flange tube is being cut by hand with the tube held down in the 1.5” recess. After cutting, the disks are filed clean while in the recess.
The flanges were then silver-soldered to a length of smaller tube. After pickling they were cleaned up and polished in the lathe as shown below.
Flanges were then made and fitted to the opposite end as shown below.
The flanges were set at the required length taken from measurement on the model using the depth gauge shown in the picture. After soldering and pickling, the second flanges, the pieces were returned to the lathe for final polishing as shown below.
The stanchions were then parted off in the lathe, degreased and blackened. The last picture shows the beam installation in progress.
Indexing pins were placed to hold the beam in position. Copper wire “bolts” were then epoxied through the beam and stanchions and into the bulwarks to permanently secure the ends. Similar bolts were then installed into the cabin structure.
One more of the several deck installations now complete. The next order of business was more challenging - the brass monkey rail around the poop deck at the stern.
Ed
-
dgbot reacted to SawdustDave in Sovereign of The Seas by SawdustDave - FINISHED
Finally managed to stick all the new stuff in place.
As you can see, very few of the original panel pieces made the cut. Same goes for the starboard side, which is now very close to being exactly the same as the port side seen here.
Only the three blank panels below the forecastle left to complete the broadside hull carvings. Haven't decided what will go there, but, we shall come up with something eventually.
For now, I think I will work on a few more gun port lids and possibly rig another cannon or two.
-
dgbot reacted to SawdustDave in Sovereign of The Seas by SawdustDave - FINISHED
Back to play dough.....Sculpy.
Spent the morning playing around with a couple of modeling clay pieces.
The main advantage I'm looking for is the ability to get a little smoother (rounded) edges.
I'll bake these rough forms in the oven for about 5 minutes (250 degrees), and remove them before they completely cure.... work on some detail refinements.... then back to the oven for another 10 minutes at 350 degrees.
A little more sanding and clean-up will still be required before painting.
-
dgbot reacted to gjdale in Sir Winston Churchill by Turatopgun - Billing Boats
Looks like you're off to a good start Phil, and I see you're already receiving plenty of good advice. Just remember to take your time and enjoy the journey. Mistakes will most certainly be a part of the process and re-dos are simply an opportunity to do better. I look forward to following your progress.
-
dgbot reacted to CharlieZardoz in Sultana by CharlieZardoz - Model Shipways - 1:64
Had a chance to catch up on an old favorite during the meanwhile. Here is where the USS Congress gets blown to pieces by the Virginia. One day I will build her and she shall rise again!
-
dgbot reacted to Landlubber Mike in Sultana by CharlieZardoz - Model Shipways - 1:64
Looking really great Charlie. All that work upfront will pay off many dividends in the end.
-
dgbot reacted to CharlieZardoz in Sultana by CharlieZardoz - Model Shipways - 1:64
Thank you so very much! I know it's a bit slow but I keep getting to her whenever possible, the benefit of the winter is more home time
-
dgbot reacted to ianmajor in HMS Unicorn by ianmajor - Corel - Scale 1:75, 1748 to 1771
Mark,
Interesting point you make. It did seem strange to me that Hahn's formula give a simple linear relationship between caliber and all of the carriage dimensions. As you say the gunners would have to be on their hands an knees with my 3 pounder. It also has me wondering about the form of tackle on the much smaller cannon. I found this photo on line <link> which seems to fit your description.
The round ports on Lyme and Unicorn seem to be very restrictive. An interesting comparison is with the 1764 Winchelsea ( <link> to NMM model and <link> to NMM held plans) where the quarter deck gun ports are square open frames with a low sill at deck level (presumably to stop the gun and crew going over the side!).
If the quarter deck on my model had been at the correct height the circular gun ports would be much closer to the deck allowing the use of smaller guns. I think I will have to go with the bigger guns as supplied.
-
dgbot reacted to ianmajor in HMS Unicorn by ianmajor - Corel - Scale 1:75, 1748 to 1771
......actually Mike, brave is not the right word. Insane might be a better adjective. My wife was watching me a few days ago and said "Would it not be better to start again?". What answer can be given to a woman's logic that can explain a man's folly?
-
dgbot reacted to BANYAN in HMS Unicorn by ianmajor - Corel - Scale 1:75, 1748 to 1771
Hi Ian, now that I am retired I have more time to read more logs and came across your very interesting and very nice build of Unicorn. Some great research and discussion here, and I look forward to taking the time to read through thoroughly in the near future.
cheers
Pat
-
dgbot reacted to ianmajor in HMS Unicorn by ianmajor - Corel - Scale 1:75, 1748 to 1771
Piet and Martin, thanks for your kind words, and thanks for the likes.
I have stripped the cap off the starboard side using Isopropyl. As a break from this nerve wracking activity and whilst the Iso dried up completely I roughed up a 3lb cannon out of wood for the barrel and card for the carriage. I used the spreadsheet with input of 3lb weight and long barrel. The information generated from the Hahn formulae was:-
3 pounder cannon:
I blackened the barrel with wood stain for (gratuitous) effect! The exercise showed two things.
First - that the barrel was rather long. All the illustrations of very small cannon that I have seen have rather short dumpy barrels. Probably this would have been resolved by using the short barrel 1:15 ratio.
Second - as can be seen in the photos below the poor little thing can't "see" over the bottom edge of the circular gun port. When viewed from outside of the hull the round ports appear to be the correct height above the upper deck gun ports. If the quarter deck had been higher (as per the NMM Lyme and Chapman Unicorn plans) the smaller cannon would be OK. As it is it looks like a will have to stick with the modified "9 pounder" Corel version.
An entertaining little diversion! When seeing how small the 3 pounder is I am not surprised that they were not regarded as part of the main armoury when Unicorn was built.
I have also attached my spreadsheet calculations for a 9 pounder long.
So - back to the caps and new rail.
-
dgbot reacted to yvesvidal in Newsworthy updates from Chris Watton
In MSW incarnation #1, there was a few threads about the work of Master modeler Chris Watton and some upcoming kits that he was designing for Amati.
I was wondering if there is anything new in that direction. I remember very vividly two gorgeous models in preparation for Amati:
1) The Bellona (unfortunately at the scale of 1/72 - I wish it would be available at 1/64th))
2) The HMS Victory at 1/64th, using a new technique based on MDF for the building of the hull and inner decks.
Could anybody shed some light on these two kits?
And then of course, there was also the Revenge:
Thanks in advance.
Yves
-
 dgbot got a reaction from Canute in airbrush for wooden ship?
Michael, if Amazon does business in Israel try them I think you will find an airbrush for less. My advice would be to go with a Paasche H or Badger Anthem. I have been a happy user with the Paasche. And I have heard many good things about the Anthem and they are both more than adequate for our hobby.
David B
-
 dgbot got a reaction from mtaylor in Sultana by CharlieZardoz - Model Shipways - 1:64
You are making good progress Charles, She is shaping up nicely.
David B
-
dgbot reacted to Piet in Surabaya by Piet - 1/80 - Mid 17th-Century VOC ship
Today was rather productive, albeit short. I didn't get to the shipyard till around ten a m but soldered the second anchor together. Then it was cleaning them and roughly polishing them. I don't want them to appear as jewelry, leaving them a little rustic like the ship is, a good match.
Next step was installing the stock. I put a small dab of CA at the center anchoring bolt and then some PVA at the ends of the stock.
Next I made the rings for the anchor cable. This posed a slight problem because the shank in square and I had to make the ring with a flat part that goes through the shank. It was a little tricky getting the ring to look like a ring yet also let it rotate in the shank. Next problem was soldering the ends together in such a way to make it look like a forged ring. I don't know if anyone on the forum ever have welded iron rings like chain links, in a black smithy or forge fire. Very tricky - yes I have. In any case this reminded me of that process. I filed both ends to a taper so that when thy are soldered together they should look like one piece. Perhaps I'm making it a lot more difficult then need be, again not really knowing how they did it in 1665. It turned out acceptable to me and if it's not the way it should be Jan will most certainly let me know. One more thing I need to look at using the URL Jan gave me.
\I normally don't start with MSW till late in the evening, sorry Jan for not yet getting to look at the model in the Rijksmuseum. Tomorrow for sure, before I do anything else.
After lunch I cleaned up and started making the bands for around the stock. I made three that are actually ready to be put on and the ends soldered. Then it was time to close shop. I cancelled the order for the iron bands
Tomorrow we'll make the bolts for the stock and finish the anchors. There is still a smaller anchor I want to make. We'll see - the 3.2 mm brass bar is a little to hefty for the smaller anchor and ordering a smaller bar at the total cost of $12.00 is a little much at tgis stage - - unless I hand machine these down.
Here I am in the process of filing the ring ends to a taper. If you squint real good you may be able to see the spit and start of the taper. I had to put a toothpick in it to hold the ring up for the picture.
Here we see the finished ring.
Here are both main anchors posing for the picture. Now the only thing left are the bolts that hold the stock pieces together.
I hope all yuns approve.
Cheers,
-
 dgbot got a reaction from lionfish in airbrush for wooden ship?
Michael, if Amazon does business in Israel try them I think you will find an airbrush for less. My advice would be to go with a Paasche H or Badger Anthem. I have been a happy user with the Paasche. And I have heard many good things about the Anthem and they are both more than adequate for our hobby.
David B
-
dgbot reacted to druxey in Greenwich Hospital barge of 1832 by druxey - FINISHED - 1:48 scale
Thank you, gentlemen all.
Finally had some quality time on the model. The first garboard plank is now spiled, cut, shaped and fitted. The stock is thin enough to cut with a sharp scalpel blade. The twist was achieved by cold wet bending and holding in place using rubber bands until dry. Castello takes more persuasion to bend than holly. Once the plank was dry, it was glued in place. I needed to cut back the plug more at the bow to allow the plank to land nicely in the bow rabbet.
One plank down, many more to go!
-
dgbot got a reaction from mtaylor in Surabaya by Piet - 1/80 - Mid 17th-Century VOC ship
Piet have you thought about using black electrician's tape or pinstriping tape to simulte the banding?
David B
-
dgbot got a reaction from mtaylor in Clara May by Moxis - FINISHED - 1/48 scale - ketch - after David McGregor plans
You have been doing a wonderful job Matti. I came across your build and have been amazed at the things you have done and achieved. If you decide to go with turnbuckles they can usually be found in a RR hobby store or supplier.
David B
-
 dgbot got a reaction from Piet in Surabaya by Piet - 1/80 - Mid 17th-Century VOC ship
Piet have you thought about using black electrician's tape or pinstriping tape to simulte the banding?
David B
-
dgbot reacted to GLakie in Wasa by md1400cs - FINISHED - Corel - 1:75
Nice rope-work Michael! Looks like a perfect eye to me.