
HOLIDAY DONATION DRIVE - SUPPORT MSW - DO YOUR PART TO KEEP THIS GREAT FORUM GOING! (Only 20 donations so far - C'mon guys!)
×


mbp521
-
Posts
1,002 -
Joined
-
Last visited
Content Type
Profiles
Forums
Gallery
Events
Everything posted by mbp521
-
 Keith, Thank you for the kind words. You are so right about that being some of the best scenery (minus the smoke of course). I was a little disappointed that we didn’t make it to Yellowstone, but I’ll definitely hit it on my next trip up there. Nice to have friends up there to go visit every so often. We spent most of our trip in Cody, WY where, if you are a gun enthusiast like I am, they have one of the best collections in the world. The Buffalo Bill Center of the West has over 7000 guns dating from the 2000’s back to the invention of gun powder. They actually have the entire Winchester collection from every model they ever made, experimental and production, to ones the Winchester family collected and traded for. We spent about five hours perusing just the gun section alone. The museum also includes other exhibits from the natural history of Wyoming and Yellowstone to artifacts from Buffalo Bill’s Wild West Show. Truly a must see if anyone is ever in Cody, WY. You may have to set aside a couple of days to see the whole thing, that’s why your admission ticket is good for two days. I would also suggest the exclusive tour of the gun museum, the cost is quite a bit more than general admission, but they take you to the vault where you get to handle some rare guns that are not on display (with white gloves of course). Truly an experience. This was just one of the rooms in the museum. Each of the pull outs has rifles and all of the drawers below have hand guns. -Brian
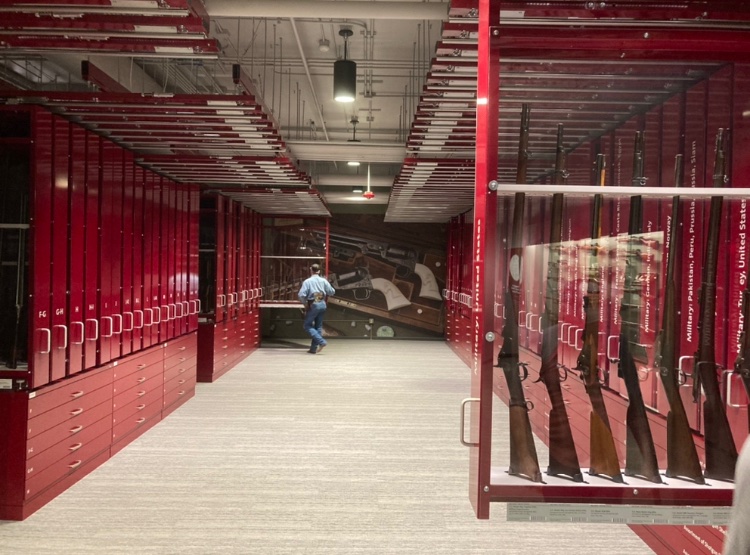
-
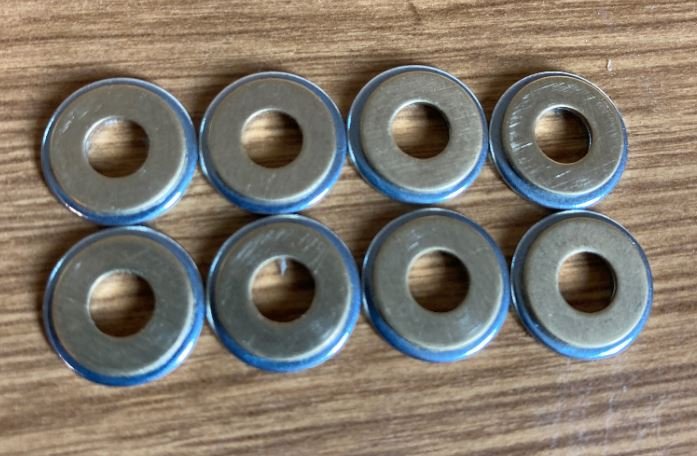
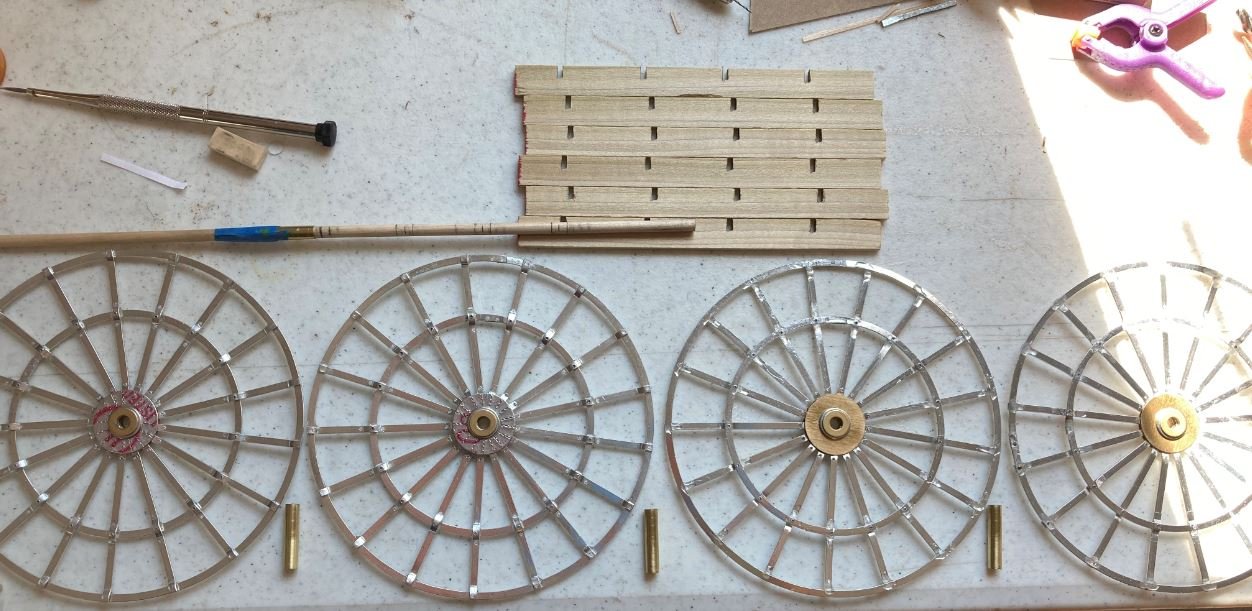
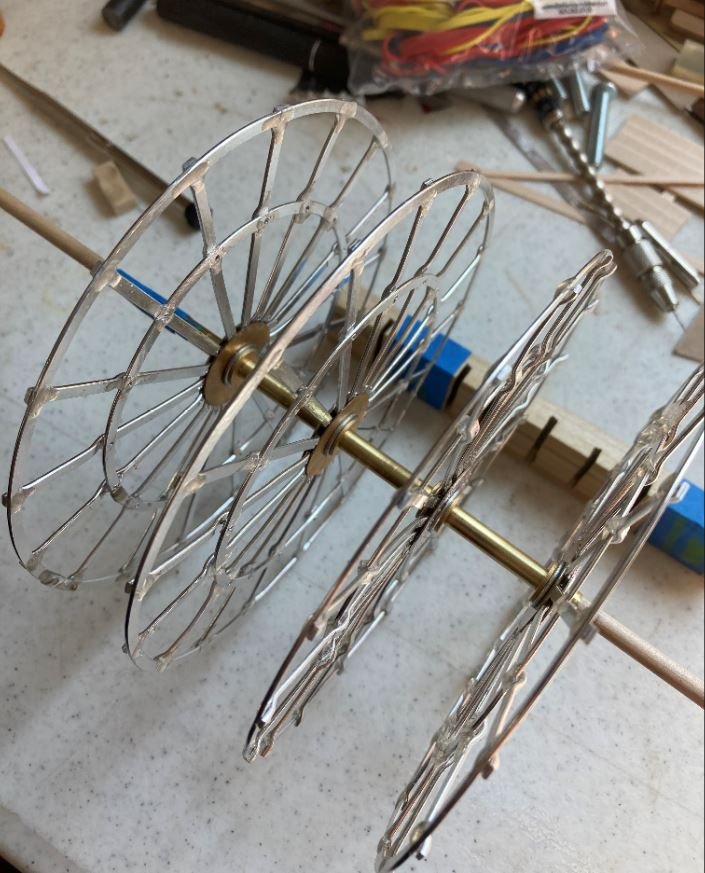
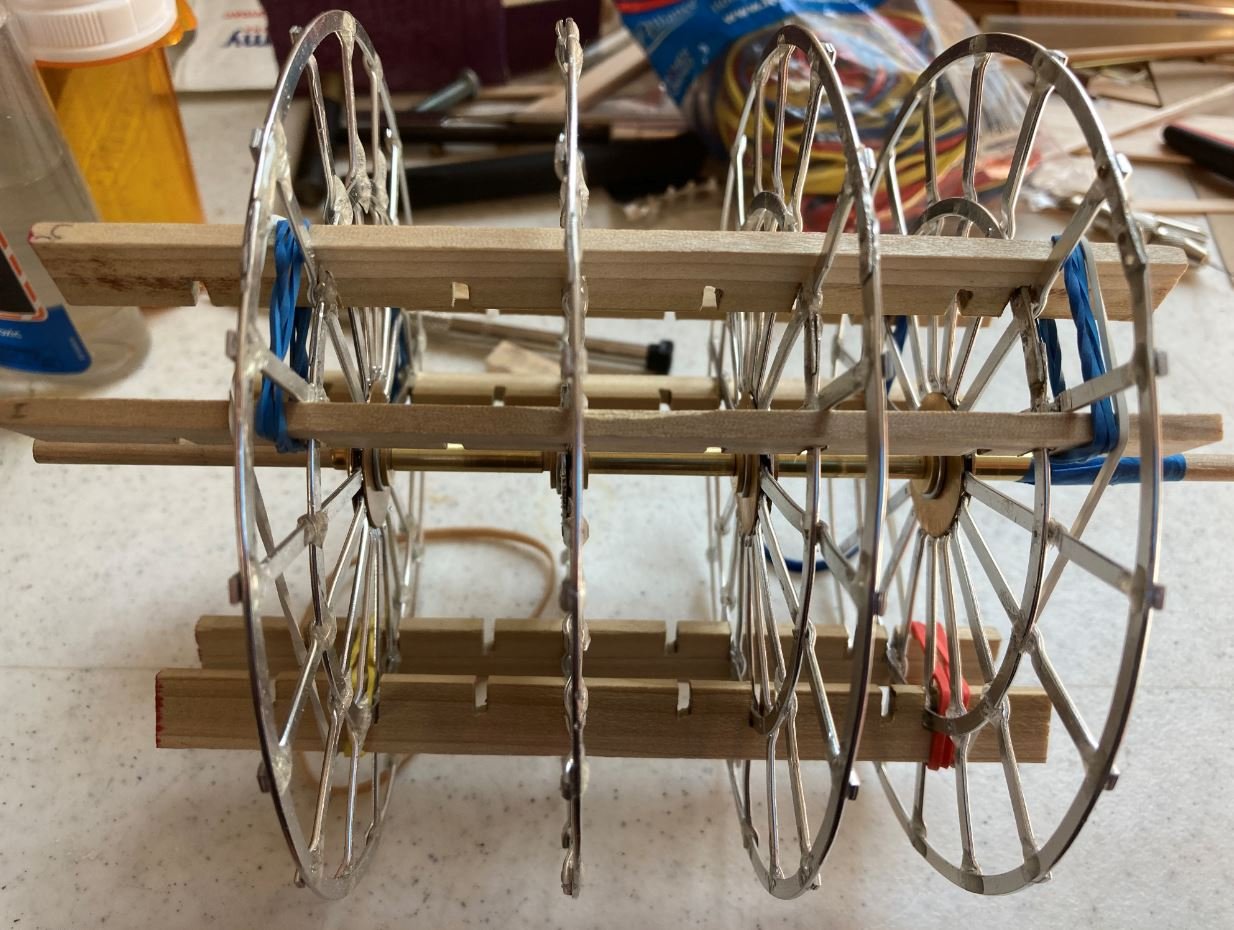
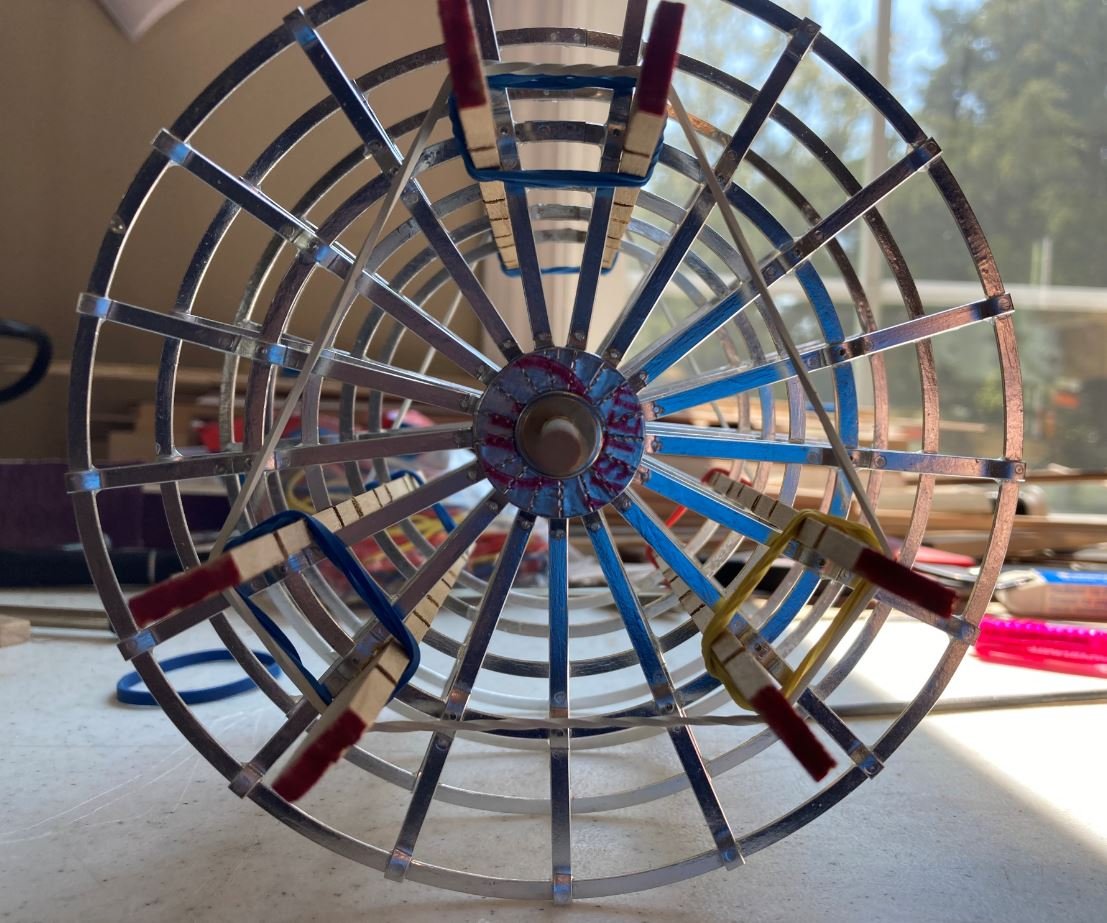
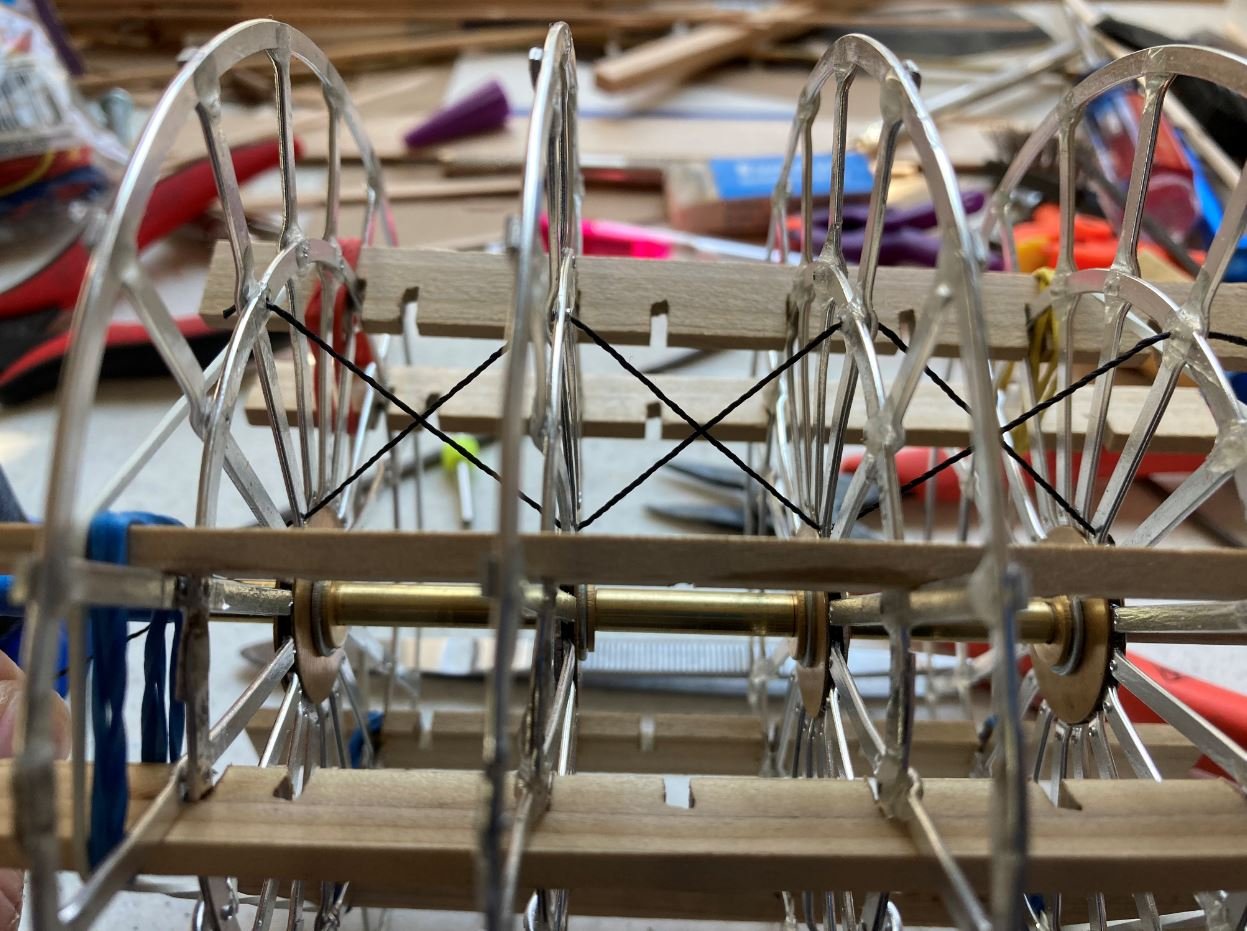
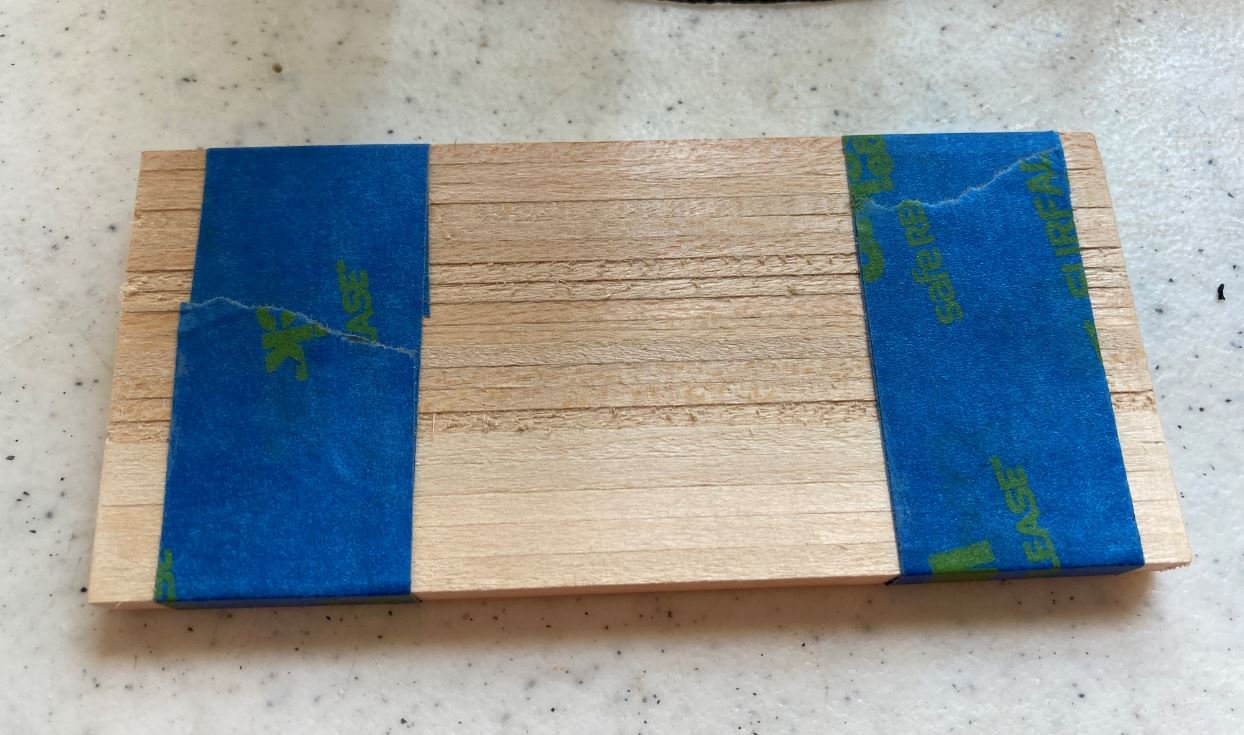
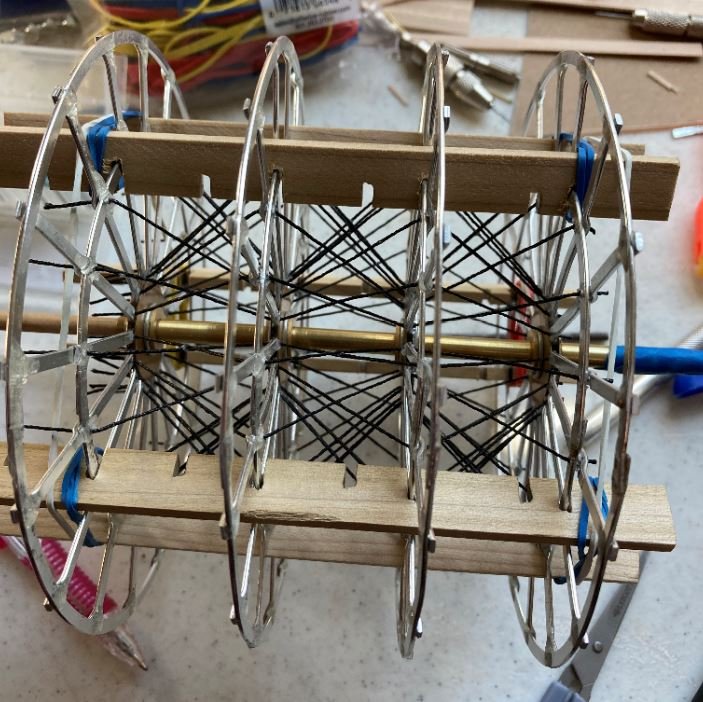
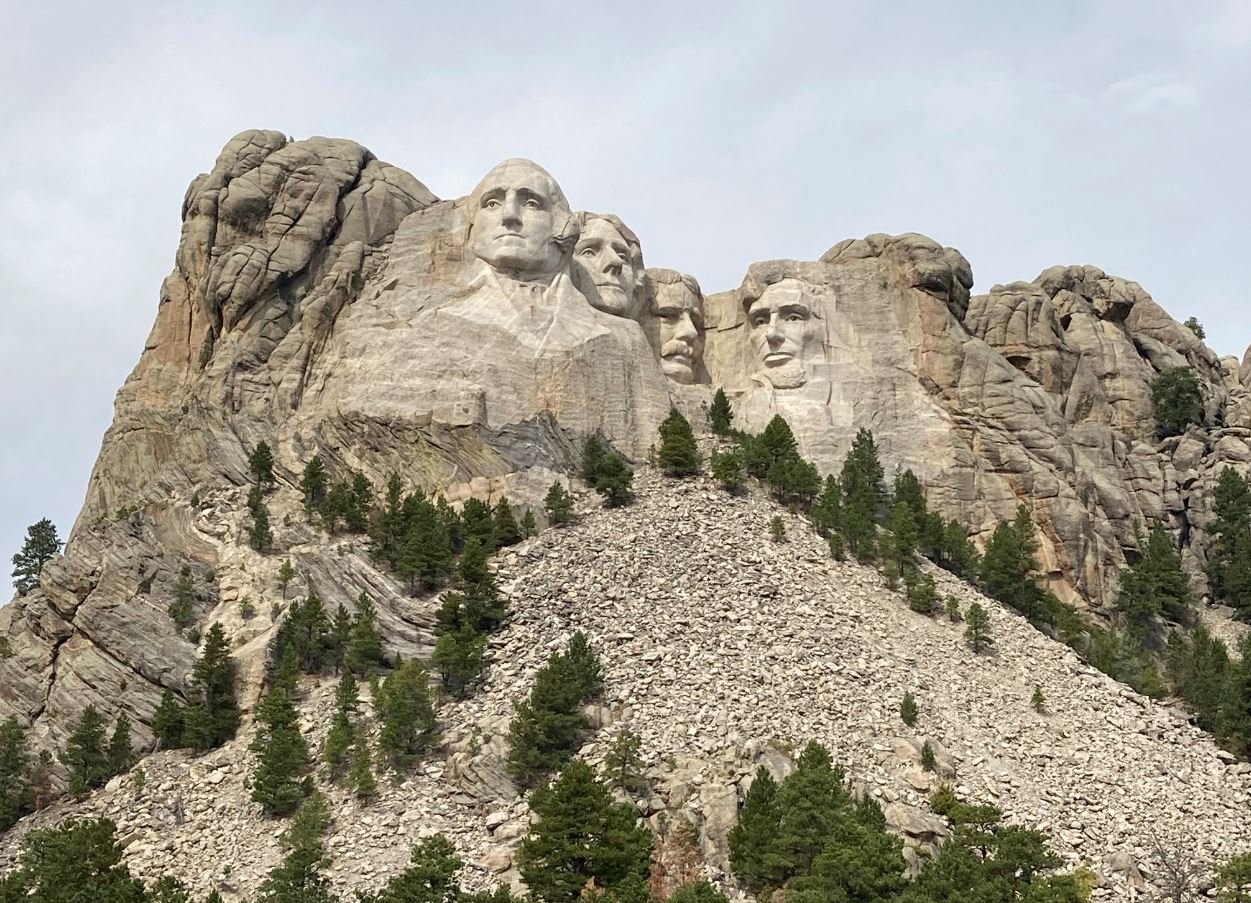
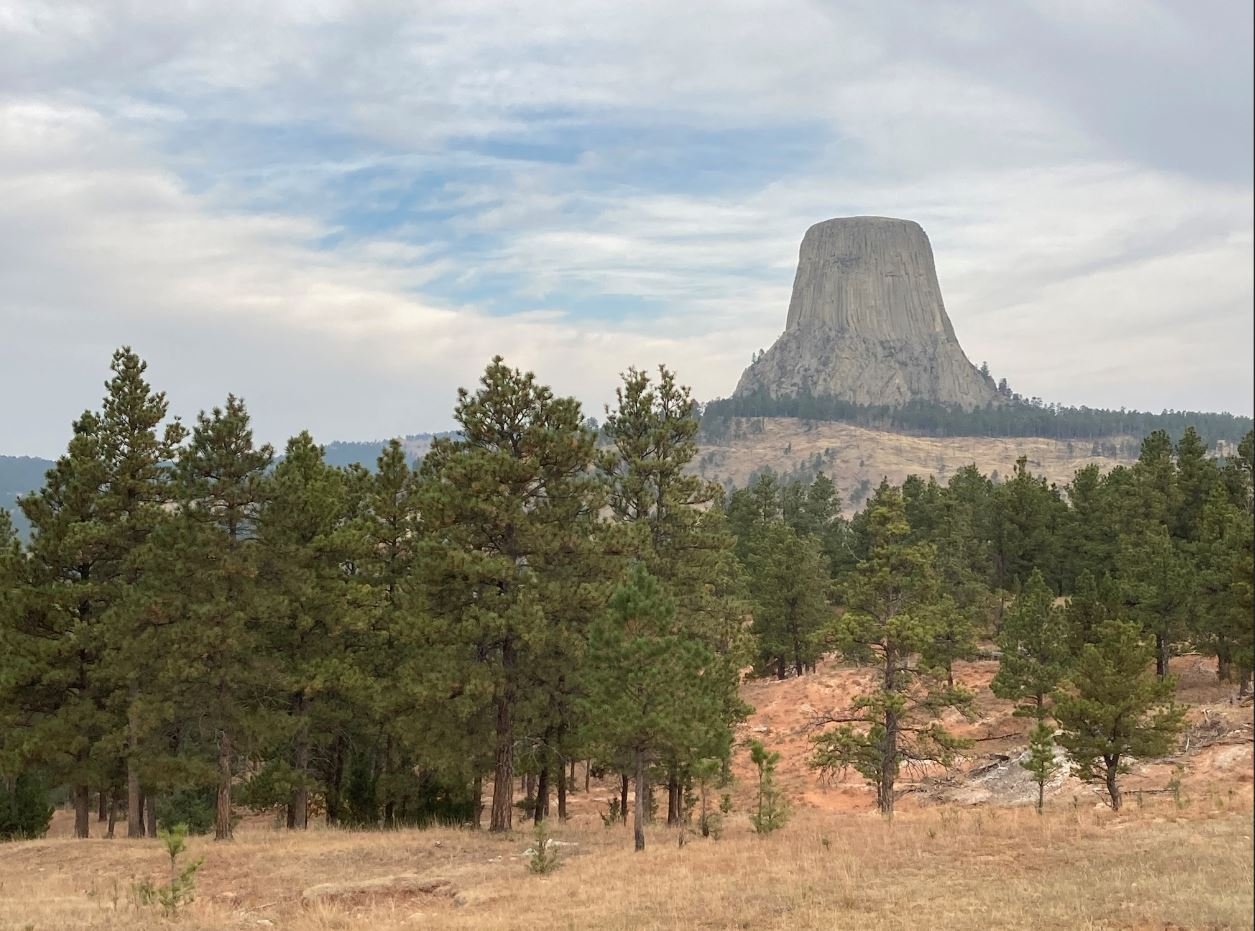
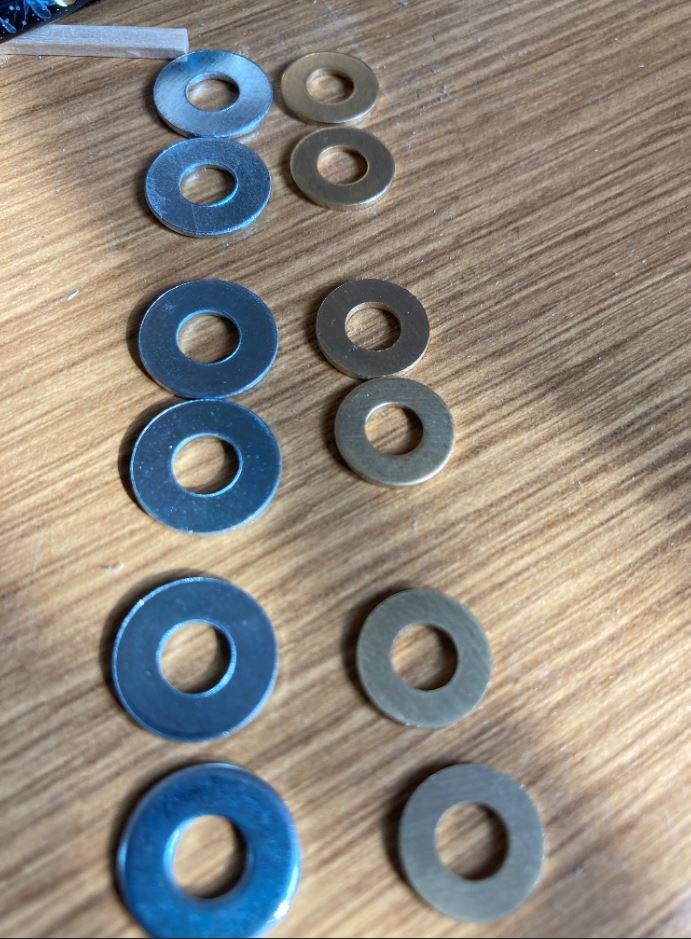
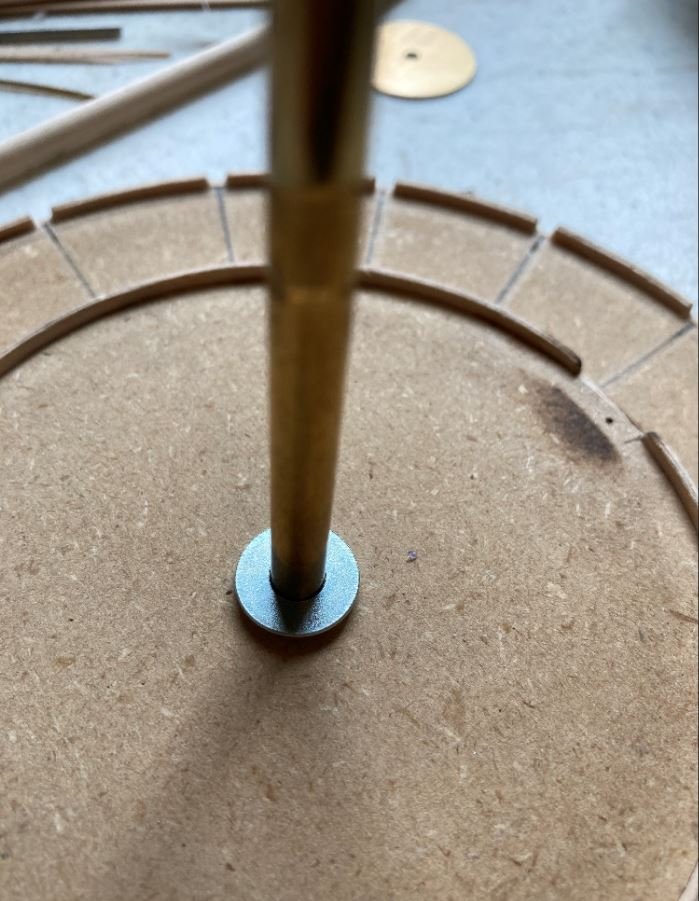
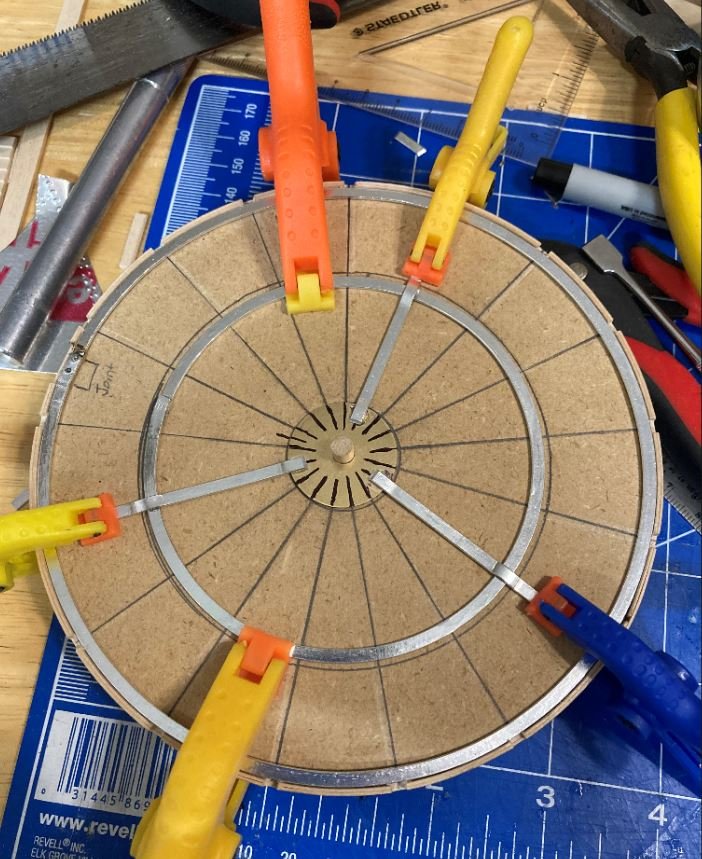
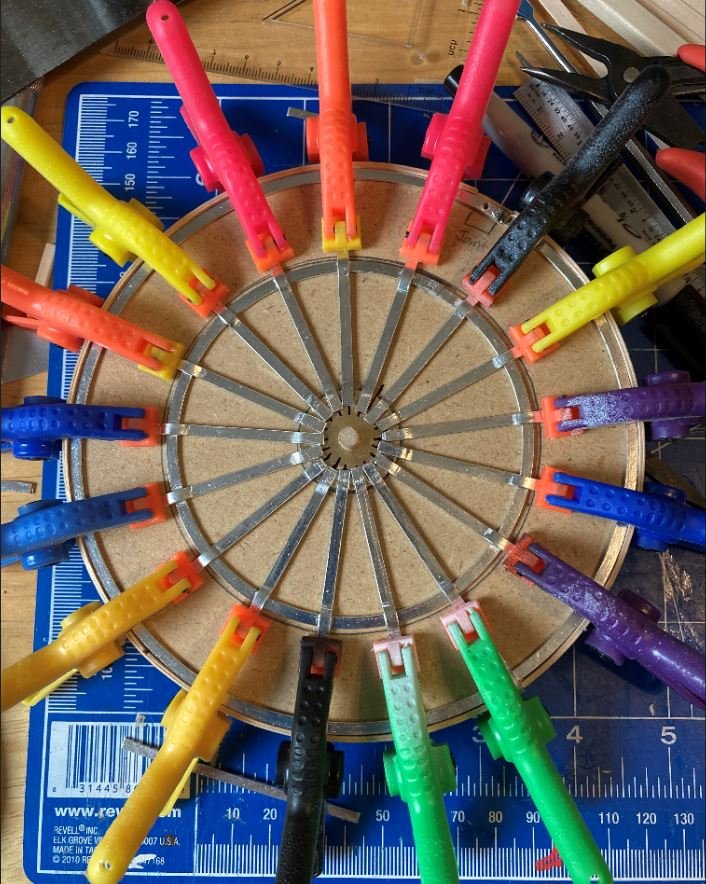
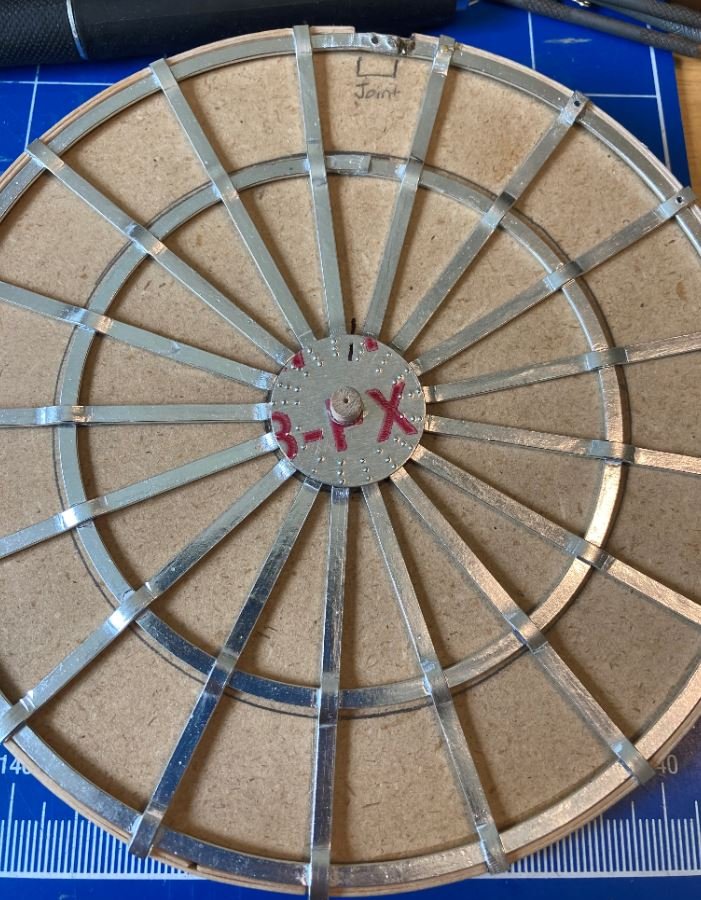
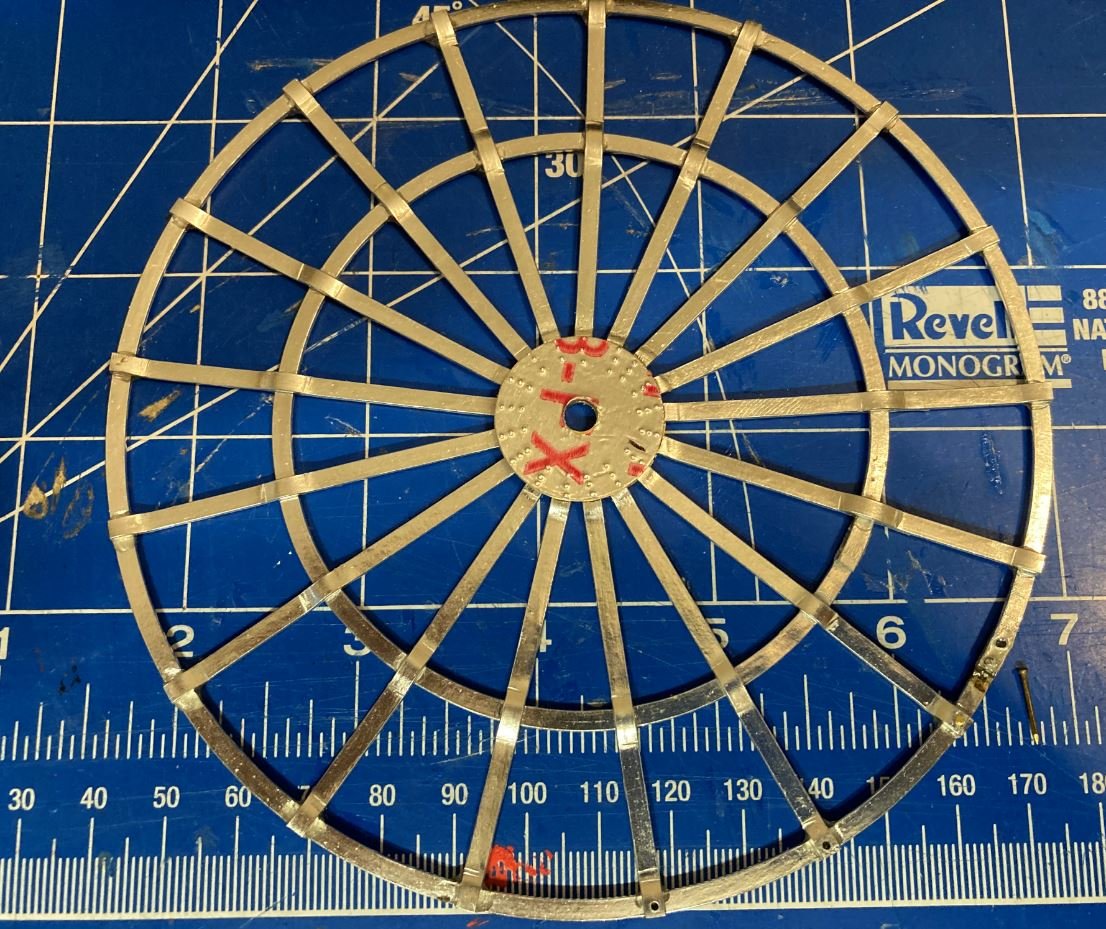
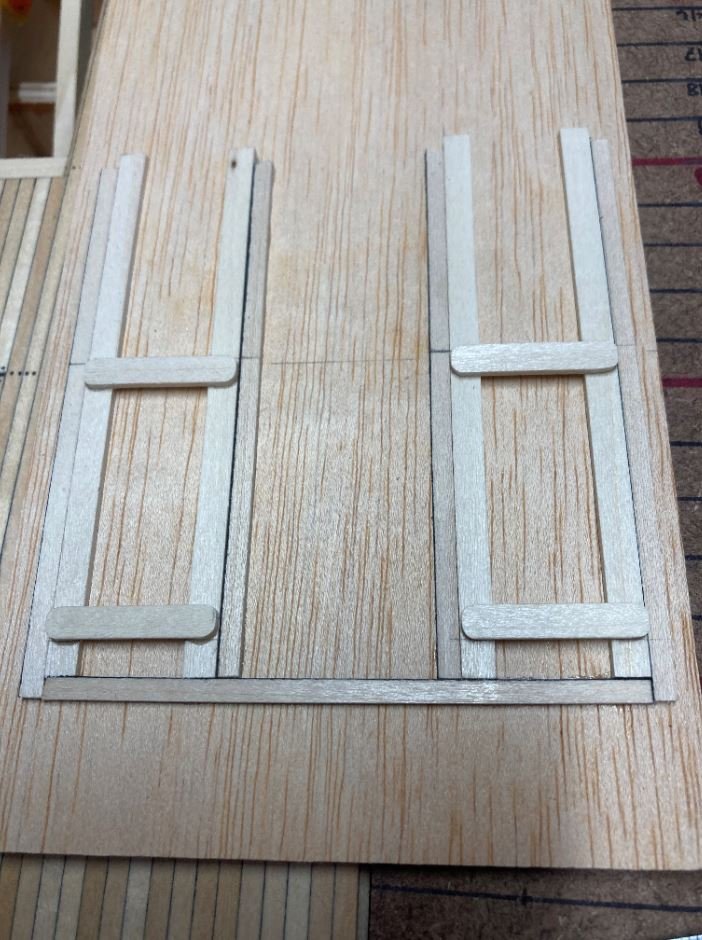
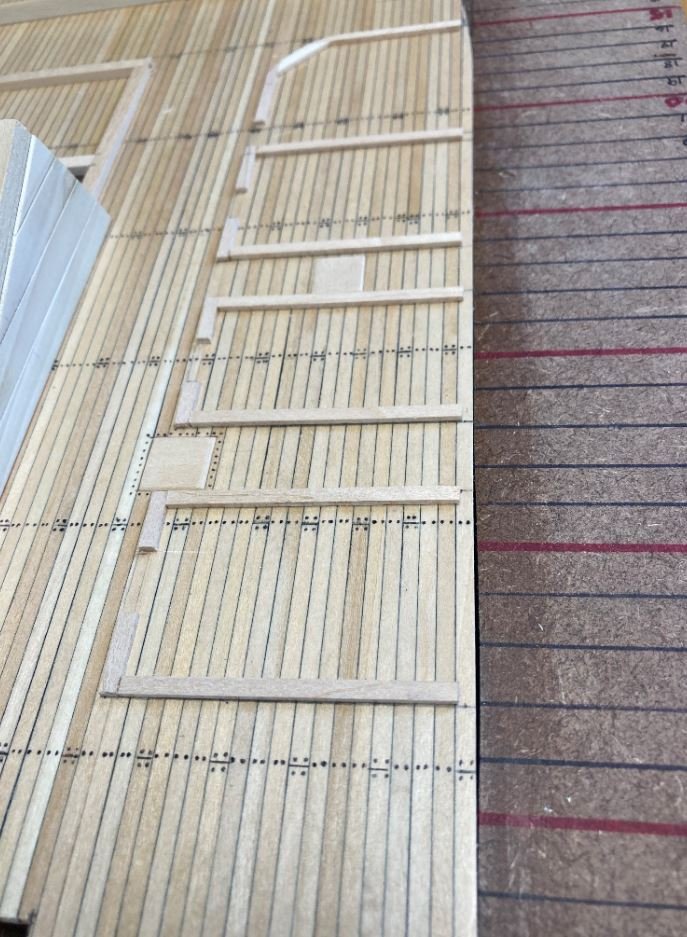
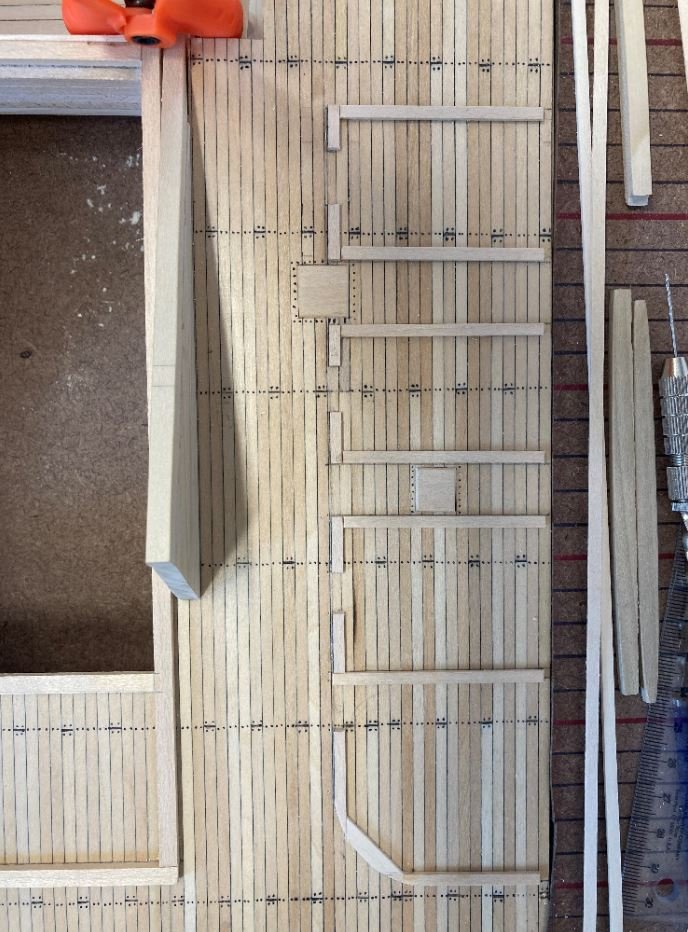
Hello again everyone, It has been a while since my last update, but I have finally returned from my hunting trip and vacation. Needless to say it was well needed and I saw some of the more beautiful parts of this country that have been on my list for a long time. Unfortunately, the wildfires that have been plaguing California, Oregon and Washington halted my trip to Yellowstone. The smoke was so bad that the air quality and visibility would not have made for a very fun trip, so I'll hit it next time. I did se a couple of other fascinating places though, as you can tell by the pictures the smoke was even bad in eastern Wyoming and South Dakota. Devils Tower was a little cloudy, but you can tell from the haze that the smoke was still a factor. Mount Rushmore was just a smoky haze, but at least it was visible to. The farther west you traveled the worse it got. Even North Texas had a smoky haze to it when I got home. I do have to give an immense amount of credit and praise to the firefighters working their tails off and putting their lives on the line containing the wildfires to protect as much as they can. We'll enough of that, on to my update. While most of the past week was spent playing catch up at work, I managed a little work on my paddle wheel. Having assembled the remaining three wheels, it was time to start building up the hubs. To simulate the hubs I used a couple of different size flat washers, stacked on top of each other to give them some depth. I used a piece of brass tubing filed to an edge to help center the washers around the paddle wheel shaft. Once the glue had dried I had eight perfectly spaced washer "Hubs" . Next I placed each of the wheels in the assembly jig and with the sharpened brass tubing installed the washers on the wheel assembly. Once that was done they were all ready to install on the paddle wheel shaft. I used the same brass tubing cut into 1" pieces as spacers for the wheels assembly and notched out a few scrap pieces of wood to keep the outer edges of the wheels spaced evenly. Wheels installed on the paddle wheel shaft. Outer spacers installed. And everything held neatly in place with rubber bands. Then it was on to one of the more complex assemblies that I have done so far on this build. Installing all of the cross bracing between the wheel assemblies. My first attempt was to use 24 gauge wire for the bracing, but I couldn't get the wire to bend one way and then the other and still remain straight. Given the tight quarters between the wheels, it was next to impossible to work the wire back into shape. So I decided to use .20 black rigging thread instead. I managed to weave the tread between the wheels, applied a dab of CA on one end, let that dry, then pulled it tight and placed a dab of CA on the other end to hold it in place. Once the CA had dried, I brushed the entire string down with a coat of CA to stiffen in up and the end result came out looking a little bit like hammered iron. Couldn't have asked for a better result. While the CA was drying on my cross braces, I went ahead and cut out my buckets and sanded them to length. Taking some tips from the St. Louis build, they have four buckets that are double the thickness as the others and spaced every other spoke for the counterbalance of the cranks. These will be installed on the opposite side of the cranks to keep the paddle wheel properly balanced. I am going to have to do a little research on how the buckets were attached to the wheel arms though. Normally they would be nailed in place, but since these wheels are iron, I don't think that was the way these were mounted. On the St. Louis build, it looks as though they tied the buckets in place, but I'm not sure if that was just temporary or if that was how they were actually done. I'll do a little digging to see if I can come up with how they were fastened. Anyhow, that is where I am for now. This week I will work on trimming up the cross bracing string, cleaning things up a little bit on the paddle wheel assembly and getting the whole thing painted. As always, thanks for for looking and all the comments and likes. -Brian
- 739 replies
-
- 16
-

-
Eric, Finally catching up on your build. It’s looking like you are overcoming the hull obstacles very nicely. It won’t be long before you can put that part behind you and move on to hopefully less frustrating construction. Love the figures. Your choice of colors is very realistic. I wouldn’t worry too much with the scale difference, from here it looks as though Sihtric is somewhat crouched in a stalking position so he would appear a little shorter than Ragnar who looks to be posed ready to launch his spear. -Brian
-
Very tedious work, but she’s looking great. Love the chisel jig as well, perfect way to keep an even edge. Pretty ingenious. -Brian
-
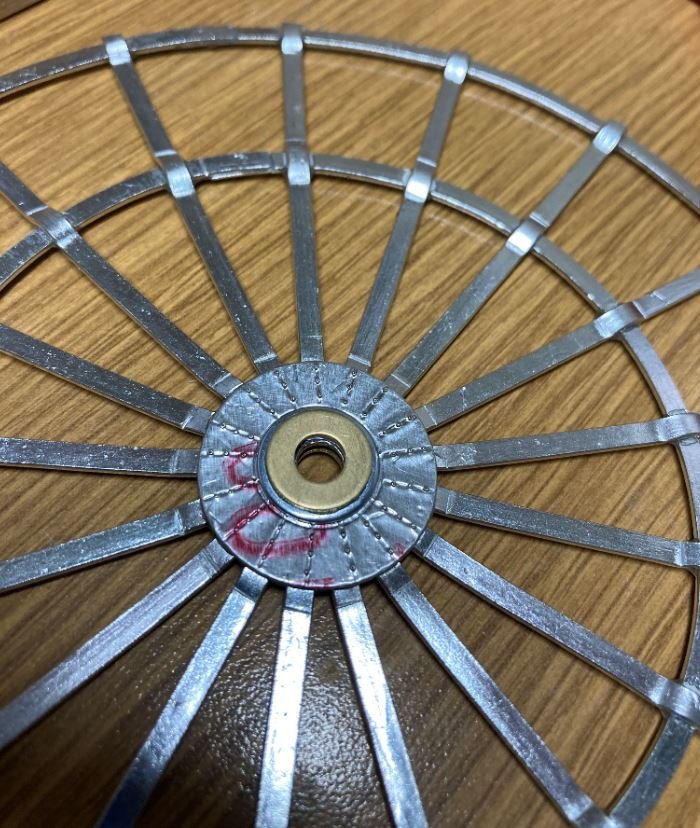
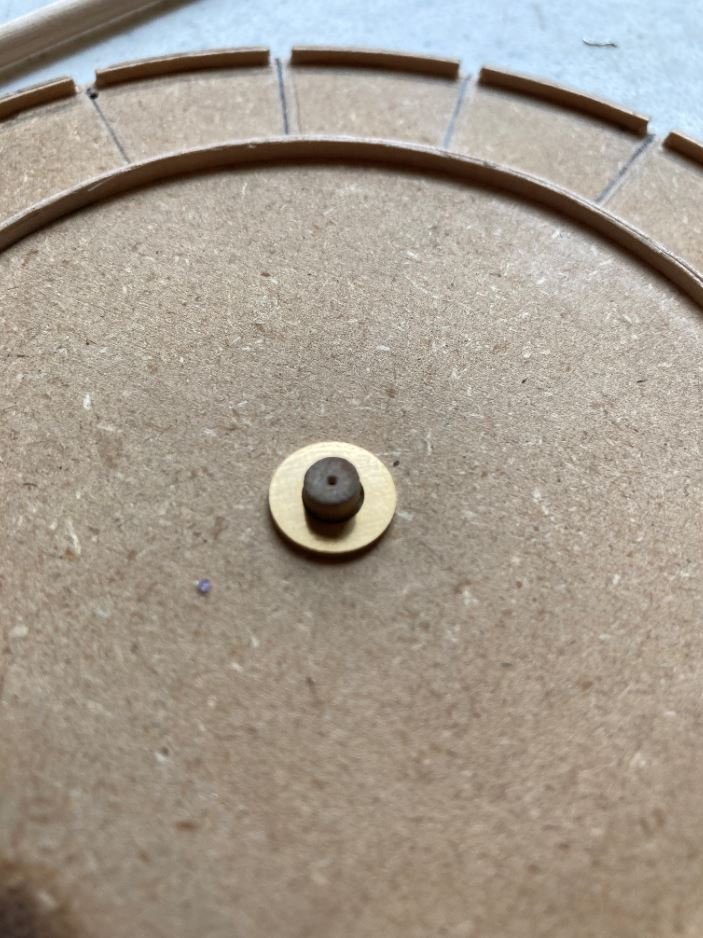
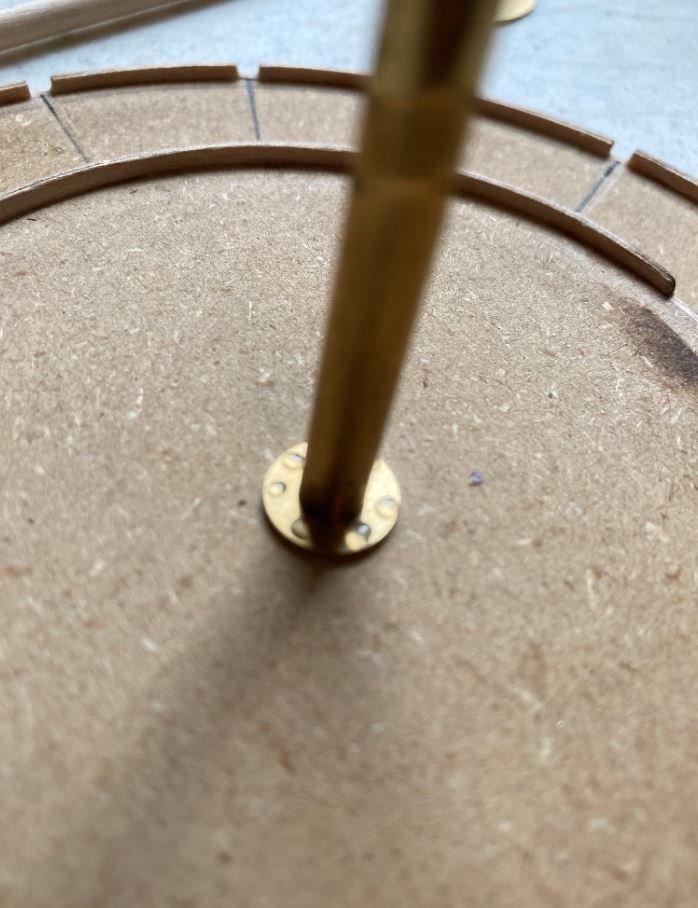
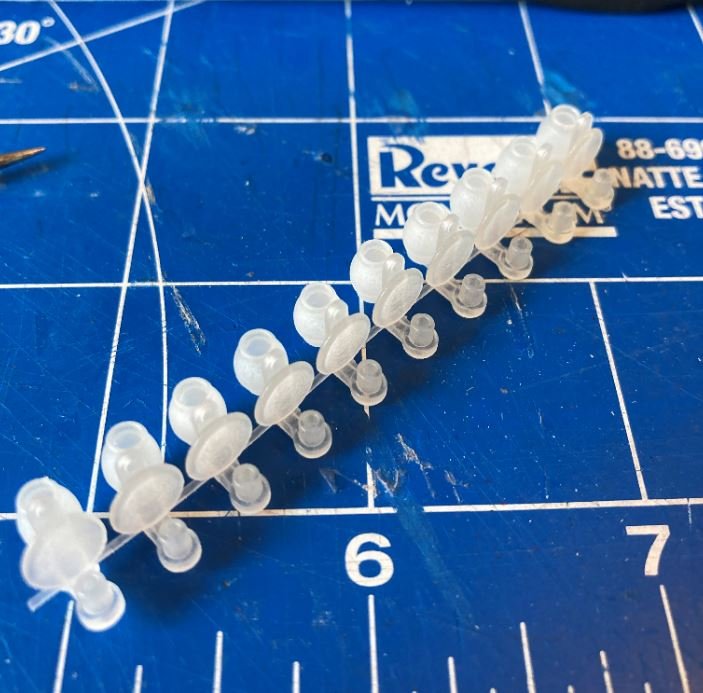
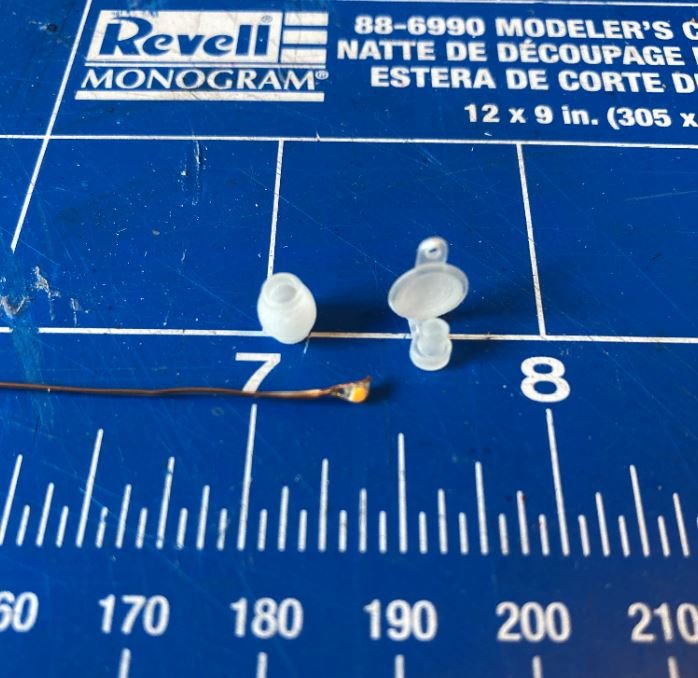
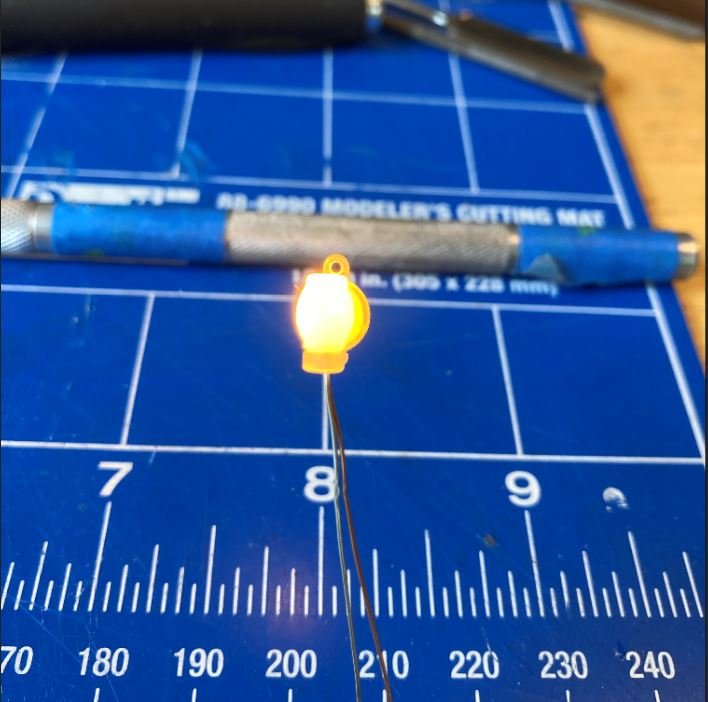
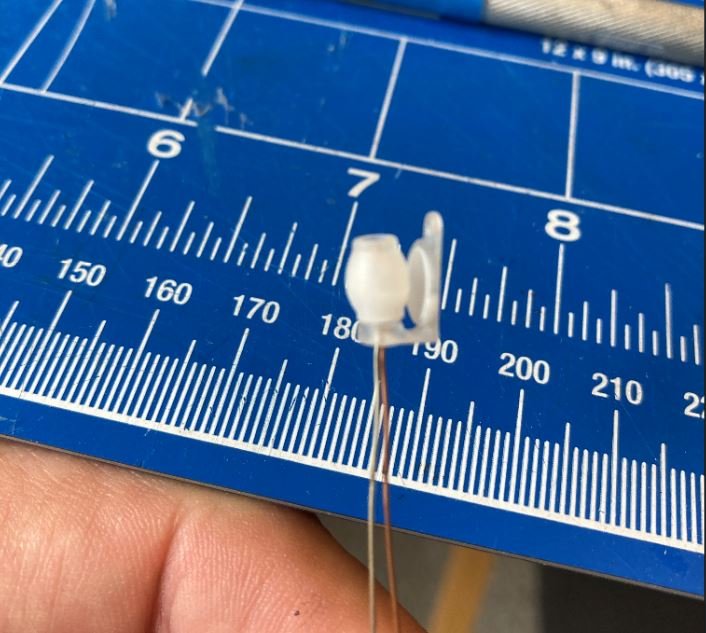
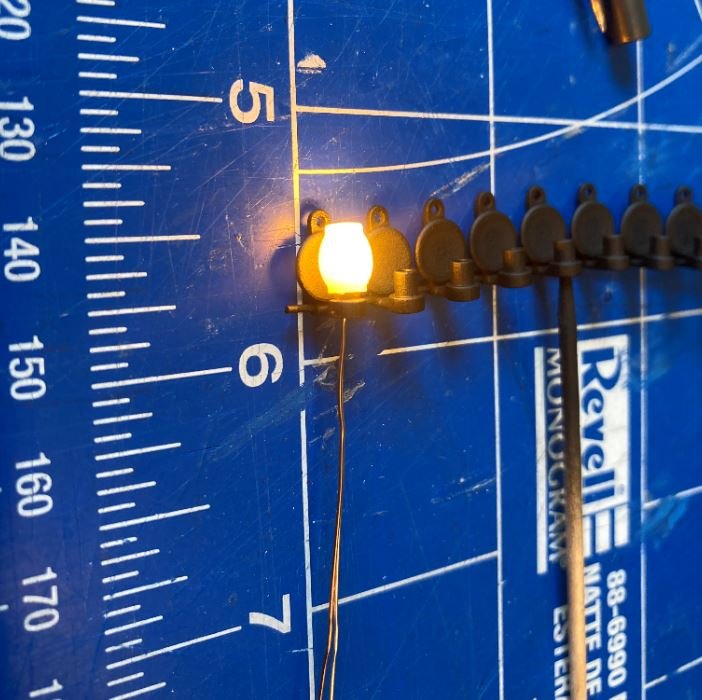
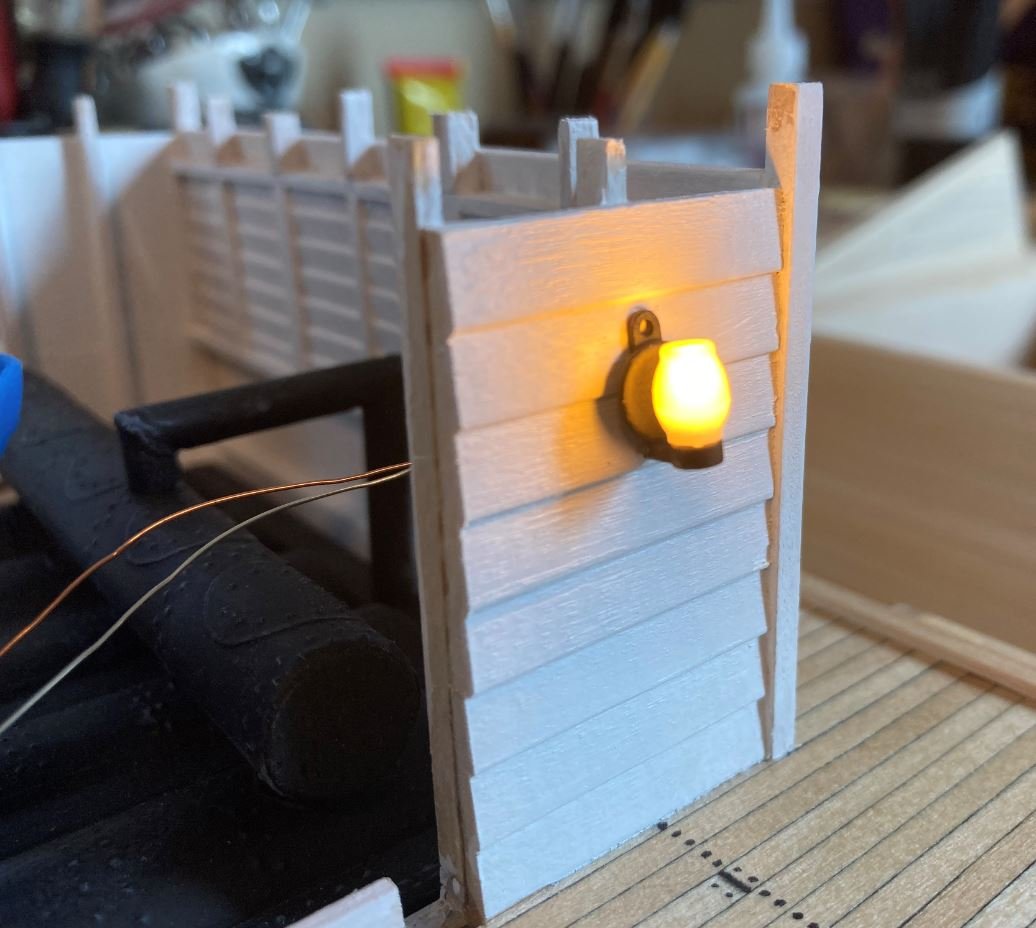
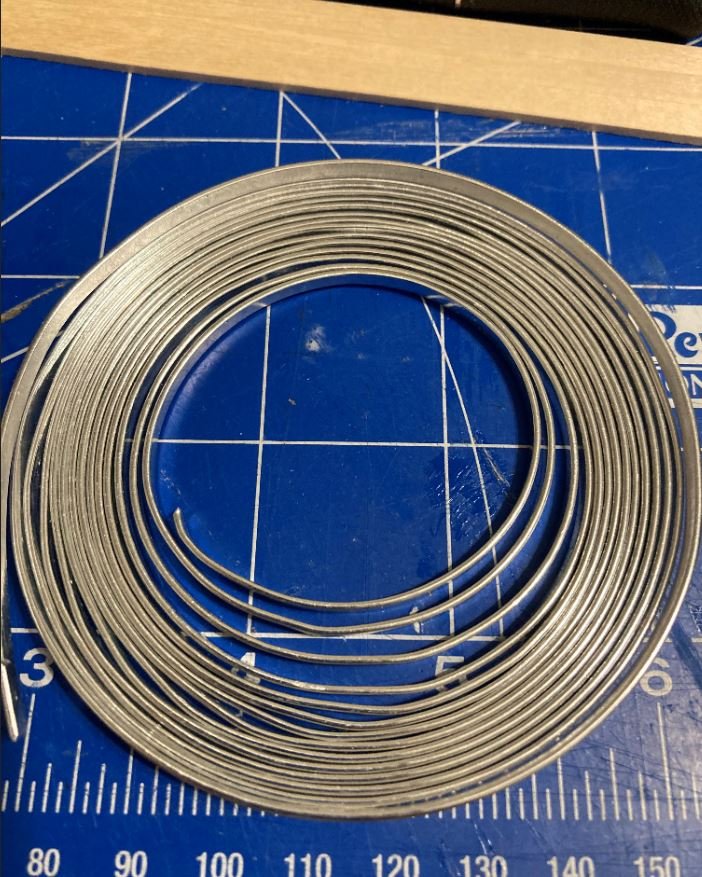
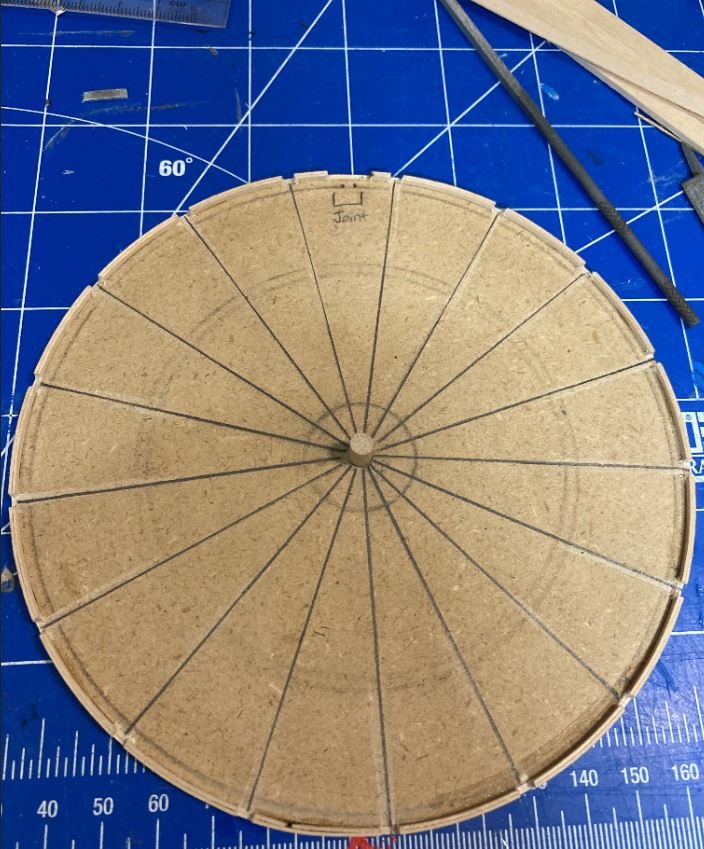
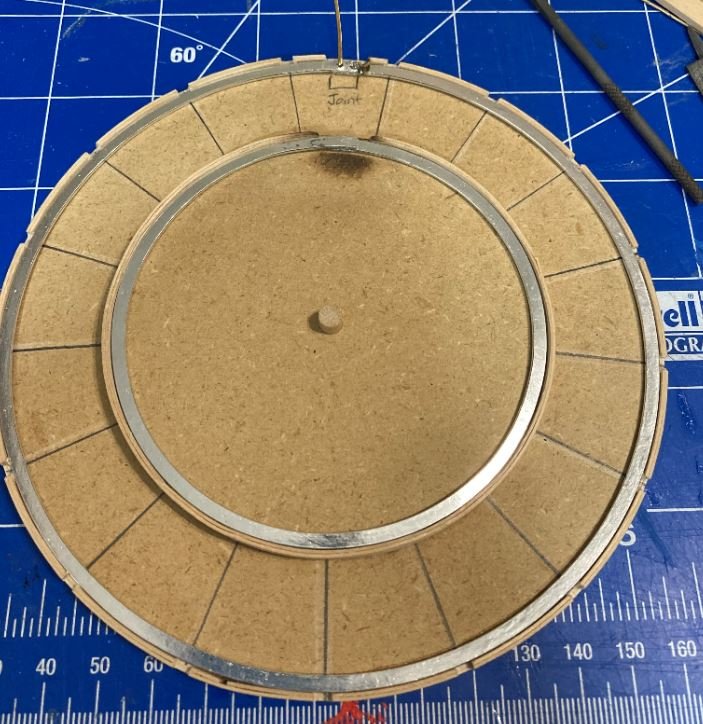
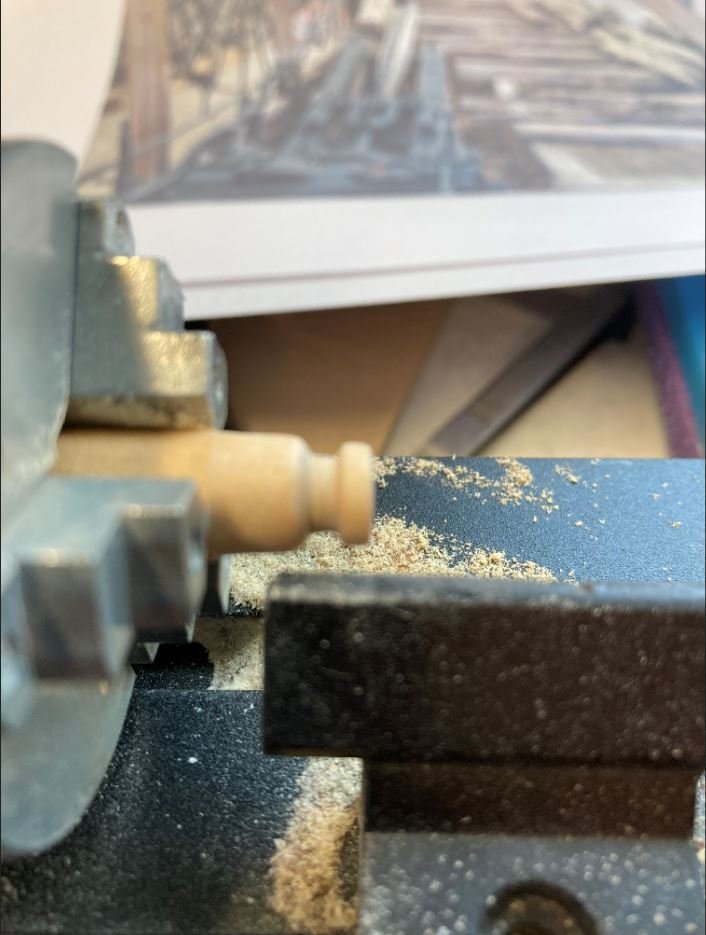
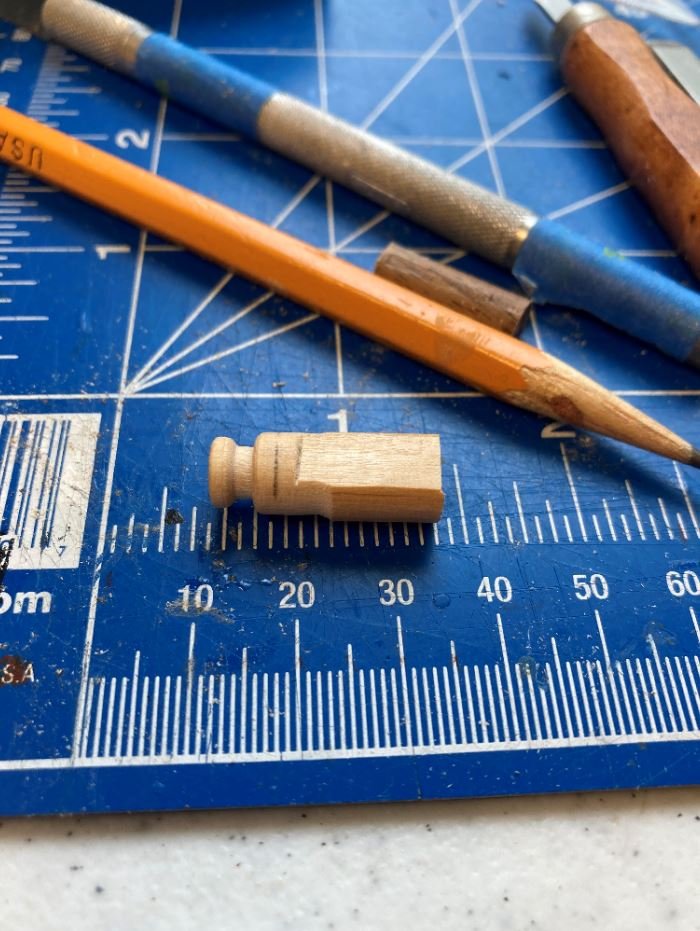
Vaddoc/Don, Thank you both for the kind comments. Vaddoc, these boat were actually fairly sturdy for being built on a short schedule and a shoestring budget. Their flat bottoms, triple keels and heavy framing helped support their heavy armor. Thankfully they only had the western rivers to contend with and not the seas, so they weren't tossed around that much, just swift river currents and enemy bombardments. Time again for a brief update. While I still contemplate work on my engines, I started working on the paddle wheel frames. I was having a difficult time deciding on what types of material to use for them. At first I wanted to use brass strips for them, but I was having a hard time finding strips of the right size and length. The thickness and width weren't as difficult as trying to find strips longer than 12". While walking around the house looking for ideas, I happened upon the Admiral's sewing supplies. In her spare time she makes face masks for the elderly and donates them to local retirement communities. While I was looking at her her supplies, I discovered the aluminum wire that she uses for the nose pieces in these face masks. This had the correct dimensions that I needed so I borrowed some from her. I did order more to replace hers though, so hopefully she won't be too upset with me. I then made a couple of simple jigs to wrap the wire in to get the proper sizes for the inner and outer frames. I started with alternating the spokes, bending them around the rings as I worked my way outward. For the center hubs I found some 1" brass discs and drilled out the centers for the axle. All of the spokes and rings were held in place with 5 minute epoxy at the cross points. A second disc was placed over the top of the spoke ends and epoxied into place. I again simulated the rivets on the hubs with aluminum tape and my ponce wheel. Once the pieces were dry they were removed from the jig and the ends of the spokes trimmed off and filed down. Next step is to drill all of the rivet holes and fill them in with brass nails. That and three more wheels to go. Slow progress, but I'll get there. Also this week I received my lanterns from Shapeways and decided to throw one together to get an idea of how it was going to look. Lanterns on the sprues. The three part that will make up the lanterns. Globe, reflector/base, and micro LED. The three pieces together. ...and lit up. Painted up the bases. Finally one mounted into place. I think I nailed it. I may take a small disc of aluminum tape and put it on the reflector to give it a little better look, I just need to find my hole punch to do this. Things will slow down for the next couple of weeks, I'm off to Wyoming this weekend for a much needed vacation. Going to attempt to decrease the Antelope population by a few and while I'm up there I'm going to knock off another bucket list item and visit Yellowstone NP. Thanks everyone for looking and all the kind comments. -Brian
- 739 replies
-
- 18
-
-
Yves, Difficult decision indeed. You could place one on the sub itself and the other as it’s own static display since they are both beautifully crafted. -Brian
-
Nice job on the painting Eric. Looks very realistic. Great use of colors and shading. -Brian
-
John, Thanks for the info. From the pictures they had the look of hammered iron, only the aluminum color was throwing me off. Good idea though to keep the shapes uniform. -Brian
-
That is great news. A model well deserving of being on the calendar. Congrats on being chosen Eric. -Brian
- 599 replies
-
- 3
-
-
- sidewheeler
- arabia
- (and 4 more)
-
Eric, Sorry for all your troubles with this build so far. I’ve had major issues with other builds in the past, but nothing on this scale. Unfortunately this boat is way out of my wheelhouse to offer up any good suggestions as to how to remedy the situation. One would think that with the way the frames were notched to accept each plank that it would work as a bend and overlap guide as the planking progresses. Obviously this is not the case, and to me seems to be an engineering flaw in the design. Without having the instructions in front of me it makes it difficult even attempt to understand how things fit together, but from your pictures it looks as though if plank 23 (I think) were wider toward the stern instead of tapering under 22 and 24, things would fit together a little better. Again this is just an assumption on my part going off of the pictures. However, not to make light of your struggles too much, you could take the Viking approach to this and beat the planks into submission. Hopefully things will sort themselves out and you’ll soon have a hull to be proud of. -Brian
-
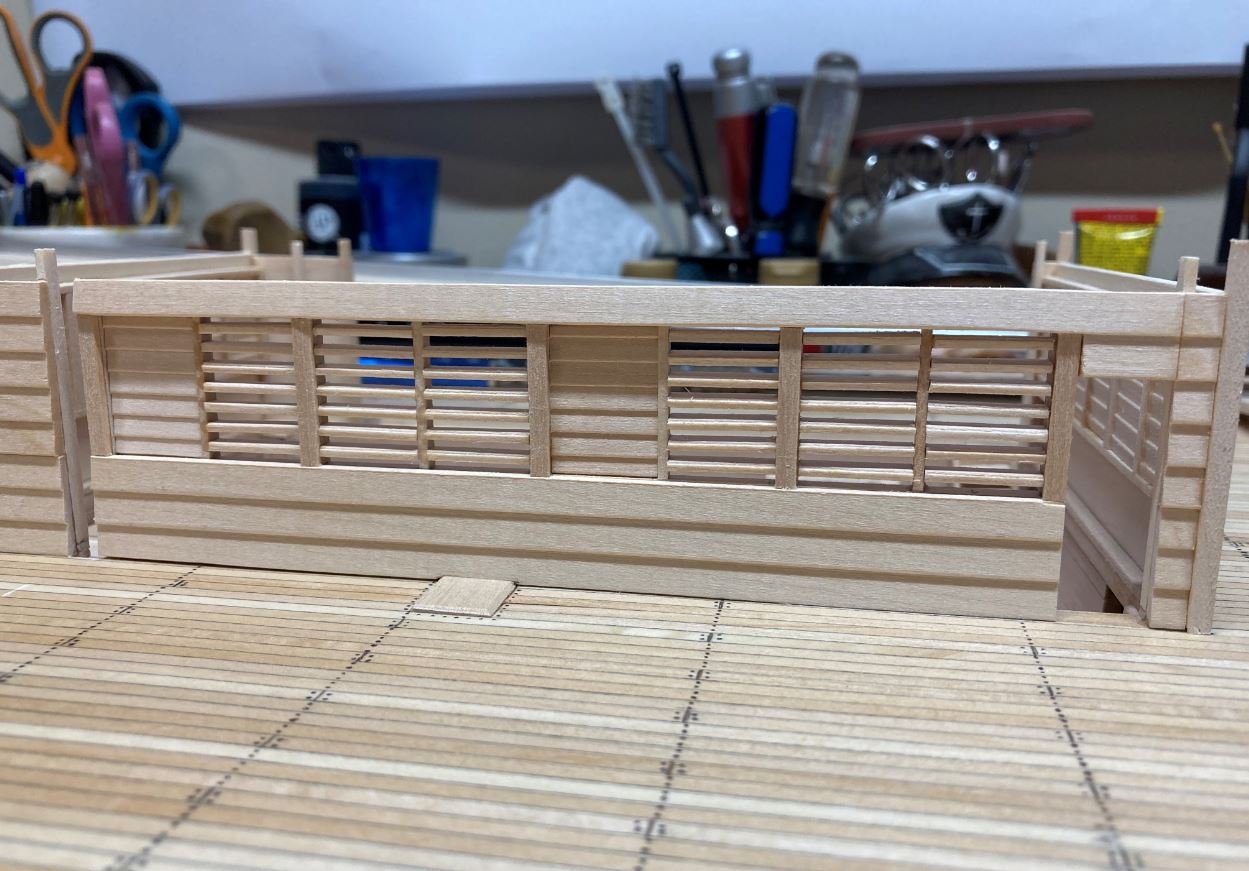
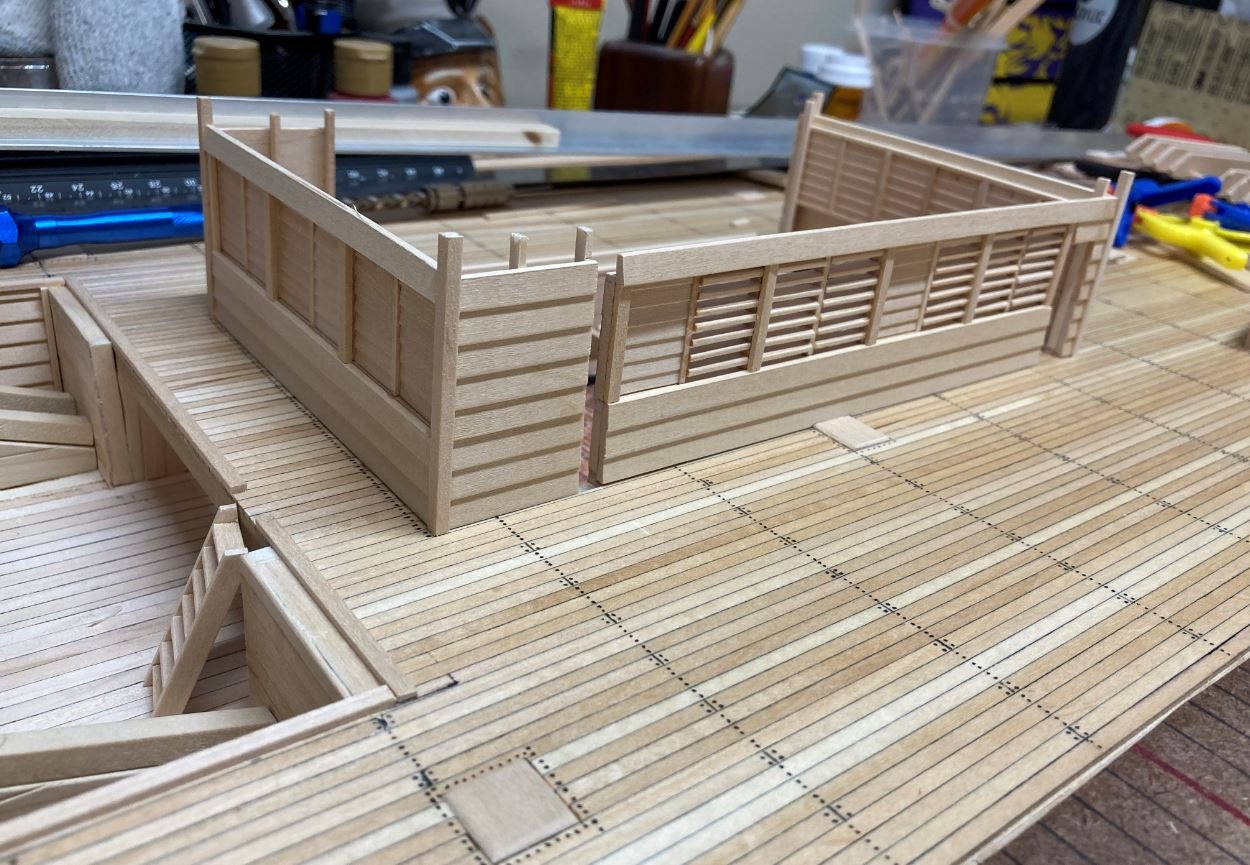
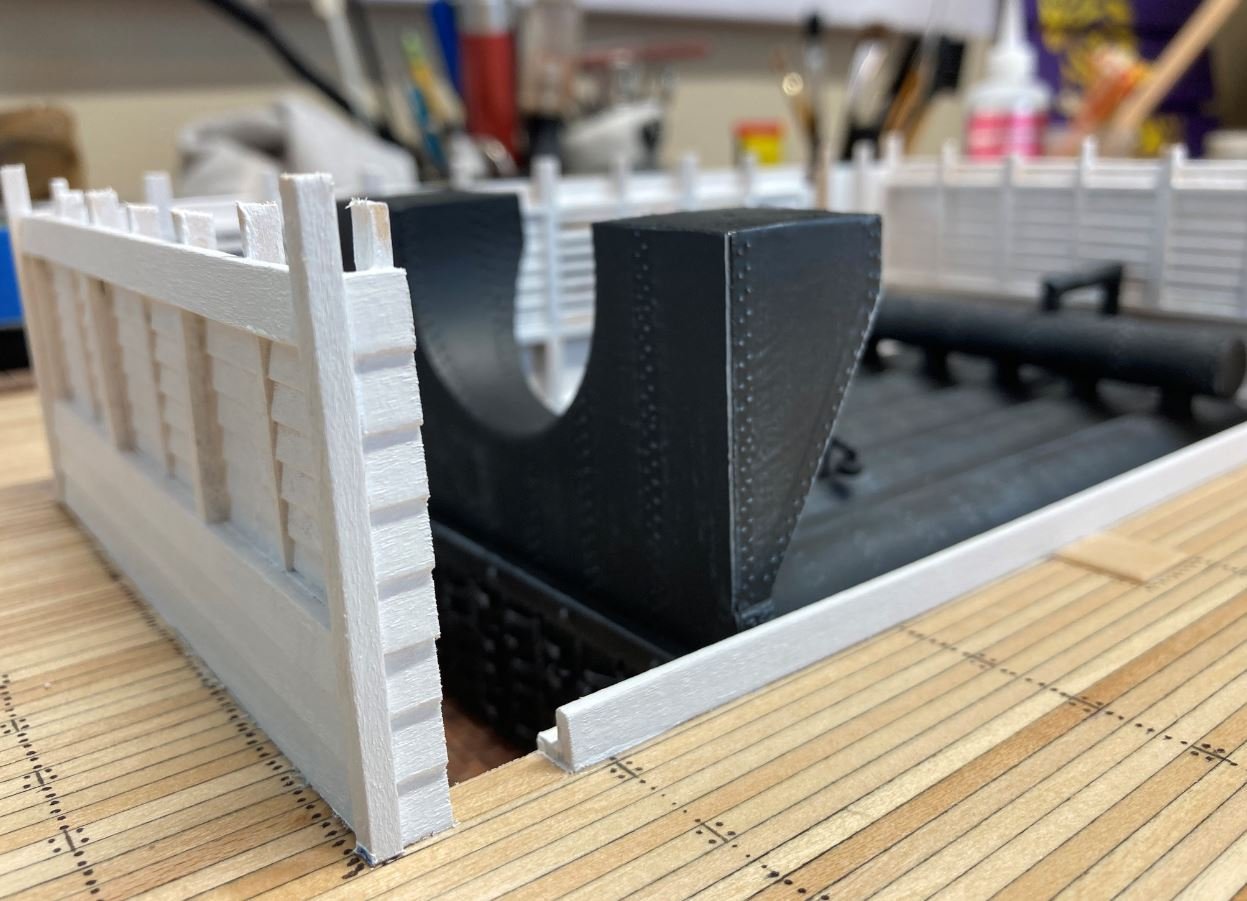
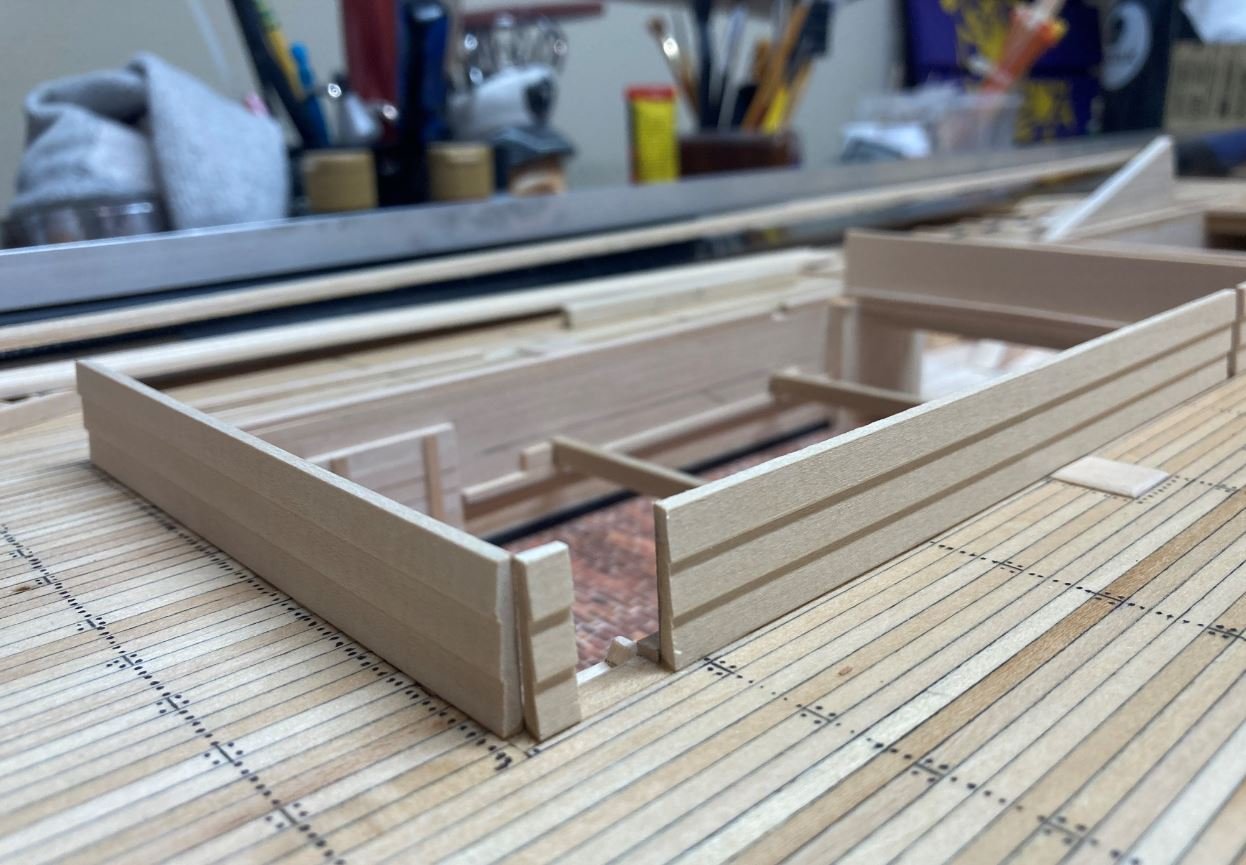
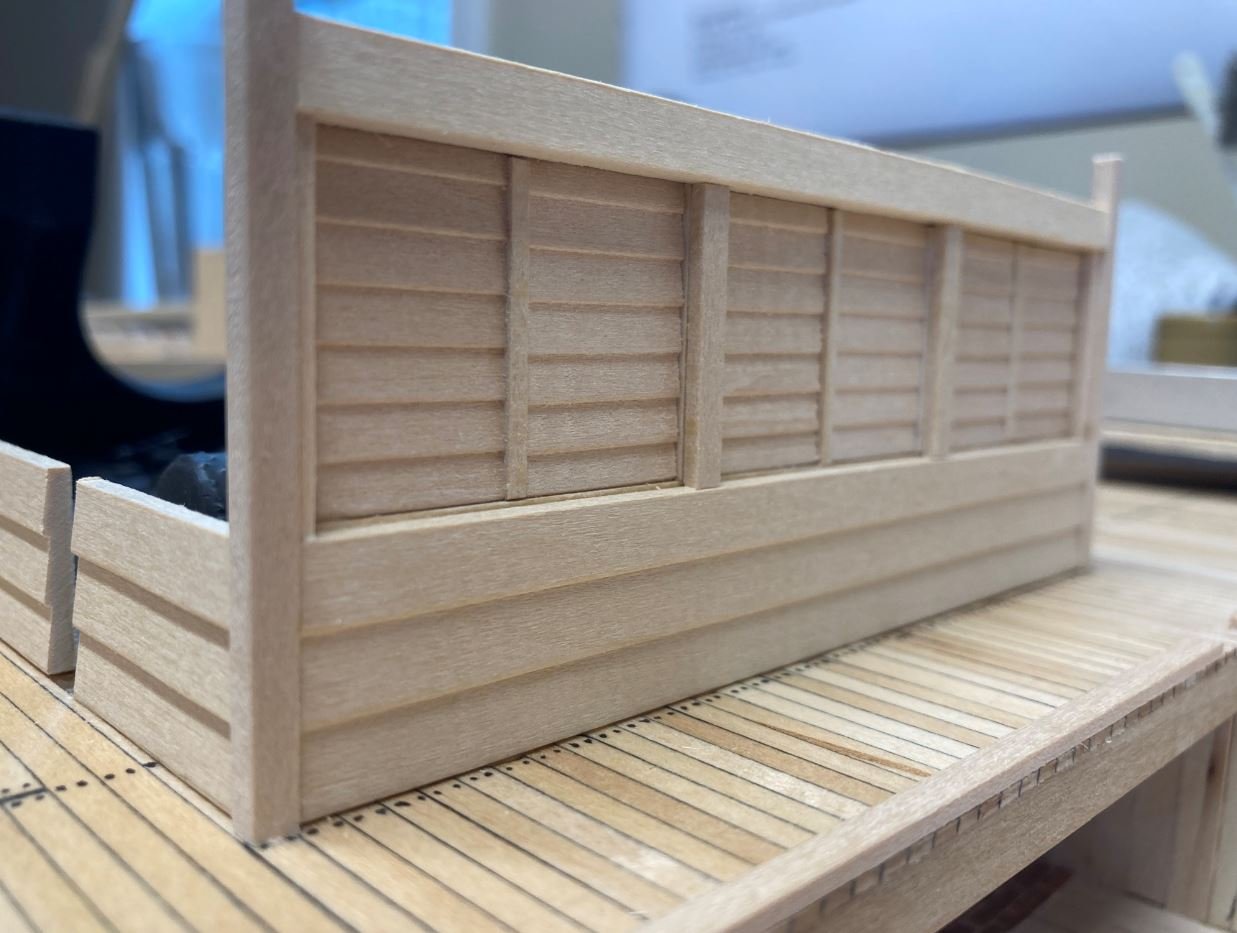
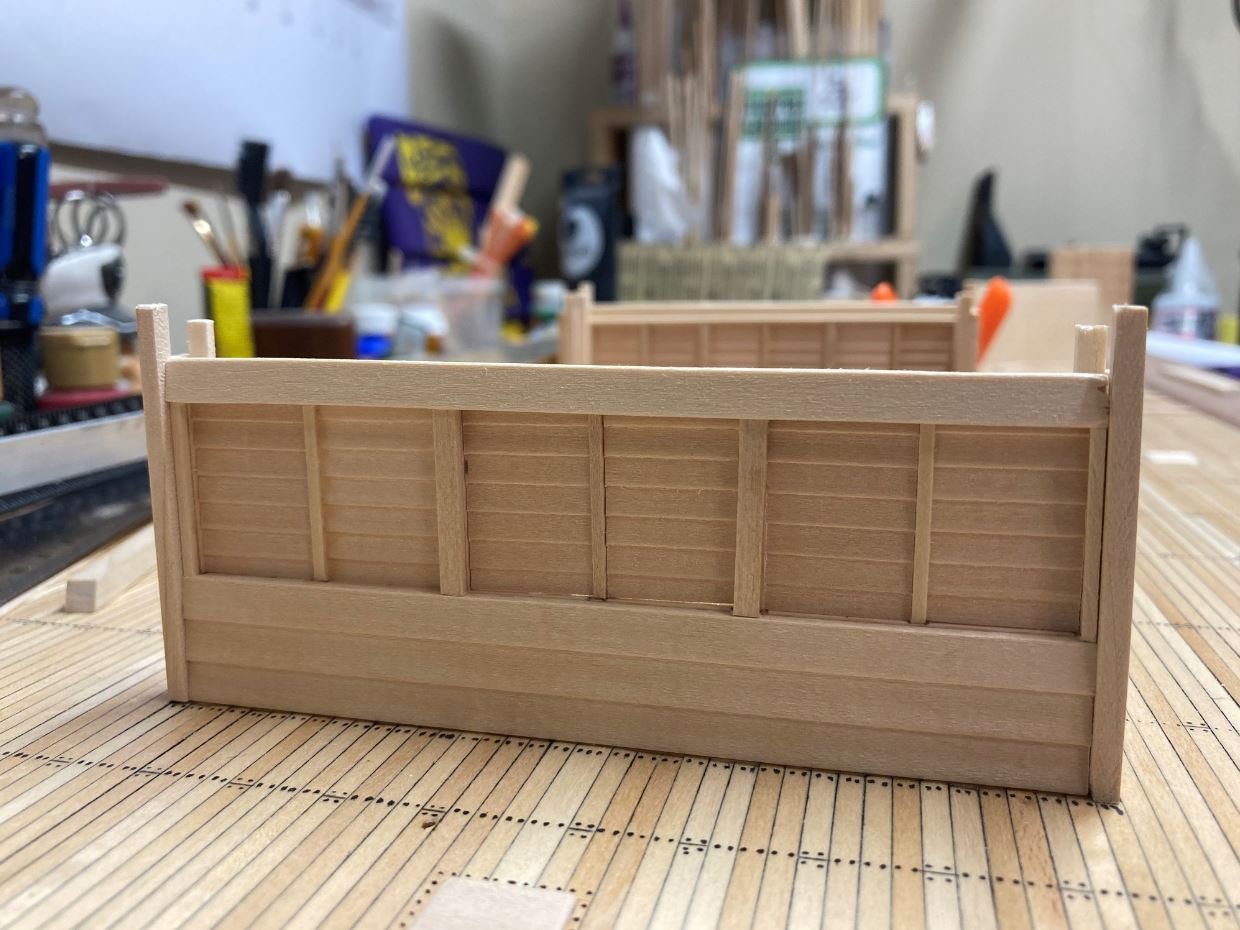
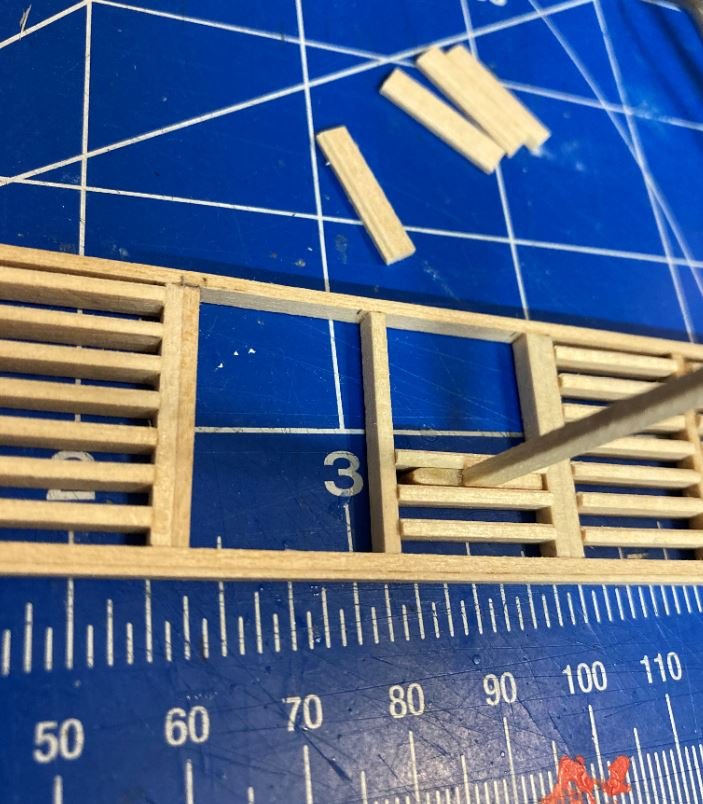
Hello again everyone, Work has begun on the boiler room walls this go round. So I finally decided that in order to show the interior of this model, I am going to leave one side partially open and complete the exterior of the other. In order to show some of the details I will also be installing LED lighting hidden behind lanterns and such. I took some ideas from the St. Louis build on how the boiler room walls were constructed. Since none of these walls survived the salvage and the plans are pretty vague on the true construction, builders liberties were taken in my interpretation of them. I installed louvered windows around the boiler walls, under the assumption that these were used for cooling and warming purposes. Air flow from the forward gun ports and funnels mounted on top pf the Hurricane deck was forced down to the gun deck, through the louvers and up through the skylights. Again, this is just my assumption as to how this worked, and I could totally be off base with this. Rough sketched plans of the fore and aft walls used as a template for the louvers. Bottom framework of the walls. Construction of the windows. Forward and aft wall in place. Construction of the starboard windows. Starboard windows in place. Coat of white paint and the boilers set in place to get a view of what it will all look like. Not much else was done. I have been dividing my time with other projects around the house, trying to take advantage of a few cooler days. I have some micro LED's and 3-D printed lanterns on order for the lighting, hope fully those will be in some time this week and I can get started on the lighting and wiring. That's all for now. Enjoy, and thanks for the kind comments and likes. -Brian


- 739 replies
-
- 12
-
-
Such precision work. Simply amazing. -Brian
-
Eric, This project definitely looks like a learning experience. I do believe though that your perseverance will pay off in the end. Just keep smiling and plank on, you’ll get there. -Brian
-
Tim, Beautiful work as always. Well worth the wait. Out of curiosity, what materials did you guys use for the hammock stanchions? -Brian
-
Tim, what a cruel tease. 😜 It’s all good though. I think we’ve all been there at one time or another. Can’t let that computer get the best of you. Patiently standing by. -Brian
-
Thanks for the info Roger. I just finished “Grant Wins the War: Decision at Vicksburg “. Fantastic read. The first chapter was primarily on the northern gunboats and most of those were the City Class “Pook Turtles “. I’ll definitely add that to my list of books to get. I’m loving my renewed interest in the American Civil War. Certainly more appreciative of it now than I was in my youth. -Brian
-
Vlad, Magnificent job on the Captains gig. I have four cutters to build from my Cairo. I can only hope they come out half as nice as this one did. Sorry to see this project coming to an end. I’ll have to switch over and follow you progress on your Glory of the Seas build. -Brian
- 200 replies
-
- 2
-
-
- cutty sark
- clipper
- (and 1 more)
-
Not a bad idea Patrick working on multiple projects. Helps keep the mind fresh. When you get hung up on an issue with one, just switch to another until You can solve it. BTW: The F-4 Phantom is one of my favorite planes. Right up there with the P-40 Warhawk and F4U Corsair. -Brian
-
Patrick, Beautiful job on the boiler and hull. Smooth lines fine finish. Also looks like you are double-dipping with those F-4 parts under the hull. 😜 -Brian
-
Vaddoc, Your craftsmanship is top notch and this shouldn't be any problem at all for you. She is really starting to take shape. -Brian
-
Eric, I did notice this little detail and really thought about adding it, but it was just one of those that I decided to forgo since it is not going to hardly be seen at all. I am glad that you showed me the Arabia pics though. Part of the reason I decided against doing the scarps joints was that I wasn’t 100% sure that was original or just built that way on the restoration since a lot of the original timbers were missing. l guess I need to stay consistent when deciding what details to add and what not to. Mostly depends on the mood I’m in at the time I’m building it. -Brian
-
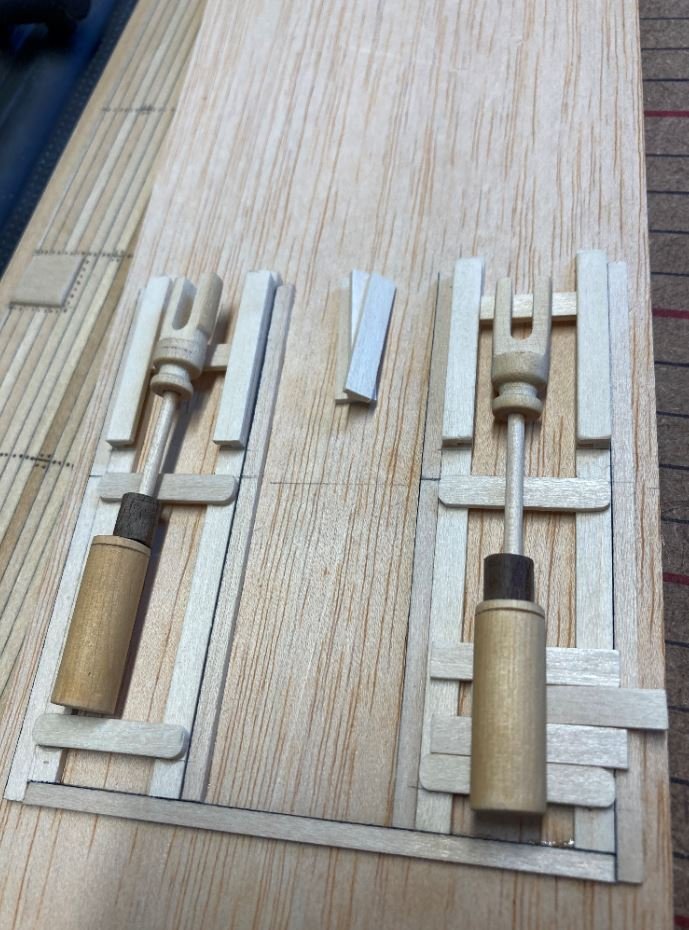
Hello again everyone, So it has been a very unproductive productive week or so. I started working on the engines last week and got them about halfway built when I started to realize that they just weren't looking the way that I wanted them to. Unfortunately there are no real good detailed drawings of them (the HSR drawings are somewhat useful but are still a little lacking in details), so I am having to rely on photos of the actual Cairo and other builds to get an idea of the shape and reasonable size of them. Working off the photos is tough given that everything is painted black and doesn't show a lot of depth. So I gave it a shot to see what my first version would look like. I started with the bottom support rails. The width was pretty easy to figure out since the HSR Gun Deck Plan drawings have them in place and since I have the plans scaled to 1:48 I could get this part close. I then turned down and carved the connecting yokes. Then using 3 different size dowels I made up the steam drums and piston rods and laid out the assembly. It was here that I started to think that they just weren't looking correctly proportioned. So I decided to work on other features and figured I'll circle back to these when I can get a better understanding of the size proportions between the assemblies. So I decided to start work on the support pillars for the engines and paddle wheel. These were a little easier to figure out. The hardest part of this was getting the height position of the paddle wheel and the correct angle of the timbers. These are the ones from the actual boat. Although they are not original, they gave me a general idea of how they were constructed. These are my versions. These are all just dry fit for now. I am waiting on another order of scale lumber to complete some of the interior walls. Once I have those in place can get everything glued down. Next, to stall for time while still pondering my engine dilemma, I decided to get the toe boards in place for the crew quarters. Starboard quarters. Port quarters. Lastly I finished installing all of the hatch covers and cut out the rough version of the Pittman arm wooden inserts. These will be used a rough draft for now until I can get the engine situation straightened out. I just wanted to see what it was going to take to get these carved out. Pittman arms. And how she sits now (pardon my foot photo-bombing the picture). I removed the boilers and set them aside so they wouldn't get dinged up while working on the other features. I still need to get the boiler hold painted with a whitewash and touch up the coal, but I'll get there. Doesn't look like very much right now, but soon I will start going vertical and it will then begin to look a little more like a gunboat instead of a barge. That's all for now. Thanks for taking the time to visit. -Brian


- 739 replies
-
- 11
-
-
Very interesting history, good to see that he was able to survive and prosper after such a devastating war. I have relatives out in Parker County as well. Most of my family immigrated from France and Ireland in the mid 1880’s and settled in Louisiana, so I have no Civil War history there. But it’s great to hear about those that have. -Brian
-
Vaddoc, Thank you for the kind compliments. The American Civil War is truly an interesting subject. A subject that I was really into when I was younger. As I grew up, my interest in it kind of faded away (once girls and cars came along). Then I was fortunate enough to get deployed to the UK during the Gulf War and that’s where the real history is. Not downplaying American history, it’s just that Europe has a lot more of it. I spent a lot of my spare time while I was there exploring historical sites and taking every opportunity to go where Uncle Sam would send me throughout Europe and Southwest Asia. It wasn’t until a few years ago when we visiting Vicksburg again that my interest in the Civil War was renewed. But you are correct, the build log coupled with the history behind the ship, definitely helps to keep it interesting. -Brian
