HOLIDAY DONATION DRIVE - SUPPORT MSW - DO YOUR PART TO KEEP THIS GREAT FORUM GOING! (Only 68 donations so far out of 49,000 members - Can we at least get 100? C'mon guys!)
×


Modeler12
-
Posts
1,716 -
Joined
-
Last visited
Content Type
Profiles
Forums
Gallery
Events
Everything posted by Modeler12
-
 Thank you Steve. Here was my reasoning for taking the approach that I did. When this model is completed it will be displayed in a glass case. A viewer might typically stand back to see this thing and their eyes might be about two to three feet away unless they get real close to see details. At the scale I am working 1 : 76, the two feet translates to 150 feet full scale. At that distance I don't think I could really see if the ratlines were made with a cowhitch, a crowhitch or any kind of hitch for that matter. Hence, no knotting for me. My first try on the port side for the fore ratlines leaves a lot to be desired, but I will not do them over again. I used a template with the ratlines drawn on that. However, the darn thing kept getting in my way. Now what I do is to use a simpler template to give me the vertical spacing. I take a tiny brush with white paint and mark the right shroud. That is where I enter my needle and I use my eyeballs to keep it horizontal. I will cover up the white later on. After touching the two ends with some CA, I let it cure for several minutes or more. Then it is easier to trim the ends as close to the shroud as I dare go. Again I leave the centers loose until all is done.
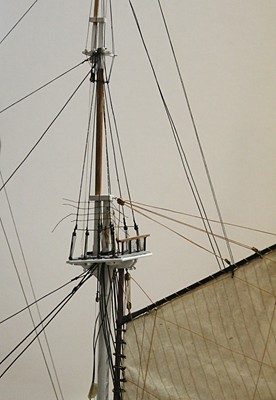
-
It is a bit nerve wracking.
-
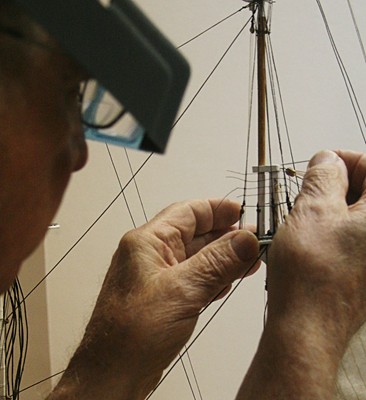
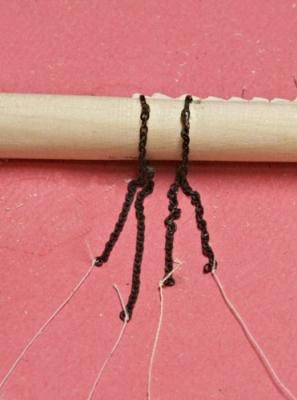
Steve, I appreciate those suggestions and I may still do something like that for the thicker, lower shrouds. But as I go along, it gets a bit better and I was only kidding about the pincushion. (I feel more like a porcupine poking myself like that, ha, ha,) The problem with making knots on these thin lines is that the knots would stand out like a big bulge. The way I do it as shown below, is to go through the five shrouds but leave the center three loose while the ends get a drop of CA to prevent them from slipping out when I trim them. I still have not adjusted the spacing and tension in the center sections. I have now also tried to do this on the mizzen topgallant shrouds which are even thinner. I go through the shroud to the right but weave between the three center shrouds before going through the end to the left. Once I am satisfied with all the spacing I will put a small drop of CA on all the center connections.
-
Sorry, no. Can you resend it or post it here? Correction. I found it in my messages and I don't look there very often.
-
Yes, on both accounts. But, like I said, I am getting better and a bit faster at this. The lower shrouds should be no sweat after these thin guys. I wonder where that name 'ratline' came from. I cannot imagine a rat dumb enough to climb up when the food is down below. Did you get my email, Jeff?
-
I had a look at making the ratlines and gave it my first try. What a job! Pushing the smallest needle I could find through a 'rope' that is 0.019 inches thick five times for each rat, is ridiculous!!! Hopefully I will get better as my hand stops shaking. I feel like a pincushion. The center three shrouds are still loose so I can adjust the ratlines as more are added.

-
Thanks John. That all makes sense. The plans I have also showed that the canvas bags contained sections of rope with knots spaced about ten inches apart.
-
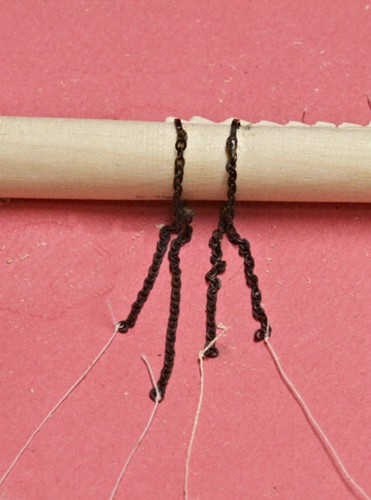
Geoff, you asked about how to pull the chain that goes around the bowstprit through the two holes in the stem. Here is what I tried and it worked. Tie a thread to the very end piece of chain and use that to pull part of the chain through the small hole in the stem. You may have to clean the hole or even enlarge it because there will be another piece of chain coming from the other direction. I made a dry run of this and it was ok, but a bit tricky, like you inferred.
-
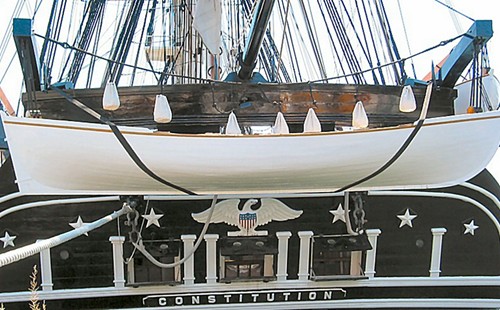
Perhaps a basic question, but were 'lifelines' intended as lifebuoys, like they are now? On the stern of the USS Constitution there are seven canvas bags with 'lifelines' hanging from above the 28 foot whale boat (or gig). What are they? It seems to me that this is a strange location if they were intended as I think they were.
-
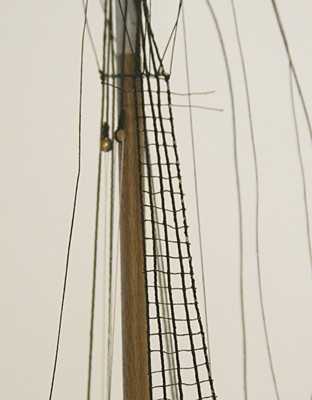
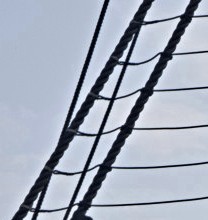
Here is a closeup of the ratlines on the USS Constitution and it shows what you are talking about. The picture is a bit fuzzy, but it does show the eyespice on the ratline and the lashing to hold it to the last shroud.
-
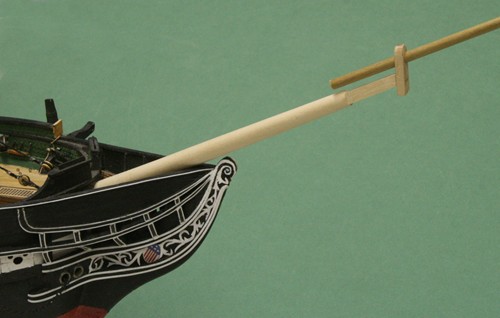
Thanks for reminding me about those two rings, Geoff. I almost forgot to attach them to the bowsprit before gluing the steps in place. I had pre-assembled the irons almost a year ago and it would not be possible to slip them on after the steps. Here is the picture I was looking for.

-
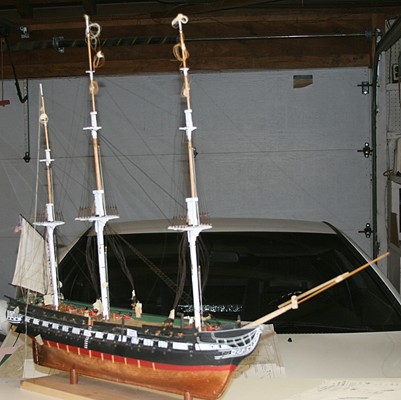
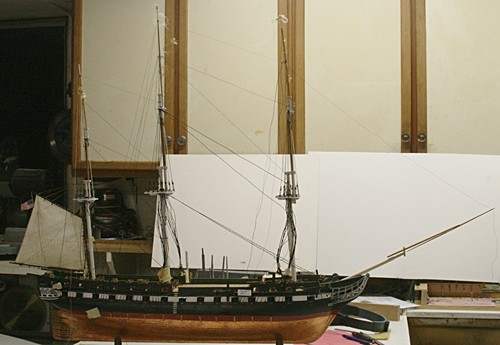
To me it is amazing how tall and long this babe is going to be. I am running out of background material for these pictures. But now that I look at this, I am glad that there will be some sails to fill the big gabs between the masts and bowsprit. I just added the bowsprit and other extensions loosely in place to take these shots. More will come later.
-
What is the best glue for cast metal parts?
Modeler12 replied to vas1949's topic in Metal Work, Soldering and Metal Fittings
One more thing to remember, just like you experienced yourself just now: Castings of metal always have a release coating to have the parts come off the mold. Hence, this coating is not all that kind to accepting glue. Be sure to remove the coating. Usually a scrubbing with some soapy water and a brush will do it. If not, use some steel wool. Use any of the glues mentioned, but I still like epoxy for strength and CA for convenience. -
micro table saw stop
Modeler12 replied to michael mott's topic in Modeling tools and Workshop Equipment
Like it. Need to do that. Q. Why is the plastic stop so far back from the blade? -
I think you are right. I made the chains and loops quite some time ago and I hope that I can still find them. Obviously it is important to make sure they don't interfere with the beams and decking of the head area. My guess is that to thread them through those holes in the stem would require some sewing thread and then a touch of CA, just like you suggested. Sorry, I thought I had a picture of that but I cannot find it. Meanwhile, bowsprit thus far.
-
Thanks Geoff and you are right about the next step. I have started turning the bowsprit and have already filed the slanted mortisses of the bow cap.
-
Starboard side
-
Thank you Bob. That is one of the reasons I like this hobby. I have done a lot of woodworking in the last fifty years, and also have tried many other 'hobbies' that require not only my hands but my brains. I always find it interesting to try different approaches. Cooking is another 'hobby' I enjoy, although my wife does not always agree with what I come up with. One recipe that did not over too well was 'Braised Squirrel Aurora'. It started with: 3 squirrels, cut into serving pieces . . .
- 732 replies
-
- 3
-

-
- constitution
- model shipways
- (and 1 more)
-
I agree Steve that the surgery was successful and that the boats will be happy with the new keels. It only goes to show that this hobby can be or lead to anything you want it to be. Like a 'red and white jersey' for your Conny? I assume that when you say 'football' you are referring to the sport of 'soccer' and not that other version of 'rugby'.
-
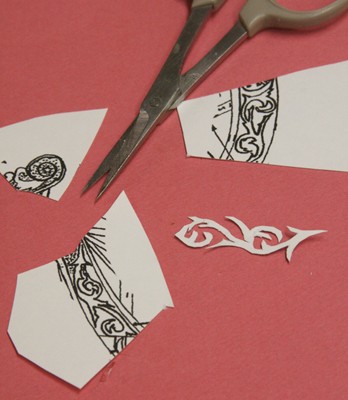
Well, not exactly . . . I assume that your computer system has a printer. Mine (HP series) includes a scanner which allows me to make hard copies as well as copying the image to the computer. I then take the image and use a Microsoft Digital Image program to flip the drawing to create the mirror image. You might have noticed in my last pictures that part of the image was erased. That is something else I can do with that program. Perhaps others here have suggestions about doing it another way that may be easier. One thing to keep in mind is that the size of the drawing has to remain the same (or close to the same). Of course, the easiest would be to simply copy the drawing 'as is' on a stiff piece of white paper. Make two copies and cut both with scissors. Use one 'as is' and the other flipped over. You will have to paint the one that shows all the black lines, but that should not be a major problem. I had to do some paint touching up as it was.
-
One of the reasons that Mr. Hunt and I did not see eye to eye on some things is that I often went against the grain.
- 732 replies
-
- 1
-
-
- constitution
- model shipways
- (and 1 more)
-
I also tried that, Jeff, but as Mr. Hunt suggested, the wood tends to break very easily with the grain and some of those 'legs' are pretty thin. I started out by drilling some holes on the inside curves and then cut away with an exacto knife. But I soon gave up.
-
Micheal, I found that with very thin threads, they became quite tight and a couple times broke if I did not help them along. Thicker thread no problem, but with the setup I have now, it works very well by rotating both ends. However, said that, i must add that the rope end rotates much slower than the three gear end. I think one reason for the 'problem' above is that the tension I use maybe a bit too much. Also the friction of the sled sliding in the track is a bit high. I could wax that but have not bothered.
-
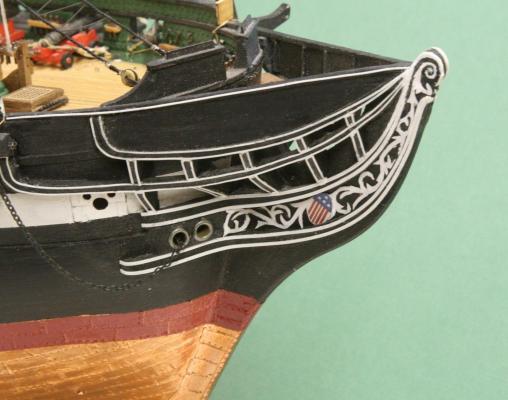
By golly, you are right. The picture I had was not as clear. I also printed the design on some thin styrene, but the ink smudged too much on the smooth surface. So, I will stick with thick paper stock.
-
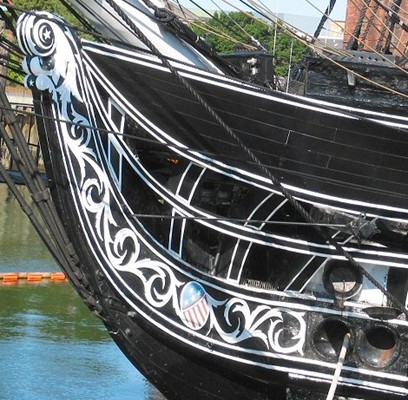
Jeff, here is what I did. I figured that there really is no reason to make the carving out of thick material. On the real ship in Boston it looks like the design is simply painted on (except for the spiral on top). So, I scanned the design from the drawing, used one as is and made another copy after flipping it over and printed them on stiff paper. I cut the whole into four pieces, eliminated some of the barbs and now keep on trimming to make each look decent without cutting them in half. I cut along the lines on the printed side, but used the back side for the real pieces.