


petervisser
-
Posts
579 -
Joined
-
Last visited
Recent Profile Visitors
4,385 profile views


-
 J Snyder reacted to a post in a topic:
Cutty Sark by uscharin - Sergal - 1:78
J Snyder reacted to a post in a topic:
Cutty Sark by uscharin - Sergal - 1:78
-
petervisser reacted to a post in a topic:
HMS Hood by Paul Jarman - FINISHED - Trumpeter - 1/200 Scale - PLASTIC
-
 Fantastic work on those lifeboats! The realism is astounding. Your ingenuity is truly inspiring! All the best with the next step in your CS! Peter
- 105 replies
-
- 1
-
-
- Cutty Sark
- Sergal
- (and 1 more)
-
 petervisser reacted to a post in a topic:
Cutty Sark by uscharin - Sergal - 1:78
petervisser reacted to a post in a topic:
Cutty Sark by uscharin - Sergal - 1:78
-
petervisser reacted to a post in a topic:
Mary Rose by Baker - scale 1/50 - "Your Noblest Shippe"
-
petervisser reacted to a post in a topic:
Mary Rose by Baker - scale 1/50 - "Your Noblest Shippe"
-
petervisser reacted to a post in a topic:
Roter Löwe 1597 by Ondras71
-
Fantastic progress Julian. She looks spectacular! Peter
-
petervisser reacted to a post in a topic:
Friesland 1663 by mrcc - Mamoli MV24 - 1:75
-
petervisser reacted to a post in a topic:
Using wood filler as primer
-
 Baker reacted to a post in a topic:
Große Jacht 1679 by Baker - FINISHED - Corel - 1:50 - modified model from the Yacht D'Oro kit
Baker reacted to a post in a topic:
Große Jacht 1679 by Baker - FINISHED - Corel - 1:50 - modified model from the Yacht D'Oro kit
-
Beautiful work! So much intricate detail to admire. Looks like a real labour of love. Congratulations on such a fine build! Peter
- 97 replies
-
- 1
-
-
- Corel
- Große Jacht
- (and 2 more)
-
Well done Jerry! Congratulations on your fine Bounty! Peter
-
hof00 reacted to a post in a topic:
Flying Cloud 1851 by hof00 - Mamoli - 1/96 - American clipper
-
Quite an array of yards! As with any stage in a model of this type, it's easy to be overwelmed by all the major tasks involved in the model's completion. But you're making great progress, judging by your build log. I look at it as taking bite size pieces and before long another stage of the build is complete! All the best going forward! Peter
- 201 replies
-
- 1
-
-
- Flying Cloud
- Mamoli
- (and 1 more)
-
Always a pleasure to see the added detail you have added to your Cutty Sark Ron. Al;ready looking forward to the next installment. Peter
-
Congratulations on your very fine Cutty Sark! A thing of beauty to be sure. Good to see it under glass and well protected from dust and inquisitive fingers.😉
-
uscharin reacted to a post in a topic:
Cutty Sark by uscharin - Sergal - 1:78
-
Just amazing what you have done to add such fine detail to your Cutty Sark! I visited the CS in 1998 before the fire. At the time the model was not really on my radar. I would love to see her again, despite the new arrangements of her display. An elegant example of the evolution of the ship. Your model is also a prime example of what can be accomplished in this amazing hobby! Looking forward to your rigging efforts! All the best, Peter
- 105 replies
-
- 1
-
-
- Cutty Sark
- Sergal
- (and 1 more)
-
hof00 reacted to a post in a topic:
Cutty Sark by petervisser - Billing Boats - Scale 1:75
-
Truer words have not been said! Your ten points should be included in every model ship kit. Thanks for the insights Jared! Peter
- 431 replies
-
- 1
-
-
- Flying Fish
- Model Shipways
- (and 2 more)
-
Congratulations Jared on your fine model. A real accomplishment for sure! Time to splice that mainbrace! Cheers, Peter
- 431 replies
-
- 1
-
-
- Flying Fish
- Model Shipways
- (and 2 more)
-
An amazing piece of work Rick. A stunning model so far. And the pictures really show off your workmanship. Peter
- 360 replies
-
- 1
-
-
- Flying Fish
- Model Shipways
- (and 1 more)
-
Hi Rob. I find this scale manageable but 1:96 scale would be too challenging for me. I also have a frigate in 1:75 scale which I would love to display next to CS but I’m getting ALOT of pushback from a certain someone about the so called clutter of ship models around the house. Girls….😉
- 207 replies
-
- 2
-

-
-
- billing boats
- cutty sark
- (and 1 more)
-
Hi Rob. It is the Billing 1:75 kit of a rather old vintage produced in the 70’s I’m guessing. The scale is hiding in the title of the log.😉 Thanks for looking in. Cheers, Peter
-
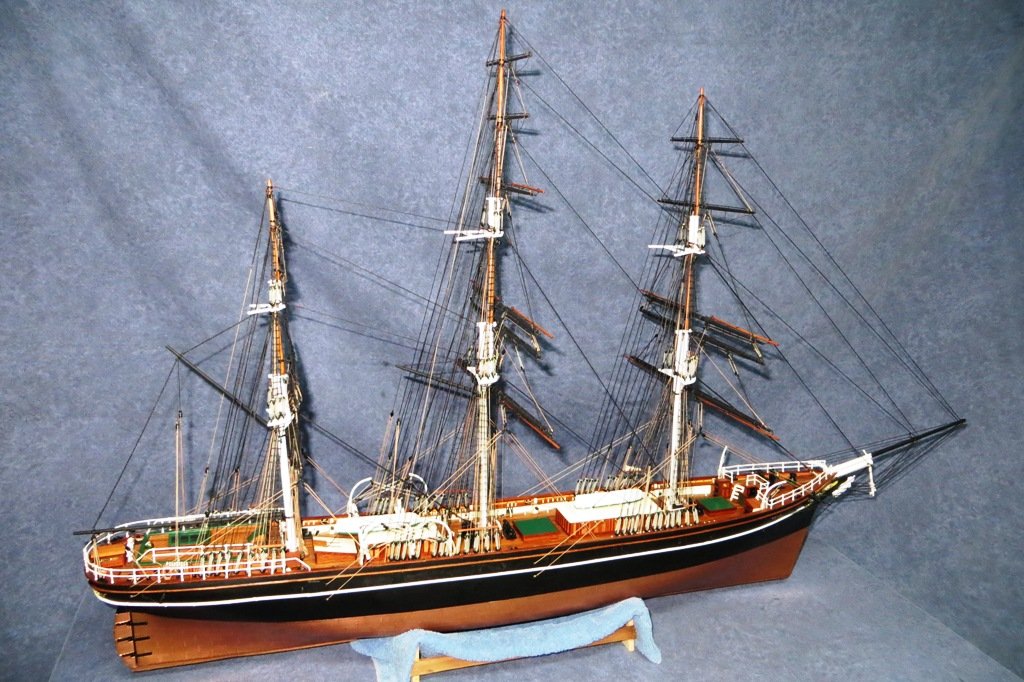
After tying about 900 clove hitches to complete the ratlines, the model is ready for the last phase of rigging. Phew! I can now begin rigging the braces at last. What with the hot weather here in Victoria, my workshop which is semi-sub ground level is one of the coolest rooms in the house. This has allowed me to work on the model, despite the sunny weather. Here's a photo showing the current status...
- 207 replies
-
- 10
-
-
-
- billing boats
- cutty sark
- (and 1 more)
-
Like you I am starting to do minor repairs to my model as the project nears the end. What with the complexity and vastness of the rigging it is so easy to snag yards and rigging when concentrating on another aspect of the model. Nice save with your predicament! I am also nearing the stage of installing the braces to the yards and now that I have seen yours, I'm getting antsy to start mine! All the best with the finishing touches, she looks great! Peter
- 431 replies
-
- 1
-
-
- Flying Fish
- Model Shipways
- (and 2 more)