


Brucealanevans
-
Posts
450 -
Joined
-
Last visited
Reputation Activity
-

 Brucealanevans got a reaction from russ in Charles W Morgan by Brucealanevans - FINISHED - Model Shipways
Finished the Hull today - a real landmark.
Further work will have to wait.
Closing the shipyard due to numerous responsibilities which have been piling up. Need to wrap up several projects before retiring, and have to prepare for an take a subspecialty exam in Clinical Informatics in October.
Probably will open back up after I take the exam in October, beginning with deadeyes, chainplate, etc.
Here are summary pictures of where things are now.
-
 Brucealanevans got a reaction from MikeB4 in Charles W Morgan by Brucealanevans - FINISHED - Model Shipways
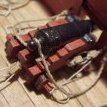
Here's the finished tryworks sitting but not cemented to the deck.
The chicken coop is a bit clunky, but overall I'm fairly pleased.
-
 Brucealanevans got a reaction from jablackwell in Charles W Morgan by Brucealanevans - FINISHED - Model Shipways
Update.
Here's the tryworks. I haven't put the side braces and wood sheathing on yet.
This took time but was not really hard. Took some time mixing paint to get a good brick color that wasn't too red - the admiral didn't like the color on my test wall of bricks.
Almost 500 bricks!
I'm relatively pleased, although the eye goes immediately to the "errors". One chimney is a bit wider, and the walls sloped in enough that I had to mount the cauldrons below the top rather than having the room to drop them through the top.
However, I like the overall effort as my modeling skills improve (3rd wooden ship build).
After the supports/sheathing, probably will make the tank and scrap box before moving on to the next most fiddly bit - the winch. I'll have to dry fit the bowsprit and put the bowsprit bitt in place first, I think, and likely the framing for the anchor deck.
-
 Brucealanevans got a reaction from Julie Mo in Charles W Morgan by Brucealanevans - FINISHED - Model Shipways
So I've started on a Charles W Morgan build, although somewhat intimidated by the speed and or quality of the currently documented construction projects for this ship.
This model is a stretch for me, given the amount of scratch building involved and the somewhat cryptic instructions of this older MS kit.
I got interested after building the New Bedford Whaleboat, and added this kit to my "to do" stack. Having finished Picket Boat #1 to my satisfaction, decided to defer the Phildelphia Gunboat and take on a more complicated project.
I'm not retired (yet) and have many professional demands on my time, so I end up working in fits and starts and when I need the "therapy".
I decided to go ahead and build the hull superstructure before planking to allow better access for clamps for the waterway, planksheer, rail and topgallant structure. That's where I am now (pictures below). The rail structure is a bit wavy viewed end on on one side, but overall I'm relatively pleased within the envelope of my skillset. I had a few disasters in terms of inadvertant breakage of thin pieces (mainly the main rail) after installation by a misplaced hand while working on another part, but managed to overcome that adequately. I still have to do some sanding on the main rail as the strip I used was a bit wider than the rail is supposed to be - that is evident in the pictures where the rail meets the laser-cut curved rail piece forwards.
Next I'll plank between the planksheer and the mail rail to reinforce that area, and then likely add the wale and plank between the planksheer and the top of the wale.
Then I'll go on to bands A-D
The build logs and galleries on this and other sites have been a great aid.
Bruce
-
Brucealanevans got a reaction from Julie Mo in Charles W Morgan by Brucealanevans - FINISHED - Model Shipways
So I've finally finished the planking and a rough sanding. Some work on filler for cracks, etc. yet to go.
-
Brucealanevans got a reaction from russ in Charles W Morgan by Brucealanevans - FINISHED - Model Shipways
At a bit of a standstill waiting for replacement mast dowels (don't ask how I could mistake rounded for squared from the plans). I realized if I wanted to have furled sails on the model, I'd need to figure out the jibs prior to rigging the forestays.
So I started researching on this site and experimenting.
Made (cut down) jibs from two thicknesses of silkspan painted with white glue/a bit of ochre paint/water after drawing the seams on one of the inside surfaces of the sandwich. The seams don't show well in the pictures, but they're appropriately understated but visible if you look. If I decide to have some of the sails only partially furled they should look good
Then after drying, turned a small seam with thread inside drawn out a the corners for attachment. Added rings (there are 10 of them) made from black coated copper wire and mounted the whole on a block with a copper rod thru the rings to keep things aligned while I re-wetted and folded the sail.
I'm reasonably pleased with this - the package should be smaller once it's bound down. Probably about half the diameter it is at present. I'll finish the other and mount them when I do the forestays. I think just the two.
Suspect the spanker/gaff at the mizzen might be more of a challenge.
I've made a decision to go with sails (furled) so I guess I also will be acquiring yet another display case. We're going to run out of room to put ships if I'm not careful, but given the speed with which I'm working not likely to be a problem.
-
 Brucealanevans got a reaction from thibaultron in Charles W Morgan by Brucealanevans - FINISHED - Model Shipways
At a bit of a standstill waiting for replacement mast dowels (don't ask how I could mistake rounded for squared from the plans). I realized if I wanted to have furled sails on the model, I'd need to figure out the jibs prior to rigging the forestays.
So I started researching on this site and experimenting.
Made (cut down) jibs from two thicknesses of silkspan painted with white glue/a bit of ochre paint/water after drawing the seams on one of the inside surfaces of the sandwich. The seams don't show well in the pictures, but they're appropriately understated but visible if you look. If I decide to have some of the sails only partially furled they should look good
Then after drying, turned a small seam with thread inside drawn out a the corners for attachment. Added rings (there are 10 of them) made from black coated copper wire and mounted the whole on a block with a copper rod thru the rings to keep things aligned while I re-wetted and folded the sail.
I'm reasonably pleased with this - the package should be smaller once it's bound down. Probably about half the diameter it is at present. I'll finish the other and mount them when I do the forestays. I think just the two.
Suspect the spanker/gaff at the mizzen might be more of a challenge.
I've made a decision to go with sails (furled) so I guess I also will be acquiring yet another display case. We're going to run out of room to put ships if I'm not careful, but given the speed with which I'm working not likely to be a problem.
-
 Brucealanevans got a reaction from cristikc in Charles W Morgan by Brucealanevans - FINISHED - Model Shipways
At a bit of a standstill waiting for replacement mast dowels (don't ask how I could mistake rounded for squared from the plans). I realized if I wanted to have furled sails on the model, I'd need to figure out the jibs prior to rigging the forestays.
So I started researching on this site and experimenting.
Made (cut down) jibs from two thicknesses of silkspan painted with white glue/a bit of ochre paint/water after drawing the seams on one of the inside surfaces of the sandwich. The seams don't show well in the pictures, but they're appropriately understated but visible if you look. If I decide to have some of the sails only partially furled they should look good
Then after drying, turned a small seam with thread inside drawn out a the corners for attachment. Added rings (there are 10 of them) made from black coated copper wire and mounted the whole on a block with a copper rod thru the rings to keep things aligned while I re-wetted and folded the sail.
I'm reasonably pleased with this - the package should be smaller once it's bound down. Probably about half the diameter it is at present. I'll finish the other and mount them when I do the forestays. I think just the two.
Suspect the spanker/gaff at the mizzen might be more of a challenge.
I've made a decision to go with sails (furled) so I guess I also will be acquiring yet another display case. We're going to run out of room to put ships if I'm not careful, but given the speed with which I'm working not likely to be a problem.
-
 Brucealanevans got a reaction from docidle in Charles W Morgan by Brucealanevans - FINISHED - Model Shipways
Well, worked hard on real world work most of the weekend.
Found myself with a couple of hours of free time, so I sneaked into the shipyard and added some trywork tool details.
I put a oil ladle and a scraps strainer on their respective sides of the tryworks, and added a "station" for the mincing knife work creating the "bible leaves" from strips of blubber and skin which would be pitched into the pot, which was done on a plank over a tub, or so my references told me.
I guess I need some small, limited projects to work on from time to time without getting sucked into a big thing like deadeyes, chainplate, shrouds, and so on.
I'll add a few barrels and buckets. I also ordered some s-scale people, to play with trying to whip them into shape to be crew with some modification and creative micro-painting. We'll see.
-
Brucealanevans got a reaction from russ in Charles W Morgan by Brucealanevans - FINISHED - Model Shipways
Back at work intermittenly in the shipyard for a few weeks. Put the chainplates/deadeyes in place and constructed and rigged up the bowsprit and boom to the extent that can be done prior to getting the masts in place for the forestays.
It's been a bit of a setback for me. After the Bedford Whaleboat and Picket Boat #1 I've gotten acceptably good at scale woodwork, but given that those models - my first wooden builds - had only minimal rigging, I'm back as a beginner again. So with each bit I do, I'm figuring out the best approach. That leads to rigging four lines, and then looking at the first and seeing only how I could have done it better.
Anyway, here's the current state of the build. Ready to begin working on the masts.
-
 Brucealanevans got a reaction from mischief in Charles W Morgan by Brucealanevans - FINISHED - Model Shipways
Well, worked hard on real world work most of the weekend.
Found myself with a couple of hours of free time, so I sneaked into the shipyard and added some trywork tool details.
I put a oil ladle and a scraps strainer on their respective sides of the tryworks, and added a "station" for the mincing knife work creating the "bible leaves" from strips of blubber and skin which would be pitched into the pot, which was done on a plank over a tub, or so my references told me.
I guess I need some small, limited projects to work on from time to time without getting sucked into a big thing like deadeyes, chainplate, shrouds, and so on.
I'll add a few barrels and buckets. I also ordered some s-scale people, to play with trying to whip them into shape to be crew with some modification and creative micro-painting. We'll see.
-
 Brucealanevans got a reaction from Mirabell61 in Charles W Morgan by Brucealanevans - FINISHED - Model Shipways
Finished the Hull today - a real landmark.
Further work will have to wait.
Closing the shipyard due to numerous responsibilities which have been piling up. Need to wrap up several projects before retiring, and have to prepare for an take a subspecialty exam in Clinical Informatics in October.
Probably will open back up after I take the exam in October, beginning with deadeyes, chainplate, etc.
Here are summary pictures of where things are now.
-
Brucealanevans got a reaction from docidle in Charles W Morgan by Brucealanevans - FINISHED - Model Shipways
Back at work intermittenly in the shipyard for a few weeks. Put the chainplates/deadeyes in place and constructed and rigged up the bowsprit and boom to the extent that can be done prior to getting the masts in place for the forestays.
It's been a bit of a setback for me. After the Bedford Whaleboat and Picket Boat #1 I've gotten acceptably good at scale woodwork, but given that those models - my first wooden builds - had only minimal rigging, I'm back as a beginner again. So with each bit I do, I'm figuring out the best approach. That leads to rigging four lines, and then looking at the first and seeing only how I could have done it better.
Anyway, here's the current state of the build. Ready to begin working on the masts.
-
 Brucealanevans got a reaction from Ryland Craze in Charles W Morgan by Brucealanevans - FINISHED - Model Shipways
Back at work intermittenly in the shipyard for a few weeks. Put the chainplates/deadeyes in place and constructed and rigged up the bowsprit and boom to the extent that can be done prior to getting the masts in place for the forestays.
It's been a bit of a setback for me. After the Bedford Whaleboat and Picket Boat #1 I've gotten acceptably good at scale woodwork, but given that those models - my first wooden builds - had only minimal rigging, I'm back as a beginner again. So with each bit I do, I'm figuring out the best approach. That leads to rigging four lines, and then looking at the first and seeing only how I could have done it better.
Anyway, here's the current state of the build. Ready to begin working on the masts.
-
 Brucealanevans got a reaction from rafine in Charles W Morgan by Brucealanevans - FINISHED - Model Shipways
Back at work intermittenly in the shipyard for a few weeks. Put the chainplates/deadeyes in place and constructed and rigged up the bowsprit and boom to the extent that can be done prior to getting the masts in place for the forestays.
It's been a bit of a setback for me. After the Bedford Whaleboat and Picket Boat #1 I've gotten acceptably good at scale woodwork, but given that those models - my first wooden builds - had only minimal rigging, I'm back as a beginner again. So with each bit I do, I'm figuring out the best approach. That leads to rigging four lines, and then looking at the first and seeing only how I could have done it better.
Anyway, here's the current state of the build. Ready to begin working on the masts.
-
 Brucealanevans got a reaction from md1400cs in Charles W Morgan by Brucealanevans - FINISHED - Model Shipways
Well, worked hard on real world work most of the weekend.
Found myself with a couple of hours of free time, so I sneaked into the shipyard and added some trywork tool details.
I put a oil ladle and a scraps strainer on their respective sides of the tryworks, and added a "station" for the mincing knife work creating the "bible leaves" from strips of blubber and skin which would be pitched into the pot, which was done on a plank over a tub, or so my references told me.
I guess I need some small, limited projects to work on from time to time without getting sucked into a big thing like deadeyes, chainplate, shrouds, and so on.
I'll add a few barrels and buckets. I also ordered some s-scale people, to play with trying to whip them into shape to be crew with some modification and creative micro-painting. We'll see.
-
Brucealanevans got a reaction from docidle in Charles W Morgan by Brucealanevans - FINISHED - Model Shipways
Finished the Hull today - a real landmark.
Further work will have to wait.
Closing the shipyard due to numerous responsibilities which have been piling up. Need to wrap up several projects before retiring, and have to prepare for an take a subspecialty exam in Clinical Informatics in October.
Probably will open back up after I take the exam in October, beginning with deadeyes, chainplate, etc.
Here are summary pictures of where things are now.
-
Brucealanevans got a reaction from docidle in Charles W Morgan by Brucealanevans - FINISHED - Model Shipways
After more than 1 1/2 years at this, I'm approaching being done with the hull.
Put on the shelter roof last night.
Next is the rail/pump area around the mainmast, and then a few random things like the grinding wheel, some barrels, and a careful review of the plan sheet to make certain all of the deck eyebolts, cleats, etc. are in place.
Likely will need to take a break before beginning rigging/masts as real life intrudes again.
Oh well, by this time next year I'll be retired or, at the worst, part time; more time to play either way!
-
 Brucealanevans got a reaction from dgbot in Charles W Morgan by Brucealanevans - FINISHED - Model Shipways
Added the steering wheel gear and fabricated the aft deck houses. I found it easiest to build the houses from 1/32nd thick sheet section by section, and plank them over with a bit of spacing between planks to get the proper look.
-
Brucealanevans got a reaction from dgbot in Charles W Morgan by Brucealanevans - FINISHED - Model Shipways
Time for another update.
When drilling out the anchor chain pipes to the deck, I came across a nice chain in the proper scale and decided to add the whole anchor chain. Which meant building the anchors.
Bluejacket has a nice blackening solution that's branded for pewter but works well on Brittania metal - used that for the anchors; replaced the metal kit crossbar with a fabricated wood one.
The tie-down chain is very small - I had quite a time getting a thread through one to the links to fasten them down, and to pass a small metal bar through the opposite end end link to hold the chain at a hole (cathead) or eyebolt (bulkhead tiedown at the anchor pad). My wife's old surgical loupes to the rescue once again.
-
 Brucealanevans got a reaction from DavidG in Charles W Morgan by Brucealanevans - FINISHED - Model Shipways
Update.
Here's the tryworks. I haven't put the side braces and wood sheathing on yet.
This took time but was not really hard. Took some time mixing paint to get a good brick color that wasn't too red - the admiral didn't like the color on my test wall of bricks.
Almost 500 bricks!
I'm relatively pleased, although the eye goes immediately to the "errors". One chimney is a bit wider, and the walls sloped in enough that I had to mount the cauldrons below the top rather than having the room to drop them through the top.
However, I like the overall effort as my modeling skills improve (3rd wooden ship build).
After the supports/sheathing, probably will make the tank and scrap box before moving on to the next most fiddly bit - the winch. I'll have to dry fit the bowsprit and put the bowsprit bitt in place first, I think, and likely the framing for the anchor deck.
-
Brucealanevans got a reaction from dgbot in Charles W Morgan by Brucealanevans - FINISHED - Model Shipways
So, here is the skylight in place.
I'm relatively pleased with the result, although there's too much overhang of the top window panes - the coaming I put in place was thicker than it should have been so the base part was slightly smaller, and I didn't allow for that when I built the top from the plans.
Overall tho, pleased with the result. 2 weeks of intermittent work.
Next on to the next most fiddly bit - the tryworks. After a break.
-
Brucealanevans got a reaction from dgbot in Charles W Morgan by Brucealanevans - FINISHED - Model Shipways
Once all the rods were in, gluing the end slats to the pillars fixes everything in place. After adjusting the position of the other slats, I fixed them in place with a drop of thin Zap at each joint.
One more side window, and then the two small end windows to go. All the windows for the top are already done.
Looking forward to painting, adding the "glass" and assembly this weekend, perhaps.
This thing has been a real challenge to make - everything is so darn small!
I hope with some sanding and a good paint job it will look the way I wanted it to.
-
Brucealanevans got a reaction from dgbot in Charles W Morgan by Brucealanevans - FINISHED - Model Shipways
I put a piece of wood into the window to hold the work while I was adjusting. It had rapidly become clear that otherwise slats or rods would squirrel out and I couldn't finish one until I came up with this. Not necessary on the single panes for the top since those could rest on the table during construction.
Then I lined up the slats, being careful to retain the orientation from the drilling in the jig.
I decided to use very small diameter steel rod/wire rather than copper, because it was smaller, and wouldn't bend during adjustment. The perfectly straight rods give a better look, in my opinion.
After cutting a piece slightly smaller than the distance between the pillars, I then would ease the rod through the same hole in successive slats. Trying to put all the rods through the holes and then dropping the assembly into place seemed like a better method, but it didn't work for me. The holes in the slats (smallest drill bit that my drill press would handle) didn't "hold" the rods, and they would inevitably slide out during the manuvering. After multiple tries I had to go to this method, which is maddenly tedious but I was usually able to succeed in one or two tries. Magnification helped to align the rods and the holes in successive slats.
Very difficult, especially for someone who has an espresso addiction and two espresso machines in the kitchen.
The slats could be moved around to allow a fine tweezer access to guide the rod to the next slat hole. One twitch and the whole thing flies out to begin again. It worked best to put the first and last rods in. Once they were all the way in and the rods could drop between the pillars, things were more stable for the following rods.
-
Brucealanevans got a reaction from dgbot in Charles W Morgan by Brucealanevans - FINISHED - Model Shipways
Thanks to John for technique for lettering, which I was worried about.
Done in a black text block in Microsoft Word, then cut out and applied with decoupage glue and coated with 2 thin coats.
I "glazed" the stern ports with a product from Micro Mark - a white viscous liquid that can be drawn across small windowed areas and dries clear.
I ended up doing the 3 starboard and larboard ports the same way, but without the circular frame.