

rdsaplala
-
Posts
602 -
Joined
-
Last visited
Reputation Activity
-

 rdsaplala got a reaction from Landlubber Mike in HMS Pegasus by Landlubber Mike - Amati/Victory Models - Scale 1:64
Hi Mike,
She's coming along beautifully, those precut bulwarks are indeed quite a pain to install, but I can see that you've overcome them with flying colors
No problem my friend, copy away, I'll be copying quite a lot of your excellent techniques in the near future too
Have a Happy New Year to you and your loved ones!
-
 rdsaplala reacted to Landlubber Mike in HMS Pegasus by Landlubber Mike - Amati/Victory Models - Scale 1:64
Well, after two nights of frustration, colorful language and adult beverages, the gunport patterns are on! As with my Badger build, fitting the gunport patterns is the most stressful part of the build, and it's good to get this stage behind me. So much of the alignment is keyed to the proper fitting of them, and unlike most items where if you don't like the part, you can remove and replace it, the gunport patterns are pretty much there to stay.
I know that kit manufacturers use the patterns to make things easier overall, but it really would be helpful if they provided a little more instructions and guidelines to help people along. The Caldercraft Badger instructions were fairly good, but the Pegasus instructions really only said to fit the patterns against the tops of the bulkheads. They should tell you how much extra material is built into the bulkheads, how to fit them at the stem, how to fit them at the stern extensions, etc. The plans also incorrectly show the jigsaw connection sitting on bulkhead 9 - from my fitting and other logs on here, the connection is just aft of that bulkhead. In addition, I found that the bowsprit hole in the patterns is pretty worthless - you can see in my next post how much I had to sand back the fore edge of the pattern.
The first soaking and fitting got the patterns in a very good shape aside from the bottom (I didn't pin the bottoms of the patterns, so they lacked that gentle curve against the middle of the hull). When I soaked them for the second time however, the patterns relaxed a bit and straightened out a bit. So, while I had planned on soaking and fitting them three times, I ended up just doing it twice.
Here are some pictures when I started with the starboard side. My approach was to get the two halves pinned and clamped, then start with the end of the front pattern and work my way forward. Then I worked the back pattern starting from the jigsaw connection to the stern. When I got to the stem, I slowly sanded the fore edge back until it fit snug against the stem. I don't think you can fit the patterns starting at the stem and working towards the stern - aligning the patterns at the middle was a much better approach I think.
I bought these planking pins from Micromark for my Badger, but never used them. I found them absolutely indispensable for attaching the bottom of the patterns on the Pegasus. They really helped ensure that the patterns fit tightly against the bulkheads, and for the ends of the patterns against the stem. They have a very strong screw with tight threads, so once you get it into the bulkheads, they worked like a charm. They are knurled though, so they are pretty rough on your fingers when trying to get them started into the MDF.
I'll post the final pictures in the next post.
-
rdsaplala reacted to Landlubber Mike in HMS Pegasus by Landlubber Mike - Amati/Victory Models - Scale 1:64
Thanks very much guys. Hope you and your families had a nice holiday.
Jason - I would think that most of the details will be covered up as I am thinking of having a very busy deck showing a working ship in sails (probably a mixture of full of furled). But, it was fun to try out and improve my skills a bit.
Spyglass - I did adjust the clamps a bit to help get the curves in. I'll detail a little more in my next post, but it was a bit tricky with the redheart extensions.
Martin - first try, but hours of finagling, running back and forth to the plans and your log and others, etc. The pictures above don't show all the blood, sweat and tears that went into fitting them (well, no blood this time).
Aldo - thanks very much. Hope you are doing well my friend. I hope you don't mind, but I copied some pictures off your log showing your main bitts construction. They will be very helpful resources, thank you!
-
rdsaplala reacted to popeye the sailor in HMS Agamemnon by mobbsie - FINISHED - Caldercraft / Jotika - 1/64
sounds like a great place to berth her! does she have any ties to the history of the fort? can the public visit and see her? I hope so!
congrats to you Mobbsie and your beautiful ship! I hope the New year brings you much more!
-
rdsaplala reacted to riverboat in HMS Agamemnon by mobbsie - FINISHED - Caldercraft / Jotika - 1/64
Nice!! move Tony........ Congrats.
Frank
-
 rdsaplala got a reaction from mtaylor in Licorne 1755 by mtaylor - 3/16" scale - French Frigate - from Hahn plans - Version 2.0 - TERMINATED
Lovely planking work Mark, that pear sure is a real eye candy, I can't wait to see her all planked up in pear
-
rdsaplala reacted to popeye the sailor in Andrea Gail by popeye the Sailor - FINISHED - 1:20 scale
thanks Aldo.......my big problem is I think of them faster than I can build them. to make matters worse........I act on them
thanks John........not so much as flattened wire....but I want to simulate the ribbings. these are in essence 55 gal drums.
thanks Piet......I'm gonna try as a matter of fact, the first one is pretty much done.....except for a little touch up and the lettering on them. I'll show you what they will look like
-
 rdsaplala got a reaction from popeye the sailor in Andrea Gail by popeye the Sailor - FINISHED - 1:20 scale
Looking great Popeye, you're doing a very fast and neat work on her, I've been absent for so long that I almost forgot just how fast you build your ships
-
 rdsaplala got a reaction from harvey1847 in HMS Triton (1/64) by Aldo - POB
Thank you very much Augie, Anja, Nils, Sjors, Mark, Grant, Robert, Mike, Christian, and Mobbsie for the kind words and well wishes, I really appreciate it, and many thanks also to all who pressed the like button
To answer some querries:
Nils, my Pegasus is unfortunately on hold as my health condition limits my building time so I prioritized Triton.
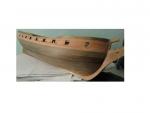
Mark, the bump has indeed been sorted out and the modification produced a relatively fair hull, it appears that the NMM draught has negligible distortion and can be directly traced to create replacements for the offending aft-most bulkheads
Sjors, I'm afraid that I don't have anymore copies of those previous pics however, to summarize, those posts just show one method on how you can detect the degree of horizontal distortion on draughts by comparing 10 feet sections at various areas such as the foremost, middle, and aftmost portions of the "ruler-like" diagram as seen in the picture below:
The closer these measurements are to each other, the less the horizontal distortion and vice versa. That is however only a minute aspect so for further reading, I highly recommend David Antscherl's two articles: "Understanding Eighteenth-Century Admiralty Drafts" and "Drawing Techniques for the Modeleller". These two excellent works give a lot of useful info on interpreting and drafting ship plans Thanks again you guys, have a Happy and Prosperous New Year to all! -
rdsaplala reacted to jaerschen in HMS Triton (1/64) by Aldo - POB
Hi Aldo
I wish you also a happy new year and very much time for model building. So we can see much progress of your nice model
-
 rdsaplala got a reaction from jaerschen in HMS Triton 1773, 1/48, POF by Juergen
Hi Juergen,
Just caught up with your Triton log, you've done a marvelous job on her Sir, very precise, clean work, and your hull has lovely lines
-
rdsaplala reacted to src in Enterprise by src - Constructo - 1:51 - or Lessons in Adapt Improvise and Overcome
This is most likely my last post till after christmas. Other than the last two days we have been on 12 hour days 7 days a week for the last three weeks and will pretty much continue until the 20th. So, very minimal build time for me. My bank account (and the IRS) are loving the double time though! Who needs sleep or hobbies? There is coffee and dreaming while awake!
Just before the insanity started at work I was working on my quarter badge window frames as my sciatica eased up. I finished my first set only to find I made my jig wrong. I had thought I allowed for a small amount of trimming top and bottom but ended up making them so big by the time I trimed them down there wasnt enough frame left to hold everything together! Dohh!!
Looks OK
Too big! DOH!!!
So I made a new jig and built some new frames. When I made my dados for the mullions I cut just a tad too deep and ended up wit numerous match sticks......Doh-dohh!! Somewhere in all this there were a couple more screw ups that required starting over. All told I think I made these 5 times before I got something I felt was workable.
I wan to get over to a place called SilPak and buy some casting epoxy for my glazing. I have several failed attempts at frames so I will experiment with that. If it doesnt work out I have some micro crystal clear I can use. My only concern is it dries so soft. we will see.
Several attempts later.
While glue was drying on the frames I continued stropping blocks for the gun carriages and ordered some 0.025 rope from Chuck for my breaching ropes. Tonight i was able to rig one carriage - took me most of two hours to do. There is still room for improvement but I am mostly OK with my first attempt. Not sure how much breaching rope I should have and how it would terminate on a lashing like this, so far I have not found a picture or drawing that shows the and of the breaching rope. All the drawings I have seen the rope is cut off at the ring, I assume for clarity.
I havent trimmed the lropes yet as I may still play with them or redo them as I gain experience.
Not sure how much of the breaching rope to leave, leaning toward the left side.
Hope everybody has a great holiday season.
Till then ,
sam
-
rdsaplala reacted to src in Enterprise by src - Constructo - 1:51 - or Lessons in Adapt Improvise and Overcome
Thanks for all the comments and likes, always appreciated.
Rich, Augi, ummmm... thanks...?
I need some advice on rigging my gun carriages. Lavery's Arming and Fitting says that a 6 pound cannon had two single blocks on each side for the gun tackle so I ordered some from Chuck (pictures on a page or two back) I started stropping the block and just want to make sure I am on the right track before I get too far into this. One block will go hooked to a ring on the bulwarks, that will have a length of rope seized to it, the other block will essentially be free meaning other than the hook stropped to one end and rope running through the pulley it will not be stropped to the tackle.
Below are picture of what I have done so far (thats two nights and most of Saturday figuring this stropping out).
I feel like I am on the right track but wanted to check in with the more experienced before I waste several nights going in the wrong direction.
This is more or less the order I did these in
A little closer. Still have lots of room for improvement, but with the naked eye from a foot away (51' in the RW) they dont look too bad
Sam
-
rdsaplala reacted to src in Enterprise by src - Constructo - 1:51 - or Lessons in Adapt Improvise and Overcome
Carl,
Yes but I have the last laugh, them Dodgers just took their division!
Back to building.
My Arch Enemy Mr Sciatica has paid me a visit and is interfering with my build time again. Not to mention work, I just spent the last two nights "wading with pirates" in a theme park attraction whose name I am not allowed to mention.
Since Ole Mr Sciatica wont let me sit for long periods I have put my windows on hold. Instead I have been doing things that can be accomplished while standing.
On a positive note I am making progress on my carriages and cannons. I think I am finally getting the hang of this blackening process!
I started out soldering the trunnions in and filing them to a constant length. I just used soft solder - they were a press fit and wont be under any stress.
After a good going over with a purple scrubby pad and brass brush I cleaned everything up in soap and distilled water with a distilled rinse. Then into the ultra sonic cleaner. My little Harbor Freight cleaner works pretty well but I wish there was a way to run for more than a 3 minute cycle. I ran it for 10 cycles then rinsed in distilled water.
After that it was into a 50/50 solution of distilled water and muratic acid. I intended to leave them in for 30 minutes but the Better Half came home and we went to lunch. They ended up being in the acid till the next morning when I woke up and went "Oh NO!!" I ran outside and pulled them out afraid of what I would find. Other than being discolored they were fine.
A quick dip in a baking soda solution and a final rinse on distilled water, into the blackening solution they went for ten minutes. They looked good while wet but when they dried not so good. The top set are after cleaning but before the second soak.
I recalled Russ saying he blackens his parts several times so I took 1/2 of them and rubbed them down with a scrubby pad and back in they went for a bout 15 minutes. This second soak was much better so I did the other half.They look pretty good to me, a nice black with a satin sheen.
While all this has been going on I have finished staining the carriages and applied a coat of linseed oil with beeswax. Once that dried for a couple of days I buffed them up and finished drilling for my hardware. I felt they needed some more oil and wax but wasnt sure how to go about that with the hardware glued in. I noodeled on it for a bit and hit on my dremmel with a buffing wheel. I rubbed a bit of oiled with a q-tip and then buffed them on a low speed. It worked so well I am going to go back and re-do my other small parts, I was never really happy with the sheen, they just do not match the hull.
I still have to make cap squares as well as finish cleaning up the trucks and get some stain on them. then I can start rigging these things.
I think next build I will opt for lighter colored wood, all my hard work kind of disappears into the darker mahogany.
I am getting there, slowly!
-
 rdsaplala got a reaction from dvm27 in Naval Cutter Alert by AnobiumPuncatum - Scale 1/36 - POF
Hi Christian,
I just finished browsing through your log, you're doing some excellent work both in CAD and in wood Sir, your Alert is looking great!
I've been lucky to have have copies of David Antscherl's " Understanding Eighteenth-Century Admiralty Drafts" and "Drawing Techniques for the Modeleller" thanks to druxey, and I am amazed at his techniques of correcting distortions and drawing the various sweeps and curves using the provided radii/centres by hand. I am equally amazed at how you are extending these mind-blowing techniques to CAD
-
 rdsaplala got a reaction from Gentlegiant in Bomb Vessel Granado 1742 by mobbsie - FINISHED - 1/48 - cross-section
Hi Mobbsie,
Just catching up, I see that you're enjoying your conversion to the darkside my friend, beautiful work Sir, that is a wonderful looking set of frames!
-
 rdsaplala got a reaction from Mirabell61 in HMS Pegasus 1776 by Mirabell61 - FINISHED - scale 1:64 - 16-gun sloop
Hi Nils,
Just caught up with your Pegasus build, wow! you've come a long way since my last visit, she's almost nearly completed.
Beautiful detail work and rigging Sir, and that boat looks fantastic!
-
 rdsaplala got a reaction from gjdale in HMS Triton (1/64) by Aldo - POB
Thank you very much Augie, Anja, Nils, Sjors, Mark, Grant, Robert, Mike, Christian, and Mobbsie for the kind words and well wishes, I really appreciate it, and many thanks also to all who pressed the like button
To answer some querries:
Nils, my Pegasus is unfortunately on hold as my health condition limits my building time so I prioritized Triton.
Mark, the bump has indeed been sorted out and the modification produced a relatively fair hull, it appears that the NMM draught has negligible distortion and can be directly traced to create replacements for the offending aft-most bulkheads
Sjors, I'm afraid that I don't have anymore copies of those previous pics however, to summarize, those posts just show one method on how you can detect the degree of horizontal distortion on draughts by comparing 10 feet sections at various areas such as the foremost, middle, and aftmost portions of the "ruler-like" diagram as seen in the picture below:
The closer these measurements are to each other, the less the horizontal distortion and vice versa. That is however only a minute aspect so for further reading, I highly recommend David Antscherl's two articles: "Understanding Eighteenth-Century Admiralty Drafts" and "Drawing Techniques for the Modeleller". These two excellent works give a lot of useful info on interpreting and drafting ship plans Thanks again you guys, have a Happy and Prosperous New Year to all! -
rdsaplala reacted to mobbsie in HMS Triton (1/64) by Aldo - POB
Welcome home mate.
Excellent planking mate, and that is a good fix with the gun ports.
Good to have you back
Be Good
mobbsie
-
rdsaplala reacted to AnobiumPunctatum in HMS Triton (1/64) by Aldo - POB
Aldo,
it's good to hear from you. I am happy that you are doing better and find time to continue your log.
-
rdsaplala reacted to Landlubber Mike in HMS Triton (1/64) by Aldo - POB
Aldo, like everyone else, I'm so happy to see you back posting here. It was a lot of fun posting with you as a fellow Badger brother. Glad to hear that you are doing better.
Your Triton is looking very nice my friend. Very nice clean work as usual. Hope you decide to stay here and post more regularly, we all enjoy your work and company!
Best wishes for a happy holiday and 2015 to you and your family.
-
rdsaplala reacted to j21896 in HMS Triton (1/64) by Aldo - POB
Aldo!
What a fantastic holiday gift to see you back in the shipyard and posting on MSW! You have been missed my friend.
I want to wish you and your family a Happy and HEALTHY new year! And let's not forget your Badger -- she deserves the company of your Triton and Pegasus along side her. So here's to a very busy shipyard as well -- for many years to come!
Cheers,
Robert
-
rdsaplala reacted to gjdale in HMS Triton (1/64) by Aldo - POB
Hi Aldo,
Wonderful to see you back in the shipyard again! I do hope this signals a resumption of play and that we'll be seeing a lot more of you once again.
Your progress looks great so far. Great idea to have Chuck laser cut some tricky parts for you.
-
rdsaplala reacted to mtaylor in HMS Triton (1/64) by Aldo - POB
Hi Aldo,
It's great to hear that you're doing better. Depression with any major health issue is a tough well to climb out of and from what I just read, you're climbing.
Nice work on the Triton. Did you get that "bump" sorted out? Ok.. obviously, as you've planked. She's looking good... better than good, actually.
-
rdsaplala reacted to Sjors in HMS Triton (1/64) by Aldo - POB
From me also welcome home Aldo !!!!!!
I'm happy that I see you building and posting again !
I've missed you.......
One question.
At 5 page ,post number 74 and 80 there are some pictures missing.
Is there any change that you can put them back ??????
When I go to the dark side ( when ever ) I need all the information that I can get my hands on
Take care my friend and take your time with every thing !!!!!!!!!
Sjors