

rdsaplala
-
Posts
602 -
Joined
-
Last visited
Reputation Activity
-

 rdsaplala got a reaction from popeye the sailor in La Renommèe by Landlubber Mike - Euromodel - Scale 1:70
Hi Mike,
It's nice to see you building this beautiful frigate, I too love the lines of this particular model, you're off to a good start my friend, she's shaping up nicely
I really enjoyed reading your discussion on establishing the identity of this ship, excellent research work
-
 rdsaplala reacted to gjdale in HMS Triton (1/64) by Aldo - POB
Hey Aldo! So pleased to see you back my friend - its been way too long!
As for your plans quandary, have you tried a print shop that deals with architects plans and large blueprints? They might have the capacity to scan your NMM plans to file for you.
Looking forward to seeing the resumption of your build. My own modelling is “on hold” at the moment while I attend to some 1:1 scale stuff - building a bunch of cabinets and storage solutions for the garage workshop.
-
rdsaplala reacted to gjdale in Da Vinci Flying Machine by gjdale - FINISHED - Imagination Factory - Scale 1:6
Thanks Mobbsie - good to see you back my friend. Thanks also to all the likes - it seems there is a bit of interest in this unusual kit.
Continuing with the Fuselage.....
The Neck Ring needs to be fitted to the Fuselage at a specific angle. To achieve this, the kit provides a template and instructs you to glue this to a piece of stiff card and then position the fuselage over the wing plan. Once in place, you are advised to: “prop the part at the correct angle with books etc so that it is unable to move”, then glue and clamp in place to allow the glue to dry.
Hmmmm…….. I decided to try a slightly more robust approach, using a solid former. I used the kit provided template to define the angle that I cut on a piece of scrap timber, which just happened to be almost the perfect size to fit across the width of the fuselage. I had already had my wing plan laminated, so I stuck my former to the wing plan with double sided tape, and then stuck the Fuselage to the wing plan, also with double sided tape. That sucker is going nowhere in a hurry! That made attaching the Neck Ring very simple, and the next pic shows the whole set-up glued and clamped.
The next components to fit to the Neck Ring are the pulleys and cable guides. The pulleys were fairly straight forward, being attached in the same way as the earlier ones on the underside of the fuselage. The cable guides are formed by gluing a bead on the shank of a cotter pin, then bending the cotter pin to the angle provided in the scale drawing in the instructions. So far, so good. Then you are invited to glue the newly constructed cable guide to the aft edge of the Neck Ring, such that the eye of the cable guide is aligned with the groove in the pulley. Once in place, the legs of the cable guide are wrapped in thread. To achieve this, I had to resort to using CA glue (which I generally avoid as I have become sensitized to it). The CA glue was just a temporary hold until I could get the thread “seizing” in place. I used some diluted PVA glue under the thread to help keep it in place as I was wrapping it, and then once the “seizing” was complete, I gave the whole thing another coat of diluted PVA. Here is relative close-up of the pulley and cable guide on one side.
And here is an overview of the completed Neck Ring:
And finally, here is an overview of the fuselage as it now stands. In this shot you can see where the Neck Ring has been trimmed flush with the fuselage and three nails (left over from a previous ship kit) inserted to “finish” the join.
Leather straps are next on the agenda!
-
rdsaplala reacted to gjdale in Da Vinci Flying Machine by gjdale - FINISHED - Imagination Factory - Scale 1:6
Thanks John and Danny, and also to all of the "likes".
Not a lot of progress on the "mousetrap" this weekend as I spent most of the weekend making a Router Table and Holding Jig for my mill.
However, some progress is better than no progress....
The installation of the harnesses commences with making the two rear wing attachment posts. These are fairly straight forward, and once again I replaced the kit provided parts with scratch-made parts from cherry. The lower back belt is then made from strips of leather and a small ‘key ring’ (for want of a better term) as the buckle. The leather straps are glued to the base of the rear wing attachment posts and then wrapped with thread.
The shoulder harness is made in much the same way, although slightly more complex. It is fixed to the base of the neck ring, again wrapped in thread, and also the sides of the fuselage, where the straps are only glued in place.
Here is an overview of progress to date:
I have commenced work on the fuselage cross-bar, but will hold off on pictures until that section is complete. Suffice to say that my mill holding jig that I made this weekend worked a treat.
-
rdsaplala reacted to Landlubber Mike in La Renommèe by Landlubber Mike - Euromodel - Scale 1:70
I made some good progress over the last week or so. Nothing particularly interesting, but I've installed all bulkheads except for the last, added blocking for the masts, and added some filler blocks at the stem. I also epoxied in some nuts into the keel to take the screws for the pedestals when I finish this build in 10 years I forgot how long all this prep work takes!
So far so good. I did have to open up the slots in the deck pieces a bit to accommodate the bulkhead tops. When I had dry fitted the bulkheads and decks as a test early on, everything seemed to fit ok. I think after squaring up the bulkheads, adding the stem and keel, etc., that things shifted a bit and so the deck slots needed slight adjustments. Things probably fit on the dry fitting because there was a little flex with the parts. When glued however, particularly with the bracers in between the bulkheads, things were locked in. Some people have seen issues with the slots not lining up with the plans, and in some cases, being misaligned between the starboard and port sides. Others have thought that some of the bulkheads were not properly shaped.
I also had a very slight wave in the keel around bulkheads 8-10 which probably didn't help (part of the reason I wanted to install the stem and keel at this stage). The upper part of the false keel around affected bulkheads leans about 1mm over to the port side. I think this should be fine because at the stem and stern, and along the bottom of the keel, the keel is perfectly straight. I'll just need to be mindful when fairing and planking the hull in that section.
-
rdsaplala reacted to Landlubber Mike in La Renommèe by Landlubber Mike - Euromodel - Scale 1:70
Figurehead
In my hull prep work, I cut out a portion of the first bulkhead and a bit of the false keel and filler blocks on either side to help seat the bowsprit. I figure that rather than having the bowsprit sit on the gun deck, it would be a little more secure if it went through the gun deck and then the gun deck and planking could serve as a sort of anchor just like mast slot blocking on for the masts. In doing so, I decided to test fit the figurehead and discovered a few problems.
As you can see, the figurehead doesn't sit squarely on the stem. Even if I squared the figurehead's, uh, bottom, a bit (or filed down the stem) so that it would sit flush, the problem is that the figurehead still will sit too high on the stem for the bowsprit. In the second picture, you can see the problem, even with the figurehead sitting at the front edge of the bowsprit. I went back to the plans to see if perhaps the rake of the bowsprit as set by the false keel and stem (two parts of which matched perfectly) was off, but the rake was in the range of both the plans (oddly, plan 7 specifically says 29 degrees from the waterline when plan 17 shows 32 degrees) and Chapman's Architectura (which was about 31 degrees). The false keel is around 31 degrees, so the problem is not with the false keel.
So given that the rake of the bowsprit as set by the false keel is correct, the figurehead needs to sit much lower, as the bowsprit should clear the top of the figurehead by around 6mm. As you can see in Chapman's Architectura, the figurehead pretty much sits way back on the stem against the curly piece of the stem, and the line of the curly piece to the top of the figurehead is roughly parallel to the line of the bowsprit.
Interestingly, in the few pictures I've found of others working on the kit, it seems as if the builders chose to increase the rake of the bowsprit to accommodate the figurehead. I think I'm going to stick with the current rake, and instead figure out what to do with the figurehead itself and the stem. For this stage of the build, I just needed to ensure that the rake of the bowsprit and seating was set up correctly, so I don't have to make any decisions at this point. My guess is that I will at some point have to lower the seat on the stem. It might come down to carving a new figurehead too if I can't modify the kit figurehead to sit squarely on the stem.
-
 rdsaplala got a reaction from CaptainSteve in Licorne 1755 by mtaylor - 3/16" scale - French Frigate - from Hahn plans - Version 2.0 - TERMINATED
Hi Mark,
Just catching up on your build, you've done a beautiful job on your hull and deck planking.
Wow! You've really taken gone deep into the dark-side doing your own laser-cutting, excellent work on those laser-cut guns and carriages
-
rdsaplala reacted to Anja in Nuestra Señora del Pilar by Anja & Sjors - FINISHED - OcCre - Scale 1:46
Hello all,
For the newcomers, a warm welcome to my buildlog.
Thank you for stopping by and the compliments. It is appreciated.
@ Popeye,
Yes Denis, I know you use the archive pen as well. I have that idea from you and it works great. Thanks for the tip.
@ Ulises
If you can get the Lego blocks, they will be a great help for little money.
It is again high time for an update. She is by far not seaworthy, but this is how she is right now.
Work done:
- Deck caulking (a bundle of 10 planks at a time)
- Reinforcing pieces glued onto the last frame
- Gun carriages painted (red Ochre from Admiralty paints)) and put a layer of surface primer on the canons (Negro black from Vallejo)
- Interior quarter deck bulwarks, forecastle bulwarks and interior hold bulwarks painted (red Ochre from Admiralty paints)
- Cut out parts the crossbeams that remain exposed over the holds
To be continued .....
Thank you all for watching and enjoy.
Regards,
Anja
-
 rdsaplala got a reaction from Martin W in HM Cutter Cheerful 1806 by Blue Ensign - FINISHED - Syren Ship Model Company - 1:48 scale
Hi B.E.,
Just catching up with your latest build, you're off to an excellent start, that's shaping up to be one slick-looking hull
-
rdsaplala reacted to Blue Ensign in HM Cutter Cheerful 1806 by Blue Ensign - FINISHED - Syren Ship Model Company - 1:48 scale
Those Stern ports are still niggling Kurt, other examples of cutters show a small aft platform covering the Rudder head on which stern chaser guns are mounted. There is an example of such an arrangement in The Naval Cutter Alert book by Peter Goodwin, showing a cutter model circa 1785 (The Science Museum)
Still I've more pressing matters on my mind at present but I may return to the subject later.
@ Mike, 'flawlessly' - if only
Post 11
Square Tuck, and completion of Chapter Two.
The Square Tuck piece was easily cut from 1/32" sheet Boxwood using a scalpel.
4830
I briefly wet the piece before clamping it in position overnight to give a bit of conformation and to take the stress out before gluing.
4834
Glued into place using pva.
4837
4842
There is a subtle concave shape to the Square Tuck piece once it is glued into place.
4873
A Balsa infill was placed behind the Square Tuck piece as indicated in the Instructions.
Now the tricky bit, getting the formation around the two outer stern frames properly faired to take the wale termination, struggling a little to get my head around this at the moment.
B.E.
03/02/2018
-
rdsaplala reacted to mtaylor in Licorne 1755 by mtaylor - 3/16" scale - French Frigate - from Hahn plans - Version 2.0 - TERMINATED
Thanks for the likes and comments. They are deeply appreciated and encouraging.
I finished the planking the interior of the gundeck and have sanded it all pretty smooth. Still needs another pass with the sandpaper, IMO, along with some crack filling. I also need to make some "trim" bits (fiddly) for the cabin. To break the monotony of sanding, I have started work on the gun carriages. I just need to find a good time to start the guns themselves.
Here's the pics as she stands in the shipyard today. I'm running an inventory of eyebolts, rings, and some blocks to see if I have enough to fit out what's needed on this deck as well as the outside hull.
-
 rdsaplala got a reaction from Landlubber Mike in HMS Triton (1/64) by Aldo - POB
Hi guys, I just came from a long break from ship building
My old computer, containing all my Triton CAD drawings crashed two years ago, plus I've been very busy with my health work ups, my job, as well as new hobbies that captured my interest, hence, shipbuilding took a backseat.
Last night however, I chanced upon a documentary on HMAV Bounty so I was inspired to take a peek here and see how things are doing in the model-shipbuilding world. I thought I'd also post photos on the small bits of progress I've accomplished.
Time sure flies, just a few years ago I was building Triton's hull, and now....... well, I'm still building Triton's hull
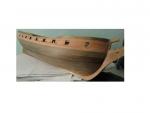
I was finally able to finish the 1st planking and gun-ports today, thanks in no small part to that Bounty documentary
Here she is awaiting her last plank:
Whether scratch-building or building a kit, one of the most satisfying steps for me is sticking in that last plank... OK, it's a sharp, pointy plank that is a glaring violation of planking rules, but this is just the first planking so cut me some slack
Once I start second planking, I'll decide whether I will properly pre-spile my planks like I did in my Pegasus or be a lazy violator of planking rules... if by chance I go with the lazy-violator route, please feel free to give me 40 lashes
The Admiral is using my workshop so I'm left to take pictures on the TV stand
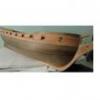
I'm happy to report that the bulge on the aft portion has disappeared with the revised aft bulkheads I've taken from the NMM draught of Triton:
The fore bulkheads were also taken directly from the NMM draught and I think the resulting shape seems acceptable enough based on this shot taken at an angle from the bow:
NEWEST CHALLENGE TO HURDLE
Like I said before, my computer crashed, taking with it all my Triton CAD drawings, including the expansion drawings that I made for the stern and its windows... I worked so hard on that and it took me such a long time just to get it done since I'm just a newbie at CAD. I was planning to have that stern and all those stern windows laser-cut to make my build easier, and to have window sills that look "to scale"... but now all those have gone pffft
Up to now, all the computer shops here suggest reformatting the computer but that will delete all my saved files
All I have left is this NMM Triton draught, which is too large to be scanned for uploading to my CAD program:
I am left with 2 options:
1. Cut my NMM draught into smaller pieces that can fit my scanner so I can load it again on CAD. Then redo all the drawings that I previously made (I'm hesitant to do this since I was planning to frame my NMM Triton draught and hang it beside the model when I finish her, and more importantly, I feel too lazy to redo everything that I drew all over again).
2. Continue my search for a computer shop that can somehow retrieve my files from my computer so as to save myself from a redoing a lot of work.
I've been going with the second option for the past 2 years, I'm just too lazy I guess
-
rdsaplala got a reaction from popeye the sailor in Gothenborg by Popeye the sailor - Billing Boats - 1:100 scale
Just catching up Popeye, thanks for the beautiful updates on Goth my friend, she's coming along nicely with all those neat fittings and masting work, I'm pleased to know that your deadeyes have arrived, looking forward to your upcoming updates
-
 rdsaplala got a reaction from goetzi73 in HMS Mars by j21896 - Caldercraft - 1:64 - modified kit
Hi Robert,
Just catching up, excellent work on the gun carriages and the blackening of your cannons turned out perfectly, hope to see you back at the shipyard my friend
-
 rdsaplala got a reaction from kier in HMS PEGASUS by rdsaplala - Victory Models - 1/64 - A bit of bashing with TFFM
Thanks for the kind words, Robert, Sjors, Augie and B.E., I appreciate it
To continue my synopsis, HMS Fly has finally arrived and so I took her keel, stem and stern post and transplanted them to Pegasus, the operation was a success and Peggy Sue is in the pink of health again
While re-planking Pegasus, I thought I'd squeeze in another modification by redoing her quarterbadge...
The kit's quarterbadge, while beautifully done, seems a bit flat when compared to the TFFM plans and the quarterbadge of the contemporary model of HMS Atalanta, a sister-ship of Pegasus:
Kit Quarterbadge
HMS Atalanta Quarterbadge
Thus, using the TFFM plans, I decided to make a new quarterbadge to which, I will add the kit provided windows and pillasters:
-
 rdsaplala got a reaction from glbarlow in HMS Vanguard by gbarlow - FINISHED - Amati/Victory Models - 1:72
Welcome back Glenn, your beautiful work on Pegasus on MSW 1 was what inspired me to build her, I have no doubt you will do an equally excellent job on your HMS Vanguard
-
 rdsaplala got a reaction from aviaamator in HMS Triton (1/64) by Aldo - POB
Thanks for the kind words, Pete, Mark, Daniel, Grant, Christian and Guy, I appreciate it
Mark, thanks for the tips on how to minimize wood wastage, I'll give them a try
Daniel, thanks for those tips on marking the different keel parts with a knife and pencil, it'll come in really handy
Just a bit of update guys, I'm finally done cutting the keel pieces. It's a very simplified version with only a few pieces (5 to be exact)... a testament to my laziness
I made the keel slightly longer than recommended so as to allow some room for tweaking, if needed later on
I was pretty surprised to see just how big this ship really is.... at 1/96 scale, she's almost as long as my 1/64 Swan Class Sloop so I could imagine just how big she would be if I made her in 1/64 scale
Well, that's it for now, time to drop a line at the "access request page" so I can start cracking on those bulkheads
-
 rdsaplala got a reaction from Kosit in Gothenborg by Popeye the sailor - Billing Boats - 1:100 scale
Ah, there's our beauty I'm pleased to see the Goth log resurrected to here full glory, Popeye, excellent work as always my friend
-
 rdsaplala got a reaction from GLakie in USS Constitution by CaptainSteve - Model Shipways - 1:76.8 scale
Hi Captain Steve, ng forward to new updates
-
 rdsaplala got a reaction from Gentlegiant in Bomb Vessel Granado 1742 by mobbsie - FINISHED - 1/48 - cross-section
Hi Mobbsie,
Just catching up, I see that you're enjoying your conversion to the darkside my friend, beautiful work Sir, that is a wonderful looking set of frames!
-
rdsaplala got a reaction from CaptainSteve in USS Constitution by CaptainSteve - Model Shipways - 1:76.8 scale
Hi Captain Steve, ng forward to new updates
-
rdsaplala got a reaction from Landlubber Mike in Badger by Landlubber Mike - FINISHED - Caldercraft - 1:64 - Brig
Hi Mike,
Congratulations on completing your Badger my friend, your upgrades to this model have really paid off in enhancing her, excellent work Sir!
-
 rdsaplala got a reaction from jaerschen in HMS Triton 1773, 1/48, POF by Juergen
Sweet planking work Juergen, she looks great
-
 rdsaplala got a reaction from Cap'n Rat Fink in Question regarding Lines of HMS Triton, 1773
Hi guys, just wanted to share the outcome of the my "experiment" on fixing the bulge on the bulkheads. Here's the half hull mock up I made (pardon the old, worn out ply I used for this project, I wanted to make sure I don't waste any wood if my efforts fail )
I think the bulge is now gone based on the run of the temporary planks I attached.
Now it's time to make a new hull using better ply....... on second thought, I think I could live with this dirty old plywood and just attach my spare bulkheads for the starboard side (too lazy to cut new bulkheads again ) Thanks very much again for all the help guys, I appreciate it
-
rdsaplala got a reaction from Cap'n Rat Fink in HMS Triton (1/64) by Aldo - POB
Hi guys,
Well, after going through nearly all the stages of depression due to my illness, I am slowly getting back on my feet. Thanks first and foremost to the Lord Jesus Christ, in Whom I find my strength and salvation, and of course, thanks to all you guys who have given me support in one way or another
This ship is included in my bucket list so I figure it's time to devote a bit of time to the shipyard, which as can be seen, needs a bit of tidying up
Anyway, I thought I'd share what little I have accomplished these past several months:
First off, I encountered a slight problem brought about by my haste to get the hull done quickly
As previously mentioned, my hull is a combination of bulkheads that I made from the NMM draughts as well as from MSW plans.
Below is a printout of my CAD work showing the NMM plan juxtaposed to the MSW centerboard plan to illustrate the problem:
As can be seen in the close up, MSW bulkheads number 6 and 18 fall directly on gunports:
I had several options to solve this, but being the lazy guy that I am, I decided on the simplest one and that was to cut off the affected bulkhead extensions and just reposition new extensions away from the area of the gunports:
I also managed do a bit of planking and used cherry strip to mark the sheer so as to make it easier to position the second planking later on. Cherry was also used to set the upper and lower borders of the gunports since I plan to use this wood for my second planking:
I've also been doing some CAD work for my stern lights and stern fascia: Once I'm done test fitting/tweaking cardboard printouts of these, I plan to send the files to Chuck for laser cutting. He makes some beautiful laser cut parts as seen in the discussion below : http://modelshipworld.com/index.php/topic/8923-laser-cut-deck-beams-from-syren-ship-model-company/?hl=%2Blaser+%2Bcut+%2Bdeck+%2Bbeams Last but not least is the long and excruciating work that I've done during the Christmas holiday, and that was..... drum roll please........ ....to frame a pair of gun ports Now I just have to complete 24 gunports on the gundeck and 6 gunports on the quarterdeck, which should be finished in another year or so That's it for now, thanks again guys