HOLIDAY DONATION DRIVE - SUPPORT MSW - DO YOUR PART TO KEEP THIS GREAT FORUM GOING! (Only 36 donations so far out of 49,000 members - C'mon guys!)
×


rwiederrich
-
Posts
5,518 -
Joined
-
Last visited
Content Type
Profiles
Forums
Gallery
Events
Everything posted by rwiederrich
-
Interesting note Rich...I asked Mike about Glory's colors and he tells me of a gentleman who was on Glory as a youngster and played on her while she was being built and was there when she was burned. He built a model of her in the late 20's or 30's....and claims she had blue waterways and was painted pearl white on her houses and gunwales. I viewed his model at Mystic and he built a good model, however she is not to scale and he depicts her with only a single skylight fore the mizzen mast? This is evidence that even first hand recollections cannot always be accepted as accurate. Rob
-
Wonderful job...Space was a premium on clippers(well most ships), However, your example is stunning. I like the cut-aways in the walls and floor..very artistic. Rob
- 257 replies
-
- 1
-

-
- young america
- Finished
- (and 1 more)
-
The poop stanchions need to be cantered on the ends to accommodate the inclination of them....so leaving them a bit long is to provide material to be removed. My assessment is the poop stanchions are 2ft. Rob
-
I will fashion carriage house stanchions separately from the poop stanchions. The ones I made are more to the poop stanchions anyway. I'll make some thinner stock...or small diameter wood and then make another cutter to make the taller thinner stanchions needed for that application. They'll be like slivers...... Rob
- 3,560 replies
-
- 1
-
-
- clipper
- hull model
- (and 2 more)
-
Great rendering Rich. The poop rails stanchions look to be around 2ft in length and the Carriage house or poop house stanchions appear to be about 30" long. Because the poop rails are resting on top of the shallow stern rail..elevating the entire finished railing system...where as the poop house rail is probably just as tall....but requires taller stanchions. I always wondered why the railing systems around her decks and houses always appeared to me to be quite short. I assume the strengthening structures and math only allowed a certain height when using wood alone as your structures. Short is stronger. Railing that catch you at just above mid thigh seams a bit unsafe to me. As evidenced by this picture with the man hunched down to the rail.
- 3,560 replies
-
- 1
-
-
- clipper
- hull model
- (and 2 more)
-
Thanks Vlad. I'm used to working in tiny scales....and if I can get as much of the tedious work out of the way first...it makes the rest go faster. Waiting is great time to do these kinds of jobs. Rob
-
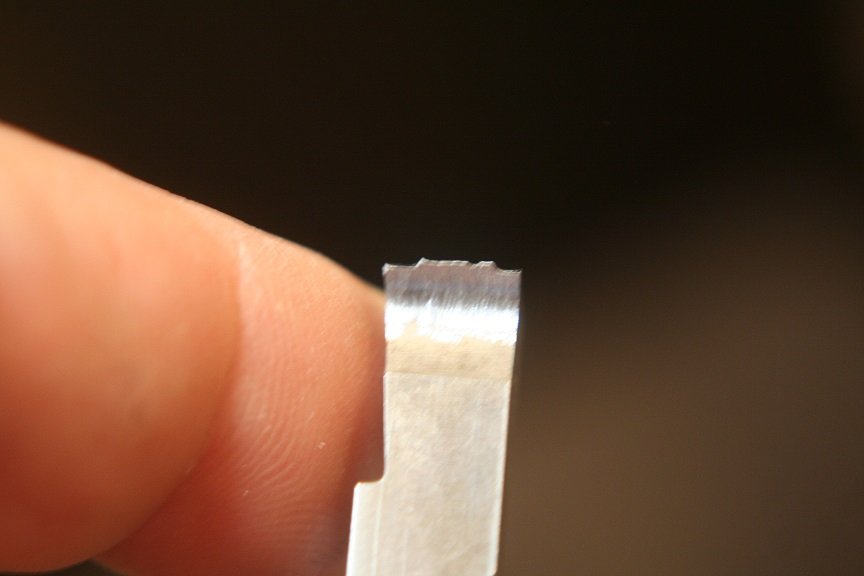
I plan on trying more ideas. The tool dulls even cutting wood and to sharpen it changes its form. Uniformity is key. Thanks for you advice.
-
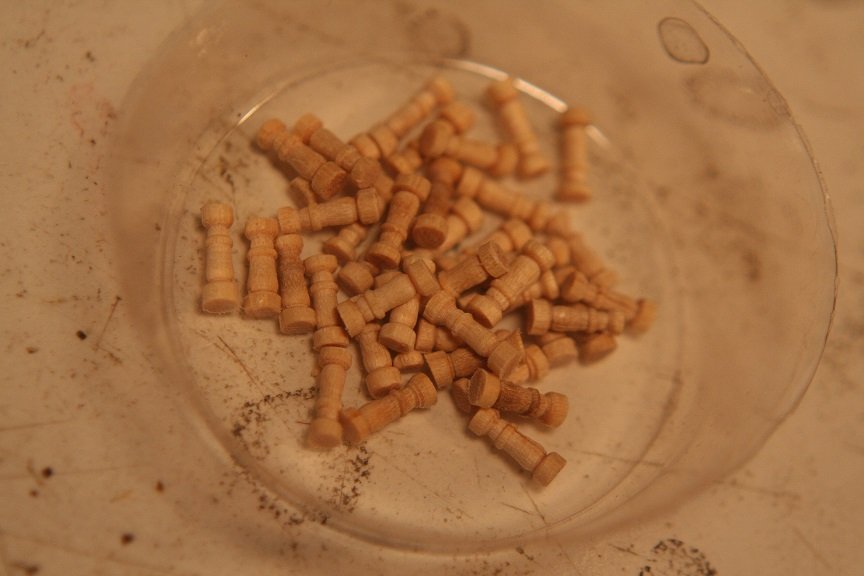
Here are the completed ones in a pile. And here is also the cutting tool I made to make them. It needs to be sharpened. Rob
- 3,560 replies
-
- 2
-
-
- clipper
- hull model
- (and 2 more)
-
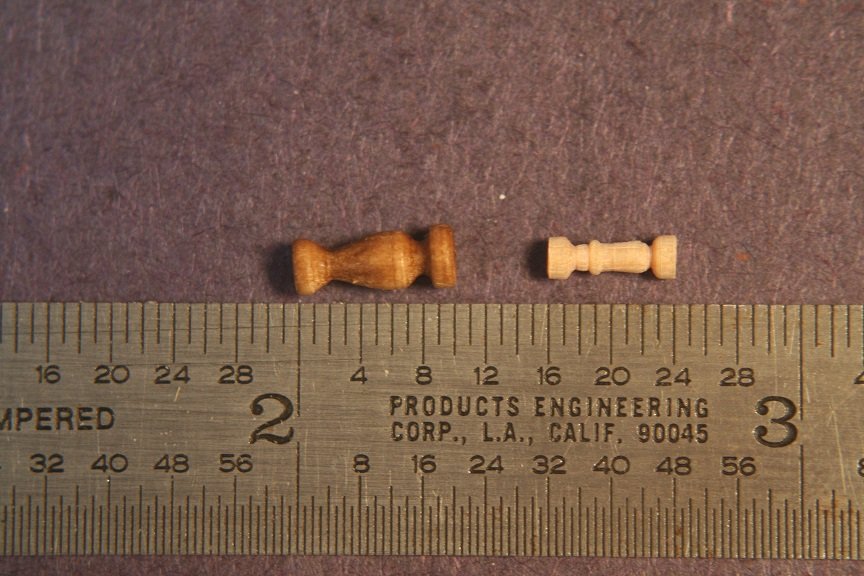
Now compared to the scale version you can get after market...they do not look the same at all and are slightly shorter to match the scale better.
- 3,560 replies
-
- 2
-
-
- clipper
- hull model
- (and 2 more)
-
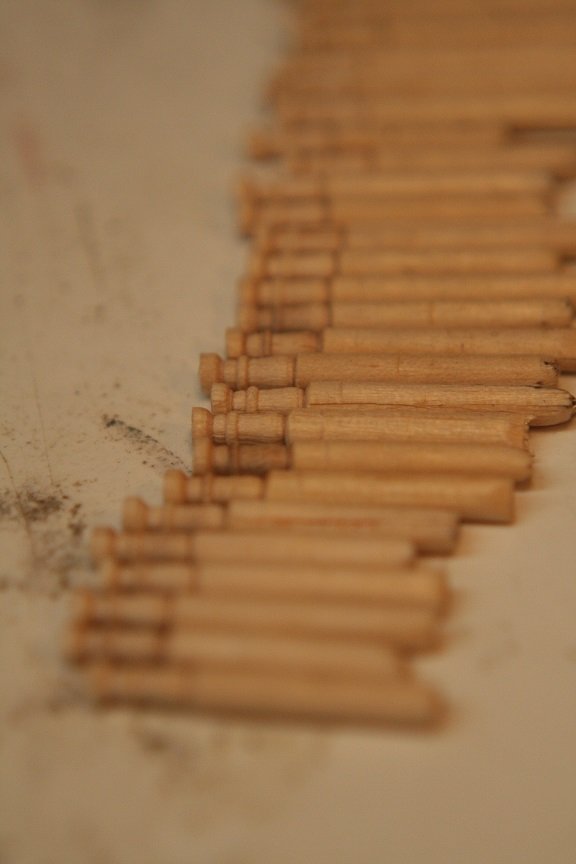
They follow the general outline and detail but they keep separating if I make them any slimmer. Here are a row of them before I separate them from their stocks.
- 3,560 replies
-
- 2
-
-
- clipper
- hull model
- (and 2 more)
-
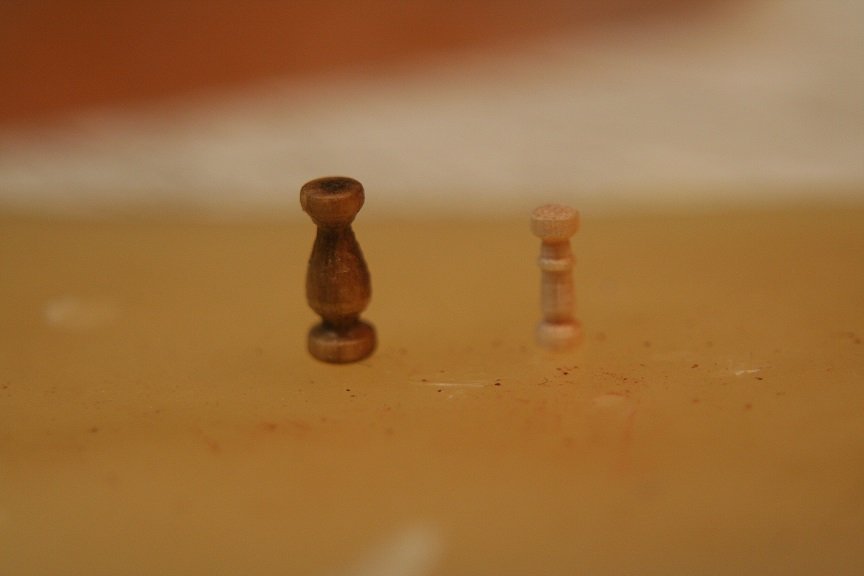
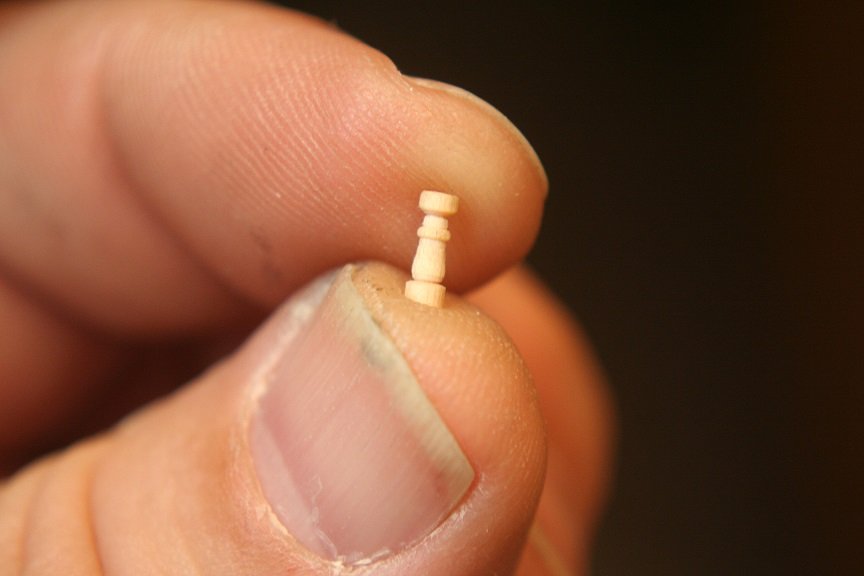
Yeah...reenie weenie Is right...every attempt to make it as thin resulted in disaster....so I made a slight compromise. Here we go...here is an image of one finished in my fingers
- 3,560 replies
-
- 2
-
-
- clipper
- hull model
- (and 2 more)
-
Today I begin the manufacture of the 100 or so custom stanchions that will guard her poop cabin roof and her quarter deck...round about her stern. No after market stanchion will do...because hers are carved a bit differently..... So this means I will fashion a cutter blade that I will use in the lathe to cut each individual stanchion. It will be long arduous work...but I have time and I will post images of the process as I proceed. Rob
- 3,560 replies
-
- 1
-
-
- clipper
- hull model
- (and 2 more)
-
Thanks Pat.....I actually like 1/96...it gives me a challenge because of its size and ...relief.... because ..... I can avoid real carpentry and joinery. I just admitted to my laziness.
-
I think the 1/96 version are well improved and will be the bee’s knees. Being cast makes them uniform. Which is critical.
- 3,560 replies
-
- 1
-
-
- clipper
- hull model
- (and 2 more)
-
I like that. Yankee ingenuity
-
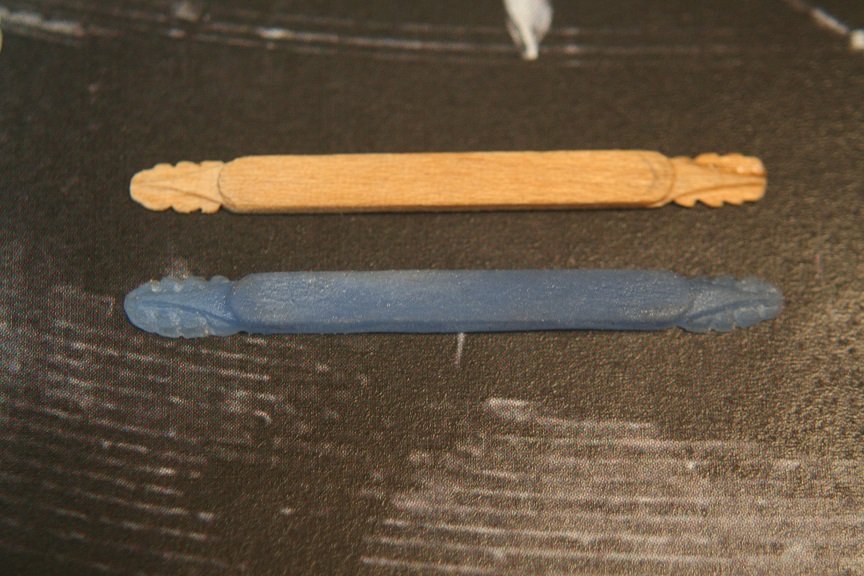
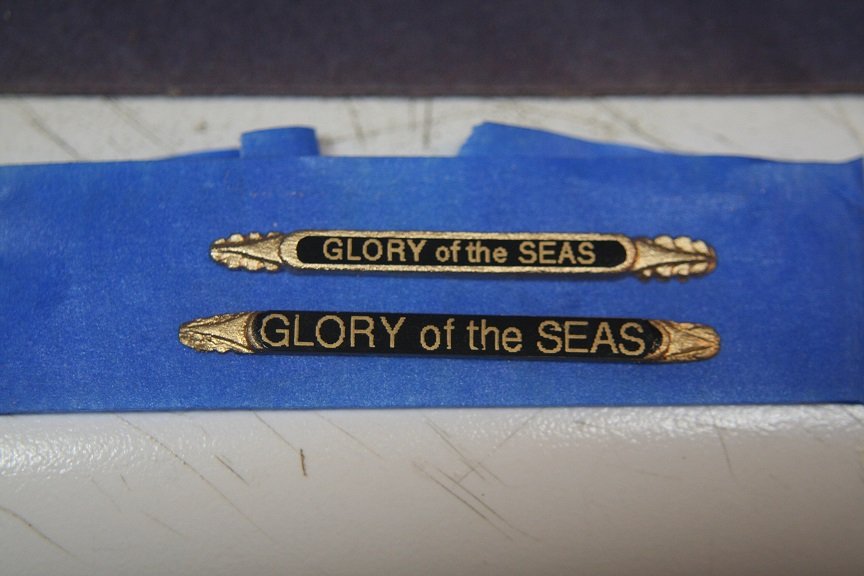
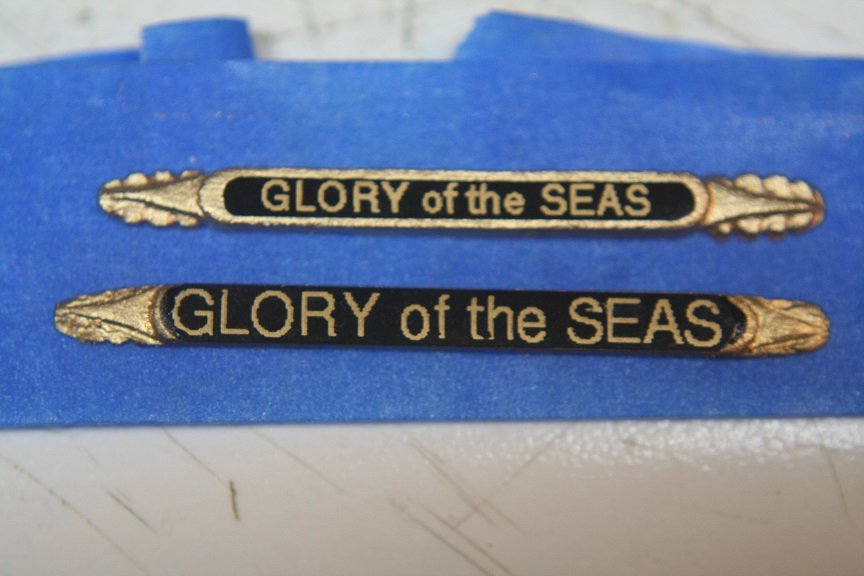
I finished up the first name board in 1/96 scale....... Compare to my first work-up in a bit larger scale. My second and final attempt is the keeper. Rob
- 3,560 replies
-
- 3
-
-
- clipper
- hull model
- (and 2 more)
-
Thanks for the update.....it's so exciting... Rob
-
I use the term lazy as a loose description of my modeling mental prowess. I can do it...but if I can find an easier way then I'm all over it
-
Thanks for kinda explaining it. I build my models out of multi-media...utilizing whatever material I can find and that may mean wood, plastic, metal, paper, wax, modeling compound...etc,etc,etc. I made my own draw blades and I cut several example styles for my model of Glory of the Seas. Rob
- 257 replies
-
- 2
-
-
- young america
- Finished
- (and 1 more)
-
Yes...you are right. One thing I do appreciate about 1/96...is you can respectfully forego some detail based upon inability or inaccessibility. I don't expect anyone to view my model with a magnifying glass. One can afford to be more discriminating when the scales get larger. Rob(did I mention lazy)
-
Vlad...I'd build in a larger scale myself...but I just don't have any place to house it for public viewing. I will be removing my other Glory from her shelf and giving that to the new Glory. She's next to the brick hearthed wood stove in the living room. I'll put the older Gory in the back bedroom next to my second Cutty Sark.....I guess. By the way...how is your own Glory build coming along? Curious minds want to know..... Rob
-
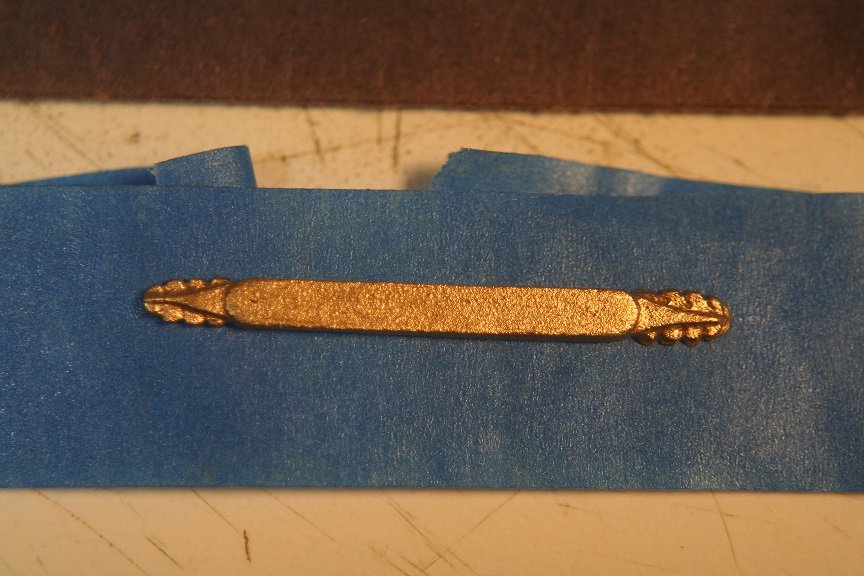
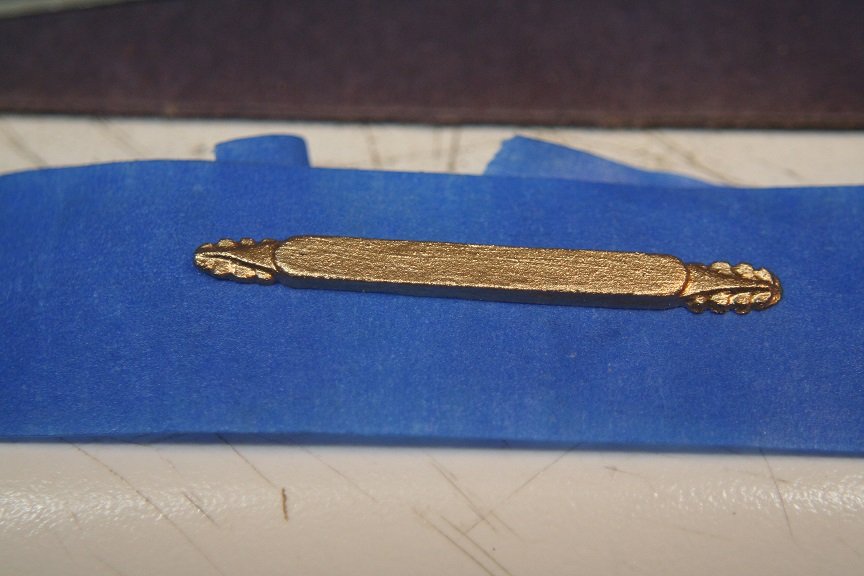
Very nice job Rich....the original in her display looks so tired and shabby....I know that is probably how she looked when removed(Over 50 years after she was placed into commission)...but I'm going to spruce her up with gold paint and brighter lettering. Now about the lettering....because my version is so small..the font may be slightly different...those wings on the G, L and Y might be an issue. We'll just have to see. Rob
- 3,560 replies
-
- 1
-
-
- clipper
- hull model
- (and 2 more)
-
You are progressing so nicely Keith...she looks great. May I suggest you simply glue the bolts to the stay first....then mark out the holes and drill them in the yard. Then place the entire jackstay and bolt assembly into their holes and glue? Just mark their locations on the stay...let them hang by gravity and the place a drop of glue. Once they are all afixed.....mark the holes..drill and place......
-
Wood master and almost finished copy...