


king derelict
-
Posts
3,292 -
Joined
-
Last visited
Content Type
Profiles
Forums
Gallery
Events
Everything posted by king derelict
-
Thank you Kevin They are really nice little prints and the holes come out very well. I much prefer them to opening out pilot holes. I printed them at 20mm high and the row of holes is quite intricate but still came out nicely. Many Thanks Alan
- 460 replies
-
- 4
-

-
- Finished
- Flower-class
- (and 1 more)
-
Great painting. The figures look really good Alan
-
F-86F-30 Sabre by Egilman - Kinetic - 1/32nd scale
king derelict replied to Egilman's topic in Non-ship/categorised builds
Beautiful finish; well worth all the experimentation and research. Its going to be a stunning model Alan -
Thank you Per. I looked at steel nozzles a while back and they all seemed to get rotten reviews citing dimensional problems. I checked again and things seem much better now so I ordered a set. Thanks for the help Alan
- 460 replies
-
- 3
-
-
- Finished
- Flower-class
- (and 1 more)
-
A beautiful model. A wonderful job and thoroughly excellent photos Alan
-
Not a lot to show today. I primered the new rafts, the bridge signalling lights and the winches and hose reels.So everything looks like it did earlier except its now grey. A short aside into the printing world. I checked the nozzle gap and it is within the usual limits so I decided that the extruder skipping and kicking back might be due to over extrusion. I dialled the step count down by 4 and tried a few test prints. I was very happy to get a successful Benchy test piece. As you can see from the debris in the background the print was failing consistently at the same place; the last part of the overhang on the bridge windows. I think the over extrusion was causing the filament to build up too much and the overhangs were warping slightly upwards causing the nozzle to knock it off the build plate. My hypothesis for the need to change the step count is that it is caused by the new nozzle. I am assuming the old nozzle had worn and was laying down a larger diameter of filament. PLA is supposed to be quite abrasive and the nozzle is brass. Changing to the new nozzle would then backpressure the nozzle causing the extruder to skip and extruded an unnecessary amount of filament. I may, of course, be talking through my hat. I painted the smoke floats in matt black and dry bruhed some silver to add a little detail followed by a black wash to dull it down a bit. The smoke floats were shamelessly taken from the files provided by @Kevin-the-lubber in the log for the Snowberry by @yvesvidal. They are a lovely little print and I hope I have done no wrong in using the files. I may have printed them a little too large but I'm struggling to find out how tall they really were. Many Thanks for looking in and I hope everyone has a great weekend Alan
.jpg.2a7543898f94f1129cfff163ef06f4be.jpg)
.jpg.86137edbd39e82f019886d6864c771fb.jpg)
- 460 replies
-
- 7
-
-
- Finished
- Flower-class
- (and 1 more)
-
Thank you Chris. After the rugged start it is nice to start seeing something like a ship materialising Alan
- 460 replies
-
- 3
-
-
- Finished
- Flower-class
- (and 1 more)
-
A beautiful paint and decal job. It looks stunning. I'm almost scared to try an aircraft build seeing the high standards set Alan
-
So far I'm continuing with the Gold label CA and no adverse effects. Of course the inevitable happened. I upset the tattoo cup containing the CA. Luckily it only spilt into the container lid. So I got the drill out and created a holder for the tattoo cups which should be harder to spill. It even has a well to hold the pins 😁 The cup can be popped out to be replaced I added some gunmetal and bare metal paint to the pulleys and hooks of the hoists and added them to the ship along with the depth charge throwers and the stowed depth charges. The binnacle was also added, Its beginning to look a bit busier While this was going on I also printed four new rafts which came out quite well. The printer is printing nicely although the extruder is still slipping at intervals and the Benchy test print fails part way through. I think I may have the nozzle too close to the print table or over extruding slightly. Or both. Or something completely different. So back to the air brush tomorrow and maybe get out the Mig Oilbrushers and start adding rust. Thanks for looking in Alan
.jpg.fc4a1cc67b19fccffd3c87a1f83bdfc8.jpg)
.jpg.c29701c5cf99a6aeb0fe269286212564.jpg)
.jpg.bdc49e7b414e4fd506777e86985d9790.jpg)
.jpg.ed08ef46506963c59c1ef27199862e98.jpg)
.jpg.a0d0b9e5791f54aace4fd3abf9008d4c.jpg)
.jpg.7259c17287dc4098aa8f4c571a2ee290.jpg)
- 460 replies
-
- 7
-
-
- Finished
- Flower-class
- (and 1 more)
-
Great work on a difficult kit Alan
-
The colour variations re very effective. Great job Alan
-
Yesterday was not a very productive day. I think I am becoming sensitized to CA glue and I have been using a lot on this build. I spent a lot of yesterday with streaming eyes and nose which thankfully disappeared overnight. I don't like CA glue and try to minimise my use of it. Generally a small dab if I have a piece of PE that is too big for Gators Grip to hold immediately and can't be clamped in place somehow. This build has seen me use an entire bottle of Gorilla Glue gel CA. So today I decided to try a bottle of Gold low odour CA which I had struggled to use because it is so thin. This time with a few drops of the glue in a tattoo ink cup and applying with pins I was able to get reasonable results. This may be the way forward for the future. The returned to the printer to print the last (maybe) parts for the ship. The side pieces for the rope and hoe reels for the aft deck and davits. I printed the davits at 75% to scale them down a bit So far the voodoo is holding and I seem to be able to print without a brim which results in a much cleaner print for items like this which would be tedious to trim the brim away. Rather than print the drums I used short sections of styrene tube which was on hand These will be wrapped with thread for the rope drums and insulated wire for the hose reel. The depth charge hits were painted and the remaining two were rigged The rafts have been painted and now need washes. Now that I think I have the printer adjusted a little better I printed a raft for comparison The man rope definition is better so I think I am talking myself into reprinting them and painting them. I guess I can experiment with washes on the original set. Shame really, although the manropes didn't paint up well I was very pleased with the way the bottom boards came out. Hopefully its repeatable. This is a recurring issue with this model. Where to draw the line about reworking and replacing earlier less competent prints. I should have taken more time to really learn about the printer before diving in. I ordered a pair of 1/48 scale Lewis guns by Eduard. They are aircraft guns but should serve the purpose. Thanks for looking in Alan
.thumb.jpg.6690bc6c05f70dbe9294ad6f5428ca13.jpg)
.thumb.jpg.09a39480111497966b4d5e69700ec081.jpg)
.thumb.jpg.b372467f533ec202cc878b80e60b6d55.jpg)
.jpg.09e2b18b5a577e5c09c3f408556e6a25.jpg)
.jpg.7787563c2ca0297f675a82eeb6841e9e.jpg)
.jpg.7e6a9731ff8b1473dff983cd276c4ef7.jpg)
- 460 replies
-
- 10
-
-
- Finished
- Flower-class
- (and 1 more)
-
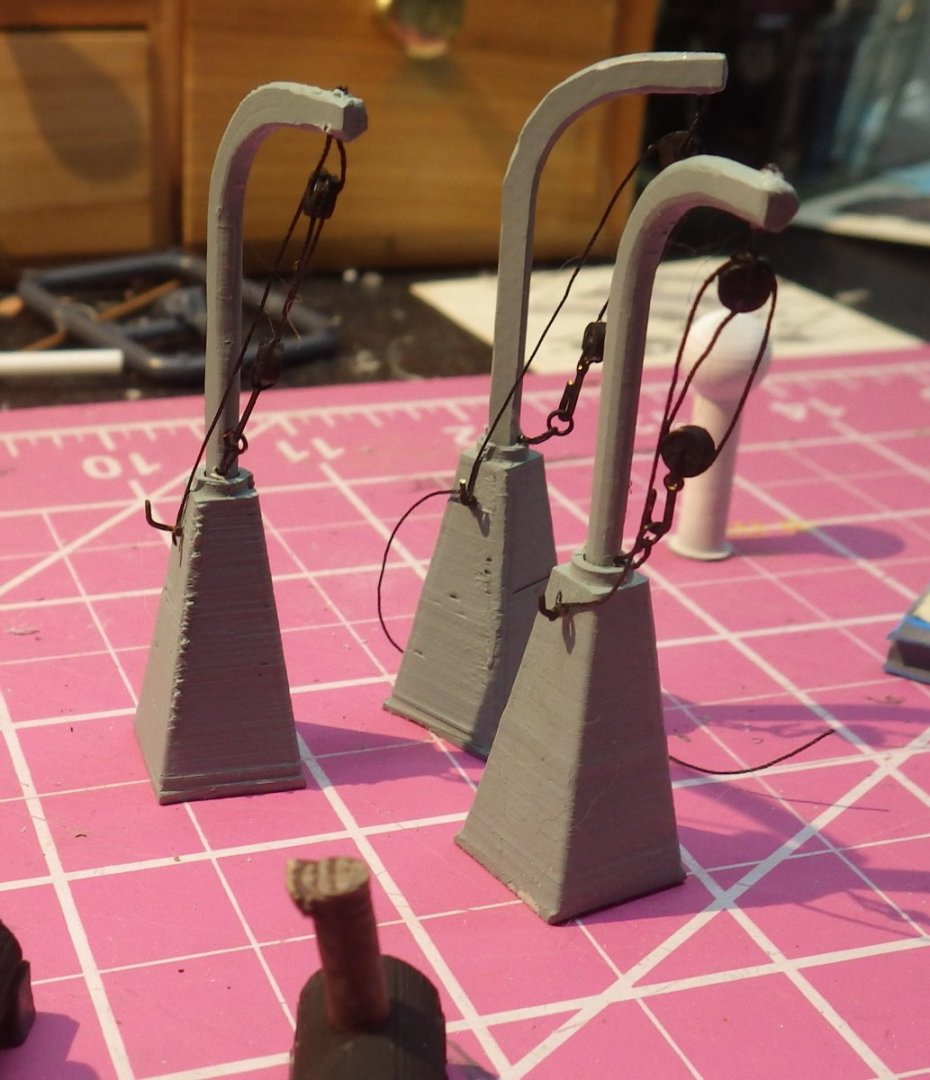
Thank you very much Per. It has been a bit of a saga The davit frames are printed from the "kit" files along with the bases in the case of the hoists. I used sections of styrene rods drilled down the centre to make the pulleys along with some brass rings and hooks from my wood model bits and rigged them with rigging thread. The bare frames looked a bit unconvincing Alan
- 460 replies
-
- 4
-
-
- Finished
- Flower-class
- (and 1 more)
-
Thank you all for input regarding the anchor chains. I think I can do better than the above options so now I'm waiting on the postman. Today was spent continuing with the details; rafts, hoists, depth charge throwers and painting the stowed depth charges. The binnacle is painted and I need to make some serious revisions to the pelorus (seen lurking in an embarrassed way at back top right of the photo below The forward hoists and the depth charge hoists are in progress. he pullies are styrene rod cut and drilled. It is still a bit simplistic but generally follows the images I have for them. Its better than the bare hoist frame. As usual I have trouble getting thread to behave like rope. A few coils will be added to finish them off along with a bit of metal painted onto the pulley surfaces The rafts are almost finished with the basic paint. I think they need some washes to break up the uniform canvas colour. Thanks for looking in Alan
.jpg.93e3ec1dad45a5275bbfcd96c1de3121.jpg)
.jpg.64acbaee766d085a03f08d582ba04a93.jpg)
.jpg.8379a986933bdec2ef6494682565b708.jpg)
- 460 replies
-
- 12
-
-
- Finished
- Flower-class
- (and 1 more)
-
Thank you so much Lou. I think you found the best option. I ordered two of their offerings. They are stud link chains and one of them should work. Just have to wait for the boat from China now. Alan
- 460 replies
-
- 5
-

-
-
- Finished
- Flower-class
- (and 1 more)
-
Thank you for the link Egilman. I think too small also. I looked at YX resin chains and theirs are much too small and Caldercraft have some I think the sizes are either too big or too small. Alan
- 460 replies
-
- 5
-
-
- Finished
- Flower-class
- (and 1 more)
-
Thank you Chris. I had overlooked the stud link isue so your input is very helpful. I think I have a better option now Alan
- 460 replies
-
- 4
-
-
- Finished
- Flower-class
- (and 1 more)
-
Thank you very much Brad. The chain photos are really useful. The links are smaller than I thought but I have only seen carrier chains up close and they would be a bit excessive on a corvette. Alan
- 460 replies
-
- 5
-
-
- Finished
- Flower-class
- (and 1 more)
-
She is waiting until there is rigging to play with. No point in showing your hand too early Alan
- 460 replies
-
- 5
-
-

-
- Finished
- Flower-class
- (and 1 more)
-
Thank you. I think the large is too big and the small is too small. I am trying a couple of better options Alan
- 460 replies
-
- 5
-
-
- Finished
- Flower-class
- (and 1 more)
-
Thank you Egilman. Please don't ever leave the forum. You are a complete and comprehensive reference source Alan
- 460 replies
-
- 4
-
-
- Finished
- Flower-class
- (and 1 more)
-
Thank you Mark. I think she is quite tolerant of my mistakes. Thanks for the chain vote too. The small one is really too small Alan
- 460 replies
-
- 4
-
-
- Finished
- Flower-class
- (and 1 more)
-
Another great face Alan
-
F-86F-30 Sabre by Egilman - Kinetic - 1/32nd scale
king derelict replied to Egilman's topic in Non-ship/categorised builds
Everything Dan said. I look forward to a steady stream of high quality reference information from you for many years ahead. And I wat to learn how to do the metal finish for my Vampires Alan
.jpg.260494bbda0f239ef78a463c5171ee7d.jpg)
.jpg.aa976c27b677fd3a9238c4dcff09fa02.jpg)
.jpg.0c293c55fcd0674906fe13bcb309324a.jpg)
