


king derelict
-
Posts
3,295 -
Joined
-
Last visited
Content Type
Profiles
Forums
Gallery
Events
Everything posted by king derelict
-
It still amazes me how much detail you can bring to those tiny faces. Its excellent painting. The hedges and the field look really good now; that a bedraggled country hedge now Get well quickly Alan
-
Thank you very much Kevin. The enthusiasm had been flagging a bit but the recent batch of good prints and seeing some painted parts has restored the desire to see this through to a decent finish. Thank you ( and all the others) for the encouragement. It helps a lot Alan
- 460 replies
-
- 4
-

-
- Finished
- Flower-class
- (and 1 more)
-
Thanks Per. The raft skates beautifully across the tile floor when batted, a requirement for a good toy. It also makes a satisfying bang when it hits the skirting boards. Alan
- 460 replies
-
- 6
-

-
-
- Finished
- Flower-class
- (and 1 more)
-
Very, very nice. You did a great job piecing the decals together and the paint work is excellent Alan
-
A bit all over the place today. I put a coat of Tamiya XF-24 dark grey on most of the decks. That made quite a hole in the bottle. I painted the bandstand and railings with the WA blue along with the blast shield and the 2 pdr gun tub. The 2 pdr gun also got the treatment and I think with a bit of detailing it will look quite reasonable I did some experimenting with the dimensions of some of the small parts to see if they would print better. I changed the thickness of the oars from 0.5 mm to 2.0 mm and got a respectable print out of it. I think an oar shaft of less than an inch is unlikely. 3.7 inches may be a bit big but not far off. I printed out two more life rafts which are nice prints The boss gave them high marks for play value I hope everyone has a great weekend Thanks for looking in Alan
.jpg.11381473e795eec205aec5e8efc54726.jpg)
.jpg.9793c39953747f244f95a4e78d200ed4.jpg)
.jpg.3eff917ffe8114fd999283e28644ddb6.jpg)
.jpg.8a7d16073cf7891cae00f82e0d2e77d9.jpg)
.jpg.3305ec44410460721a4f7905ad9282d1.jpg)
- 460 replies
-
- 12
-
-
- Finished
- Flower-class
- (and 1 more)
-
F-86F-30 Sabre by Egilman - Kinetic - 1/32nd scale
king derelict replied to Egilman's topic in Non-ship/categorised builds
The engine continues to get better and better. As well as the one to go with the Sabre you should print a larger scale version just to admire when its all done The FOD screens are very nice. In service they must have been responsible for a massive inlet loss of thrust. Alan -
Very, very nice effects Dan. The subtle colour changes are so effective. Alan
-
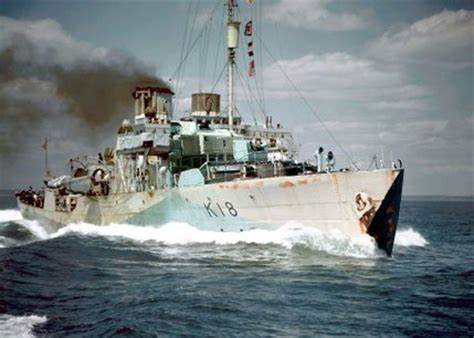
Thank you very much Lou. That is a great photo also for placing the depth charges I found this photo of Campanula and with a bit of staring and some imagination I think you can see two twin Lewis guns on the engine room roof. They may be a bit of a challenge to make but thankfully its a way off yet. Thanks again Alan
- 460 replies
-
- 4
-
-

-
- Finished
- Flower-class
- (and 1 more)
-
Thank you very much Kevin. When I started this I planned to make all the parts with the printer as a demonstration of what can be done. I've moved away from that given the difficulty of getting good small components (al least from FDM). I have put too much time into it and now i want to do the best I can with it. To me it makes sense to use other mediums where appropriate. I started looking at the H ventilators. I could print a series of cylinders and make them up but - nah - its going to be a lot easier to use styrene tube. cutting, filing and gluing will all be easier. The masting will also not be printed and I am going to see what I can do to gussy up the Oerlikons with brass rod, styrene etc. Alan
- 460 replies
-
- 5
-
-
- Finished
- Flower-class
- (and 1 more)
-
Beautiful model of an iconic car Mike. You did a great job of the finish. A mate at university had one. He used to take it hill climbing. A great car. Up there with the Lotus 7 Alan
-
Not a lot of progress today. I got bogged down in trying to resolve details of campanulas foredeck configuration. I've concluded - - There is little commonality between the Flowers, even in a build batch - An individual Flower has changes even between the major refits so raft locations, weapons change. - There are limited photos of most Flowers - just enough to be confusing - It might have been smarter to pick a Flower that have no photos available The big conundrum was the railings for the 4 inch gun bandstand. Some photos on Campanula seem to show a splinter shiels around the bandstand with a possible rail to prevent too low a gun elevation. Or it may be a canvas dodger but it doesn't seem to be rigged high enough if it is. Earlier photos just show railings around the bandstand with nothing additional to baulk the gun barrel. The resolution on most of the phots is not good enough to be definitive. I didn't like the look of the dodger / splinter screen so I went with the railings and used brass rod as the handrails and finally did something constructive with the afternoon and put the stanchions in place and made the rails from brass rod. Now ready for priming. There are a lot more confused details to decide. The photos show H ventilators on the foredeck as well as the funnel type. The armament is also a bit vague. I've read about possible Lewis guns on the aft decks but details are shaky. And of course not all these things may have been there at the same time. I think I am just going to have to decide on a configuration and go with it. There are going to be discrepancies that I cannot fix so a few wild details are not going to be too terrible Thanks for looking in Alan
.jpg.8db8defb27a009ca2ad9da0bd625e790.jpg)
.jpg.a7a0644fd8106bcf7146c340fa5924f2.jpg)
- 460 replies
-
- 8
-
-
- Finished
- Flower-class
- (and 1 more)
-
I think I;ll be using trees more in the future. Its difficult trying to get the normal supports off anything delicate. Getting them off the dinghies was a real exercise in patience. Alan
- 460 replies
-
- 4
-
-
- Finished
- Flower-class
- (and 1 more)
-
Thanks for the information Dan. Its good to know that they can be air brushed. I put an order in for some to try. Alan
-
Just keeps getting better Alan
-
Dan The metal nozzle painting looks really splendid. I will get some of those paints and hope I can do as well Alan
-
It's a Creality Ender 3 v2. Slicing with Cura. I think the Ender is a good machine if you factor in upgrading as part of the purchase. Alan
- 460 replies
-
- 4
-
-
- Finished
- Flower-class
- (and 1 more)
-
I'm very happy the mishap wasn't worse. I would have hated to not see this reach a splendid conclusion Alan
-
I reprinted the hose reels and primed the winch parts so it feels like we are moving forward again with a model. I did have a bit of a learning experience printing the shield for the 2 pdr gun. The angled shield requires a support and the usual structure was too strongly attached even with the density reduced by half. Instead of playing with the infill details I tried a "tree" support and it worked out nicely The printed shield with the tree and the brim still in place Then with the support and brim removed - still needs cleaning up I assembled the gun onto the shield and primed it. I think it will look acceptable with some paint and a few washes More painting and less printing tomorrow although I do want to get the depth charge throwers and racks done before the voodoo wears off. Thanks for looking in Alan
.jpg.1791e43a7dece12e9dd50efb7a41d2c9.jpg)
.jpg.a77c6e6ef8ea53590d7301f0ca660082.jpg)
.jpg.3d55f6f18718ce6b5e42012363de1006.jpg)
.jpg.c798785b89bbc664041d60bb9e247c8b.jpg)
- 460 replies
-
- 9
-
-
- Finished
- Flower-class
- (and 1 more)
-
The buildings are very realistic. The last photo of th eright side of the front could be a real farm building. Just the right amount of dirt and weeds. The hay cart is a beautiful detail. Alan
-
Hi Mr P I'm printing with a layer height of 0.2 mm. I may go down to 0.12 for some of the Oerlikon parts but I'll try them at 0.2 to start with. Alan
- 460 replies
-
- 3
-
-
- Finished
- Flower-class
- (and 1 more)
-
Today i returned to making Flower parts. I printed the 4 inch and 2 pounder gun parts and was much happier with teh results. The new and old parts are shown below The 4 inch gun port side The 2 pounder still on its brim and support but much nicer than the previous attempt I decided that it was worth making the steam winch again and printed all the parts for that. The slight imperfections on the chain guides is due to me being impatient removing them from the build plate while they were still hot. A selection of previous attempts for comparison. I will reprint the hose reels and start priming and painting and a spot of conventional modelling. I may try and print the Oerlikon parts to see how they look. Those are about the only unknowns left in the parts list I think Thanks for looking in Alan
.jpg.d4bd0d1024c6f7c5945a9565ec974d2d.jpg)
.jpg.6b1ba671df77f551ad319bec56c16736.jpg)
.jpg.3fa7c1776417f443d57a2b8d0bf20e14.jpg)
.jpg.404e742230ef970dd6bb31d744b80286.jpg)
- 460 replies
-
- 7
-
-
- Finished
- Flower-class
- (and 1 more)
-
I think that's what I'm missing. A cauldron, a broomstick and a black cat
- 460 replies
-
- 4
-
-
- Finished
- Flower-class
- (and 1 more)
-
A short weekend update. After a lengthy interlude while Windows 11 occupied my laptop I carried out one more calibration test print; the Polypearl tower. It looked like it might be a test too far but I was excited to see a decent model print out. I plan to keep the sliced files for these test pieces. My thinking is that given the inputs in the files a decent print should result unless something else has changes such as extrusion rate, filament quality a new and exciting problem with the machine. So lulled into a doubtless false sense of confidence I have sliced new files for the Flower using the same settings to repeat the 4 inch gun parts and the 2 pounder and we shall see how they come out. Thanks for looking in alan
.thumb.jpg.26aa8b511c4534174b5d256b35b8c076.jpg)
- 460 replies
-
- 5
-
-
- Finished
- Flower-class
- (and 1 more)
-
Hi Kevin Yes the number of variables in FDM printing is boggling - and a little depressing when you are trying to address a problem. Online opinions also differ on solutions which isn't always helpful. I'm glad to have got to an acceptable print by modifying the printer in much the same way you have, drying the filament and adjusting the speed and temperature along with trying to maintain a solid bed alignment. I would rather not get into retraction distance, refraction speed and all the other options in Cura. We are moving into the warmer weather here in South Florida so the air conditioning is running and the humidity in the house is much lower than in winter so its a good season for maintaining decent filament. Thanks for the great input Alan
- 460 replies
-
- 4
-
-
- Finished
- Flower-class
- (and 1 more)
-
F-86F-30 Sabre by Egilman - Kinetic - 1/32nd scale
king derelict replied to Egilman's topic in Non-ship/categorised builds
The engine modelling looks wonderful. The detail is excellent Alan