


king derelict
-
Posts
3,295 -
Joined
-
Last visited
Content Type
Profiles
Forums
Gallery
Events
Everything posted by king derelict
-
The light grey surfaces look really good Alan
-
It looks terrific. The lantern windows came out really well in spite of looking difficult to achieve a tidy result. You have placed it in a great location and should be very happy. Alan
-
I think it's a very tough trick to pull off. I've seen a lot of dioramas where casualties are essentially standing figures cut off their bases and placed lying down. They don't have the slumped look you see in paintings and photos and rather spoil the appearance. I think you have it sorted out. Alan
-
Looks very good OC. The pile will look very convincing when it's in place. It's going to be a cracking diorama
-
I'm glad you showed the details of the colour build up. I'm very interested in learning how to develop shading in painted surfaces instead of a bland uniform cost Alan
-
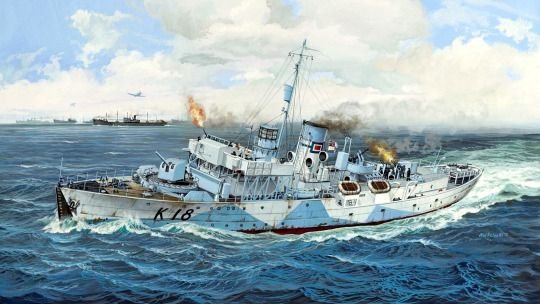
Moving along in a few areas I printed the parts for the 20mm Oerlikon and assembled one. It isn't too bad and painted up might work out. Its a curious thing; the left shoulder rest prints fine but the right one doesn't. Its a repeatable problem. I'll fiddle with the file and see if I can improve it. Both files have been modified to increase the print height which helped make the left rest useable but the right one is still a problem. At worst a spare left rest can be modified to become a right one. The railings at the back of the charthouse were added and painted. Its the first time I have used the Mr Metal Primer and the paint really went on nicely after it. I started masking up the funnel to add the band. There is a bit of variation in the photos and paintings of the band but I am going with what looks like a "W" code flag on the sides and an "X" flag fore and aft Thanks for looking in and the likes Alan
.thumb.jpg.b881698b9d226713babced41d7ba8edf.jpg)
.jpg.18c888f66a150a13c79b2b3d3205e96b.jpg)
.jpg.daee24342a6f26bb4bbac97b9907d6f1.jpg)
.jpg.84f63bb979f52b0727eef1a80e93672b.jpg)
.jpg.8c0b30b7949f41ebf24896859838d7ba.jpg)
- 460 replies
-
- 8
-

-
- Finished
- Flower-class
- (and 1 more)
-
Thank you Todd. It seems to have been an unnecessarily long road to get this far but learning to get good results from the Ender was a tiresome business and I very nearly abandoned the whole enterprise. Thats partly why I reprinted the smaller scale version; it was partly to reassure me that printing was (generally) a fairly routine and controllable activity. Some aspects are still a bit frustrating but I have learnt a lot. I'm somewhat tempted to get the files for the Astute sub as the next print project. Alan
- 460 replies
-
- 6
-
-
- Finished
- Flower-class
- (and 1 more)
-
Impressive detail in those resin figures. Its easy to forget how small those figures really are. The photo of the lane with the injured soldier and the long shadows looks very convincing. The pile of casualties is quite a challenge. I look forward to the end result. Alan
-
The build is still in progress but I'm reprinting parts, touching up paint, not very interesting or photogenic. The chartroom has been glazed (I knew those old overhead projector transparencies would come in useful sometime). The wooden decks of teh bridge, chartroom and side decks have been finished, weathered and sealed. I used a variety of methods and they have come up looking pretty well used. The fore deck has been filled and the paint has been touched up. The model has had its number added and is now HMS Campanula (K18). I printed the numbers on thin copy paper, resized them and cut them out. The K and the 1 were easy but the 8 was a test of my free hand cutting. Glued and sealed with diluted white glue. The bandstand and four inch gun are now permanently attached. I still need to add handrails, ventilators and cleats to the foredeck along with the side shields. The bridge structure is just placed as a fit check I finished printing the scaled down hull and finished assembling it. The coamings were a tight fit but with a bit of fairing to lead them into place they worked well. The joy of printing each section successfully first time was a quiet triumph after the earlier struggles. I'm not sure how much further I will go with the 1/72 scale version. It was more an experiment in scaling. Hopefully the bridge srtucture is not far from being ready to add to the hull. Thanks for looking in Alan
.jpg.c4d433eb06845bd6d345928b831ed51b.jpg)
.jpg.4c71aab8af6e87439985cddbc5a4c410.jpg)
.jpg.9853136810eaa09f39678b80eb4b84ee.jpg)
.jpg.da6369d97bb83d2f29d7f126db92b254.jpg)
- 460 replies
-
- 11
-
-
- Finished
- Flower-class
- (and 1 more)
-
Very tidy work Mike. i like the colour scheme a lot too Alan
-
F-86F-30 Sabre by Egilman - Kinetic - 1/32nd scale
king derelict replied to Egilman's topic in Non-ship/categorised builds
Absolutely marvelous Egilman. You should be very proud of your work. It looks excellent. I can't believe how good the intake screens look. I'd be dancing around the room for that alone Alan -
Great variety of facial expressions. I really like the hatless guy loading in the back row
-
A wood working day today. I laid the planked sections of the side decks. I'm not sure why only a short section was planked but the plans show several Flowers with that configuration The wheelhouse side galleries have been planked Now the bridge and bridge wings are in progress It all needs sanding down and then weathering before sealing. Keeping the Flower motif going these two Flowers from Mirage (Poland) arrived today. I haven't found and 1/700 Flowers so these were the next best thing. They have some very interesting small ships so the credit card may escape from the wallet again. I got the Flower PE from White Ensign which looks really good (and very delicate in places). Spirea has a basic PE fret including railings but Zinnea has nothing and will probably get the full PE treatment. They are full hull kits instead of my usual waterline but I have an ambition (fantasy) to try to diorama this Thanks for looking in. Alan
.thumb.jpg.a3e52e61f7d1fb6fe4cdeecb524d33e1.jpg)
.jpg.ace6c3e5e922f172d9cfdf80e36c66e4.jpg)
.jpg.d091222add539d1e44d1425c7ad8be09.jpg)
.thumb.jpg.09e87e7b71c6ab334e6a728575d547ff.jpg)
- 460 replies
-
- 9
-
-
- Finished
- Flower-class
- (and 1 more)
-
looking very good Alan
-
F-86F-30 Sabre by Egilman - Kinetic - 1/32nd scale
king derelict replied to Egilman's topic in Non-ship/categorised builds
Looks very good. Some interesting territory ahead of you. Alan -
I'm back. Work has been continuing but nothing that seemed to be worth a post. A lot of the sub assemblies have been painted their WA white or blue coats. The various photos and pictures of the superstructure scheme show different renditions of the white / blue scheme so I have gone with a version that is consistent with other details I want to add. It seems the Flowers were a highly changeable set of ships. I've also been reprinting several parts that didn't look good enough when painted. Some truly horrible prints from the under-extruding days like the cabin which can almost be pulled apart in places because the filament is so loosely bonded. The white piece is its nicer replacement. I printed the deck again too to remove the nasty scoring in places Some pieces will be left with their imperfections - I think they add a bit of character to the ship. I doubt it was maintained to Royal Yacht standards during convoy work. I built the second steam winch and completed the 4 inch gun. Its a bit sparce with details but I think it will work The viewing angle inside the shield will be limited once the blast shield goes into place. Hatches, bollards and hose reels now in place. The big moment was then adding the deck to the hull. A definite boost to morale which is a bit fragile on this build. All the other bits are just placed check they are still going to fit. I started puttying the edge of teh deck to the hull. Once cured and sanded it will look acceptable. A deck paint refresh will be necessary once that is complete The cleats and ventilators will follow. It seems the ventilations changed configuration on Campanula during her life. To stay consistent with the paint scheme I am back with a mixture of the horn and mushroom type ventilators instead of the H ones. It must have been extremely wet in the crew spaces below. With the Ender 3 sat relatively idle and with a spool with quite a lot of elderly filament loaded I started an exploratory line of thinking. I scaled the 3D models down to 67% which I think is 1/72 scale and tried printing the hull again. That is an advantage of the virtual kit; teh ability to print several copies and at a choice of sizes. The hull is printing nicely. The walls are still thick enough to be very strong and the coamings that join the sections still fit snugly although the prints have to be cleaned up very well to ensure the fit. So far six hull sections (of nine) have been printed and it seems that there wasn't as much filament as I thought. I finished section six last night with less than three feet remaining (I was sure I was going to run out). I have to feel that I have made some progress with the printer settings. All six pieces printed nicely which is quite a step forward if you read the account od the gnashing and wailing that accompanied the printing of the main build hull sections early on in this log. I'm not sure how far I will go with this. I think I'll load a new spool and finish the hull but I'm also curious to see how the decks and superstructure turn out. I think there is more after market stuff for 1/72 so it may be possible get the details that way. Or maybe a resin printer. Thank you all for looking in and providing helpful comments and support. I'm beginning to think I'm not a natural scratch builder. I hope everyone is having a great weekend Alan
.jpg.e1caa56b62e41c7239a043d46a77445e.jpg)
.jpg.23d692fba616264490bea3eb4649caea.jpg)
.jpg.4acc1152aa756ff24488799fe47431c1.jpg)
.jpg.f9dffd2d1ab229ee36e0758bb25d464e.jpg)
.jpg.29f1559ebdc78ce74141a05d6646f003.jpg)
.thumb.jpg.615c5fca03ad1834f85bb2c530f1442a.jpg)
.jpg.0c9389f63cfaafb9aea4b5f39b6daa09.jpg)
.jpg.c8553efed301f410144103bd31c9659c.jpg)
- 460 replies
-
- 11
-
-

-
- Finished
- Flower-class
- (and 1 more)
-
The top sail looks really nice. Great work Looks like a lively sailing day in the photo Alan
-
F-86F-30 Sabre by Egilman - Kinetic - 1/32nd scale
king derelict replied to Egilman's topic in Non-ship/categorised builds
The engine modelling is exquisite. The attention to detail is going to make it a work of art. People would buy it just to have the stand alone engine model. I would. Regarding Shapeways I'm a little cautious about their offerings. They have some great looking secondary armament for my Flower corvette although the price would be more than everything put into the model and if I bought the 4 inch gun it would exceed the cost of everything including the printer. Unfortunately the site shows only the 3D rendering of the parts not a printed piece. I can't see FEM printing delivering the gun sights on a 1\48 scale 20 mm cannon. I think I need to get brave and buy a resin printer. The cost wouldn't be much mpre. Good luck with the medical encounter Alan -
I really enjoy watching the details of those tiny faces emerge. Great work Alan
-
The plane with PE looks great. I usually paint the 1/700 aircraft with an airbrush, light coats and as low a pressure as I can get away with. The problem is holding them while painting. I have had good luck with double sided tape on wooden stirrers or lolly sticks Alan
-
Maybe use the PE on the others and place these in amongst the pack where thir details are not so easily seen Look nice though Alan
-
Brings back not so happy memories of my under extruding episode. I'm continuing to find parts that need to be reprinted. The Nautilus Dry Dock kits are very tempting. I am thinking about the Astute sub quite seriously - if the Ender can take the punishment Alan

.jpg.95910d49fae58c04fdfd385bc8c17554.jpg)
.jpg.fd52b79921d9f2756d6d47268d8b3fb5.jpg)
.jpg.e6045cf979c0300cbbab3c73da64de45.jpg)
.jpg.ab77a3055b2cff815bace50ed1954068.jpg)