


king derelict
-
Posts
3,294 -
Joined
-
Last visited
Content Type
Profiles
Forums
Gallery
Events
Everything posted by king derelict
-
I have the Mr Metal Primer in spray can. Its good but wasteful on small parts. I'll buy the brush on version next time. The paint really sticks well to metal after treatment with the primer. Alan
-
F-86F-30 Sabre by Egilman - Kinetic - 1/32nd scale
king derelict replied to Egilman's topic in Non-ship/categorised builds
I looked at the first image and thought it was a reference photos of a real aircraft. Great work. Keep pushing back on real life. Echoing every sentiments and good luck Alan -
A bit of work on the details today. I printed the life belts but I think they come out too thin so I scaled the thickness up by 2.5x. Its a nice feature of this way of building that you can change dimensions and resize parts. And keep printing them as needed. I also made up some mounts for the Lewis guns. The depth charge is about the right diameter for the base so I reduced it in height to 1mm and printed a few. With some styrene rod they will work fine. The pelorus is in progress in the background More depth charges have been printed and primed I look at the area where the door to the radar room is and it seems to need a set of railings at that open corner otherwise moving about in that area in a big sea would be highly hazardous. I have run out of the 20mm stanchions and I'm reluctant to buy more just to use one so I will experiment with some homemade options. The stretch cord I ordered off Amazon turns out to not be stretch cord at all so I have reordered and hopefully will do better next time. So rigging will be later in the week. The flag is the next challenge. Thanks for looking in Alan
.jpg.f57fd33edbce87dcc0884718d3bcb8d1.jpg)
.thumb.jpg.72f53f72542eb2c6416452b236646a18.jpg)
.thumb.jpg.d739ce1cc32c315f147b3962a8d9d205.jpg)
- 460 replies
-
- 9
-

-
- Finished
- Flower-class
- (and 1 more)
-
Thank you very much OC. A place to display her is the next problem. At just over four feet she needs quite a bit of space. There may have to be a major reshuffle of the shelves and cupboards Alan
- 460 replies
-
- 4
-
-
- Finished
- Flower-class
- (and 1 more)
-
For some reason the prop and rudder has been sitting on the side being ignored so i painted and added them. I gave the prop a coat of matt black and then a thin coat of gold to try to make it fit in with the "slightly used" concept. I finished rigging the falls for the boats and added the cable drums Lashings and oars need to go on next. For some reason the oars have been in the same pile as the rudder and prop - being ignored. The aft deck looks a little bare. I'm thinking about adding some extra depth charges. Also I may add a couple of hatches. Some Flowers had them and some didn't. I can't find any information on Campanula one way or another. Maybe the hatches and a few depth charges between the rails would fill it up nicely. Thanks for looking and have a great weekend Alan
.jpg.cb5ee5cfe8946227a22373fbd42f68c1.jpg)
.thumb.jpg.484265cb5cb103037f554998929e088d.jpg)
.thumb.jpg.ad9af407b1eeaae5e29321d4e1a62c98.jpg)
.thumb.jpg.4343625e9bc408e3916d31b5d5597727.jpg)
.jpg.47ba5ac9d6f8a9a8463a76b07a027eef.jpg)
- 460 replies
-
- 12
-
-
- Finished
- Flower-class
- (and 1 more)
-
Thank you very much Craig. Its appreciated. Yep; I jumped into this with both feet without realising some of the challenges. Its been a big learning experience at very many levels and I'm grateful for all the help i have received on the forum Alan
- 460 replies
-
- 4
-
-
- Finished
- Flower-class
- (and 1 more)
-
A great job on an interesting subject. Very nicely finished Alan
-
I looked at the hull this morning and decided that I had got a bit out of hand with the rust in a few places. I used washes of the base colours and some dry brushing and now I think I am happy with it. The anchors got the heavy weathering treatment and were added. The chains need to be tidied up at the windlass once the glue has fully set. I am still not sure about weathering the superstructure but I didn't like the clean appearance so I added some light rust at the ventilator bolt rings and at the joints in the galley funnel. I fixed the ships boats and the davits in place and have started rigging the falls. I think I have a better wy of setting the ropes so I will try again tomorrow Thanks for looking in Alan
.jpg.6c9627d332ffa1246934a1ae669af1e8.jpg)
.jpg.6b7dd4cb6d9d86e748c76a39fa38a374.jpg)
.jpg.f9f6e347aea91ea58d15309ae9b64361.jpg)
.thumb.jpg.cef5ed3e6487fae52af1f94281784cb1.jpg)
.jpg.1b27439a0b6a8efd4a9988a2057d028c.jpg)
.thumb.jpg.79a944d133d1374b3827c047cc26f9d0.jpg)
.thumb.jpg.fdbfaf7a875b32102a07edeec969f29a.jpg)
- 460 replies
-
- 13
-
-
- Finished
- Flower-class
- (and 1 more)
-
Weathering continues on the hull. I added the light rust washes to the dark rust at the panel joints and below the scuppers (may have overdone that). The coloured images I have don't show any significant rust around the portholes which slightly surprised me but I have left it off. This may be a bit too heavy in places but I wanted to get an Atlantic convoy look. Those little ships really took a pounding out there. I added rust to the bridge supports and started on the bandstand and 2 pounder gun tub supports. I;m not sure whether to add a light touch to the ventilator stacks otherwise I plan to leave the superstructure relatively clean. I have rigging thread arriving tomorrow and I'm trying to work out a rigging plan. As in everything else it looks like every Flower was different. Thanks for looking in Alan
.jpg.519231991c1c512312d4a39af0a84e81.jpg)
.jpg.8209310534d5e046bf5dd705e4f95320.jpg)
.jpg.b8e9cc1883d279fa5bd57355a7918715.jpg)
.jpg.e01a34f1dc15cc28e2887bb3731caeb2.jpg)
.jpg.48b795ae75c57bbaf937cfc497047166.jpg)
.jpg.7a8cf2ed1f05f61b6bb27916b7d0281e.jpg)
.jpg.731721b7a0065d3983ab0c8fdbbf0266.jpg)
.jpg.d00e246c094036e44452cfb31c760f56.jpg)
- 460 replies
-
- 12
-
-

-

-
- Finished
- Flower-class
- (and 1 more)
-
I think it might look a bit like a duck from below and if you are an alligator, you can generally afford to bite it and see what you got Alan
- 460 replies
-
- 4
-
-
- Finished
- Flower-class
- (and 1 more)
-
Thank you very much. I'm enjoying the weathering but a bit scared of overdoing it Alan
- 460 replies
-
- 4
-
-
- Finished
- Flower-class
- (and 1 more)
-
F-86F-30 Sabre by Egilman - Kinetic - 1/32nd scale
king derelict replied to Egilman's topic in Non-ship/categorised builds
Really nice and sharp work on the fuselage stripe. Excellent Alan- 585 replies
-
- 10
-
-
-
Thats quit a dogfight of planes. They look great. If I need more grip I put a piece of duct tape adhesive side up onto the double sided tape. It seems the tape then has enough area to hold the duct tape securely and the extra stickiness of the duct tape holds the small parts. Alan
-
The anchor chain arrived this weekend and i think it looks the part. The proportions are good and it does have stud links I gave it a base paint of flat brown and then dry brushed a dark blue over it. A rust wash finishes the chain I used some thin styrene rod to create the antenna loops (I assume these are the DF loops - I'm not knowledgeable in this area) and also made up some speaking tubes for the bridge. I'm trying to make it look a little less empty. I still need to fiddle with teh pelorus The big moment arrived this afternoon. Weathering. I started with some thin lines of dark rust at the panel lines and then added light rust and washed that out. I'm going to be working this up a little at a time. Its a bit beyond the tiny dabs that finish a 1/700 destroyer build and I'm keen not to mess it up too much. I'm working with the few colour images I can find. Thank you all for looking in and for the likes Alan
.jpg.ff123e50805c8d15c0fc41262dd54e65.jpg)
.jpg.e12fccd6cf349df6e978c29963243451.jpg)
.jpg.56398999e5d502f7700d1ba350be554c.jpg)
.jpg.983e85dab91b52ed1baa3bb6009a0e54.jpg)
.thumb.jpg.6a08fcddb134bae7031cfb4fcfd0b057.jpg)
.thumb.jpg.af59ae51265058bcf9e7c8c508126928.jpg)
.jpg.52ba860326cf34809b4bd2e2247709d0.jpg)
- 460 replies
-
- 12
-
-
-
- Finished
- Flower-class
- (and 1 more)
-
Thank you for the kind words Lou. Much appreciated. You are right I should have made it an RC model but I have never tried anything RC and the printer seemed like enough of a challenge. The beauty of the virtual kit is that I still have the files, the printer and the license to make as many kits as I want. So its probable there will be a sister Flower some day in the next year or so on the lake behind my house depth charging the alligators. Especially as the printing shouldn't be the exercise in patience that it was first time round. You are right about the small arms configurations. Oerlikons were in short supply and some corvettes never got beyond Lewis guns; I think captains grabbed anything they could get their hands on. Those little ships must have felt very vulnerable under air attack. Alan
- 460 replies
-
- 4
-
-
-
- Finished
- Flower-class
- (and 1 more)
-
F-86F-30 Sabre by Egilman - Kinetic - 1/32nd scale
king derelict replied to Egilman's topic in Non-ship/categorised builds
That looks like a very handy thing tohave around. It might have made painting the corvette a bit less of a chore. Your result is really nice Alan -
F-86F-30 Sabre by Egilman - Kinetic - 1/32nd scale
king derelict replied to Egilman's topic in Non-ship/categorised builds
The painstaking work is really paying off. Looks really good alan -
The details come out so beautifully. Congratulations alan
- 203 replies
-
- 4
-
-
- Roma
- Micromaster
- (and 4 more)
-
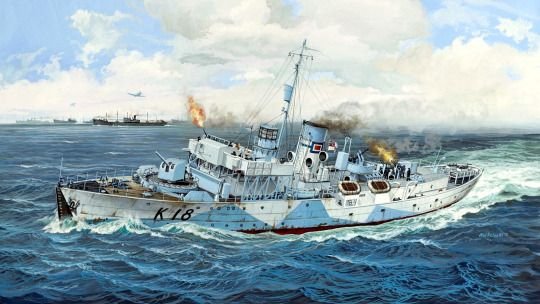
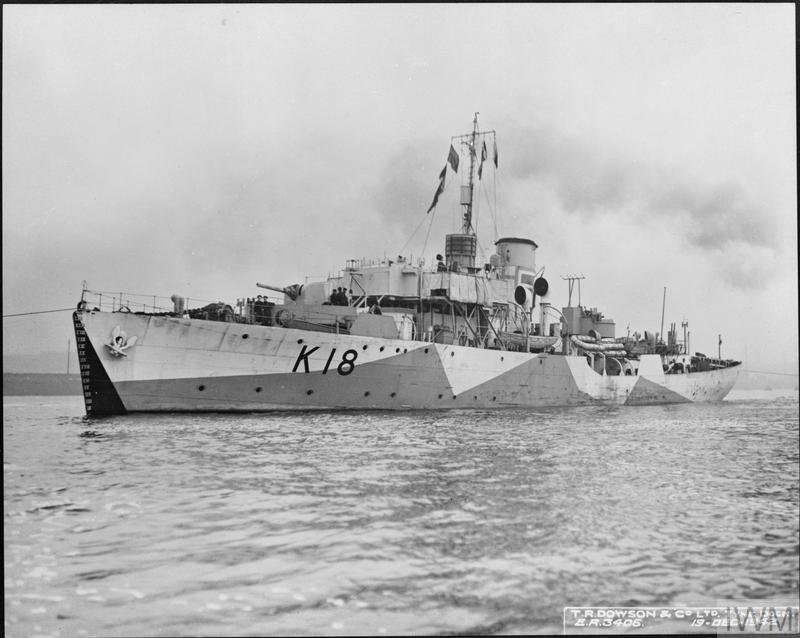
The Eduard Lewis guns arrived and are very nice although my PE skills have been atrophying and it took longer than it should to put them together. They now have a primer coat and hoping not to break them before installing them The question of the Lewis gun configuration is a bit vexed. It seems that single and twin Lewis gns were mounted, either with or without shields. The picture below is the one I am using as my guide for my interpretation. The image shows the Lewis gun firing and looks like a single with a shield Later photos show twin Lewis with shields I suspect the twin gun installation was the most frequent but I am going to use the singles that I have. I'm not sure about the shield yet; I'll see how some styrene sheet looks. The reprinted boats were air brushed for the man ropes and bottom boards. Still not perfect' the texture of the print is too rough in places. Its better than my hand painting so we will move forward and weather the bottom boards The boats need oars and tiller adding and then rigged with the davits. The hull weathering is next and I need to work out what rigging I am going to add. Thank you for looking in and responding. Its been a long journey from unpacking the Ender printer and switching it on for the first time. Alan
.jpg.aa913f7e3c3732cbb7444fb64bb41f25.jpg)
.jpg.2a8f0dfb0b62469139b2585dae84a708.jpg)
.jpg.fde4edcd79d53a7610da8e720ee7cd95.jpg)
.jpg.855cc7c73bb699dc5390f24a3def7a77.jpg)
.jpg.458bad79a085b14c96f24faedb732f04.jpg)
.jpg.e20cd064b49885d3b66c466dc13f59f0.jpg)
.jpg.90a8775b4a41c0a5502b29371e5173a1.jpg)
- 460 replies
-
- 10
-
-
- Finished
- Flower-class
- (and 1 more)
-
Very kind OC Its stretching my abilities - and sometimes my patience. Alan
- 460 replies
-
- 4
-
-
- Finished
- Flower-class
- (and 1 more)
-
Thank you very much Per Its felt like a bit of an epic at times Alan
- 460 replies
-
- 3
-
-
- Finished
- Flower-class
- (and 1 more)
-
I'm slowly working away at the details> added handrails to the ladders and Aldis lamps to the bridge wings. I'm starting to dabble with weathering. I am not using my usual black washes; The lines left by the filament on some parts take up the wash and it looks ugly. I bought this Life Color set of washes a while ago and didn't like them for the usual 1/700 stuff. It goes on as a dark grey but dries very light. The remover can be used to tone down the effect or blend it back. I think it might work to break up some of the areas that look like big white slabs. I have read that the Atlantic storms took areas of the paint off the hull so it may get used there too. I painted the smaller smoke floats and added them to the depth charge rails I decided that my shaky free hand painting was going to spoil the reprinted rafts so I am masking them for air brushing. Its a bit tedious especially as the tape does not adhere well to the printed surface. It will need a coat of clear to seal it before using the air brush. So - this is where I am now. Coming together. I'm trying to work up the courage to start slapping the rust on the hull and parts of the superstructure tomorrow Thanks for looking in Alan
.jpg.cd8e1538812f353e55b7aae4b8d814b7.jpg)
.jpg.cf08dc0a76a46a2a167a6eb74b132ac0.jpg)
.jpg.3bedf10fa0736bd2b3d99f69072f7d35.jpg)
.jpg.36bda69a2b038dd4dcf12619a213406c.jpg)
.jpg.955d117c7c372a841d39938469e03d50.jpg)
.jpg.6d1d8283927c885e6327d0b1f03fe960.jpg)
.thumb.jpg.d0f53d80d54ef1b367b5a27710116304.jpg)
- 460 replies
-
- 12
-
-
- Finished
- Flower-class
- (and 1 more)
-
You re rolling out some beautiful figures OC Alan
-
F-86F-30 Sabre by Egilman - Kinetic - 1/32nd scale
king derelict replied to Egilman's topic in Non-ship/categorised builds
The wings look great. The detail is very impressive and so is the finish. The magnifiers are a huge help to me. I think I would have had to give up without them. I found a pair that have 5X magnification but the focal length is so short that I am hitting the parts with my nose so I stick with the 3.5 X Great Job Alan
.jpg.25163b05eb0c23d96e6b595c281677fb.jpg)
.jpg.e8b4b7c67588ba47b8a790c97362408e.jpg)
.jpg.919b7f9853e2bfe405b04c32c545e4d3.jpg)
.jpg.e09acb525671604b8d992f43b4c627fe.jpg)
.jpg.7ced98a9d1d5a607d9ede10b15a0acbb.jpg)
.jpg.d074abe875fffa7fe306982c2aec9d35.jpg)
.jpg.6e7ebd8ddcab5c85358729e318e04d64.jpg)
.jpg.b68434173bb5f6dafcedacb45ae8363b.jpg)
.jpg.ffd5a5189599984de905fd73d05bb3ff.jpg)
.jpg.7601cdbddb3ee06502124a4acc859127.jpg)