


king derelict
-
Posts
3,295 -
Joined
-
Last visited
Content Type
Profiles
Forums
Gallery
Events
Everything posted by king derelict
-
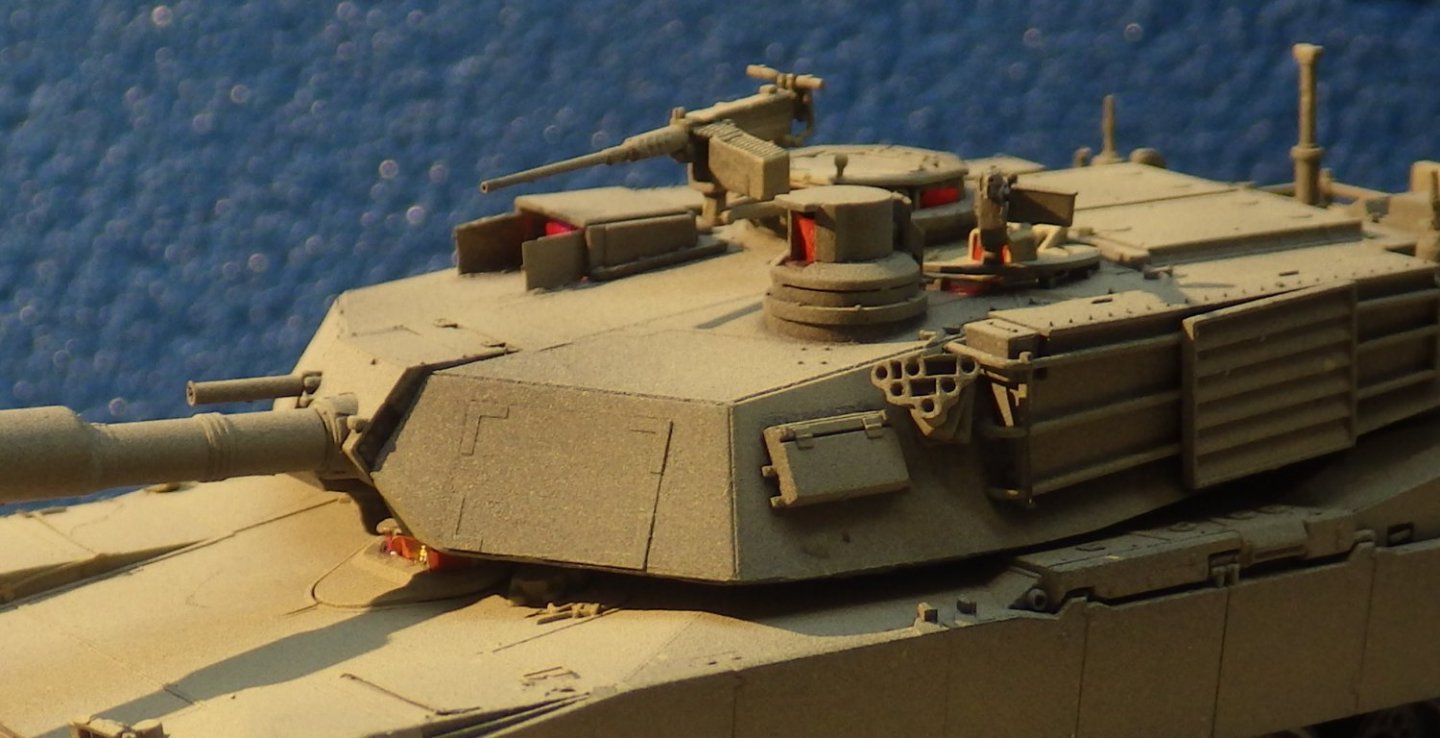
The research into appropriate foils for the vision blocks continued. I found I could buy 600 foil squares in six colours from Amazon for $12 or I could buy a grossly over priced box of Quality Street for $8. This left me with the dilemma of what to do with 594 squares of coloured foil or what to do with the chocolate. It arrived yesterday and my raw material stock was complete Its sort of like @Egilman metal finish research but without all his expertise and skill but with more calories The foil was a bit delicate to handle but I managed to place it into all teh vision block apertures and fixed it with PVA glue. Once this had set I gave it a coat of clear gloss to complete setting it in place and stiffen it. The hatch covers and turrets are just dry fitted to see how it looks Not as nice as @Old Collingwood but I think they are better than paint or dyes The deck was glued onto the lower hull and the warp mentioned earlier resulted in a poor fit at the rear bulkhead. I was able to pull it together with a bit of CA and a clamp but it will stull need a bit of filling. Thats all the bits together; now its time to add detail Thanks for looking in and have a great weekend alan
.thumb.jpg.0b3d7a37350a8a3f70a8ad108f1bbc4a.jpg)
.jpg.6858de6353d977edb8ccbbe7ec6335b8.jpg)
.jpg.6a4ede05054567f3c91069e91ea8976b.jpg)
.jpg.843099f278e9746bb74d57aea58a914a.jpg)
.jpg.399584abfdbfbde9f65087f176fea0b6.jpg)
.jpg.7d51ceec8ce4625c346b4569288f4e21.jpg)
-
Thanks Denis Thats a good point. I plan a fair amount of dust and sand around the road wheels and that will obscure the faults with the tyres. Alan
-
Fantastic Yves. I had just been thinking that a submarine would make an excellent subject for the 3D printer. I am ecited to see you launch one. Now I feel lazy and think its about time to return to HMS Campanula Alan
-
Catching up on your development of a bare metal finish since I've been away. Your work looks very good. The methodology looks repeatable and controllable which is very encouraging. The F104 is going to be spectacular. I'm very grateful for the tutorials; I'm keen to get my Vampire out on teh table. Great Work Alan
-
Apart from the metallic foil research being conducted in the candy aisle I built up the tracks today. Flyhawk made quite a nice way to create them The inner road wheels and the return idlers go onto the axles and the rear inner sprocket half is installed The inner half of the track is added and keys into the sprocket. The outer road wheels are put on Then the outer half of the tracks and the outer half of the sprocket And the lower hull is ready for the deck Very restful stuff after the PE on the Wasp Thanks for looking in Alan
.jpg.a10bb579b48a1b27eb1bd008fc17ab45.jpg)
.jpg.e42308d3e716706da1cb7ac04c7c822f.jpg)
.jpg.f29f573fb716528b1bc0fe2386704865.jpg)
.jpg.0c4d28427a73ecc7bf0a7eb2f4d46cbb.jpg)
.jpg.1424efe210c98cfc7e0e6b4a84a6effc.jpg)
- 79 replies
-
- 10
-

-
That PE gun mount is very nice OC Great work Alan
-
Thanks OC. Wispa bars come in purple foil and i brought several back along with teh Crunchie bars and Twirls. I wish I had thought about this earlier and brought some Quality Street chocolates back; they have a great set of coloured foils. Alan
-
Thanks Denis I now need to look at a suitable load for the bustle alan
-
Thank you OC Its another Flyhawk gem Alan
-
The jet lag is easing from the UK trip and I came back to this build after fraying my nerves with the Wasps netting PE. I painted the metal parts of the road wheels. Flyhawk provide a nice brass mask to mask the thin rubber rims. It fits over the rim of the wheel and is quite effective. Thirty two wheels painted Generally they came out quite well although some touch up is necessary. Looking at @Old Collingwood beautiful vision blocks made me vey dissatisfied with my trials will dyes and tints in gloss varnish. I'm looking at other ideas now This is my current inspiration Obviously I discarded the chocolate bar because I wanted the wrapper. I'm thinking the coloured foil might work if I can find suitable colours. I can then colour each aperture differently Now I need to do research at the grocery store Thanks for looking in Alan
.jpg.f13dc4101934a4edc6c00cc46e50876c.jpg)
.jpg.315e8ee3fef0eb094fdfb0174fa6b74b.jpg)
.jpg.1863ea171c3588a11622d1d164fe99a5.jpg)
.jpg.e34317d389825030bb5a4b9e643296e4.jpg)
.thumb.jpg.ae7577d0362818ab9384e7effc05c599.jpg)
-
I worked on the last major part of the build today; the netting. I was not looking forward to trying to add the PE parts edge on to the hull but in the event it went reasonably well. CA glue all the way because i needed the fast grip to stop the netting sagging before the glue dried. Lining up the parts around the elevators was fiddly but it came out quite nicely. The netting attaches with small tabs rather than along the length of the part - hence the CA glue. The nettings are a vast simplification of the real ones but they are better than not having any and as after market parts i am not sure how you could attach them to the hull in a more realistic manner. Probably a project for a 1/350 model. Slowly it all came together and all the netting was installed. The elevators were fiddly and adding the PE ordinance disposal chute was a bit of a breath holder Apart from the odd sape ladder and door and a set of ordinance disposal chutes to add to the flight deck the PE frets are now empty. Except for a last piece of railing. The instructions would have you install it across the flight deck at the bows but thats not a normal configuration on a flight deck. And really not a good idea A lot of small tasks now. I need to add the 50 cal guns but they were wrapped up in covers during the flight testing so I need to mould some putty around the parts to resemble that. Weathering and then helos, jets and vehicles need to be finished. Still some more fun to be had but its getting fragile to work on now. Thanks for looking in Alan
.jpg.23de1960699c9cb4cb44080c36ea1bb9.jpg)
.jpg.e6f0eaf9df4ad70266bc72942d4a5d7b.jpg)
.jpg.b023e28e9d0bf99b9ab33910d6611d1c.jpg)
.jpg.36c74f3e1d3580a07eedeffc2eec0bdc.jpg)
.jpg.7ffaabc306fab263a4d9643135b7075b.jpg)
.jpg.6acc92ab0414ff04ebd6903ec3a6bb7e.jpg)
.jpg.21d7814307656abe7e5aee3c4151efeb.jpg)
-
Thanks OC. It was great to spend time with family and see some old haunts but its good to be home too. Alan
-
You have made great progress while I have been away OC. The Abrams is coming out really nicely. I am very envious of your polarized vision blocks. I don't think I am going to be able to get anything close to that look in my 1/72 version. Excellent Stuff Alan
-
Sorry about the hiatus in progress. I've been back to Blighty for thed last three weeks visiting my dad and other family after a covid driven two year absence. The family was priority so I didn't get out and about as much as I had hoped but I had a great time. I did take my 96 year old dad out to the National Arboretum and we spent four hours walking about and making our usual stop at the Parachute Regiment memorial (his wartime mob), The cafe for coffee and homemade cakes afterwards was also a favourite. We have been there a number of times and still haven't seen a lot of the monuments. Great place. So back home and jet lagged it looks like everyone has been doing some marvelous work. I have so much to catch up on. After fending off my attention starved cats I did manage to spend some time on the next part of the Wasp build; fitting the life raft containers. My photos show significant changes from the kit layout to the ship configuration in 2013. Thankfully this meant I needed less containers rather than more. In 2013 the ship had considerably fewer containers fitted. After a lot of time studying the photos the containers were installed. The starboard side is 100% correct but the angles of some of the photos of the starboard side mke placement a bit obscure but I think its very close now. I gave the containers a white wash to make them a little more visible. In real life they are a light grey but they looked a bit formless with just the grey coat. Its good to be home and hopefully making some more progress. The netting will be the next job Thanks for looking in Alan
.thumb.jpg.a23f4f0f7d697adee49ea89ea09f62ec.jpg)
.jpg.7356aa4279eadac6f4b38e1c399bec6f.jpg)
.jpg.8103e25e5f31f6e40c06748bb6edd00c.jpg)
.jpg.09d0175be559ae567dece0ca3a734dda.jpg)
-
Thank you very much Dave Its starting to come together. I'm hoping not to fall on my face in the last stages. The weathering is going to be really interesting. Alan
-
A small update; its really all painting. i put down a coat of black Mig One Shot primer. I'm getting to like that paint; it seems to go on very evenly. Then a series of thin sand colour. I'm trying to get more shading in the paint by using the thin colours. Its bleached out a bit in the photos but it looks better in real life Now the road wheels and tracks Have a great weekend everyone Thanks for looking in Alan
.jpg.5de3c36f6082ac1443179a215c8b5eb5.jpg)
.jpg.e14f18ab6ec6121e0c7bb2a456a2fb7e.jpg)
.jpg.d7527d8ced6e2e41d3f86589bbd47006.jpg)
- 79 replies
-
- 10
-
-
The engine looks fantastic; The shading makes it very real Alan
-
Looks very promising Egilman. The test pieces look great. Alan
-
Back again after some days of annoying activity in the real world, renewing house insurance and the 2021 income tax return. PE never looked so good! There are two radar platforms that mount on the hull and are made up of six pieces. The instructions has you making up teh assembly and installing it as a complete item. That sounded quite good until I realised that this would mean getting six holes and a tab perfectly aligned. Not a a chance so I used medium CA glue and installed the platform and dome and then the braces and while the glue was soft moved each piece into final place. A big moment - I added the island. It seemed that the hull was going to get very fragile with the nets installed and getting the island down snug might involve a bit of force so I put it on. It went down quite nicely and suddenly this is starting to look like a ship. With the island on I added the deck railings behind it on the starboard side. Some very small pieces Next step will be to do a bit more touching up - and straighten that aft mast top platform Still a long way to go. I'm beginning to think this might deserve a seascape and a case of its own. I hope everyone has a great weekend Thanks for looking in Alan
.jpg.1a200428da74cbf0b9a5c051dc2de6d5.jpg)
.jpg.756890b36b2b4c054f80413a1c50d151.jpg)
.jpg.314366090d567eb27a83feb004e8d7b3.jpg)
.jpg.dc1cb70c0263c2c784c1d1d9635242a3.jpg)
.jpg.6a814d3e4c28753635660daa3d14113b.jpg)
.jpg.07e124b41f373f976644e553414d4c3e.jpg)
.jpg.9625cf1d70315bd1852083d8f2515396.jpg)
-
Looking forward to a great build Alan
-
Thank you very much Edward. I used a pin with a bit of beeswax on the point but it was really still an exercise in patience and bad language. I just put the first paint coats on and haven't dared look to see if they are still there or even visible 😄 Alan
-
I was able to finish the turret as far as I want to go before painting. The 7.62 mg is another nice detail The kit provides some insanely small PE numerals to fit to one side of the turret. I'm not sure what they refer to as they seem to be independent of the unit markings in the decal set. I doubt they will be very visible after painting but I thought I would accept the challenge. Just cutting them out of the fret and getting them on the turret without losing them was a nerve wracking exercise. They are not as straight as i would like but they are in place. I used Future as the adhesive to set them. I would have lost them in the white Gators Grip glue. Its the first time I have tried it (I think @Landlubber Mike mentioned it somewhere) and it seemed to work well. Pure hubris! Thanks for looking in and have a great weekend everyone Alan
.thumb.jpg.612240580c62ffb566fb2238c9ca640e.jpg)
.jpg.4164aeacf1d626aa97ba95eeb3163b81.jpg)
.jpg.56892d949d80ff04d22c3ba659dbcef2.jpg)
- 79 replies
-
- 12
-
-
Thank you Egilman; that is more great advice. I will try that technique with the coloured Future using the ink as the colouring agent. I have some more clear sprues to play with before trying it on teh real parts. alan
-
Thank you very much OC. It has some very crisp detail. I'm enjoying how it is coming together. Alan
.jpg.b2d01bf0463c7855e5fd032b3e75354c.jpg)


.jpg.20652021240c0dbe03e253a6c373fe52.jpg)

.jpg.342afc9d09f0647758b84f0dba4aa62f.jpg)
.jpg.a2b3e34a5bc13d76372fdd9147dee6a5.jpg)