


king derelict
-
Posts
3,295 -
Joined
-
Last visited
Content Type
Profiles
Forums
Gallery
Events
Everything posted by king derelict
-
The engine castings look like the real metal thing. Excellent Alan
-
Very nice work OC Alan
-
Thank you very much Dave for all those kind words. I have really enjoyed building this model and its been a special experience to build a ship that I have been on board on deployment. That gives a special desire to try to get it as right as possible. I would love to donate it to VX23 Test and Evaluation at NAWC Patuxent River Thank you for pointing out the grey wheel - I somehow only painted one side and it was the wrong one. That also drew my attention to the hair on the wing so that has also been dealt with Much happier now Thanks again Alan
-
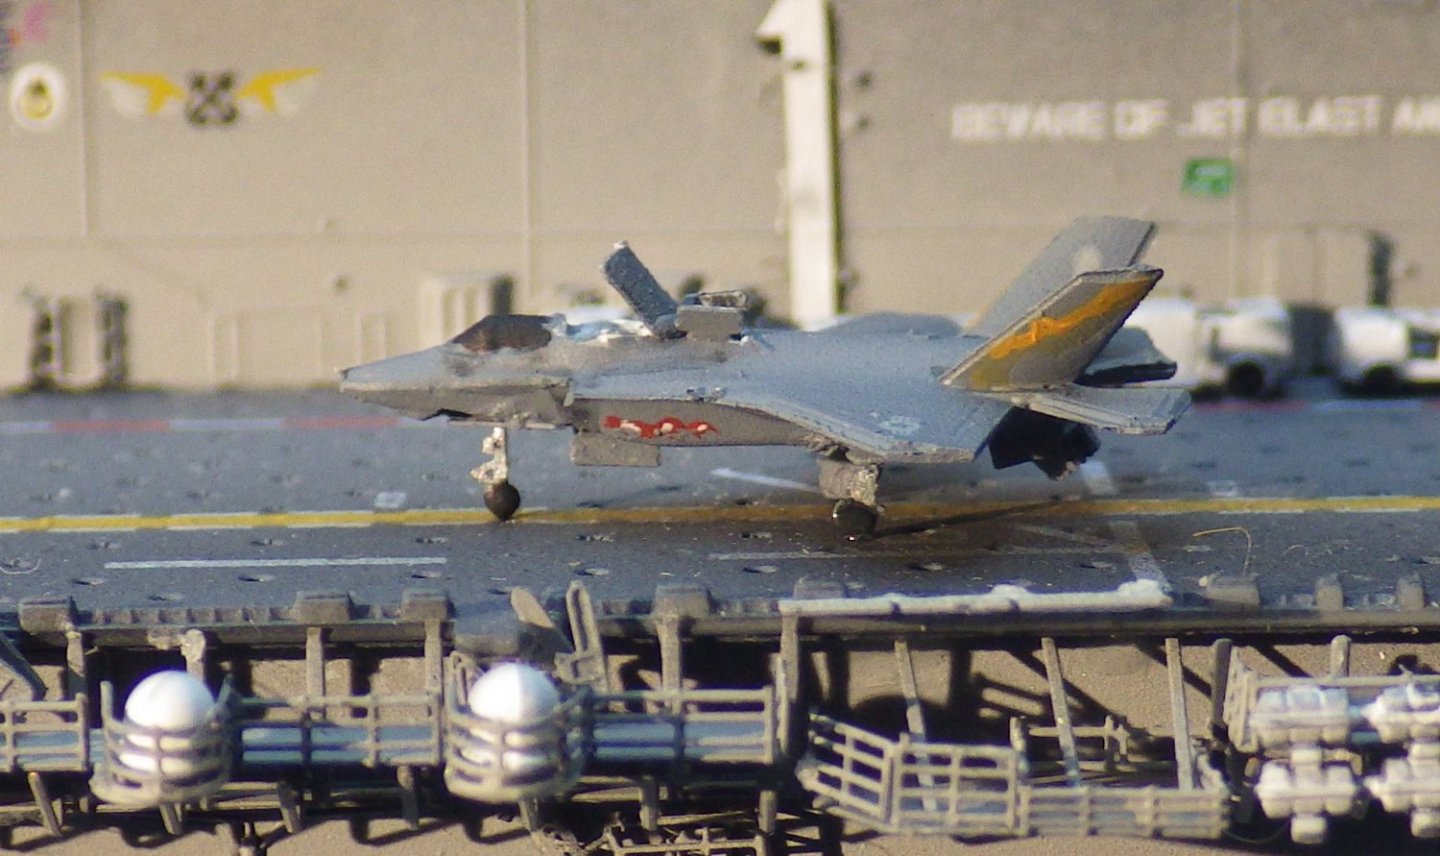
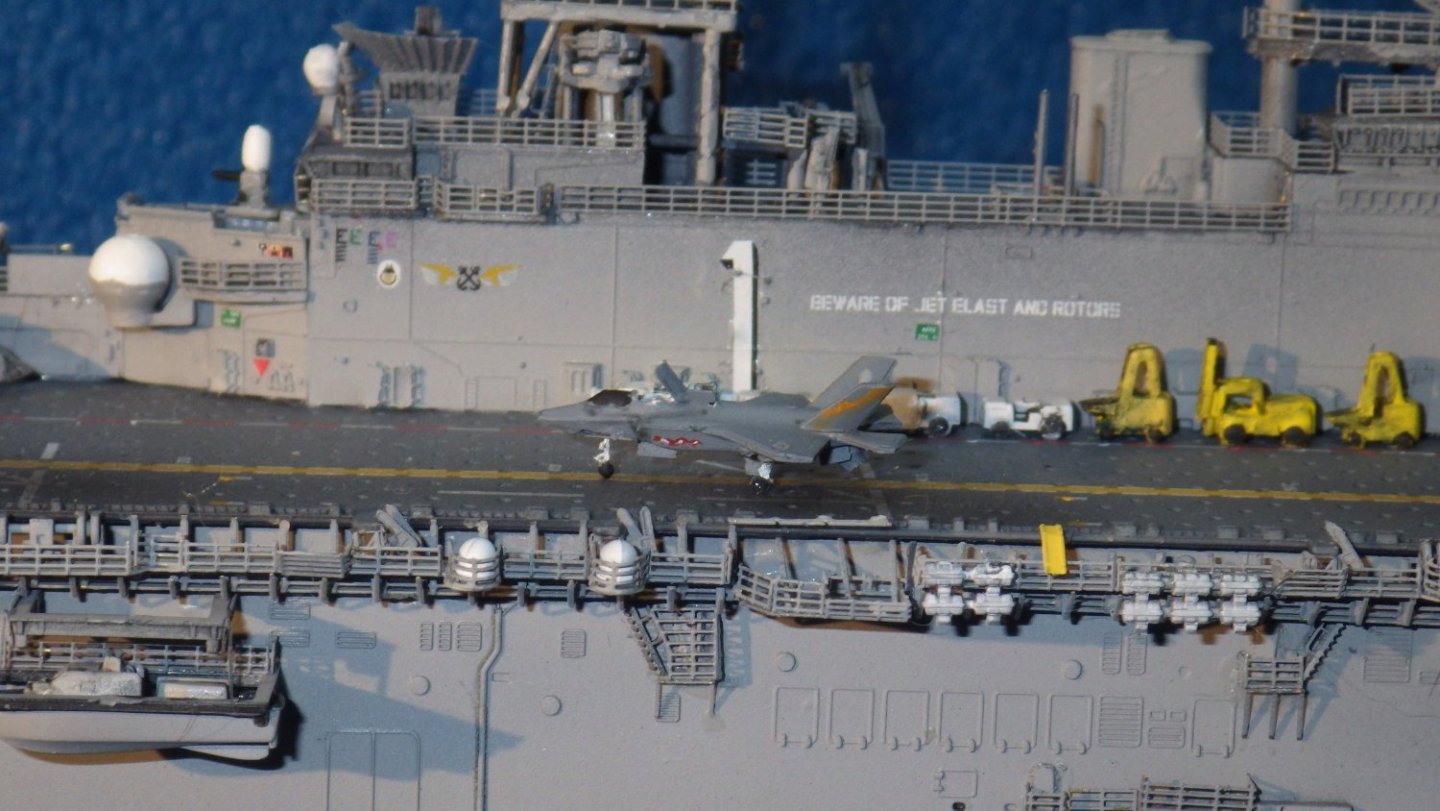
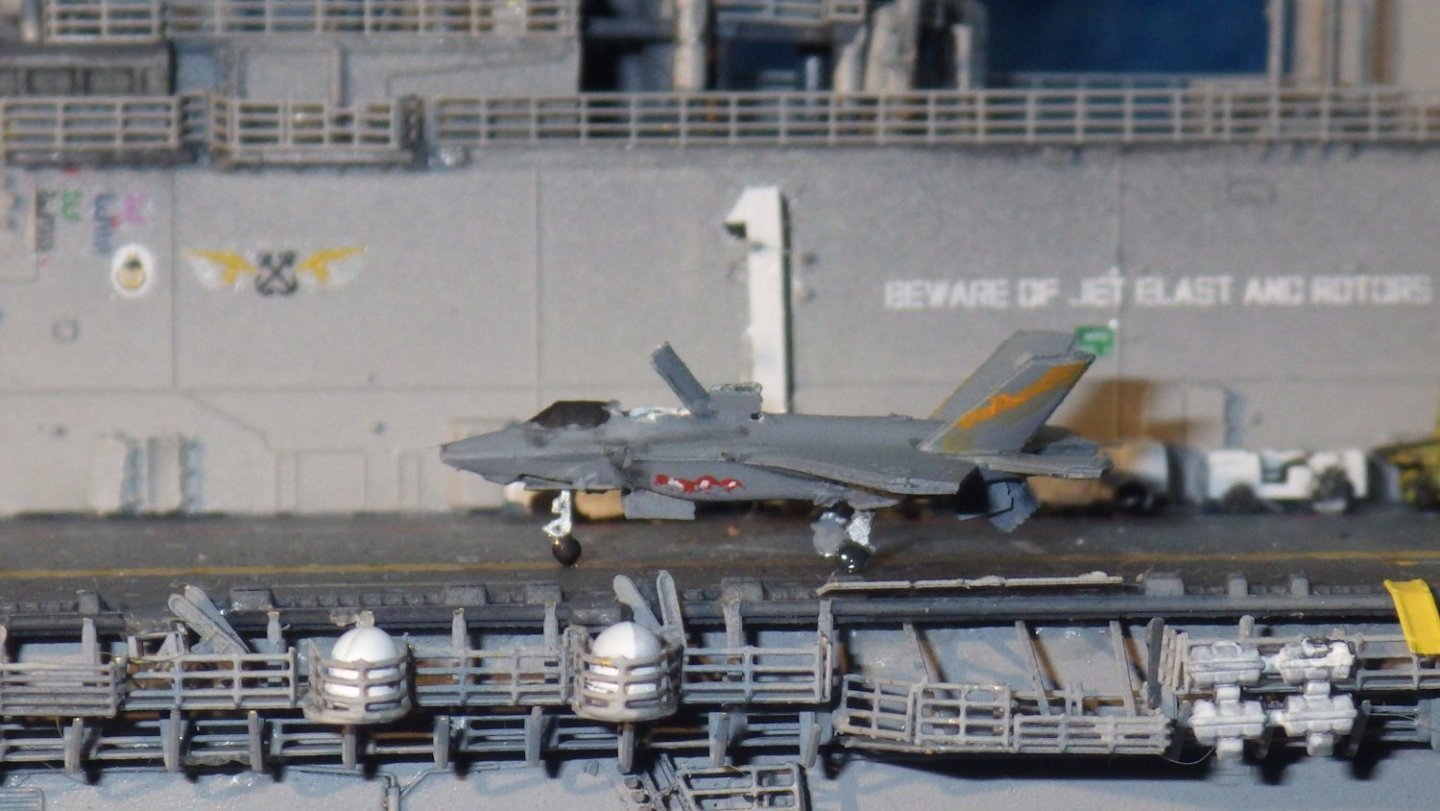
The two F-35B have been painted and the decals added. I also finished the SH-60s and added their tiny decals. The layout I had decided on had test aircraft BF-1 on the 400 foot mark for take off and BF-5 the second jet on the elevator. A spare SH-60 is up by the island and another is forward of the island. A further SH-60 is presumed already airborne on SAR duty. That leaves me with a spare SH-60 and a V-22 that really don't look appropriate on the deck so I have left them off. Another round of PE touch up was completed and then a matt coat. This completes the ship and I will now start on the sea scape. I hope its not inappropriate but if anyone has a use for a 1/700 scale Marines expeditionary set please drop me a line and I'll be happy to mail it out. I hate to throw it out but I don't see a need for it. It has Combat Vehicles 2 x M1A1 Abrams 2 x M60A3 2 x AAV-7 2 x M1097 Humvee Shelter Carriers 2 x M1114 Humvees 2 x M198 towed artillery 2 x LAV-25 2 x MTVR trucks Landing Craft 2 x LCAC 2 x LCU Aircraft 2 x AH-1W Cobra 4 x AV-8B Harrier II 4 x CH-46 Sea Knight 4 x MV-22 Osprey 4 x CH-53E Sea Stallion So a rather indulgent photo set to finish the ship work Thanks for looking in Alan
.jpg.594df78741fd2b56708291bf0055ca5a.jpg)
.jpg.2c7d8f33ebe5311e524d0e8ca23590a5.jpg)
.jpg.e36667d97d3b917b8dfa8c3fcc10346d.jpg)
.jpg.9304aebc068c8e0d7edc5381d30cf0bc.jpg)
.jpg.fe0ddf97eb14f05784f3d09a7d681f62.jpg)
.jpg.ebd055e7d28071c1f5c6dd5e32dca2ee.jpg)
.jpg.43ba792625d2ee8c1f090070bd297b50.jpg)
.jpg.3c3553d8cc0f2e6a95fa060ba923f8b0.jpg)
.jpg.ea817a554be772c71db085f8770b7d7c.jpg)
.jpg.871e271840a628d853ad219114f3dba8.jpg)
.thumb.jpg.ad38d9168921b983c89de2f52be76d56.jpg)
.thumb.jpg.210f039dddb8e3a4d181a63c81de20fa.jpg)
.thumb.jpg.6b0e6c9b0700e7930eb116aa90103eca.jpg)
-
Well, somewhere in amongst the Wasp painting the last strip of railing for the Lance was painted up. It is now fitted; the anchors are in place and some basic rust marks have been added to the hull. The railing have been touched up amd I think this is now complete Thanks for all the likes and comments Alan
.jpg.ad3813ecb2e6c303f58ee099e990ee63.jpg)
.jpg.9167855e74e80feaa4a44a0280df5964.jpg)
.jpg.003766935a7094aafa45c875e50b1d1a.jpg)
.jpg.e2acfc97a8d0f29739e94fe5f4fcc8c1.jpg)

-
An update with the photos taken against a neutral background. The colours are more like those on teh model now Thanks for the likes and comments alan
.jpg.8d810fcf034d51fe74a561f5edec2095.jpg)
.jpg.1a09f4b10c79535acc2ddcafcfa6cf16.jpg)
.jpg.d2c14123ec014ec82f08d58b38a64902.jpg)
.jpg.95c396e44ce3ef97f814beae84728f6f.jpg)
.jpg.27a4b6164456dfb04c33cdd5e4c4e8f4.jpg)
- 79 replies
-
- 13
-

-
Thank you very much OC. Flyhawk do such a nice job of things like the guns with hollow barrels. Now where next? Alan
-
I think this is about finished. I put a gloss coat on and added the decals then a coat of sandy dust colour lightly applied on the upper surfaces and deepening as it went lower. It doesn't really show against the tanks own colour but it does dull down the markings nicely and makes the tracks look dusty. I haven't added any weathering beyond this. All teh photos I have found show them to be dusty and sandy but not really knocked about. I used a green board as the background which was a mistake as its messed up the colour balance in the pictures. I'll try again tomorrow with something more neutral. In the meantime I don't think this needs anything more adding to is. Thanks for looking in Alan
.jpg.85e174f0ffdd1c79758f07a17369a68a.jpg)
.jpg.c08dd3d7eb6d60e9cecb01f6f136e2dd.jpg)
.jpg.f03131e3c477cd3d0cd474838f4ef37a.jpg)
.jpg.515b23cb3b942f0c2de5441500a3e0c2.jpg)
.jpg.4087d319a00d5759b21e95c251afd3b4.jpg)
.jpg.079a2c23ecedbeea1f1b527d6a9f6ae0.jpg)
- 79 replies
-
- 11
-
-
The use of rice as fish is new to me so thank you for that Denis. I'll try to remember that for when I get my nose out of 1/700 scale. Alan
-
F-86F-30 Sabre by Egilman - Kinetic - 1/32nd scale
king derelict replied to Egilman's topic in Non-ship/categorised builds
I haven't really explored the 3D drawing side of the printing process beyond a few forays into Tinkercad. I guess the eight cans could be made separately and assembled as a ring. The inlet to the compressor and its four struts looks like the tricky bit needing a fairly thin wall section.. I guess that is not so much of an issue for a resin printer though. At first look the printer looks like the salvation for this. I don't see a hocolate related fix here😄 Alan -
Thank you Dave. I drove myself crazy today trying to put the red stripes on the crash truck.😆 The two jets are two of the flight test fleet from NAS Patuxent River,MD and they seem a shade darker than the regular USMC grey. I'll have to look at the photos from the USS America LHA6 deployment which had a mix of flight test and fleet aircraft on board. It may all be my eyesight. Alan
-
I hoping the aircraft will land on later this week. I find the aircraft and vehicles difficult to make convincing. Alan
-
It's rather fun thinking outside the online hobby supply catalogues and looking around the house instead. Alan
-
Not to mention putting ourselves in harms way for our hobby. Think of the cholesterol. Alan
-
F-86F-30 Sabre by Egilman - Kinetic - 1/32nd scale
king derelict replied to Egilman's topic in Non-ship/categorised builds
That plastic engine is disappointing. The front end is rather nasty. It's going to be a bit of a carve up to install the struts. I'm confident that you will find an elegant solution Alan -
I spent quite a bit of time today cleaning up the details on the ship. Chasing around the PE painting over the little gleams of brass from handling damage. And then going around it again as the light catches new areas. I painted and added washes to the fork trucks, tugs, fire trucks and the crane. They still need a bit of detail and some cleaning up but I placed them just to see if they were somewhat acceptable. The SAR helo with folded rotors is also parked in its probable final spot. I painted the F-35Bs - the shortest spray session versus cleaning the air brush but they look good and some detail is getting added. I added some black wash to the hull to bring out some of the detail and then a rust wash where the phoptos show it. I think I need a bit more work to darken it in a few places. The Vallejo rust wash is very light. I'll try to finish the F-35s tomorrow and think about a seascape. Thanks for looking in Alan
.jpg.e7e885f89992b694e3d319661e257b1c.jpg)
.jpg.a0f5d5e23caebd5c25e4da6891e5f9ab.jpg)
.jpg.45c2dc4a6d1bf7d9f95d81a50bc41146.jpg)
.jpg.da5ce29e1bc3063b39b32f0b7a6f8733.jpg)
.jpg.d82ff344cbb835ce48594f4f38281cad.jpg)
.jpg.eaaffd250bc41e2d4e5a13568b0ce43f.jpg)
-
Thank you Greg. Its pushed my abilities but I like how its coming out. In 1/350 I think you could create a gem. The netting would be much nicer and the aircraft would be less clunky although I do like the 1/700 F-35Bs Alan
-
Thanks Mike. Its been a fun kit and its generally accurate too. The Eduard PE was great to work with and really make the model hugely better. Alan
-
Thanks Egilman. It was a great experiment - and of course the chocolate didn't go to waste. Alan
-
Thank you OC. I remembered your warning(?) about food creeping in. I think thats a good thing. I'm still thrilled with my hoard hauled back from the UK. Twiglets at last and even Marmite peanuts. Big Peat Whiskey and a belated Christmas pudding - and all the chocolate of course. Alan
-
Its looking really nice now as the detail builds up. Great work. Maybe needs just a little chocolate. Alan
-
Down in the detail today. Touching up the paint on the PE (and trying not to knock anything off). I added the yellow PE ordinance disposal chutes. The kit is wrong relative to the 2013 configuration but the photos sorted it out. The booms were added too. I just need to finish the 50 cals and that's the ship done apart from weathering. I then need to work up the vehicles and the aircraft. I'm leaning more towards a seascape to display it and its own case. Thanks for looking in. Have a great weekend everyone Alan
.jpg.f6cd39bc62226763d39a42ab0fbc2c58.jpg)
.jpg.7219c2181ac1603df84b42151ab5f8d1.jpg)
.jpg.668c02d41996aaac76a6a1a579f6257b.jpg)
-
Thank you Ziggy. I hope you won't be too disappointed to see only two F-35Bs (those were the test birds in 2013) . I will have the SAR helos and a V-22 on deck too though. Alan


.jpg.2e73759594099be3cafbcce7b38cca94.jpg)
.jpg.303abc0f969d51f672d3f9d377e37ee9.jpg)
.jpg.e661c756bf1cad06ceb44445f175be60.jpg)


