HOLIDAY DONATION DRIVE - SUPPORT MSW - DO YOUR PART TO KEEP THIS GREAT FORUM GOING! (Only 20 donations so far - C'mon guys!)
×


JerseyCity Frankie
-
Posts
1,338 -
Joined
-
Last visited
Content Type
Profiles
Forums
Gallery
Events
Everything posted by JerseyCity Frankie
-
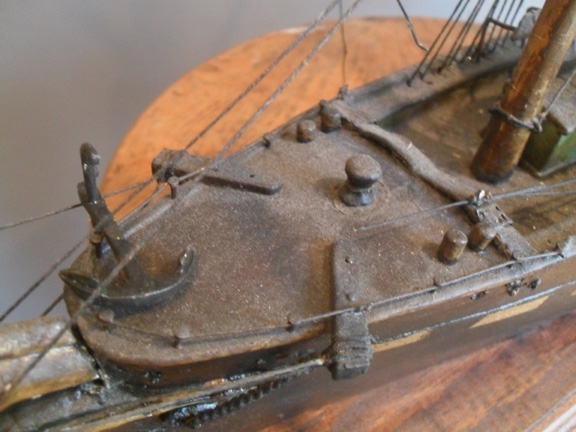
Speaking of splotchy, is there any white fuzz growing out of the anchors windlass or other metal parts of the model? Little piles of whit powdery residue on deck? There was a common problem with off the shelf fittings made of metal where over time oxidation would cause the lead in the alloy to break down and form white fuzzy flakes. There is no cure for this.
-
The varnish is a shiny coating like any varnish but it does not claim to do anything other than form a coating. I would use the painting restoration stuff first. Who knows if the varnish would clear up the splotchy parts or merely preserve them under a transparent film? All manufacturers of every liquid of any kind always suggest you "try product in a small area first" to see if it causes something awful to happen. if you exhaust the soap and water and household cleaners with no effect, I would try a very small dab of thinner swiped on with a Q-tip on some out of the way place and see if that doesn't do some good, it could be all you need.
-
I think the watchword is "First, do no harm" meaning don't use any methods that will damage the model. Dry loose dirt can be removed with a dry paintbrush or a toothbrush but usually there is a hard coating of grime. I agree Q-tips are the tool of choice for the next steps. start cleaning by swabbing with a Q-tip dipped in warm water. Slowly go over every hard surface on the model, being lavish in the use of Q-tips and throwing them away as soon as they collect any dirt. If that won't work, add some mild soap. Then try some household cleaners. Denatured alcohol is good but leaves a chalky residue. After this point it becomes a chemistry experiment and you are on shaky ground since anything you do from this point on could be irreversible. Thinner, turpentine, nail polish remover and a product called Goof Off sold in hardware stores for removing paint and hardened crud. I have had to resort to all of these at one point or another. But by now your likely to be stripping off original paint and this is something you should avoid. Hopefully you won't have to go to that level of aggressive chemical cleaning. There is a product sold for art restoration called "Cleaning Solution for Paintings" made by the Webber company. Its probably a blend of a bunch of mild chemical solvents and will make you dizzy if used without ventilation. But it does an excellent job of smoothing out the finish of old ship models and making the paint or varnish look revitalized just by wiping some on with a rag. Since its formulated for art restoration I assume its not as dangerous to the model as the Goof Off mentioned above, which can and will strip old paint to the bare wood.
-
Here are two before and after shots of the bow of a model I restored using the Golden brand MSA varnish. naturally I CLEANED the model and removed a lot of built up nastiness. As you can see the varnish really brings out a lot of color, color I am sure was once there on the original model. Hats off to your grandfather and his life at sea, this makes the model all the more attractive and worthwhile in my opinion.


-
BEAUTIFUL models bye the way. They certainly deserve to be well taken care of.
-
I disagree with the person above who was saying "don't match the look of the old model with the new restoration" or words to that effect. I think it makes a lot more sense to make the repairs blend in seamlessly. Imaginary future restorations are not a compelling reason to settle for a discordant series of repairs. Why live with a model with a spit personality? I will admit I am biased though, I am, as we speak, restoring an 85 year old model and I am doing my very best to make it look like I was never here. I'm aging, with paint and selection of materials, my newly manufactured parts to look exactly like the old components of the model. If you want to give a nod toward future restoration you can do what I have done: Before you begin restoration, coat every surface with a restorers varnish like Golden's MSA Varnish. This varnish is designed to be easily dissolved with alcohol and goes in as a barrier coat to separate the original material from the restorations that go on over it. The theory being that if 80 years from now someone wants to take off the restoration you are putting on today, they can easily do so by wiping the model down with alcohol. But lets be realistic: is this at all likely? And further, 80 years from now ship model restoration guys are going to have more sophisticated tools at their disposal.
-
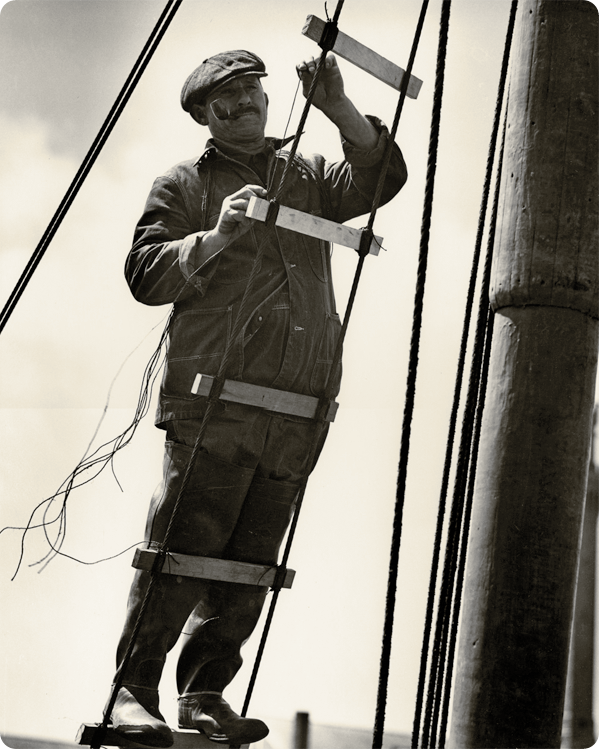
The thinnest thread I have been able to get my hands on is Fly Tying Thread intended for fly fishermen who make their own lures- the kind with little feathers and stuff lashed onto them. This thread is very very fine and comes in many colors but it has some drawbacks. Its not made of an organic vegetable fiber and has a lot of 'memory" meaning it won't drape and lay across the deck, its like an uncoiled spring that has to be glued into position. The clothing and sportswear company Eddie Bauer is where I found mine, the two retail shops of theirs which I have been into each had a fishing department in the back and they stock this thread. Here is a photo I found of a guy lashing ratlines. Note the relative thickness of the tarred marline he is using. I can't imagine the seizing material ever needing to be thicker than this. In fact the finished seizing is put on very tight and viewed from a distance its really only noticeable due to the color contrast. So maybe you could get away with simply gluing the ratlines on then painting the lashings with a contrasting color?

- 2,250 replies
-
- 2
-

-
- model shipways
- Charles W Morgan
- (and 1 more)
-
It pained me greatly to say anything at all critical of your otherwise really impressive model. I had strong misgivings about saying anything! I know myself, I have a hard time accepting criticism, its a character flaw of mine.
- 2,250 replies
-
- 3
-
-
- model shipways
- Charles W Morgan
- (and 1 more)
-
Oh dear I worry the lashings on those ratlines are made of too thick stuff.
- 2,250 replies
-
- 3
-
-
- model shipways
- Charles W Morgan
- (and 1 more)
-
It certainly makes me wonder what the circumstances were that would prompt the decision to run the bowsprit inboard. If you can simply take in sail, why go to all the trouble of physically running the bowsprit inboard? Consider that "all that trouble ALSO could mean striking the topmast, since the topmast stay would lose effectiveness the closer inboard it was made. I suppose if the boat was pitching excessively it would run the tip of the bowsprit into the sea and threaten its breaking off and this would necessitate getting it in out of the way? It certainly must have been an exciting life being crew on one of these cutters, the fastest thing afloat but with no creature comforts. Very little room for anything on deck and when the time comes to strike the rig, imagine the chaos for the leiutenant giving orders in the proper sequence. There would be no room for any shortcomings in crew competence. With everything struck, wouldn't every available inch of deck space be piled high with coils and spars? Then when the weather moderates, put it all back in place!
- 14 replies
-
- 2
-
-
- Heel rope
- Sherbourne
- (and 1 more)
-
The spar would run inboard very easily in comparison to the effort required to run it out. The geometry of the standing rigging bearing on its outer end would always be trying to run it inboard. Also there are plenty of lines already attached to the spar convenient for hauling it inboard, and note that these lines need not be attached directly to the heel of the spar, a purchase at any point on the spar could be used for pulling the spar back inboard. Also the fid holes clearly are for adjusting the sail area and center of effort of the vessel. Considering the fact that cutters already had Bowsprit Travelers its a wonder the designers felt this extra bit of control was worth all the trouble of configuring a spar so it could be adjusted this way.
- 14 replies
-
- 2
-
-
- Heel rope
- Sherbourne
- (and 1 more)
-
Sounds to me like this arrangement is exactly like that of the Top Rope on a topmast. If you look at how topmasts are swayed up, its very easy to imagine this same principle being used horizontally for the bowsprit. I built a cutter once and at the time I was frustrated at the lack of documentation of how the bowsprit was run in and out, and exactly how the bits or samson post at the windlass forward was shaped in order to control the bowsprit. But there must be a fid of some sort to hold the spar in place once its located properly. But that led to further unanswered questions concerning the Bowsprit. For instance, were there only two positions available, All the way inboard and all the way outboard, or was there a way to run the spar out only halfway? If this is so, there would have to be another fid hole somewhere along the inner third of the bowsprit? But I can't see the riggers allowing a hole in the spar anywhere along its length, particularly on a cutter. Alternatively there could PERHAPS have been a fitting on the fife rail to accept the fid at the spars heel?
- 14 replies
-
- 1
-
-
- Heel rope
- Sherbourne
- (and 1 more)
-
Durhams Rock Hard Water Putty comes to mind. Its got "hard" right in its tittle. Its a dry powder with infinite shelf life, mix as you need it, with water, dries in three hours. Sandable drillable can be cast in molds, won't flake off. And it is very hard, harder than plaster or wood filler.
-
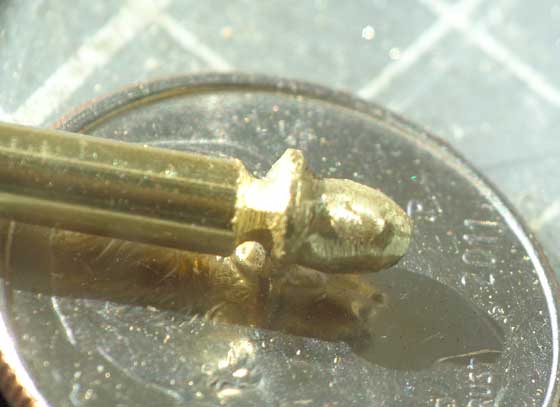
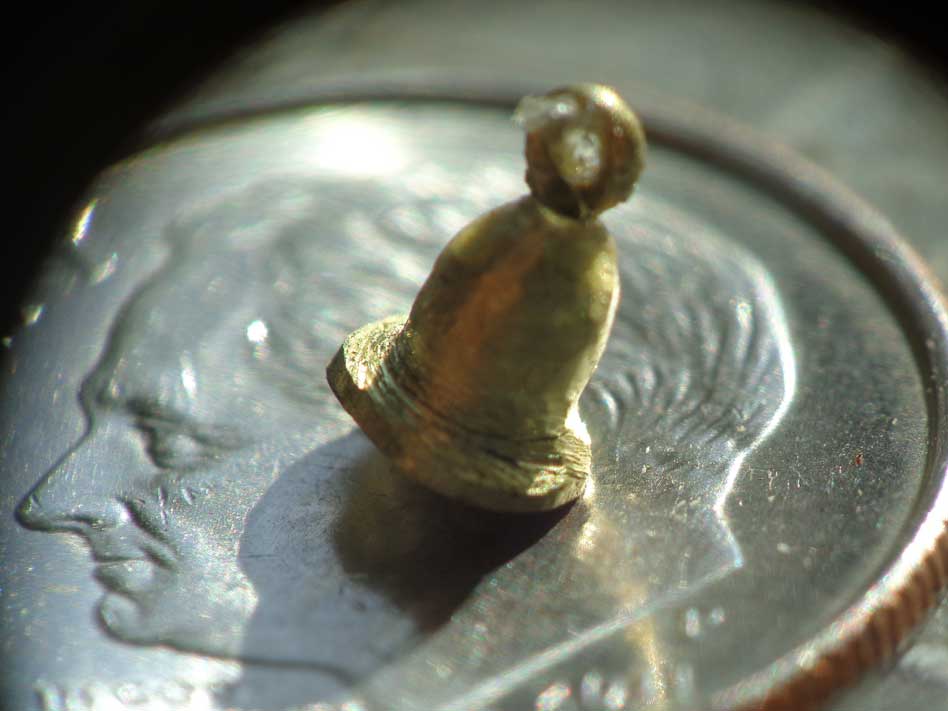
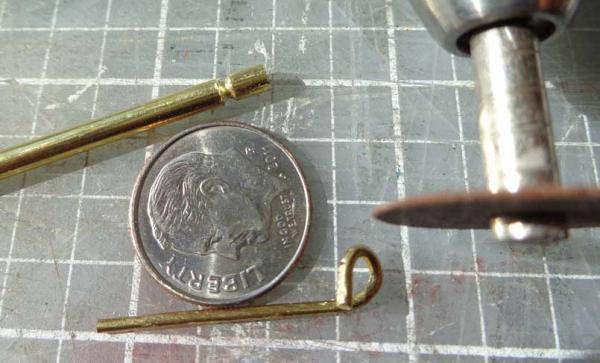
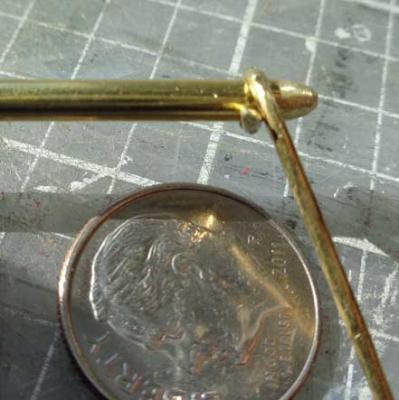
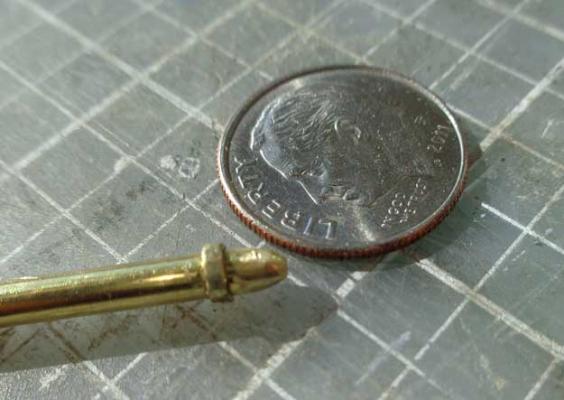
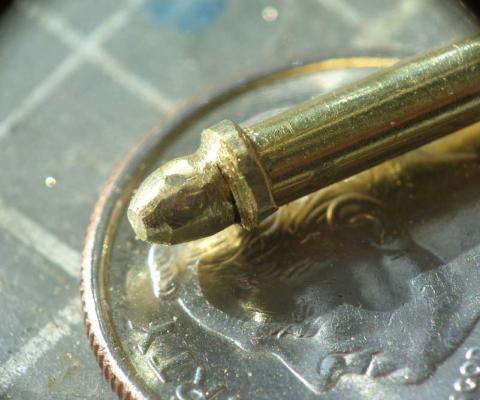
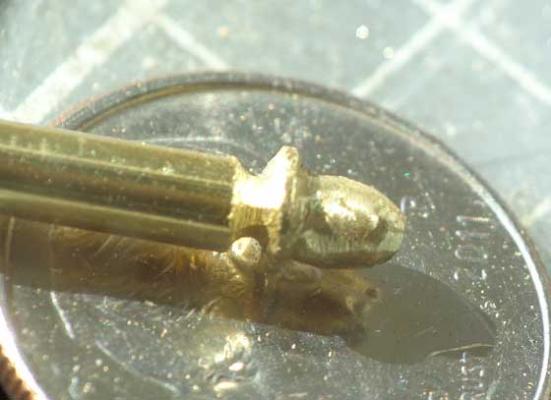
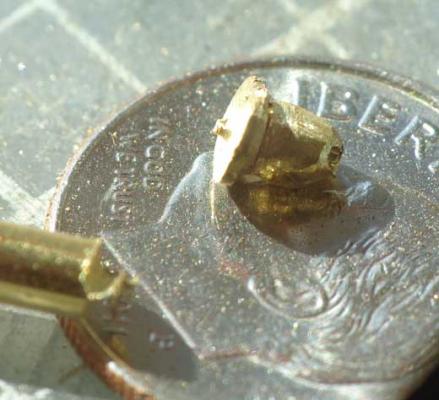
I needed a bell for a model I am restoring and I did not want to see what the internet had, nor wait for it to arrive if it even existed in the first place. 3mm was the thickest solid rod my local art supply store had, I was hoping for something thicker that I could then carve down to a bell shape. Instead I used a ring of brass wire set into a grove cut into the rod stock to represent the flared out shape of the bottom of the bell. I used the high speed cut off wheel for most of this. I have a love/hate relationship with these disks. On the one hand they cut through anything. On the other hand they are so fragile they always break apart. I have used hundreds of them and maybe only three of those actually wore down to a tiny doughnut. The rest broke being handled or flew apart while under load. I have never been cut by flying pieces but then again I ALWAYS use eye protection when using a cut off wheel. I have no lathe so this is all by hand and eye. I cut a groove around the rod and I round off the end of the rod to resemble the curved top of the bell. I wrap thickish brass wire down into the groove I cut, aiming for exactly the right length so the wire forms a ring. Then I hammer this down with a tack hammer, trying to mash the wire into the groove while smoothing the juncture with the rod. Then I use the cut off wheel some more, this time as a shaping tool, smoothing the transition from the wire to the rod. Then I part off the "bell" and as I was doing this I realized I could leave a bit of the "stalk" intact to look like a clapper. I drilled a hole in the top of the bell and put in a fine brass wire eye, secured with super glue. I did not want to solder anything as I was going to use the brass in its natural finish.

-
Attaching / bending Sails to Yardarms
JerseyCity Frankie replied to fxitgood's topic in Masting, rigging and sails
I cant imagine how it would be possible to furl a sail UNDER the yard. How would the sailors get the fabric up to the yard if they couldn't pile it up on top of the yard one bight at a time, allowong gravity to help hold it in place while they completed the work? I should point out that I have always held the heretical opinion that there must always have been footropes going all the way back to the earliest days of square sails. I know there is as yet no documentation for this idea, but the alternative explanation, that men went out on the yard by walking on it, has never rung true to my ears. And particularly due to the issue of furling the sail. I do not think you can have your cake and eat it too when it comes to what the accepted historical record has left us. How can you be clinging to a naked yard AND furl? But lets assume you can, for the sake of argument. I STILL can't see the furled sail hanging UNDER the yard. What would be the advantage, and how would you manage the feat? I suppose you could furl the sail on top of the yard, and when you got it all in a nice bundle you could tie it up with yet more lines then push it off the yard. But now when you want to set it you won't be able to control it, its more likely to foul, in my opinion. Still I will say that its possible I am wrong about this stuff. But I would like to see the argument in favor of furling Under the yard, and some explanation of how the crew could furl in bad weather with no footropes. -
Attaching / bending Sails to Yardarms
JerseyCity Frankie replied to fxitgood's topic in Masting, rigging and sails
Oh I have little doubt that if you went back in time and compared British and French ships, that the sails would be bent to the yards the same way in each navy. Robands rove through grommets on the head of the sail, and the lashing to the yard, I believe would be indistinguishable from each other. WHERE on the yard the sailors held the head of the sail as they passed the robands is what I am wondering. I tend to believe the sail would stay where it was lashed. The idea that the roband has to pass through the grommet multiple times suggests to me that the grommet would be within easy reach of the sailor and thus NOT hanging on the underside of the yard, where it COULD be reached but where it would make the whole operation way more difficult and time consuming. Also I think the sail would NOT pull the head of the sail to the underside of the yard at a later date, after the force of the wind and the effect of gravity on the sail pulled on it. I think all those robands would be a very strong bond that would not permit the later shifting of the canvas. But I could CERTAINLY be wrong and would like to see more close up photos of replicas with traditional non-jackstay lashing. -
Attaching / bending Sails to Yardarms
JerseyCity Frankie replied to fxitgood's topic in Masting, rigging and sails
I'm bending sails on my Heller Victory right now and you can see the process on my log, the link is in my signature. If you read it you will see at the end I am wondering about where exactly on the yard the very top of the sail would be located. I HAVE been bending the sails onto the yard with the heads of the sails on the front aspect of the yard, not hanging off the bottom. I did this without giving it conscious thought, I pictured this would be how the crew would have done it. But I saw a photo of the recent Hermione the French have just launched and you can see clearly the sails are hanging under the yards. I am not sure this one example is one to use as a yardstick though as I have noted some odd inconsistancies in Hermionie's sails, and I take into consideration she is very new. -
I don't have any experience with flying square topsails. But I imagine there are two choices: Have the sheets gasket coiled and they stick with the sail as you pull the yard and sail up with a single halyard from the deck and when its aloft crew go up and cast off the gasket coils and reave the sheets from up there. No braces at all. OR, the sail and its yard are on deck ready to fly aloft, and the sheets are already rove aloft and reach all the way down to the sail laying on the deck. As the halyard hauls the sail and its yard aloft, the sheets are also taken up on. This seams far fetched though. since its an awful lot of line. But it has the advantage of requiring nobody aloft to set the sail, it would be done entirely from the deck. But the crew would not be unable or unwilling to go up and do the work so its, like I say, far fetched.
-
I'm happy with the book in every way. Sure it could have been in a larger format, as it is its 250cm X 195 cm or 10" X 7.5" but on the other hand it was affordable. I am CERTAIN that if it had been large format the price would have been over $75 US.
-
Scratch Build George Law rigging question
JerseyCity Frankie replied to Boat Doc's topic in Masting, rigging and sails
My only title I can think of is Unerhill's Masting and Rigging of the Clipper Ship and Ocean Carrier. Not because it has any content relating to transitional steam and sail vessels, it has NONE. But it does cover steel wire rope and chain and the iron fixtures that would be utilized on ships like the one you are talking about, ships from the late stage of sail. I think Underhill and his several books are considered the best source for late stage sail and riging information. -
Scratch Build George Law rigging question
JerseyCity Frankie replied to Boat Doc's topic in Masting, rigging and sails
Its an era that is underrepresented in the hobby. There is certainly a need for more information about this transitional period as it is fascinating and has some real oddball pairings of ships and rigs. I wish I could remember the name but I recently saw a modelers plan of an early 20th century ocean liner that had square rigged sails AND a catapult for a seaplane. I would LOVE to imagine a scenario where the seaplane pilot is aloft helping to furl the sail, then gets the word the ship is in range and he must return to the deck, suit up and fly the mail ahead to New York. -
I am putting together a pretty detailed account of my sailmaking process for my HMS Victory, using bed sheet material, http://modelshipworld.com/index.php/topic/9359-hmsvictory-by-jerseycity-frankie-–-heller-–-plastic-1100-–mostly-rigging-and-sails/page-2
-
How is the Pudding Spar attached?
JerseyCity Frankie replied to tsurfing's topic in Masting, rigging and sails
Plenty of discussion on this topic here. If you read my two cents you will see I am saying it's a lashing. http://modelshipworld.com/index.php/topic/9027-puddened-gripes/ -
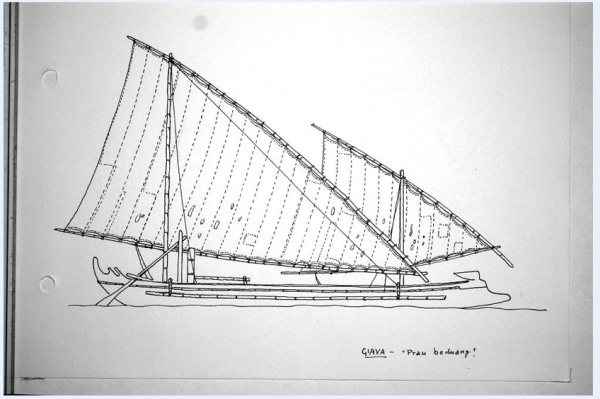
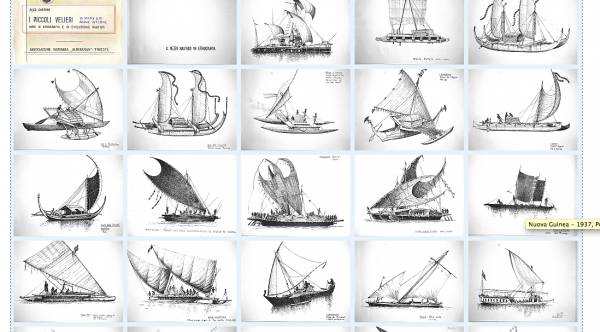
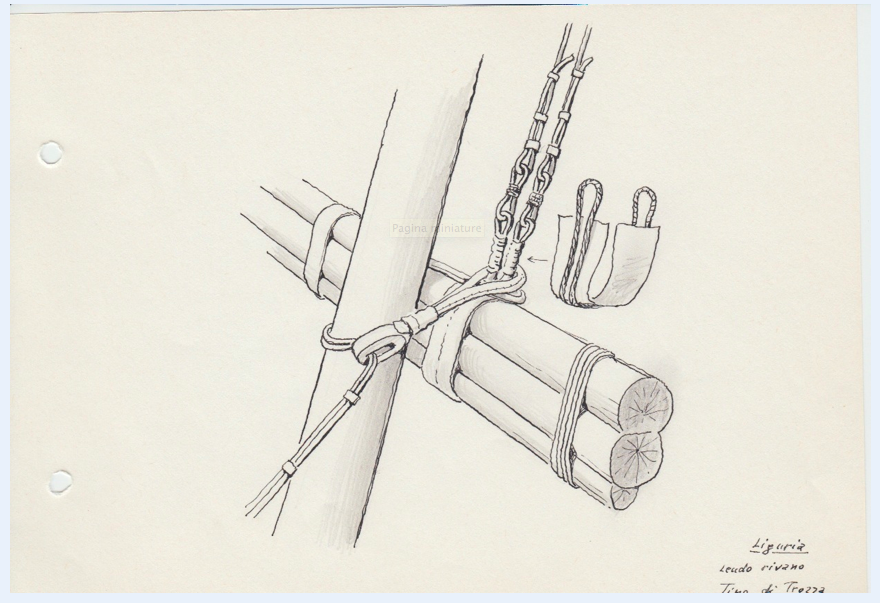
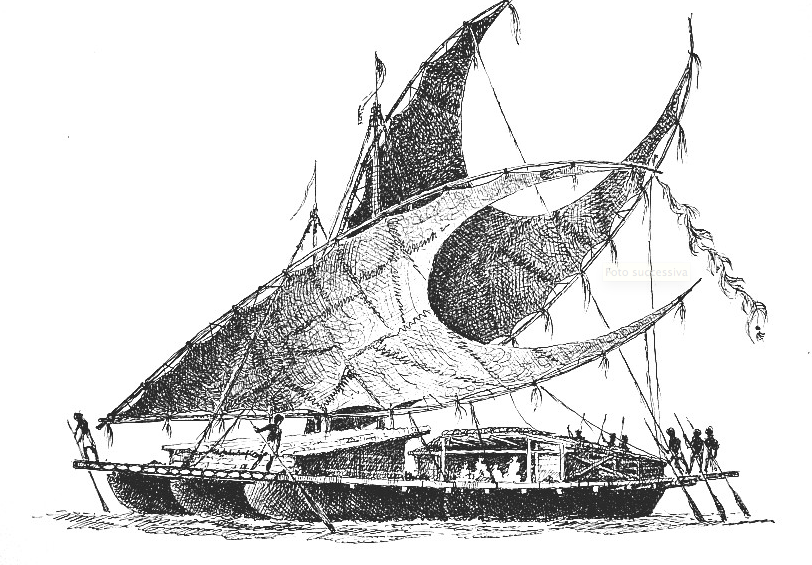
Most of these rigs have been ignored by the Ship Model hobby. I guess the hobby reflects the Western European and North American sailing culture, which is fore and aft or square rigged only with hardly a lateen to be seen. But to be fair, there is not much documentation available for this exotic stuff.
-
Found this link on Reddit, looks like13 pages from a sketchbook have been reproduced. http://www.cherini.eu/etnografia/IND/index.html the root website doesn't translate to English but if you click on the hotlinks there is treasure: http://www.cherini.eu/and I do mean TREASURE, I have not seen so much information on delightful non-Western rigs before.