
HOLIDAY DONATION DRIVE - SUPPORT MSW - DO YOUR PART TO KEEP THIS GREAT FORUM GOING! (Only 20 donations so far - C'mon guys!)
×


JerseyCity Frankie
-
Posts
1,338 -
Joined
-
Last visited
Content Type
Profiles
Forums
Gallery
Events
Everything posted by JerseyCity Frankie
-
what does a stuns'l boom do?
JerseyCity Frankie replied to Ian B's topic in Masting, rigging and sails
They are regarded as difficult creatures. Studdingsail booms are almost thought of as disposable since they often break, as I have heard crew from Pride of Baltimore II report. They can only exist in light wind conditions and if the wind picks up they must be got in quickly. "Modern" square rigged ships seldom carried them, for instance none of the big steel hulled German barques had them. -
what does a stuns'l boom do?
JerseyCity Frankie replied to Ian B's topic in Masting, rigging and sails
Hi Ian. Stunsails (spelled Studdingsails) are supplementary sails that can be set on either side of the square sails. The booms you mention could be slid outboard through iron rings attached to the yards well past the ends of the yardams. On these extensions smaller square sails could then be spread, giving the effect of more canvas on each yard. Here is an excellent recently posted photo of them in use on the the Europa which makes their disposition plain. Studdingsails were only set in light airs with the wind abaft the beam. Most of the time the booms were not in use and they were positioned inboard, which is how they are usually depicted on models. The canvas on them was "flown" up to them from the deck, not furled on them at all when not in use. The sails could be set as needed and not necessarily all at the same time nor even symmetrically- you could set the portside ones but not the starboard ones, or even set the ones to port on some yards and ones to starboard on others. All depending on the wind.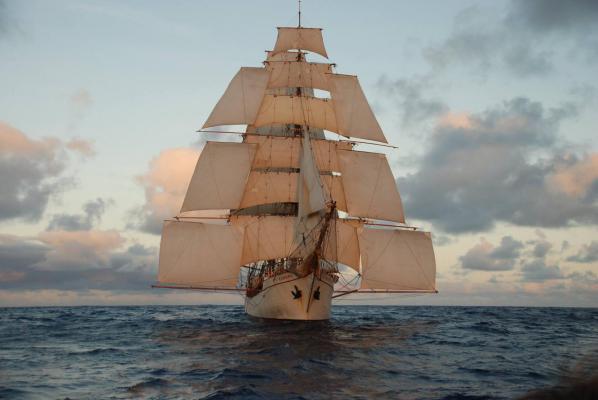
- 27 replies
-
- 13
-

-
Experimenting with starch left me disappointed. I used the powdered form of laundry starch in hot water and I dipped the sailcloth into it then draped the sailcloth over holes cut in cardboard. The holes in the cardboard were cut to the size and shape of the outside of the sails. I allowed the sails to air dry overnight. They DID take on the form of the billowing sails and they WERE quite stiff. But something about the starch also made the fabric pucker in a pattern across the entire sail. The result reminded me very much of those old vacu-form topographic maps of mountainous terrain you used to see. I have had success with a commercial product called "Stiffen Stuff" and another similar product called "Stiffen Quick" which are pump spray craft products you mist onto fabric which has the result of preserving the fabric in the shape it was in when the product was applied. It stiffens the fabric nicely without causing the sort of puckering distortions I found the starch caused.
-
Below the thunders of the upper deep; Far far beneath in the abysmal sea, His ancient, dreamless, uninvaded sleep The Kraken sleepeth: faintest sunlights flee About his shadowy sides; above him swell Huge sponges of millennial growth and height; And far away into the sickly light, From many a wondrous grot and secret cell Unnumber'd and enormous polypi Winnow with giant arms the slumbering green. There hath he lain for ages, and will lie Battening upon huge seaworms in his sleep, Until the latter fire shall heat the deep; Then once by man and angels to be seen, In roaring he shall rise and on the surface die.
-
I'm reading Moby-Dick again and today I saw this, another of Melville's many digressions from the narrative. Chapter 60 starts off with a description of the whale line used in the boats, its the line attached to the harpoon. Since he mentions tar and the coloration I thought it would be nice to post it here: CHAPTER 60. The Line. With reference to the whaling scene shortly to be described, as well as for the better understanding of all similar scenes elsewhere presented, I have here to speak of the magical, sometimes horrible whale-line. The line originally used in the fishery was of the best hemp, slightly vapoured with tar, not impregnated with it, as in the case of ordinary ropes; for while tar, as ordinarily used, makes the hemp more pliable to the rope-maker, and also renders the rope itself more convenient to the sailor for common ship use; yet, not only would the ordinary quantity too much stiffen the whale-line for the close coiling to which it must be subjected; but as most seamen are beginning to learn, tar in general by no means adds to the rope's durability or strength, however much it may give it compactness and gloss. Of late years the Manilla rope has in the American fishery almost entirely superseded hemp as a material for whale-lines; for, though not so durable as hemp, it is stronger, and far more soft and elastic; and I will add (since there is an aesthetics in all things), is much more handsome and becoming to the boat, than hemp. Hemp is a dusky, dark fellow, a sort of Indian; but Manilla is as a golden-haired Circassian to behold.".... Golden haired Cirassian indeed. You can read the whole chapter (or the whole novel) here: http://www.gutenberg.org/files/2701/2701-h/2701-h.htm#link2HCH0060
-
I had read that the solute the sailors gave was to hold their hand to their forehead with the fingers facing the face, so as not to offend the officers with the black tar on their hands. The sailors are even often referred to as "tars" due to their usual state of being covered in tar.
-
I have a history of doing maintenance work on historic sailing ships and I have painted on a fair amount of pine tar in my day. Landlubbers often think the tar we talk about when we talk about Tar is asphalt tar, a not too good smelling petroleum industry byproduct used in road maintenance on land. Easy to mistake it with Pine Tar if you don’t use your nose since the two products are shiny black and gloopy. But those of us who use Pine Tar on ships all agree it’s the most lovely smelling substance, perhaps in all the world. Some even say its an aphrodisiac. But I digress. Traditional pine tar is made by heating the roots of pine trees in the absence of oxygen, which produces charcoal and pine tar. http://en.wikipedia.org/wiki/Pine_tar and this nice essay on tar is worth a look too: http://www.maritime.org/conf/conf-kaye-tar.htm Nobody on modern tall ships paints tar on their ratlines, but neither do modern sailing vessels use natural fiber line as ratline stuff. Unlike natural fiber line, modern Dacron line is impervious to rot and requires no coatings. But natural fiber line can last longer in a marine environment if its painted or impregnated with tar. Tar can and often should be cut with turpentine or linseed oil or both, this allows it to flow better and penetrate the fibers of a rope. Full strength unadulterated tar has the consistency of molasses and appears black and is very gloppy. Its not really pigmented and if painted onto a white nonporous surface it will appear to be a streaky dark brown film, it will not behave like black paint which has pigment particles suspended in it and will thus “cover” the same white surface the tar would only smear. Also the paint will dry in a day while the tar remains very sticky for quite a long while, it remains sticky for weeks. Repeated applications of tar will eventually produce a thick black opaque coating and this is why shrouds and standing rigging is black, they have many coats of tar applied to them eventually leading to a hard shell of tar which keeps the water out and the Ultraviolet Radiation can’t penetrate. Despite modern man-made-fiber lines imperviousness to rot, it still can be harmed by U.V. radiation and this is why it is sometimes tarred but I have read that black paint is often used on modern ships in place of tar since it performs the same U.V. blocking function, LOOKS like tar and is also universally available while Pine Tar can be hard to come by in our modern age. But back in the old days Pine Tar was ubiquitous. Today small quantities are available at tack shops for the horse riding trade. If you paint Pine Tar on canvas (which I tried once) it turns the fabric an olive drab color and makes it heavy and waterproof and this is where we get Tarpaulin. Paint it on manila line and it darkens it slightly but not so much that you would tell the difference right away between a painted and unpainted piece of line. Put four coats on manila and you will certainly see the color shift to a darker hue but nowhere near black, the line now fairly waterproof and very sticky. Getting finally to the point, the long way, I am sure pine tar was painted on ratlines. Also I am sure pine tar was already in the rope when it arrived at the ship, having been applied at the ropewalk in a thinned solution or rubbed on with a rag to produce a coating that would penetrate the fibers and add to the lines longevity. But I don’t think it would have been applied in thick enough or repeated coatings sufficient to make the ratlines black. I imagine the bo’sun would have thin tar applied to the ratlines whenever they started to appear dry or took on a chalky chaffed appearance but I do not know that for a fact, I just surmise it from my own experience.
- 57 replies
-
- 12
-
-
This very common style of folding stock anchor is known as a Fisherman's Anchor. Its folding stock allows it to adopt a more or less flat aspect aboard the ship when not in use on the sea floor.
-
There is an extensive thread elsewhere on MSW on this subject in which the opinion seams to be running against the use of beeswax for ship models for reasons of archival longevity. I on the other hand stick with beeswax, if beeswax is wrong I don't want to be right. Emiliano Marino has a book about sewing canvas sails for full size vessels The Sailmaker's Apprentice in which he recommends beeswax mixed with turpentine or tar for the sailtwine used in sewing actual sails. I love the smell of pine tar and I sew a lot of canvas so I keep the beeswax mixed with tar handy and I like using it on ship models since the tar in it is a direct link to the past and the culture of sailing ships.
-
Constitution. Mystery rigging in top
JerseyCity Frankie replied to JerseyCity Frankie's topic in Masting, rigging and sails
Thanks for the detective work Popeye2sea! I'm also glad my theory that they were holding up the edge of the top was wrong, I would hate to think she would be so floppy. Brushing up on Truss Pendants in Lees Masting and Rigging I see he has them led upwards into the top rather than down to the deck under the cap starting around 1830. Prior to that date they were hung from the trestle trees and after 1840 they went back to the trestle trees and became chain too so I guess they rigged Constitution to that 1830's era, going by the Truss Pendants anyway. -
I think this technique would actually take more time to achieve than simply putting sails on the model, with the added detraction of being an affectation requiring explanation.
-
Constitution. Mystery rigging in top
JerseyCity Frankie replied to JerseyCity Frankie's topic in Masting, rigging and sails
....."I don’t think those lines run to the deck as backstays of some sort, at least the Starboard one on the Mizen is viewed clearly against the white paint and doesn’t run to the deck."..... -
I think the arrangement as shown also puts a lot of strain on the shrouds, which I used to think of only in terms of holding the masthead in vertical alignment, not as holding the channels from drooping under the weight of the anchors, but I bet that is one of the forces acting on those shrouds.
-
Constitution. Mystery rigging in top
JerseyCity Frankie posted a topic in Masting, rigging and sails
I consider this to be a pretty awesome modern shot of Constitution, its very high resolution and shows a lot of detail. Scanning the rigging I saw something odd and I wonder if any of you Constitution modelers have an opinion: There is an odd bit of tackle on the after side of all the Tops, it looks like lines Port and Starboard are led from ringbolts on the after lower sides of the caps down to the after outboard edge of the tops. A means of keeping the tops from sagging? I would assume all that timber up there is newish and in good shape. I don’t think those lines run to the deck as backstays of some sort, at least the Starboard one on the Mizen is viewed clearly against the white paint and doesn’t run to the deck. Also I note the flag hoist appears to say N A P J and I wonder what that means. here is the link to the photo: http://www.navy.mil/management/photodb/photos/120819-N-BJ178-330.jpg -
The ship I will build is the Trumpeter 1/350 scale Hood with its associated photo etch set. My plan is to build the 1/426 Revell Arizona first as a dry run- its been a while since I built a plastic kit and I happen to have an old photo etch set that was intended to convert the Revell Arizona into a later war Pennsylvania. So I will go to school on photo etch conversion and airbrush painting on the cheaper kit then move on to the stately Hood.
-
I'm about to get hired to build a plastic steel navy battleship model but I have not built in plastic in ages and I have NEVER used an airbrush and I have no background or experience with airbrushes or the paint to use in them. I am sure there has been discussion about this topic prior to this post so forgive me. But I would love to hear the opinions of those of you who use airbrushes and build in plastic and hear your recommendations for a suitable machine. what I am really asking for is three recommendations since I will need to select the brush itself, a compressor and suitable paint for the job. I'm certain I don't want a top-of-the-line machine since I know they can cost hundreds of dollars. So I guess what I am asking is what can I get away with and still have decent results? Thanks in advance for any tips you can pass along.
-
More on the Ballentine coil: I remember a discussion about it on a different model ship website, there were questions about when this type of coil came into use- I remember points made about there not being any documentation for it. It could be it was ALWAYS in use but nobody ever thought it worth mentioning? Anyway, the Ballentine coil does two things that a regular Round coil doesn't. First, it fits the same amount of line into a much smaller more compact shape on deck. This is a very attractive feature for smaller ships with limited deck space. The second thing it does is that it has a robust nature that resists having its inner workings disturbed when kicked or stepped on by sailors feet. An ordinary round coil is just a stack of bights or rope, a "stack of circles" and a wayward foot can knock the side of this stack in and the resulting overlapping of the "circles" or bights can cause snarls when the sails are dropped and the coil has to run. Having the Throat Hailyard jam while the Peak Hailyard is running can cause an awful mess of things so a coil that runs perfectly is essential. The Ballentine is made with three inner smaller radially symmetric coils laid down so that they overlap each other at the center of the coil- there is a small triangular core to the coil all the way down to the deck where the three smaller coils overlap. These inner three use up the otherwise wasted interior volume of the coil and this makes the Ballentine smaller and denser than a regular Round Coil. To make the Ballentine you first make a "dirty coil" of the entire line, which is just a quick rough round coil on deck which you form by starting from the point of the rope closest to the pin. You do this to make sure the line has all the twists out of it, the twists will come out of the bitter end which is free to rotate. Now that you have got your line to behave nice, you lay the Bitter End of the rope on deck at the point where you want the coil to live then you make a large bight with the line, this initial circle of rope establishes the diameter of the entire coil, then three smaller radially symmetrical bights that all have their outer edge resting on top of the edge of that first larger bight and their inner edges overlapping each other, then another large bight the exact same size as the first large bight and resting directly on top of it and the three smalls, followed by three smalls again, each the same size as and directly over the first three smalls, and so on until the line is expended. In this way, when the coil runs, the line comes off the top of each bight in an ordered measured sequence. The interlocking nature of where all the bights overlap each other within the structure of the coil are what make the coil feel solid and resist the accidental kick and it also ensures that the coil can run smoothly when it pays out. The "hole" down the center of the coil makes visual inspection of the coil very easy since if you can look down the center and see the deck- or feel it with your hand- you know the interlocking bights have not been disturbed and the coil will run.
-
I have sailed numerous times on the Lettie G Howard, although not at all recently. Her hailyards, like on all schooners, represent a large amount of line to deal with on deck when the sails are set and as you point out, you could never hang a coil of line that size on the low pinrails of a schooner. On Lettie and again on many schooners like her, the line is coiled on deck under the pin the line is belayed to. Sometimes its just a large coil, other times its a Balentine coil: http://www.google.com/search?tbm=isch&hl=en&q=ballantine+coil&gbv=2&sa=X&as_q=&nfpr=&spell=1&ei=a0y_U8aYApOryATas4LoAQ&ved=0CBIQvwU Other schooner coil the line on deck then hang this large coil above the pin on the shrouds, tied temporarily in place with a short pice of line with a toggle and an eye on its ends.
-
Since we are on the subject of sewing verses drawing tabling lines and other sail construction details I will second the OPINION that actual sewn seams are too out of scale and that the thinnest thread would be something as thick as your arm at nearly every scale, with stitches two feet long. On the other hand, if you stick with this argument then you would also have to concede that any woven fabric you could name is ALSO too out of scale for any practical model use. I want to have my cake and eat it too though, I'm AGAINST sewing but I am FOR woven fabric. I have used plenty of paper for sails though over the years. Also I don't see any need to sew on a bolt rope since its very easy to glue boltrope in place and the stitching 9 by hand or by machine) puckers the fabric and changes the look of that whole part of the sail. Recently, at a high end stationary store, I found a white ink ball point pen that writes wonderful opaque clear lines that do not bleed when I write on the woven fabric I have slated for use on my Heller 1/100 H.M.S. Victory. In the past I used white Prismicolor colored pencils to rule on the tabling lines but found that it was tough to get consistent lines on the fabric since the soft 'lead" of the pencils would not take and keep a good sharp point to make thin enough lines that were more than a couple of inches long before the point would snap or simply wear down to a broad nub. I have high expectations for the white ink pen and I promise to show some photos when I make my sails.
-
people viewing your completed model will feel a tiny bit cheated if they can't see a cannonball somewhere. You could perhaps have all the guns save one housed or sea stowed or whatever, with lashings holding them in place as I image they would spend most of their time on Bounty, then have one run out for firing with the gear out of deck for the sake of the viewers expectations. Plausibly, the crew could be exercising with this gun.
-
Victory had some shroud cleats that took some of the lines. Also, pairs of buntlines can live on the same pin, they don't need their own individual pins as they were always being used together.
-
Stropping and Seizing
JerseyCity Frankie replied to Stuntflyer's topic in Masting, rigging and sails
The strop used on a real rope strop block is made from a rope grommet. http://www.google.com/search?client=safari&rls=en&q=rope%20grommet&oe=UTF-8&um=1&ie=UTF-8&hl=en&tbm=isch&source=og&sa=N&tab=wi which is made by unlaying one strand out of a three stranded rope and then laying this single strand up alongside itself. The result is a rope ring with no visible end. Achieving this in small diameter line used on ship models would be very difficult so you would have to fake this up somehow. I would suggest unlaying each end of some thread of a correct length and gluing the frayed ends alongside the cheek of the block you are using, blending them together from each direction. When its dry you could put on your seizings and form the eyes. -
Rigging arrangement in Crows nest
JerseyCity Frankie replied to Newton's topic in Masting, rigging and sails
A note about nomenclature: A "crows nest" is really only a term used in whaling ships, where it describes the position aloft where spotters keep a lookout for whales. Also, on ships in icy seas there are crows nests used for those aloft keeping an eye out for ice. In every other instance the point in the rigging defined by the juncture of the Cross Trees and Trestle Trees is called simply a Top. Unfortunately Crows Nest is one of the few rigging related terms the general public seams to have grasped and so its often misapplied to Tops. Which means if you do a web search for Crows Nest you're going to get some useful hits but you will be better served by your search engine if you use "Top", "Fighting Top", or "Trestle Tree". -
What a great resource this website is, thanks for posting and the best of luck with your ship model!
-
I'm so glad someone built a model of the Pennsylvania. Such an odd wrinkle of American maritime history, the story of this ships "career" deserves better distribution in the literature than it gets. I think there is a Currier and Ives print of her? Another reason I like this build is the nature of the cross section. A few years ago I built a very detailed model of the mast of a frigate that stands, with its base, 8' high. I have long contemplated building the section of hull contiguous with the shrouds associated with the mast. As it is now, the mast is stepped on a purpose built wooden stool and the model starts with the deadeyes and goes up but there is absolutely no framing planking or deck furniture of any kind, just the wooden stool.
- 126 replies
-
- 1
-
-
- pennsylvania
- ship of the line
- (and 1 more)
