HOLIDAY DONATION DRIVE - SUPPORT MSW - DO YOUR PART TO KEEP THIS GREAT FORUM GOING! (89 donations so far out of 49,000 members - C'mon guys!)
×


JerseyCity Frankie
-
Posts
1,338 -
Joined
-
Last visited
Content Type
Profiles
Forums
Gallery
Events
Everything posted by JerseyCity Frankie
-
Work from the deck up and from the bow out. Masts and bowsprit consist of three or more individual units that rise one upon the other getting more slender as they stack up farther from the deck. All these parts have specific names and all the rigging that will go on the spars also have individual names- and on the real ship they all performed specific functions. Its going to be very difficult to learn all this but on the other hand if you get some ship model building books you will find all the information there. Plus there are a LOT of build logs here on Model Ship World that go from a bare hull to a completed ship, most of these with step by step photos with detailed written comments. There are a LOT of USS Constitution build logs to chose from and you will have no trouble at all finding photos of every step of the rigging process.
-
I think the lines you mention DO go to the bullwark pinrails, and they do lead through the top. Often bullseye fairleads are lashed on the inner faces of the shrouds to lead the lines to the pins. Also the buntlines are always cast off or belayed all at the same time and thus they can live on the same pin, so that eliminates the need for one of the bullwark pins.
-
1/48 scale! Many modelers have built (and are building) HMS Victories, but how many chose 1/48 scale? I remember the Longridge model is none feet long! Or maybe the case it resides in was nine feet? I wonder if you plan to rig the model? where this huge model go when it is completed?
-
Ripping thin planks
JerseyCity Frankie replied to Peaksol's topic in Modeling tools and Workshop Equipment
I have no experience with table top hobby saws, but on a full size table saw I would say you need featherboards, which are easy enough to make from scrap: http://www.google.com/images?client=safari&rls=en&q=featherboard&oe=UTF-8&hl=en&sa=X&oi=image_result_group&ei=yXvBVKqcMau1sQSr_IKYAQ&ved=0CCkQsAQ -
Ooh where did you get the 1/100 scale officer figure?
-
I have heard of at least one other instance where the U.K. and U.S.A. titles were altered, and it was one of the patrick O'Brian seafaring novels. The fifteenth novel in the series is The Truelove in the United States but in the United Kingdom it is titled Clarissa Oakes. I have never heard ANY explanation why the editors decided they needed a name change. All of the other titles in the series of novels are the same on each side of the Atlantic.
-
Someone just mentioned this place to me. Has anyone here had any experience with them? http://www.ultramarinebooks.com/cgi-bin/umb455/index.html 44 South portland ave Brooklyn. I tried the number and it went right to voicemail.
-
HM Mermaid Rigging questions (edited by admin)
JerseyCity Frankie replied to Rick01's topic in Masting, rigging and sails
I have worked on actual schooners and there are occasions when the Throat and Peak hailyards are taken off the gaff in order to be used to lift very heavy objects aboard. In fact this process is used for every uprig and downrig since its the best way to rig the spars on and off the boat. I image moving the guns on a cutter would be greatly simplified this way. If you think about it it makes a great deal of sense since the tackle is all set up, the crew is VERY accustomed to its use and its located perfectly. Having hooks makes its use that much easier. -
I am picking up this discussion late in the process and trying to understand the issues. Like many topics on MSW there are many pages of static to wade through. Can someone sum up what is at issue with the kit in question? As an outsider picking up the thread, I see this topic starts out with the designer of the kit setting out to discover what is amiss with the kit as delivered. And I see here at the end of the thread that there is some confusion about the state of things in early days of 2015. Can someone sum up what turned out to be "wrong" with the kit? Elsewhere on the internet a new term has arisen, its expressed as TL/DR and stands for "too long, didn't read". Its used when there are daunting walls of text that are "too long" and as a result people don't read them. A volunteer then steps forward and provides a synopsis for those who would like to understand what is at issue. The volunteer posts some text begging with "TL/DR:" and then provides the synopsis. is this possible here, or is the issue too complex to distill?
-
My two or three cents about pins and pinrails: Use the smallest possible pin you can find or make, this will prevent a cascading series of scale issues from developing later. Obviously the smaller the pins, the more can be fit on a rail. Every pinrail I have seen has the pins spaced evenly about 10" apart. Any closer together and the belayed lines passed around the pins would interfere with each other and the sailors couldn't get their hands in there. Most of the pins I see on models are too big and have en exaggerated shape and if scaled up would look like three foot high wooden lightbulbs. Most actual pins are two inches wide at most and are seldom longer than 18". They do flare out on their upper halves, but only a bit and a human hand can still grasp them- the commercially available ones all too often flare out into nearly spherical globes. Also consider that once there is a line on the pin, the pin itself is no longer visible except maybe its very top. For this reason I mostly just use wire or rod. An issue that always arises is the apparent low number of pins, modelers often find their accurate plans do not provide enough places for all the lines to belay to. This is a very common problem. As mentioned above, another very common problem is not fixing your pinrail strongly enough. There isn't very much tension on them but the pinrails on models do very often pull out or distort from the accumulated strain placed on them by the rigging, which apparently over time can contract.
-
how to work with teeny blocks???
JerseyCity Frankie replied to achuck49's topic in Masting, rigging and sails
I use the Constrictor Knot in these situations. Its a very simple, very compact, very strong knot perfect for seizing. Here is a tutorial I put up a while back on the most simple method of tying this great useful knot: http://modelshipworld.com/index.php/topic/4029-the-constrictor-knot/?hl=constrictor Tie the constrictor ahead of time in the small stuff you are using for the seizing, don't pull the knot tight yet, leave the loops wide open. Pass a bight of the heavier thread you are using for the blocks strop THROUGH the Constrictor Knots loop and then over and around your tiny little block. As mentioned above, clip your block into the holding contraption of your choice. Pull the two ends of the Constrictor Knot tight. The knot will Constrict and from now on it will behave like a collar that will NOT loosen, you can take your hands off it and it stays put. Pull the two ends of your stropping material apart and work the Constrictor Knot down snug against your tiny little block. The beauty of the Constrictor Knot is that it will HOLD when you tighten it. You can tug and pull it to manipulate it where you want it to go. You can use the two leftover long ends to put more turns on your throat seizing or you can just cut the ends short. -
Many years ago I saw a Bounty Launch with Bligh's uniform coat draped over the thwart in the stern sheets. It was pretty ingenious, just some blue paper cut into the shape of a coat with buttons and epaulets made of gold foil, draped over the seat. There were no figures and no other personal items that I can recall. Maybe a telescope? Wish I had thought of that.
-
I'm reading in Anatomy of the Ship Victory that in 1805 there were 22 midshipmen to be crammed in, I wonder where they put them all? There were nine Lieutenants and seven Masters Mates too. There were fourteen other guys who probably didn't normally swing in a hammock in with the great unwashed crew too, Marine officers and the surgeons party and a bunch of others. Lots of people to have to shoehorn in!
-
Latest Conway Anatomy of the Ship titles offered online at very odd prices: Bellona for $102.58 and Endeavor for $264.33. The good news is they both come with free shipping. My theory for the wildly inappropriate pricing is that the seller is trying to make you feel better when you click on his (conjectured) other book, selling for "only" $75. What bothers me is that when I DO see a pricey book I really AM considering buying, its now going to haunt me that maybe this book is ALSO vastly overpriced and I am just not in the know.
-
Thanks guys. Can you give any specifics about where the information in the books is at fault? The framing of the Constitution is noted. What is wrong with the Bellona? In my experience the rigging schedule in HMS Pandora was very useful, there is a comprehensive list of every line giving diameter and block sizes. Something similar appears in HMS Bounty. I don't see this sort of information anywhere else and in the case of the Pandora the books tables were more useful even than Lee's Masting and Rigging, since it was so specific and comprehensive. Like the fold out plans, I was sad to see that the rigging schedule was not a feature or all the books.
-
Apologies if this topic is not a new one. I wanted to start discussion about the Conway Anatomy of the Ship series of books. I think they represent a great resource for ship model builders and are worthy of a discussion. I see the titles appear one at a time in some posts here on Books and Publications but I am interested in some general sharing of knowledge among those who have the books and those who have questions about specific titles. If the idea of this topic is too broad or if the mods think it is covering a topic already discussed I hope they will delete this thread. I have six volumes so far and I would like to collect them all. The original three I acquired were all second editions published in England by Conway in 2001 and 2003. These were The Pandora The Bounty and The Endavour. They have a silver background to the cover art and each has a two sided dust jacket with a large fold out ship diagram on the reverse. A note on the covers states “Complete with fold out plan”. The other three I acquired online and all three of these were published by the Naval Institute Press for North American distribution. These were The Diana The Bellona and The Blandford. Each of these had a white background to their cover art and none of them have the large fold out plan. I was a bit let down when I discovered the Naval Institute Press editions I had did not include the nice feature of the fold out plan. Which makes me ask the question, did the original Conway published editions have the plan? Since I only have three of the NIP editions I do not know if other titles have published by NIP have or do not have the fold out plan, or for that matter if all the Conway U.K. published titles originally had the plans. Or perhaps only a few of them did. Anyone have a Bellona Diana or a Blandford with a fold out plan? Another curious thing about these books is their dramatic price differences when found online. http://www.conwaypublishing.com/?s=anatomy Conway (now an imprint of Bloomsbury Publishing) has a paperback HMS Victory! Are there/were there other paperback editions? The Conway website oddly also has Pandora listed twice for no discernable reason. There are only a few titles from the series available here. Are the rest out of print? On Ebay some of the titles are less than twenty dollars while others top one hundred, sometimes under the same title. Some of this skewing must be attributed to the varying expectations of the sellers, but is there more at work? Are some genuinely harder to come by? I quick search for “Naval Cutter Alert” reveals prices between $50 and $104. That’s all I have for now but the discussion of these books could go on since each was written by a different person and there is significant variation in the type of content included. They all have drawings but some have more rigging information than others, I note. Would love to hear the personal experiences of the Model Ship World people.
-
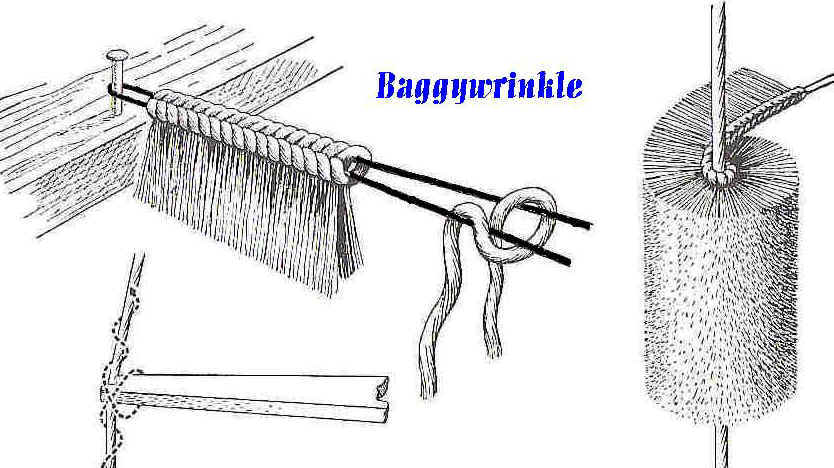
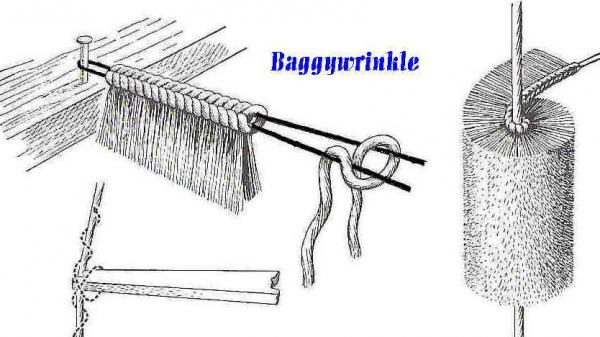
I’m happy to see the topic discussed since one seldom sees baggywrinkle, or any chafe gear of any kind, depicted on a model. Probably this is due to its not being shown on rigging plans. I have used brown paper glued over bits of line on the model to simulate leather chafe gear but the only baggywrinkle I put on any of my models was on ship in a bottle models of schooners. As a joke I made the baggyrinkle on THOSE models out of a tiny slice of rope yarn. Thus it was made out of real baggywrinkle. I hate to be the guy that suggests a technique I have not actually ever tried or seen done, but here goes: On a large scale model one could almost make real baggywrinkle? One could shave off 1/32” rope fibers from the yarn of a tight laid natural fiber line, and drag a thread dipped in glue through the pile of fibers. When dry the thread could be spiraled around a quarter lift or wherever.
-
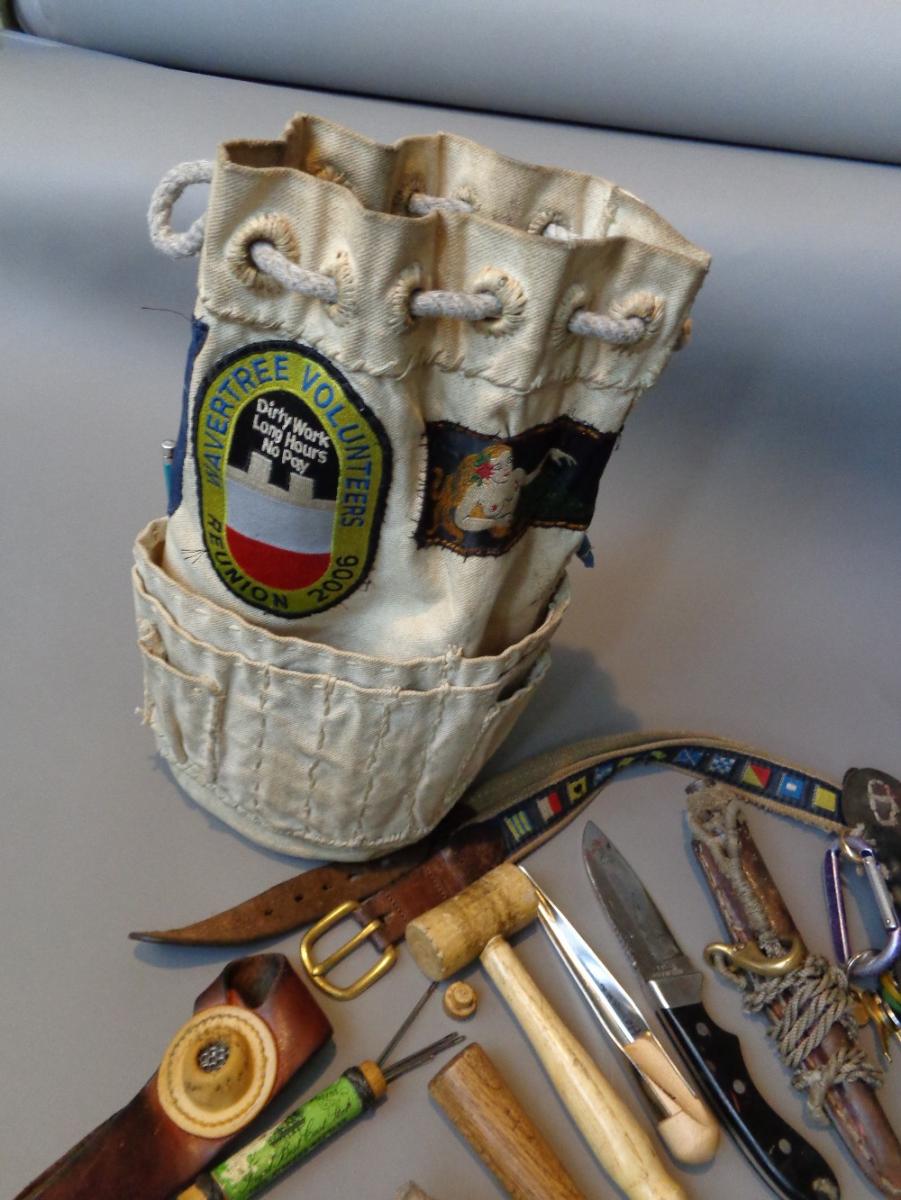
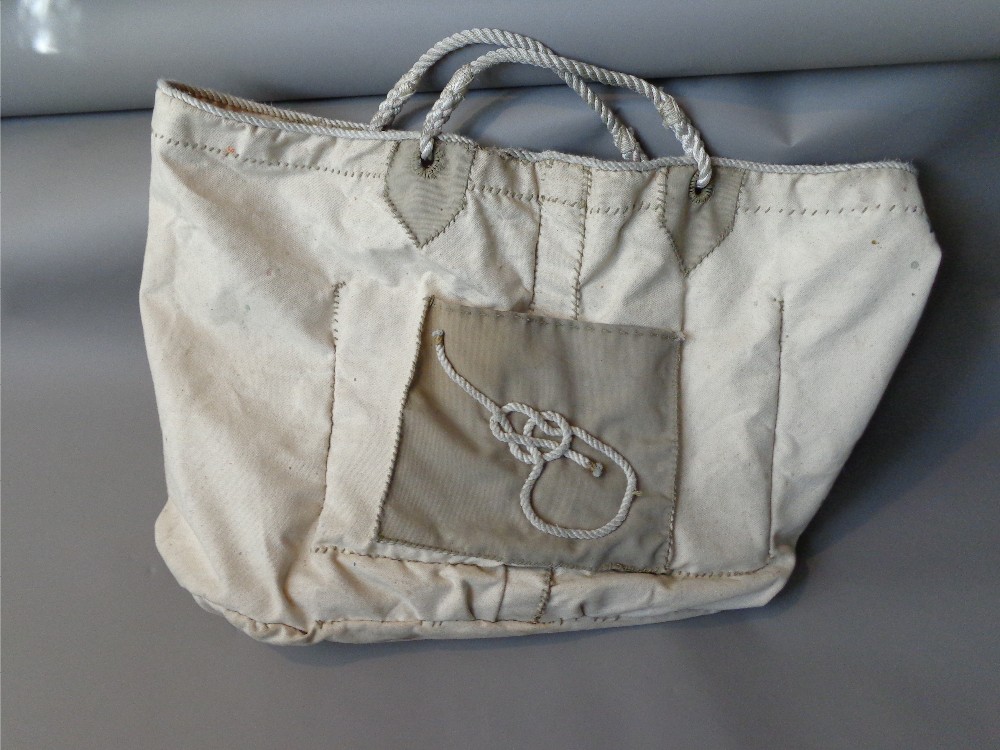
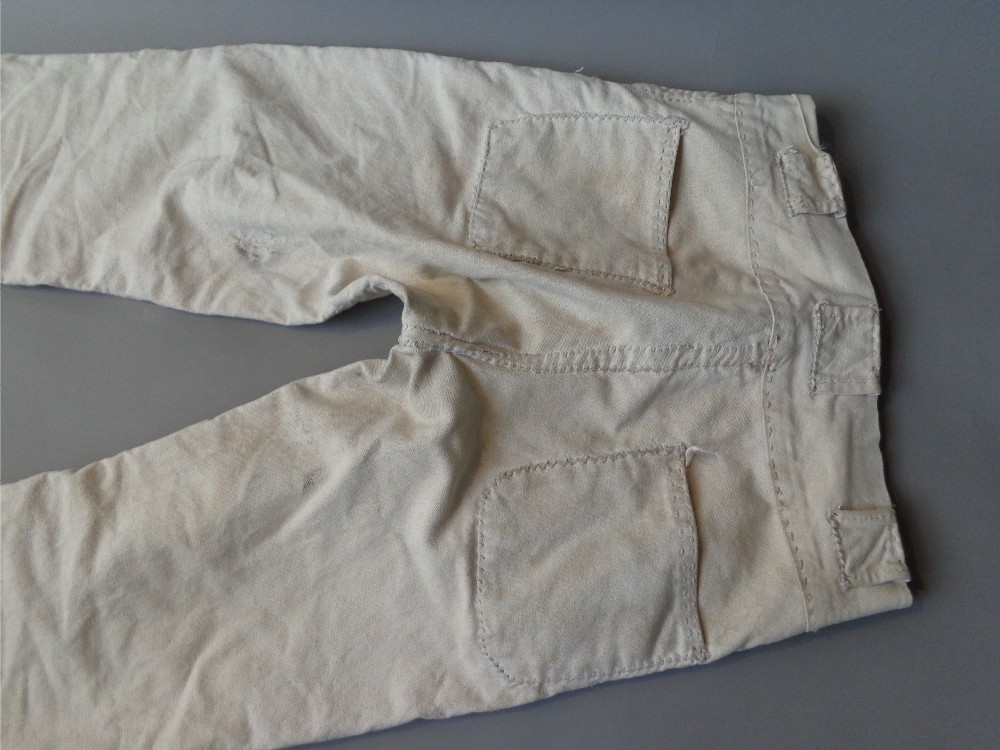
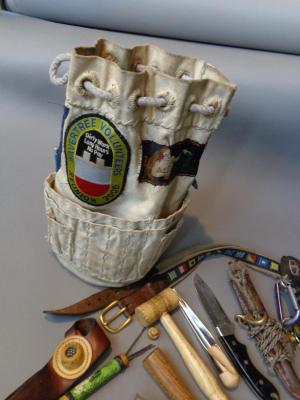
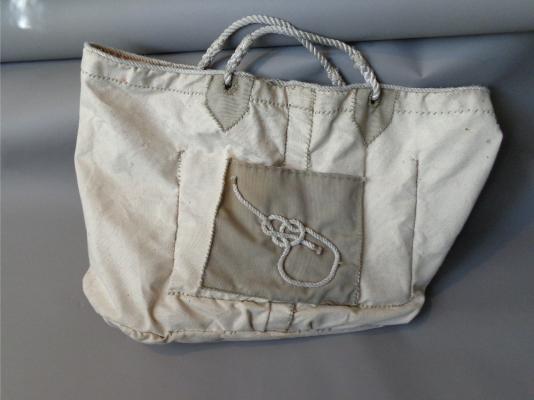
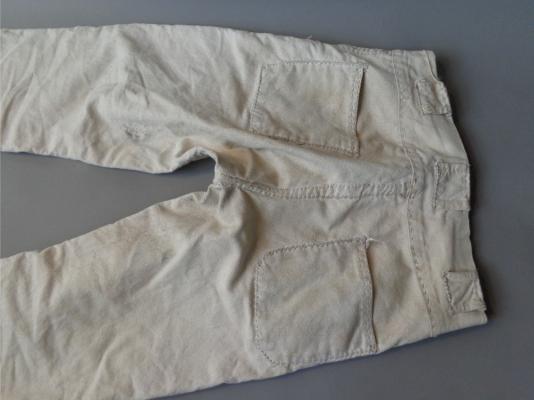
A nautical hobby of mine, parallel to model building, is canvas sewing. I use the traditional Palm and Needle sewing of the sailmaker and the canvas I use is from the art supply store, intended for painters but available by the yard in many thicknesses. Pictured here are my ditty bag, which I use to hold my sailor tools just like back in the old days. Mine is a more modern design though. Next is the sort of tote bag I make and give as gifts.I have made about twenty of these over the years. I try to incorporate discarded line and canvas I pull out of dumpsters at my local marina. Last is a pair of pants I sewed. I had read that sailors were issued sailcloth and were allowed on Sundays to make and mend their clothing, so I sewed a pair for myself. The sewing methods, the seam construction, the edge roping and grommeting is all done exactly the way it is done on handsewn sails.
-
The small "personal bags" they refer too are ditty bags. For holding small tools and personal items, they are like a cloth toolbox. http://www.google.com/search?q=ditty+bag&safe=off&client=safari&rls=en&prmd=ivns&source=lnms&tbm=isch&sa=X&ei=BtR5VKbHIemCsQSzsYCoDg&ved=0CAUQ_AU
-
I would ditch the kit supplied out of scale parts and come up with your own solution. I agree the jacksatays would be smaller rather than larger.
-
Question about bolt ropes
JerseyCity Frankie replied to JesseLee's topic in Masting, rigging and sails
The Sailmakers Apprentice, by Emilliano Marino, is an excelent 494 page WELL ILLUSTRATED source for real world traditional sail construction information. Its a complex subject with no "one size fits all" answer but what I see in the book dovetails with what Cardely says above: The boltrope originates at one of the corners of the sail and runs around the edge of the sail, sometimes but not always in one continuous piece of rope. Often though changing diameters on different facets of the sail and thus many ropes are spliced together. The eyes at the corners were either spliced or seized eyes. There is a small galaxy of possible splices a person can put into a rope but they all involve unlaying the strands and tucking these individual strands in very particular patterns back into the rope or into the next rope. These tucks make one rope appear to seamlessly blend into another. If you google "long splice" or "short splice" or "Eye Splice" you will get lots of helpful diagrams. The sort of juncture at the corners of a square sail are achieved by either seizing an eye into the part of the rope that goes around the corner of the sail or short splicing one rope into the eye of the other. For instance if your headrope has an eye spliced in each end at the earrings, the leach boltropes can be spliced into these eyes at a 90 degree angle. This sort of very elaborate splicing would only be duplicated on a very large highly detailed model. Seized eyes are likely all you really need. As to what to do with the ends, its easy enough to unlay a bit of the thread you are using and smooth the strands up against the other end with some white glue to hold it in place and in that way avoid an obvious visible juncture. -
Perhaps the removable bulkheads that made up the cabins did not go all the way from the deck below to the deck above? If the tiller was as high as possible within the space, and the bulkheads stopped 16" or so short of the deck above, perhaps you could have your cake and eat it too?
-
Most modern tall ship standing rigging is nearly always steel wire rope and thus its stable and can't stretch. But in the old days all rigging was natural fiber and it would stretch. Not only stretching as a result of strain placed upon it during use but also do to changing atmospheric conditions. Also it could shrink. So standing rigging had to be adjusted fairly regularly.
-
Bobstay for bowsprit on Sherbourne?
JerseyCity Frankie replied to tkay11's topic in Masting, rigging and sails
My two cents is that they would certainly all have had bobstays. I don't want to put words in anyones mouth but I think we can all agree that the object of a cutters rig was to provide the maximum sail area to give the highest possible speed. I find it difficult to believe anyone would load a rig with all that canvas and such a long long bowsprit and then neglect such an important feature as the bobstay. I will concede its possible to omit a bobstay on a running bowsprit on a sailing vessel, but not if you want to have the maximum amount of sail on the rig. Here is a contemporary model of the Hawk 1777 showing a bobstay: http://collections.rmg.co.uk/collections/objects/66275.html- 17 replies
-
- 1
-

-
- Sherbourne
- bobstay
- (and 2 more)
-
Am I wrong in saying the conventional wisdom is that the guns are fired with the training tackle drawn up tight? The Breaching Rope is intended to take the shock load when the gun jumps backward, but is the training tackle expected to help in damping the recoil of the gun? I find this a bit hard to believe, I don't think a gun tackle can be used as a shock absorber. In the instant after the gun is fired, perhaps eight feet of line would have to race through the blocks in fractions of seconds or part instantly, which I think is more likely. Also a lot of force would be trying to snap the pins within the sheaves and tear out the ringbolts in the few milliseconds the gun was flying inboard. If you have ever used a Handy Billy, a block and tackle tool very much like the Training Tackle of a great gun, you know it will not "ease" very fast, certainly not instantaneously. And if it WERE possible for the Training Tackle to run that fast, the coils or flakes on deck would instantly fly inboard with the gun, presenting an angry whipping danger to all those clustered around the gun when it went off, six or eight crewmembers with their handspikes and rammers would have to get their limbs out of the way and their bodies inboard to avoid the line or risk having some part of their anatomy wrenched or taken into the swallow of the blocks. What makes a lot more sense to me is that the training tackle would be unhooked from the gun and run out on deck in the moments before firing, allowing the crew with handspikes to hold the gun in position and the breaching rope alone to take the shock load of the recoil. The blocks would be overhauled slightly so the tackle would be in the correct position to be hooked on again to prepare for the next shot. I admit this scenario stretches credulity too in that the guys with handspikes would need superhuman situational awareness and the danger of a semi-loose cannon would be faced every time the guns were used.